1
Troubleshooting Guide for Application
Launcher and Business Element Manager
Avaya Business Communications Manager
Release 6.0
Document Status: Standard
Document Number: NN40171-700
Document Version: 01.01
Date: December 2010
© 2010 Avaya Inc.
All Rights Reserved.
Notices
While reasonable efforts have been made to ensure that the information in this document is complete and accurate at the time of printing,
Avaya assumes no liability for any errors. Avaya reserves the right to make changes and corrections to the information in this document
without the obligation to notify any person or organization of such changes.
Documentation disclaimer
Avaya shall not be responsible for any modifications, additions, or deletions to the original published version of this documentation
unless such modifications, additions, or deletions were performed by Avaya. End User agree to indemnify and hold harmless Avaya,
Avaya’s agents, servants and employees against all claims, lawsuits, demands and judgments arising out of, or in connection with,
subsequent modifications, additions or deletions to this documentation, to the extent made by End User.
Link disclaimer
Avaya is not responsible for the contents or reliability of any linked Web sites referenced within this site or documentation(s) provided by
Avaya. Avaya is not responsible for the accuracy of any information, statement or content provided on these sites and does not necessarily
endorse the products, services, or information described or offered within them. Avaya does not guarantee that these links will work all
the time and has no control over the availability of the linked pages.
Warranty
Avaya provides a limited warranty on this product. Refer to your sales agreement to establish the terms of the limited warranty. In
addition, Avaya’s standard warranty language, as well as information regarding support for this product, while under warranty, is
available to Avaya customers and other parties through the Avaya Support Web site: http://www.avaya.com/support
Please note that if you acquired the product from an authorized reseller, the warranty is provided to you by said reseller and not by Avaya.
Licenses
THE SOFTWARE LICENSE TERMS AVAILABLE ON THE AVAYA WEBSITE, HTTP://SUPPORT.AVAYA.COM/LICENSEINFO/
ARE APPLICABLE TO ANYONE WHO DOWNLOADS, USES AND/OR INSTALLS AVAYA SOFTWARE, PURCHASED FROM
AVAYA INC., ANY AVAYA AFFILIATE, OR AN AUTHORIZED AVAYA RESELLER (AS APPLICABLE) UNDER A
COMMERCIAL AGREEMENT WITH AVAYA OR AN AUTHORIZED AVAYA RESELLER. UNLESS OTHERWISE AGREED TO
BY AVAYA IN WRITING, AVAYA DOES NOT EXTEND THIS LICENSE IF THE SOFTWARE WAS OBTAINED FROM ANYONE
OTHER THAN AVAYA, AN AVAYA AFFILIATE OR AN AVAYA AUTHORIZED RESELLER, AND AVAYA RESERVES THE
RIGHT TO TAKE LEGAL ACTION AGAINST YOU AND ANYONE ELSE USING OR SELLING THE SOFTWARE WITHOUT A
LICENSE. BY INSTALLING, DOWNLOADING OR USING THE SOFTWARE, OR AUTHORIZING OTHERS TO DO SO, YOU,
ON BEHALF OF YOURSELF AND THE ENTITY FOR WHOM YOU ARE INSTALLING, DOWNLOADING OR USING THE
SOFTWARE (HEREINAFTER REFERRED TO INTERCHANGEABLY AS "YOU" AND "END USER"), AGREE TO THESE
TERMS AND CONDITIONS AND CREATE A BINDING CONTRACT BETWEEN YOU AND AVAYA INC. OR THE
APPLICABLE AVAYA AFFILIATE ("AVAYA").
Copyright
Except where expressly stated otherwise, no use should be made of the Documentation(s) and Product(s) provided by Avaya. All content
in this documentation(s) and the product(s) provided by Avaya including the selection, arrangement and design of the content is owned
either by Avaya or its licensors and is protected by copyright and other intellectual property laws including the sui generis rights relating
to the protection of databases. You may not modify, copy, reproduce, republish, upload, post, transmit or distribute in any way any
content, in whole or in part, including any code and software. Unauthorized reproduction, transmission, dissemination, storage, and or
use without the express written consent of Avaya can be a criminal, as well as a civil offense under the applicable law.
Third Party Components
Certain software programs or portions thereof included in the Product may contain software distributed under third party agreements
("Third Party Components"), which may contain terms that expand or limit rights to use certain portions of the Product ("Third Party
Terms"). Information regarding distributed Linux OS source code (for those Products that have distributed the Linux OS source code),
and identifying the copyright holders of the Third Party Components and the Third Party Terms that apply to them is available on the
Avaya Support Web site: http://support.avaya.com/Copyright.
Trademarks
The trademarks, logos and service marks ("Marks") displayed in this site, the documentation(s) and product(s) provided by Avaya are the
registered or unregistered Marks of Avaya, its affiliates, or other third parties. Users are not permitted to use such Marks without prior
written consent from Avaya or such third party which may own the Mark. Nothing contained in this site, the documentation(s) and
product(s) should be construed as granting, by implication, estoppel, or otherwise, any license or right in and to the Marks without the
express written permission of Avaya or the applicable third party. Avaya is a registered trademark of Avaya Inc. All non-Avaya
trademarks are the property of their respective owners.
Downloading documents
For the most current versions of documentation, see the Avaya Support. Web site: http://www.avaya.com/support
Contact Avaya Support
Avaya provides a telephone number for you to use to report problems or to ask questions about your product. The support telephone
number is 1-800-242-2121 in the United States. For additional support telephone numbers, see the Avaya Web site: http://
www.avaya.com/support
3
Contents
Preface . . . . . . . . . . . . . . . . . . . . . . . . . . . . . . . . . . . . . . . . . . . . . . . . . . . . . . . . . . .
5
Symbols used in this guide . . . . . . . . . . . . . . . . . . . . . . . . . . . . . . . . . . . . . . . . . . . . . . . . . .
5
Text conventions . . . . . . . . . . . . . . . . . . . . . . . . . . . . . . . . . . . . . . . . . . . . . . . . . . . . . . . . . .
5
Acronyms . . . . . . . . . . . . . . . . . . . . . . . . . . . . . . . . . . . . . . . . . . . . . . . . . . . . . . . . . . . . . . . .
6
Related publications . . . . . . . . . . . . . . . . . . . . . . . . . . . . . . . . . . . . . . . . . . . . . . . . . . . . . . .
6
Customer service . . . . . . . . . . . . . . . . . . . . . . . . . . . . . . . . . . . . . . . . . . . . . . . . . . . . . . . . . .
7
Navigation . . . . . . . . . . . . . . . . . . . . . . . . . . . . . . . . . . . . . . . . . . . . . . . . . . . . . . . . . . . .
7
Getting technical documentation . . . . . . . . . . . . . . . . . . . . . . . . . . . . . . . . . . . . . . .
7
Getting product training . . . . . . . . . . . . . . . . . . . . . . . . . . . . . . . . . . . . . . . . . . . . . .
7
Getting help from a distributor or reseller . . . . . . . . . . . . . . . . . . . . . . . . . . . . . . . . .
7
Getting technical support from the Avaya Web site . . . . . . . . . . . . . . . . . . . . . . . . .
7
Overview . . . . . . . . . . . . . . . . . . . . . . . . . . . . . . . . . . . . . . . . . . . . . . . . . . . . . . . . .
9
BCM Web page – first look . . . . . . . . . . . . . . . . . . . . . . . . . . . . . . . . . . . . . . . . . . . . . . . . . .
10
Application Launcher tabs . . . . . . . . . . . . . . . . . . . . . . . . . . . . . . . . . . . . . . . . . . . . . . . . . . .
12
Main tab . . . . . . . . . . . . . . . . . . . . . . . . . . . . . . . . . . . . . . . . . . . . . . . . . . . . . . . . . . . . .
12
Advanced tab . . . . . . . . . . . . . . . . . . . . . . . . . . . . . . . . . . . . . . . . . . . . . . . . . . . . . . . . .
13
Business Element Manager . . . . . . . . . . . . . . . . . . . . . . . . . . . . . . . . . . . . . . . . . .
15
Install through the Application Launcher . . . . . . . . . . . . . . . . . . . . . . . . . . . . . . . . . . . . . . . .
15
Installing the Business Element Manager using the BCM software download site . . . . . . . .
15
Install through the standalone Business Element Manager . . . . . . . . . . . . . . . . . . . . . . . . .
16
Remove older versions . . . . . . . . . . . . . . . . . . . . . . . . . . . . . . . . . . . . . . . . . . . . . . . . . .
16
Configuration of the Application Launcher . . . . . . . . . . . . . . . . . . . . . . . . . . . . .
17
Branding Web page . . . . . . . . . . . . . . . . . . . . . . . . . . . . . . . . . . . . . . . . . . . . . . . . . . . . . . . .
17
Addition of custom applications . . . . . . . . . . . . . . . . . . . . . . . . . . . . . . . . . . . . . . . . . . . . . . .
18
XML tag definitions . . . . . . . . . . . . . . . . . . . . . . . . . . . . . . . . . . . . . . . . . . . . . . . . . . . . .
19
Examples . . . . . . . . . . . . . . . . . . . . . . . . . . . . . . . . . . . . . . . . . . . . . . . . . . . . . . . . . . . .
20
Example 1 . . . . . . . . . . . . . . . . . . . . . . . . . . . . . . . . . . . . . . . . . . . . . . . . . . . . . . . . .
20
Example 2 . . . . . . . . . . . . . . . . . . . . . . . . . . . . . . . . . . . . . . . . . . . . . . . . . . . . . . . . .
21
Example 3 . . . . . . . . . . . . . . . . . . . . . . . . . . . . . . . . . . . . . . . . . . . . . . . . . . . . . . . . .
21
Example 4 . . . . . . . . . . . . . . . . . . . . . . . . . . . . . . . . . . . . . . . . . . . . . . . . . . . . . . . . .
21
Example 5 . . . . . . . . . . . . . . . . . . . . . . . . . . . . . . . . . . . . . . . . . . . . . . . . . . . . . . . . .
21
Example 6 . . . . . . . . . . . . . . . . . . . . . . . . . . . . . . . . . . . . . . . . . . . . . . . . . . . . . . . . .
22
Best practices . . . . . . . . . . . . . . . . . . . . . . . . . . . . . . . . . . . . . . . . . . . . . . . . . . . . .
23
Frequently asked questions . . . . . . . . . . . . . . . . . . . . . . . . . . . . . . . . . . . . . . . . . .
25
Business Element Manager . . . . . . . . . . . . . . . . . . . . . . . . . . . . . . . . . . . . . . . . . . . . . . . . . .
25
Troubleshooting Guide for Application Launcher and Business Element Manager
4
Contents
Application Launcher . . . . . . . . . . . . . . . . . . . . . . . . . . . . . . . . . . . . . . . . . . . . . . . . . . . . . . .
NN40171-700
26
Preface
This document describes the Application Launcher and Business Element Manager, and provides
some troubleshooting tips for the Avaya Business Communications Manager (Avaya BCM) 5.0
and later releases.
Symbols used in this guide
This guide uses symbols to draw your attention to important information. The following symbols
appear in this guide:
Caution: Caution Symbol
Alerts you to conditions where you can damage the equipment.
Danger: Electrical Shock Hazard Symbol
Alerts you to conditions where you can get an electrical shock.
Warning: Warning Symbol
Alerts you to conditions where you can cause the system to fail or work improperly.
Note: Note Symbol
A Note alerts you to important information.
Text conventions
This guide uses the following text conventions:
italic text
Indicates book titles.
Example: Business Communications Manager Installation and
Maintenance Guide.
bold text
Indicates items on the screen or keys on the keyboard.
Example: Press the Enter key.
Troubleshooting Guide for Application Launcher and Business Element Manager
6
Preface
Acronyms
This guide uses the following acronyms:
BCM
Business Communications Manager
JRE
Java Runtime Environment
PC
Personal Computer
SSL
Secure Socket Layer
URL
Uniform Resource Locator
XML
Extensible Markup Language
Related publications
For more information about using Avaya BCM, refer to the Avaya Business Communications
Manager 6.0 Documentation Roadmap (NN40170-119).
NN40171-700
Preface 7
Customer service
Visit the Avaya Web site to access the complete range of services and support that Avaya
provides. Go to http://www.avaya.com or go to one of the pages listed in the following sections.
Navigation
•
“Getting technical documentation” on page 7
•
“Getting product training” on page 7
•
“Getting help from a distributor or reseller” on page 7
•
“Getting technical support from the Avaya Web site” on page 7
Getting technical documentation
To download and print selected technical publications and release notes directly from the Internet,
go to http://www.avaya.com/support.
Getting product training
Ongoing product training is available. For more information or to register, you can access the Web
site at http://www.avaya.com/support. From this Web site, you can locate the Training contacts
link on the left-hand navigation pane.
Getting help from a distributor or reseller
If you purchased a service contract for your Avaya product from a distributor or authorized
reseller, contact the technical support staff for that distributor or reseller for assistance.
Getting technical support from the Avaya Web site
The easiest and most effective way to get technical support for Avaya products is from the Avaya
Technical Support Web site at http://www.avaya.com/support.
Troubleshooting Guide for Application Launcher and Business Element Manager
8
Preface
NN40171-700
Chapter 1
Overview
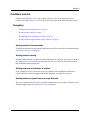
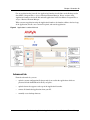
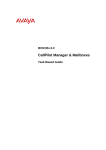
After you launch a web browser at an Avaya Business Communications Manager (Avaya BCM)
IP address, you can see the Application Launcher. The Application Launcher is a Web application
responsible for a number of operations including:
•
presenting a list of applications that is customized based on your Avaya BCM Login
credentials
•
allowing you to run or install any application that is presented to you
Application Launcher replaces the static web pages from earlier BCM releases with options
tailored to match the privileges of the user logging into the BCM.
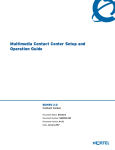
Figure 1 shows the Application Launcher.
Figure 1 Application Launcher
When the Application Launcher attempts to run an application, the Application Launcher checks
the type of application. The Application Launcher supports two types of applications:
•
Web based application – a link to a web site
Troubleshooting Guide for Application Launcher and Business Element Manager
10
Chapter 1 Overview
•
A PC based application – requires installation, version checking, and signature validation
If you run a PC based application, the Application Launcher validates the version of the
application installed on the PC (if installed before). If the application installed on the PC is an old
version, the Application Launcher automatically downloads and updates the application. If the
version is correct, the Application Launcher validates (to ensure it has not been corrupted or
tampered) and runs the Application.
Avaya business partners can also customize the list of applications available on a BCM through
the upload Custom Configuration functions of the application launcher. Additionally, a business
partner is able to update the banner residing on the top of the BCM main web interface.
Benefits of the Application Launcher:
•
installs the latest version of the applications that you selected seamlessly
•
ensures that if an application is corrupted or modified, a new version is installed automatically
•
enables a reduction in patch sizes, for example the Business Element Manager has been
reduced from 160MB to 17MB
•
customizable by business partners
•
provides a dynamic list of applications and URLs based on BCM user access levels
•
provides branding capabilities by allowing the replacement of the default banner with a
corporate logo
Note: The Application Launcher requires the Java Runtime
Environment (JRE). Java is no longer packaged with the Business
Element Manager. Avaya recommends that you download and install
JRE 1.6 update 14 or later from http://java.sun.com.
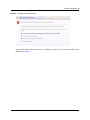
BCM Web page – first look
Upon connecting to a BCM, you must login and accept the BCM Certificates. Application
Launcher requires Java 1.6 update 14 or later. You are prompted to update Java on the PC if Java
is not at the correct release.
If you are not prompted to install or update Java and the Application Launcher is not visible, you
must manually install Java. You can download Java from the Java distribution site at
http://java.sun.com.
NN40171-700
Chapter 1 Overview 11
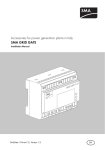
Figure 2 Example of a certificate error
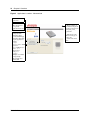
After both the SSL certificate and the Java certificate is accepted, you are presented with the main
BCM screen (Figure 3).
Troubleshooting Guide for Application Launcher and Business Element Manager
12
Chapter 1 Overview
Figure 3 BCM main screen
Application Launcher tabs
There are two tabs in the Application Launcher. A Main tab which contains most of the
functionality of the Application Launcher, and the Advanced tab which contains less used features.
Main tab
From the Main tab, you can install applications and launch web pages. If you want to run an
application or access content in the Applications list, perform the following steps:
•
Select an application from the Applications section.
•
Select the preferred download location, or use the default.
•
Double click the Application, or use the run button.
•
If this is the first time an application is run, the application also creates a desktop shortcut to
provide rapid access to the application.
NN40171-700
Chapter 1 Overview 13
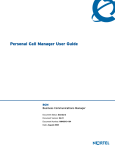
For any application that it installs, the Application Launcher installs links on the Desktop and in
Start Menu > Program Files > Avaya > Business Element Manager. Newer versions of the
Application Launcher also install and uninstall applications in the Start Menu > Program Files >
Avaya > Business Element Manager.
When you run an application using the Application Launcher, the launcher validates the local copy
of the application, installs a new version if required, and runs the application.
Figure 4 Applications Launcher Main tab
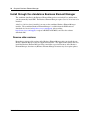
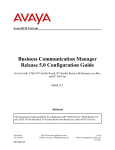
Advanced tab
From the advanced tab, you can:
•
upload a custom configuration file that permiyd you to tailor the applications which are
presented in both the BCM and 3rd Party categories.
•
upload a banner that appears at the top of the Application Launcher.
•
remove all downloaded applications from your PC.
•
manually create desktop shortcuts.
Troubleshooting Guide for Application Launcher and Business Element Manager
14
Chapter 1 Overview
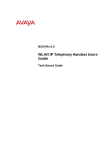
Figure 5 Applications Launcher - Advanced tab
Remove downloaded
applications
Upload a banner that
will be displayed at
the top of the
Application Launcher
Upload custom
Configuration File
• Customize (hide)
not relevant BCM apps
• Customize (hide/add)
3rd party applications
• Format:
<config>
<category name=”BCM
Application
name=”BCM Monitor”
visible=”no”>
</application>
</category>
</config>
• Template is available
at: https://bcmip
address/Application
Launcher.xml
NN40171-700
• Banner template is
available at http://bcm
ipaddress/oam/em.web
/template_north_
panel.htm
• Dimensions of the
branded web page is
130 x 740
• format of the file is
htm
Chapter 2
Business Element Manager
Starting with Avaya Business Communications (Avaya BCM) Release 5.0, the Business Element
Manager is installed by the Application Launcher. To install the Business Element Manager,
connect to the Avaya BCM Application Launcher or the Avaya download site
Install through the Application Launcher
After the Business Element Manager is installed, the Application Launcher attempts to copy your
existing node list from a previously installed Business Element Manager. If the previous version
of Business Element Manager was installed by the Application Launcher, the installation process
automatically copies over your node list and cartridges. If the previous version of Business
Element Manager (pre BCM Release 5.0 - 61.0.1) was not installed by the Application Launcher,
the installation process prompts you to select the folder where the previous instance of Business
Element Manager node list and cartridges are located so that the node list and cartridges can be
copied.
Note: If your previous version was installed using a pre-BCM Release
5.0 Business Element Manager (earlier then 61.0.1), then it must be
manually uninstalled after the Application Launcher installs the latest
Business Element Manager using the Control Panel Add/Remove.
Note: Use the links created by the Application Launcher for the newly
installed Business Element Manager and not the previous instance of
Business Element Manager. You can verify the version of the Business
Element Manager by checking the Help->About version. The version
must be 61.0.1 or later.
Installing the Business Element Manager using the BCM
software download site
You can install the Business Element Manager online from the following location:
http://www.avaya.com/support.
Troubleshooting Guide for Application Launcher and Business Element Manager
16
Chapter 2 Business Element Manager
Install through the standalone Business Element Manager
The standalone installer for the Business Element Manager does not include Java and therefore
you must manually install JRE. The Business Element Manager requires Java 1.6.14 or later to be
installed.
After Java 1.6.14 or later is installed, you can use the standalone Business Element Manager
installer. The standalone Business Element Manager is available from the BCM software
download site, located at http://www.avaya.com/support. After reaching
http://www.avaya.com/support, navigate to BCM50 or BCM450, and select the software
downloads link.
Remove older versions
Remember to remove older versions of the Business Element Manager after you install the new
Business Element Manager using the Application Launcher. The Application Launcher does not
install the Business Element Manager in the same folder as previous instances of the Business
Element Manager; therefore any Business Element Manager shortcuts may also require updates.
NN40171-700
Chapter 3
Configuration of the Application Launcher
The Application Launcher supports customization of the web banner. The administrator can also
customize the list of Avaya Business Communications Manager (Avaya BCM) and third party
applications.
This topic describes the two different options and provides examples.
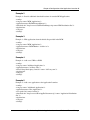
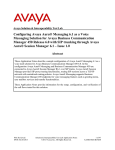
Branding Web page
With the Application Launcher, you can upload a web page onto the Avaya BCM to replace the
branding along with home and contact information. The dimensions of the branded web page are
130 x 740 approximately.
A template is available for modification. You can download the template from the following URL:
http://<bcmipaddress>/oam/em.web/template_north_panel.htm.
The format of the file is html.
The following image shows the brandable area (Figure 6).
Figure 6 Application Launcher - Branding
Brandable area
Dimensions are:
130 x 740
Troubleshooting Guide for Application Launcher and Business Element Manager
18
Chapter 3 Configuration of the Application Launcher
The following figure is an example of Application Launcher branding.
Figure 7 Example of Application Launcher branding
Addition of custom applications
Business partners can provide new applications directly to customers by adding them to the
Application Launcher. Any new application added to the Application Launcher appears under the
3rd party button.
You can customize the list of applications available through the Application Launcher by using
one of the following two methods:
•
modifying the default list of applications
•
adding new applications or web links
You can modify existing applications or add a new application by uploading a new XML
configuration file to the BCM.
NN40171-700
Chapter 3 Configuration of the Application Launcher 19
The following describes the specific format of the XML file.
The most important XML tags in the BCM configuration file are described in the following list:
•
All BCM configuration updates are enclosed in <config> and </config> tags
•
Changes to applications in the BCM category must be enclosed in <category name="BCM
Applications"> </category> tags
•
New 3rd Party applications and web links or changes to existing 3rd Party applications must
be enclosed in <category name="Additional Applications"> </category> tags
Additional details are provided later in this section and are demonstrated through the examples in
this document.
XML tag definitions
The following is a list of XML tag definitions.
•
config—tag specifies the beginning and end of a configuration entry.
•
category—tag defines the start and end of an application category. There are two existing
categories defined by the name setting:
• BCM Applications—contains all BCM specific applications.
• Additional Applications—contains all non-BCM specific applications.
The category tag can contain applications.
•
application—the inside of this tag defines an application or web link that is added to the BCM.
Application tags can have the following settings:
• name—required for all applications.
• visible—optional field set to true if it is always visible, and false if it is hidden.
• version—a non-space field that contains the version of the application.
• folder—the sub folder in which the application is installed.
There are two types of applications: web URLs and executable applications.
An executable application can contain the following tags:
•
exec—the executable to run. The only two supported executable formats are: .bat files and .exe
files.
•
download—a URL that contains the application to be downloaded.
A web URL application can contain the following tag:
•
url—the URL of the application.
Troubleshooting Guide for Application Launcher and Business Element Manager
20
Chapter 3 Configuration of the Application Launcher
Examples
The following are examples of custom applications that you can add to the Application Launcher.
Example 1
01. <config>
02. <category name="BCM Applications">
03. <application name="BCM Monitor" visible="no" />
04. <application name="Data Migration Manager" visible="no" />
05. <application name="Business Element Manager">
06. <download url="http://staging.server.com/BCM_cache/EM-61.0.0.zip" name="Highspeed
Server"/>
07. </application>
08. </category>
09. <category name="Additional Applications">
10. <application name="Avaya Support" visible="no" />
11. <application name="Acme System Support">
12. <url url="http://www.acme.com/support/BCM" name="Acme System Support"/>
13. </application>
14. </category>
15. </config>
The following list describes lines 01 to 15 in the above example.
•
The config sections indicate the start and end of the file and must be present in all XML
configurations. See line 1 and 15.
•
The category tag surrounds an Application Group. There are types of groups as mentioned.
Category tags appear on lines 2, 8, 9, 14.
•
The application tags define visibility, or contain additional download URLs. Application tags
appear on lines 3, 4, 5, 7, 10, 11, 13.
•
Lines 5 and 7 open and close a Business Element Manager application update, and line 6
indicates that a new download URL should be added.
•
Lines 11 through to lines 13 indicate the addition of an application to the Additional
Applications group with a single web link named Acme Support Systems.
•
The download tag is indicates additional download locations for applications. See line 6.
•
The url tag indicates a web link. See line 12.
•
The application section can have more then one url or download.
NN40171-700
Chapter 3 Configuration of the Application Launcher 21
Example 2
Example 2—Provide additional download locations for standard BCM applications.
<config>
<category name="BCM Applications">
<application name="BCM Element Manager">
<download url=" http://serverx3/5.0/ElementManager.zip name=“EM Distribution Site”/>
</application>
<category>
</config>
Example 3
Example 3—Hide applications from the default list provided in the BCM.
<config>
<category name="BCM Applications">
<application name=“BCM Monitor“ visible=“no”>
</application>
<category>
</config>
Example 4
Example 4—Add a new URL to a BCM.
<config>
<category name="Additional Applications">
<application name=“3rd Party Sales">
<url url="http://the3rdparty.com/sale” name=“3rd Party.com”/>
</application>
<category>
</config>
Example 5
Example 5—Add a new application to the Application Launcher.
<config>
<category name=" Additional Applications">
<application name=“New Application">
<exec path="bin" name="run.bat"/>
<download url=" http://serverx3/NewAppForCustomers.zip” name=“Application Distribution
Site”/>
</application>
<category>
</config>
Troubleshooting Guide for Application Launcher and Business Element Manager
22
Chapter 3 Configuration of the Application Launcher
Example 6
Example 6—Add an application that is available to specific users.
<config>
<category name="Additional Applications">
<application name="Help" folder="3rdPartyHelp" version="1">
<privilege username="nnadmin"/>
<privilege id="Admin"/>
<exec name="help.exe" />
<download url="http://3rdParty.co.uk/bcm/help/help.exe" name="3rd Party Main Office"/>
</application>
</category>
</config>
NN40171-700
Chapter 4
Best practices
You are only required to have the latest copy of Business Element Manager installed. There is no
requirement to have multiple versions; having multiple versions can cause confusion.
Ensure you have backup copies of your Business Element Manager cartridges and Node list.
Make sure to keep your PC patch current.
Backup your Avaya Business Communications Manager (Avaya BCM) regularly.
Periodically check for new Avaya BCM applications by running the applications through the
Application Launcher.
Change your BCM passwords from the default.
Troubleshooting Guide for Application Launcher and Business Element Manager
24
Chapter 4 Best practices
NN40171-700
Chapter 5
Frequently asked questions
This chapter answers common questions about the Business Element Manager and the Application
Launcher.
Business Element Manager
This section answers common questions about the Business Element Manager.
Will the new version of Business Element Manager work with older versions of the Avaya
Business Communications Manager (Avaya BCM)? For instance, will Business Element
Manager 61.0.1 work with BCM50 1.0?
Yes, the Business Element Manager is backwards compatible with older versions of Avaya BCM.
Can I copy my new Business Element Manager node list and cartridges to an older version of
Business Element Manager?
No, this is not supported as the formats have changed.
I started up Business Element Manager but I don’t see my node list.
You may have selected the incorrect shortcut to the Business Element Manager. Ensure that the
version of the Business Element Manager is 61.0.1 or later using the Help -> About in the
Business Element Manager.
The new Business Element Manager is located in the user’s profile for example, in Windows XP
this is by default:
C:\Documents and Settings\pcuser\.bcm\BEM\
If the version of the Business Element Manager is correct, copy the node list and cartridges from a
backup copy of the node list and cartridges to the newly installed Business Element Manager
location.
How do I uninstall an earlier version of the Business Element Manager?
Warning: You must ensure that you only uninstall the previous version of the
Business Element Manager after you install the new version of the Business Element
Manager.
You can safely use the Control Panel to uninstall the Business Element Manager that was not
installed using the Application Launcher. Ensure that you keep a copy of your Node List
(summary.xml) and Cartridge files.
How do I remove applications installed by the Application Launcher?
You can uninstall applications installed by the Application Launcher by using the Advanced tab of
the Application Launcher.
Troubleshooting Guide for Application Launcher and Business Element Manager
26
Chapter 5 Frequently asked questions
As of Application Launcher 1.04: As of a new update, any application installed by the Application
Launcher can also be un-installed using the Start Menu > Program Files > Avaya > Business
Element Manager > Uninstall application.
Where is the Business Element Manager on my PC?
The Business Element Manager is installed by the Application Launcher in the current users
profile in the .bcm/BCM folder.
For example:
C:\Documents and Settings\pcuser\.bcm\BEM\.
Where is Business Element Manager node list stored?
The Business Element Manager node list resides in the following path:
[root folder of Element Manager install]\bin\access\summary.xml
For example:
C:\Documents and Settings\pcuser\.bcm\BEM\bin\access\summary.xml
Or, for an older Business Element Manager install:
C:\Program Files\Avaya\Business Element
Manager\BusinessElementManager\bin\access\summary.xml
Application Launcher
This section answers common questions about the Application Launcher.
Where are the installed applications?
The Application Launcher downloads and caches applications to a user’s profile in the folder
.bcm. For example, on a Windows XP machine this is:
Documents And Settings\[username]\.bcm.
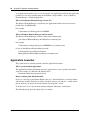
Browser running with add-ons disabled.
If you see a message in your Internet Explorer that says, "Internet Explorer is currently running
with add-ons disabled. Click here to manage, disable or remove your add-ons.", it likely means
that the shortcut you used to run internet explorer has the option "-extoff".
To fix the issue, create a new shortcut to Internet Explorer without the -extoff option.
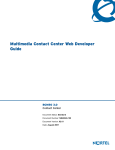
The following image shows the option after it is enabled.
NN40171-700
Chapter 5 Frequently asked questions 27
Figure 8 Add ons disabled screen
Browser that does not have Java installed.
If you do not have JRE installed for your browser and you were not asked to install one, the
following image appears.
The following screen appears if you do not have JRE installed for your browser.
Troubleshooting Guide for Application Launcher and Business Element Manager
28
Chapter 5 Frequently asked questions
Figure 9 No JRE installed
To resolve the issue, uninstall the JRE, if there is one currently installed, using the instructions
provided by Sun at www.java.com, on the downloads page.
After the Java JRE is uninstalled, you must reinstall it.
I can’t install the Business Element Manager with the Application Launcher. The
Application Launcher says download 100% and then my Internet Explorer freezes and the
Java console icon disappears from my start menu when my mouse hovers over it.
There is an interaction problem discovered in some older PCs between the Web Browser and JRE.
Sun is working on a fix. You must disable the next generation Java Plugin while the installation of
an application is occurring.
For instructions on a temporary work around, go to www.java.com, and select the downloads
page.
NN40171-700