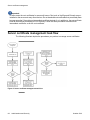
1
Administration and Security
Avaya 3100 Mobile Communicator
3.1
NN42030-600, 04.05
October 2010
© 2010 Avaya Inc.
All Rights Reserved.
Notice
While reasonable efforts have been made to ensure that the
information in this document is complete and accurate at the time of
printing, Avaya assumes no liability for any errors. Avaya reserves the
right to make changes and corrections to the information in this
document without the obligation to notify any person or organization of
such changes.
Documentation disclaimer
Avaya shall not be responsible for any modifications, additions, or
deletions to the original published version of this documentation unless
such modifications, additions, or deletions were performed by Avaya.
End User agree to indemnify and hold harmless Avaya, Avaya's agents,
servants and employees against all claims, lawsuits, demands and
judgments arising out of, or in connection with, subsequent
modifications, additions or deletions to this documentation, to the
extent made by End User.
Link disclaimer
Avaya is not responsible for the contents or reliability of any linked Web
sites referenced within this site or documentation(s) provided by Avaya.
Avaya is not responsible for the accuracy of any information, statement
or content provided on these sites and does not necessarily endorse
the products, services, or information described or offered within them.
Avaya does not guarantee that these links will work all the time and has
no control over the availability of the linked pages.
Warranty
Avaya provides a limited warranty on this product. Refer to your sales
agreement to establish the terms of the limited warranty. In addition,
Avaya’s standard warranty language, as well as information regarding
support for this product, while under warranty, is available to Avaya
customers and other parties through the Avaya Support Web site:
http://www.avaya.com/support. Please note that if you acquired the
product from an authorized Avaya reseller outside of the United States
and Canada, the warranty is provided to you by said Avaya reseller and
not by Avaya.
Licenses
THE SOFTWARE LICENSE TERMS AVAILABLE ON THE AVAYA
WEBSITE, HTTP://SUPPORT.AVAYA.COM/LICENSEINFO/ ARE
APPLICABLE TO ANYONE WHO DOWNLOADS, USES AND/OR
INSTALLS AVAYA SOFTWARE, PURCHASED FROM AVAYA INC.,
ANY AVAYA AFFILIATE, OR AN AUTHORIZED AVAYA RESELLER
(AS APPLICABLE) UNDER A COMMERCIAL AGREEMENT WITH
AVAYA OR AN AUTHORIZED AVAYA RESELLER. UNLESS
OTHERWISE AGREED TO BY AVAYA IN WRITING, AVAYA DOES
NOT EXTEND THIS LICENSE IF THE SOFTWARE WAS OBTAINED
FROM ANYONE OTHER THAN AVAYA, AN AVAYA AFFILIATE OR AN
AVAYA AUTHORIZED RESELLER, AND AVAYA RESERVES THE
RIGHT TO TAKE LEGAL ACTION AGAINST YOU AND ANYONE
ELSE USING OR SELLING THE SOFTWARE WITHOUT A LICENSE.
BY INSTALLING, DOWNLOADING OR USING THE SOFTWARE, OR
AUTHORIZING OTHERS TO DO SO, YOU, ON BEHALF OF
YOURSELF AND THE ENTITY FOR WHOM YOU ARE INSTALLING,
DOWNLOADING OR USING THE SOFTWARE (HEREINAFTER
REFERRED TO INTERCHANGEABLY AS “YOU” AND “END USER”),
AGREE TO THESE TERMS AND CONDITIONS AND CREATE A
BINDING CONTRACT BETWEEN YOU AND AVAYA INC. OR THE
APPLICABLE AVAYA AFFILIATE (“AVAYA”).
accessed by multiple users. “Software” means the computer programs
in object code, originally licensed by Avaya and ultimately utilized by
End User, whether as stand-alone products or pre-installed on
Hardware. “Hardware” means the standard hardware originally sold by
Avaya and ultimately utilized by End User.
Copyright
Except where expressly stated otherwise, no use should be made of
materials on this site, the Documentation(s) and Product(s) provided
by Avaya. All content on this site, the documentation(s) and the
product(s) provided by Avaya including the selection, arrangement and
design of the content is owned either by Avaya or its licensors and is
protected by copyright and other intellectual property laws including the
sui generis rights relating to the protection of databases. You may not
modify, copy, reproduce, republish, upload, post, transmit or distribute
in any way any content, in whole or in part, including any code and
software. Unauthorized reproduction, transmission, dissemination,
storage, and or use without the express written consent of Avaya can
be a criminal, as well as a civil, offense under the applicable law.
Third-party components
Certain software programs or portions thereof included in the Product
may contain software distributed under third party agreements (“Third
Party Components”), which may contain terms that expand or limit
rights to use certain portions of the Product (“Third Party Terms”).
Information regarding distributed Linux OS source code (for those
Products that have distributed the Linux OS source code), and
identifying the copyright holders of the Third Party Components and the
Third Party Terms that apply to them is available on the Avaya Support
Web site: http://www.avaya.com/support/Copyright/.
Trademarks
The trademarks, logos and service marks (“Marks”) displayed in this
site, the documentation(s) and product(s) provided by Avaya are the
registered or unregistered Marks of Avaya, its affiliates, or other third
parties. Users are not permitted to use such Marks without prior written
consent from Avaya or such third party which may own the Mark.
Nothing contained in this site, the documentation(s) and product(s)
should be construed as granting, by implication, estoppel, or otherwise,
any license or right in and to the Marks without the express written
permission of Avaya or the applicable third party.
Avaya is a registered trademark of Avaya Inc.
All other trademarks are the property of their respective owners.
Downloading documents
For the most current versions of documentation, see the Avaya Support
Web site: http://www.avaya.com/support
Contact Avaya Support
Avaya provides a telephone number for you to use to report problems
or to ask questions about your product. The support telephone number
is 1-800-242-2121 in the United States. For additional support
telephone numbers, see the Avaya Web site: http://www.avaya.com/
support
Avaya grants End User a license within the scope of the license types
described below. The applicable number of licenses and units of
capacity for which the license is granted will be one (1), unless a
different number of licenses or units of capacity is specified in the
Documentation or other materials available to End User. “Designated
Processor” means a single stand-alone computing device. “Server”
means a Designated Processor that hosts a software application to be
2
Administration and Security
October 2010
Contents
Chapter 1: New in this release.................................................................................................7
Features............................................................................................................................................................7
Administration enhancements..................................................................................................................7
Other changes...................................................................................................................................................7
Chapter 2: Introduction...........................................................................................................11
Navigation.......................................................................................................................................................12
References......................................................................................................................................................12
Chapter 3: Using the Avaya 3100 Mobile Communicator Web Administration Console
...................................................................................................................................................13
Overview.........................................................................................................................................................13
Avaya 3100 Mobile Communicator Web Administration Console buttons......................................................13
Logging on to the Avaya 3100 Mobile Communicator Web Administration Console as an administrator
........................................................................................................................................................................16
Logging on to the Avaya 3100 Mobile Communicator Web Administration Console as an administrator
........................................................................................................................................................................16
Logging on to the Avaya 3100 Mobile Communicator Web Administration Console as a user......................17
Changing the Avaya 3100 Mobile Communicator Web Administration Console password............................18
Resetting the Web Administration Console administrator password...............................................................19
Chapter 5: Administration......................................................................................................21
Navigation.......................................................................................................................................................21
Chapter 5: Gateway administration.......................................................................................23
Adding an Avaya 3100 Mobile Communicator Gateway server......................................................................23
Procedure job aid............................................................................................................................................24
Deleting an Avaya 3100 Mobile Communicator Gateway server....................................................................24
Locking and unlocking an Avaya 3100 Mobile Communicator Gateway server.............................................25
Configuring the Gateway settings...................................................................................................................26
Procedure job aid............................................................................................................................................27
Configuring the dial plan conversion parameters............................................................................................32
Variable definitions..........................................................................................................................................33
Rules that use the carat sign...........................................................................................................................33
Configuring the device settings.......................................................................................................................34
Procedure job aid............................................................................................................................................34
Configuring the emergency telephone numbers.............................................................................................37
Configuring the Administration server port settings........................................................................................38
Procedure job aid............................................................................................................................................39
Adding a license file........................................................................................................................................39
Checking Gateway server statistics................................................................................................................41
Procedure job aid............................................................................................................................................41
Checking Gateway server status....................................................................................................................43
Procedure job aid............................................................................................................................................43
Checking Gateway server license file information..........................................................................................45
Procedure job aid............................................................................................................................................46
Managing the server processes from the Web Administration Console.........................................................46
Procedure job aid............................................................................................................................................47
Managing the server processes from the command line................................................................................47
Administration and Security
October 2010
3
Chapter 6: Mobile client administration................................................................................49
Client upgrade methods..................................................................................................................................49
Uploading the mobile client software files.......................................................................................................53
Deleting files in the software repository..........................................................................................................54
Filtering the mobile client software files..........................................................................................................55
Downloading software files as Administrator..................................................................................................55
Downloading client software from the software repository to a computer.......................................................56
Tracking license usage....................................................................................................................................57
Installing or upgrading the Avaya 3100 Mobile Communicator - Client for BlackBerry using the BlackBerry
Enterprise Server............................................................................................................................................58
Checking Instant Conferencing status............................................................................................................59
Procedure job aid............................................................................................................................................59
Client language support..................................................................................................................................60
Chapter 7: User administration..............................................................................................61
Configuring user parameters for autoconfiguration.........................................................................................61
Procedure job aid............................................................................................................................................62
Filtering users..................................................................................................................................................62
Logging off users.............................................................................................................................................62
Removing users..............................................................................................................................................63
Clearing a user message................................................................................................................................64
Checking user status.......................................................................................................................................64
Procedure job aid............................................................................................................................................65
Checking user statistics..................................................................................................................................66
Procedure job aid............................................................................................................................................67
Chapter 8: Audio prompt administration..............................................................................69
Prompt requirements.......................................................................................................................................69
Creating a language pack...............................................................................................................................70
Creating a language pack task flow................................................................................................................70
Creating a language pack task flow navigation...............................................................................................71
Preparing prompt translations.........................................................................................................................71
Language and locale code job aid..................................................................................................................72
Prompt localization job aid..............................................................................................................................72
Record the prompts.........................................................................................................................................78
Preparing the file structure..............................................................................................................................78
Packaging the prompt files..............................................................................................................................80
Testing the language pack..............................................................................................................................80
Installing the language packs..........................................................................................................................81
Configuring the language on the Avaya 3100 Mobile Communicator Gateway..............................................82
Removing a language pack.............................................................................................................................83
Chapter 10: Security................................................................................................................85
Navigation.......................................................................................................................................................85
Chapter 10: Server certificate management.........................................................................87
Server certificate management task flow........................................................................................................88
Enrolling with a CA..........................................................................................................................................89
Generating a CSR for Avaya 3100 Mobile Communicator Gateway Server...................................................90
Job aid.............................................................................................................................................................91
Generating a CSR for Avaya 3100 Mobile Communicator Gateway Administration Server...........................91
Obtaining a signed certificate..........................................................................................................................93
4
Administration and Security
October 2010
Obtaining the CA signed SSL/TLS certificate for Avaya 3100 Mobile Communicator Gateway Server.........94
Obtaining the CA-signed certificate for the Avaya 3100 Mobile Communicator Gateway Administration Server
........................................................................................................................................................................94
Installing the root and signed certificates on the Avaya 3100 Mobile Communicator Gateway Server..........95
Installing the root and signed certificates on the Administration Server..........................................................96
Copying single server keystore.......................................................................................................................97
Chapter 11: Client certificate management...........................................................................99
Installing a root certificate on a Nokia device..................................................................................................99
Installing a root certificate on a Windows Mobile device...............................................................................100
Installing a root certificate on a BlackBerry device in the non-BES configuration.........................................101
Chapter 12: Server certificate administration.....................................................................103
Changing the certificate keystore default password......................................................................................103
Generating a self-signed certificate for Avaya 3100 Mobile Communicator Gateway Server.......................104
Generating a self-signed certificate for Avaya 3100 Mobile Communicator Gateway Administration Server
......................................................................................................................................................................106
Chapter 13: Maintenance......................................................................................................109
Backing up the Avaya 3100 Mobile Communicator Gateway server databases...........................................109
Restoring the Avaya 3100 Mobile Communicator Gateway server databases.............................................110
Checking the Avaya 3100 Mobile Communicator Gateway Software Version..............................................111
Sending a system notification to all users......................................................................................................111
Sending a system notification to individual users..........................................................................................112
Network configuration changes.....................................................................................................................112
Chapter 14: Common procedures........................................................................................115
Accessing the server command line as nortel...............................................................................................115
Accessing the server command line as superuser........................................................................................115
Administration and Security
October 2010
5
6
Administration and Security
October 2010
Chapter 1: New in this release
The following sections detail what's new in Avaya 3100 Mobile Communicator Administration and Security,
NN42030-600 for Avaya 3100 Mobile Communicator Release 3.1.
• Features on page 7
• Other changes on page 7
Features
The following sections describe the features.
Administration enhancements on page 7
For all the new Avaya 3100 Mobile Communicator features, see Avaya 3100 Mobile
Communicator Fundamentals, NN42030-109.
Administration enhancements
Avaya 3100 Mobile Communicator Release 3.1 provides the following enhancements:
• Changes to support the new user interface, see Configuring the device settings on
page 34
• Ability to change all audio prompts from English (default) to another language, see Audio
prompt administration on page 69.
Other changes
The Web Console has been renamed the Web Administration Console. Information related to
the Avaya 3100 Mobile Communicator - Web UI has been added.
Revision history
October 2010
Administration and Security
Standard 04.05. This document is issued to support Avaya 3100
Mobile Communicator Release 3.1. Removed obsolete references.
October 2010
7
New in this release
July 2010
Standard 04.04. This document is issued to support Avaya 3100
Mobile Communicator Release 3.1. This document contains
editorial changes.
November 2009
Standard 04.03. This document is issued to support Avaya 3100
Mobile Communicator Release 3.1. Updates were made to
Configuring the Gateway settings on page 26, Configuring the
device settings on page 34, Backing up the Avaya 3100 Mobile
Communicator Gateway server databases on page 109, Restoring
the Avaya 3100 Mobile Communicator Gateway server
databases on page 110, Logging on to the Avaya 3100 Mobile
Communicator Web Administration Console as a user on page 17,
Changing the Avaya 3100 Mobile Communicator Web
Administration Console password on page 18, Logging off
users on page 62, and Audio prompt administration on
page 69.Resetting the Web Administration Console administrator
password on page 19 was added.
November 2009
Standard 04.02. This document is issued to support Avaya 3100
Mobile Communicator Release 3.1. Updates were made to Logging
on to the Avaya 3100 Mobile Communicator Web Administration
Console as a user on page 17, Configuring the Gateway
settings on page 26, Checking Gateway server license file
information on page 45, Tracking license usage on page 57, and
Configuring user parameters for autoconfiguration on page 61.
October 2009
Standard 04.01. This document is issued to support Avaya 3100
Mobile Communicator Release 3.1.
July 2009
Standard 03.08. This document is issued to support Avaya 3100
Mobile Communicator Release 3.0 and the Avaya Communication
Server 2100 (Avaya CS 2100). Information regarding the Avaya CS
2100 was added.
June 2009
Standard 03.07. This document is up-issued to support Avaya 3100
Mobile Communicator Release 3.0. Updates were made to the
Procedure job aid table.
June 2009
Standard 03.06. This document is issued to support Avaya 3100
Mobile Communicator Release 3.0 SU3. Updates were made to the
Configuring the device settings section.
April 2009
Standard 03.05 This document is issued to support Avaya 3100
Mobile Communicator Release 3.0. The following sections were
deleted from this document:
• Installing the ECM Avaya 3100 Mobile Communicator Gateway
software
• Adding the Avaya 3100 Mobile Communicator Gateway as an
element from the primary ECM
• Upgrading to a different network framework
• Accessing the Avaya 3100 Mobile Communicator Web Console
from the ECM
8
Administration and Security
October 2010
Other changes
January 2009
Standard 03.04 This document is issued to support Avaya 3100
Mobile Communicator Release 3.0. Changes were made to address
formatting issues, including changes to the procedure Configuring
the device settings on page 34 and the creation of the procedure
Configuring the emergency telephone numbers on page 37.
December 2008
Standard 03.03. This document is issued to support Avaya 3100
Mobile Communicator Release 3.0. Added the Native Dialing
Numbers field to Configuring the device settings on page 34.
Numerous updates to Server certificate management on page 87
and Client certificate management on page 99.
December 2008
Standard 03.02. This document is issued to support Avaya 3100
Mobile Communicator Release 3.0. Updates were made to include
links to multimedia presentations and to update technical content.
September 2008
Standard 03.01. This document is issued to support Avaya 3100
Mobile Communicator Release 3.0.
May 2008
Standard 02.03. This document is issued to support Avaya 3100
Mobile Communicator Release 2.1. A sample email was updated.
April 2008
Standard 02.02. This document is issued to support Avaya 3100
Mobile Communicator Release 2.1. Added the DNS port to the Port
table.
April 2008
Standard 02.01. This document is issued to support Avaya 3100
Mobile Communicator Release 2.1.
November 2007
Standard 01.04. This document is up-issued to include changes in
technical content for the packet dump utility, E.164 fully qualified
international format numbers, CallPilot, and Call Detail Recording
(CDR).
October 2007
Standard 01.03. This document is up-issued to include changes in
technical content including an Avaya 3100 Mobile Communicator Client for BlackBerry/Nokia implementation workflow and updated
screen captures.
October 2007
Standard 01.02. This document is up-issued to include changes in
technical content for Avaya 3100 Mobile Communicator Gateway
configuration parameter fields and network configuration changes.
September 2007
Standard 01.01. This document is issued to support the Avaya 3100
Mobile Communicator Series Portfolio on Avaya Communication
Server 1000 Release 5.0 and Avaya Multimedia Communication
Server 5100 Release 4.0.
Administration and Security
October 2010
9
New in this release
10
Administration and Security
October 2010
Chapter 2: Introduction
This document provides information about the administration and security of the Avaya 3100 Mobile
Communicator.
Avaya 3100 Mobile Communicator contains the following components:
• Avaya 3100 Mobile Communicator Gateway (3100 MCG)
• Avaya 3100 Mobile Communicator - Client for BlackBerry
• Avaya 3100 Mobile Communicator - Client for Nokia
• Avaya 3100 Mobile Communicator - Client for Windows Mobile
• Avaya 3100 Mobile Communicator - Client for iPhone
• Avaya 3100 Mobile Communicator - Web UI
The Avaya 3100 Mobile Communicator Gateway extends network feature functionality to the Avaya 3100
Mobile Communicator - Client application on mobile devices. Internally, the Avaya 3100 Mobile
Communicator Gateway contains the Avaya 3100 Mobile Communicator Gateway Server and the Avaya
3100 Mobile Communicator Administration Server.
The Avaya 3100 Mobile Communicator - Client application registers to the Avaya 3100 Mobile
Communicator Gateway to access the enterprise network. After registration, users can perform a variety of
functions such as:
• Manage friends by using the Avaya 3100 Mobile Communicator - Client local directory. Avaya 3100
Mobile Communicator - Client for BlackBerry users can also manage friends by using the BlackBerry
address book.
• Search the corporate directory and the Avaya 3100 Mobile Communicator - Client local directory.
• Use the logs to view the most recent related incoming and outgoing calls, voice mail indicator, and
system events.
• Create a user group that contains multiple friends and then initiate an ad hoc conference call to the
group members.
• Redirect incoming calls to alternative contact locations (for example. office, home, or other).
• Associate a single number with all of outbound calls.
• Handle the message waiting indicator (MWI) for new voice mail messages.
This document refers to the supported clients using the generic term mobile client.
Important:
Mobile client devices must have an internet connection.
Administration and Security
October 2010
11
Introduction
Navigation
• Using the Avaya 3100 Mobile Communicator Web Administration Console on page
13
• Administration on page 21
• Gateway administration on page 23
• Mobile client administration on page 49
• User administration on page 61
• Audio prompt administration on page 69
• Security on page 85
• Server certificate management on page 87
• Client certificate management on page 99
• Server certificate administration on page 103
• Maintenance on page 109
• Common procedures on page 115
References
For more information, see the following documents:
• Avaya 3100 Mobile Communicator - Client for BlackBerry User Guide, NN42030-101
• Avaya 3100 Mobile Communicator - Client for Nokia User Guide, NN42030-102
• Avaya 3100 Mobile Communicator - Client for Windows Mobile User Guide,
NN42030-107
• Avaya 3100 Mobile Communicator - Client for iPhone User Guide, NN42030-111
• Avaya 3100 Mobile Communicator Fundamentals, NN42030-109
• Avaya 3100 Mobile Communicator - Web UI User Guide, NN42030-110
• Avaya 3100 Mobile Communicator Troubleshooting, NN42030-700
12
Administration and Security
October 2010
Chapter 3: Using the Avaya 3100 Mobile
Communicator Web
Administration Console
This chapter describes the Avaya 3100 Mobile Communicator Web Administration Console.
• Overview on page 13
• Logging on to the Avaya 3100 Mobile Communicator Web Administration Console as an
administrator on page 16
• Logging on to the Avaya 3100 Mobile Communicator Web Administration Console as a user on
page 17
• Changing the Avaya 3100 Mobile Communicator Web Administration Console password on
page 18
• Resetting the Web Administration Console administrator password on page 19
Overview
You perform administrative tasks for the Avaya 3100 Mobile Communicator Gateway server
using the Avaya 3100 Mobile Communicator Web Administration Console, a Web-based tool.
You access the standalone Avaya 3100 Mobile Communicator Web Administration Console
through Microsoft Internet Explorer or Mozilla Firefox.
Two access levels exist for the Avaya 3100 Mobile Communicator Web Administration
Console:
• Administrator access
• Enterprise user access
Avaya 3100 Mobile Communicator Web Administration
Console buttons
The following table describes all the Avaya 3100 Mobile Communicator Web Administration
Console buttons and their actions.
Administration and Security
October 2010
13
Using the Avaya 3100 Mobile Communicator Web Administration Console
Table 1: Web Administration Console buttons
Button
Screen
Add Gateway
System Configuration
Displays the Add Gateway
window. Only active when an
Avaya 3100 Mobile
Communicator Gateway server
can be added.
Advanced
View
User Info
Displays all the configuration
parameters.
Browse
Admin Portal, License Information
Enables you to find a required file.
Cancel
Send Notification Message, Configure
Gateway, Configure Service, Lock
Enables you to cancel the
Gateway, Add Gateway
Configuration.
Capture
Tools
Starts a packet capture for
troubleshooting.
Clear
Messages
User Info
Clears queued user messages if
the user's queue exceeds normal
levels.
Close
Gateway Statistics, User Statistics,
Configure Gateway, Configure
Service,
Closes the window.
Configure
Gateway
System Configuration (Gateway
Actions button)
Displays the Configure Gateway
window.
Configure
Services
System Configuration (Gateway
Actions button)
Displays the Configure Service
window
Default View
User Info
Displays a subset of the user
configuration parameters.
Download
(hyperlink)
Admin Portal, User Portal
Starts the download of the client
file to the computer.
Download all
logs
(hyperlink)
Tools
Displays information on how to get
the logs.
Edit
Device Configuration, Configure
Gateway, Configure Service
Enables changes to parameters.
Filter
User Info
Uses search parameters to select
a subset of the information.
Gateway
Actions
System Configuration
Enables you to manage and
configure the gateway server.
Group Actions System Configuration
14
Description
Administration and Security
Displays the Add Gateway button.
October 2010
Avaya 3100 Mobile Communicator Web Administration Console buttons
Button
Screen
Description
Help
Web Administration Console main
window
Displays the Avaya 3100 Mobile
Communicator pages on http://
www.avaya.com
Install
License Information
Enables you to install the
information.
License
System Configuration (Gateway
Actions button)
Displays the License Information
window
User ID
(hyperlink)
User Info
Displays the User Statistics
window for the selected user.
Lock
System Configuration (Gateway
Actions button)
Displays the Lock Gateway
window.
User Info
Logs the user out of their client.
Logout
Web Administration Console main
window
Logs you out of the Web
Administration Console.
No
Removal Confirmation
Cancels the removal request.
Notify
User Info, System Configuration
(Gateway Actions button)
Displays the Send Notification
Message window
OK
Lock Gateway, Add Gateway
Enables you to confirm the
changes made to the fields.
Refresh
Gateway Statistics, User Statistics
Refreshes the statistics when
automatic refresh is disabled.
User Info
Remove users and deallocate
their licenses.
Remove
Admin Portal
Removes the client file from the
Avaya 3100 Mobile
Communicator Gateway server.
Remove from
Group
System Configuration (Gateway
Actions button)
Displays the Removal
Confirmation window.
Restart
System Configuration (Gateway
Actions button)
Enables you to restart the
Gateway server.
Save
Device Configuration, Tools, Configure Saves the changes made to the
Gateway, Configure Service
fields.
Send
Send Notification Message
Enables you to send the
notification message.
Start
System Configuration (Gateway
Actions button)
Enables you to start the Gateway
server.
Stop
Tools, System Configuration (Gateway
Actions button)
Stops the packet capture.
Administration and Security
October 2010
15
Using the Avaya 3100 Mobile Communicator Web Administration Console
Button
Screen
Description
Unlock
System Configuration (Gateway
Actions button)
Displays the Unlock Gateway
window.
View User
Portal
Admin Portal
Displays the User Portal.
Yes
Removal Confirmation
Enables you to confirm the
removal of the file.
Logging on to the Avaya 3100 Mobile Communicator Web
Administration Console as an administrator
This module describes the procedure you use to log on to Avaya 3100 Mobile Communicator
Web Administration Console to perform administration tasks.
Logging on to the Avaya 3100 Mobile Communicator Web
Administration Console as an administrator
Log on to the Avaya 3100 Mobile Communicator Web Administration Console as an
administrator to manage the system, monitor the users, monitor Instant Conferencing, and
manage the client server repository.
Important:
Wait two minutes after starting the Avaya 3100 Mobile Communicator Gateway before
accessing the Avaya 3100 Mobile Communicator Web Administration Console.
Prerequisites
• You need the administrator user id and password to perform this procedure.
• Access the Avaya 3100 Mobile Communicator Web Administration Console using a web
browser.
Important:
User names and passwords are case-sensitive.
1. In the Address field of your Web browser, enter
http://<IP address | hostname>:8282/adminserver
OR
16
Administration and Security
October 2010
Logging on to the Avaya 3100 Mobile Communicator Web Administration Console as a user
https://<IP address | hostname>:8553/adminserver
2. In the Username field, type the user name.
3. In the Password field, type the admin password.
Important:
Avaya recommends that you change the default administrator password. For
more information, see Changing the Avaya 3100 Mobile Communicator Web
Administration Console password on page 18.
4. Click Sign In.
5. Click a tab at the top of the Avaya 3100 Mobile Communicator Web Administration
Console to view the corresponding page.
Variable definitions
Variable
Value
<IP address | hostname>
The name of the Avaya 3100 Mobile Communicator
Gateway server in fully qualified domain name
(FQDN) format, or the IP address of the server.
user name
Default: admin
admin password
Default: password
Logging on to the Avaya 3100 Mobile Communicator Web
Administration Console as a user
Log on to the Avaya 3100 Mobile Communicator Web Administration Console as a user to
access the User Portal to download client files.
Prerequisites
You need to know the IP address or Fully Qualified Domain Name (FQDN) of the Avaya 3100
Mobile Communicator Gateway.
1. In the Address field of your Web browser, enter one of the following addresses.
• http://<IP address | FQDN>:8282/adminserver/
userportal.html
Administration and Security
October 2010
17
Using the Avaya 3100 Mobile Communicator Web Administration Console
• https://<IP address | FQDN>:8553/adminserver/
userportal.html
2. Press Enter.
The User Portal screen displays.
Variable definitions
Variable
<hostname>
Definition
The name of the MCG server in fully qualified
domain name (FQDN) format, or the IP
address of the server.
Changing the Avaya 3100 Mobile Communicator Web
Administration Console password
Change the Avaya 3100 Mobile Communicator Web Administration Console password from
the default password.
Prerequisites
You must be logged into the Avaya 3100 Mobile Communicator Web Administration Console
as administrator. For more information, see Logging on to the Avaya 3100 Mobile
Communicator Web Administration Console as an administrator on page 16.
1. On the Avaya 3100 Mobile Communicator Web Administration Console main page,
click the Tools tab.
2. In the Admin Server Password section, in the Current Password box, type the
current password.
Important:
Passwords are case-sensitive.
3. In the New Password box, type a new password.
4. In the Confirm New Password box, retype the new password.
5. In the Admin Server Password section, click Save.
18
Administration and Security
October 2010
Resetting the Web Administration Console administrator password
Variable definitions
Variable
Value
Current Password
Existing password.
The default password for new servers is
password
New password
New password for the Admin server.
Secure passwords use a mix of letters, numbers
and alphabetic characters and can be up to 19
characters in length.
Confirm New Password
New password for confirmation.
Resetting the Web Administration Console administrator
password
Use this procedure to reset the Avaya 3100 Mobile Communicator Web Administration Console
administrator password.
Prerequisites
You must be logged in to the server as nortel. For more information, see Accessing the server
command line as nortel on page 115.
1. Enter the following command:
su If prompted, enter the root password.
2. Enter the following command:
/opt/MobilityGateway/etc/resetadminpw.sh
The tool changes the administrator password to password
Important:
Avaya recommends that you immediately change the password to a more secure
password.
Administration and Security
October 2010
19
Using the Avaya 3100 Mobile Communicator Web Administration Console
20
Administration and Security
October 2010
Chapter 5: Administration
The following chapters describe administration procedures for the Avaya 3100 Mobile Communicator.
Navigation
• Gateway administration on page 23
• Mobile client administration on page 49
• User administration on page 61
• Audio prompt administration on page 69
Administration and Security
October 2010
21
Administration
22
Administration and Security
October 2010
Chapter 5: Gateway administration
This chapter describes procedures for gateway administration.
• Adding an Avaya 3100 Mobile Communicator Gateway server on page 23
• Deleting an Avaya 3100 Mobile Communicator Gateway server on page 24
• Locking and unlocking an Avaya 3100 Mobile Communicator Gateway server on page 25
• Configuring the Gateway settings on page 26
• Configuring the dial plan conversion parameters on page 32
• Configuring the device settings on page 34
• Configuring the emergency telephone numbers on page 37
• Configuring the Administration server port settings on page 38
• Adding a license file on page 39
• Checking Gateway server statistics on page 41
• Checking Gateway server status on page 43
• Checking Gateway server license file information on page 45
• Managing the server processes from the Web Administration Console on page 46
• Managing the server processes from the command line on page 47
Adding an Avaya 3100 Mobile Communicator Gateway
server
Add the Avaya 3100 Mobile Communicator Gateway using the Avaya 3100 Mobile
Communicator Web Administration Console.
Prerequisites
• The Avaya 3100 Mobile Communicator Gateway software must be installed on the server.
• You must be logged into the Avaya 3100 Mobile Communicator Web Administration
Console as administrator. For more information, see Logging on to the Avaya 3100 Mobile
Communicator Web Administration Console as an administrator on page 16.
1. Click the System Configuration tab.
2. On the System Configuration page, select Group Actions > Add Gateway.
Administration and Security
October 2010
23
Gateway administration
Important:
In a redundant system, add the local server first.
3. Enter the Gateway Address as an IP Address or Fully Qualified Domain Name
(FQDN).
4. Click OK.
5. If you receive a prompt to restart the gateway,
To restart the gateway, click Yes.
OR
To restart at a later time, click No.
Important:
Avaya recommends that you restart the gateway.
Procedure job aid
Use the following table to help you understand the Add Gateway parameters.
Field
Gateway Address
Description
The IP address or FQDN of the new Avaya
3100 Mobile Communicator Gateway server
being added.
Deleting an Avaya 3100 Mobile Communicator Gateway
server
Delete an Avaya 3100 Mobile Communicator Gateway on the Avaya 3100 Mobile
Communicator Gateway Web Administration Console. This procedure only removes the Avaya
3100 Mobile Communicator Gateway from management by the Web Administration Console;
the gateway continues to operate.
Important:
In a redundant system, delete the remote server first.
Prerequisites
You must be logged in to the Avaya 3100 Mobile Communicator Web Administration Console
as administrator. For more information on logging in as an administrator, see Logging on to
24
Administration and Security
October 2010
Locking and unlocking an Avaya 3100 Mobile Communicator Gateway server
the Avaya 3100 Mobile Communicator Web Administration Console as an administrator on
page 16.
1. Click System Configuration tab.
2. Select Gateway Actions > Remove from Group.
3. At the confirmation prompt, click Yes.
The Avaya 3100 Mobile Communicator Gateway is deleted. The Avaya 3100 Mobile
Communicator Gateway software remains installed.
4. If you receive a prompt to restart the gateway,
To restart the gateway, click Yes.
OR
To restart at a later time, click No.
Locking and unlocking an Avaya 3100 Mobile
Communicator Gateway server
Lock and unlock an Avaya 3100 Mobile Communicator Gateway server to perform
maintenance. The following table helps you understand the types of server locks.
Table 2: Server locks
Lock type
New calls
accepted?
Current call actions
Current user
actions
Unlocked (Default)
Yes
Calls are active.
Users can log in.
Graceful
No
Calls remain active
Users who are not in
a call are logged off.
Immediate
No
In progress calls
continue, but no
Avaya 3100 Mobile
Communicator
Gateway features
can be used.
Users are logged off
immediately,
Important:
Lock the server before performing system maintenance or changing gateway configuration
parameters.
Administration and Security
October 2010
25
Gateway administration
Prerequisites
You must be logged in to the Avaya 3100 Mobile Communicator Web Administration Console
as administrator. For more information on logging in as an administrator, see Logging on to
the Avaya 3100 Mobile Communicator Web Administration Console as an administrator on
page 16.
1. Click System Configuration tab.
2. To unlock the server, click Gateway Actions > Unlock.
3. To lock the server, click Gateway Actions > Lock and then perform one of the
following actions:
• Select Graceful Lock and click OK.
• Select Immediate Lock and click OK.
Configuring the Gateway settings
Configure the Gateway settings to enable the Avaya 3100 Mobile Communicator Gateway to
interact with the network elements. In redundant Avaya 3100 Mobile Communicator
deployments, most of the Gateway settings are shared between the two servers.
Prerequisites
• You must be logged into the Avaya 3100 Mobile Communicator Web Administration
Console as administrator. For more information, see Logging on to the Avaya 3100 Mobile
Communicator Web Administration Console as an administrator on page 16.
• Add the Avaya 3100 Mobile Communicator Gateway server before beginning this
procedure.
1. Click the System Configuration tab.
2. Select Gateway Actions > Configure Gateway.
3. In redundant configurations, select the gateway.
4. Click Edit.
5. Modify the Gateway settings.
Important:
Secondary gateway configuration comes from the data you enter for the primary
gateway. Secondary gateway configuration is automatic; there is no need to
configure it separately.
6. Click Save.
26
Administration and Security
October 2010
Procedure job aid
7. Click Close.
You receive a prompt to restart the server.
8. To restart the system, click Yes. The updated Gateway settings are applied.
OR
To restart the system at a later time, click No. The updated Gateway settings are
applied when the system is restarted later.
Important:
Avaya recommends that you restart the gateway.
9. On a redundant system, open the Gateway Configuration window for both gateways
and check that their settings match. If there is a mismatch, re-enter the settings and
restart the system.
Procedure job aid
Use the following table to help you understand the Gateway settings.
Field
Description
Mobility Server
Server Address
Enter the address that the local Avaya 3100 Mobile
Communicator Gateway uses for SIP traffic. Format: <IP
address l FQDN>
This parameter is unique to the local server.
SIP Port
Enter the SIP server port. The default value is 5060.
This parameter applies to both servers in the redundant
configuration.
Domain
Enter the SIP registration domain defined on the
Enterprise Call Server (ECS).
This parameter applies to both servers in the redundant
configuration.
Gateway name
Enter the gateway identity defined on the ECS for the
Avaya 3100 Mobile Communicator Gateway.
This parameter applies to both servers in the redundant
configuration.
Media Server Default Locale
Select the media server default locale. The Avaya 3100
Mobile Communicator Gateway plays prompts to the
Avaya 3100 Mobile Communicator - Client or Web UI
user in the language that the individual user has
configured. If that language is not installed on the Avaya
Administration and Security
October 2010
27
Gateway administration
Field
Description
3100 Mobile Communicator Gateway, the prompts play
in the language specified in this field.
For more information on prompts, see Audio prompt
administration on page 69.
Incoming Call Reliable Timer
Specify the amount of time, in seconds, that the Avaya
3100 Mobile Communicator Gateway waits after it plays
the cellular voice mail avoidance prompt, while waiting
for the pound (#) key to be pressed, before the call
forwards to the Enterprise voice mail system.
This parameter applies to both servers in the redundant
configuration.
Enable Cellular Voicemail
Avoidance
Select Yes to route unanswered cell phone calls to the
enterprise voice mail system. Select No to route
unanswered cell phone calls to the cellular voice mail
system.
When call screening mode is disabled, this parameter
controls whether an unanswered, incoming call diverts
to the enterprise voice mail system or to the cellular
voice mail system.
Default: No
Enable Music on Hold
Select Yes to enable the Music on Hold feature. The
system must have an audio file installed containing the
music to be played to the caller when on hold. Select No
to disable the Music on Hold feature. Default: Yes
Primary ECS Address
Enter the address and port of the primary ECS. Format:
<IP address l FQDN> :<port>
This parameter applies to both servers in the redundant
configuration.
Secondary ECS Address
Enter the address and port of the secondary ECS.
Format: <IP address l FQDN> :<port>
This parameter applies to both servers in the redundant
configuration.
Device Access
28
HTTP Port
Select the hypertext transport protocol (HTTP) port used
by clients to access the system and to download
software over the air. The valid range is 8080 to 8089;
the default is 8080. Select 0 to disable the port.
This parameter applies to both servers in the redundant
configuration.
HTTPS Port
Select the HTTP Secure (HTTPS) port used by clients
to access the system and to download software over the
air. The valid range is 8440 to 8449; the default is 8443.
Select 0 to disable the port.
Administration and Security
October 2010
Procedure job aid
Field
Description
Use HTTPS when a certificate infrastructure exists on
the clients and Avaya 3100 Mobile Communicator
Gateway.
This parameter applies to both servers in the redundant
configuration.
HTTPS certificate password
Enter the password used for the HTTPS certificate
transmitted by clients to the Avaya 3100 Mobile
Communicator Gateway server. The default is Avaya.
This parameter applies to both servers in the redundant
configuration.
Dial Plan
User Prefix/Phone-context for
Call Origination
Enter the user name prefix or phone context for call
origination. This prefix applies to calls originated by the
Avaya 3100 Mobile Communicator Gateway server and
to the calling address.
This parameter applies to both servers in the redundant
configuration.
Mobility Prefix
Enter the user name mobility prefix for call termination.
This prefix applies to calls received by the Avaya 3100
Mobile Communicator Gateway server and to the called
address.
This parameter applies to both servers in the redundant
configuration.
Dial-In Service DN
Enter the Service Directory Number (DN) for client calls
that will arrive at the Avaya 3100 Mobile Communicator
Gateway on the SIP network. This field is mandatory.
The Service DN allows Avaya 3100 Mobile
Communicator - Client for BlackBerry, Avaya 3100
Mobile Communicator - Client for Windows Mobile, and
Avaya 3100 Mobile Communicator - Client for Nokia
users to place calls directly from their wireless devices
to other parties using Direct Outbound call mode. The
PSTN numbers that are dialed by the mobile on the
PSTN are defined on the device configuration page.
When the call arrives at the enterprise the PSTN number
must be converted to an internal format for use on the
SIP network, routed by the NRS, and which will
eventually arrive at the Avaya 3100 Mobile
Communicator Gateway.
Mobility Prefix: 555
Username 343XXXX
Password XXXXXXX
Outgoing Call Service DN +41123456 789
Administration and Security
October 2010
29
Gateway administration
Field
Description
The mobile phone will dial +41123456789 for direct
outbound calls. This PSTN number will be routed to the
enterprise as a DID number. When the number arrives
at the Enterprise we must manipulate the PSTN number
(+41123456789) to be routed on the SIP network.
Important:
If you have a mapping on the incoming trunk route on
the call server to map a PSTN service DN number:
+41123456789 to 5550006789, you would configure
the service DN on the Avaya 3100 Mobile
Communicator Gateway as 0006789. In the case
where an enterprise has multiple service DN’s all
incoming PSTN service DN calls must map to the
single service DN number configured in this field. For
example:+1613132 4567 to 5550006789.
Dialplan Conversion List
For information on configuring this field, see Configuring
the dial plan conversion parameters on page 32.
DTR
Initial port for DTR (27000-27499) Enter the first port in the range of ports used by the
Avaya 3100 Mobile Communicator Gateway server
Digital Tone Receiver (DTR) engine. A DTR recognizes
Dual Tone Multi-Frequency (DTMF). 1500 ports are
allotted for DTR.
The port must be an even number (for example, 27000).
This parameter applies to both servers in the redundant
configuration.
Mid-Call Cellular Prefix
Enter the prefix used by clients to invoke mid-call
features using DTMF. Permitted values include the
characters star (*) and pound (#), and the numerals 0 to
9, entered in any combination. The default value is *,
which needs to be changed only if it conflicts with other
network resources.
For example, if clients use * to access conference
features, then you must change the Mid-Call Cellular
Prefix to a different value such as # or #99.
This parameter applies to both servers in the redundant
configuration.
LDAP
30
URL
Enter the address and port of the Lightweight Directory
Access Protocol (LDAP) server that hosts the corporate
directory. Obtain this value from the directory
administrator. Format: ldap://<IP address l FQDN> :<port>
This parameter applies to both servers in the redundant
configuration.
Search Base
Enter the distinguished name of the search base object
(node) that defines the location in the directory from
Administration and Security
October 2010
Procedure job aid
Field
Description
which the LDAP search begins. Obtain this value from
the directory administrator.
This parameter applies to both servers in the redundant
configuration.
LDAP Username
Enter the user name required to gain access to the
LDAP server that hosts the corporate directory. Obtain
this value from the directory administrator.
This parameter applies to both servers in the redundant
configuration.
Authorization
Enter the authorization mechanism required to connect
to the LDAP server. The default value is simple, which
causes user names and passwords to be sent as clear
text.
This parameter applies to both servers in the redundant
configuration.
Password
Enter the password required to gain access to the LDAP
server that hosts the corporate directory. Obtain this
value from the directory administrator.
This parameter applies to both servers in the redundant
configuration.
LDAP attribute tag that contains
the user ID
Enter the tag for the User ID attribute on the LDAP
server. The default is ipPhone.
This parameter applies to both servers in the redundant
configuration.
LDAP attribute tag that contains
the user's first name
Enter the tag for the User First Name attribute on the
LDAP server. The default is givenName.
This parameter applies to both servers in the redundant
configuration.
LDAP attribute tag that contains
the user's last name
Enter the tag for the User Last Name attribute on the
LDAP server. The default is sn.
This parameter applies to both servers in the redundant
configuration.
LDAP attribute tag that contains
the user's display name
Enter the tag for the User Display Name attribute on the
LDAP server. The default is displayName.
This parameter applies to both servers in the redundant
configuration.
LDAP attribute tag that contains
the user's business #
Enter the tag for the User Business Phone Number
attribute on the LDAP server. The default is
telephoneNumber.
This parameter applies to both servers in the redundant
configuration.
LDAP attribute tag that contains
the user's mobile #
Enter the tag for the User Mobile Phone Number
attribute on the LDAP server. The default is ipPhone.
Administration and Security
October 2010
31
Gateway administration
Field
Description
This parameter applies to both servers in the redundant
configuration.
LDAP attribute tag that contains
the user's email address
Enter the tag for the User E-mail Address attribute on
the LDAP server. The default is email.
This parameter applies to both servers in the redundant
configuration.
LDAP attribute tag that contains
the user's extension
Enter the tag for the User Extension attribute on the
LDAP server. The default is ipPhone.
This parameter applies to both servers in the redundant
configuration.
LDAP attribute tag that contains
the user's home phone
Enter the tag for the User Home Phone Number attribute
on the LDAP server. The default is homePhone.
This parameter applies to both servers in the redundant
configuration.
Configuring the dial plan conversion parameters
Use this procedure to facilitate dial plan conversion.
Prerequisites
• You must be logged into the Avaya 3100 Mobile Communicator Web Administration
Console as administrator. For more information, see Logging on to the Avaya 3100 Mobile
Communicator Web Administration Console as an administrator on page 16.
• Understand the dial plan of the Enterprise Communication Server (ECS). For more
information, see the ECS documentation.
• Understand the format of telephone numbers in the corporate directory server.
1. Click the System Configuration tab.
2. Select Gateway Actions > Configure Gateway.
3. On redundant systems, select a gateway.
4. Click Edit.
5. Click Dialplan Conversion List.
6. Enter <number combination> and click Add.
The number appears in the Dialplan Conversion List.
7. Repeat step 6 on page 32 to add additional entries.
32
Administration and Security
October 2010
Variable definitions
The system automatically inserts commas between the entries in the list.
8. To save the changes, click OK.
Variable definitions
Variable
<number
combination>
Value
Represents the elements of a dialable number and what these
elements translate to in order to be dialed. Format: <original
combination>=<converted number> Example: ESN=6 If the
corporate directory gives a telephone number as ESN1234567,
the ESN is changed to the digit 6 when the number is dialed,
resulting in the number 61234567 being dialed.
Rules that use the carat sign
When you write a rule without the carat (^) sign, the Avaya 3100 Mobile Communicator
Gateway replaces all occurrences of what is on the left side of the equal (=) sign with what is
on the right. For example, if you have the following rule 0=00, the rule changes a phone number
dialed on the Avaya 3100 Mobile Communicator - Client as 0123456789 to 00123456789 but
also changes a phone number like 01230123 to 0012300123
When you write a rule with the ^ sign, the Avaya 3100 Mobile Communicator Gateway replaces
only the leading occurrence of the string of what is on the left side of the equal (=) sign with
what is on the right. For example, you have a rule ^0=00. If the phone number dialed on the
Avaya 3100 Mobile Communicator - Client is 0123456789, the number changes to
00123456789. However, if the phone number dialed is 01230123, the number changes to
001230123.
You can use the ^ sign when writing rules in North America or Europe to dial national numbers
without adding the access code of 1 used within the enterprise. You can write a rule to look
for a leading 0 in Europe or 1 in North America and insert the proper access code to make the
number dialable in the enterprise. For example, in North America the rule would be ^1=61
assuming an access code of 6. This takes a number dialed as 16131234567 and substitutes
6161231234567 to make the number dialable in the enterprise. In Europe, this same rule would
be ^0=00. This adds an extra 0 to any number that a user dials on the Avaya 3100 Mobile
Communicator - Client . For example, 0123456789 becomes 00123456789 or
00411234567890 becomes 00041123456789.
Administration and Security
October 2010
33
Gateway administration
Configuring the device settings
The mobile device settings can automatically download to all the clients. A null value
downloads if a parameter is not configured.
By default, whenever a user logs in, the device settings download to the device. You can
change this behavior so that settings only download when the user first logs in.
Prerequisites
• You must be logged into the Avaya 3100 Mobile Communicator Web Administration
Console as administrator. For more information, see Logging on to the Avaya 3100 Mobile
Communicator Web Administration Console as an administrator on page 16.
• Add the Avaya 3100 Mobile Communicator Gateway server before beginning this
procedure.
• Configure the Gateway settings before beginning this procedure.
1. Click the Device Configuration tab.
2. Click Edit.
3. Modify the Device settings.
4. Click Save.
The new device settings are applied upon the next successful login by each user.
On a redundant system, the settings are automatically shared between both
gateways.
Procedure job aid
Use the following table to help you understand the Devices settings.
Field
Description
Primary 3100MCG (all
configurations)
External: Address (IP/host:Port)
34
Administration and Security
Enter the address of the primary Avaya 3100 Mobile
Communicator Gateway public interface on the
Internet. Client application users connect to this
address. Format: <IP address l FQDN> :<port>
October 2010
Procedure job aid
Field
Description
External: Use Secure Connection
Select Yes to enable HTTPS connections on the
primary Avaya 3100 Mobile Communicator Gateway
public interface using security certificates on the clients
on Avaya 3100 Mobile Communicator Gateway. Select
No to enable HTTP.
Use HTTPS when the clients use certificates to encrypt
communication with the Avaya 3100 Mobile
Communicator Gateway.
The Nokia and Windows Mobile devices, along with
BlackBerry devices that do not employ the enterprisehosted BlackBerry Enterprise Server (BES), can use
HTTPS and certificates.
Default: Yes
Internal: Address (IP/host:Port)
Enter the address of the primary Avaya 3100 Mobile
Communicator Gateway private interface on the
network.
Configure this parameter if your Avaya 3100 Mobile
Communicator system implementation uses
BlackBerry devices that use the BES.
Internal: Use Secure Connection
Select Yes to enable HTTPS connections on the
primary Avaya 3100 Mobile Communicator Gateway
private interface. Select No to enable HTTP.
Default: No
Secondary 3100MCG (all
configurations)
External: Address (IP/host:Port)
Enter the address of the secondary Avaya 3100 Mobile
Communicator Gateway public interface on the
Internet. Client application users connect to this
address when the primary Avaya 3100 Mobile
Communicator Gateway fails. Format: <IP address l
FQDN> :<port>
External: Use Secure Connection
Select Yes to enable HTTPS connections on the
secondary Avaya 3100 Mobile Communicator Gateway
public interface using security certificates on the clients
on Avaya 3100 Mobile Communicator Gateway. Select
No to enable HTTP.
Use HTTPS when the clients use certificates to encrypt
communication with the secondary Avaya 3100 Mobile
Communicator Gateway.
The Nokia and Windows Mobile devices, along with
BlackBerry devices that do not employ the enterprisehosted BlackBerry Enterprise Server (BES), can use
HTTPS and certificates.
Default: Yes
Administration and Security
October 2010
35
Gateway administration
Field
Description
Internal: Address (IP/host:Port)
Enter the address of the secondary Avaya 3100 Mobile
Communicator Gateway private interface on the
network.
Configure this parameter if your Avaya 3100 Mobile
Communicator system implementation uses
BlackBerry devices that use the BES.
Internal: Use Secure Connection
Select Yes to enable HTTPS connections on the
secondary Avaya 3100 Mobile Communicator Gateway
private interface. Select No to enable HTTP.
Default: No
Access Numbers
Voice Mail Numbers
Enter the list of valid regional or office based numbers
users of the system can use to call and access their
voice mail.
Service Numbers
Enter the list of valid regional or office-based Direct
Outbound Mode numbers for client calls. These
numbers are PSTN/E.164 numbers. Avaya 3100
Mobile Communicator users use service numbers to
place calls directly from their wireless devices to other
parties using Direct Outbound call mode.
On the Avaya CS 1000, the PSTN number must map
to the gateway name assigned to the Avaya 3100
Mobile Communicator Gateway as a trunk steering
code.
Dial Plan
36
Corporate Prefix Number
Enter the digits that must be dialed to make a call within
the company.
For example, if the telephone dialing plan requires that
corporate calls be made using a specific trunk, the
digits required to access that trunk can be programmed
in this field. The Corporate Prefix Number is also known
as the trunk steering code.
Local Prefix Number
Enter the local out-dial prefix.
For example, if your telephone dialing plan requires a
9 to reach the Public Switched Telephone Network
(PSTN), enter 9.
Long Distance Prefix Number
Enter the long distance prefix.
For example, if your telephone company requires that
long distance calls be prefixed with a 1, enter 1.
International Prefix Number
Enter the international prefix.
For example, if your telephone company requires that
international calls be prefixed with a 011, enter 011.
Administration and Security
October 2010
Configuring the emergency telephone numbers
Field
Native Dialing Numbers
Description
For information on configuring this field, see
Configuring the emergency telephone numbers on
page 37
Auto-Download of Device
Configuration
Allow Client Override
Controls the automatic downloading of the device
configuration (including blank values) to the clients.
Select No to download the configuration every time a
user logs in. The download overwrites local updates.
Select Yes to download the configuration the first time
each user logs in. After the initial download, users can
change their configuration.
Default: No
Calling Features
Prefix Screen Setting
Controls the use of prefixes by users.
Select Disable to allow users to dial outgoing calls with
prefixes. For this setting and the Native Call Intercept
setting to work correctly, your dial plan must support
calls from the client in the same way that calls from the
native dialer are handled.
Select Enable to require users to enter a prefix every
time they make an outgoing call. This setting is useful
if your dial plan does not support E.164 numbers.
Default: Disable
Default for Native Call Intercept
Setting
Defines the default setting to control the ability for users
to make private calls that route through the Avaya 3100
Mobile Communicator Gateway. Private calls are calls
placed through the native dialer.
Select On to place private calls through the Avaya 3100
Mobile Communicator Gateway.
Select Off to place private calls through the native
dialer.
The user can override this setting on the client. If the
user overrides this setting, changes to this parameter
do not change the client configuration.
Default: On
Configuring the emergency telephone numbers
Add one or more entries to facilitate emergency number dialing from the device's native phone.
Administration and Security
October 2010
37
Gateway administration
Prerequisites
• You must be logged into the Avaya 3100 Mobile Communicator Web Administration
Console as administrator. For more information, see Logging on to the Avaya 3100 Mobile
Communicator Web Administration Console as an administrator on page 16.
• You must know the emergency telephone numbers for your location.
1. Select the Device Configuration tab.
2. Click Edit.
3. Click Native Dialing Numbers to display the Native Dialing Numbers dialog.
4. In the Add box, type a dialable telephone number and click Add.
5. Repeat to add other entries to the list.
6. Click OK to save your changes.
For example, to enable emergency number dialing in North America, add 911. When
a mobile client user dials that number, the Avaya 3100 Mobile Communicator - Client
switches to the native device phone and places the call over the cellular network.
Configuring the Administration server port settings
You access the Administration server using HTTP or HTTP ports. By default, both ports are
enabled. If desired, you can disable one port.
Important:
In redundant systems, each server must have identical ports enabled.
Prerequisites
You must be logged in to the Avaya 3100 Mobile Communicator Web Administration Console
as administrator. For more information on logging in as an administrator, see Logging on to
the Avaya 3100 Mobile Communicator Web Administration Console as an administrator on
page 16
.
1. Click the Tools tab.
2. On the Tools page, in the Admin Server Port Setting section, select the check box
next to each control to enable or disable each port.
38
Administration and Security
October 2010
Procedure job aid
To block access to a port, clear the corresponding check box for that port.
3. In the Admin Server Port Setting section, click Save.
Procedure job aid
Use the following table to help you understand the Admin Server Port Setting parameters.
Each parameter contains two numbers. The first number indicates the total number of events
since the server came online. The second number indicates the number of events since the
table was last refreshed.
Field
Description
Enable HTTP port
Select this box to enable access to the HTTP port.
Enable HTTPS port
Select this box to enable access to the HTTPS port.
For more information on ports, see Avaya 3100 Mobile Communicator Planning and
Engineering, NN42030-200.
Adding a license file
The license file controls how many mobile client users can log on to the system. For example, if
your organization purchases a 100-seat license, a maximum of 100 users can be licensed and
can log on.
The specific license order code determines the license generation. After you order a license,
the code passes to the Avaya Keycode Retrieval System (KRS). The KRS interacts with the
license generator to obtain the license. You retrieve licenses from the KRS.
Important:
The system allocates licenses on a first-come, first-served basis, and the licenses remain
allocated until the system administrator removes the user.
You must order and install a license file to allow Avaya 3100 Mobile Communicator - Client
and Avaya 3100 Mobile Communicator Gateway use. You can update your license file if you
require additional licenses. The additional license adds more licenses to the existing licenses.
For example, if you have 100 licenses already, purchasing and installing a 50-user license
gives you 150 licenses.
Important:
Install the license file on each gateway server.
Administration and Security
October 2010
39
Gateway administration
Important:
Make sure you save a backup copy of your license files in a secure location. You will need
these files if you reinstall or perform major upgrades on the Avaya 3100 Mobile
Communicator Gateway.
Prerequisites
• You must be logged in to the Avaya 3100 Mobile Communicator Web Administration
Console as administrator. For more information on logging in as an administrator, see
Logging on to the Avaya 3100 Mobile Communicator Web Administration Console as an
administrator on page 16.
• Obtain the license file from Avaya, and store it in a location that can be accessed from
the Avaya 3100 Mobile Communicator Gateway.
• Add the Avaya 3100 Mobile Communicator Gateway server before beginning this
procedure.
1. Click the System Configuration tab.
2. On the System Configuration page, click Gateway Actions > License.
3. On the License Information window, click Browse.
4. In the Choose file dialog box, locate and select the license file.
5. Click Open.
6. Click Install.
The License Information window updates.
7. Click Close.
License State updates on the System Configuration page.
If the installation is successful, the state appears as “Licensed” and users can begin
logging in and receiving their individual licenses. If the installation is unsuccessful,
the state appears as “Unlicensed” or “Invalid.”
For information on troubleshooting license file problems, see Avaya 3100 Mobile
Communicator Troubleshooting, NN42030-700.
8. On a redundant system, repeat the procedure on the second (remote) gateway
using the same license file.
Important:
User licenses are allocated on a first-come first-serve basis, and remain allocated
until the user is removed from the system. Login status does not affect the status
of user licenses.
40
Administration and Security
October 2010
Checking Gateway server statistics
Checking Gateway server statistics
Check Gateway server statistics to check the number of outgoing calls, incoming calls, Instant
Conferencing, log ins and log offs, and corporate directory searches by all registered users.
As soon as the Gateway server comes online, the system records the number of events
processed for all users. The statistics display in tabular form, with each item displaying the
total number of events since the server came online and in brackets the number of events
since the table last refreshed. By default, the table refreshes every 5 seconds.
To reset the server statistics, you must restart the system.
Prerequisites
You must be logged in to the Avaya 3100 Mobile Communicator Web Administration Console
as administrator. For more information on logging in as an administrator, see Logging on to
the Avaya 3100 Mobile Communicator Web Administration Console as an administrator on
page 16.
1. Click the System Status tab.
2. In the System Status section, click IP Address for the Gateway Server, for which
you want to obtain statistics.
The Gateway Statistics window appears.
3. Check the Gateway statistics.
4. To update the statistics snapshot, click Refresh.
OR
To automatically refresh the statistics every 5 seconds, select the check box.
5. Click Close.
Procedure job aid
Use the following table to help you understand the Gateway Server statistics parameters. Each
parameter contains two numbers. The first number indicates the total number of events since
the server came online. The second number indicates the number of events since the table
last refreshed.
Field
Description
Calling
Administration and Security
October 2010
41
Gateway administration
Field
Description
Incoming call (IC) The total number of incoming calls processed by the server for this user
Outgoing call
(OC)
The total number of outgoing calls processed by the server for this user
Move call (MV)
The total number of calls that have been moved between the users'
desktop phones and the client application.
Swap call (SC)
The total number of swap call operations.
Transfer call (TC) The total number of call transfers.
Call cancel (CCL) The total number of cancelled calls.
Buddy List
Buddy group
renames (BGN)
The total number of buddy groups renamed.
Buddy group
adds (BGA)
The total number of buddy groups added.
Buddy group
removes (BGR)
The total number of buddy groups deleted.
Buddy adds
(BDA)
The total number of buddies added.
Buddy queries
(BDQ)
The total number of buddy queries.
Buddy removes
(BDR)
The total number of buddies deleted.
Features
42
Conference (CF)
The total number of conference calls.
Instant
conference (GC)
The total number of instant conferences.
Instant
messages sent
(IMS)
The total number of instant messages sent.
Instant
messages
received (IMR)
The total number of instant messages received.
Corporate
directory queries
(DRQ)
The total number of corporate directory searches.
Call screen set
(CSS)
The total number of call screening operations processed by the server
for all users. Call screening occurs when calls redirect to an alternate
contact location or call handling point, such as voice mail.
Administration and Security
October 2010
Checking Gateway server status
Field
Description
Presence
updates (PRU)
The total number of presence status updates.
Presence sets
(PRS)
The total number of presence status updates on the network.
Presence queries The total number of presence status queries.
(PRQ)
Connection
Login (LGI)
The total number of log ins processed by the server.
Logout (LGO)
The total number of log outs processed by the server.
Loss of service
(LOS)
The total number of times that clients have lost service.
Checking Gateway server status
Check the Gateway server status to view the information such as the number of connections
and the system load.
The System Status page lists the server processes and autoupdates every five seconds.
Prerequisites
You must be logged into the Avaya 3100 Mobile Communicator Web Administration Console
as administrator. For more information, see Logging on to the Avaya 3100 Mobile
Communicator Web Administration Console as an administrator on page 16.
1. Click the System Status tab.
The System Status page appears.
2. On the System Status page, monitor the status of the Gateway Server.
Procedure job aid
Use the following table to help you understand the Gateway Server System status fields.
Administration and Security
October 2010
43
Gateway administration
Field
Description
IP Address
Contains the IP Address of the Gateway Server.
Status information appears to the right of this field.
Click the IP Address to view statistical data related to
the associated server.
If the IP Address displays in red, the server is not
responding, which can indicate a server software
problem or system outage.
If the IP Address displays in grey, the server is
unavailable.
Domain Name
Contains the Domain name for the Avaya 3100 Mobile
Communicator Gateway server.
Status
Indicates the status of the Gateway Servers.
• Running—The server is running and active.
• Network Error—Connectivity to the server has been
lost.
• Stopped—The server is stopped.
• Running-Standby—The server is in standby mode.
If users cannot log in for any reason, the gateway
status appears in red. If the server is running but needs
a restart (for example, to apply pending configuration
changes), the gateway status appears in orange and
an asterisk (*) appears beside the text.
Last Alarm Entry
Click this field to open the alarm log file. The
timestamp (MM/DD/YYYY HH:MM:SS) indicates the
time of the most recent SEVERE or WARNING alarm
message. The total number of outstanding alarms
appears in brackets. For example, (5) indicates that
five alarms have been raised but not yet cleared.
Message examples:
• The “MandatoryGatewayConfig” alarm indicates
that you must enter configuration settings and
restart the server.
• The “GatewayStopped” information message
indicates that the server has been stopped from the
Web Administration Console or command line.
Notes:
• You can access the alarm log file from the Tools
page under Server Logs.
• To clear an alarm, you must solve the original error
condition.
• Whenever the Avaya 3100 Mobile Communicator
Gateway server stops, all alarms and informational
44
Administration and Security
October 2010
Checking Gateway server license file information
Field
Description
messages clear. However, persistent error
conditions (such as missing or incorrect
configuration settings) immediately generate new
alarms. To permanently delete an alarm, you must
solve the original error condition.
• Recurrent events only generate one alarm.
Active Connections
Indicates the current number of active connections
(clients) handled by the server. The license key
determines the maximum number of connections.
Queued Messages
Indicates the current number of queued message
waiting to be sent from the server to the client.
The CPU and number of server processes determines
the maximum number of queued messages. A large
number of queued messages can be caused by
network congestion or by users having lost service. If
the queue reaches the maximum number, system
stability can be compromised.
You can check the message queue for individuals or
clear the message queue for individual users.
System Load
Indicates the current load on the server CPU,
expressed as a percentage, averaged over the last
minute. The system load indicates the average
number of processes that are currently running on the
system.
A system load exceeding 100% adversely affects
system performance.
Tx(kbps)
Indicates the current number of messages transmitted
by the server, expressed in kilobits per second (kbps),
averaged over the preceding minute.
Rx(kbps)
Indicates the current number of messages received by
the server, expressed in kbps, averaged over the
preceding minute.
License Info
Displays the current number of licenses used against
the total number of licenses available.
Checking Gateway server license file information
This procedure shows you, at a glance, how many licenses your system is licensed for, and
how many licenses are allocated. You use this information to determine if you need to purchase
additional licenses.
Administration and Security
October 2010
45
Gateway administration
Prerequisites
You must be logged in to the Avaya 3100 Mobile Communicator Web Administration Console
as administrator. For more information on logging in as an administrator, see Logging on to
the Avaya 3100 Mobile Communicator Web Administration Console as an administrator on
page 16.
1. Click the System Status tab.
2. Monitor the license file status using the Licenses field.
Procedure job aid
Use the following table to help you understand the Gateway license file information in the
License Info field.
Field
Description
Single
Indicates the number of single-mode client licenses allocated to users
and the total number of licenses of this type.
Dual
Indicates the number of dual-mode client licenses allocated to users and
the total number of licenses of this type. Not currently used.
Managing the server processes from the Web
Administration Console
Use this procedure to start, stop, and restart server processes from the Web Administration
Console.
Stopping the server causes the clearing of message queues for all users on the system.
Restarting the server causes the server to stop and then start again.
Prerequisites
You must be logged in to the Avaya 3100 Mobile Communicator Web Administration Console
as administrator. For more information on logging in as an administrator, see Logging on to
the Avaya 3100 Mobile Communicator Web Administration Console as an administrator on
page 16.
1. Click the System Configuration tab.
46
Administration and Security
October 2010
Procedure job aid
The Status field indicates which server is currently active. In a single-server system,
this is always the local server.
2. To stop the server processes, click Gateway Actions beside the server to be
stopped and select Stop.
3. To start the server processes, click Gateway Actions beside the server to be started
and select Start.
4. To restart the server processes, click Gateway Actions beside the server to be
restarted and select Restart.
Procedure job aid
The following table provides field descriptions for the status of the Gateway Server.
Field
Description
Running
The server is running. In redundant configuration, the server is
the active server.
Connecting
The server is trying to connect to the Avaya 3100 Mobile
Communicator server.
Network Error
Connectivity to the server has been lost.
Stopped
The server is stopped.
Running-Standby
The server is in standby mode in a redundant configuration.
Managing the server processes from the command line
Instead of using the Web Administration Console, you can use the Linux command line to
check, start, stop, and restart server processes.
Prerequisites
You must be logged into the server as superuser. For more information, see Accessing the
server command line as superuser on page 115.
1. To check the server processes, enter
appstart status
Administration and Security
October 2010
47
Gateway administration
The system responds with the status of the server processes.
2. To start the server, enter
appstart start
3. To stop the server, enter
appstart stop
4. To restart the server, enter
appstart restart
Important:
Some implementations of the Avaya 3100 Mobile Communicator Gateway do not
include the restart command.
48
Administration and Security
October 2010
Chapter 6: Mobile client administration
This chapter provides information and describes procedures that you use to administer the mobile clients.
• Client upgrade methods on page 49
• Uploading the mobile client software files on page 53
• Deleting files in the software repository on page 54
• Filtering the mobile client software files on page 55
• Downloading software files as Administrator on page 55
• Downloading client software from the software repository to a computer on page 56
• Tracking license usage on page 57
• Installing or upgrading the Avaya 3100 Mobile Communicator - Client for BlackBerry using the
BlackBerry Enterprise Server on page 58
• Checking Instant Conferencing status on page 59
• Client language support on page 60
Client upgrade methods
Upgrading the mobile client software takes place in a number of ways:
• You place the software on a file server, notify the users where to locate the files, and have
the users upgrade their devices from their computer.
• You place the software on a file server, give the users the Uniform Resource Locator
(URL) to the server, and have the users upgrade their devices over the air.
• For Avaya 3100 Mobile Communicator - Client for BlackBerry users only, you can push
the software through the BlackBerry Enterprise Server (BES). For more information, see
Installing or upgrading the Avaya 3100 Mobile Communicator - Client for BlackBerry using
the BlackBerry Enterprise Server on page 58.
The following table describes the advantages of each method.
Administration and Security
October 2010
49
Mobile client administration
Table 3: Client upgrade comparisons
Install or upgrade type
From a computer
Advantages
Disadvantages
retains a copy of the
software on the computer
for backup purposes
• users must be connected
to their computers
• additional configuration
may be required
• users can select an
incorrect load
Over the air
• users can install or update
at any time, without being
tied to their computers
• reduces configuration
steps
no backup copy of the files
for reloading so users need
to go back to the server to
refresh the software load
• less chance for users to
access the wrong load
From the BlackBerry
Enterprise Server (BES)
BlackBerry users receive
the new loads
automatically
only for the BlackBerry;
must use alternate
methods for Nokia and
Windows Mobile users
Important:
Avaya recommends the use of the Over the air download technique.
You use E-mail to announce the availability of new software and give the download instructions
in the E-mail messages. The E-mail message to your users should contain the following
information:
• How to obtain and install the client software.
• How to start the application and enter basic configuration, including the Avaya 3100
Mobile Communicator Gateway connection details, Username, Password, and mobile
phone number.
• How to install a root certificate (if required).
• How to log in to the Avaya 3100 Mobile Communicator.
The remainder of this section contains sample e-mail messages. For more information on the
installation and upgrade methods, see:
• Avaya 3100 Mobile Communicator - Client for BlackBerry User Guide, NN42030-101
• Avaya 3100 Mobile Communicator - Client for Nokia User Guide, NN42030-102
• Avaya 3100 Mobile Communicator - Client for Windows Mobile User Guide,
NN42030-107
50
Administration and Security
October 2010
Client upgrade methods
Figure 1: Sample E-mail - Avaya 3100 Mobile Communicator - Client for BlackBerry over the
air download on page 51 is a sample message you can send to a BlackBerry user for the
over the air download. Substitute your server addresses for the <URL> in the message.
Figure 1: Sample E-mail - Avaya 3100 Mobile Communicator - Client for BlackBerry over the air download
Figure 2: Sample E-mail - Avaya 3100 Mobile Communicator - Client for Nokia over the air
download on page 52 is a sample message you can send to a Nokia user for the over the
air download. Substitute your server addresses for the <URL> in the message.
Administration and Security
October 2010
51
Mobile client administration
Figure 2: Sample E-mail - Avaya 3100 Mobile Communicator - Client for Nokia over the air download
Figure 3: Sample E-mail - Avaya 3100 Mobile Communicator - Client for Windows Mobile over
the air download on page 53 is a sample message that you could send to a Windows Mobile
user for the over the air download. Substitute your server addresses for the <URL> in the
message.
52
Administration and Security
October 2010
Uploading the mobile client software files
Figure 3: Sample E-mail - Avaya 3100 Mobile Communicator - Client for Windows Mobile over the air
download
Uploading the mobile client software files
Use this procedure to manually upload new mobile client software files to the User Portal to
provide access for users.
When you upgrade the software (for example, for a Service Upissue), the mobile client software
updates automatically on the User Portal.
Important:
Only the administrator can access the Administrative Portal.
In systems with redundant Avaya 3100 Mobile Communicator Gateway servers, both
servers must be equipped with matching client software loads.
Prerequisites
• You must be logged in to the Avaya 3100 Mobile Communicator Web Administration
Console as administrator. For more information on logging in as an administrator, see
Administration and Security
October 2010
53
Mobile client administration
Logging on to the Avaya 3100 Mobile Communicator Web Administration Console as an
administrator on page 16.
• You must have downloaded the updated files from the Avaya Web site, and have the files
accessible from the PC running the Web Administration Console.
1. Click the Admin Portal tab.
2. Click Browse.
3. On the Choose File dialog box, navigate to the location of the zipped file.
4. Click the file to select it.
5. Click Open.
The file is unzipped.
6. In the Submit File dialog box, click Yes.
The software repository updates with the new files.
Deleting files in the software repository
Delete files in the software repository to remove old software files.
Prerequisites
You must be logged in to the Avaya 3100 Mobile Communicator Web Administration Console
as administrator. For more information on logging in as an administrator, see Logging on to
the Avaya 3100 Mobile Communicator Web Administration Console as an administrator on
page 16.
1. Click the Admin Portal tab.
2. On the Admin Portal page, in the Software Repository section, click Remove
beside the file that you want to delete.
A confirmation dialog box appears.
3. Select Yes to delete the software.
OR
Select No to retain the software.
54
Administration and Security
October 2010
Filtering the mobile client software files
Filtering the mobile client software files
Filter the mobile client software files to view the files by product, platform, and language.
Prerequisites
You must be logged in to the Avaya 3100 Mobile Communicator Web Administration Console
as administrator. For more information on logging in as an administrator, see Logging on to
the Avaya 3100 Mobile Communicator Web Administration Console as an administrator on
page 16.
1. Click the Admin Portal tab.
2. On the Admin Portal page, select your criteria from the Product Name, Platform
Name, or Languages lists.
Downloading software files as Administrator
Use this procedure to download client software as Administrator.
Over-the-air download is termed such because it involves the transfer of files via a wireless
connection. When the user performs an OTA software installation, the system recommends a
software load that matches their device's particular operating system, features, and language.
The user can accept the recommendation or select a different load.
Prerequisites
You must be logged in to the Avaya 3100 Mobile Communicator Web Administration Console
as administrator. For more information on logging in as an administrator, see Logging on to
the Avaya 3100 Mobile Communicator Web Administration Console as an administrator on
page 16.
1. Click the Admin Portal tab.
2. Click Download beside the file that you want to download.
3. Click Save.
4. Navigate to the folder where you want to save the software,
5. Click Save.
6. Upload and install the software on your mobile device as described in Avaya 3100
Mobile Communicator - Client for BlackBerry User Guide, NN42030-101, Avaya
Administration and Security
October 2010
55
Mobile client administration
3100 Mobile Communicator - Client for Nokia User Guide, NN42030-102, or Avaya
3100 Mobile Communicator - Client for Windows Mobile User Guide, NN42030-107.
Downloading client software from the software repository
to a computer
Users can download client software from the software repository to a PC prior to uploading the
files to their mobile devices. This procedure can be used in the E-mail you send to the users, as
described in Client upgrade methods on page 49.
Prerequisites
This procedure requires the user to have:
• an Internet connection to download the software to their PC
• a USB connection to upload the software from the computer to the mobile device
1. In the Address field of a Web browser on a PC, enter http://<IP |
hostname>:8282/adminserver/userportal.html
OR
https://<IP | hostname>:8553/adminserver/userportal.html
2. In the Software Repository section, select one of the following options:
• Product Name menu to filter by the product
• Platform Name menu to filter by device model
• Languages menu to filter by language
3. Select the Download link beside the required software load.
The file name format is <device>_<model>_<language>_<version_number>.zip
4. Click Save.
5. In the Choose file dialog box, navigate to the location where you want to save the
file.
6. Click Save.
The software downloads to the specified folder.
The user must then upload the software to the device. For more information, see:
• Avaya 3100 Mobile Communicator - Client BlackBerry User Guide,
NN42030-101
• Avaya 3100 Mobile Communicator - Client Nokia User Guide, NN42030-102
56
Administration and Security
October 2010
Tracking license usage
• Avaya 3100 Mobile Communicator - Client Windows Mobile User Guide,
NN42030-107
Variable definitions
Variable
<IP | hostname>
Definition
The name of the MCG server in fully qualified
domain name (FQDN) format, or the IP
address of the server.
Tracking license usage
Use this procedure to monitor the license usage.
For information on troubleshooting license file problems, see Avaya 3100 Mobile
Communicator Troubleshooting, NN42030-700.
Prerequisites
You must be logged in to the Avaya 3100 Mobile Communicator Web Administration Console
as administrator. For more information on logging in as an administrator, see Logging on to
the Avaya 3100 Mobile Communicator Web Administration Console as an administrator on
page 16.
1. Click the System Status tab.
2. On the System Status page, the License Info field appears:
• Number of single mode licenses used/available
• Number of dual mode licenses used/available (Not currently used)
Administration and Security
October 2010
57
Mobile client administration
Installing or upgrading the Avaya 3100 Mobile
Communicator - Client for BlackBerry using the BlackBerry
Enterprise Server
You can deploy the Avaya 3100 Mobile Communicator for BlackBerry by placing the software
on the BlackBerry Enterprise Server (BES), and allow the BES to push the software to the
user. The user does not need to manually install or upgrade the software.
Three push methods exist:
• deploy to devices directly connected to the administration computer
• deploy to devices connected to computers with the Desktop Manager
• deploy to devices connected to the wireless network
Table 4: BES deployment options on page 58 describes the options, advantages and
limitations of each method.
Table 4: BES deployment options
Deployment option
Uses and advantages
Limitations
Device connected directly to
the administration computer
• Provides complete control
over the software
installation process.
• The number of
communication ports that
are available on the
administration computer
limit the number of devices
that can be updated at one
time.
• Can be used to perform
initial and update software
installations.
• Quick file transfer speed.
Device connected to the
user's computer
• Enables software to deploy
to devices connected to
users' computers.
• Can be used to perform
initial and update software
installations.
• The devices must be
connected directly to the
administration computer.
• The devices must be
connected to the users'
computers during the
software installation.
• The Research in Motion
(RIM) Desktop Manager
must be installed on the
users' computers.
• LAN capacity limits the file
transfer speed.
Device connected to the
wireless network
58
Administration and Security
• Enables software
deployment to devices
• Initial configuration
information (for example,
October 2010
Checking Instant Conferencing status
Deployment option
Uses and advantages
connected to the wireless
network.
• Can be used to perform
initial and upgrade
software installations.
• Enables the software to be
deployed to multiple
devices simultaneously.
Limitations
username and password)
must be sent to the users,
which can result in errors or
cause security concerns.
• The capacity of the
wireless network limits the
file transfer speed. Typical
installations can take more
than four hours.
For information on uploading the updates to the BES, see the BlackBerry Enterprise Server
documentation.
Checking Instant Conferencing status
Check Instant Conferencing status to see an overview of active calls on the Instant
Conferencing Server.
Prerequisites
You must be logged in to the Avaya 3100 Mobile Communicator Web Administration Console
as administrator. For more information on logging in as an administrator, see Logging on to
the Avaya 3100 Mobile Communicator Web Administration Console as an administrator on
page 16.
1. Click the Instant Conferencing tab.
2. Monitor the Instant Conferences.
Procedure job aid
The following table provides field descriptions for the Instant Conferencing window.
Field
Description
Gateway
The IP Address or the host name of the server hosting the
Instant Conference.
Instant Conference ID
A randomly generated number that uniquely identifies the
Instant Conference. Use the Instant Conferencing ID to
identify related records in the session log.
Administration and Security
October 2010
59
Mobile client administration
Field
Description
Initiator
The extension, telephone number, or mobile phone number
of the Instant Conferencing initiator.
Active Participants
Displays the extension, telephone number, or mobile phone
number of each participant, including the Instant
Conference initiator, currently engaged in the Instant
Conference.
Missing Participants
Indicates the number of participants not yet participating in
the Instant Conference.
Creation Time
The Instant Conference initiation date and time.
Client language support
The clients support the following languages:
• Chinese
• Dutch
• English
• French
• German
• Japanese
• Norwegian
• Swedish
When the user installs a client a load using the Over the air download method, the system
recommends a software load that matches the operating system, features, and language of
the device. The user can reconfigure the device so that the system recommends a different a
different load. For example, if a user changes the language from English to French on the
device, the system will recommend a French load instead of an English load.
60
Administration and Security
October 2010
Chapter 7: User administration
This chapter describes procedures used to administer users.
• Configuring user parameters for autoconfiguration on page 61
• Filtering users on page 62
• Logging off users on page 62
• Removing users on page 63
• Clearing a user message on page 64
• Checking user status on page 64
• Checking user statistics on page 66
Configuring user parameters for autoconfiguration
The Avaya 3100 Mobile Communicator Gateway server automatically distributes default
settings to all users, to speed the user configuration and reduce the chance of input errors.
Prerequisites
Add and configure the gateway settings before beginning this procedure.
1. Configure an account for each user on the Enterprise Call Server (ECS).
2. Configure the fields in the job aid on each device.
Important:
You can give the users instructions to do this configuration themselves in the
email you send to users to install the client application on their devices.
The users can now log in and automatically receive all the parameters required to
place calls and exchange instant messages with the client application.
Administration and Security
October 2010
61
User administration
Procedure job aid
Field
Description
Server Address
The IP Address or Fully Qualified Domain Name (FQDN) of
the Avaya 3100 Mobile Communicator Gateway Server.
Login Name
The user's account user name on the network.
Login Password
The user's login password on the network.
Mobile Phone Number
The user device telephone number on the network.
Important:
Not all devices can autoconfigure this field. Instruct the
user to check their mobile phone number in the client
configuration screen.
Filtering users
Filter users to view a specific list of users.
Prerequisites
You must be logged in to the Avaya 3100 Mobile Communicator Web Administration Console
as administrator. For more information on logging in as an administrator, see Logging on to
the Avaya 3100 Mobile Communicator Web Administration Console as an administrator on
page 16.
1. Select the User Info tab.
2. In the Filter dialog box, type the search parameters by which you want to filter.
3. Click Filter.
A list of the users that match the search parameters displays.
You can also sort the list by clicking on the User Info page field headings.
Logging off users
Use the Avaya 3100 Mobile Communicator Web Administration Console to log off one or more
users from the system. For example, if a user loses a mobile device, you can log the user off
62
Administration and Security
October 2010
Removing users
and reconfigure the username and password on the Enterprise Communication Server (ECS).
The user can log on again using a new mobile device.
If the user's password is reset on the ECS, you must manually log the user off the Avaya 3100
Mobile Communicator Gateway before the user can log in again with the new password.
Prerequisites
You must be logged in to the Avaya 3100 Mobile Communicator Web Administration Console
as administrator. For more information on logging in as an administrator, see Logging on to
the Avaya 3100 Mobile Communicator Web Administration Console as an administrator on
page 16.
1. Click the User Info tab.
2. On the User Info page, select the check box next to the users that you want to log off.
3. Click Logout.
The system logs off the selected users and changes their status to inactive.
Removing users
Use this procedure to remove one or more users and deallocate their licenses.
Prerequisites
You must be logged in to the Avaya 3100 Mobile Communicator Web Administration Console
as administrator. For more information on logging in as an administrator, see Logging on to
the Avaya 3100 Mobile Communicator Web Administration Console as an administrator on
page 16.
1. Click the User Info tab.
2. On the User Info page, select the check box next to the users that you want to
remove.
3. Click Logout.
Important:
You must log out users before removing them from the system.
4. Click Remove.
The system removes the selected users and their licenses are de-allocated.
Administration and Security
October 2010
63
User administration
Clearing a user message
You can clear user messages if the user's queue exceeds normal levels due because of spam
received while the user was logged off. You can clear the message queue for one user or
multiple users.
Prerequisites
You must be logged in to the Avaya 3100 Mobile Communicator Web Administration Console
as administrator. For more information on logging in as an administrator, see Logging on to
the Avaya 3100 Mobile Communicator Web Administration Console as an administrator on
page 16.
1. Click the User Info tab.
2. On the User Info page, type the filter parameter in the Filter box.
3. Click Filter.
4. Select check box for one user, multiple users, or all users.
5. Click Clear Messages.
The message queue is cleared for the selected users.
Checking user status
Check user status to see the status of all registered users.
In the User window, a single record displays for each user. If a user has multiple devices (for
example, desktop phone, desktop client, mobile client), the record applies to the last device to
log on.
Users can only be logged on to one Avaya 3100 Mobile Communicator server at a time.
Important:
Reset the system to restore the server statistics to null values.
Prerequisites
You must be logged in to the Avaya 3100 Mobile Communicator Web Administration Console
as administrator. For more information on logging in as an administrator, see Logging on to
64
Administration and Security
October 2010
Procedure job aid
the Avaya 3100 Mobile Communicator Web Administration Console as an administrator on
page 16.
1. Click the User Info tab.
The User Info page appears with the users currently registered to the Avaya 3100
Mobile Communicator Gateway.
2. Click Advanced View to view all fields.
OR
Click Default View to view a subset of all fields.
3. To sort the list, click on the field headings.
4. Monitor the status of the users.
Procedure job aid
Use the following table to understand the user status fields.
Field
Description
User ID
The user ID configured on the Enterprise Call Server (ECS).
User Name
The User Name configured on the ECS.
Extension
The User Extension configured on the ECS.
Gateway
The IP address or the host name of the Avaya 3100 Mobile
Communicator Gateway server that the user is registered to. In
a redundant system, all users are logged into the active unit.
Status
Indicates the current status of the user.
• Active: The client is logged in (connected).
• In Call (Mobile): The client is active and in a cellular call.
• In Call (WiFi): The client is active and in a WiFi call.
• Inactive: Indicates one of the following reasons:
- The client has been logged out by the user.
- The client has been logged out by the administrator.
- The client has been logged out by the server.
- The client has been closed by the user (exited).
- The client is connecting.
Administration and Security
October 2010
65
User administration
Field
Description
- The client is disconnecting.
• Out of Coverage: The client cannot communicate with the
server.
The Status field updates in real time.
Permission
Indicates the license type assigned to the user.
Mobile Number
The mobile phone number configured on the user's mobile
device.
Queued Messages
The number of messages queued on the server for delivery to a
client device or application.
Last Status Change
The date and time that the user's status last changed.
Device Make
The brand of the user's mobile device (for example, RIM, Nokia,
Windows Mobile 5, Windows Mobile 6).
Device Model
The model of the user's mobile device (for example, Nokia E60,
8703e or Nokia E61).
Device ID
The device ID can be used to keep track of the device in
Microsoft Exchange, Lotus Notes, and the Research in Motion
(RIM) BlackBerry Enterprise Server (BES).
• Windows Mobile devices: 16-byte identifier for the device that
consists of two parts:
- platform ID (hardware type)
- preset ID (unique value)
• BlackBerry devices: RIM-assigned Personal Identification
Number (PIN) for the device.
Software Version
The version number of the Avaya 3100 Mobile Communicator
- Client software loaded on the user's mobile device.
Session ID
A randomly generated number that identifies the
communication session. The session ID tracks related
sessions in the session log.
Checking user statistics
Check the user statistics for calls, buddies, features, and connections.
Prerequisites
You must be logged in to the Avaya 3100 Mobile Communicator Web Administration Console
as administrator. For more information on logging in as an administrator, see Logging on to
66
Administration and Security
October 2010
Procedure job aid
the Avaya 3100 Mobile Communicator Web Administration Console as an administrator on
page 16.
1. Click the User Info tab.
2. On the User Info page, click the User ID of the user whose statistics you want to
check.
3. Check the User statistics.
4. To update the statistics snapshot, click Refresh.
OR
To automatically refresh the statistics every 5 seconds, select the check box.
Procedure job aid
Use the following table to understand user statistics fields.
Field
Description
Calling
Incoming call (IC) The total number of incoming calls for this user
Outgoing call
(OC)
The total number of outgoing calls for this user
Move call (MV)
The total number of calls that have moved between the user’s desktop
phone and the client application.
Swap call (SC)
The total number of swap call operations.
Transfer call (TC) The total number of call transfers.
Call cancel (CCL) The total number of cancelled calls.
Buddy List
Buddy group
renames (BGN)
The total number of buddy groups renamed.
Buddy group
adds (BGA)
The total number of buddy groups added.
Buddy group
removes (BGR)
The total number of buddy groups deleted.
Buddy adds
(BDA)
The total number of buddies added.
Administration and Security
October 2010
67
User administration
Field
Description
Buddy queries
(BDQ)
The total number of buddy queries.
Buddy removes
(BDR)
The total number of buddies deleted.
Features
Conference (CF)
The total number of conference calls.
Instant
The total number of instant conference calls.
Conference (GC)
Instant
messages sent
(IMS)
The total number of instant messages sent.
Instant
messages
received (IMR)
The total number of instant messages received.
Corporate
directory queries
(DRQ)
The total number of corporate directory searches for this user
Call screen set
(CSS)
The total number of call screens processed by this user. Calls are
screened when they are redirected to an alternate contact location or
call handling point, such as voice mail.
Presence
updates (PRU)
The total number of presence status updates.
Presence sets
(PRS)
The total number of presence status updates on the network.
Presence queries The total number of presence status queries.
(PRQ)
Connection
68
Login (LGI)
The total number of log ons for this user.
Logout (LGO)
The total number of log offs for this user.
Loss of Service
(LOS)
The number of times the user lost service.
Administration and Security
October 2010
Chapter 8: Audio prompt administration
This chapter provides information and procedures for audio prompt administration.
By default, the Avaya 3100 Mobile Communicator Gateway contains United States English language
prompts only. However, the Avaya 3100 Mobile Communicator Gateway supports audio prompts in
multiple languages. You configure the default language in the Gateway Settings. For more information,
see Avaya 3100 Mobile Communicator Deployment Guide, NN42030-301. To support other languages,
you must create and install additional language packs.
Warning:
When you upgrade or reinstall the Avaya 3100 Mobile Communicator Gateway software, you must
reinstall your language packs. Language packs are not backed up or restored when you backup and
restore the system database.
Each prompt is contained in a separate file, and prompts are grouped into modules by language. The
prompts are packaged into a zip file, and a tool on the Avaya 3100 Mobile Communicator Gateway installs
the package.
• Prompt requirements on page 69
• Creating a language pack on page 70
• Removing a language pack on page 83
Prompt requirements
New audio prompts must adhere to the following criteria.
• Prompt filenames must match the English filenames as described in Record the
prompts on page 78. The folder names must be as described in Packaging the prompt
files on page 80. Filenames and paths are case-sensitive.
• Prompts must be recorded according to the following specifications:
- file extension: wav
- Sample size: 16-bit (2 bytes)
- Sample encoding: signed (2s complement)
- Channels: 1
- Sample rate: 8000
- Audio format: PCM
Administration and Security
October 2010
69
Audio prompt administration
- Endian: little
• Prompts should start with a 100 to 250 millisecond silence before the voice starts, to
ensure that the prompt is not clipped on playback.
• Prompts must be recorded at an appropriate volume. The system does not attenuate or
amplify the audio.
Creating a language pack
Use this task to create and install a language pack.
Creating a language pack task flow
70
Administration and Security
October 2010
Creating a language pack task flow navigation
Creating a language pack task flow navigation
• Preparing prompt translations on page 71
• Record the prompts on page 78
• Preparing the file structure on page 78
• Packaging the prompt files on page 80
• Testing the language pack on page 80
• Installing the language packs on page 81
• Configuring the language on the Avaya 3100 Mobile Communicator Gateway on
page 82
Preparing prompt translations
Use this procedure to prepare for the new prompts.
1. Determine the two character language code and two character locale code for the
new language according to the International Standards Organization (ISO)
standards. Record the codes in Language and locale code job aid on page 72.
Examples:
• en_US (for US English)
• pt_BR (for Brazil Portuguese)
• pt_PT (for Portugal Portuguese)
Use the following references to obtain the ISO standards:
• http://www.iso.org/iso/country_codes/iso_3166_code_lists/
english_country_names_and_code_elements.htm
• http://www.iso.org/iso/iso_catalogue/catalogue_ics/catalogue_detail_ics.htm,
and then select By ICS, 01, 01.140, 01.140.20, ISO 639-1:2002.
2. Translate all the phrases in the target language, using Prompt localization job aid on
page 72.
Administration and Security
October 2010
71
Audio prompt administration
Language and locale code job aid
Use the following table to record the language code and local code.
Code name
Requirements
Codes to be used
language_code
two characters, lowercase
local_code
two characters, uppercase
Prompt localization job aid
Photocopy and fill in the following table with your localized prompts. Only the spoken prompts
are contained in this table. Tones do not require localization.
Each module contains a number of prompt files. You need the module information when
preparing the file structure.
Module
72
Notes
Filename
Phrase
ANNOUNCEME
NT
waitConnect Please hold, while
ing.wav
your call is being
connected
ANNOUNCEME
NT
presspound. Please press the #
wav
key to accept your
enterprise call
GROUPCALL
allmuted.wa
v
All others have
been muted.
GROUPCALL
allunmuted.
wav
All others have
been unmuted.
GROUPCALL
confirm.wav
Press '1' to confirm,
or '#' to cancel.
GROUPCALL
confonhold.
wav
… of them are away
from the phone.
GROUPCALL
confonhold1
.wav
… however, one of
them is away from
the phone.
GROUPCALL
deniedfull.w
av
You could not be
connected. There
are no free
Administration and Security
Localized phrase
October 2010
Prompt localization job aid
Module
Notes
Filename
Phrase
Localized phrase
conference lines
available.
GROUPCALL
deniedlocke
d.wav
You could not be
connected. The
conference you
tried to join is not
accepting
additional
participants.
GROUPCALL
however.wa
v
… however, …
GROUPCALL
invalidbridge That is not a valid
.wav
bridge number.
GROUPCALL
invalidconfo
ption.wav
That is not a valid
option.
GROUPCALL
invite2.wav
You are being
asked to join …
GROUPCALL
newnumber.
wav
Enter the number or
extension of the
person you want to
join, followed by '#'.
GROUPCALL
nowmuted.w You are now muted.
av
GROUPCALL
nowmutedot
her.wav
You have been
muted.
GROUPCALL
nowunmute
d.wav
You are now
unmuted.
GROUPCALL
nowunmute
dother.wav
You have been
unmuted.
GROUPCALL
onlyparticipa You are the only
nt.wav
participant in this
conference.
GROUPCALL
optiondialou
t.wav
GROUPCALL
optionlock.w Press '7' to close
av
this conference to
additional
participants.
GROUPCALL
optionmuteo Press '5' to mute all
thers.wav
other participants.
Administration and Security
Press '3' to add a
participant to this
conference.
October 2010
73
Audio prompt administration
Module
Filename
Phrase
GROUPCALL
optionmutes
elf.wav
GROUPCALL
optionreport. Press '8' to report
wav
the number of
participants.
GROUPCALL
optionreturn. Press '9' to exit
wav
conference options.
GROUPCALL
optiontermin Press '1' to end this
ate.wav
conference.
GROUPCALL
optiontitle.w
av
GROUPCALL
optiontitlerer To re-record your
ecord.wav
title, press '2'.
GROUPCALL
optionunlock Press '7' to re-open
7.wav
this conference to
additional
participants.
GROUPCALL
optionunmut Press '5' to unmute
eothers.wav all other
participants.
GROUPCALL
optionunmut Press '6' to unmute
eself.wav
yourself.
GROUPCALL
74
Notes
locale ‘ar’
only
Press '6' to mute
yourself.
To listen to your
title, press '1'.
participant.w … participant
av
GROUPCALL
participants.
wav
… participants.
GROUPCALL
poundtojoin.
wav
Or, to start the
conference, press
'#'.
GROUPCALL
readytojoin.
wav
Press '#' when you
are ready to join this
conference.
GROUPCALL
retitleprompt At the sound of the
.wav
tone, please record
a title. When you
are finished, press
'#' for more options.
GROUPCALL
terminatewa
rning.wav
Administration and Security
Localized phrase
This will disconnect
all conference
participants.
October 2010
Prompt localization job aid
Module
Notes
GROUPCALL
Filename
Phrase
thereare.wa
v
Including yourself,
there are …
MEDIA
numbers 0
to 9
0.wav
zero
MEDIA
numbers 0
to 9
1.wav
one
MEDIA
numbers 0
to 9
2.wav
two
MEDIA
numbers 0
to 9 locale
‘zh’ only
2_zh.wav
Word indicating 2
people
MEDIA
numbers 0
to 9
3.wav
three
MEDIA
numbers 0
to 9
4.wav
four
MEDIA
numbers 0
to 9
5.wav
five
MEDIA
numbers 0
to 9
6.wav
six
MEDIA
numbers 0
to 9
7.wav
seven
MEDIA
numbers 0
to 9
8.wav
eight
MEDIA
numbers 0
to 9
9.wav
nine
MEDIA
numbers 0 00.wav
to 9 with “0”
prefix
oh oh
MEDIA
numbers 0 01.wav
to 9 with “0”
prefix
oh one
MEDIA
numbers 0 02.wav
to 9 with “0”
prefix
oh two
MEDIA
numbers 0 03.wav
to 9 with “0”
prefix
oh three
MEDIA
numbers 0 04.wav
to 9 with “0”
prefix
oh four
Administration and Security
Localized phrase
October 2010
75
Audio prompt administration
Module
76
Notes
Filename
Phrase
MEDIA
numbers 0 05.wav
to 9 with “0”
prefix
oh five
MEDIA
numbers 0 06.wav
to 9 with “0”
prefix
oh six
MEDIA
numbers 0 07.wav
to 9 with “0”
prefix
oh seven
MEDIA
numbers 0 08.wav
to 9 with “0”
prefix
oh eight
MEDIA
numbers 0 09.wav
to 9 with “0”
prefix
oh nine
MEDIA
numbers
10.wav
10 and
above (see
note
below)
ten
MEDIA
numbers
11.wav
10 and
above (see
note
below)
eleven
MEDIA
numbers
12.wav
10 and
above (see
note
below)
twelve
MEDIA
numbers
13.wav
10 and
above (see
note
below)
thirteen
MEDIA
numbers
14.wav
10 and
above (see
note
below)
fourteen
MEDIA
numbers
15.wav
10 and
above (see
fifteen
Administration and Security
Localized phrase
October 2010
Prompt localization job aid
Module
Notes
Filename
Phrase
Localized phrase
note
below)
MEDIA
numbers
16.wav
10 and
above (see
note
below)
MEDIA
numbers
(and so on)
10 and
above (see
note
below)
MEDIA
numbers
99.wav
10 and
above (see
note
below)
ninety nine
MEDIA
numbers
100.wav
10 and
above (see
note
below)
one hundred
MEDIA
numbers
200.wav
10 and
above (see
note
below)
two hundred
MEDIA
numbers
(and so on)
10 and
above (see
note
below)
MEDIA
numbers
900.wav
10 and
above (see
note
below)
nine hundred
MEDIA
numbers
1000.wav
10 and
above (see
note
below)
one thousand
MEDIA
numbers
10 and
two thousand
Administration and Security
2000.wav
sixteen
October 2010
77
Audio prompt administration
Module
Notes
Filename
Phrase
Localized phrase
above (see
note
below)
MEDIA
numbers
(and so on)
10 and
above (see
note
below)
MEDIA
numbers
9000.wav
10 and
above (see
note
below)
nine thousand
MEDIA
other
and.wav
and
MEDIA
other
goodbye.wa
v
goodbye
MEDIA
other
hundred.wa
v
hundred
MEDIA
other
hundreds.w
av
hundreds
MEDIA
other
oh.wav
oh
Note: These number phrases are optional. Typically, conferences have fewer than nine
participants. Provide enough phrases to meet your system requirements and capacity.
Record the prompts
Record each prompt, as listed in Prompt localization job aid on page 72. The prompts must
conform to the specifications in Prompt requirements on page 69.
Avaya does not recommend any particular prompt recording software.
For the steps required to record and create the prompt files, see your prompt recording
software documentation.
Preparing the file structure
Use this procedure to create and populate the language prompt file structure.
78
Administration and Security
October 2010
Preparing the file structure
Prerequisites
• You need the information in Language and locale code job aid on page 72.
• You need the individual prompt files, as created in Record the prompts on page 78.
1. Create a folder named prompts
2. Within the prompts folder, create the following subfolders:
• ANNOUNCEMENT
• GROUPCALL
• MEDIA
3. Within each of these folders, create the subfolder <language>_<locale>.
In the following example, the structure uses the languages Canadian French (fr_CA)
and Netherlands Dutch (nl_NL).
Figure 4: Example of a language file structure
4. Copy each prompt file to the appropriate module folder and language subfolder.
For example, place the file presspound.wav record in Canadian French in the folder
prompts/ANNOUNCEMENT/fr_CA.
5. Check that you have all the localized prompt files in the prompt folder structure.
Variable definitions
Variable
Value
<language>
The two-character, lowercase, language
code.
<locale>
The two-character, uppercase, locale.
Administration and Security
October 2010
79
Audio prompt administration
Packaging the prompt files
The prompt files must be packaged into a zip file to deploy the files. The installation process
requires the specific folder structure.
Prerequisites
• You need an archive tool such as WinZip, 7-Zip, or zip (the UNIX command line tool).
• You must have the file structure prepared, as described in Preparing the file structure on
page 78.
Use your selected archive tool to create a zip file, containing the prompts folder, and
all subfolders and files.
Name your zip file according to the languages contained in the prompts folder.
Testing the language pack
Use this procedure to test the language pack before you install the pack on the Avaya 3100
Mobile Communicator Gateway.
Prerequisites
• You must be logged into the server as nortel. For more information, see Accessing the
server command line as nortel on page 115.
• You must have the zip file created in Preparing the file structure on page 78.
1. Copy <zipfilename>.zip file to /home/nortel.
2. Enter the following command:
su If prompted, enter the root password.
3. Enter the following command:
/opt/MobilityGateway/etc/langpack.sh --test /home/nortel/
<zipfilename>.zip
If the zip file has the correct structure, the langpack.sh tool returns a message that
the tests have passed.
80
Administration and Security
October 2010
Installing the language packs
If the langpack.sh tool encounters a problem, it returns a message describing the
problem. Correct the error, recreate the zip file, and retest the language pack.
Important:
After the zip file is error-free, back up the zip file to another server or other media
for long-term storage. Language files are not retained during upgrades or
reinstallations, so you may need the language files at a later date.
Variable definitions
Variable
<zipfilename>
Value
The name of the zip file.
Installing the language packs
Use this procedure to install a language pack on the Avaya 3100 Mobile Communicator
Gateway using the tool langpack.sh.
Warning:
The langpack.sh tool used in this procedure halts the running Avaya 3100 Mobile
Communicator Gateway. Schedule this procedure for an off-peak period to decrease user
impact.
The langpack.sh tool performs analysis on the zip file contents before stopping the Avaya 3100
Mobile Communicator Gateway, installing the valid language structure, and making some
required configuration changes.
Important:
Retain the zip file in a secondary storage device, in case you need to remove or reinstall the
language package.
Prerequisites
• You must be logged into the server as nortel. For more information, see Accessing the
server command line as nortel on page 115.
• You must have tested the zip file, as described in Testing the language pack on page
80.
Administration and Security
October 2010
81
Audio prompt administration
1. If not already installed on the server, copy the tested zip file, <zipfilename>.zip, to /
home/nortel.
2. Stop the Avaya 3100 Mobile Communicator Gateway:
appstart stop
3. Enter the following command:
su If prompted, enter the root password.
4. Enter the following command:
/opt/MobilityGateway/etc/langpack.sh --install /home/nortel/
<zipfilename>.zip
5. Respond to the prompts that the langpack.sh tool outputs.
6. Enter the following command:
exit
7. Enter the following command:
appstart start
If prompted, enter the root password.
8. Repeat steps 1 to 7 for all servers in the system.
Warning:
Failure to install language packs on all servers leads to inconsistent behavior.
Variable definitions
Variable
<zipfilename>
Value
The name of the zip file.
Configuring the language on the Avaya 3100 Mobile
Communicator Gateway
Use this procedure to configure a new default locale (language) for the Avaya 3100 Mobile
Communicator Gateway.
82
Administration and Security
October 2010
Removing a language pack
Warning:
If you configure a new default locale, and then later remove the language pack, the Avaya
3100 Mobile Communicator Gateway uses the system-default locale (en_US).
Prerequisites
You must be logged into the Avaya 3100 Mobile Communicator Web Administration Console
as administrator. For more information, see Logging on to the Avaya 3100 Mobile
Communicator Web Administration Console as an administrator on page 16.
1. Click the System Configuration tab.
2. Select Gateway Actions, Configure Gateway.
3. In redundant configurations, select the gateway.
4. Click Edit.
5. In the Media Server Default Locale field, select the desired default local.
6. Click Save.
Removing a language pack
Use this procedure to remove a language pack from the Avaya 3100 Mobile Communicator
Gateway.
Warning:
To perform this procedure, you must stop and start the Avaya 3100 Mobile Communicator
Gateway. Schedule this procedure for an off-peak period to decrease user impact.
Important:
Do not attempt to remove the default en_US language pack.
Prerequisites
• You must be logged into the server as nortel. For more information, see Accessing the
server command line as nortel on page 115.
• You must have the zip file for the language pack to be removed.
1. If not already installed on the server, copy the tested zip file, <zipfilename>.zip, to /
home/nortel.
2. Enter the following command
Administration and Security
October 2010
83
Audio prompt administration
appstart stop
3. Enter the following command:
su If prompted, enter the root password.
4. Enter the following command:
/opt/MobilityGateway/etc/langpack.sh --remove /home/nortel/
<zipfilename>.zip
5. Respond to the prompts that the langpack.sh tool outputs.
6. Enter the following command:
exit
7. Enter the following command:
appstart start
If prompted, enter the root password.
8. Repeat steps 1 to 7 for all servers in the system.
Warning:
Failure to remove language packs on all servers leads to inconsistent behavior.
Variable definitions
Variable
<zipfilename>
84
Administration and Security
Value
The name of the zip file.
October 2010
Chapter 10: Security
The following chapters provide security information and describe security procedures for the Avaya 3100
Mobile Communicator.
Navigation
• Server certificate management on page 87
• Client certificate management on page 99
• Server certificate administration on page 103
Administration and Security
October 2010
85
Security
86
Administration and Security
October 2010
Chapter 10: Server certificate management
This chapter describes the procedures that you use to manage server certificates. You implement a
certificate infrastructure to encrypt the following traffic:
• Signaling traffic exchanged between the client devices and the Avaya 3100 Mobile Communicator
Gateway. This type of traffic includes caller ID information, call setup commands, instant messaging,
and corporate directory search requests and results. BlackBerry clients do not require certificates if
deployed using the BlackBerry Enterprise Server (BES). The BES protects the data channel.
• Service management traffic exchanged between PC-based Web Administration Console clients and
the Avaya 3100 Mobile Communicator Gateway administration server. This type of traffic includes
log in requests and configuration updates.
Avaya 3100 Mobile Communicator supports
• Certificate Authority (CA) signed certificates—A certificate authority (CA) acts as a trusted thirdparty that issues and validates the certificates. You can employ a commercial CA, such as VeriSign or
CACert, or build your own using tools such as those provided with Microsoft Exchange Server.
• Self-signed certificates—As an alternative to using a CA, you can generate your own certificates on
the Avaya 3100 Mobile Communicator Gateway. Avaya recommends that self-signed certificates be
used only for test purposes.
You implement the certificates on the Avaya 3100 Mobile Communicator Gateway server and Avaya
3100 Mobile Communicator Gateway Administration server.
The Avaya 3100 Mobile Communicator Gateway installation provides default, self-signed certificates, to
enable security immediately. However, self-signed certificates do not provide the same level of security
as CA-signed certificates. Self-signed certificates should be used only for test or demonstration purposes.
For information on generating self-signed certificates, see Generating a self-signed certificate for Avaya
3100 Mobile Communicator Gateway Server on page 104.
Important:
On redundant systems, you must generate CSRs and obtain CA-signed certificates for both servers.
You must obtain the CA root certificate in two formats:
• PEM format for installation on the Avaya 3100 Mobile Communicator Gateway Administration Server,
client PCs, and Windows Mobile 6 devices.
• DER format for installation on the Avaya 3100 Mobile Communicator Gateway server, Windows
Mobile 5 devices, Nokia devices, and RIM BlackBerry devices.
To obtain the CA root or intermediate certificate, use the certificate management tool provided by the CA.
Administration and Security
October 2010
87
Server certificate management
Important:
In some cases the root certificates for some well-known CAs (such as VeriSign and Entrust) are preinstalled on the server and many client devices. Do not download root certificates that you already have.
In some cases the CA provides an intermediate certificate instead of, or in addition to, the root certificate.
Read all instructions provided by the CA carefully. Follow the same procedure to download an
intermediate certificate, as for the root certificate.
Server certificate management task flow
The following flowchart depicts the procedures you perform to manage server certificates.
Figure 5: Server certificate management task flow
88
Administration and Security
October 2010
Enrolling with a CA
Result
Server certificate management procedures
• Enrolling with a CA on page 89
• Generating a CSR for Avaya 3100 Mobile Communicator Gateway Server on page
90
• Generating a CSR for Avaya 3100 Mobile Communicator Gateway Administration
Server on page 91
• Obtaining a signed certificate on page 93
• Obtaining the CA signed SSL/TLS certificate for Avaya 3100 Mobile Communicator
Gateway Server on page 94
• Obtaining the CA-signed certificate for the Avaya 3100 Mobile Communicator Gateway
Administration Server on page 94
• Installing the root and signed certificates on the Avaya 3100 Mobile Communicator
Gateway Server on page 95
• Installing the root and signed certificates on the Administration Server on page 96
• Copying single server keystore on page 97
Enrolling with a CA
To get a CA-signed certificate, you enroll with a commercial Certificate Authority.
1. Select a commercial CA.
2. Enroll with the CA, providing information about the person who will use or maintain
the certificates in your organization (your certificate administrator).
Most CAs require the following information (at minimum):
• Contact first and last name—the name of the certificate administrator
• Contact email—the email address of the certificate administrator. Avaya
recommends that you use an email alias (for example,
[email protected]).
• Other information requested by the CA.
Administration and Security
October 2010
89
Server certificate management
Generating a CSR for Avaya 3100 Mobile Communicator
Gateway Server
Generate a Certificate Signing Request (CSR) for the Avaya 3100 Mobile Communicator
Gateway Server.
Prerequisites
• You must be logged into the Web Administration Console as administrator. For more
information, see Logging on to the Avaya 3100 Mobile Communicator Web Administration
Console as an administrator on page 16.
• You must be logged into the server as superuser. For more information, see Accessing
the server command line as superuser on page 115.
1. Change to the certificate keystore directory.
cd /opt/mobilitygw-2.1/server/default/data
2. Delete the default Avaya 3100 Mobile Communicator Gateway Server keystore.
rm ssl-keystore
If the keystore does not exist, you see the message rm: cannot Istat 'sslkeystore': No such file or directory
3. Generate the Avaya 3100 Mobile Communicator Gateway Server keystore and
private key.
/usr/java/jdk1.6.0_03/bin/keytool -genkey -validity
<valDays> -alias smog-ssl -keyalg RSA -keystore ssl-keystore
4. When prompted, enter the Avaya 3100 Mobile Communicator Gateway Server
keystore password. You should choose a strong password.
5. When prompted for a first and last name, enter the Common Name for the Avaya
3100 Mobile Communicator Gateway Server.
Use a fully qualified domain name (FQDN), for example, mg.domain.com.
Important:
The same FQDN must be entered on all mobile clients that employ Secure Socket
Layer/Transport Layer Security (SSL/TLS).
6. If required by your CA, enter the optional information (for example, organization or
city) when prompted.
7. When prompted to enter the key password for SMOG-SSL, press Enter to use the
keystore password specified in step 4 on page 90.
90
Administration and Security
October 2010
Job aid
8. Change ownership of the Avaya 3100 Mobile Communicator Gateway Server
keystore from root to mobility with the following two commands:
chown mobility:mobility ssl-keystore
chmod 755 ssl-keystore
9. Generate the certificate signing request for the Avaya 3100 Mobile Communicator
Gateway Server.
/usr/java/jdk1.6.0_03/bin/keytool -certreq -keyalg RSA alias smog-ssl -file mgcertreq.csr -keystore ssl-keystore
10. In the Web Administration Console, select the System Configuration tab.
11. Select Gateway Actions > Configure Gateway > Edit.
The Gateway Configuration window appears.
12. In the HTTPS certificate password box, type the password from step 4 on
page 90.
Job aid
Use the following table to understand the parameters.
Parameter
<valDays>
Description
The number of days that the certificate is valid.
Range: 0 to 3600
Generating a CSR for Avaya 3100 Mobile Communicator
Gateway Administration Server
Generate a Certificate Signing Request (CSR) for the Avaya 3100 Mobile Communicator
Gateway Administration Server.
Prerequisites
• You must be logged into the Web Administration Console as administrator. For more
information, see Logging on to the Avaya 3100 Mobile Communicator Web Administration
Console as an administrator on page 16.
• You must be logged into the server as superuser. For more information, see Accessing
the server command line as superuser on page 115.
Administration and Security
October 2010
91
Server certificate management
1. Change to the certificate keystore directory. cd /opt/mobilitygw-2.1/
server/default/data
2. Delete the default Avaya 3100 Mobile Communicator Administration Server
keystore.
rm admin-ssl-keystore
If the keystore does not exist, you see the message rm: cannot Istat 'sslkeystore': No such file directory
3. Generate the Avaya 3100 Mobile Communicator Administration Server keystore
and private key.
/usr/java/jdk1.6.0_03/bin/keytool -genkey -validity
<valDays> -alias smog-ssl -keyalg RSA -keystore ssl-keystore
4. When prompted, enter the Avaya 3100 Mobile Communicator Administration Server
keystore password. You should choose a strong password.
5. When prompted for a first and last name, enter the Common Name for the Avaya
3100 Mobile Communicator Administration Server. Use a fully qualified domain
name (FQDN), for example, mg.domain.com.
Important:
The same FQDN must be entered on all mobile clients that employ SSL/TLS.
6. If required by your CA, enter the optional information (for example, organization or
city) when prompted.
7. When prompted to enter the key password for SMOG-SSL, press Return to use
the keystore password specified in 4 on page 92.
8. Change ownership of the Avaya 3100 Mobile Communicator Administration Server
keystore from root to mobility with the following two commands:
chown mobility:mobility admin-ssl-keystore
chmod 755 admin-ssl-keystore
9. Generate the certificate signing request for the Avaya 3100 Mobile Communicator
Administration Server.
/usr/java/jdk1.6.0_03/bin/keytool -certreq -keyalg RSA alias smog-ssl -file mgcertreq.csr -keystore admin-sslkeystore
10. Update the HTTPS certificate password for the Avaya 3100 Mobile Communicator
Administration Server with the password specified in 4 on page 92 using the
following command:
92
Administration and Security
October 2010
Obtaining a signed certificate
/usr/java/jdk1.6.0_03/bin/java -cp ../lib/jbosssx.jar
org.jboss.security.plugins.FilePassword mobility 13
<password> keystore.password
Variable definitions
Variable
Definition
<password>
The new password for the keystore
Default: mobility
<valDays>
The number of days that the certificate is
valid.
Range: 0 to 3600
Obtaining a signed certificate
Obtain your signed certificates from the Certificate Authority (CA) and save them in an
accessible location.
Some CA root certificates may be preinstalled on your system or devices, and these
preinstalled certificates do not need to be reinstalled. Also, some CAs provide intermediate
certificates instead of root certificates. This procedure handles intermediate certificates and
root certificates.
1. Use the certificate management tools provided by your CA to access the prompt or
Web page where you can request certificates.
2. If prompted to specify a server type, select Apache.
3. Open the CSR file (mgcertreq.csr or admincertreq.csr).
4. Paste the contents into the prompt or Web page.
5. Request your signed SSL/TLS certificate.
The CA generates your signed SSL/TLS certificate and E-mails it to your enterprise
certificate administrator.
6. Save the SSL/TLS certificate to a location that is accessible from the server.
7. Distribute the certificate to clients. For instructions on how to install certificates on
PC-based clients, consult the documentation provided with your web browser. For
Administration and Security
October 2010
93
Server certificate management
instructions on installing certificates on mobile clients, see Client certificate
management on page 99.
Obtaining the CA signed SSL/TLS certificate for Avaya 3100
Mobile Communicator Gateway Server
Obtain your signed SSL/TLS certificates from the CA, and save them in an accessible location.
1. Use the certificate management tools provided by your CA to access the prompt or
Web page where you can request certificates.
2. If prompted to specify a server type, select Apache.
3. Open the CSR file (mgcertreq.csr).
4. Paste the contents into the prompt or Web page.
5. Request your signed SSL/TLS certificate.
The CA generates your signed SSL/TLS certificate and E-mails it to your enterprise
certificate administrator.
6. Save the SSL/TLS certificate to a location that is accessible from the server.
Obtaining the CA-signed certificate for the Avaya 3100
Mobile Communicator Gateway Administration Server
Obtain your signed SSL/TLS certificates from the CA, and save them in an accessible location.
Important:
If the Avaya 3100 Mobile Communicator Gateway Server and Avaya 3100 Mobile
Communicator Gateway Administration Server are on the same machine, you can skip this
procedure.
1. Use the certificate management tools provided by your CA to access the prompt or
Web page where you can request certificates.
2. If prompted to specify a server type, select Apache.
3. Open the CSR file (admincertreq.csr).
94
Administration and Security
October 2010
Installing the root and signed certificates on the Avaya 3100 Mobile Communicator Gateway Server
4. Paste the contents into the prompt or Web page.
5. Request your signed SSL/TLS certificate.
The CA generates your signed SSL/TLS certificate and e-mail it to your enterprise
certificate administrator.
6. Save the SSL/TLS certificate to a location that is accessible from the server.
Installing the root and signed certificates on the Avaya 3100
Mobile Communicator Gateway Server
Install the root and signed certificates onto the Avaya 3100 Mobile Communicator Gateway
Administration Server.
Prerequisites
• You must be logged into the server as superuser. For more information, see Accessing
the server command line as superuser on page 115.
• The root and signed certificates must be saved in a location that is accessible from the
Avaya 3100 Mobile Communicator Gateway server.
1. To change to the certificate keystore directory, enter:
cd /opt/mobilitygw-2.1/server/default/data
2. To import the CA root or intermediate certificate to the Avaya 3100 Mobile
Communicator Gateway Server, enter:
/usr/java/jdk1.6.0_03/bin/keytool -import -trustcacerts keystore ssl-keystore -alias root -file <path-root_cert_file>
3. To import your signed TLS certificate for the Avaya 3100 Mobile Communicator
Gateway Server, enter: /usr/java/jdk1.6.0_03/bin/keytool -import keystore ssl-keystore -alias smog-ssl -file <pathsigned_mgcert_file>
Variable definitions
Variable
<path-root_cert_file>
Administration and Security
Definition
The full name of the root certificate file,
including the path
October 2010
95
Server certificate management
Variable
<path-signed_mgcert_file>
Definition
The full name of the Avaya 3100 Mobile
Communicator Gateway TLS certificate,
including the path
Installing the root and signed certificates on the
Administration Server
Install the root and signed certificates onto the Avaya 3100 Mobile Communicator Gateway
Administration Server.
Prerequisites
• You must be logged into the server as superuser. For more information, see Accessing
the server command line as superuser on page 115.
• The root and signed certificates must be saved in a location that is accessible from the
Avaya 3100 Mobile Communicator Gateway server.
1. To change to the certificate keystore directory, enter:
cd /opt/mobilitygw-2.1/server/default/data
2. To import the CA root or intermediate certificate to the Avaya 3100 Mobile
Communicator Gateway Administration Server, enter:
/usr/java/jdk1.6.0_03/bin/keytool -import -trustcacerts keystore admin-ssl-keystore -alias root -file <pathroot_cert_file>
3. To import your signed TLS certificate for the Avaya 3100 Mobile Communicator
Administration Server, enter:
/usr/java/jdk1.6.0_03/bin/keytool -import -keystore adminssl-keystore -alias smog-ssl -file <pathsigned_admincert_file>
4. To restart the server, enter:
appstart restart
Important:
Do not use the Web Administration Console to restart the server.
5. Enter the root password when prompted.
96
Administration and Security
October 2010
Copying single server keystore
Important:
Make a backup copy of your keystore databases (ssl-keystore and admin-sslkeystore) as a precaution against overwriting, deleting, or corrupting the file.
Variable definitions
Variable
Definition
<path-root_cert_file>
The full name of the root certificate file,
including the path
<path-signed_admincert_file>
The full name of the Avaya 3100 Mobile
Communicator Gateway TLS certificate,
including the path
Copying single server keystore
To copy the Gateway Server keystore to the administration server for the single server.
Prerequisites
• You must be logged into the server as superuser. For more information, see Accessing
the server command line as superuser on page 115.
• The root and signed certificates must be saved in a location that is accessible from the
Avaya 3100 Mobile Communicator Gateway server.
1. Change to the certificate keystore directory: cd /opt/mobilitygw2.1/
server/default/data
2. Enter the following command: cp ssl-keystore admin-ssl-keystore
Administration and Security
October 2010
97
Server certificate management
98
Administration and Security
October 2010
Chapter 11: Client certificate management
This chapter describes the procedures that you use to manage client certificates on the devices.
Typically, you E-mail the root certificate to your users, and they must install the certificates on their devices.
Root certificates have two formats—DER and PEM. Distribute the DER-formatted certificates to Windows
Mobile Version 5, Nokia and BlackBerry users. Distribute the PEM-formatted certificates to Windows
Mobile Version 6 users.
• Installing a root certificate on a Nokia device on page 99
• Installing a root certificate on a Windows Mobile device on page 100
• Installing a root certificate on a BlackBerry device in the non-BES configuration on page 101
Installing a root certificate on a Nokia device
Install a root certificate on a Nokia device to implement security and enable the user to engage
in secure communications sessions. This procedure can be used in the E-mail you send to the
users, as described in Client upgrade methods on page 49.
1. Download the certificate to your computer.
2. Connect the device to your computer with a USB cable.
3. On the computer, select Start, Programs, Nokia PC Suite, Nokia PC Suite.
4. Click File Manager.
5. Copy the root certificate file (.cer extension) to the Nokia Phone Browser, Nokiaxxx, Phone memory, Data, Documents directory.
6. On the device, press the Menu key.
7. Select Office, File mgr, Documents.
On some Nokia devices, you start by selecting Tools before selecting the rest of the
menu entries.
8. Select the certificate.
9. Select Options, Open.
The Save Certificate window appears, asking you to save or discard the certificate.
10. Select Save. You see a prompt warning that the certification might be unsecure.
11. Select Save. You see a prompt asking for a label for the certificate.
Administration and Security
October 2010
99
Client certificate management
12. Select OK.
13. When the Certificate Uses prompt appears, select the Internet check box.
The root certificate is installed in the device.
Installing a root certificate on a Windows Mobile device
Install a root certificate on a Windows Mobile device to implement security and enable the user
to engage in secure communications sessions. This procedure can be used in the E-mail you
send to the users, as described in Client upgrade methods on page 49.
1. Download the certificate to your computer.
2. Connect the mobile device to your computer with a USB cable.
3. On the computer, start ActiveSync, and then click Explore.
4. Copy the root certificate file (.cer extension) to the device.
5. On the device, locate the certificate using File Explorer and select it.
6. Windows Mobile Version 6 users see a message about the certificate. Select More
to read the remainder of the message.
7. Select Install to install the root certificate on your device.
Important:
If the CA’s root certificate is not installed, you should still be able to log in, although
you will receive a warning message that the client is using “Unknown Certificate
Authority.”
Variable definitions
Variable
100
Definition
<certificate name>
Name of the root certificate file.
<CA Name>
Name of the Certification Authority.
Administration and Security
October 2010
Installing a root certificate on a BlackBerry device in the non-BES configuration
Installing a root certificate on a BlackBerry device in the
non-BES configuration
Install a root certificate on a BlackBerry in the non-BES configuration to implement security
and enable the user to engage in secure communication sessions. This procedure can be used
in the E-mail you send to the users, as described in Client upgrade methods on page 49.
1. Download the certificate to your computer.
2. On the computer, right-click the root certificate.
3. Click Install certificate.
You receive the prompt Do you want to open this file?
4. Select Open.
The Certificate Import Wizard appears.
5. Click Next.
6. Click Place all certificates in the following store.
7. Click Browse.
8. Click Trusted Root Certification Authorities.
9. Click Next.
10. Click Finish.
11. In the Security Warning dialog box, click Yes.
The confirmation prompt appears.
12. Click OK.
13. Connect your BlackBerry to the BlackBerry Desktop Manager.
14. Double-click Certificate Synch.
Important:
If you do not have the certificate synchronization tool, reinstall the BlackBerry
Desktop Software using the custom installation option and install the certificate
synchronization tool, before doing this step.
15. On the Root Certificate tab, select the certificate to download.
16. Click Synchronize to load the certificate on the device.
Administration and Security
October 2010
101
Client certificate management
102
Administration and Security
October 2010
Chapter 12: Server certificate administration
This chapter describes the procedures that you use to administer server certificates.
• Changing the certificate keystore default password on page 103
• Generating a self-signed certificate for Avaya 3100 Mobile Communicator Gateway Server on
page 104
• Generating a self-signed certificate for Avaya 3100 Mobile Communicator Gateway Administration
Server on page 106
Changing the certificate keystore default password
Avaya 3100 Mobile Communicator applications use the information in the Gateway server
configuration (HTTPS certificate password field) to access the keystore used for clientserver communications (ssl-keystore). The password is only used within the Avaya 3100
Mobile Communicator Gateway.
The default password for the ssl-keystore is mobility. You can change the default sslkeystore password to increase security or if administrative access to the Avaya 3100 Mobile
Communicator Gateway is compromised.
Important:
Do not change the keystore password for administrative access (admin-ssl-keystore). This
keystore must always use the mobility password.
Prerequisites
• You must be logged into the server as superuser. For more information, see Accessing
the server command line as superuser on page 115.
• You must be logged in to the Avaya 3100 Mobile Communicator Web Administration
Console as administrator. For more information on logging in as an administrator, see
Logging on to the Avaya 3100 Mobile Communicator Web Administration Console as an
administrator on page 16.
1. At the command line, execute the following commands:
cd /opt/mobilitygw-2.1/server/default/data
/usr/java/jdk1.6.0_03/bin/keytool -storepasswd -new <newpw>
-storepass <oldpw> -keystore /opt/MobilityGateway/server/
default/data/ssl-keystore
Administration and Security
October 2010
103
Server certificate administration
/usr/java/jdk1.6.0_03/bin/keytool -keypasswd -alias smog-ssl
-keypass <oldpw> -new <newpw> -keystore ssl-keystore
2. At the prompt, enter <newpw> .
3. Change the keystore owner to mobility:
chown mobility:mobility ssl-keystore
4. On the Avaya 3100 Mobile Communicator Gateway Web Administration Console,
select System Configuration > Gateway Actions > Configure Gateway.
5. In the HTTPS certificate password field, enter <newpw>
6. Click Save.
7. To restart the service, access the command line and enter:
appstart restart
Important:
Do not use the Web Administration Console to restart the server.
8. Enter the root password when prompted.
Variable definitions
Variable
Definition
<oldpw>
Existing keystore password. Default: mobility
<newpw>
Your new chosen password.
Generating a self-signed certificate for Avaya 3100 Mobile
Communicator Gateway Server
Generate a self-signed certificate as an alternative to enrolling with a Certificate Authority. Selfsigned certificates do not provide the same level of security as CA-signed certificates and
should be used only for test or demonstration purposes. You must create certificates for the
Avaya 3100 Mobile Communicator Gateway Server and the Avaya 3100 Mobile Communicator
Gateway Administration Server.
After you complete this procedure, you need to distribute the client certificate as described in
Client certificate management on page 99.
104
Administration and Security
October 2010
Generating a self-signed certificate for Avaya 3100 Mobile Communicator Gateway Server
Prerequisites
• You must be logged into the server as superuser. For more information, see Accessing
the server command line as superuser on page 115.
• You must be logged in to the Avaya 3100 Mobile Communicator Web Administration
Console as administrator. For more information on logging in as an administrator, see
Logging on to the Avaya 3100 Mobile Communicator Web Administration Console as an
administrator on page 16.
1. Change to the certificate keystore directory for the Avaya 3100 Mobile
Communicator - Client system: cd /opt/mobilitygw-2.1/server/
default/data
2. Delete the Avaya 3100 Mobile Communicator Gateway server default keystore.
rm ssl-keystore
Important:
For extra security, you can back up the keystore before deleting it.
3. Generate the self-signed certificate keystore for the Avaya 3100 Mobile
Communicator Gateway server.
/usr/java/jdk1.6.0_03/bin/keytool -genkey -validity
<valDays> -keyalg RSA -keystore ssl-keystore -alias smog-ssl
-keypass <password> -storepass <password>
4. Respond to the prompts. For the common name (first and last name), enter a fully
qualified domain name (FQDN) such as mg.domain.com.
5. Change ownership of the Avaya 3100 Mobile Communicator Gateway server
keystore from root to mobility with the following command:
chown mobility:mobility ssl-keystore
chmod 755 ssl-keystore
6. Generate the client certificate (for installation on the client devices):
/usr/java/jdk1.6.0_03/bin/keytool -export -keystore sslkeystore -alias smog-ssl -file ssl-keystore.der -storepass
<password> -keypass <password>
7. To create the certificate for the Windows Mobile users, enter the following command:
cp ssl-keystore.der ssl-keystore.cer
8. On the Avaya 3100 Mobile Communicator Web Administration Console, select
System Configuration > Gateway Actions > Configure Gateway > Edit.
9. In the HTTPS certificate password field, enter <password>.
10. Click Save
11. Distribute the certificate to clients. For information about how to install certificates
on PC-based clients, consult the documentation provided with your web browser.
Administration and Security
October 2010
105
Server certificate administration
For information about how to install certificates on mobile clients see Client
certificate management on page 99.
Variable definitions
Variable
Definition
<password>
The password for the keystore.
<valDays>
The number of days that the certificate is valid.
Range: 0 to 3600
Generating a self-signed certificate for Avaya 3100 Mobile
Communicator Gateway Administration Server
Generate a self-signed certificate as an alternative to enrolling with a Certificate Authority. Selfsigned certificates do not provide the same level of security as CA-signed certificates and
should be used only for test or demonstration purposes.
Prerequisites
You must be logged into the server as superuser. For more information, see Accessing the
server command line as superuser on page 115.
1. At the command line for Avaya 3100 Mobile Communicator systems, change to the
certificate keystore directory:
cd /opt/mobilitygw-2.1/server/default/data
2. At the server command line, delete the Avaya 3100 Mobile Communicator Gateway
Administration Server default keystore.
rm admin-ssl-keystore
Important:
For extra security, you can back up the keystore before deleting it.
3. Generate the self-signed certificate keystore for the Avaya 3100 Mobile
Communicator Gateway Administration server.
/usr/java/jdk1.6.0_03/bin/keytool -genkey -validity
<valDays> -keyalg RSA -keystore admin-ssl-keystore -alias
smog-ssl -keypass <password> -storepass <password>
106
Administration and Security
October 2010
Generating a self-signed certificate for Avaya 3100 Mobile Communicator Gateway Administration Server
Important:
The admin-ssl-keystore password must always be mobility.
4. Respond to the prompts. For the common name (first and last name), enter a FQDN
such as mg.domain.com.
5. Change ownership of the Avaya 3100 Mobile Communicator Gateway
Administration keystore from root to mobility with the following command:
chown mobility:mobility admin-ssl-keystore
chmod 755 admin-ssl-keystore
6. Generate the client certificate for the Avaya 3100 Mobile Communicator Gateway
Administration server.
/usr/java/jdk1.6.0_03/bin/keytool -export -keystore adminssl-keystore -alias smog-ssl -file admin-ssl-keystore.der storepass <password> -keypass <password>
Important:
The admin-ssl-keystore password must always be mobility.
Important:
If the clients use the Over the air download mechanism exclusively, you do not
require the client certificate for the Administration server.
7. Use the password specified in step 3 on page 106 to program the HTTPS certificate
password for the Avaya 3100 Mobile Communicator Gateway Administration
Server.
/usr/java/jdk1.6.0_03/bin/java -cp ../lib/jbosssx.jar
org.jboss.security.plugins.FilePassword mobility 13
<password> keystore.password
8. Restart the server:
appstart restart
Important:
Do not use the Web Administration Console to restart the server.
Variable definitions
Variable
<password>
Administration and Security
Definition
The password for the keystore. Must be mobility.
October 2010
107
Server certificate administration
Variable
<valDays>
108
Administration and Security
Definition
The number of days that the certificate is valid.
Range: 0 to 3600
October 2010
Chapter 13: Maintenance
This chapter describes procedures for maintaining the Avaya 3100 Mobile Communicator.
• Backing up the Avaya 3100 Mobile Communicator Gateway server databases on page 109
• Restoring the Avaya 3100 Mobile Communicator Gateway server databases on page 110
• Checking the Avaya 3100 Mobile Communicator Gateway Software Version on page 111
• Sending a system notification to all users on page 111
• Sending a system notification to individual users on page 112
• Network configuration changes on page 112
Backing up the Avaya 3100 Mobile Communicator Gateway
server databases
Use this procedure to back up the databases and current system configuration. You should
perform this procedure after each installation or upgrade, and after you change the system
configuration. The backup is created on the server. You should also store the backup in a
different location (for example, on another server).
Important:
This procedure does not back up the language packages.
Prerequisites
You must be logged into the server as nortel. For more information, see Accessing the server
command line as nortel on page 115.
1. To verify that the backup directory exists, enter:
ls /admin/nortel/backup
You should see mobilitybase in the directory list.
2. To backup the current system configuration, enter:
sudo /opt/mobilitybase/backup.sh
The system creates the backup file /admin/nortel/backup/mobilitybase/
mobilitybasebackup.tar
Administration and Security
October 2010
109
Maintenance
Important:
Avaya recommends that you copy this backup file to another server or other
media.
When preparing for an upgrade from Release 3.0 to Release 3.1, copy the backup
file to the /tmp directory of the server.
Restoring the Avaya 3100 Mobile Communicator Gateway
server databases
Use this procedure if you need to restore system parameters.
Important:
Perform the database restore procedure during a period of low system use because the
system is out of service for two or more minutes, depending on the size of the databases.
Important:
This procedure does not restore the language packages.
Prerequisites
• You must be logged into the server as superuser. For more information, see Accessing
the server command line as superuser on page 115.
• Obtain a copy of the backup file if not available on the system. The file must be in the /
admin/nortel/backup directory and named mobilitybasebackup.tar.
Important:
This procedure does not restore the shared files for the Instant Conferences.
1. To stop the server processes, enter the following command:
appstart stop
2. To restore the backup, enter the following command:
/opt/mobilitybase/restore.sh
3. To start the server processes, enter the following command:
appstart start
110
Administration and Security
October 2010
Checking the Avaya 3100 Mobile Communicator Gateway Software Version
Checking the Avaya 3100 Mobile Communicator Gateway
Software Version
The Avaya 3100 Mobile Communicator Gateway current software version appears on the
System Configuration page.
Prerequisites
You must be logged in to the Avaya 3100 Mobile Communicator Web Administration Console
as administrator. For more information on logging in as an administrator, see Logging on to
the Avaya 3100 Mobile Communicator Web Administration Console as an administrator on
page 16.
Click the System Configuration tab.
The software version number appears on the right side of the System Configuration
page.
Sending a system notification to all users
Use this procedure to send a message to all registered users.
Prerequisites
You must be logged in to the Avaya 3100 Mobile Communicator Web Administration Console
as administrator. For more information about how to log on as an administrator, see Logging
on to the Avaya 3100 Mobile Communicator Web Administration Console as an
administrator on page 16.
1. Click the System Configuration tab.
2. Select Gateway Actions > Notify.
3. In the Send Notification Message window, type a Subject and Message.
4. Click Send.
A Notification Message Sent dialog box appears if the notification is sent
successfully.
Administration and Security
October 2010
111
Maintenance
A Notification Message Failed dialog box appears if the notification is not sent
successfully.
5. Click Close.
Sending a system notification to individual users
Use this procedure to send a message to an individual registered user or a group of users.
Prerequisites
You must be logged in to the Avaya 3100 Mobile Communicator Web Administration Console
as administrator. For more information about how to log on as an administrator, see Logging
on to the Avaya 3100 Mobile Communicator Web Administration Console as an
administrator on page 16.
1. Select the User Info tab.
2. On the User Info page, type the filter parameters by which you want to filter.
3. Click Filter.
4. Select the check box for one user, multiple users, or all users.
5. Click the Notify tab.
6. In the Send Notification Message window, type a Subject and Message.
7. Click Send.
A Notification Message Sent dialog box appears if the notification is sent
successfully.
A Notification Message Failed dialog box appears if the notification is not sent
successfully.
8. Click Close.
Network configuration changes
If you must change the network configuration parameters of the Avaya 3100 Mobile
Communicator Gateway, you use the networkconfig script to change network parameters
configured during the initial installation (for example, IP address or default gateway). This script
is part of the Linux Base installation. You must reboot the Avaya 3100 Mobile Communicator
112
Administration and Security
October 2010
Network configuration changes
Gateway after you run the script. For more information about the networkconfig script, see
Linux Platform Base and Applications Installation and Commissioning, NN43001-315.
Important:
The license check uses the hostname as part of the machine identification. If you change
the hostname of the Avaya 3100 Mobile Communicator Gateway, you must reactivate the
license. After you reboot the Avaya 3100 Mobile Communicator Gateway, reload the license
file to trigger the reactivation.
Administration and Security
October 2010
113
Maintenance
114
Administration and Security
October 2010
Chapter 14: Common procedures
This chapter contains commonly used procedures.
• Accessing the server command line as nortel on page 115
• Accessing the server command line as superuser on page 115
Accessing the server command line as nortel
Use this procedure to access the server command line as nortel.
Prerequisites
You require the password to the nortel userid on the server.
1. Use SSH to connect to the server.
2. At the userid prompt, enter nortel
3. At the password prompt, enter <password>
Variable definitions
Variable
<password>
Value
The password associated with the nortel
userid. For information about the default
nortel password, see Linux Platform Base
and Applications Installation and
Commissioning, NN43001-315.
Accessing the server command line as superuser
Use this procedure to access the server command line as root.
Administration and Security
October 2010
115
Common procedures
Prerequisites
• You require the password to the nortel userid on the server.
• You require the password to the superuser (root) userid on the server.
1. Use SSH to connect to the server.
2. At the userid prompt, enter nortel.
3. At the password prompt, enter <password>.
4. To become the root user, enter su root.
5. At the prompt, enter <root_password>.
Variable definitions
Variable
116
Value
<password>
The password associated with the nortel
userid. For information about the default
nortel password, see Linux Platform Base
and Applications Installation and
Commissioning, NN43001-315.
<root_password>
The password associated with the
superuser. For information about the default
superuser password, see Linux Platform
Base and Applications Installation and
Commissioning, NN43001-315.
Administration and Security
October 2010