1
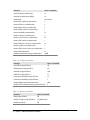
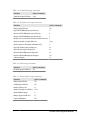
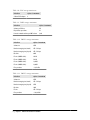
Want to read more?
You can buy this book at oreilly.com
in print and ebook format.
Buy 2 books, get the 3rd FREE!
Use discount code: OPC10
All orders over $29.95 qualify for free shipping within the US.
It’s also available at your favorite book retailer,
including the iBookstore, the Android Marketplace,
and Amazon.com.
Spreading the knowledge of innovators
oreilly.com
VMware Cookbook, Second Edition
by Ryan Troy and Matthew Helmke
Copyright © 2012 Ryan Troy, Matthew Helmke. All rights reserved.
Printed in the United States of America.
Published by O’Reilly Media, Inc., 1005 Gravenstein Highway North, Sebastopol, CA 95472.
O’Reilly books may be purchased for educational, business, or sales promotional use. Online editions
are also available for most titles (http://my.safaribooksonline.com). For more information, contact our
corporate/institutional sales department: 800-998-9938 or [email protected].
Editor: Andy Oram
Production Editor: Rachel Steely
Copyeditor: Absolute Service, Inc.
Proofreader: Absolute Service, Inc.
June 2012:
Indexer: BIM Publishing Services
Cover Designer: Karen Montgomery
Interior Designer: David Futato
Illustrators: Robert Romano and Rebecca Demarest
Second Edition.
Revision History for the Second Edition:
2012-06-06
First release
See http://oreilly.com/catalog/errata.csp?isbn=9781449314477 for release details.
Nutshell Handbook, the Nutshell Handbook logo, and the O’Reilly logo are registered trademarks of
O’Reilly Media, Inc. VMware Cookbook, the image of a leatherback sea turtle, and related trade dress
are trademarks of O’Reilly Media, Inc.
Many of the designations used by manufacturers and sellers to distinguish their products are claimed as
trademarks. Where those designations appear in this book, and O’Reilly Media, Inc., was aware of a
trademark claim, the designations have been printed in caps or initial caps.
While every precaution has been taken in the preparation of this book, the publisher and authors assume
no responsibility for errors or omissions, or for damages resulting from the use of the information contained herein.
ISBN: 978-1-449-31447-7
[Malloy]
1339014310
Table of Contents
Preface . . . . . . . . . . . . . . . . . . . . . . . . . . . . . . . . . . . . . . . . . . . . . . . . . . . . . . . . . . . . . . . . . . . . . ix
1. VMware Infrastructure Installation . . . . . . . . . . . . . . . . . . . . . . . . . . . . . . . . . . . . . . . . 1
1.1
1.2
1.3
1.4
1.5
1.6
1.7
1.8
1.9
1.10
1.11
1.12
1.13
1.14
What Is VMware Infrastructure 5?
What Is VMware vSphere 5.0?
Convergence from ESX to ESXi with vSphere 5.0
VMware ESXi 5.0 Configuration Maximums
VMware ESXi 5.0 Server Overview
VMware ESXi 5.0 Overview
VMware ESXi 5.0 Installation
VMware vCenter Server 5.0 Overview
vCenter Server 5.0 Installation
VMware vCenter Client 5.x Overview
vCenter Client 5.x Installation
vCenter 5.0 Web Client Installation
vSphere 5.0 License Changes
vConverter
2
3
5
5
12
13
14
19
19
27
27
27
28
29
2. Storage . . . . . . . . . . . . . . . . . . . . . . . . . . . . . . . . . . . . . . . . . . . . . . . . . . . . . . . . . . . . . . 33
2.1
2.2
2.3
2.4
2.5
2.6
2.7
2.8
2.9
2.10
2.11
2.12
Comparing ESXi Storage Options
Selecting the Virtual Machine Datastore Location
Storage Runtime Naming Scheme
Creating a Network for the Software iSCSI Initiator
Configuring Software iSCSI on ESXi
Configuring Hardware iSCSI with an HBA
Configuring iSCSI in Windows Virtual Machines
Opening Firewall Ports for an ESXi iSCSI Software Initiator
Multipathing with iSCSI
Adding Fibre Channel Storage in ESXi
Creating a Raw Device Mapping for Virtual Machines
Creating a VMkernel Port for Access to NFS Datastores
33
35
36
37
39
44
46
49
50
52
54
55
iii
2.13
2.14
2.15
2.16
2.17
2.18
2.19
2.20
2.21
2.22
2.23
2.24
2.25
Configuring ESXi to Use NFS
Creating a VMFS Volume in vCenter
Performing a Storage Rescan
Creating a VMFS Volume via the Command Line
Viewing the Files that Define a VMFS Volume
Increasing the VMFS Volume Capacity
Reading VMFS Metadata
Creating a Diagnostic Partition
Removing Storage Volumes from ESXi
Determining whether a VMFS Datastore Is on a Local or SAN Disk
Adjusting Timeouts When Adding Storage in vCenter
Setting Disk Timeouts in Windows
Renaming Datastores
58
60
65
65
66
67
70
71
72
73
73
74
74
3. Networking . . . . . . . . . . . . . . . . . . . . . . . . . . . . . . . . . . . . . . . . . . . . . . . . . . . . . . . . . . . 77
3.1
3.2
3.3
3.4
3.5
3.6
3.7
3.8
3.9
3.10
3.11
3.12
3.13
3.14
3.15
3.16
3.17
3.18
3.19
Configuring ESXi Network Ports and the Firewall
Creating a vSwitch for Virtual Machines
Removing a Virtual Switch
Adding VMotion to Enable Virtual Machine Migration
Modifying the Speed of a Network Adapter
Choosing Network Elements that Protect Security
Setting the Basic Level 2 Security Policy
Ethernet Traffic Shaping on Standard vSwitches
Load Balancing and Failover
Enabling Jumbo Frames on a VMkernel for iSCSI
Enabling Jumbo Frames on a Standard vSwitch
Enabling Jumbo Frames on a Virtual Machine
Changing the ESXi Host IP Address
Using the Remote Command Line to Locate Physical Ethernet
Adapters
Changing the Ethernet Port Speed via the Command Line
Enabling TCP Segmentation Offload Support on a Virtual Machine
Enabling Jumbo Frames on a Distributed Switch
Changing DNS Entries on the ESXi Host
Creating a vSphere Distributed Switch
77
82
85
85
89
90
91
94
96
100
101
102
103
104
105
106
107
108
108
4. Resource and vCenter Management . . . . . . . . . . . . . . . . . . . . . . . . . . . . . . . . . . . . . . 113
4.1 Monitoring Virtual Machines Inside the vSphere Cluster
4.2 Understanding Virtual Machine Memory Use Through
Reservations, Shares, and Limits
4.3 Configuring Virtual Machine CPU Limits
4.4 Configuring Virtual Machine CPU Shares
4.5 Configuring Virtual Machine CPU Reservations
iv | Table of Contents
114
115
118
119
121
4.6
4.7
4.8
4.9
4.10
4.11
4.12
4.13
4.14
4.15
Setting Up Resource Pools
Understanding Resource Pools
Expandable Reservations in Resource Pools
Creating a Cluster
Adding Hosts to a Cluster
Enabling Hyperthreading on a Virtual Machine
Enabling DRS in a Cluster
Understanding Cluster States and Warnings
Using ESXi CPU/RAM Hot Add/Hotplug Support
Surviving a vCenter Server Failure or Outage
122
124
125
128
130
134
135
139
140
141
5. Useful Tools and References . . . . . . . . . . . . . . . . . . . . . . . . . . . . . . . . . . . . . . . . . . . . 145
5.1
5.2
5.3
5.4
5.5
5.6
5.7
5.8
5.9
5.10
5.11
5.12
5.13
5.14
5.15
5.16
5.17
5.18
5.19
5.20
5.21
5.22
5.23
5.24
5.25
5.26
5.27
5.28
5.29
5.30
5.31
Entering Maintenance Mode via the Command Line
Displaying Server Information
Viewing the ESXi Version
Changing the Virtual Disk from BusLogic to LSI Logic
Hiding the VMware Tools Icon
Viewing Disk Partitions via the Console
Monitoring CPU Usage
Monitoring Memory
Monitoring Storage Performance
Monitoring Network Usage
Managing Virtual Switches
Generating a Logfile for VMware Support
Checking ESXi Patches
Enabling NTP in the vCenter
Changing the ESXI Server’s Time
Restarting the vCenter Agent
Finding Virtual Machine Snapshots
Renaming a Virtual Machine via the vCenter
Setting ESXi Options Using the Command Line
Configuring Authentication Choices Using the Command Line
Manipulating the Crash Dump Partition
Configuring a Firewall on the Command Line
Managing ESXi Driver Modules
Configuring Storage Multipathing
Managing NFS Mounts
Managing Disk Volumes
Configuring Ethernet Adapters
Rescanning Host Bus Adapters
Managing Add-ons from the Command Line
Managing VMkernel Network Routes
Configuring Software iSCSI Options
145
146
148
149
151
151
152
155
160
162
163
166
167
169
172
173
173
174
174
176
177
178
178
180
184
185
186
187
188
190
191
Table of Contents | v
5.32
5.33
5.34
5.35
5.36
Configuring Hardware iSCSI Options
Upgrading Software VIBs
Displaying Storage Path Information
Managing SCSI Device Mappings with ESXi5 vSphere
Managing VMkernel Ports
192
193
194
201
202
6. General Security . . . . . . . . . . . . . . . . . . . . . . . . . . . . . . . . . . . . . . . . . . . . . . . . . . . . . . 205
6.1
6.2
6.3
6.4
6.5
6.6
6.7
6.8
6.9
6.10
6.11
6.12
6.13
6.14
6.15
6.16
6.17
6.18
6.19
6.20
6.21
6.22
6.23
6.24
6.25
6.26
Enabling SSH on ESX 3.5 / ESX 4.x
Enabling Direct Root Logins on Your ESX Server
Adding Users and Groups
Allowing or Denying Users the Use of SSH
Turning On the Message of the Day for Console Users
Changing the Root Password via the Console
Recovering a Lost Root Password
Disabling Direct Root Console Logins
Securing the GRUB Bootloader Menu
Disabling USB Drive Mounting
Opening and Closing Firewall Ports via the Console
Checking Default ESX Ports
Turning on SNMP for Remote Administration
Using SNMP Version 3
Using Sudo
Configuring Sudo
Tracking Users via the CLI
Configuring Active Directory Authentication
Setting a Maximum Number of Failed Logins
Limiting Access to the Su Command
Setting User Password Aging
Disabling Copy and Paste
Disabling Disk Shrinking on Virtual Machines
Disabling Unneeded Devices
Preventing Unwanted Device Additions and Removals
Disabling VMware Tools Settings Override
205
206
207
209
211
211
212
214
215
216
217
219
221
223
224
225
226
229
231
232
233
237
238
239
239
240
7. Automating ESXi Installations . . . . . . . . . . . . . . . . . . . . . . . . . . . . . . . . . . . . . . . . . . 241
7.1
7.2
7.3
7.4
7.5
7.6
7.7
7.8
Selecting a Different Boot Option with ESXi 5.x
Building a Kickstart Configuration File for Automated Deployments
Differences Between ESXi 4.x and ESXi 5.x Kickstart Commands
Advanced Installation Scripting Using %firstboot
Advanced Installation Scripting Using %pre
Advanced Installation Scripting Using %post
Methods of Upgrading ESX 4.0 Classic to ESXi 5.0
Upgrading ESXi 4.x to ESXi 5.0 via CD/DVD
vi | Table of Contents
241
242
249
250
252
253
254
255
7.9 Installing vSphere Auto Deploy
7.10 Formatting a USB Key for ESXi Installations
258
264
8. vCloud Director Overview . . . . . . . . . . . . . . . . . . . . . . . . . . . . . . . . . . . . . . . . . . . . . . 267
8.1
8.2
8.3
8.4
8.5
8.6
8.7
8.8
8.9
8.10
What Is vCloud Director?
What’s New in vCloud Director 1.5
vCloud Director Maximums
vCloud Director Requirements
vCloud Director (Evaluation Appliance)
Deploying vShield Manager
Attaching vCloud Director to the vCenter Server
Creating a Provider Virtual Datacenter
Allocating External Network Resources
Adding Network Pools for Virtual Datacenters
267
270
272
273
276
286
295
299
303
306
9. vSphere Storage Appliance . . . . . . . . . . . . . . . . . . . . . . . . . . . . . . . . . . . . . . . . . . . . . 311
9.1
9.2
9.3
9.4
What Is the vSphere Storage Appliance?
vSphere Storage Appliance Requirements
Installation of the vSphere Storage Appliance
vSphere Storage Appliance Cluster Creation Process
311
312
314
317
Index . . . . . . . . . . . . . . . . . . . . . . . . . . . . . . . . . . . . . . . . . . . . . . . . . . . . . . . . . . . . . . . . . . . . . 329
Table of Contents | vii
CHAPTER 1
VMware Infrastructure Installation
This book aims to be useful for both new and seasoned VMware ESXi users. Because
of the intermediate-to-advanced nature of this cookbook, we will assume from time to
time that you have advanced knowledge and understanding of how the products work.
Before we begin serving the main recipes of our cookbook, we define several terms we
will use throughout the rest of the book, and make sure that you have all the necessary
components installed.
Virtualization provides a way for multiple operating systems to be installed on the same
physical hardware. By using virtual technology, we can consolidate hardware and instantly build production, quality assurance, and test environments. This is a tremendous breakthrough, as it allows underutilized equipment to do more than sit around
idly, and allows developers and administrators to test and use multiple software configurations and packages that require different operating systems on the same piece of
equipment, without having to purchase, set up, and maintain multiple computers. This
savings makes the accounting department and managers happy and gives the technology lovers an opportunity to do all the things they want or need to do at the same time.
A typical IT scenario goes something like this: you have lots of servers in your rack or
collection of racks. Most of them run at only about 10%–15% of their capacity the
majority of the time, but you let that happen because you want to keep their various
functions and operating systems isolated from one another. This provides some security, both because if one server is compromised it does not necessarily mean that access
has been granted to others, and because a problem with one piece of software will not
cause other parts of your IT infrastructure to go down as you deal with it.
Virtualization helps you make better use of those physical resources, without compromising the original intent of keeping services isolated. Instead of installing your operating system directly on your hardware, you instead begin with a virtualization layer:
a stripped-down OS designed to schedule access to network, disk, memory, and CPU
resources for guest OSs, the same way that those guest OSs control that scheduling for
their applications. Most virtualization platforms limit themselves to specific hardware
and present a specific set of virtual components to the operating systems installed on
1
top of them. This provides a very stable and consistent presentation to the operating
systems you install and allows them to be moved much more easily.
Once you’ve installed and configured the virtualization layer, you can partition the
physical hardware and assign it to discrete operating system instances that you install
on top of the virtualization layer. These virtual installations operate exactly as they
would normally. They are not aware of the presence of other virtual installations that
exist on the same hardware. Each acts as if it is installed on a predefined piece of
equipment by itself, with the virtualization layer controlling what the virtual installation
sees and how it interacts with other equipment outside of its control. Basically, the
virtual installation looks, feels, acts, and is administered exactly the same as a standard
installation from the inside, but it may be manipulated and configured easily and
alongside others from the outside.
Here is the coolest part: virtualization, as provided by sophisticated systems like
VMware, also allows you to pool the resources of several physical machines and then
divide them up however you want or need. If you have 10 physical servers, each with
4 processors, 4GB of RAM, and an 80GB hard drive, you can segment those resources
to provide a small and low-powered server for your in-house email, a powerful and
high-memory processor for the number crunchers in accounting, multiple loadbalanced servers for your web server, a separate server for your database, and so on,
each with a configuration of memory, disk space, processor power, and so on, specific
for its needs. Then, if you discover that one virtual server has more resources than it
really needs and another doesn’t have enough, you can change the configuration quickly, easily, and without taking your servers offline! You can take a physical server offline
for maintenance without losing access to any of your virtual servers and their functions.
You can move resources in and out and around your pool as needed, and even automatically. These are the sorts of things we will discuss in this book.
There are many companies that provide powerful and stable virtualization platforms,
but we have found VMware’s offerings to be wonderfully stable, flexible, easy to set
up, maintain, and well supported. We like VMware. If you are reading this book, you
probably do, too, but chances are you want to make better use of its potential than you
are doing now—either that, or you have been asked to set it up or maintain it and
you are wondering how to get started. Whatever your reason, if you use VMware at all,
we hope you will find this book useful and practical.
1.1 What Is VMware Infrastructure 5?
VMware, Inc., is a company headquartered in Palo Alto, California, with over 11,000+
employees and about 300,000 customers, including 100% of the Fortune 100. In 2007,
it had revenues of over $1.33 billion. In 2010, that number was up to $1.4 billion.
VMware is a rapidly growing company that began in 1998 and now has more than
300,000 customers and over 25,000 partnerships with companies ranging from somewhat small to extremely large.
2 | Chapter 1: VMware Infrastructure Installation
VMware vSphere 5 is easily the most widely used virtualization platform today. It is
well tested and has been used in applications ranging from very small, localized installations with just a handful of servers to exceptionally large server farms in major corporations. It is robust, scalable, easy to administer, and flexible. It is also small and
fast, which means the virtual installations running on top of it have more processor
power and other resources available to them than they would if they were using some
of the more resource-heavy virtualization software available.
Unlike some of the other hosted virtualization products you may be familiar with,
including the company’s well-known VMware server, VMware vSphere 5 does not require any other operating system. Most virtualization platforms begin with a Linux/
Unix, Mac OS X, or Windows platform; install their product on top of it; and then
begin segmenting the resources from there. This is how a developer may run a copy of
Windows on top of her laptop’s base installation of Linux, perhaps using a product
like VMware server, Xen, or VirtualBox. vSphere is designed to be installed on bare
metal, as the base operating system. This design choice eliminates a layer of software
between the virtual installations and the hardware and results in faster, smoother
performance.
1.2 What Is VMware vSphere 5.0?
In August 2011, VMware launched ESXi 5.0, which now falls under the vSphere 5.0
suite of products. vSphere 5.0 encapsulates both vCenter Server and ESXi 5.0, along
with other products that we don’t discuss in this book. This new release not only brings
incremental improvements, but also takes the virtualization platform to a whole new
level by letting you think in terms of complete installations or deployments instead of
managing your site server by server. It’s worth mentioning that ESXi 5.0 has some really
great features, such as:
• vSphere 5.0, which is now based on the ESXi platform, eliminating the old ESX
platform
• Updated Virtual Machine functionality, including more CPUs, RAM, support for
USB 3.0, and 3D graphics
• Support for OS X, larger file systems, 512 virtual machines per physical host, and
Metro vMotion
For a complete list of new features, please visit:
http://www.vmware.com/support/vsphere5/doc/vsphere-esx-vcenter-server-50-new
-features.html
Here are 10 features we feel are worth highlighting:
Metro vMotion
Metro vMotion allows the end user to move a running virtual machine between
two physical locations when certain circumstances allow; there is a minimum of 5
1.2 What Is VMware vSphere 5.0? | 3
ms latency between the two remote ESXi servers. However, the maximum latency
is supported up to 10 ms.
Improved SNMP support
vSphere 5 now allows you to convert CIM indications to SNMP traps. vSphere 5
supports a larger set of vendors and equipment, but we still recommend you check
with your vendor to ensure your vendor supports these features.
VMFS 5 filesystem
VMFS 5 will allow scaling up to 64TB per datastore using one extent. This is a
massive improvement over the VMFS 4 filesystem, which could only scale up to
2TB using one extent.
Storage distributed resource scheduler
Storage distributed resource scheduler (DRS) allows the storage system to take
advantage of resource aggregation, automated placement, and the ability to avoid
bottlenecks. By creating datastore clusters, you can create a load-balanced scenario
that allows the VMDK files to be placed on the storage system with less I/O load.
Enhanced network I/O control
Administrators can now create user-defined network resource pools, giving the
ability to create multitenant environments and the ability to bridge virtual and
physical infrastructures with QoS per resource using 802.1 tagging.
vSphere auto deploy
Administrators with large ESXi installations can simplify their deployments by
creating a set of rules. These rules can be used to upgrade ESXi versions by simply
rebooting the physical server.
Virtual machine hardware improvements
Virtual machines can now scale up to 32 virtual SMP processors and up to 1TB of
RAM. There is also support for 3D graphics, UEFI virtual BIOS, and USB support.
Physical node improvements
Physical hosts can now have up to 2TB of memory, 160 logical CPUs, and 512
virtual machines.
Distributed switch improvements
With the improvements in the vSphere 5 distributed switches, administrators now
have a deeper and more granular view into the virtual machine traffic using Netflow. Additional troubleshooting is now available via SPAN and LLDP.
Storage profiles
Allows for streamlining the storage provisioning process and allows for the
VMware administrator to mass scale the storage within the environment.
4 | Chapter 1: VMware Infrastructure Installation
1.3 Convergence from ESX to ESXi with vSphere 5.0
VMware started to get the community familiar with ESXi back with ESXi 3.5 and has
continued to develop and evolve the product over the course of the past few years. In
2010, VMware stated that it would be moving to the ESXi platform in 2011, thus eliminating the older ESX version. Here, we outline the changes and benefits from this
convergence.
A smaller and more efficient platform
Older versions of ESX were based on the Red Hat Linux operating system. VMware
utilized this as the OS layer in which its VMkernel and application stack lived.
Today, by removing the Red Hat OS, VMware was able to remove 2–3GB of OS
that wasn’t required to run ESXi, so the installation size is now around 100MB.
This switch means that less security and update patches need to be applied to the
ESXi server.
Simple deployment
Because the installation is only around 100MB, the complex setup routine has been
removed. Now the installation can be done within minutes.
Improved management and API
ESXi has a built-in API that allows third-party application vendors to build plugins. No longer do you need to install each plug-in on the ESX console, which was
required with previous releases of ESX. VMware has also developed a remote command line interface (RCLI) to run the familiar commands that were present on the
ESX 3.x and 4.x consoles.
1.4 VMware ESXi 5.0 Configuration Maximums
VMware’s vSphere (ESXi 5.x) has limits within which it can operate. We feel it is
important to include this information so that you have it at your disposal prior to
installing ESXi 5.0 or vCenter. These values are crucial when planning your virtual
environment, and we suggest you read through them to become familiar with the different limits. We’ve included all relevant, publicly provided values from VMware for
reference (Tables 1-1 through 1-23).
Table 1-1. Virtual machine maximums
Value/Item
vSphere 5.x maximum
Number of virtual CPUs per virtual machine
32
RAM per virtual machine
1TB
Virtual machine swap file size
1TB
Virtual SCSI adapters per virtual machine
4
Virtual SCSI targets per virtual SCSI adapter
15
1.4 VMware ESXi 5.0 Configuration Maximums | 5
Value/Item
vSphere 5.x maximum
Virtual SCSI targets per virtual machine
60
Virtual disks per virtual machine (PVSCSI)
60
Virtual disk size
2TB - 512 bytes
Number of IDE controllers per virtual machine
1
Number of IDE devices per virtual machine
4
Number of floppy devices per virtual machine
2
Number of floppy controllers per virtual machine
1
Number of virtual NICs per virtual machine
10
Number of serial ports per virtual machine
4
Number of remote consoles to a virtual machine
40
Number of USB controllers per virtual machine
1
Number of USB devices connected to a virtual machine
20
Number of parallel ports per virtual machine
3
Number of USB 3.0 devices connected to a virtual machine
1
Number of xHCI USB controllers
20
Maximum amount of video memory per virtual machine
128MB
Table 1-2. Compute maximums
Value/Item
vSphere 5.x maximum
Logical CPUs per physical ESXi host
160
Virtual Machines per physical ESXi host
512
Virtual CPUs per physical ESXi host
2,048
Virtual CPUs per physical ESXi core
25
Fault tolerance virtual disks per physical ESXi host
16
Fault tolerance virtual CPUs per physical ESXi host
1
Maximum RAM per fault tolerant virtual machines
64GB
Maximum Fault Tolerant virtual machines per physical ESXi host
4
Table 1-3. Memory maximums
Value/Item
vSphere 5.x maximum
RAM per physical ESXi host
2TB
Number of swap files per physical ESXi host
1 per virtual machine
Maximum swap file size
1TB
6 | Chapter 1: VMware Infrastructure Installation
Table 1-4. Virtual disk storage maximums
Value/Item
vSphere 5.x maximum
Virtual disks per physical ESXi host
2,048
Table 1-5. iSCSI physical storage maximums
Value/Item
vSphere 5.x maximum
LUNs per physical ESXi server
256
Qlogic 1Gb iSCSI HBA initiator ports per ESXi server
4
Broadcom 1Gb iSCSI HBA initiator ports per ESXi server
4
Broadcom 10Gb iSCSI HBA initiator ports per ESXi server
4
NICs that can be associated with or bound to the software iSCSI stack
8
Number of total paths on a physical ESXi server
1,024
Number of paths to a LUN (software and hardware iSCSI)
8
Qlogic iSCSI: dynamic targets per adapter port
64
Qlogic iSCSI: static targets per adapter port
62
Broadcom 1Gb iSCSI HBA targets per adapter port
64
Broadcom 10Gb iSCSI HBA targets per adapter port
128
Software iSCSI targets
25
Table 1-6. NAS storage maximums
Value/Item
vSphere 5.x maximum
NFS mounts per physical ESXi host
256
Table 1-7. Fibre Channel storage maximums
Value/Item
vSphere 5.x maximum
LUNs per physical ESXi host
256
LUD ID per physical ESXi host
255
Number of paths to a LUN
32
Number of total paths on an ESXi host
1,024
Number of HBAs of any type
8
HBA ports per physical ESXi server
16
Targers per HBA adapter
256
1.4 VMware ESXi 5.0 Configuration Maximums | 7
Table 1-8. FCoE storage maximums
Value/Item
vSphere 5.x maximum
Software FCoE adapters
4
Table 1-9. VMFS storage maximums
Value/Item
vSphere 5.x maximum
Volumes per ESXi host
256
Physical hosts per volume
64
Powered on virtual machines per VMFS volume
2,048
Table 1-10. VMFS 3 storage maximums
Value/Item
vSphere 5.x maximum
Volume size
64TB
Raw device mapping size (virtual)
2TB - 512 bytes
Raw device mapping size (physical)
2TB - 512 bytes
Block size
8MB
File size (1MB Block Size)
256GB
File size (1MB Block Size)
512GB
File size (1MB Block Size)
1,024GB
File size (1MB Block Size)
2,048GB
Files per volume
~30,720 files
Table 1-11. VMFS 5 storage maximums
Value/Item
vSphere 5.x maximum
Volume size
64TB
Raw device mapping size (virtual)
2TB - 512 bytes
Raw device mapping size (physical)
64TB
Block size
1MB
File size
2TB - 512 bytes
Files per volume
~130,960 files
8 | Chapter 1: VMware Infrastructure Installation
Table 1-12. Storage DRS maximums
Value/Item
vSphere 5.x maximum
Virtual disks per datastore cluster
9,000
Datastores per datastore cluster
32
Datastore clusters per vCenter
256
Table 1-13. Storage concurrent operations
Value/Item
vSphere 5.x maximum
Concurrent vMotion operations per datastore
128
Concurrent storage vMotion operations per datastore
8
Concurrent storage vMotion operations per ESXi host
2
Concurrent non-vMotion provisioning operations per host
8
Table 1-14. Networking physical NICs
Value/Item
vSphere 5.x maximum
e1000 1Gb Ethernet ports (PCI-x)
32
e1000 1Gb Ethernet ports (PCI-e)
24
igb 1Gb Ethernet ports (Intel)
16
tg3 1Gb Ethernet ports (Broadcom)
32
bnx2 1Gb Ethernet ports (Broadcom)
16
forcedeth 1Gb Ethernet ports (NVIDIA)
2
nx_nic 10Gb Ethernet ports (NetXen)
8
ixgbe 10Gb Ethernet ports (Intel)
8
bnx2x 10Gb Ethernet ports (Broadcom)
8
be2net 10Gb Ethernet ports (Emulex)
8
Combination of 10Gb and 1Gb Ethernet ports
6x 10Gb Ports & 4x 1Gb Ports
Infiniband ports (refer to VMware Community Support)
N/A - third-party drivers available from Mellanox Technologies
Table 1-15. VMDirect path limits
Value/Item
vSphere 5.x maximum
VMDirectPath PCI/PCIe devices per host
8
VMDirectPath PCI/PCIe devices per virtual machine
4
1.4 VMware ESXi 5.0 Configuration Maximums | 9
Table 1-16. vSphere standard and distributed switch maximums
Value/Item
vSphere 5.x maximum
Total virtual network switch ports per host (VDS and VSS ports)
4,096
Maximum active ports per host (VDS and VSS)
1,016
Virtual network switch creation ports per standard switch
4,088
Port groups per standard switch
256
Distributed virtual network switch ports per vCenter Instance
30,000
Static port groups per vCenter Instance
5,000
Ephemeral port groups per vCenter
256
Hosts per VDS switch
350
Distributed switches per vCenter instance
32
Table 1-17. Networking concurrent operations
Value/Item
vSphere 5.x maximum
Concurrent vMotion operations per host (1Gb/s network)
4
Concurrent vMotion operations per host (10Gb/s network)
8
Table 1-18. Cluster, High Availability (HA), and DRS maximums
Value/Item
vSphere 5.x maximum
Physical ESXi hosts per cluster
32
Virtual machines per cluster
3,000
Virtual machines per host
512
Maximum concurrent host HA failover
32
Failover as percentage of cluster
100%
Resource pools per cluster
1,600
Table 1-19. Resource pool maximums
Value/Item
vSphere 5.x maximum
Resource pools per ESXi host
1,600
Children per resource pool
1,024
Resource pool tree depth
8
10 | Chapter 1: VMware Infrastructure Installation
Table 1-20. vCenter Server maximums
Value/Item
vSphere 5.x maximum
Hosts per vCenter server
1,000
Powered on virtual machines per vCenter server
10,000
Registered virtual machines per vCenter server
15,000
Linked vCenter servers
10
Hosts in linked vCenter servers
3,000
Powered-on virtual machines in linked vCenter servers
30,000
Registered virtual machines in linked vCenter servers
50,000
Concurrent vSphere clients
100
Number of host per datacenter
500
MAC addresses per vCenter server
65,536
USB devices connected at vSphere Client
20
Table 1-21. vCenter VASA maximums
Value/Item
vSphere 5.x maximum
Storage providers
10
Table 1-22. vCenter update manager maximums
Value/Item
vSphere 5.x maximum
Host scans in a single vCenter server
1,000
Virtual machine scans in a single vCenter server
10,000
Cisco VDS update and deployment
70
VMware Tools scan per ESXi host
90
VMware Tools upgrade per ESXi host
24
Virtual machine hardware scan per host
90
Virtual machine hardware upgrade per host
24
VMware Tools scan per VUM server
75
VMware Tools upgrade per VUM server
75
Virtual machine hardware scan per VUM server
75
Virtual machine hardware upgrade per VUM server
75
ESXi host scan per VUM server
75
ESXi host remediation per VUM server
71
ESXi host upgrade per VUM server
71
ESXi host upgrade per cluster
1
1.4 VMware ESXi 5.0 Configuration Maximums | 11
Table 1-23. vCloud director maximums
Value/Item
vSphere 5.x maximum
Virtual machine count
20,000
Powered-on virtual machine count
10,000
Organizations
10,000
Virtual machines per vApp
64
vApps per organization
500
Number of networks
7,500
Hosts
2,000
vCenter servers
25
Virtual data centers
10,000
Datastores
1,024
Catalogs
1,000
Media
1,000
Users
10,000
See Also
Recipes 1.7 and 1.11
1.5 VMware ESXi 5.0 Server Overview
VMware’s ESXi server is the foundation for every other piece of the virtualization package. It’s the hypervisor or main software layer that installs on the bare metal and allows
everything above it to communicate with the hardware to allow virtualization. It used
to be that when you installed VMware ESXi, you were actually installing two main
components: the VMkernel and the Service Console. This has changed slightly, as we
will now explain.
The VMkernel is the base on which all other software in the package is built: the operating system. For those familiar with Linux, this would be the equivalent of (and is
built from) the Linux kernel, without any other software.
The changes in ESXi 5.0 have removed the Service Console that existed in ESX 3.x and
4.x. Today, a minimum configuration can be done at the provided console within the
ESXi hypervisor or using the RCLI tools. For everything else, VMware has provided a
large and useful collection of utilities that can be run from the command line on any
server. These tools are called the RCLI. The RCLI provides the same tools that were
once available via the service console. Typically, management will be done via the
vCenter client; however, there may be cases where you find you can accomplish things
more easily with the command line or need to use it because you can’t access vCenter.
12 | Chapter 1: VMware Infrastructure Installation
VMware has designed the ESXi server to run only on specific pieces of hardware and
has removed support for any kinds of devices it is not interested in, thereby reducing
the kernel code. What remains is a stripped-down, fast kernel and tool package with
little to no extra overhead. This is one of the things that gives VMware an advantage
over other virtualization technologies that require installation on top of a standard
operating system, which will be filled with drivers and features you won’t need.
It is important to verify the hardware on which you will be running your virtualized
environment, because VMware does not directly support smaller desktop-related hardware. However, everything that a server needs is well supported. This is a sleek operating system designed to put as little as possible between the virtual machines and the
hardware.
Refer to the VMware Hardware Compatibility list for ensure support for your hardware:
http://www.vmware.com/resources/compatibility/search.php
1.6 VMware ESXi 5.0 Overview
ESXi is a newer form of the technology that strips down the ESXi server even further,
to the absolute bare minimum possible. It does not include or rely on a service console
and it can perform its hypervisor duties with an installation that takes up a mere 32MB
of disk space. In the ESX server, the service console runs on top of the hypervisor
alongside the installed virtual machines. In ESXi, the hypervisor is all you install on
your hardware. This allows for very fast hardware additions to existing pools. Want to
add a new server to your rack? No problem. Hook it up, power it on, install ESXi, set
your root password and networking details, take a minute or two to configure the virtual
network, and you’re all set. This is an amazingly quick way to create or expand an
existing ESXi hardware cluster.
Even more exciting than the installable version of ESXi is the embedded version. It is
now possible to buy hardware that is preconfigured with ESXi installed on it. This
completely eliminates the installation step and speeds up the configuration process.
Companies such as Dell, which graciously allowed us to borrow some of its equipment
as we were writing this book, are now selling servers that require only a little more than
racking, cabling, and powering on to expand your VMware cluster.
The benefits of using ESXi over the standard ESXi product are that it’s extremely lightweight and installs quickly, it can be purchased on some servers from Dell and other
vendors as an embedded option, it has no service console, and it requires less patching
and maintenance. ESXi is also available for free and includes the basic functions needed
to start a virtual environment.
1.6 VMware ESXi 5.0 Overview | 13
1.7 VMware ESXi 5.0 Installation
VMware customers who have received a preinstalled OEM version of ESXi may have
vendor-specific customizations and drivers. These versions will be different from the
downloadable version on VMware’s website.
Before you get started installing ESXi, you should verify that your hardware is fully
compatible by visiting the following URL, because VMware’s ESXi product has a much
smaller compatibility list than its older ESXi model:
http://www.vmware.com/resources/compatibility/search.php
ESXi 5.0 can also be installed and virtualized within the VMware Workstation and
VMware Fusion. This allows you to install, test, and get a feel for the products before
implementing them on physical hardware.
ESXi 5.0 has the following CPU requirements: it will run and install only
on 64-bit x86 CPUs, it requires at least two cores, and it supports only
LAHF and SAHF CPU instructions.
VMware ESXi 5.0 has the following requirements:
• Supports all AMD Opteron processors
• Supports all Intel Xeon 3000/3200, 3100/3300, 5100/5300, 5200/5400,
5500/5600, 7100/7300, 7200/7400, and 7500 processors
• 2GB of RAM minimum
• One or more gigabit or 10Gb Ethernet controllers; check hardware compatibility
matrix
• Basic SCSI controllers such as Adaptec Ultra-160 or Ultra-320, LSI Logic FusionMPT, or most NCR/Symbios SCSI
• RAID controllers such as Dell PERC (Adaptec RAID or LSI MegaRAID), HP Smart
Array RAID, or IBM (Adaptec) ServeRAID controllers
• SATA disk drives connected behind supported SAS controllers or supported onboard SATA controllers
• Dedicated SAN disk on Fibre Channel or iSCSI
• USB devices
This list represents the minimum requirements to install ESXi, but many more devices
are available. To ensure complete compatibility, search for your specific hardware at
the aforementioned URL.
14 | Chapter 1: VMware Infrastructure Installation
You can download the ESXi ISO image from a VMware site or use an alternative method
such as PXE boot, Kickstart or VMware Auto Deploy. VMware has done a great job of
streamlining the installation of ESXi. If you are familiar with installing older versions
of ESX, this will be a breeze. After booting to the installation CD-ROM, you’ll notice
a blue screen titled “ThinESXi Installer” that looks similar to the bootloader in Linux.
Once the initial boot has completed, the installer will present a couple of options: you
can choose to cancel the installation, upgrade an existing installation, or perform a
fresh ESXi installation (Figure 1-1). Once you have selected the appropriate installation
type, you will be shown the end user license agreement (EULA). Press F11 to accept
and continue the installation.
Figure 1-1. ESXi initial installation
Select the disk on which you wish to install ESXi. Typically, this will be a local disk.
Also, make sure you have disconnected all your Fibre Channels or iSCSI SANs and
direct-attached storage, if connected, to prevent any accidental data removal. Once
you’ve selected the disk, the installation will begin and will take only a few minutes.
When it is complete, remove the CD-ROM and reboot the system. If you are installing
with PXE or another automated tool, reboot once the installation is completed.
ESXi requires a little more configuration after the initial install, because the only thing
being configured during installation is the disk on which the hypervisor is going to be
installed. Once the new ESXi server has been rebooted, you will notice a screen that is
similar to the ESXi console screen but with two new options: F11 to reboot the system
and F2 to manage the system.
1. To begin configuration, make sure you have a keyboard and monitor plugged into
the ESXi server. Press F2 to access the menu-based configuration utility, which will
be the main screen in which all ESXi configurations will take place (Figure 1-2).
1.7 VMware ESXi 5.0 Installation | 15
Figure 1-2. ESXi management menu
2. This is the first option that will need to be configured, because it is not set by
default. The password you set here will be the default for the “root” user account
(Figure 1-3).
Figure 1-3. Changing the password
3. By default, ESXi will be configured to use the Dynamic Host Configuration Protocol (DHCP) and will automatically attempt to configure the IP address. However,
you can bypass this and set your network to use a static IP address using the tools
provided in the management network interface. Using a static IP address is
recommended.
16 | Chapter 1: VMware Infrastructure Installation
As shown in Figure 1-4, the management network offers a few options to configure
your ESXi server.
Figure 1-4. Management network configuration
The Network Adapters option allows you to select which network adapter to use
for the service console IP address if you have more than one interface available; the
interfaces will be labeled vmnic0, vmnic1, etc.
You also have the option to configure your service console IP address to use a
specific VLAN. This is an optional setting.
The next option on the list is IP Configuration. Here, you have the option to configure a DHCP or a static IP address. Choosing the latter will allow you to enter
the basic information needed, such as the IP address, subnet mask, and gateway
(Figure 1-5).
Restart Management Network
Making changes to a static IP address or renewing a DHCP lease on the network may require a restart of the management network.
Test Management Network
Testing the management network will bring up a menu allowing you to perform ping tests to resolve DNS entries.
1.7 VMware ESXi 5.0 Installation | 17
Figure 1-5. IP configuration screen
Configure Keyboard
ESXi supports different keyboard layouts. English is the default, but you can
select from French, German, Russian, and Japanese.
View Support Information
No configurable options are available in this menu; however, it provides a
general location for your ESXi server’s license key, serial number, and SSL
footprint, and the URL to VMware’s support website.
View System Logs
There are three options available here for viewing log entries. You can view
system messages, config, and management agent (hostd) logs.
Restart Management Agents
From time to time, it may be necessary to restart the management agents on
the ESXi host without restarting the server itself. If the management agents are
restarted, all remotely connected clients (such as vCenter clients and the vCenter server) will be disconnected.
It’s important to note that in your vCenter server, the host will show as disconnected while the management network restarts; however, your virtual
machines will continue to be unaffected.
Reset Customized Settings
Resetting the customized settings will reset all the variables on the ESXi server
to factory defaults.
4. The DNS servers and hostname will need to be configured as well. Select the DNS
Configuration menu as shown (Figure 1-6).
Primary DNS Server
This will be the primary DNS server inside your network.
Alternative DNS Server
This will be the secondary DNS server inside your network.
Hostname
This will be the hostname of this ESXi server.
18 | Chapter 1: VMware Infrastructure Installation
Figure 1-6. DNS configuration
5. You will now be able to manage this ESXi server via the vCenter client directly or
add this host to an existing vCenter server for additional management.
See Also
Recipe 1.4
1.8 VMware vCenter Server 5.0 Overview
As virtual environments grow, there comes a point when it becomes unwieldy to manage each ESXi server individually. For some of us, that happens right around the time
the second ESXi server is added, because we want to use our time for more interesting
things rather than for repetitive procedures and maintenance. VMware vCenter Server
provides a central location for managing all of the virtual machines deployed inside the
VMware vSphere infrastructure. It is licensed and sold separately and requires a dedicated Windows server or a Windows virtual machine and a database (Oracle or
Microsoft SQL Server). Once installed and configured, it will make the system administrator’s life much easier. VMware vCenter Server provides a way to distribute resources, manage users, move virtual machines from one piece of physical hardware to
another (while still running!), schedule tasks, and much more.
1.9 vCenter Server 5.0 Installation
To get started, download vCenter Server from the VMware site.
The vCenter Server installation is pretty straightforward. During the course of the installation you will be asked to enter some required information and make some crucial
decisions about your environment. We will walk you through those steps in this section.
1.9 vCenter Server 5.0 Installation | 19
The vCenter server can be installed on a physical server or, as an alternative, inside a
virtual machine. As infrastructure is consolidated into virtual environments, it often
makes sense to utilize the high availability of the vSphere platform. The benefits of
installing your vCenter server inside a virtual machine include taking advantage of HA
inside the environment, moving the virtual machine to new hardware without outages,
and using snapshots. There are many opinions about installing inside a virtual machine;
we feel it makes sense.
It’s worth mentioning that if you plan to install your vCenter database
on the same server as your vCenter server, the system server requirements will be larger. However, it is best practice to separate the vCenter
server and the database server.
VMware vCenter 5.0 Server Requirements
The vCenter server 5.0 requires a 64-bit operating system and will not install on a 32bit operating system. The supported 64-bit operating systems are Microsoft Standard,
Enterprise, or Datacenter 2003 (SP2/R2 SP2) or 2008 (SP2/R2). Minimum requirements are:
•
•
•
•
A 2.0GHz or faster Intel or AMD X86 processor with two or more logical cores
4GB or more of RAM
Minimum 6GB of disk space (this includes vCenter and SQL if on the same server)
10/100/1000 Ethernet adapter (gigabit recommended)
VMware vCenter 5.0 Server Database Requirements
The vCenter server requires one of the following databases:
•
•
•
•
•
•
•
•
•
IBM DB2 9.5
IBM DB2 9.7
Microsoft SQL Server 2005 32-bit Standard with SP3
Microsoft SQL Server 2005 64-bit Enterprise with SP3
Microsoft SQL Server 2008 64-bit Express R2 (5 hosts and 50 virtual machines)
Microsoft SQL Server 2008 R2
Microsoft SQL Server 2008 32-bit or 64-bit Standard/Enterprise
Microsoft SQL Server 2008 32-bit or 64-bit Standard/Enterprise with SP1
Oracle 10g 32-bit Standard, Enterprise, One R2 (supported with version 10.2.0.3.0
or higher)
• Oracle 10g 64-bit Standard, Enterprise, One R2 (requires version 10.2.0.4)
20 | Chapter 1: VMware Infrastructure Installation
• Oracle 11g 32-bit or 64-bit Standard, Enterprise, One R1
• Oracle 11g 32-bit or 64-bit Standard, Enterprise, One R2
The vCenter server offers a few download options: you may download an ISO image
that can be burned to DVD, or a ZIP file that can be extracted on the server on which
you wish to install vCenter Server. Once you have chosen your installation method,
follow these steps:
1. Either insert the CD-ROM and let autorun.exe start the installation, or manually
run the autorun.exe, which is located in the ZIP file that you downloaded (Figure 1-7). Click Next to continue.
Figure 1-7. vCenter Server installation
2. The introduction page tells you the benefits of vCenter Server. Once you have read
these, click Next to continue.
3. Read the license agreement and accept it by clicking “I accept the terms in the
license agreement.” The radio button next to this statement will now show a dot.
Click Next to continue the installation.
4. You will now be prompted to enter information about your user account and company (Figure 1-8). When you’re done, click Next to continue.
5. You are now ready to choose the database method (Figure 1-9). Refer to the database requirements list for the exact databases and versions that are supported.
For production installations, VMware recommends that you do not use the
Microsoft SQL Server Desktop Engine (MSDE) that is included with the installation because it’s suitable only for sites containing, at most, 5 hosts and 50 virtual
machines.
1.9 vCenter Server 5.0 Installation | 21
Figure 1-8. Entering customer information
Assuming the installation will be in a production environment, select the “Use an
existing database server” option and fill in the necessary fields with your database’s
information, keeping in mind the following:
• You must set up ODBC connections before you use Microsoft SQL Server or
Oracle. This can be accomplished in the Control Panel on Windows.
• The data source name (DSN) must be a system DSN.
• If you are using a local SQL server with Windows NT authentication, make
sure to leave the username and password fields blank. Otherwise, enter the
username and password of the remote SQL server to which you are connecting
as shown in Figure 1-10.
Once you have entered your information successfully, press the Next button to
continue the installation are connecting (Figure 1-10).
6. Next, select the destination folders for the vCenter server (Figure 1-11). Click Next
to continue.
7. Now that the basic elements of the installation have been taken care of, you must
decide what pieces of the application to install. You have two different options
(Figure 1-12).
Create a standalone VMware vCenter Server
This option will install vCenter server in standalone mode, or if this is the first
installation, select this option.
Join a VMware vCenter Server Group using linked mode to share information
Select this option if you will be joining the vCenter server to an existing vCenter
server to create a linked group.
22 | Chapter 1: VMware Infrastructure Installation
Figure 1-9. vCenter Server Database selection
Figure 1-10. vCenter Server Database credentials
Once you have chosen the method of installation you wish to use, click the Next
button to continue.
8. Next, configure the ports that vCenter Server will use (Figure 1-13) and click Next
to continue. The default ports will be acceptable here unless you have specific
requirements for your vCenter Server installation.
1.9 vCenter Server 5.0 Installation | 23
Figure 1-11. vCenter destination folders
Figure 1-12. Choosing the vCenter installation type
9. Next, configure the vCenter Server inventory ports (Figure 1-14). Again, the default
ports will be acceptable here unless there are specific requirements for your vCenter
Server installation. Click Next to continue.
24 | Chapter 1: VMware Infrastructure Installation
Figure 1-13. Configure vCenter Server ports
Figure 1-14. vCenter Server inventory ports
10. Next, set the Java JVM web server’s memory configuration (Figure 1-15). This
setting will allocate a specific amount of memory on the vCenter server for Java. If
there is enough memory available on the vCenter server, select the large install
option to prevent issues in the future if your environment will grow. For most
installations, the small or medium option will be fine.
1.9 vCenter Server 5.0 Installation | 25
Figure 1-15. vCenter Server JVM configuration
11. Finally, click Install to begin the installation (Figure 1-16). If the vCenter server
will be handling more than 2,000 virtual machines, click the check box to increase
the number of ephemeral ports available within vCenter Server.
Figure 1-16. vCenter Server install summary
26 | Chapter 1: VMware Infrastructure Installation
1.10 VMware vCenter Client 5.x Overview
The vCenter client is used to manage individual ESXi hosts as well as to provide an
administration interface to the vCenter server. It is included with the vCenter server
download.
1.11 vCenter Client 5.x Installation
vCenter Client requirements are:
• One of the following 32-bit or 64-bit operating systems:
— Windows 7
— Windows 7 SP1
— Windows 2003 Server with SP2
— Windows 2003 Server R2
— Windows 2008 R2
— Windows 2008 R1 with SP1
• .NET Framework 3.5 SP1 (this is included with the vCenter Client installer)
• 1 CPU, 500MHz Intel or AMD X86 processor, 1GHz CPU recommended
• 1GB RAM minimum (2GB recommended)
• 2GB storage space for the basic installation
• 1Gb network connection
The vCenter client is normally installed along with the vCenter server installation.
However, it is possible to install the vCenter client by itself on other computers by going
to https://youresxserver/client/VMware-viclient.exe and downloading the client installer. Once you’ve downloaded it, run the application. The installation is very intuitive.
1.12 vCenter 5.0 Web Client Installation
The release of vSphere 5.0 has brought some exciting changes to the way you can
manage your VMware environment. Former web consoles weren’t user friendly and
administrators had to utilize the vCenter client install. However, with vSphere 5.0, this
has changed. Today, there is a functional and useful interface that was written using
Adobe Flex, allowing for cross-platform and browser compatibility. We’ll outline the
steps here to install the web client on your vCenter server or an additional server if you
wish.
1.12 vCenter 5.0 Web Client Installation | 27
1. Insert the vCenter installation disk or mount the ISO image. Once the installer
appears, select the vSphere Web Client (Server) option.
2. Follow the installation steps. After you complete them, additional options will need
to be configured so the server can connect to your vCenter server.
3. Navigate to https://127.0.0.1:9443/admin-app inside your browser (from the server
you installed the Web Client on).
4. Next, you’ll need to register the Web Client with your vCenter Server. Click the
Register vCenter server link in the upper right hand corner.
5. A new window will appear. Enter the credentials and click Register.
vCenter Server URL
Enter the fully qualified name to the server on which you have vCenter Server
installed.
Username
Enter an administrator account inside vCenter.
Password
Enter the password you have chosen for your administrator account.
vSphere Web Client URL
This will be the URL used to access the web client.
6. You can now log in to the interface at https://webclientserver:9443/vsphere-client/, which allows you to log in with your vCenter credentials and start managing
your virtual machines.
1.13 vSphere 5.0 License Changes
VMware has made some modifications to its license model with the release of vSphere
5.0. In this section, we’ll take a look at those changes and what will be required to
upgrade from vSphere 4.x or ESX 3.x.
vSphere 5.0 is still based on the per-socket license, but now also includes a vRAM
entitlement. This means the license scheme will take a holistic approach, removing all
CPU and memory limitations and then taking all the servers managed via vCenter into
consideration when calculating the available licenses. This change allows customers to
purchase servers with different CPU socket configurations without having to purchase
expensive licensing if they do not plan to use the additional sockets or memory. Instead,
the available resources inside vCenter will be used to create a pool of resources that
each ESXi server will use.
VMware has implemented a compliance policy to maintain an accurate license model.
Each physical CPU must be licensed, and will calculate a 12 month average of consumed
vRAM rather than a high water mark. If the amount of vRAM is over the amount in
the pool, additional licenses will be required. If an upgrade is required, a customer can
upgrade all the CPU licenses to a license with a higher vRAM allotment.
28 | Chapter 1: VMware Infrastructure Installation
In the following, we will take a look at the changes and how they will affect each part
of the vSphere environment.
CPU restrictions
The new license model requires at least one CPU in the physical server.
vRAM entitlements
vRAM is the amount of RAM allocated to a virtual machine. For example, if you
create a virtual machine with 2GB RAM that will translate into 2GB of vRAM. It
is possible to overallocate vRAM on a single ESXi server regardless of the amount
of physical RAM, as long as the resources are available from a vRAM perspective.
vRAM per VM
RAM that is allocated to a virtual machine will pull from the vRAM license pool,
which allocates a maximum amount of 96GB to each virtual machine. Thus, if a
virtual machine was allocated 128GB of vRAM, it will only take 96GB from your
license pool.
1.14 vConverter
vConverter is a free application available from VMware that allows you to transform
your physical servers into virtual servers easily, moving them from their own machines
into your VMware system. There are two ways this can be done. In a cold migration,
you power down a server and convert it while it is offline. With vConverter, however,
you can also perform a hot migration, which allows you to convert and migrate a live
operating server while it is in use. VMware Converter also allows you to take older
virtual machines and migrate them into a new network while upgrading them to the
current version.
The installation of vConverter is pretty straightforward. vCenter Converter Standalone
5.x components (client, server, and agent) can be installed on the following platforms:
•
•
•
•
•
•
Windows XP Professional (32-bit and 64-bit)
Windows Server 2003 SP2, R2 (32-bit and 64-bit)
Windows Vista (32-bit and 64-bit)
Windows Server 2008 (32-bit and 64-bit)
Windows Server 2008 R2 (64-bit)
Windows 7 (32-bit and 64-bit)
vConverter can be downloaded from the following URL (registration is required to
download):
http://vmware.com/download/converter
1.14 vConverter | 29
To install vConverter on Windows:
1. Download the Windows executable file.
2. Run the installer and click Next at the introduction screen.
3. Accept the license agreement by checking “I accept the terms in the license agreement.” Click Next to continue.
4. Choose the directory in which to install the files. The installer will default to
C:\Program Files\VMware\VMware vCenter Converter Standalone. Once you’re
satisfied, click Next to continue the installation.
5. Select the type of installation you want to do. There are two options here (Figure 1-17):
Local installation
This installs vCenter Converter on the server. It allows you to create and manage conversion tasks from this local server only.
Client/Server installation (advanced)
This option sets up a client/server model for vCenter Converter. Here, you can
install the individual client, server, and/or agent pieces on the local server
(Figure 1-18).
If you choose Local installation, jump to step 7; otherwise, continue to step 6.
Figure 1-17. vCenter Converter setup types
6. The advanced installation choice gives you the option to specify which ports
vCenter Converter will use (Figure 1-19). The defaults are:
30 | Chapter 1: VMware Infrastructure Installation
Figure 1-18. vCenter Converter custom setup
• HTTPS Service Port: 443
• HTTP Service Port: 80
• Agent Service Port: 9089
When you are satisfied with the ports, click Next to continue the installation.
Figure 1-19. vCenter Converter custom ports
7. You are now ready to proceed with the installation. Click Install to continue.
1.14 vConverter | 31
8. When the installation has completed, you will have the option to automatically
launch the vCenter Converter client. Click the Finish button to complete the
installation.
32 | Chapter 1: VMware Infrastructure Installation
O’Reilly Ebooks—Your bookshelf on your devices!
When you buy an ebook through oreilly.com you get lifetime access to the book, and
whenever possible we provide it to you in five, DRM-free file formats—PDF, .epub,
Kindle-compatible .mobi, Android .apk, and DAISY—that you can use on the devices of
your choice. Our ebook files are fully searchable, and you can cut-and-paste and print
them. We also alert you when we’ve updated the files with corrections and additions.
Learn more at ebooks.oreilly.com
You can also purchase O’Reilly ebooks through the
iBookstore, the Android Marketplace, and Amazon.com.
Spreading the knowledge of innovators
oreilly.com