1
Wireless(BT) Pocket Laser Scanner
- MS916 -
User's Manual
Version 2.0
© 2015 Unitech Electronics Co., Ltd. All rights reserved. Unitech is a registered trademark of
Unitech Electronics Co., Ltd.
Regulatory Compliance Statements
FCC Warning Statement
This equipment has been tested and found to comply with the limits for a Class
B digital device, pursuant to part 15 of the FCC rules. These limits are
designed to provide reasonable protection against harmful interference in a
residential installation. This equipment generates, uses and can radiate radio
frequency energy and, if not installed and used in accordance with the
instructions, may cause harmful interference with radio communications.
However, there is no guarantee that interference will not occur in a particular
installation. If this equipment does cause harmful interference with radio or
television reception, which can be determined by turning the equipment off and
on, the user is encouraged to try to correct the interference by one or more of
the following measures:
–Reorient or relocate the receiving antenna.
–Increase the separation between the equipment and receiver.
–Connect the equipment into an outlet on a circuit different from that to
which the receiver is connected.
–Consult the dealer or an experienced radio/TV technician for help.
1. This Transmitter must not be co-located or operating in conjunction with
any other antenna or transmitter.
2. This equipment complies with FCC RF radiation exposure limits set forth
for an uncontrolled environment. To maintain compliance with FCC RF
exposure requirements, avoid direct contact to the transmitting antenna
during transmitting.
3. Any changes or modifications (including the antennas) made to this device
that are not expressly approved by the manufacturer may void the user’s
authority to operate the equipment.
i
FCC Label Statement
This device complies with part 15 of the FCC rules. Operation is subject to the
following two conditions:
1. This device may not cause harmful interference, and
2. This device must accept any interference received, including interference
that may cause undesired operation.
Canadian Compliance Statement
This Class B Digital apparatus meets all requirements of the Canadian
Interference-Causing Equipment Regulations.
Cet appareil numerique de la classe B respecte les exigences du Reglement
sur le material broilleur du Canada.
European Conformity Statement
This device complies with the R&TTE Directive (1999/5/EC) issued by the
Commission of the European Community.
RoHS Statement
This device conforms to RoHS (Reduction Of
Hazardous Substances) European Union regulations
that set maximum concentration limits on hazardous
materials used in electrical and electronic
equipment.
ii
TaiwanNCC Warning Statement
低功率電波輻射性電機管理辦法
第十二條: 經型式認證合格之低功率射頻電機,非經許可,公司、商號或使用
者均不得擅自變更頻率、加大功率或變更原設計之特性及功能。
第十四條: 低功率射頻電機之使用不得影響飛航安全及干擾合法通信;經發現
有干擾現象時,應立即停用,並改善至無干擾時方得繼續使用。低
功率射頻電機需忍受合法通信或工業、科學及醫療用電波輻射性電
機設備之干擾。
i
Laser Information
The Unitech MS916 series is certified in the U.S. to conform to the
requirements of DHHS/CDRH 21CFR Subchapter J and to the requirements of
IEC 825-1. Class II and Class 2 products are not considered to be hazardous.
The MS916 series contains internally a Visible Laser Diode (VLD) whose
emissions do not exceed the maximum limits as set forth in the above
regulations. The scanner is designed so that there is no human access to
harmful laser light during normal operation, user maintenance or prescribed
service operations.
The laser safety warning label required by the DHHS/IEC for the MS916
series' optional laser scanner module is located on the memory compartment
cover, on the back of the unit.
CAUTION! Use of controls or adjustments or performance of procedures
other than those specified herein may result in hazardous laser
light. Use of optical instruments with the scanner, including
binoculars, microscopes, and magnifying glasses, with will
increase eye damage. This does not include eyeglasses worn by
the user.
ii
Table of Contents
Chapter 1: Overview ......................................................................................1
1.1 Package .................................................................................................1
1.2 Scanner Detail........................................................................................3
1.3 Getting Started .......................................................................................4
1.4 Battery Charging ....................................................................................5
1.5 Specifications .........................................................................................6
1.6 LED Indicator/Beeper sequence.............................................................9
Chapter 2: Display Menu Tree.....................................................................10
Chapter 3: Installation .................................................................................13
3.1 BT HID..................................................................................................13
3.2 BT SPP.................................................................................................13
3.3 BT SPP (Slave) ....................................................................................14
3.4 USB SPP..............................................................................................15
Chapter 4: Command settings ....................................................................16
4.1 System setting......................................................................................16
4.2 Bluetooth pairing ..................................................................................17
4.3 Output data transmit .............................................................................19
4.4 BT Config .............................................................................................21
4.5 Beep & Vibration ..................................................................................24
4.6 Scan mode ...........................................................................................26
4.7 Laser on time........................................................................................28
4.8 Aim duration .........................................................................................28
4.9 Time out between same symbol ...........................................................29
4.10 Transmit “No Read” message.............................................................29
4.11 Data Terminator ..................................................................................30
4.12 Prefix / Suffix ......................................................................................31
Chapter 5: Symbology .................................................................................35
5.1 Disable All Symbologies .......................................................................35
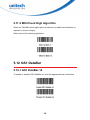
5.2 UPC/EAN .............................................................................................35
5.3 Code 128..............................................................................................49
5.4 Code 39................................................................................................51
5.5 Code 93................................................................................................59
iii
5.6 Code 11 ................................................................................................61
5.7 Interleaved 2 of 5..................................................................................64
5.8 Discrete 2 of 5 ......................................................................................67
5.9 Chinese 2 of 5 ......................................................................................69
5.10 Codabar..............................................................................................69
5.11 MSI .....................................................................................................73
5.12 GS1 DataBar ......................................................................................76
5.13 Transmit Code ID Character...............................................................78
5.14 Linear Code Type Security Level........................................................79
5.15 Bi-directional Redundancy..................................................................81
Appendix A: Miscellaneous Code Information...........................................82
Appendix B: Numeric Bar Codes ................................................................86
iv
Chapter 1
Overview
Chapter 1: Overview
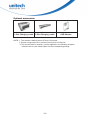
1.1 Package
Please make sure the following contents are in the MS916 gift box. If
something is missing or damaged, please contact your Unitech representative.
The standard package contents
MS916 Scanner
Quick Reference Guide
Micro USB to USB
Cable
Hand Strap
-1-
Optional accessories
1-Slot Charging cradle
5-Slot Charging cradle
USB Adapter
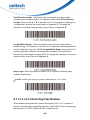
NOTE: 1. The scanner’s default power off time is 5 minutes.
2. Please charge scanner for at least 2 hours prior to initial use.
3. The barcode with an asterisk (*) which appears in the following chapters
indicates that it is the default option for the corresponding setting.
-2-
1.2 Scanner Detail
Scan & Power Button
Power On/Off & Scan barcode
Page up / Page down keys
Move up / down through list of
menu items
Scan Window
Charging Status LED (Red LED)
It will light up while the scanner is
charging
Scan LED (Green LED)
It will light up while the barcode is
successfully scanned
Laser Warning Label
Reset Key
Product Label
Hand Strap Hole
Micro USB Connector
For scanner charging and
data transmission
-3-
1.3 Getting Started
To turn on the scanner, press and hold the Scan & Power Button for about 2
seconds. To turn off the scanner, press and hold the Scan & Power Button for
about 5 seconds.
After powering on, you will see the following screen on the scanner display.
The scanner is now under standby mode. Now you can scan the desired
barcode.
The standby display will show the current Battery Status, Scanner Type,
Operation Mode, and Time.
To scan a barcode, make sure the aiming beam crosses every bar and space
of the barcode.
-4-
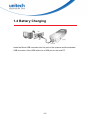
1.4 Battery Charging
Insert the Micro USB connector into the port on the scanner and the standard
USB connector of the USB cable into a USB port on the host PC.
-5-
1.5 Specifications
System
Display
1" OLED, 128 x 64
OS
Proprietary, Connect to host with Windows, Android and
iOS
Memory
64 Kbytes SRAM / 16MB Flash ROM
Key
3 Keys: Page Up, Page Down, Scan with power on/off
feature
Optical & Performance
Receiving Device Laser Engine
Light Source
650 nm visible laser diode
Max. Resolution
4mil
Scan Rate
104 scans/second
Skew Angle
47±3 degrees
Pitch Angle
35±3 degrees
Printing Contrast
Scale
minimum 25%
Depth of Field
Symbology | Density | Near | Far
(DOF PCS=80%) Code 39, 4 mils | 2.5 cm | 13.97 cm
Code 39, 5 mils | 3.18 cm | 20.32 cm
Code 39, 7.5 mils | 3.81 cm | 33.02 cm
Code 39, 10 mils | 3.81 cm | 45.72 cm
Code 39, 15 mils | 3.81 cm | 71.72 cm
Code 39, 20 mils | 4.45 cm | 83.82 cm
Code 39, 40 mils | x | 91.44 cm
Code 39, 55 mils | x | 114.3 cm
UPC, 13 mils | 3.81 cm | 60.96 cm
-6-
Functionality
Symbologies
1D
Code 39, Full ASCII Code 39, Interleave 2 of 5, UPC
A/E/E1, MSI, Codabar, Code 11, EAN8/13, Code 93, Code
128, EAN 128, Code32, GS1 databar Code, Bookland
EAN, Discreate 2 of 5, Chinese 2 of 5, ISBT 128, UCC
Coupon Extended Code, Bookland 128
Operation Mode
Trigger mode, Pulse mode, Flash mode, Continuous Mode,
Buffer mode
Data Formatting
Prefix, Suffix, Code ID, Reformatting Date
Environmental
ESD Protection
Functional after 8K Contact and 12K Air
Mechanical Shock 1.5m onto concrete (scanner only)
IP Rate
IP42
Operating
Temperature
0°C to 50°C
Storage
Temperature
-30°C to 70°C
Relative Humidity 95% non-condensing
Electrical
Operation Voltage DC 3V to 5V
Current
Consumption
Operation mode: < 125mAh, Standby mode: < 39mAh
Battery Type
Rechargeable Li-ion battery
Battery Capacity
680 mAh
Battery Charging
time
Fully charged in about 3 hours
Operating Time
8 hours at condition of 1 scan/5 sec
-7-
Communication
Radio Frequency Bluetooth V2.1+EDR. Class 2
Protocol
Wireless SPP & HID profiles
Range
Up to 30 Feet (Open space)
Interface
supported
Micro USB
Mechanical
Scanner
Dimension
H21.1*W36.9*L95.9mm
Scanner Weight
63g
Switch life
10 million times
Regulation Approvals
CE, FCC, BSMI, VCCI
-8-
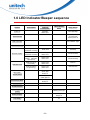
1.6 LED Indicator/Beeper sequence
Division
Action/Status
LED for Barcode
reading &
Communication
LED for Battery
status
Red Light
blinks once
Power On
Beep / Sound
One High Beep
Auto Power Off
Three short beeps
at 15 seconds
before power off
USB connection
Low- Medium -High
USB disconnection
High- Medium -Low
Barcode reading
Data sent to PC
Data delete /
All Data delete
■ Wedge & Auto
(When BT Connect)
Green Light
blinks once
One Beep
■ Batch
(When BT Connect)
Green Light
blinks once
One short Beep
■ Batch & Auto &
Wedge (When BT
Disconnect)
Green Light
blinks once
One short Beep
■Data sent to PC
successfully
Green Light
blinks once
Dee-Du
■Fail sent data to
PC (Inventory)
Green Light
blinks once
Dee-Dee-Dee
DeletingGreen light
always on
Completed Green light off
Power Saving Mode
Green light
always on
BT connection
Low- Medium -High
High- Medium -Low
BT disconnection
Low Battery Alarm
(<10%)
Blinking Red Light
Battery charging
Red light
always on
Battery
Fully charged
Green light always
on
-9-
Chapter 2
Display Menu Tree
Chapter 2: Display Menu Tree
To enter main menu of MS916, press and hold Page Down button and then
press Page Up button. You will see the following screen on the MS916 display.
Now you can use Page Up/Down button to scroll through the menu and use
Scan button to make your selection.
You can access the desired function refer to the Menu Tree.
Top
Menu
Sub Menu Level 1
Sub Menu Level 2
Options/Result
Default Setting
1. Scanner Type
BT HID/USB SPP/
BT SPP/BT SPP (Slave)
BT HID
2. Operation Mode
Auto/Wedge/Batch
Auto Mode
3.1 View Date/Time
Show date and time
N/A
3.2 Set Date/Time
SET DATE/SET TIME
2015-01-01
08:00:00
3.3 Time Display
Auto/Always
Auto
3.4 Exit
Return to the previous menu
N/A
4.1 Power Saving
Disable/30/20/15/10/5 Sec.
15 Sec.
4.2 Auto Power Off
Disable/30/20/15/10/5/3/1 Min.
5 Min.
4.3 Exit
Return to the previous menu
N/A
Enable/Disable
Enable
Yes/No
No
7. FW Version
Show Firmware Version
V0.50
8. Exit
Return to the previous menu
N/A
3. Date/Time
General
Setting
4. Power Manager
5. Setup By Label
6. FAC Default
6.1 Restore to FAC Default?
- 10 -
Top
Menu
Sub Menu Level 1
1. Buffer Data
Sub Menu Level 2
Options/Result
1.1. Erase Previous Buffer Entry?
Yes/No
No
CR/None/TAB/CRLF/LF
CR
Show Free Buffer Memory Space
20 KB
Yes/No
No
Return to the previous menu
N/A
(Press scan key to cancel )
N/A
2. BT MAC Address
Show BT MAC Address
N/A
3. Paired Device
Show BT paired Name and MAC Address
N/A
Yes/No (If a BT device has been paired with
MS916)
No
5. BT FW Version
Show BT Firmware Version
N/A
6. Exit
Return to the previous menu
N/A
2. Data Terminator
Data &
Memory 3. Free MEM Space
4. Erase Memory
4.1. Erase Buffer?
5. Exit
1. BT Pairing
Bluetooth
CFG
Default Setting
4. Remove Pair
BT Pairing in progress
4.1 Remove Current BT Pair ?
- 11 -
Top
Menu
Sub Menu Level 1
Sub Menu Level 2
Options/Result
1. Beeper Volume
High/Medium/Low/Mute
Medium
2.Vibrator
Enable/Disable
Disable
3.1 Good Read
Beeper&Vibrator/Vibrator/Beeper/None
Beeper&Vibrator
3.2 Connection
Beeper&Vibrator/Vibrator/Beeper/None
Beeper&Vibrator
3.3 System Setting
Beeper&Vibrator / Vibrator/Beeper/None
Beeper&Vibrator
3.4 System Warn/Err
Beeper&Vibrator /Vibrator/Beeper/None
Beeper&Vibrator
3.5 PwrOn
Beeper&Vibrator /Vibrator/Beeper/None
Beeper&Vibrator
3.6 PwrOff Alarm
Beeper&Vibrator /Vibrator/Beeper/None
Beeper&Vibrator
3.7 Exit
Return to the previous menu
N/A
ON/OFF
OFF
*UPC-A
Enable/Disable
Enable
*UPC-E
Enable/Disable
Enable
*EAN-8
Enable/Disable
Enable
*EAN-13
Enable/Disable
Enable
*Code 39
Enable/Disable
Enable
*Code 128
Enable/Disable
Enable
*EAN 128
Enable/Disable
Enable
*I 2 of 5
Enable/Disable
Enable
Code 93
Enable/Disable
Disable
Codabar
Enable/Disable
Disable
Code 11
Enable/Disable
Disable
MSI
Enable/Disable
Disable
UPC-E1
Enable/Disable
Disable
Bookland EAN
Enable/Disable
Disable
Discreate 2 of 5
Enable/Disable
Disable
Chinese 2 of 5
Enable/Disable
Disable
GS1-14
Enable/Disable
Disable
Beep &
Vibrate
3. Indicators
1. Disable All Code
Barcode
setting
Default Setting
Remote
setting
- 12 -
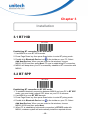
Chapter 3
Installation
Chapter 3: Installation
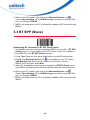
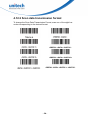
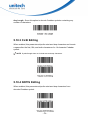
3.1 BT HID
BT HID*
Establishing BT connection in BT HID mode.
1. Use MS916 to scan BT HID barcode.
2. Press Page Down key then press Scan button to enter BT pairng mode.
3. Double-click Bluetooth Device icon in the toolbar on your PC. Select
Add New Devices. When you see a device list windows, choose
MS916-XXXX and then press Next. PC now is establishing BT connection.
4. MS916 will beep when your PC successfully establish a BT connection with
MS916.
3.2 BT SPP
BT SPP
Establishing BT connection in BT SPP mode.
1. To establish bluetooth connection between MS916 and your PC in BT SPP
mode, you must install unitech CDC driver on your PC in advance.
2. Use MS916 to scan BT SPP barcode.
3. Press Page Down key then press Scan button to enter BT pairng mode.
4. Double-click Bluetooth Device icon in the toolbar on your PC. Select
Add New Devices. When you see a device list windows, choose
MS916-XXXX and then press Next.
5. When PC is establishing a bluetooth connection in BT SPP mode with
MS916, windows system will automatically install the required drivers.
- 13 -
6. Back to your PC toolbar, right click on the Bluetooth Device icon ,
choose Open Settings. Go to COM Port page and select in-coming COM
port , for example COM 28.
7. MS916 will beep when your PC successfully establish a BT connection with
MS916.
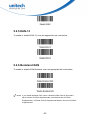
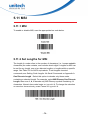
3.3 BT SPP (Slave)
BT SPP (Slave)
Establishing BT connection in BT SPP (Slave) mode.
1. To establish bluetooth connection between MS916 and your PC in BT SPP
(Slave) mode, you must install unitech CDC driver on your PC in advance.
2. Use MS916 to scan BT SPP (Slave) barcode.
3. Press Page Down key then press Scan button to enter BT pairng mode.
4. Double-click Bluetooth Device icon in the toolbar on your PC. Select
Add New Devices. When you see a device list windows, choose
MS916-XXXX and then press Next.
5. When PC is establishing a bluetooth connection in BT SPP (Slave) mode
with MS916, windows system will automatically install the required drivers.
6. Back to your PC toolbar, right click on the Bluetooth Device icon ,
choose Open Settings. Go to COM Port page and select out-going COM
port , for example COM 27.
7. MS916 will beep when your PC successfully establish a BT connection with
MS916.
- 14 -
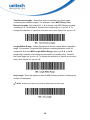
3.4 USB SPP
USB SPP
Establishing BT connection in USB SPP mode.
1. To establish bluetooth connection between MS916 and your PC in USB
SPP mode, you must install unitech CDC driver on your PC in advance.
2. Use MS916 to scan USB SPP barcode.
3. Connect MS916 to your PC with a Micro USB-USB cable.
4. Back to your PC, open the application named ‘Tera Term’ and then choose
the COM Port named 'CDC USB'.
- 15 -
Chapter 4
Command settings
Chapter 4: Command settings
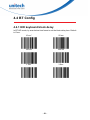
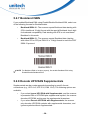
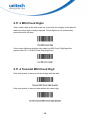
4.1 System setting
4.1.1 Default
By scan below bar code can restore the factory setting
Factory Default
4.1.2 Display FW version
By scan below bar code to show the current F/W & BT version
FW version
4.1.3 Auto Power Off
By scan below bar code to setting the time frame for auto power off
1 Minute
3 Minutes
5 Minutes *
10 Minutes
15 Minutes
20 Minutes
30 Minutes
Disable
- 16 -
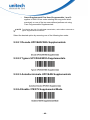
4.1.4 Power Saving
By scan below bar code to setting the time frame for power saving
5 Seconds
10 Seconds
15 Seconds
20 Seconds
30 Seconds
Disable
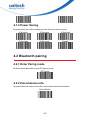
4.2 Bluetooth pairing
4.2.1 Enter Paring mode
By Scan below bar code to enter BT pairing mode
BT Pairing
4.2.2 Paired device info.
By scan below bar code to show the current paired device information
Paired Device
- 17 -
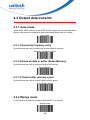
4.2.3 Remove the pair
You can scan below bar code to remove BT pair
Remove Pair
- 18 -
4.3 Output data transmit
4.3.1 Auto mode
In this mode, When scanner is out off BT transmit range, the scanned data will be
stored in the memory and transmit data automatically when back to in-range.
Auto mode*
4.3.1.1 Erased last memory entry
By scan below bar code to erase last scanned data in memory
Erased Last Memory Entry
4.3.1.2 Erase all data in buffer (Erase Memory)
By scan below bar code to erase all data in the memory
Erase Memory
4.3.1.3 Check buffer memory space
By scan below bar code to check buffer memory space
Free Memory Space
4.3.2 Wedge mode
In this mode, the data only transmit while the BT is connected
Wedge mode
- 19 -
4.3.3 Batch mode
In this mode, the scanned data will be stored in the memory all the time and
transmit data only when BT is conncted by scanned the “send batch” bar code
Batch mode
4.3.3.1 Send batch
By scan below bar code to send the stored data to host
Send Batch
4.3.3.2 Erase last memory entry
By scan below bar code to erase last scanned data in batch memory
Erase Last Memory Entry
4.3.3.3 Erase all data in batch (Erase memory)
By scan below bar code to erase all data in batch momery
Erase Memory
4.3.3.4 Free batch memory space
By scan below bar code to check batch memory space
Free Memory Space
- 20 -
4.4 BT Config
4.4.1 HID keyboard block delay
In BT HID mode, by scan below time frame to set the block delay time. Default
is 10ms.
10 ms *
50 ms
100 ms
500 ms
1 Sec.
3 Sec.
- 21 -
4.4.2 HID keyboard inter-character delay
In BT HID mode, by scan below time frame to set inter-character delay time.
Default is 1ms.
1 ms *
5 ms
10 ms
20 ms
4.4.3 HID keyboard Case
In BT HID mode, by scan below bar code to change the alphabet case. Scan
‘’to lower” barcode to output data in lower case; or scan “to upper” barcode to
output data in upper case. Default setting: “auto trace” to have original
scanned data transmitted.
Auto Trace *
To Lower
- 22 -
To Upper
4.4.4 HID keyboard language
In BT HID mode, by scan below bar code to change keyboard language.
Default is US English
US English *
UK English
Swiss
Swedish
Norwegian
Italian
German
French
Danish
Partial ALT
Japanese (OADG109)
Spanish
ALT Mode
- 23 -
4.5 Beep & Vibration
4.5.1 Beep
By scan below bar code to adjust beep volume. Default: Medium volume
4.5.1.1 High volume
High Volume
4.5.1.2 Medium volume *
Medium Volume*
4.5.1.3 Low volume
Low Volume
4.5.1.4 Mute
Mute
- 24 -
4.5.2 Vibration
The vibration is off in default. By scan below bar code to open vibration
function
Enable Vibrator
Disable Vibrator *
- 25 -
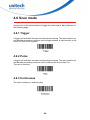
4.6 Scan mode
Choose one of the options below to trigger the scan engine. Bar codes are on
the following page.
4.6.1 Trigger
A trigger pull activates the laser and decode processing. The laser remains on
and decode processing continues until a trigger release, a valid decode, or the
Laser On Time-out is reached.
4.6.2 Pulse
A trigger pull activates the laser and decode processing. The laser remains on
and decode processing continues until a valid decode or the Laser On
Time-out is reached.
4.6.3 Continuous
The laser is always on and decoding.
- 26 -
4.6.4 Flash
This trigger mode is used for trigger less operation. Scanning range is reduced
in this mode. This mode cannot be used with engines that support an aim mode.
- 27 -
4.7 Laser on time
This parameter sets the maximum time decode processing continues during a
scan attempt. It is programmable in 0.1 second increments from 0.50 to 25.5
seconds.
To set a Laser On Time, scan the bar code below. Next scan two numeric bar
codes beginning on Appendix B that correspond to the desired on time. Single
digit numbers must have a leading zero. For example, to set an on time of 0.5
seconds, scan the bar code below, then scan the "0", "5" and "0" bar codes; to
set an on time of 10.5 seconds, scan the bar code below, then scan the "1", "0"
and "5" bar codes. To change the selection or cancel an incorrect entry, scan
Cancel on Appendix B
.
4.8 Aim duration
It is programmable in 0.1 second increments from 0.0 to 9.9 seconds. No aim
pattern is visible when the value is 0.0.
To set an aim duration, scan the bar code below. Next scan two numeric bar
codes beginning on Appendix B that correspond to the desired aim duration.
Single digit numbers must have a leading zero. For example, to set an aim
duration of 0.5 seconds, scan the bar code below, then scan the “0” and “5” bar
codes. To change the selection or cancel an incorrect entry, scan Cancel on
Appendix B.
.
- 28 -
4.9 Time out between same symbol
When in Continuous triggering mode, this parameter sets the minimum time
that must elapse before the scan engine decodes a second bar code identical
to one just decoded. This reduces the risk of accidently scanning the same
symbol twice. It is programmable in 0.1 second increments from 0.0 to 9.9
seconds.
To set a time-out between same symbol, scan the bar code below. Next scan
two numeric bar codes beginning on Appendix B that correspond to the
desired time-out. Single digit values must have a leading zero. For example, to
set a time-out of 0.5 seconds, scan the bar code below, then scan the “0” and
“5” bar codes. To change the selection or cancel an incorrect entry, scan
Cancel on Appendix B.
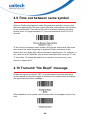
4.10 Transmit “No Read” message
Enable this option to transmit “NR” if a symbol does not decode during the
timeout period or before the trigger is released. Any enabled prefix or suffixes
are appended around this message.
When disabled, and a symbol cannot be decoded, no message is sent to the
host.
- 29 -
4.11 Data Terminator
By scan below bar code to terminate data
None
CR*
CRLF
LF
TAB
- 30 -
4.12 Prefix / Suffix
4.12.1 Prefix/Suffix Values
A prefix and/or one or two suffixes can be appended to scan data for use in
data editing. To set these values, scan a four-digit number (i.e. four bar codes)
that corresponds to ASCII values. See the Table 5-2 and Numeric Bar Codes
on Appendix B. To change the selection or cancel an incorrect entry, scan
Cancel on Appendix B. To set the Prefix/Suffix values via serial commands,
see Setting Prefixes and Suffixes Via Serial Commands on Table 4-1.
NOTE In order to use Prefix/Suffix values, the Scan Data Transmission Format on
4.12.2 Scan data transmission format must be set.
- 31 -
Table 4-1 Character Equivalents
Scan Value
Keystroke
Scan Value
Keystroke
1000
CTRL 2
1033
!
1001
CTRL A
1034
‘
1002
CTRL B
1035
#
1003
CTRL C
1036
$
1004
CTRL D
1037
%
1005
CTRL E
1038
&
1006
CTRL F
1039
‘
1007
CTRL G
1040
(
1008
CTRL H
1041
)
1009
CTRL I
1042
*
1010
CTRL J
1043
+
1011
CTRL K
1044
,
1012
CTRL L
1045
-
1013
CTRL M
1046
.
1014
CTRL N
1047
/
1015
CTRL O
1048
0
1016
CTRL P
1049
1
1017
CTRL Q
1050
2
1018
CTRL R
1051
3
1019
CTRL S
1052
4
1020
CTRL T
1053
5
1021
CTRL U
1054
6
1022
CTRL V
1055
7
1023
CTRL W
1056
8
1024
CTRL X
1057
9
1025
CTRL Y
1058
:
1026
CTRL Z
1059
;
1027
CTRL [
1060
<
1028
CTRL \
1061
=
1029
CTRL ]
1062
>
1030
CTRL 6
1063
?
1031
CTRL -
1064
@
1032
Space
1065
A
- 32 -
Scan Value
Keystroke
Scan Value
Keystroke
1066
B
1098
b
1067
C
1099
c
1068
D
1100
d
1069
E
1101
e
1070
F
1102
f
1071
G
1103
g
1072
H
1104
h
1073
I
1105
i
1074
J
1106
j
1075
K
1107
k
1076
L
1108
l
1077
M
1109
m
1078
N
1110
n
1079
O
1111
o
1080
P
1112
p
1081
Q
1113
q
1082
R
1114
r
1083
S
1115
s
1084
T
1116
t
1085
U
1117
1086
V
1118
v
1087
W
1119
w
1088
X
1120
x
1089
Y
1121
y
1090
Z
1122
z
1091
[
1123
{
1092
\
1124
|
1093
]
1125
}
1094
^
1126
~
1095
_
1127
Undefined
1096
‘
1097
a
- 33 -
u
4.12.2 Scan data transmission format
To change the Scan Data Transmission Format, scan one of the eight bar
codes corresponding to the desired format.
- 34 -
Chapter 5
Symbology
Chapter 5: Symbology
5.1 Disable All Symbologies
Scan the bar code below to disable the decoding of all symbologies. Use this
to simplify selecting a single symbology to decode by scanning this, then
scanning the desired enable code type bar code. Note that the decoder can
still decode parameter bar codes.
5.2 UPC/EAN
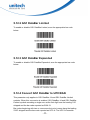
5.2.1 UPC-A
To enable or disable UPC-A, scan the appropriate bar code below.
- 35 -
5.2.2 UPC-E
To enable or disable UPC-E, scan the appropriate bar code below.
5.2.3 UPC-E1
To enable or disable UPC-E1, scan the appropriate bar code below.
NOTE UPC-E1 is not a UCC (Uniform Code Council) approved symbology.
5.2.4 EAN-8
To enable or disable EAN-8, scan the appropriate bar code below.
- 36 -
5.2.5 EAN-13
To enable or disable EAN-13, scan the appropriate bar code below.
5.2.6 Bookland EAN
To enable or disable EAN Bookland, scan the appropriate bar code below.
NOTE If you enable Bookland EAN, select a Bookland ISBN Format. Also select
either Decode UPC/EAN Supplementals, Autodiscriminate UPC/EAN
Supplementals, or Enable 978/979 Supplemental Mode in Decode UPC/EAN
Supplementals.
- 37 -
5.2.7 Bookland ISBN
If you enabled Bookland EAN using Enable/Disable Bookland EAN, select one
of the following formats for Bookland data:
•
Bookland ISBN-10 - The scanner reports Bookland data starting with
978 in traditional 10-digit format with the special Bookland check digit
for backward-compatibility. Data starting with 979 is not considered
Bookland in this mode.
•
Bookland ISBN-13 - The scanner reports Bookland data (starting
with either 978 or 979) as EAN-13 in 13-digit format to meet the 2007
ISBN-13 protocol.
NOTE For Bookland EAN to function properly, first enable Bookland EAN using
Enable/Disable Bookland EAN.
5.2.8 Decode UPC/EAN Supplementals
Supplementals are bar codes appended according to specific format
conventions (e.g., UPC A+2, UPC E+2, EAN 13+2). The following options are
available:
•
If you select Ignore UPC/EAN with Supplementals, and the scanner
is presented with a UPC/EAN plus supplemental symbol, the scanner
decodes UPC/EAN and ignores the supplemental characters.
•
If you select Decode UPC/EAN with Supplementals, the scanner
only decodes UPC/EAN symbols with supplemental characters, and
ignores symbols without supplementals.
- 38 -
•
If you select Autodiscriminate UPC/EAN Supplementals, the
scanner decodes UPC/EAN symbols with supplemental characters
immediately. If the symbol does not have a supplemental, the scanner
must decode the bar code the number of times set via Decode
UPC/EAN Supplemental Redundancy before transmitting its data to
confirm that there is no supplemental.
•
If you select one of the following Supplemental Mode options, the
scanner immediately transmits EAN-13 bar codes starting with that
prefix that have supplemental characters. If the symbol does not have
a supplemental, the scanner must decode the bar code the number of
times set via Decode UPC/EAN Supplemental Redundancy before
transmitting its data to confirm that there is no supplemental. The
scanner transmits UPC/EAN bar codes that do not have that prefix
immediately.
•
•
Enable 378/379 Supplemental Mode.
Enable 978/979 Supplemental Mode.
NOTE If you select 978/979 Supplemental Mode and are scanning Bookland EAN
bar codes, see Enable/Disable Bookland EAN to enable Bookland EAN, and
select a format using Bookland ISBN Format.
•
•
•
•
Enable 977 Supplemental Mode.
Enable 414/419/434/439 Supplemental Mode.
Enable 491 Supplemental Mode.
Enable Smart Supplemental Mode - applies to EAN-13 bar
codes starting with any prefix listed previously.
•
Supplemental User-Programmable Type 1 - applies to EAN-13
bar codes starting with a 3-digit user-defined prefix. Set this
3-digit prefix using User-Programmable Supplementals.
•
Supplemental User-Programmable Type 1 and 2 - applies to
EAN-13 bar codes starting with either of two 3-digit user-defined
prefixes. Set the 3-digit prefixes using User-Programmable
•
Supplementals.
Smart Supplemental Plus User-Programmable 1 - applies to
EAN-13 bar codes starting with any prefix listed previously or the
user-defined prefix set using User-Programmable
Supplementals.
- 39 -
•
Smart Supplemental Plus User-Programmable 1 and 2 applies to EAN-13 bar codes starting with any prefix listed
previously or one of the two user-defined prefixes set using
User-Programmable Supplementals.
NOTE To minimize the risk of invalid data transmission, select either to decode or
ignore supplemental characters.
Select the desired option by scanning one of the following bar codes.
5.2.8.1 Decode UPC/EAN With Supplementals
5.2.8.2 *Ignore UPC/EAN With Supplementals
5.2.8.3 Autodiscriminate UPC/EAN Supplementals
5.2.8.4 Enable 378/379 Supplemental Mode
- 40 -
5.2.8.5 Enable 978/979 Supplemental Mode
5.2.8.6 Enable 977 Supplemental Mode
5.2.8.7 Enable 414/419/434/439 Supplemental Mode
5.2.8.8 Enable 491 Supplemental Mode
5.2.8.9 Enable Smart Supplemental Mode
5.2.8.10 Supplemental User-Programmable Type 1
- 41 -
5.2.8.11 Supplemental User-Programmable Type 1 and 2
5.2.8.12 Smart Supplemental Plus User-Programmable 1
5.2.8.13 Smart Supplemental Plus User-Programmable
1 and 2
5.2.9 User-Programmable Supplementals
If you selected a Supplemental User-Programmable option from Decode
UPC/EAN Supplementals, select User-Programmable Supplemental 1 to set
the 3-digit prefix. Then select the 3 digits using the numeric bar codes
beginning on Appendix B. Select User-Programmable Supplemental 2 to set
a second 3-digit prefix. Then select the 3 digits using the numeric bar codes
beginning on Appendix B.
- 42 -
5.2.10 Decode UPC/EAN Supplemental
Redundancy
With Autodiscriminate UPC/EAN Supplementals selected, this option adjusts
the number of times a symbol without supplementals are decoded before
transmission. The range is from 2 to 30 times. Five or above is recommended
when decoding a mix of UPC/EAN symbols with and without supplementals,
and the autodiscriminate option is selected.
Scan the bar code below to select a decode redundancy value. Next scan two
numeric bar codes beginning on Appendix B. Single digit numbers must have
a leading zero. To change the selection or cancel an incorrect entry, scan
Cancel on Appendix B.
5.2.11 Transmit UPC-A Check Digit
Scan the appropriate bar code below to transmit the symbol with or without the
UPC-A check digit.
- 43 -
5.2.12 Transmit UPC-E Check Digit
Scan the appropriate bar code below to transmit the symbol with or without the
UPC-E check digit.
5.2.13 Transmit UPC-E1 Check Digit
Scan the appropriate bar code below to transmit the symbol with or without the
UPC-E1 check digit.
- 44 -
5.2.14 UPC-A Preamble
Preamble characters (Country Code and System Character) can be
transmitted as part of a UPC-A symbol.
Select one of the following options for transmitting UPC-A preamble to the host
device: transmit system character only, transmit system character and country
code (“0” for USA), or transmit no preamble.
5.2.15 UPC-E Preamble
Preamble characters (Country Code and System Character) can be
transmitted as part of a UPC-E symbol.
Select one of the following options for transmitting UPC-E preamble to the host
device: transmit system character only, transmit system character and country
code (“0” for USA), or transmit no preamble.
- 45 -
- 46 -
5.2.16 UPC-E1 Preamble
Preamble characters (Country Code and System Character) can be
transmitted as part of a UPC-E1 symbol.
Select one of the following options for transmitting UPC-E1 preamble to the
host device: transmit system character only, transmit system character and
country code (“0” for USA), or transmit no preamble.
5.2.17 Convert UPC-E to UPC-A
Enable this parameter to convert UPC-E (zero suppressed) decoded data to
UPC-A format before transmission. After conversion, data follows UPC-A
format and is affected by UPC-A programming selections (e.g., Preamble,
Check Digit).
Scan DO NOT CONVERT UPC-E TO UPC-A to transmit UPC-E (zero
suppressed) decoded data.
- 47 -
5.2.18 Convert UPC-E1 to UPC-A
Enable this parameter to convert UPC-E1 (zero suppressed) decoded data to
UPC-A format before transmission. After conversion, data follows UPC-A
format and is affected by UPC-A programming selections (e.g., Preamble,
Check Digit).
Scan DO NOT CONVERT UPC-E TO UPC-A to transmit UPC-E1 (zero
suppressed) decoded data.
5.2.19 EAN Zero Extend
When enabled, this parameter adds five leading zeros to decoded EAN-8
symbols to make them compatible in format to EAN-13 symbols.
Disable this parameter to transmit EAN-8 symbols as is.
- 48 -
5.2.20 UCC Coupon Extended Code
The UCC Coupon Extended Code is an additional bar code adjacent to a UCC
Coupon Code. To enable or disable UCC Coupon Extended Code, scan the
appropriate bar code below.
5.3 Code 128
5.3.1 Code 128
To enable or disable Code 128, scan the appropriate bar code below.
5.3.2 GS1-128 (formerly UCC/EAN-128)
To enable or disable GS1-128, scan the appropriate bar code below. (See
Appendix A, Miscellaneous Code Information for details on GS1-128 (formerly
UCC/EAN-128).)
- 49 -
GS1-128 (formerly UCC/EAN-128)
GS1-128 is a convention for printing data fields with standard Code 128 bar
code symbols. GS1-128 symbols are distinguished by a leading FNC 1
character as the first or second character in the symbol. Other FNC 1
characters are used to delineate fields.
When GS1-128 symbols are read, they are transmitted after special formatting
strips off the leading FNC 1 character, and replaces other FNC 1 characters
with the ASCII 29 (GS) control character.
When AIM symbology identifiers are transmitted, the modifier character
indicates the position of the leading FNC 1 character according to AIM
guidelines. For example, ]c1 indicates a GS1-128 symbol with a leading
FNC1 character.
Standard Code 128 bar codes which do not have a leading FNC 1 may still be
used, but are not encoded according to the GS1-128 convention. Standard
Code 128 and GS1-128 may be mixed in an application. The SE955
autodiscriminates between these symbols, and can enable or disable one or
both code types. Table 5-1 indicates the behavior of the SE955 in each of the
four possible parameter settings.
Table 5-1 Reading Standard Code 128 & GS1-128
Standard Code 128
GS1-128
Effect and Example
Disable
Disable
No Code 128 symbols can be read.
Disable
Enable
Read only symbols with leading FNC 1.
Examples:
FNC1
ABCDFNC1E are read as ABCD29E
FNC1
BCDFNC1E are read as ABCD29E
A
FNC1FNC1
ABCDFNC1E are read as ABCD29E
FNC1
E cannot be read
ABCD
- 50 -
ABCDE cannot be read
Enable
Disable
Read only symbols without leading FNC 1.
Examples:
FNC1
ABCDFNC1E cannot be read
FNC1
BCDFNC1E cannot be read
A
FNC1FNC1
ABCDFNC1E cannot be read
FNC1
E is read as ABCD29E
ABCD
ABCDE is read as ABCDE
Enable
Enable
Read both types of symbols.
Examples:
FNC1
ABCDFNC1E are read as ABCD29E
FNC1
BCDFNC1E are read as ABCD29E
A
FNC1FNC1
ABCDFNC1E are read as ABCD29E
FNC1
E is read as ABCD29E
ABCD
ABCDE is read as ABCDE
5.3.3 ISBT 128
To enable or disable ISBT 128, scan the appropriate bar code below.
5.4 Code 39
5.4.1 Code 39
To enable or disable Code 39, scan the appropriate bar code below.
- 51 -
5.4.2 Trioptic Code 39
Trioptic Code 39 is a variant of Code 39 used in marking computer tape
cartridges. Trioptic Code 39 symbols always contain six characters.
To enable or disable Trioptic Code 39, scan the appropriate bar code below.
NOTE Trioptic Code 39 and Code 39 Full ASCII cannot be enabled simultaneously.
If an error beep sounds when enabling Trioptic Code 39, disable Code 39 Full
ASCII and try again.
5.4.3 Convert Code 39 to Code 32
Code 32 is a variant of Code 39 used by the Italian pharmaceutical industry.
Scan the appropriate bar code below to enable or disable converting Code 39
to Code 32.
NOTE Code 39 must be enabled in order for this parameter to function.
- 52 -
5.4.4 Code 32 Prefix
Enable this parameter to add the prefix character “A” to all Code 32 bar codes.
Convert Code 39 to Code 32 must be enabled for this parameter to function.
5.4.5 Set Lengths for Code 39
The length of a code refers to the number of characters (i.e., human readable
characters), including check digit(s) the code contains. Lengths for Code 39
may be set for any length, one or two discrete lengths, or lengths within a
specific range. If Code 39 Full ASCII is enabled, Length Within a Range or
Any Length are the preferred options.
NOTE When setting lengths, single digit numbers must always be preceded by a
leading zero.
One Discrete Length - This option limits decodes to only those Code 39
symbols containing a selected length. Lengths are selected from the numeric
bar codes beginning on Appendix B. For example, to decode only Code 39
symbols with 14 characters, scan Code 39 - One Discrete Length, then scan
1 followed by 4. To change the selection or cancel an incorrect entry, scan
Cancel on Appendix B.
- 53 -
Two Discrete Lengths - This option limits decodes to only those Code 39
symbols containing either of two selected lengths. Lengths are selected from
the numeric bar codes beginning on Appendix B. For example, to decode only
those Code 39 symbols containing either 2 or 14 characters, select Code 39 Two Discrete Lengths, then scan 0, 2, 1, and then 4. To change the selection
or cancel an incorrect entry, scan Cancel on Appendix B.
Length Within Range - This option limits decodes to only those Code 39
symbols within a specified range. For example, to decode Code 39 symbols
containing between 4 and 12 characters, first scan Code 39 - Length Within
Range. Then scan 0, 4, 1, and 2. Numeric bar codes begin on Appendix B. To
change the selection or cancel an incorrect entry, scan Cancel on Appendix B.
Any Length - Scan this option to decode Code 39 symbols containing any
number of characters.
5.4.6 Code 39 Check Digit Verification
When this feature is enabled, the scan engine checks the integrity of all Code
- 54 -
39 symbols to verify that the data complies with specified check digit algorithm.
Only those Code 39 symbols which include a modulo 43 check digit are
decoded. Only enable this feature if your Code 39 symbols contain a module
43 check digit.
5.4.7 Transmit Code 39 Check Digit
Scan this symbol to transmit the check digit with the data.
Scan this symbol to transmit data without the check digit.
5.4.8 Code 39 Full ASCII
Code 39 Full ASCII is a variant of Code 39 which pairs characters to encode
the full ASCII character set. To enable or disable Code 39 Full ASCII, scan the
appropriate bar code below.
See Table 5-2 for the mapping of Code 39 characters to ASCII values.
- 55 -
NOTE Trioptic Code 39 and Code 39 Full ASCII cannot be enabled simultaneously.
If you get an error beep when enabling Code 39 Full ASCII, disable Trioptic
Code 39 and try again.
- 56 -
Table 5-2 Character Equivalents
Scan Value
Full ASCII Code 39
Encode Char.
Scan Value
Full ASCII Code 39
Encode Char.
1000
%U
1032
Space
1001
$A
1033
/A
1002
$B
1034
/B
1003
$C
1035
/C
1004
$D
1036
/D
1005
$E
1037
/E
1006
$F
1038
/F
1007
$G
1039
/G
1008
$H
1040
/H
1009
$I
1041
/I
1010
$J
1042
/J
1011
$K
1043
/K
1012
$L
1044
/L
1013
$M
1045
-
1014
$N
1046
.
1015
$O
1047
/
1016
$P
1048
0
1017
$Q
1049
1
1018
$R
1050
2
1019
$S
1051
3
1020
$T
1052
4
1021
$U
1053
5
1022
$V
1054
6
1023
$W
1055
7
1024
$X
1056
8
1025
$Y
1057
9
1026
$Z
1058
/Z
1027
%A
1059
%F
1028
%B
1060
%G
1029
%C
1061
%H
1030
%D
1062
%I
1031
%E
1063
%J
- 57 -
Scan Value
Full ASCII Code 39
Encode Char.
Scan Value
Full ASCII Code 39
Encode Char.
1064
%V
1096
%W
1065
A
1097
+A
1066
B
1098
+B
1067
C
1099
+C
1068
D
1100
+D
1069
E
1101
+E
1070
F
1102
+F
1071
G
1103
+G
1072
H
1104
+H
1073
I
1105
+I
1074
J
1106
+J
1075
K
1107
+K
1076
L
1108
+L
1077
M
1109
+M
1078
N
1110
+N
1079
O
1111
+O
1080
P
1112
+P
1081
Q
1113
+Q
1082
R
1114
+R
1083
S
1115
+S
1084
T
1116
+T
1085
U
1117
+U
1086
V
1118
+V
1087
W
1119
+W
1088
X
1120
+X
1089
Y
1121
+Y
1090
Z
1122
+Z
1091
%K
1123
%P
1092
%L
1124
%Q
1093
%M
1125
%R
1094
%N
1126
%S
1095
%O
1127
- 58 -
5.5 Code 93
5.5.1 Code 93
To enable or disable Code 93, scan the appropriate bar code below.
5.5.2 Set Lengths for Code 93
The length of a code refers to the number of characters (i.e., human readable
characters), including check digit(s) the code contains. Lengths for Code 93
may be set for any length, one or two discrete lengths, or lengths within a
specific range. To set lengths via serial commands, see Setting Code Lengths
Via Serial Commands.
One Discrete Length - Select this option to decode only those codes
containing a selected length. For example, select Code 93 One Discrete
Length, then scan 1, 4, to limit the decoding to only Code 93 symbols
containing 14 characters. Numeric bar codes on Appendix B. To change the
selection or cancel an incorrect entry, scan Cancel on Appendix B.
Two Discrete Lengths - Select this option to decode only those codes
containing two selected lengths. For example, select Code 93 Two Discrete
Lengths, then scan 0, 2, 1, 4, to limit the decoding to only Code 93 symbols
- 59 -
containing 2 or 14 characters. Numeric bar codes begin on Appendix B. To
change the selection or cancel an incorrect entry, scan Cancel on Appendix B.
Length Within Range - This option sets the unit to decode a code type within
a specified range. For example, to decode Code 93 symbols containing
between 4 and 12 characters, first scan Code 93 Length Within Range, then
scan 0, 4, 1 and 2 (single digit numbers must always be preceded by a leading
zero).
Numeric bar codes begin on Appendix B. To change the selection or cancel an
incorrect entry, scan Cancel on Appendix B.
Any Length - Scan this option to decode Code 93 symbols containing any
number of characters.
- 60 -
5.6 Code 11
5.6.1 Code 11
To enable or disable Code 11, scan the appropriate bar code below.
5.6.2 Set Lengths for Code 11
The length of a code refers to the number of characters (i.e., human readable
characters), including check digit(s) the code contains. Set lengths for Code 11
to any length, one or two discrete lengths, or lengths within a specific range.
•
One Discrete Length - Select this option to decode only Code 11
symbols containing a selected length. Select the length using the
numeric bar codes beginning on Appendix B. For example, to decode
only Code 11 symbols with 14 characters, scan Code 11 - One
Discrete Length, then scan 1 followed by 4. To correct an error or to
change the selection, scan Cancel on Appendix B.
- 61 -
•
Two Discrete Lengths - Select this option to decode only Code 11
symbols containing either of two selected lengths. Select lengths
using the numeric bar codes beginning on Appendix B. For example,
to decode only those Code 11 symbols containing either 2 or 14
characters, select Code 11 - Two Discrete Lengths, then scan 0, 2,
1, and then 4. To correct an error or to change the selection, scan
Cancel on Appendix B.
•
Length Within Range - Select this option to decode a Code 11
symbol with a specific length range. Select lengths using numeric bar
codes beginning on Appendix B. For example, to decode Code 11
symbols containing between 4 and 12 characters, first scan Code 11
- Length Within Range. Then scan 0, 4, 1, and 2 (single digit
numbers must always be preceded by a leading zero). To correct an
error or change the selection, scan Cancel on Appendix B.
•
Any Length - Scan this option to decode Code 11 symbols containing
any number of characters within the scan engine capability.
- 62 -
5.6.3 Code 11 Check Digit Verification
This feature allows the scan engine to check the integrity of all Code 11
symbols to verify that the data complies with the specified check digit algorithm.
This selects the check digit mechanism for the decoded Code 11 bar code.
The options are to check for one check digit, check for two check digits, or
disable the feature.
To enable this feature, scan the bar code below corresponding to the number
of check digits encoded in your Code 11 symbols.
5.6.4 Transmit Code 11 Check Digits
This feature selects whether or not to transmit the Code 11 check digit(s).
NOTE Code 11 Check Digit Verification must be enabled for this parameter to
function.
- 63 -
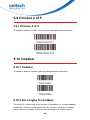
5.7 Interleaved 2 of 5
5.7.1 Interleaved 2 of 5
To enable or disable Interleaved 2 of 5, scan the appropriate bar code below.
5.7.2 Set Lengths for Interleaved 2 of 5
The length of a code refers to the number of characters (i.e., human readable
characters), including check digit(s) the code contains. Lengths for I 2 of 5 may
be set for any length, one or two discrete lengths, or lengths within a specific
range. To set lengths via serial commands, see Setting Code Lengths Via
Serial Commands.
NOTE When setting lengths, single digit numbers must always be preceded by a
leading zero.
One Discrete Length - Select this option to decode only those codes
containing a selected length. For example, select I 2 of 5 One Discrete
Length, then scan 1, 4, to decode only I 2 of 5 symbols containing 14
characters. Numeric bar codes begin on Appendix B. To change the selection
or cancel an incorrect entry, scan Cancel on Appendix B.
- 64 -
Two Discrete Lengths - Select this option to decode only those codes
containing two selected lengths. For example, select I 2 of 5 Two Discrete
Lengths, then scan 0, 6, 1, 4, to decode only I 2 of 5 symbols containing 6 or
14 characters. Numeric bar codes begin on Appendix B. To change the
selection or cancel an incorrect entry, scan Cancel on Appendix B.
Length Within Range - Select this option to decode only codes within a
specified range. For example, to decode I 2 of 5 symbols containing between 4
and 12 characters, first scan I 2 of 5 Length Within Range, then scan 0, 4, 1
and 2 (single digit numbers must always be preceded by a leading zero).
Numeric bar codes begin on Appendix B. To change the selection or cancel an
incorrect entry, scan Cancel on Appendix B.
Any Length - Scan this option to decode I 2 of 5 symbols containing any
number of characters.
NOTE Selecting this option may lead to misdecodes for I 2 of 5 codes.
5.7.3 I 2 of 5 Check Digit Verification
When enabled, this parameter checks the integrity of an I 2 of 5 symbol to
ensure it complies with a specified algorithm, either USS (Uniform Symbology
Specification), or OPCC (Optical Product Code Council).
- 65 -
5.7.4 Transmit I 2 of 5 Check Digit
Scan this symbol to transmit the check digit with the data.
Scan this symbol to transmit data without the check digit.
5.7.5 Convert I 2 of 5 to EAN-13
This parameter converts a 14 character I 2 of 5 code into EAN-13, and
transmits to the host as EAN-13. To accomplish this, I 2 of 5 must be enabled,
one length must be set to 14, and the code must have a leading zero and a
valid EAN-13 check digit.
- 66 -
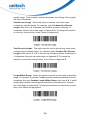
5.8 Discrete 2 of 5
5.8.1 Discrete 2 of 5
To enable or disable Discrete 2 of 5, scan the appropriate bar code below.
5.8.2 Set Lengths for Discrete 2 of 5
The length of a code refers to the number of characters (i.e., human readable
characters), including check digit(s) the code contains. Lengths for D 2 of 5
may be set for any length, one or two discrete lengths, or lengths within a
specific range. To set lengths via serial commands, see Setting Code Lengths
Via Serial Commands.
One Discrete Length - Select this option to decode only those codes
containing a selected length. For example, select D 2 of 5 One Discrete
Length, then scan 1, 4, to decode only D 2 of 5 symbols containing 14
characters. Numeric bar codes begin on Appendix B. To change the selection
or cancel an incorrect entry, scan Cancel on Appendix B.
- 67 -
Two Discrete Lengths - Select this option to decode only those codes
containing two selected lengths. For example, select D 2 of 5 Two Discrete
Lengths, then scan 0, 2, 1, 4, to decode only D 2 of 5 symbols containing 2 or
14 characters. Numeric bar codes begin on Appendix B. To change the
selection or cancel an incorrect entry, scan Cancel on Appendix B.
Length Within Range - Select this option to decode codes within a specified
range. For example, to decode D 2 of 5 symbols containing between 4 and 12
characters, first scan D 2 of 5 Length Within Range, then scan 0, 4, 1 and 2
(single digit numbers must be preceded by a leading zero). Numeric bar codes
begin on Appendix B. To change the selection or cancel an incorrect entry,
scan Cancel on Appendix B.
Any Length - Scan this option to decode D 2 of 5 symbols containing any
number of characters.
NOTE Selecting this option may lead to misdecodes for D 2 of 5 codes.
- 68 -
5.9 Chinese 2 of 5
5.9.1 Chinese 2 of 5
To enable or disable Chinese 2 of 5, scan the appropriate bar code below.
5.10 Codabar
5.10.1 Codabar
To enable or disable Codabar, scan the appropriate bar code below.
5.10.2 Set Lengths for Codabar
The length of a code refers to the number of characters (i.e., human readable
characters), including check digit(s) the code contains. Lengths for Codabar
may be set for any length, one or two discrete lengths, or lengths within a
- 69 -
specific range. To set lengths via serial commands, see Setting Code Lengths
Via Serial Commands.
One Discrete Length - Select this option to decode only those codes
containing a selected length. For example, select Codabar One Discrete
Length, then scan 1, 4, to decode only Codabar symbols containing 14
characters. Numeric bar codes begin on Appendix B. To change the selection
or cancel an incorrect entry, scan Cancel on Appendix B.
Two Discrete Lengths - This option sets the unit to decode only those codes
containing two selected lengths. For example, select Codabar Two Discrete
Lengths, then scan 0, 2, 1, 4, to decode only Codabar symbols containing 6 or
14 characters. Numeric bar codes begin on Appendix B. To change the
selection or cancel an incorrect entry, scan Cancel on Appendix B.
Length Within Range - Select this option to decode a code within a specified
range. For example, to decode Codabar symbols containing between 4 and 12
characters, first scan Codabar Length Within Range, then scan 0, 4, 1 and 2
(single digit numbers must always be preceded by a leading zero). Numeric
bar codes begin on Appendix B. To change the selection or cancel an incorrect
entry, scan Cancel on Appendix B.
- 70 -
Any Length - Scan this option to decode Codabar symbols containing any
number of characters.
5.10.3 CLSI Editing
When enabled, this parameter strips the start and stop characters and inserts
a space after the first, fifth, and tenth characters of a 14-character Codabar
symbol.
NOTE Symbol length does not include start and stop characters.
5.10.4 NOTIS Editing
When enabled, this parameter strips the start and stop characters from
decoded Codabar symbol.
- 71 -
- 72 -
5.11 MSI
5.11.1 MSI
To enable or disable MSI, scan the appropriate bar code below.
5.11.2 Set Lengths for MSI
The length of a code refers to the number of characters (i.e., human readable
characters) the code contains, and includes check digits. Lengths for MSI can
be set for any length, one or two discrete lengths, or lengths within a specific
range. See Table 5-2 for ASCII equivalents. To set lengths via serial
commands, see Setting Code Lengths Via Serial Commands on Appendix A.
One Discrete Length - Select this option to decode only those codes
containing a selected length. For example, select MSI Plessey One Discrete
Length, then scan 1, 4, to decode only MSI Plessey symbols containing 14
characters. Numeric bar codes begin on Appendix B. To change the selection
or cancel an incorrect entry, scan Cancel on Appendix B.
- 73 -
Two Discrete Lengths - Select this option to decode only those codes
containing two selected lengths. For example, select MSI Plessey Two
Discrete Lengths, then scan 0, 6, 1, 4, to decode only MSI Plessey symbols
containing 6 or 14 characters. Numeric bar codes begin on Appendix B. To
change the selection or cancel an incorrect entry, scan Cancel on Appendix B.
Length Within Range - Select this option to decode codes within a specified
range. For example, to decode MSI symbols containing between 4 and 12
characters, first scan MSI Length Within Range, then scan 0, 4, 1 and 2
(single digit numbers must always be preceded by a leading zero). Numeric
bar codes begin on Appendix B. To change the selection or cancel an incorrect
entry, scan Cancel on Appendix B.
Any Length - Scan this option to decode MSI Plessey symbols containing any
number of characters.
NOTE Selecting this option may lead to misdecodes for MSI codes.
- 74 -
5.11.3 MSI Check Digits
These check digits at the end of the bar code verify the integrity of the data. At
least one check digit is always required. Check digits are not automatically
transmitted with the data.
If two check digits are selected, also select an MSI Check Digit Algorithm.
(please refer to 5.11.5 MSI Check Digit Algorithm)
5.11.4 Transmit MSI Check Digit
Scan this symbol to transmit the check digit with the data.
Scan this symbol to transmit data without the check digit.
- 75 -
5.11.5 MSI Check Digit Algorithm
When the Two MSI check digits option is selected, an additional verification is
required to ensure integrity.
Select one of the following algorithms.
5.12 GS1 DataBar
5.12.1 GS1 DataBar-14
To enable or disable GS1 DataBar-14, scan the appropriate bar code below.
- 76 -
5.12.2 GS1 DataBar Limited
To enable or disable GS1 DataBar Limited, scan the appropriate bar code
below.
5.12.3 GS1 DataBar Expanded
To enable or disable GS1 DataBar Expanded, scan the appropriate bar code
below.
5.12.4 Convert GS1 DataBar to UPC/EAN
This parameter only applies to GS1 DataBar-14 and GS1 DataBar Limited
symbols. When this conversion is enabled, GS1 DataBar-14 and GS1 DataBar
Limited symbols encoding a single zero as the first digit have the leading '010'
stripped and the bar code reported as EAN-13.
Bar codes beginning with two or more zeros but not six zeros have the leading
'0100' stripped and the bar code reported as UPC-A. The UPC-A Preamble
- 77 -
parameter to transmit the system character and country code applies to
converted bar codes. Note that neither the system character nor the check
digit can be stripped.
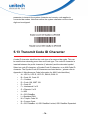
5.13 Transmit Code ID Character
A code ID character identifies the code type of a scanned bar code. This can
be useful when decoding more than one code type. The code ID character is
inserted between the prefix character (if selected) and the decoded symbol.
Select no code ID character, a Symbol Code ID character, or an AIM Code ID
character. The Symbol Code ID characters are listed below; ( please refer to
Appendix A, Miscellaneous Code Information for AIM Code Identifiers)
•
•
•
•
•
•
•
•
•
•
•
•
•
A = UPC-A, UPC-E, UPC-E1, EAN-8, EAN-13
B = Code 39, Code 32
C = Codabar
D = Code 128, ISBT 128
E = Code 93
F = Interleaved 2 of 5
G = Discrete 2 of 5
J = MSI
K = GS1-DataBar
L = Bookland EAN
M = Trioptic Code 39
N = Coupon Code
R = GS1 DataBar-14, GS1 DataBar Limited, GS1 DataBar Expanded.
- 78 -
5.14 Linear Code Type Security Level
The MS916 offers four levels of decode security for linear code types (e.g.
Code 39, Interleaved 2 of 5). Select higher security levels for decreasing levels
of bar code quality. As security levels increase, the scan engine’s
aggressiveness decreases.
Select the security level appropriate for your bar code quality.
Linear Security Level 1
The following code types must be successfully read twice before being
decoded:
Code Type
Length
Codabar
All
MSI
4 or less
D 2 of 5
8 or less
I 2 of 5
8 or less
- 79 -
Linear Security Level 2
All code types must be successfully read twice before being decoded.
Linear Security Level 3
Code types other than the following must be successfully read twice before
being decoded. The following codes must be read three times:
Code Type
Length
MSI
4 or less
D 2 of 5
8 or less
I 2 of 5
8 or less
Linear Security Level 4
All code types must be successfully read three times before being decoded.
- 80 -
5.15 Bi-directional Redundancy
This parameter is only valid when a Linear Code Type Security Level is
enabled (please refer to 5.14 Linear Code Type Security Level). When this
parameter is enabled, a bar code must be successfully scanned in both
directions (forward and reverse) before being decoded.
- 81 -
Appendix A
Miscellaneous Code Information
Appendix A: Miscellaneous Code Information
AIM Code Identifiers
Each AIM Code Identifier contains the three-character string ]cm where:
] = Flag Character (ASCII 93)
c = Code Character (see Table A-2)
m = Modifier Character (see Table A-3).
Table A-1 Code Characters
Code Character
Code Type
A
Code 39, Code 39 Full ASCII, Code 32
C
Code 128, ISBT 128, GS1-128,
Coupon (Code 128 portion)
E
UPC/EAN, Coupon (UPC portion)
F
Codabar
G
Code 93
H
Code 11
I
Interleaved 2 of 5
M
MSI
S
Discrete 2 of 5, IATA 2 of 5
X
Code 39 Trioptic, Bookland EAN
e
GS1 DataBar
- 82 -
The modifier character is the sum of the applicable option values based on the
following table.
Table A-2 Modifier Characters
Code Type
Option
Value
Option
Code 39
0
No Check character or Full ASCII processing.
1
Reader has checked one check character.
3
Reader has checked and stripped check character.
4
Reader has performed Full ASCII character conversion.
5
Reader has performed Full ASCII character conversion and
checked one check character.
7
Reader has performed Full ASCII character conversion and
checked and stripped check character.
Example: A Full ASCII bar code with check character W, A+I+MI+DW, is
transmitted as ]A7AimId where 7 = (3+4).
Trioptic Code 39
0
No option specified at this time. Always transmit 0.
Example: A trioptic bar code 412356 is transmitted as ]X0412356
Code 128
0
Standard data packet, No Function code 1 in first symbol
position.
1
Function code 1 in first symbol character position.
2
Function code 1 in second symbol character position.
Example: A Code (EAN) 128 bar code with Function 1 character in the first
position, FNC1 Aim Id is transmitted as ]C1AimId
I 2 of 5
0
No check digit processing.
1
Reader has validated check digit.
3
Reader has validated and stripped check digit.
Example: An I 2 of 5 bar code without check digit, 4123, is transmitted
as ]I04123
- 83 -
Code Type
Option
Value
Option
Codabar
0
No check digit processing.
1
Reader has checked check digit.
Example: A Codabar bar code without check digit, 4123, is transmitted
as ]F04123
Code 93
0
No options specified at this time. Always transmit 0.
Example: A Code 93 bar code 012345678905 is transmitted
as ]G0012345678905
MSI
0
Mod 10 check digit checked and transmitted.
1
Mod 10 check digit checked but not transmitted.
Example: An MSI bar code 4123, with a single check digit checked, is
transmitted as ]M04123
D 2 of 5
0
No options specified at this time. Always transmit 0.
Example: A D 2 of 5 bar code 4123, is transmitted as ]S04123
UPC/EAN
0
Standard packet in full EAN country code format, which is
13 digits for UPC-A, UPC-E, and EAN-13 (not including
supplemental data).
1
Two digit supplement data only.
2
Five digit supplement data only.
3
Combined data packet comprising 13 digits from a UPC-A,
UPC-E, or EAN-13 symbol and 2 or 5 digits from a
supplemental symbol.
4
EAN-8 data packet.
Example: A UPC-A bar code 012345678905 is transmitted
as ]E00012345678905
Bookland EAN
0
No options specified at this time. Always transmit 0.
Example: A Bookland EAN bar code 123456789X is transmitted
as ]X0123456789X
- 84 -
According to AIM standards, a UPC with supplemental bar code is transmitted
in the following format:
]E0 (UPC chars) (terminator) ]E2 (supplemental) (terminator)
In the SE955, however, the format is changed to:
]E0 (UPC chars) ]E2 (supplemental)
Therefore, a UPC with two supplemental characters, 01234567890510, is
transmitted to the host as a 21-character string, ]E00012345678905]E110.
Setting Code Lengths Via Serial
Commands
There are two lengths (L1 and L2) for each variable length code type. See the
individual code types in Chapter 8, Parameter Menus for the L1 and L2
parameter numbers.
Depending on the selected option, the scan engine decodes:
•
One discrete length bar code
•
Two discrete length bar codes
•
Bar codes within a range of lengths within the scan engine capability
•
Any length of bar codes within the scan engine capability.
Table A-3 lists the requirements for each option.
Table A-3 Setting Variable Code Lengths
Code Length Option
L1 value
L2 value
One discrete length is decoded.
Discrete length to decode
0x00
Two discrete lengths is decoded.
Higher length value
Lower length value
Lengths within a range are decoded within the scan
Lower length value
Higher length value
0x00
0x00
engine capability.
Any length bar code is decoded within the scan
engine capability.
- 85 -
Appendix B
Numeric Bar Codes
Appendix B: Numeric Bar Codes
For parameters requiring specific numeric values, scan the appropriately
numbered bar code(s).
Cancel
To change the selection or cancel an incorrect entry, scan the bar code below.
- 86 -