1
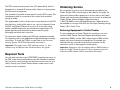
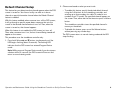
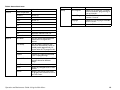
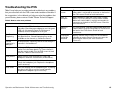
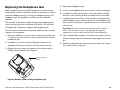
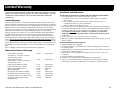
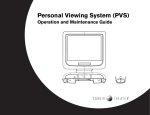
PVS15 Personal Viewing System
Operation and Maintenance Guide
®
ch
POWER
vol
audio
source
1
2
3
4
5
6
7
8
9
0
®
®
Radio Frequency Interference (RFI)
Always follow basic safety precautions when using this
equipment to reduce the chance of injury, fire, or damage.
Federal Communications Commission, Part 15
•
Read all instructions before installing and using the
equipment. Follow any labels on the equipment.
WARNING: To prevent fire or electrical shock, do not expose this
equipment to rain, moisture or excess heat.
•
Use the power adapter provided with the equipment. Plug the
power adapter into an appropriate, grounded power outlet as
marked on the equipment. Do not use accessory attachments
that are not recommended by the manufacturer, as such
attachments may cause injuries.
The unit has been tested and found to comply with the limits for
Part 15 of the FCC Rules. These limits are designed to provide
reasonable protection against harmful interference when the
equipment is operated in a commercial environment.
The PVS generates, uses, and can radiate radio frequency energy
and, if not installed and used in accordance with the assembly,
installation and maintenance instruction manuals, may cause
harmful interference to radio communications.
•
Position power cables so that they are not walked on or
pinched by items placed upon or against them.
•
Make sure that the equipment has adequate ventilation. Do
not place anything on top of or over the equipment. Do not
use on a cushioned surface that could block the ventilation
openings.
•
Keep the equipment away from water and moisture.
•
Locate the equipment away from sources of heat, such as
radiators, heat registers, and stoves. Avoid temperature
extremes.
•
Reorient or relocate the receiving antenna.
•
Increase the separation between the equipment and the
receiver.
•
Avoid dropping anything on or spilling anything inside the
equipment, because doing so can damage the electronics.
•
Connect the equipment into a separate outlet that uses a
different circuit than the receiver.
•
Do not attempt to service the unit yourself except to follow the
maintenance instructions found in this manual.
Consult a Cardio Theater or an experienced radio/TV technician
for help.
However, there is no guarantee that interference will not occur in
a particular installation. If the unit does cause harmful interference
to radio or television reception, which can be determined by
turning the equipment off and on, the user is encouraged to try to
correct the interference by one or more of the following measures:
IMPORTANT SAFETY INSTRUCTIONS
Important Safety Instructions
WARNING: Per FCC rules, changes or modifications not expressly
approved by Cardio Theater could void the user’s authority to
operate the equipment.
Operation and Maintenance Guide: Important Safety Instructions
1
Canadian Department of Communications
The PVS does not exceed the Class A limits for radio noise
emissions from a digital apparatus set out in the Radio Interference
Regulations of the Canadian Department of Communications.
Le présent appareil numérique n’émet pas de bruits
radioéélectriques dépassant les limites applicables aux appareils
numériques de la class A prescrites dans le Règlement sur le
brouillage radioélectrique édicté par le ministére des
Communications du Canada.
Operation and Maintenance Guide: Important Safety Instructions
2
Table of Contents
Important Safety Instructions ...............................................1
Radio Frequency Interference (RFI) ....................................1
Canadian Department of Communications .............................. 2
Before You Begin .....................................................................4
Required Tools ................................................................................ 5
Obtaining Service ........................................................................... 5
Maintenance and Troubleshooting ................................... 14
Cleaning the PVS and Controller .............................................14
Checking the Standalone Controller .......................................14
Troubleshooting the PVS ............................................................15
Replacing the Headphone Jack ................................................16
Limited Warranty .................................................................... 17
Initial Search for Channels ....................................................6
Manually Adding or Deleting Channels .............................7
Using the Standalone Controller to
Set Up Custom Features ........................................................8
Automatic Power On/Off Setup .................................................. 8
Default Channel Setup .................................................................. 9
TV and DVD/CD Setup ...............................................................10
Quick Reference ...........................................................................11
Using the Main Menu ............................................................12
Operation and Maintenance Guide: Table of Contents
3
Before You Begin
The Cardio Theater Personal Viewing System (PVS) adds
personalized entertainment to workouts. A person steps on the
exercise equipment, plugs headphones into the jack, selects a TV
program using the Channel buttons, and begins exercising. The
program appears on a bright, full-color liquid crystal display (LCD)
directly in front of the person, rather than at a distance on the wall.
Volume buttons on the standalone controller allow a person to
change the audio level. Depending on how the PVS screen is
configured, Closed Captioning may appear allowing people to
exercise without headphones.
PVS screen
Fitness facilities can add a PVS screen to any Precor exercise
equipment using an integrated bracket assembly. The bracket
assembly allows the PVS screen to be installed conveniently close
to people exercising. For exercise equipment from other
manufacturers, fitness facilities can use a stand designed to safely
support the PVS screen, and place the stand near the equipment.
Figure 1 shows the PVS15 screen and CNTE standalone controller.
The standalone controller is attached during installation; it can be
attached to the handlebars of almost any exercise equipment, except
those with handlebars that move.
The LED turns on when PVS screen
is on and flashes to indicate
programming mode.
Power button turns the screen
on and off.
®
Channel buttons let you
scroll through the
available channels.
ch
POWER
vol
audio
source
1
2
3
4
5
6
7
8
9
Volume buttons let you adjust the
audio level when using
headphones.
0
Number keys let you
enter specific channel
numbers.
®
Headphone jack
Figure 1: Overview of PVS15 screen and CNTE standalone controller
Operation and Maintenance Guide: Before You Begin
4
The PVS screen receives power from a DC power block, which is
plugged into a standard AC power outlet. It does not rely on power
from the exercise equipment.
The standalone controller receives power from the PVS screen. The
coiled power cable is connected to the screen (and controller)
during assembly.
This guide explains how to set up some custom features on the PVS
that the fitness facility might want to use, such as Automatic Power
On/OFF and Default Channel. It also lists all of the video setup
options available and covers any maintenance requirements. For
proper operation and maintenance, please read this guide
thoroughly and follow the instructions.
For information about installing the PVS and standalone controller
on equipment, refer to the appropriate integrated bracket assembly
instructions. To install the PVS on a stand, refer to the Personal
Viewing System (PVS) Stand Assembly Instructions.
Important: This guide covers PVS software version 1.x. Your
software may be different from that described in this guide.
Required Tools
Obtaining Service
Do not attempt to service any of the equipment provided in the
Cardio Theater PVS system except as described in this guide. For
information about product operation or service, refer to the Cardio
Theater web site at www.cardiotheater.com or contact an authorized
Cardio Theater Technical Support Representative at
1-800-776-6695 or [email protected]. Representatives
are available to serve you from 6:00 am to 5:00 pm, Monday through
Friday, U.S.A. Pacific Time.
Returning Equipment to Cardio Theater
To return equipment to Cardio Theater for any reason, you must
contact Cardio Theater Technical Support and obtain a return
authorization (RMA) number. When requesting the RMA number,
explain why you are returning the equipment, for example you
ordered too many controllers and the extra controller can be
returned to stock, or the equipment needs repairs.
Important: Equipment must be shipped with an RMA number in
order for Cardio Theater to process it. Any equipment received
without an RMA number will be returned to the sender.
You will need a remote control (CXITVRMT) to perform functions on
the PVS screen that cannot be done using the standalone controller.
You may find it useful to have more than one remote control in your
facility. Contact your Cardio Theater dealer to order one or more
remote controls as desired.
Operation and Maintenance Guide: Before You Begin
5
Initial Search for Channels
After you install the PVS hardware and all power and cable or
antenna connections are completed, you can turn on the PVS
screen and run the automatic program feature. This feature identifies
the TV channels that are available. After the feature runs, the PVS
screen displays only those channels that are available.
Important: You will need the remote control to run the automatic
program feature. The standalone controller does not access the
Main Menu, so you cannot use it for this procedure.
While you are in the Main Menu, if you do not press a button or
complete a sequence after a short period of time, the Main Menu
disappears and the PVS screen will return to normal viewing mode.
7. After selecting the TV format, use Channel – button to move to
Start, and then press SEL to begin the automatic search
process.
The search process may take several minutes to finish. As it
scrolls through the list of channels, each channel number
appears on the screen. When it finds a channel with enough
signal strength, the color of the channel number changes. When
the process completes, the lowest programmed channel number
appears on the screen.
Note: You can stop the automatic programming process at any
time by pressing the Menu button.
To exit from any menu screen, you can press the Menu button. Each
press of the Menu button moves you back one menu until you reach
normal viewing mode.
1. Turn on the PVS screen by pressing the red Power button on the
remote control.
2. Press the Menu button on the remote control. The Main Menu
appears on the PVS screen.
3. Use the Channel – button to move to Setup.
4. Press the SEL button to select Setup. The Setup menu appears.
5. Press the SEL button again to select Auto Program, which is
already highlighted. The Auto Program menu appears with
Table highlighted.
6. At the Table option, select the appropriate TV format mode for
the PVS by using the Volume +/– buttons to move to the
appropriate mode. Typically, you would select the Cable STD
mode.
Operation and Maintenance Guide: Initial Search for Channels
6
Manually Adding or Deleting Channels
Sometimes, if the signal for a channel is not strong enough, the PVS
screen may not catch it during automatic programming. Follow these
instructions to add a missed channel, or delete an unwanted
channel.
Deleting an unwanted channel will not keep people from selecting it
if they use the number buttons. This process does not block access
to that channel. For example, if you delete channel 127, and a person
enters 127 with the number buttons, that channel will appear on the
screen. However, when a person uses the Channel buttons to scroll
through the available channels, channel 127 will not appear.
Important: You will need the remote control to add or delete
channels. The standalone controller does not access the Main
Menu, so you cannot use it for this procedure.
6. Move to Skip using the Channel – button, and then change the
setting as desired using the Volume +/– buttons:
If you want the channel to…
Then, select…
Appear
Off (Skip Off)
Not appear
On (Skip On, so it will skip that
channel)
7. Move to Memorize, and press the SEL button.
8. Press the Menu button as needed to exit and return to normal
viewing mode.
While you are in the Main Menu, if you do not press a button or
complete a sequence after a short period of time, the Main Menu
disappears and the PVS screen will return to normal viewing mode.
1. Make sure the PVS screen is turned on.
2. Press the Menu button on the remote control. The Main Menu
appears on the PVS screen.
3. Use the Channel – button to move to Setup, and then press the
SEL button.
4. Move to Manual Program using the Channel – button, and then
press the SEL button.
5. At Channel, use the Volume +/– buttons to select the channel
you want to add or delete. You could also specify the channel
with the number buttons.
Operation and Maintenance Guide: Manually Adding or Deleting Channels
7
Using the Standalone Controller to Set Up Custom Features
Cardio Theater has customized a number of features that are
commonly used in a fitness facility. The customization allows you to
easily enable or disable a feature using the standalone controller.
Use of these features is optional.
• Automatic Power On/Off feature causes the PVS screen to turn
off automatically when headphones are removed and turn on when
headphones are inserted.
• Default Channel feature lets you specify a channel that will
appear whenever the screen is turned on. You might use this
feature if you offer an in-house channel.
• TV and DVD/CD feature allows access to a DVD or CD player
when one is installed. Once the feature is enabled, a person can
press the Source button on the standalone controller to switch to
the DVD player and watch a movie. Or, with the TV on, a person
can press the Audio button and listen to a favorite CD while
watching a TV program.
This section provides instructions for setting up each of these
features. At the end of this section, you will find a table that provides
a quick reference to the buttons you press. Once you are familiar
with setting up these features, you may find the table is all you need.
Important: You must use the standalone controller to set up these
features. The remote control accesses the standard PVS features,
not the customized Cardio Theater features.
Automatic Power On/Off Setup
The Automatic Power On/Off feature turns the PVS screen on
automatically when headphones are inserted into the headphone
jack. At the end of the exercise session, when the headphones are
disconnected from the jack, the screen turns off after approximately
30 seconds. This feature is typically used to conserve power and
lengthen screen life.
This procedure uses the standalone controller only.
1. Press both Volume ▲ and ▼ buttons simultaneously until the
LED begins flashing (about 5 seconds). The flashing LED
indicates that the PVS screen has entered Program Device
mode. If nothing happens, try pressing both Volume ▲ and ▼
buttons at the same time again.
Note: While you are in Program Device mode, if you do not press
a button within 15 seconds, the PVS screen will time out and
return to normal viewing mode.
2. Choose one based on what you want to do:
• To enable the feature, press the Channel ▲
• To disable the feature, press the Channel ▼
As soon as you press a button, the PVS screen returns to normal
viewing mode and the LED stops flashing.
Operation and Maintenance Guide: Using the Standalone Controller to Set Up Custom Features
8
Default Channel Setup
This feature lets you determine what channel appears when the PVS
screen is turned on. Your fitness facility can offer an in-house
channel or special informative channel when the Default Channel
feature is enabled.
With this feature enabled, when someone turns off the PVS screen,
it will go through a specific power-down sequence that sets the
screen to the desired channel before it turns off. Then, when the
screen is turned on, that channel appears.
When this feature is not enabled, the PVS screen just turns off.
Then, when someone turns it on, the last channel being viewed will
appear on the screen.
This procedure uses the standalone controller only.
2. Choose one based on what you want to do:
• To enable this feature, specify the desired default channel
using the 0–9 buttons on the standalone controller, and
entering up to three numbers for cable TV mode (or two
numbers for air TV mode). The specified channel appears on
the screen. Then, either wait for the timeout or press a Volume
button.
The standalone controller stores the specified channel in
memory as the default.
• To disable this feature, press one of the Volume buttons
without pressing any number keys.
The PVS screen returns to normal viewing mode and the LED
stops flashing.
1. Press both Volume ▲ and ▼ buttons simultaneously until the
LED begins flashing (about 5 seconds). The flashing LED
indicates that the PVS screen has entered Program Device
mode.
Note: While you are in Program Device mode, if you do not press
a button within 15 seconds, the PVS screen will time out and
return to normal viewing mode.
Operation and Maintenance Guide: Using the Standalone Controller to Set Up Custom Features
9
TV and DVD/CD Setup
Enable this feature when the PVS screen is connected to a DVD or
CD player. Then, a person can press the Source button on the
standalone controller to switch from normal TV mode to the DVD
player and watch a movie. Or, if a CD player is connected, a person
can press the Audio button and listen to a favorite CD while
watching a TV program.
Only one of these features is available at a time. For example, a
person cannot watch a movie and listen to a CD at the same time.
When a person is watching a DVD, the CD player option is not
available.
2. Choose one based on what you want to do:
• To enable this feature, press the Source button on the
standalone controller. Both Source and Audio buttons can
now be used.
• To disable this feature, when no DVD or CD player is
connected, press the Audio button.
The PVS screen returns to normal viewing mode and the LED
stops flashing.
If you enable this feature, you might consider enabling the Closed
Captioning feature as well. This will allow people watching the TV
and listening to a CD to better follow the TV programming by
reading the text that appears. You enable Closed Captioning through
the Main Menu using the remote control. Refer to Using the Main
Menu for more information.
This procedure uses the standalone controller only.
1. Press both Volume ▲ and ▼ buttons simultaneously until the
LED begins flashing (about 5 seconds). The flashing LED
indicates that the PVS has entered Program Device mode.
Note: While you are in Program Devide mode, if you do not press
a button within 15 seconds, the PVS screen will time out and
return to normal viewing mode.
Operation and Maintenance Guide: Using the Standalone Controller to Set Up Custom Features
10
Quick Reference
Once you are familiar with setting up the customized Cardio Theater
features, you may find the following table useful as a quick reference.
Remember these features can only be set up using the standalone
controller.
Table 1: Quick reference to customized features
Action
Automatic Power
On/Off Feature
Default Channel
Feature
TV and DVD/CD
Feature
Access
feature
Press both Volume Press both Volume Press both Volume
▲ and ▼ buttons ▲ and ▼ buttons ▲ and ▼ buttons
Enable
Press Channel ▲
Enter a channel
Press Source
number, then press button
Volume ▲
Disable
Press Channel ▼
Press Volume ▼
Press Audio button
Operation and Maintenance Guide: Using the Standalone Controller to Set Up Custom Features
11
Using the Main Menu
The PVS screen offers a number of features that are accessible only
from the Main Menu. You access the Main Menu using the remote
control. Access to this menu and its features should be limited to
facility personnel.
While you are in the Main Menu, if you do not press a button for a
short period of time, the Main Menu disappears and the PVS screen
will return to normal viewing mode.
Table 2 gives an overview of how to use the menu. Tables 3 and 4
show the first- and second-level menus.
Table 3: Main Menu
Main Menu Selection
Description
Picture
Allows you to adjust contrast, brightness, hue
and other features to improve the quality of
the picture shown on the screen.
Sound
Provides controls for changing the quality of
the audio and adjusting audio through the
speakers.
Special
Provides access to features such as Closed
Captioning and Parental Control. You can
also reset values that have been changed,
such as on the Picture menu.
If needed, use this menu to determine the
software version of screen.
Setup
Allow you to configure PVS channels.
Table 2: How to use the Main Menu
Action
Remote Control
Access Main Menu
Press Menu button
Move up and down through
the menu
Use Channel (CH) + and – buttons
Select an item
Press SEL button
Change a parameter value
Use Volume (VOL) + and – buttons
Go back to the previous menu
level
Press MENU button
Enter a password
Use the number buttons
Operation and Maintenance Guide: Using the Main Menu
12
Table 4: Second-level menu
Main Menu
Second Level
Picture
Color Temperature
Sound
Special
Information
Contrast
Default 75
Brightness
Default 65
Color
Default 75
Sharpness
80
Tint
0
Main Menu
Second Level
Information
Setup
Auto Program
Allows you to select the TV format
and run automatic programming to
set up channels.
Manual Program
If needed, allows you to add and
remove a channel.
Language
Shows a list of languages available
for this screen.
Model
Lists the TV format for your country.
Equalizer
Balance
0
AVL
(Automatic Volume Level) Off
Surround
Off
Blue Back
Lets you change the background
when there is no signal on a
channel.
Auto Sleep
With this feature turned on, the
screen will automatically switch to
standby mode approximately 10
minutes after the TV program ends.
Childlock
N/A
Caption
Displays any captioning provided
by the TV programming.
Parental Control
Allows you to block unwanted TV
programs based on different
ratings.
Auto On
N/A
Reset
Resets any changed values to their
defaults.
Version
Shown in the center of the menu,
this displays the software version of
the PVS screen.
Operation and Maintenance Guide: Using the Main Menu
13
Maintenance and Troubleshooting
In general, the PVS screen and standalone controller require little
maintenance and will rarely experience problems once installed.
However, you may find the information in this section useful.
This section also explains how to replace the headphone jack when
it no longer provides good audio quality.
Cleaning the PVS and Controller
For the Precor exercise equipment, follow the daily cleaning
instructions and cautionary statements found in the Product
Owner’s Manual.
Checking the Standalone Controller
Check the standalone controller often to make sure it is secure and
cannot be moved. Also make sure that the controller is positioned so
that moisture from people exercising cannot enter through the
connection and damage the electronics.
Make sure that the rubber boot around the RJ45 connector is
properly positioned. Push the rubber boot firmly into the recess
around the connector to ensure a tight seal.
Periodically dust the PVS screen with a soft clean cloth.
CAUTION: Do not use liquid cleaners or aerosol cleaners to
clean the screen. Do not use any solvents such as alcohol and
paint thinner, or acidic cleaners.
Each week, clean the standalone controller with a mild soap and
water solution. Lightly dampen a soft clean cloth with the solution
and wipe the controller. Do not use too much solution on the cloth or
spray cleaning solution directly on controllers. Doing so could cause
moisture to enter through the connector and damage the controller.
Operation and Maintenance Guide: Maintenance and Troubleshooting
14
Troubleshooting the PVS
Table 5 may help you to understand and troubleshoot any problems
that you encounter with the PVS screen and standalone controller. If
the suggestions in the table do not help you solve the problems that
you encounter, please contact Cardio Theater Technical Support.
Table 5: How to solve most problems
What to Do
Bars on
screen
Try a new channel; it may be station trouble. Make sure
video cable is connected to connector on the back of
the PVS screen. Check for local interference.
Poor TV
reception
Adjust Sharpness under the Picture menu (in Main
Menu). Try a new channel; it may be station trouble.
Make sure coaxial cable is securely connected to its
connector on the back of the PVS screen. Check for
local interference.
What to Do
No power
Make sure the LED is lit on the screen and on the
controller. Check the power adapter to see if the green
LED is lit. If Automatic Power On/Off feature is
enabled, connect head phones to the jack.
Ghosts in
picture
Try a new channel; it may be station trouble. Make sure
coaxial cable is securely connected to its connector on
the back of the PVS screen. Check for local
interference.
No Closed
Captioning
Make sure Caption is On under the Caption feature in
the Special menu. Closed Captioning may not be
available on that channel; try a different channel.
TV program
cannot be
watched
Closed
captioning is
delayed
A delay between captioning and the actual dialogue is
common in live broadcasts.
Specify channel using 0–9 keys on the standalone
controller or remote control. If necessary, rerun the
Auto Program feature (see Initial Search for
Channels.)
No picture
Make sure PVS screen is fully plugged into a power
outlet. Push the Power button. Try a new channel; it
may be station trouble. Turn the PVS screen off, and
then turn it back on after one minute.
Poor picture
Adjust controls such as Brightness, Color, and
Sharpness under the Picture menu (in Main Menu).
No audio
Increase the audio level with the Volume ▲ button.
Check the headphone jack. Replace the headphone
jack if necessary.
Poor audio
Re-insert the plug into the headphone jack. Try moving
the plug in the jack to see if the sound improves.
Replace the headphone jack if necessary.
Operation and Maintenance Guide: Maintenance and Troubleshooting
15
Replacing the Headphone Jack
4. Remove the headphone jack.
When someone using a controller experiences no sound or poor
sound quality (such as intermittent sound or crackling), you should
check the headphone jack. Try moving the headphone plug in the
headphone jack. If the problem continues, the jack should be
replaced.
5. Insert a new headphone jack. Insert the two screws and tighten.
The controller is designed to make changing the headphone jack
a quick and easy job, one easily done at the facility. You will need
a Phillips-head screwdriver to replace the headphone jack.
6. If needed to re-attach the receiver, insert two wire ties through
the holes in the mounting bracket on the back of the controller.
7. If needed, place the receiver on the neoprene mounting pad or
rubber adapter mounts, and then attach it to the equipment with
the wire ties. Use the pliers to tighten the wire ties so the receiver
cannot move.
You do not need to disconnect the power cable from the controller
to perform this procedure.
Important: Be sure to secure the receiver so that it cannot
move. If the receiver moves, it may damage the exercise
equipment as well as itself, and void the Limited Warranty.
1. Determine whether or not you need to remove the receiver from
its location to access the two screws on the back that hold the
headphone jack.
8. If you re-attached the receiver, cut off the excess plastic from the
wire ties, being careful not to leave any sharp edges on the wire
ties.
2. If needed, cut the two wire ties holding the receiver to the
equipment. Remove the wire ties from the receiver and toss.
9. Check the rubber boot over the connector to make sure it covers
the connector with a tight seal.
3. Remove the two screws at the bottom of the receiver with a
Phillips-head screwdriver. See Figure 2.
Remove these two
screws
Figure 2: Remove screws holding headphone jack
Operation and Maintenance Guide: Maintenance and Troubleshooting
16
Limited Warranty
PLEASE READ THESE WARRANTY TERMS AND CONDITIONS CAREFULLY BEFORE
USING YOUR CARDIO THEATER PRODUCT. BY USING THE EQUIPMENT, YOU ARE
CONSENTING TO BE BOUND BY THE FOLLOWING WARRANTY TERMS AND
CONDITIONS.
Limited Warranty.
Precor Incorporated (“Precor”) warrants all new Cardio Theater products to be free from
defects in materials and manufacture for the warranty periods set forth below. The warranty
periods commence on the invoice date of the original purchase. This warranty applies only
against defects discovered within the warranty period and extends only to the original
purchaser of the product. Parts repaired or replaced under the terms of this warranty will be
warranted for the remainder of the original warranty period only. To claim under this
warranty, the buyer must notify Precor or your authorized Cardio Theater dealer within 30
days after the date of discovery of any nonconformity and make the affected product
available for inspection by Precor or its service representative. Cardio Theater product
deemed defective by a Cardio Theater representative, will be issued a return authorization
number. Precor will not accept returns without a return authorization number. Precor
reserves the right, at their option, to repair or replace the product after verification of defect.
Product that fails after the warranty period expires will be repaired or replaced at the current
part and labor pricing after authorization from the customer. Repairs are warranted for 90
days.
Precor’s obligations under this warranty are limited as set forth below.
Warranty Periods and Coverage.
• Cardio Theater Transmitters
xTV-T Wireless or Wired Floor Models
xTVFM system transmitter
• Cardio Theater Receivers
XTV-R Wireless or Wired Upper Models
XTVFM system receiver
• Cardio Theater LCD Screen (PVS)
• Cardio Theater Screen Controllers
• Quick Change Headphone Jack
• Optional DVD Player
• CT Experience Series Screen (PVS12)
• CT Experience Series Screen Controller
• CT Experience Series 900 & 863 Receiver
• CT Experience Series Quick Change
Headphone Jack
3 Years
Parts & Labor
1 Year
Parts & Labor
1 Year
1 Year
90 Day
1 Year
2 Years
2 Years
2 Years
90 Days
Parts & Labor
Parts & Labor
Parts Only
Parts
Parts & Labor
Parts & Labor
Parts & Labor
Parts Only
Operation and Maintenance Guide: Limited Warranty
Conditions and Restrictions.
This warranty is valid only in accordance with the conditions set forth below:
1. The warranty applies to the Cardio Theater product only while
a. it remains in the possession of the original purchaser and proof of purchase is
demonstrated,
b. it has not been subjected to accident, misuse, abuse, improper service, or
mechanical, electrical or non-Precor modification.
c. claims are made within the warranty period.
2. This warranty does not cover damage or product failure caused by electrical wiring not
in compliance with electrical codes or Precor owner’s manual specifications, or failure to
provide reasonable and necessary maintenance as outlined in the owner’s manual.
This warranty excludes misuse or failures of, for example, poor quality CD’s,
multiple discs inserted in the player, failures caused by home-produced copies
of discs, etc.
3. Except in Canada, Precor does not pay labor outside the United States.
4. Warranties outside the United States and Canada may vary. Please contact your local
Dealer for details.
This Limited Warranty shall not apply to:
1. Software (PROM) version upgrades.
2. Normal wear and tear, consumables and cosmetic items, including, but not limited to
the following: labels.
3. Repairs performed on Cardio Theater products missing a serial number or with a serial
tag that has been altered or defaced.
4. Service calls to correct installation of the product or instruct owners on how to use
the product.
5. Pickup and delivery involved with repairs.
6. Any labor costs incurred beyond the applicable labor warranty period.
7. The user is cautioned that changes or modifications not expressly approved by the
manufacturer of the product could void the user’s authority to operate the product.
17
Disclaimer and Release.
The warranties provided herein are the exclusive warranties given by Precor and supersede
any prior, contrary or additional representations, whether oral or written. ANY IMPLIED
WARRANTIES, INCLUDING THE WARRANTY OF MERCHANTABILITY OR FITNESS
FOR A PARTICULAR PURPOSE THAT APPLY TO ANY PARTS DESCRIBED ABOVE
ARE LIMITED IN DURATION TO THE PERIODS OF EXPRESS WARRANTIES GIVEN
ABOVE FOR THOSE SAME PARTS. PRECOR HEREBY DISCLAIMS AND EXCLUDES
THOSE WARRANTIES THEREAFTER. Some States do not allow limitations on how long
an implied warranty lasts, so the above limitation may not apply to you. PRECOR ALSO
HEREBY DISCLAIMS AND EXCLUDES ALL OTHER OBLIGATIONS OR LIABILITIES,
EXPRESS OR IMPLIED, ARISING BY LAW OR OTHERWISE, WITH RESPECT TO ANY
NONCONFORMANCE OR DEFECT IN ANY PRODUCT, INCLUDING BUT NOT LIMITED
TO: (A) ANY OBLIGATION, LIABILITY, RIGHT, CLAIM OR REMEDY IN TORT, WHETHER
OR NOT ARISING FROM THE NEGLIGENCE OF PRECOR OR ITS SUPPLIERS
(WHETHER ACTIVE, PASSIVE OR IMPUTED); AND (B) ANY OBLIGATION, LIABILITY,
RIGHT, CLAIM OR REMEDY FOR LOSS OF OR DAMAGE TO ANY PRODUCT. This
disclaimer and release shall apply even if the express warranty set forth above fails of its
essential purpose.
Exclusive Remedies.
For any product described above that fails to conform to its warranty, Precor will provide, at
their option, one of the following: (1) repair; (2) replacement; or (3) refund of the purchase
price. Limited Warranty service may be obtained by contacting the authorized dealer from
whom you purchased the item. Precor compensates Servicers for warranty trips within their
normal service area to repair commercial product at the customer’s location. You may be
charged a trip charge outside the service area. THESE SHALL BE THE SOLE AND
EXCLUSIVE REMEDIES OF THE BUYER FOR ANY BREACH OF WARRANTY.
EXCLUSION OF CONSEQUENTIAL AND INCIDENTAL
DAMAGES.
PRECOR AND/OR ITS SUPPLIERS SHALL HAVE NO OBLIGATION OR LIABILITY,
WHETHER ARISING IN CONTRACT (INCLUDING WARRANTY), TORT (INCLUDING
ACTIVE, PASSIVE, OR IMPUTED NEGLIGENCE AND STRICT LIABILITY), OR
OTHERWISE, FOR DAMAGE TO THE PRODUCT, PROPERTY DAMAGE, LOSS OF
USE, REVENUE OR PROFIT, COST OF CAPITAL, COST OF SUBSTITUTE PRODUCT,
ADDITIONAL COSTS INCURRED BY BUYER (BY WAY OF CORRECTION OR
OTHERWISE) OR ANY OTHER INCIDENTAL, SPECIAL, INDIRECT, OR
CONSEQUENTIAL DAMAGES, WHETHER RESULTING FROM NONDELIVERY OR
FROM THE USE, MISUSE OR INABILITY TO USE THE PRODUCT. This exclusion applies
even if the above warranty fails of its essential purposes and regardless of whether such
damages are sought for breach of warranty, breach of contract, negligence, or strict liability
in tort or under any other legal theory. Some states do not allow the exclusion or limitation of
incidental or consequential damages, so the above limitation may not apply to you.
This warranty gives you specific legal rights, and you may also have other rights, which vary
from state to state.
Complete this portion and keep for your records.
Purchased From: _____________________________________________________
(Dealer or store name)
Phone Number:
_____________________________________________________
(Dealer or store telephone number)
Product/Model:
_____________________________________________________
(For example: Transmitters, Receivers)
Serial Number:
_____________________________________________________
(The serial number is found on the shipping container or item.)
Effective 30 June 2006
P/N CX30037-102
Operation and Maintenance Guide: Limited Warranty
18
Notes:
Operation and Maintenance Guide
19
Notes:
Operation and Maintenance Guide
20
®
Cardio Theater, Precor, and EFX are registered trademarks, and Cardio Theater PVS and Cardio Theater
Quick Change Headphone Jack are trademarks of Precor Incorporated.
Copyright 2006 Precor Incorporated.
www.cardiotheater.com
A Division of Precor Incorporated
20031 142nd Ave NE
Woodinville, WA USA 98072-4002
NOTICE:
Due to continuing advancements in technology, Precor Incorporated reserves the right to make changes in
hardware, packaging, and any accompanying documentation without prior written notice.
PVS15 OMG CX30438-101
Warranty Statement CX30037-102
06 November 2006