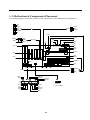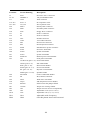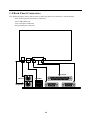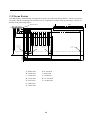
1
EC Declaration of Conformity We Iwill Corp. No. 10, Wu Chuan 3rd Rd., Hsin Chuang City, Taipei, Taiwan, R.O.C. Declare under sole responsibility that the BD100 Plus motherboard Meets the intent of Directive 89/336/ECC for Electromagnetic Compatibility. Compliance was demonstrated to the following specifications as listed in the official Journal of the European Communities: EN 50081-1 Emissions: EN 55022 Radiated, Class B EN 55022 Conducted, Class B EN 60555-2 Power Harmonics EN 50082-1 Immunity: IEC 801-2 Electrostatic Discharge IEC 801-3 RF Radiate IEC 801-4 Fast Transient 1 About This Manual This manual will introduce to the user how this product is consisted. All useful information will be described in later chapters. Keep this manual for your future upgrade or system re-configuration. Chapter 0 Overview An overview of some special and basic features of the BD100 Plus motherboard Chapter 1 Features The detailed features and specifications of the BD100 Plus motherboard Chapter 2 Quick Installation The quick reference for experienced users Chapter 3 Hardware Installation The detailed information on jumper setting, connection, and hardware installation Chapter 4 System BIOS Setup The detail information of the system BIOS setup options Chapter 5 Software and Tools The detail information for install software and tools Copyright This manual contains information protected by copyright law. All rights are reserved. No any part of this document may be used or reproduced in any forms or by any means, or stored in a database or retrieval system without prior written permission from Iwill Corp. This manual is subject to change without notice. Trademark Intel / Pentium are trademarks of Intel Corporation. IWILL and IWILL logo are trademarks of IWILL Corp. Sound Blaster is a registered trademark of Creative Technology Ltd. Sound Blaster-LINK and SB-LINK are trademarks of Creative Technology Ltd. All other product names are trademarks and registered trademarks of their respective owners. Warning Most of the features of this product have passed strict verification and are subject to change at any time without notice. If any malfunction occurs due to the future technical changes made by the respective component manufacturers, Iwill assumes no responsibility or liability for it. 2 Contents CHAPTER 0 ................................................................................................. 5 OVERVIEW ................................................................................................. 5 CHAPTER 1 ................................................................................................. 7 FEATURES................................................................................................... 7 1.1 FEATURES .............................................................................................. 7 1.2 ENVIRONMENT REQUIREMENTS............................................................... 9 1.3 MOTHERBOARD COMPONENTS PLACEMENT........................................... 10 1.4 BACK PANEL CONNECTOR .................................................................. 102 1.5 FORM FACTOR ...................................................................................... 13 CHAPTER 2 ............................................................................................... 15 QUICK INSTALLATION .......................................................................... 15 CHAPTER 3 ............................................................................................... 19 HARDWARE INSTALLATION ................................................................ 19 3.1 PREPARATION AND INSPECTION ............................................................. 19 3.2 UNPACK THE BD100 PLUS .................................................................... 19 3.3 INSTALLATION PROCEDURE ................................................................... 20 CHAPTER 4 ............................................................................................... 29 SYSTEM BIOS SETUP.............................................................................. 29 4.1 INTRODUCTION..................................................................................... 29 4.2 MAIN MENU ......................................................................................... 30 4.3 STANDARD CMOS SETUP ............................................................... 31 4.4 BIOS FEATURES SETUP ................................................................... 34 4.5 CHIPSET FEATURES SETUP ............................................................ 38 4.6 POWER MANAGEMENT SETUP...................................................... 41 4.7 PNP/ PCI CONFIGURATION.............................................................. 45 3 4.8 INTEGRATED PERIPHERALS .......................................................... 46 4.9 LOAD SETUP DEFAULTS ................................................................. 50 4.10 IWILL SMART SETTING................................................................. 50 4.11 SUPERVISOR / USER PASSWORD SETTING................................. 51 4.12 IDE HDD AUTODETECTION.......................................................... 52 4.13 SAVE & EXIT SETUP....................................................................... 52 4.14 EXIT WITHOUT SAVING................................................................ 52 CHAPTER 5 ............................................................................................... 53 SOFTWARE AND TOOLS ........................................................................ 53 5.1 SOFTWARE INSTALLATION ..................................................................... 53 5.2 HOW TO MAKE DRIVER DISKETTE WITHOUT O.S. INSTALLED................... 54 5.3 CPU FREQUENCY SELECTION BY BIOS.................................................. 54 5.4 VIEW DETAILED MANUAL..................................................................... 55 5.5 INSTALLING OPERATING SYSTEMS ......................................................... 55 5.6 INSTALLING THE SUSPEND TO DISK UTILITY ON YOUR BD100 PLUS ...... 57 5.7 HOW TO USE THE THERMAL SENSOR ...................................................... 62 5.8 IWILL SCSI SERIES ............................................................................... 63 4 Chapter 0 Overview Thank you for purchasing Iwill BD100 Plus motherboard. This operation manual will instruct you how to configure and install the system properly. It contains an overview about the engineering design and features of this product. Also, this manual provides useful information for later upgrades or configuration changes. Keep this for your future reference. BD100 PLUS FEATURES The BD100 Plus is the newest, most exciting motherboard in the market today. A step ahead of the competition, the BD100 Plus provides more power, convenience, and reliability for users. The BD100 Plus has more speed, and is great for better, fast computer graphics. The BD100 Plus has our special Iwill Smart Setting —an easy way to set your CPU frequency —and also more versatile power-on functions, all for your convenience. Furthermore, the BD100 Plus has several power saving modes to reduce energy waste. All of these features are compacted in a dynamic motherboard that has the stability you require in a powerful motherboard. Special features of the BD100 Plus include: l l l l l l AGP Booster —allows for fast graphics for games, and in some cases brings more stability to your AGP port Iwill Smart Setting —allows easy setting of your CPU frequency, no jumpers required! Versatile Power-On —you can power-on the system using a hot key, password, LAN, or modem Power Management Setup —allows you to set Doze, Standby, and Suspend modes Power Failure Recovery —after a power failure, the system will automatically turn on again once the power returns Health Monitoring System —helps manage your system so that your system runs safely The BD100 Plus also includes some basic features, such as: 1 x Slot 1 for Pentium ® III/II/Celeron, Intel 443BX chipset, 4 x DIMM slots, 5 x PCI slots, 1 x FDC floppy disk connector, 2 x IDE connectors, 2 x USB ports, 1 x PS/2 mouse, 1 x PS/2 keyboard ports, one parallel port, two serial ports, ATX power connector, one Sound Blast Link connector, and much, much more! The BD100 Plus has speed, convenience, and reliability, all wrapped up in one outstanding motherboard. The BD100 Plus is ahead of the pack. There is no other motherboard quite like it. Iwill: Lead the way into the 21st century! 5 YEAR 2000 issue The IBM compatible PC utilizes a Motorola MC146818 compatible Real-Time Clock (RTC) chip to maintain the date and time. Unfortunately, the “century” is not manipulated by the RTC. It uses 8bits of information to report the year and can only hold the last two digits of a year in packed BCD format. For example, 1997 is reported solely as 97. Since the RTC also contains non-volatile memory, IBM specified a location in the memory to hold “century” information. By combining the century data with the year data, software can obtain a full 4-digit year. When the Year 2000 occurs, the RTC reports the year as ’00’ and the “century” in RTC memory will contain ’19.’ Combining the full 4-digit year yields 1900, not 2000. Any applications which compare dates, or uses relative dates to perform functions will see incorrect dates. All motherboards contain BIOS, which is one of the key ingredients to check for systems designed to handle the year 2000. All motherboards currently shipped from Iwill contain BIOS capable of handling the year 2000 date correctly. The BIOS contains a feature that checks the least two significant digits of the year stored in the RTC during each BIOS request (INT 1Ah) to read the date and, if less than `80', updates the century byte to `20'. This feature enables operating systems and applications using the BIOS date/time services to reliably manipulate the year as a four-digit value. Be aware that the BIOS capability alone does not ensure that the system will handle the transition correctly. Other system components such as the operating system and application software also need to be able to handle the year 2000 date, and recognize the date format from other sources. Peripherals and Devices If you want to improve your system’s I/O performance, choose the latest Iwill SCSI controllers. The following are some Iwill SCSI controllers you may purchase and use with your BD100 Plus motherboard: l l l l SIDE 2930C: a fast SCSI for MO, CD-R, CD-R/W, CD-ROM. This value/performance SCSI card connects up to 7 devices. SIDE 2930U+: a 20MB/Sec. transfer rate. A full function card, supports booting from hard disk or CD-ROM, connects 7 devices SIDE 2935UW: 40 MB/sec transfer rate, 15 devices. The most stable product for an efficient system SIDE 2935LVD: an 80MB/sec transfer rate, and a 12-meter cable length connecting 15 devices. Perfect solution for enthusiasts. 6 Chapter 1 Features 1.1 Features 1.1.1 Processor Supports single Pentium® III/II/Celeron processors Supports 100 MHz and 66 MHz bus speeds Supports all published Pentium® III/II/Celeron processor voltages SEC (Single Edge Contact) cartridge Slot 1 connector Jumper inside selects the processor speed from 233 MHz to 500 MHz or higher 1.1.2 Core Logic Intel 82443BX PCI/ AGP controller Integrated DRAM controller Integrated PCI bus mastering controller Integrated Accelerated Graphics Port (AGP) bus controller Intel 82371EB PCI/ISA/IDE Xcelerator (PIIX4E) Multifunction PCI-to-ISA bridge (PCI Rev 2.1 compliant) Integrated IDE controller with Ultra DMA/33 support USB host interface with support for two USB ports Enhanced DMA controller and standard Interrupt controller and Timer function System Management Bus (SMB) with support for DIMM Serial PD 1.1.3 Main Memory 4 x 168-pin DIMM (Dual Inline Memory Module) sockets Supports up to 1 GB of 3.3 V Unbuffered SDRAM or Registered DIMM Supports up to 1 GB of 3.3 V Extended Data Out (EDO) memory. 64-bit data interface with ECC support (SDRAM only) 7 1.1.4 Multi I/O Winbond W83977 super I/O controller Note: Several different chips of the W83977 series may be used to support special features. Supports two floppy disk drives (include 3 Mode drive) and / or QIC-80 tape drive Supports one multi-mode parallel port Supports two high speed 16550 FIFO serial ports Integrated keyboard controller Integrated PS/2 mouse controller Supports PS/2 Power-On function Supports Power Failure Recovery 1.1.5 Expansion slots 1 x ISA slot 4 x PCI slots 1 x shared ISA/PCI slot 1 x AGP slot 1.1.6 Form Factor Compliance with ATX Version 2.01 specification Supports ATX power supply connector Supports the remote on/off switch Physical dimensions: length: 188 mm / width: 305 mm 1.1.7 Manageability Winbond W83781 System Hardware Monitor built-in. Note: Several different chips of the W83781 series may be used to support special features. Wake on LAN header for use with add-in network interface cards (NICs) Power failure recovery Wake on modem 1.1.8 Other features Award BIOS Using 2Mbit Flash ROM to provide on-board-upgrade ability without changing components Plug and Play compatible Supports Advanced Power Management (APM) Supports ACPI (Advanced Configuration Power Interface) Supports Creative SB-LINK to deliver Sound Blaster 16 compatibility 8 1.2 Environment Requirements Temperature 0-55 degrees C (operating or storage) 5% to 95% non-condensing relative humidity At least a 250 W power supply The power supply must comply with the following recommendations found in the specifications: The potential relation between 3.3 VDC and +5 VDC power rails The current capability of the +5VSB line All timing parameters 9 1.3 Motherboard Components Placement The following figure shows the location of the components on the BD100 Plus motherboard. 1 VCC NC IRRX 1 5VSB GND GND WOL IR IRTX IRMODE LID-ON 3 NC 7 FAN2 1 4 GNT# Tmp2 GND REQ# GND SB-LINK SIRQ 3 6 JP9 LPT S1 S2 USB KB MS J21,J22 J52 PWR 1 1 SLOT1 JP5 AGP PCIx FAN1 DIMM0~3 JP42 1 1 1 FDC 1 1 JP10 J43 PWR ON JP11 IDE1 3 IDE0 SENSE +12V FAN3 GND 1 Reset CathodeAnode+ GND RST ALED ACPI LED 10 20 Buzz NC SPKR KL PLED CathodeJP1 Anode+ 1 3 11 1--2:Normal Anode+ 2--3:Clear CMOS GND NC Cathode- VCC Keylock GND 10 1 Location Screen Printing Description J3 Slot 1 Processor Slot 1 connector J5--J8 DIMM0--3 168-pin DIMM Sockets J11 AGP AGP connector J12--J16 PCI1--5 PCI expansion slots J21--J22 J21, J22 ISA expansion slots J28 IDE 0 Primary IDE connector J29 IDE 1 Secondary IDE connector J30 FDC Floppy drive connector J31 S1 Serial 1 connector J32 S2 Serial 2 connector J33 LPT Parallel connector J34 USB Two USB connectors J35 MS PS/2 mouse connector J35 KB PS/2 keyboard connector J37 PWR Standard ATX power connector J39 FAN1 Processor fan header J40 FAN2 System fan header J41 FAN3 System fan header J42 PWR ON Remote power-on/off header J43 J43 Front panel I/O header ACPI LED (pins 1--2): ACPI LED header ALED (pins 5--6): IDE LED header RST (pins 9--10): Reset Switch header PLED (pins 11--13): Power LED header KL (pins 14--15): Keylock switch header SPKR (pins 17--20): Speaker header J44 SB-LINK Creative SB-LINK header J45 IR IR (infrared) connector J46 WOL Wake On LAN header J50 Tmp2 2nd temperature sensor header J52 KB ON PS/2 Power-On jumper block JP1 CLRTC Jumper for clearing CMOS JP5 JP5 Jumper for PCI devices compatibility JP9 JP9 Adjustable Vcore (5% or 10 %) JP10 VIO Adjustable VIO (3.5, 3.6, or 3.8) JP11 JP11 Adjustable AGP Frequency JP42 JP42 Clear Keyboard Power-On Password 11 1.4 Back Panel Connectors The following figure shows the location of the back panel I/O connectors, which include: PS/2-style keyboard and mouse connectors Two USB connectors Two serial port connectors One parallel port connector Parallel Mouse USB1 Keyboard Serial 1 USB0 12 Serial 2 1.5 Form Factor The BD100 Plus motherboard is designed to fit into an ATX form-factor chassis. The I/O connector locations and the mounting hole locations are in compliance with the ATX specification. Please see details in the following figure: Datum (0, 0) 6.250 G F E D CB A REAR I/O WINDOW IN CHASSIS 0.800 TYP. Between Connectors 0.156 inch 1.612 Pin 1 ISA to P i n 1 P C I 0.768 Pin 1 AGP to Pin 1 PCI H I J K L A: 0.400 inch H: 0.150 inch B: 1.000 inch I: 0.650 inch C: 1.300 inch J: 5.550 inch D: 1.625 inch K: 11.750 inch E: 2.627 inch L: 12.000 inch F: 6.500 inch G: 7.086 inch 13 Mounting Holes 14 Chapter 2 Quick Installation Several easy installation steps will be described in this chapter to help the experienced users with quick installation. If you are a beginner, or need to know more about this product, please refer to Chapter 3. Note: Please reviews 1.3 Motherboard Components Placement graphic for reference. Warning: Users must follow these guidelines to ensure the BD100 Plus is protected during installation. a. Make sure your computer is unplugged whenever working with inside components. b. Beware of Static electricity! Either wear anti-static wrist straps, or ensure that you touch a safely grounded object (such as a metal desk/table). Don’t handle components near high static objects (i.e. carpets, wool/ acrylic sweaters, etc.). c. Pick up components by their bodies. Try not to touch IC chips, connectors or leads. Don’t handle components any more than necessary. d. Keep all magnets away from both your hard and floppy disk drives, especially magnetic screwdrivers. Keep both floppy and hard disks apart if disassembled. e. Keep water and liquids away from your computer and its components. Step 1. Install processor This process is for motherboards already equipped with the universal retention mechanism. For Pentium II processors: a. Lift each of the two retention mechanism brackets so that they stand fully upright. You should hear a soft “click” sound once each bracket is in the correct upright position. b. With the CPU fan facing the DIMM sockets, insert the CPU horizontally into the retention mechanism, sliding both edges in simultaneously and as “evenly” as possible. Then, press down gently yet firmly so that the CPU is fully inserted correctly into the socket. c. Locate the two CPU lock switches, which are on the top, one on each side of the CPU just above its respective bracket. With the CPU fan facing you, use both hands and grasp the CPU, placing each thumb on top of each lock switch. Then, at the same time “flip” each lock switch outward in opposite directions (both away from the CPU fan). You should hear two “click” sounds, one from each switch. This indicates the CPU is secured into place. d. To release CPU, grasp the CPU (in the same manner in “c” above) and push both lock switches inward (toward the CPU fan). You should hear two “click” sounds, one from each switch. Lift CPU upward and out of the socket. 15 For Pentium III/Celeron processors: a. Follow steps “a” ~ “b” above. b. Locate the two sliding locks on each bracket. Read the writing on each lock: “OPEN” and “LOCK”. To lock, use your index finger and thumb, grasp each lock, and gently slide upward. This may be done simultaneously with two hands, or one at a time. Once each lock has been fixed upward, the CPU is secured into place. c. To release CPU, use your index finger and thumb, grasp each lock, and gently push downward. Lift the CPU upward and out of the socket. Step 2. Install processor fan This process is executed more quickly if your Pentium II/III/Celeron processor already has a fan attached to it. If so, attach the processor fan power cable to the “FAN1” header. Step 3. Setting CPU speed The CPU speed is setup using Iwill Smart Setting. This is found in the BIOS setup by pressing <Del> during the boot up process. Please refer to Chapter 4 for instructions on setting CPU speed. Note: The CPU speed must be setup according to the CPU’s specifications. Step 4. Install the memory module At least one memory module, such as a 168-pin 3.3V unbuffered SDRAM, Registered DIMM or EDO DIMM, needs to be inserted into the DIMM sockets. You may select any of the four DIMM sockets —there are no restrictions. Note: Be sure the edges of your memory module line-up correctly with the socket before attempting to insert the memory module. Step 5. Connect the internal peripherals The internal peripherals are devices that are located within the computer chassis, such as the floppy disk drive, hard disk drive, CD-ROM drive, etc. There is one 34-pin flat cable for floppy disk drive, and one 40-pin flat cable for several IDE devices included in your retail package. Note: The plastic lead on the middle of one side of the cable’s connector acts as a key, and slides easily into the gap in the middle of the receiving connector on the motherboard when inserting the cable connector. Step 6. Connect the Reset button The 2-pin reset header is located on pins 9--10 (identified as RST). Connect the reset button cable from the RST header to the reset button on the front panel of your PC case. Locate the RST header on the motherboard: Pin 9 RESET Pin 10 Ground 1 2 16 1 11 Step 7. Connect the Speaker The 4-pin speaker header is located on pins 17--20 (identified as SPKR. Connect the cable from the SPKR header to the speaker on the front panel of your PC case. Locate the SPKR header on the motherboard: Pin 17 VCC Pin 18 Ground Pin 19 NC Pin 20 BUZZ 1 11 1 2 Step 8. Connect the power LED The 3-pin power LED header is located on pins 11--13 (identified as PLED. Connect the cable from the PLED header to the power LED on the front panel of your PC case. Locate the PLED header on the motherboard: Pin 11 Anode (+) Pin 12 NC Pin 13 Cathode (-) 1 2 1 11 Step 9. Connect the keylock switch The 2-pin keylock header is located on pins 14--15 (identified as KL). Connect the cable from the KL header to the keylock switch (if supported) on the front panel of your PC case. Locate the KL header on the motherboard: Pin 14 KEYLOCK Pin 15 Ground 1 11 1 2 Step 10. Connect the IDE LED The 2-pin IDE LED header is located on pins 5--6 (identified as ALED). Connect the cable from ALED header to the LED on the front panel of your PC case. Locate the ALED header on the motherboard: Pin 5 Anode (+) Pin 6 Cathode (-) 1 2 1 11 Step 11. Connect the ACPI LED The 2-pin ACPI LED is located on pins 1-2 (marked as ACPI) of the front panel connector. Connect the chassis‘s ACPI LED to this header. Signal of ACPI LED header Pin 1 Cathode (-) Pin 2 Anode (+) 1 2 17 1 11 Step 12. Connect the Power-ON button All ATX computers provide a Power-On button on the front panel of your PC case. Simply plug in the ATX power connector into the Power-On button. Step 13. Install the Power Supply cord The BD100 Plus motherboard provides a 20-pin ATX power connector. This works in conjunction with the Power-On button to provide remote On/Off function. Step 14. Install the Keyboard Connect the cable from the PS/2 keyboard connector at the back panel to the keyboard. Step 15. Install the Display Card Insert the display card into the ISA, PCI or AGP expansion slot. Step 16. Connect the External Peripherals The external peripherals are devices located outside the computer chassis, such as the serial mouse, printer, PS/2 mouse, external modem, etc. Connect these devices to their appropriate connectors. Step 17. Power-on the system Once the system is powered on, make sure you enter the BIOS setup program and load the manufacturer’s default settings. After the system reboot, you are ready to install your operating system. Enjoy! 18 Chapter 3 Hardware Installation 3.1 Preparation and Inspection The BD100 Plus motherboard, like all other electronic equipment, is sensitive to static. Please take the proper precautions when handling it. If possible, ground yourself by touching a metal table or desk. Keep the board in its conductive wrapping until it is configured and ready to be installed in your system. Note: Please review 1.3 Motherboard Components Placement graphic for reference. 3.2 Unpack the BD100 Plus You should find the following components when opening the box: One BD100 Plus motherboard This operation manual One 40-pin IDE cable One 34-pin floppy cable One Iwill Power Installer CD diskette One Thermal Sensor Kit) For installation, you may need some or all of the following tools: Medium size flat blade screwdriver Medium size Phillips head screwdriver A 3/16 inch nut driver or wrench Warning: Users must follow these guidelines to ensure the BD100 Plus is protected during installation. a. Make sure your computer is unplugged whenever working with inside components. b. Beware of Static electricity! Either wear anti-static wrist straps, or ensure that you touch a safely grounded object (such as a metal desk/table). Don’t handle components near high static objects (i.e. carpets, wool/ acrylic sweaters, etc.). c. Pick up components by their bodies. Try not to touch IC chips, connectors or leads. Don’t handle components any more than necessary. d. Keep all magnets away from both your hard and floppy disk drives, especially magnetic screwdrivers. Keep both floppy and hard disks apart if disassembled. e. Keep water and liquids away from your computer and its components. 19 3.3 Installation procedure 3.3.1 Processor (Slot 1 and FAN1) The BD100 Plus motherboard supports single Pentium® III/II/Celeron processors. The processor’s VID pins automatically program the voltage regulator on the motherboard to the required voltage. The motherboard currently supports processors that run internally from 233 MHz to 500 MHz or higher. This process is for motherboards already equipped with the universal retention mechanism. For Pentium II processors: a. Lift each of the two retention mechanism brackets so that they stand fully upright. You should hear a soft “click” sound once each bracket is in the correct upright position. b. With the CPU fan facing the DIMM sockets, insert the CPU horizontally into the retention mechanism, sliding both edges in simultaneously and as “evenly” as possible. Then, press down gently yet firmly so that the CPU is fully inserted correctly into the socket. c. Locate the two CPU lock switches, which are on the top, one on each side of the CPU just above its respective bracket. With the CPU fan facing you, use both hands and grasp the CPU, placing each thumb on top of each lock switch. Then, at the same time “flip” each lock switch outward in opposite directions (both away from the CPU fan). You should hear two “click” sounds, one from each switch. This indicates the CPU is secured into place. d. To release CPU, grasp the CPU (in the same manner in “c” above) and push both lock switches inward (toward the CPU fan). You should hear two “click” sounds, one from each switch. Lift CPU upward and out of the socket. For Pentium III/Celeron processors: a. Follow steps “a” ~ “b” above. b. Locate the two sliding locks on each bracket. Read the writing on each lock: “OPEN” and “LOCK”. To lock, use your index finger and thumb, grasp each lock, and gently slide upward. This may be done simultaneously with two hands, or one at a time. Once each lock has been fixed upward, the CPU is secured into place. c. To release CPU, use your index finger and thumb, grasp each lock, and gently push downward. Lift the CPU upward and out of the socket. Locate the FAN1 header (processor fan header) on the motherboard: Pin 1 Ground Pin 2 +12 V Pin 3 SENSE Note 1. The processor fan must always be attached to the processor to prevent overheating. Note 2. The second-level cache is located on the base of the SEC cartridge. The cache size and cacheable memory size vary, depending on the processor used. 20 3.3.2 Setting CPU speed The CPU speed is setup using Iwill Smart Setting. This is found in the BIOS setup by pressing <Del> during the boot up process. Please refer to Chapter 4 for instructions on setting CPU speed. When adjusting frequency, select the frequency that matches your motherboard's bus speed in order to maximize your motherboard's performance. Enclosed is a list of possible CPU settings. Note: The CPU speed must be setup according to the CPU’s specifications. CPU Model BIOS Setting Intel Pentium II 233MHz Manual, x3.5, 66MHz Intel Pentium II 266MHz Intel Pentium II 300MHz Manual, x4, 66MHz 300Mhz(66x4.5) Intel Pentium II 333MHz 333Mhz(66x5) Intel Pentium II 350MHz 350Mhz(100x3.5) Intel Pentium II 400MHz 400Mhz(100x4) Intel Pentium II 450MHz 450Mhz(100x4.5) Intel Pentium III 450MHz 450Mhz(100x4.5) Intel Pentium III 500MHz 500Mhz(100x5) Intel Pentium III 550MHz 550Mhz(100x5.5) Intel Celeron 266MHz Manual, x4, 66MHz Intel Celeron 300 300Mhz(66x4.5) Intel Celeron 333MHz 333Mhz(66x5) Intel Celeron 366MHz 366Mhz(66x5.5) Intel Celeron 400MHz 400Mhz(66x6) Intel Celeron 433MHz 433Mhz(66x6.5) Intel Celeron 466MHz 466Mhz(66x7) 3.3.3 Main memory (DIMM0--3) The BD100 Plus motherboard has four Dual Inline Memory Module (DIMM) sockets, which support memory size from 8 MB to 1 GB with SDRAM and EDO DRAM. The Synchronous DRAM (SDRAM) improves memory performance through memory access that is synchronous with the memory clock. The Error Checking and Correcting (ECC) memory improves system security by detecting and correcting error bits when accessing memory. The BD100 Plus motherboard supports the following memory features: JEDEC MO-161 compliant 168-pin DIMMs with gold-plated contacts 3.3 V memory module only ECC logic detects multiple-bit errors and corrects single-bit errors (SDRAM) Unbuffered SDRAM, Registered DIMM or 60-ns 3.3 V EDO DIMMs 16 / 64 Mbit DRAM technology Symmetrical and asymmetrical DRAM addressing Single-sided or double-sided DIMMs Note: 3.3 V EDO and SDRAM DIMMs cannot be installed together (at the same time) on the BD100 Plus motherboard 21 Memory can be installed in DIMM sockets without any order restrictions. The memory type, size, speed can vary between sockets. The BIOS automatically detects memory type, size and speed. Note 1: In order to reduce the loading, the total memory chip count installed on the system should not exceed 72 unless the Registered DIMMs are used. Note 2: The Serial Presence Detect (SPD) information is highly recommended on all 100 MHz DIMMs for the BD100 Plus motherboard. This function is implemented using an EEPROM component on the memory module. The nonvolatile storage device contains data programmed by the DIMM manufacturer that identifies the module type and various SDRAM organization and timing parameters. A warning message will be displayed if any DIMMs installed on this motherboard have no SPD EEPROM. If this is the case, the system might become unstable without correct timing parameters. 3.3.4 Accelerated Graphics Port (AGP) The Accelerated Graphics Port (AGP) is a high-performance bus, especially for graphic-intensive 3D applications. AGP is independent of the PCI bus, and is intended for exclusive use with graphics devices. The AGP supports AC timing for 133 MHz data transfer rates, allowing data throughput of 533 MB/sec. The most important feature of AGP is DIME (Direct Memory Execute). DIME needs to allocate some system memory via the OS to access large textures outside the local graphic memory of the card. In order to take advantage of the DIME feature, some software components should be installed or upgraded within your system. For Windows NT 4.0: Upgrade to "Windows NT 4.0 Service Pack 3" or later versions For Windows 95: Upgrade to Windows 95 OSR 2.1 or later versions Install DirectX 5 or later versions from Microsoft 3.3.5 Primary/Secondary IDE connectors (IDE0 and IDE1) The BD100 Plus motherboard has two bus-mastering IDE interfaces, which support PIO Mode 3 / 4 and Ultra DMA 33 mode transfer. These interfaces support IDE disks, ATAPI devices (ex: CDROM), ZIP and LS-120 devices. If two devices are connected to one channel, one should be set to "Master" and the other one to "Slave" (Refer to device operation guide). Note: The IDE interfaces are fully compatible with ATA66 HDD. 3.3.6 Floppy drive connector (FDC) The BD100 Plus motherboard has one floppy interface, which supports 360K, 720K, 1.2M, 1.44M, 2.88M, 3 Mode floppy drives and QIC-80 floppy tape drive. It supports up to two devices in any capacity using the same connector. Simply connect the 34-pin cable connector from the connector on the motherboard to the floppy drive or drives. 3.3.7 Serial port connector (S1 and S2) The two 9-pin D-Sub serial port connectors on the back panel are compatible with 16550 UART. These ports are used for serial mouse, serial printer, fax modem, etc. Simply connect the serial cable from the serial port connector to your serial devices. 22 3.3.8 Parallel port connector (LPT) The connector for the multi-mode parallel port is a 25-pin D-Sub connector located on the back panel. It is used for printers, or other parallel devices. Simply connect the parallel cable connector from the parallel port to your parallel devices. 3.3.9 Universal Serial Bus (USB) The USB is suitable for mid-to-low speed devices such as mice, keyboards, joysticks, etc. In the past, all of these devices used different connectors, and it was difficult for end users to install the system. With USB technology, the various types of ports are replaced with a single connection, from which you can connect dozens of USB-compatible devices. Simply connect a hub into the USB port, and then plug all of your USB peripherals into the hub. The system is ready to go! The BD100 Plus motherboard supports the following USB features: Self-identifying, hot pluggable peripherals Support of isochronous and asynchronous transfer type Supports a maximum of 127 physical devices Supports data transfer rate up to 12 Mbit/sec The BD100 Plus motherboard has two USB ports; any USB peripheral can be connected to either port. For more than two USB devices, connect a hub to either port. 3.3.10 PS/2 keyboard and mouse connectors (KB and MS) Find the 6-pin mini-DIN keyboard connector, located on the back panel. Simply plug in the keyboard cable’s connector into this back panel connector (Note: It’s the lower one on the motherboard). Then, find the 6-pin mini-DIN PS/2 mouse connector, also located on the back (Note: It’s the upper one). Plug in the mouse cable’s connector into PS/2 mouse connector on the back panel. Note: It is recommended that you turn off the computer’s power before connecting or disconnecting a keyboard and/or mouse. 3.3.11 ATX power connector (PWR) The BD100 Plus motherboard supports an ATX power connector. Simply connect the ATX power cord into this connector.) 3.3.12 System fan headers (FAN2 and FAN3) The system’s airflow is critical for its reliability. To generate airflow within a system, ensure you have the proper size and number of fans (and vents), and position each fan properly in relation to the system’s components. Most systems are equipped with at least one fan. However, the user may have to purchase additional (secondary) fans in order to take advantage of this function. The BD100 Plus motherboard supports two extra system fan headers: FAN2 and FAN3. Connect the power cable from the FAN2/3 header to each additional fan used within your system. These fans automatically stop when the system enters the suspend mode. 23 Locate the FAN2/3 header on the motherboard: Pin 1 Ground Pin 2 +12 V Pin 3 SENSE 3.3.13 Power-On header (PWR ON) The Power-On header can be connected to the Power-On button located on front panel of your PC case. Pressing this button turns your system on or off. At least two seconds must pass before the power supply will recognize another on/off signal. Note: Press the Power-On button, holding it in for four seconds. This will forcibly execute the shutdown procedure immediately. 3.3.14 Front panel connector (J43) The J43 connector contains several headers, which are connected to buttons or switches located on front panel of your PC case. Note: These functions are optional for the user. 3.3.14.1 IDE LED header (ALED) S are working. The 2-pin IDE If connected, the LED will light up whenever the IDE devices LED header is located on pins 5--6 (identified as ALED). To use this function, connect the cable from the ALED header to the LED on the front panel of your PC case. Locate the ALED header on the motherboard: Pin 5 Anode (+) Pin 6 Cathode (-) 1 11 1 2 3.3.14.2 RESET header (RST) If connected, you may use the button on the front panel to reset the system. The 2-pin reset header is located on pins 9--10 (identified as RST). To use this function, connect the cable from the RST header to the reset button located on front panel of your PC case. Locate the RST header on the motherboard: Pin 9 RESET Pin 10 Ground 1 2 1 11 3.3.14.3 Power LED header (PLED) If connected, the LED will light up each time you power-on the PC. The 3-pin power LED header is located on pins 11--13 (identified as PLED). To use this function, connect the cable from the PLED to the LED located on front panel of your PC case. Locate the PLED header on the motherboard: Pin 11 Anode (+) Pin 12 NC Pin 13 Cathode (-) 1 2 24 1 11 3.3.14.4 KEYLOCK header (KL) If connected, the user is able to temporarily disable the keyboard (often used as security when the user steps away momentarily from the PC). The function is activated by pressing the keylock button on the front panel of the PC case. The 2-pin keylock header is located on pins 14--15 (identified as KL). To use this function, connect the cable from the KL header to the switch located on front panel of your PC case. Locate the KL header on the motherboard: Pin 14 KEYLOCK Pin 15 Ground 1 11 1 2 3.3.14.5 SPEAKER header (SPKR) If connected, the speaker sounds an error “beep” code/information (during the POST) in the event that the computer can not use the video interface. The 4-pin speaker header is located on pins 17--20 (identified as SPKR). To use this function, connect the cable from the SPKR header to the switch located on front panel of your PC case. Locate the SPKR header on the motherboard: Pin 17 VCC Pin 18 Ground Pin 19 NC Pin 20 BUZZ 1 11 1 2 3.3.14.6 Connect the ACPI LED If connected, the ACPI LED will light up each time your PC is in suspend or power saving mode. The 2-pin ACPI LED is located on pins 1-2 (identified as ACPI). Connect the cable from the ACPI LED header to the ACPI located on front panel of your PC case. Locate the ACPI LED header on the motherboard: Pin 1 Anode (+) Pin 2 Cathode (-) 1 2 1 11 3.3.15 SB-LINK header (SB-LINK) Sound Blaster 16 was the standard of the ISA bus sound cards. Several games have been programmed for Sound Blaster especially under the DOS environment. Users who continue to play games that use ISA bus sound cards may experience compatibility problems with the new upgraded PCI bus sound cards. This function adopts Intel’s PC/PCI technology to deliver Sound Blaster 16 compatibility to PCI bus sound card, enabling users to play real-mode DOS games. To use this function, connect the cable provided by the PCI sound card to the SB-LINK header. Locate the SB-LINK header on the motherboard: Pin 1 GNT# Pin 4 Ground Pin 2 Key Pin 5 REQ# Pin 3 Ground Pin 6 SIRQ 25 3.3.16 Infrared connector (IR) The Infrared connector supports infrared wireless transmitting and receiving of data between devices when using the appropriate application software. You must configure a Serial Port 2 to support an IrDA module prior to using this feature. The 7-pin Infrared header (identified as IR) is located in between the PCI1 and PCI2 slots. Connect the cable from the IrDA module to the IR header. 3.3.17 WOL header (WOL) The WOL (“Wake On LAN,”) is a feature which allows you to power-on or “wake up” the computer through a network LAN. This feature can only be used if your system has a network interface card (NIC) that supports WOL technology, and your system has an ATX power supply of at least 800mA.). The 3-pin WOL header (identified as WOL) is located in near the PCI1 slot. Connect the cable from a network interface card (NIC) to the WOL header. Note: When operating WOL, ensure the power cord is still plugged into the socket, and that the computer has been turned off. Locate the WOL header on the motherboard: Pin 1 5VSB Pin 2 Ground Pin 3 LID_ON (Active High) 3.3.18 PS/2 Power-On (J52) This is essential for the PS/2 Power-On to function properly (see below). Your system requires an ATX power supply of at least 300mA on the +5VSB lead. There are several ways you can choose to power-on your system through PS/2 devices: keyboard 98, password, Hot KEY, Mouse Left and Mouse Right. Please refer to Chapter 4 for instructions on setting PS/2 Power-On mode. If you DO NOT want to use this function, place the jumper cap over pins 1-2, and the funtion will be disabled. If you want this function, place the jumper cap over pins 2-3 to set 5V_SB, and enable the function. Note: In case of AC power loss, the Power-On function will reset to “BUTTON ONLY”. To re-set your Power-On function to one of the above modes again, you must re-enter CMOS setup utility. 3 2 1 3 2 1 Disable (Default) 5V_SB 3.3.19 Clear Keyboard Power-On Password (JP42) To enable function, place the jumper cap over pins 1-2. Then enter BIOS and select “Password Power-On” to set your password for the keyboard power-on function. Once you select and enter the Keyboard Password Power-On mode, you must type the correct password in order to turn on your system. The remote on/off button will be disabled. If you forget your password, place the jumper cap over pins 2-3 (pins 2-3 become ON), and use the Power-On button on the front panel of your PC case to power-on the system. 1 1 2 2 3 3 Normal Clear power-on password 26 3.3.20 Adjustable Vcore (JP9) This function offers adjustable processor Vcore. When NO jumper caps are used, the motherboard automatically generates the proper Vcore voltage that requested by the CPU. Place the jumper cap over pins 1-2 to increase 5% more voltage to the processor’s Vcore. Place the jumper cap over pins 2-3 to increase 10% more voltage to the processor’s Vcore. Note: A wrong voltage setting will cause irreversible permanent damage to the CPU. DO NOT use these functions unless you are an experienced user, and are willing to take your own risk. 1 1 1 2 2 2 3 3 3 Auto (Default) Increase 10% Increase 5% 3.3.21 Adjustable VIO (JP10) This function offers adjustable VIO. When NO jumper caps are used, the system automatically uses the VIO default setting, which is 3.5V. To set the VIO to 3.6V, place the jumper cap over pins 1-2. To set the VIO to 3.8V, place the jumper cap over pins 2-3. Note: A wrong voltage setting will cause irreversible permanent damage to the CPU. DO NOT use these functions unless you are an experienced user, and are willing to take your own risk. 3 2 1 3 2 1 3 2 1 3.6V 3.5V (default) 3.8V 3.3.22 AGP Booster (JP11) This function offers AGP frequency setup. The AGP frequency normally runs at 66MHz. To set the AGP frequency to its default setting, which is roughly two-thirds of the processor’s external frequency, place the jumper cap on pins 1-2. To set the AGP frequency at the same speed as processor’s external frequency, place the jumper cap on pins 2-3. 1 2 3 1 2 3 2/3 1:1 In most instances, it is best to leave the jumper in its default setting (on pins 1-2). For testing and/or other purposes, here are some examples for your reference. CPU Type 66MHz FSB 66MHz JP11 AGP Clock 2-3 66MHz Remarks Normal usage 66MHz 75MHz 2-3 75MHz Over-clocking at CPU/AGP 66MHz 83MHz 2-3 83MHz Over-clocking at CPU/AGP 66MHz 100MHz 2-3 100MHz Over-clocking at CPU/AGP 100MHz 66MHz 2-3 66MHz Downgrade at CPU 100MHz 75MHz 2-3 75MHz Downgrade at CPU, over-clocking at AGP 100MHz 83MHz 2-3 83MHz Downgrade at CPU, over-clocking at AGP 27 100MHz 100MHz 2-3 100MHz Over-clocking at AGP 100MHz 112MHz 2-3 112MHz Over-clocking at CPU/AGP 100MHz 133MHz 2-3 133MHz Over-clocking at CPU/AGP CPU Type FSB JP11 AGP Clock Remarks 66MHz 66MHz 1-2 44MHz Downgrade at AGP 66MHz 75MHz 1-2 50MHz Over-clocking at CPU, down grade at AGP 66MHz 83MHz 1-2 55MHz Over-clocking at CPU, down grade at AGP 66MHz 100MHz 1-2 66MHz Over-clocking at CPU 100MHz 66MHz 1-2 44MHz Downgrade at CPU/AGP 100MHz 75MHz 1-2 50MHz Downgrade at CPU/AGP 100MHz 83MHz 1-2 55MHz Downgrade at CPU/AGP 100MHz 100MHz 1-2 66MHz Normal usage 100MHz 112MHz 1-2 75MHz Over-clocking at CPU/AGP 100MHz 133MHz 1-2 88MHz Over-clocking at CPU/AGP 3.3.23 Clear CMOS jumper block (JP1) To reset the RTC (Real Time Clock) CMOS data, take the JP1 jumper cap off pins 1-2, place onto pins 2-3, and then place back onto pins 1-2 again. This will return the RTC to the default setting. Then, you will need to get into the BIOS setup program (See Chapter 4) choose LOAD SETUP DEFAULTS, and select the original manufacturer default settings in your CMOS. 3.3.24 System Hardware Monitor The system hardware monitor supports following features: Integrated temperature sensor to monitor system temperature Voltage sense monitoring to detect voltage level, Vcore, VTT, +3.3V, +5V, -5V, +12V, -12V Fan speed sensors for up to three fans Using a proprietary application, the system’s hardware monitor logic will check the voltage, temperature and fan speed at all times. If any failure occurs, the application will display a warning message immediately. 28 Chapter 4 System BIOS Setup 4.1 Introduction The BD100 Plus motherboard uses AWARD BIOS, which is stored in flash memory and can be upgraded using the appropriate software program. The setup program is for viewing and changing the BIOS setting for a computer. These settings are stored in battery-backed RAM so that it retains all the settings after the power has been turned off. 4.1.1 Upgrade BIOS The BIOS can be upgraded from a diskette with the Award Flash utility -- AWDFLASH.EXE. The BIOS image file, and update utility are available from Iwill’s WEB site: www.iwill.com.tw. 4.1.2 Recovering BIOS Data Some types of conditions can destroy the BIOS. Nevertheless, the BIOS can be recovered from a diskette. To recover BIOS, you must create a bootable diskette, then copy the recovery files onto it. The recovery files are available from Iwill. Note: No video is displayed during the recovery process. 4.1.3 Enter BIOS setup program Power-on the system by either pressing the Power-On button, or by using any of the power-on features provided by the BD100 Plus motherboard. Then, press the <Del> key after the Power-On Self Test (POST), and before the scanning of IDE devices. Simply look for the message “Press DEL to enter SETUP” displayed at the bottom of the screen during the boot up process. If the message disappears before you’ve had a chance to respond, you can restart the system by Turning off the system power then turn it on again, or Pressing the "RESET" button on the system case, or Pressing <Ctrl>, <Alt> and <Del> keys simultaneously. 29 4.1.4 Using BIOS setup program The following table shows the function keys available for each menu screen. áUp Move to the previous field âDown Move to the next field ßLeft Move to the field on the left hand side àRight Move to the field on the right hand side <Esc> Quit from setup program without saving changes, or Exit from current menu page and return to main menu page <PgUp> or <+> Select the previous value for a field <PgDn> or <-> Select the next value for a field <F1> Bring up a help screen for the current field (Shift)<F2> Change screen color. F2 to select color forward, (Shift) F2 to select color backward <F10> Save the current value and exit setup program NOTE Generally, the BIOS default settings have been carefully chosen by the system manufacturer to provide the absolute maximum performance and reliability. It is very dangerous to change any setting without full understanding. We strongly recommend that you DO NOT update your BIOS if the system works perfectly. DO NOT change any setting unless you fully understand what it means. If the system does not work smoothly after changing the BIOS settings, follow the procedures described previously, enter the BIOS setup program, then load the original manufacturer default settings. If the system is no longer able to boot after changing the settings, the only way to recover it is to clear the data stored in RTC CMOS. To reset the RTC CMOS data, take the JP1 jumper cap off pins 1-2, place onto pins 2-3, and then place back onto pins 1-2 again. This will return the RTC to the default setting. Then, get into the BIOS setup program (see 4.1.3 above), choose LOAD SETUP DEFAULTS, and select the original manufacturer default settings in your CMOS. 4.2 Main Menu The main menu allows you to select from several setup pages. Use the arrow keys to select among these pages and press <Enter> key to enter the sub-menu. Note: A brief description of each highlighted selection appears at the bottom of the screen. The main menu includes the following setup pages. STANDARD CMOS SETUP Allocates resources for hardware components BIOS FEATURES SETUP Specifies advanced features available through the BIOS 30 CHIPSET FEATURES SETUP Specifies advanced features available through the chipset POWER MANAGEMENT SETUP Specifies power management features PNP /PCI CONFIGURATION Specifies Plug and Play and PCI features INTEGRATED PERIPHERALS Specifies on-board controller features LOAD SETUP DEFAULTS Loads the manufacturer default setting into CMOS IWILL SMART SETTING Specifies special features SUPERVISOR / USER PASSWORD Specifies passwords IDE HDD AUTO DETECTION Auto-detects the parameters of IDE disks SAVE & EXIT SETUP Saves current value to CMOS and exit setup EXIT WITHOUT SAVING Abandons all changes and exit setup 4.3 STANDARD CMOS SETUP This setup page is used for allocating resources for hardware components. 4.3.1 Date This field specifies the current date. The date format is <day>, <month>, <date>, and <year>. 4.3.2 Time This field specifies the current time. The time format is <hour>, <minute>, and <second>. The time is calculated based on the 24-hour (military-time) clock. 4.3.3 Primary Master / Primary Slave / Secondary Master / Secondary Slave This field specifies the geometric parameters and translation mode of IDE disk drives. 31 4.3.3.1 TYPE This field specifies type of drive that corresponds to the drive installed in your system. If you select User, please specify the correct number of Cylinders, Heads, and Sectors. Options Description 1 – 45 Specifies pre-defined disk drive type User Specifies disk drive type by user Auto BIOS automatically fills in the values for the cylinders, heads and sectors fields None No disk drive attached 4.3.3.2 Cylinders If you select Auto, this field automatically fills in the number of cylinders for your hard disk and can not be modified. If you select User, you must type the correct number of cylinders for your hard disk. 4.3.3.3 Heads If you select Auto, this field automatically fills in the number of heads for your hard disk and can not be modified. If you select User, you must type the correct number of heads for your hard disk. 4.3.3.4 Sectors If you select Auto, this field automatically fills in the number of sectors for your hard disk and can not be modified. If you select User, you must type the correct number of sectors for your hard disk. 4.3.3.5 MODE This field specifies the IDE translation mode. Options Description NORMAL Specifies traditional CHS addressing mode LARGE Specifies extended CHS translation mode LBA Specifies LBA translation mode AUTO BIOS specifies translation method automatically 32 4.3.4 Drive A / Drive B This field specifies the traditional type of the floppy drives. Options Description None No floppy drive is connected 360K, 5.25 in. A 360K floppy drive is connected 1.2M, 5.25 in. A 1.2M floppy drive is connected 720K, 3.5 in. A 720K floppy drive is connected 1.44M, 3.5 in. A 1.44M floppy drive is connected 2.88M, 3.5 in. A 2.88M floppy drive is connected 4.3.5 Floppy 3 Mode Support 3 Mode floppy drive is a type of 3.5-inch drive used by NEC PC98 computers. It supports both 1.2M and 1.44M formats using the same drive. This field specifies which drive supports 3 Mode. When a floppy drive is specified to support 3 Mode, the respective drive setting in “Drive A / Drive B” field will be invalid. Options Description Disabled No 3 Mode drive is connected Drive A A 3 Mode drive is connected as drive A Drive B A 3 Mode drive is connected as drive B Both Both drive A and drive B are 3 Mode drives 4.3.6 Video This field specifies the type of the graphics adapters used by the primary system monitor. Options Description EGA/VGA Specifies EGA or VGA adapter CGA 40 Specifies CGA adapter with 40 column mode CGA 80 Specifies CGA adapter with 80 column MONO Specifies Monochrome adapter 4.3.7 Halt On This field determines how the system reacts to errors once detected. Options Description All Errors Each time the BIOS detects a non-fatal error, the system will stop and display an error message No Errors The system will not stop for any errors that are detected All, But Keyboard The system will stop for any errors except keyboard error All, But Diskette The system will stop for any errors except diskette error All, But Disk/Key The system will stop for any errors except diskette and keyboard errors 33 4.3.8 Base Memory The POST (Power-On Self Test) determines the amount of base (conventional) memory installed in the system. The value of the base memory is typically 640K. This field has no options. 4.3.9 Extended Memory The BIOS determines how much extended memory is present during the POST. This is the amount of memory located above 1MB in the processor’s memory address map. This field has no options. 4.3.10 Other Memory This refers to the memory located in the 640K to 1024K address space. This memory can be used for different applications. DOS uses this area to load device drivers in an effort to keep as much base memory free for application programs. The BIOS is the most frequent user of this RAM area since this is where it shadows RAM. This field has no options. 4.4 BIOS FEATURES SETUP This setup page specifies advanced features available through the BIOS. Note: An asterisk (*) denotes the default setting. 4.4.1 Virus Warning When this function is enabled, the BIOS monitors the boot sector and partition table of the hard disk drive for any attempt at modification. If an attempt is made, the BIOS will halt the system and then display an error message. Afterwards, if necessary, you can run an anti-virus program to locate and remove the problem before any damage is done. Many disk diagnostic programs will attempt to access the boot sector table, which can cause the above warning message. If you run such a program, we recommend that you first disable the Virus Warning function beforehand. Options Enabled Disabled (*) 4.4.2 CPU Internal Cache This field configures the CPU internal cache (L1 cache). Options Enabled (*) Disabled 4.4.3 External Cache This field configures the system’s external cache (L2 cache). Options Enabled (*) Disabled 34 4.4.4 CPU L2 Cache ECC Checking This field specifies whether the CPU L2 cache supports ECC or not. Options Enabled (*) Disabled 4.4.5 Quick Power-On Self Test When enabled, BIOS will shorten or skip some items during the Power-On Self Test (POST). Options Enabled (*) Disabled 4.4.6 Boot From LAN First This field configures the boot from the network adapter. If this feature is enabled, no matter what Boot Sequence you choose (see below section 4.4.7), the system will try to boot from the network adapter first. The adapter must have a BootROM on it. Options Enabled Disabled (*) 4.4.7 Boot Sequence This field configures the boot sequence of drive devices. Options Description A, C, SCSI (*) System will first try to boot from floppy drive, then master IDE disk drive on primary channel, and then SCSI disk drive C, A, SCSI Master IDE disk drive on primary channel, floppy drive, SCSI disk driver C, CDROM, A Master IDE disk drive on primary channel, ATAPI CDROM drive, floppy drive CDROM, C, A ATAPI CDROM drive, master IDE disk drive on primary channel, floppy drive D, A, SCSI Slave IDE disk drive on primary channel, floppy drive, SCSI disk drive E, A, SCSI Master IDE disk drive on secondary channel, floppy drive, SCSI disk drive F, A, SCSI Slave IDE disk drive on secondary channel, floppy drive, SCSI disk drive SCSI, A, C SCSI disk drive, floppy drive, ATAPI CD-ROM drive SCSI, C, A SCSI disk drive, master IDE disk drive on primary channel, floppy drive C only Master IDE disk drive on primary channel only LS/ZIP, C LS-120 or ZIP drive, master IDE disk drive on primary channel 35 4.4.8 Swap Floppy Drive When enabled, floppy drives A and B will be exchanged without the user physically changing the cable. Options Enabled Disabled (*) 4.4.9 Boot Up NumLock Status This field determines the configuration of the numeric keypad after system boot up. If On, the keypad uses numbers keys. If Off, the keypad uses arrow keys. Options Description On (*) Keypad works as number keys Off Keypad works as arrow keys 4.4.10 Gate A20 Option This field configures how the gate A20 is handled. The gate A20 is a device used to address memory above 1 MB. At first, the gate A20 was handled from a pin on the keyboard. While some keyboards still provide this support, it is more common, and much faster, for modern system chipsets to provide support for gate A20. Options Description Fast (*) GateA20 signal supported by core logic Normal GateA20 signal supported by keyboard controller 4.4.11 Typematic Rate Setting This field determines if the typematic rate is to be used. When enabled, the BIOS will report (after a moment) that the key has been depressed repeatedly. When disabled, the BIOS will report only once if a key is held down continuously. This feature is used to accelerate cursor movements using the arrow keys. Options Enabled Disabled (*) 4.4.12 Typematic Rate (Chars/Sec) This field specifies how many characters will be displayed in one second when a key is held down continuously. Options 6 (*), 8, 10, 12, 15, 20, 24, 30 4.4.13 Typematic Delay (Msec) When enabled, typematic delay allows you to select the time delay between when the key was first depressed and when the acceleration begins. Options 250 msec (*), 500 msec, 750 msec, 1000 msec 36 4.4.14 Security Option This field configures how the system security is handled. It works conjunction with SETTING SUPERVISOR / USER PASSWORD page to control the security level of the system. Options Description Setup (*) System needs a password to enter BIOS setup program System System needs a password to boot 4.4.15 PS/2 mouse function control When enabled, your system can use a PS/2 mouse. Options Enabled (*) Disabled 4.4.16 PCI / VGA Palette Snoop This field controls the ability of a primary PCI graphics controller to share a common palette with an ISA/VESA video or MPEG cards. Options Description Enabled PCI VGA co-works with ISA MPEG card Disabled (*) All cases except above 4.4.17 Assign IRQ for VGA When enabled, BIOS will assign your Video Graphics Array (VGA) an IRQ (Interrupt Request) level. Options Disabled Enabled (*) 4.4.18 OS Select for DRAM >64MB When enabled, this field allows you to access the memory that is over 64MB under OS/2. Options OS/2 Non-OS/2 (*) 4.4.19 Report No FDD For WIN 95 For a floppy diskless system that runs Windows 95, this field should be set to Yes. Options Yes No (*) 37 4.4.20 Video BIOS Shadow When enabled, the video BIOS will be copied to system memory and increase the video speed. Options Enabled (*) Disabled 4.4.21 C8000-CBFFF / CC000-CFFFF / D0000-D3FFF Shadow D4000-D7FFF / D8000-DBFFF / DC000-DFFFF Shadow When enabled, the extended ROM data located at the respective address range will be copied to system memory. Options Enabled Disabled (*) 4.5 CHIPSET FEATURES SETUP This setup page is used to specify advanced features available through the chipset. The default settings have been chosen carefully for most operating conditions. DO NOT change the value of any field in this setup page without full understanding. 4.5.1 Auto Configuration When enabled, BIOS will divide all the EDO memory into two categories: 50ns DRAM and 60ns DRAM. A set of pre-defined values about DRAM timing will be used for each category. Then the user can assign the correct timing easily. When disabled, user can specify the EDO DRAM timing value. Note: Some engineering knowledge is needed prior to handling Auto Configuration. Options Enabled (*) Disabled 4.5.2 EDO DRAM Speed Selection This field selects pre-defined EDO DRAM timing for different speed categories. It is available only when the Auto Configuration field is enabled. Options Description 50ns Pre-defined timing for 50ns EDO DRAM 60ns (*) Pre-defined timing for 60ns EDO DRAM 4.5.3 EDO CASx# MA Wait State This field specifies the Wait State of EDO DRAM address line. This field is available only when the Auto Configuration field is disabled. Note: This field is for experienced users only. Options Description 2 (*) 2 system clocks wait state for EDO address line 1 1 system clock wait state for EDO address line 38 4.5.4 EDO RASx# Wait State This field specifies the Wait State of EDO DRAM row address line. This field is available only when the Auto Configuration field is disabled. Note: This field is for experienced users only. Options Description 2 (*) 2 system clocks wait state for EDO row address line 1 1 system clock wait state for EDO row address line 4.5.5 SDRAM CAS Latency Time This field specifies the SDRAM CAS latency timing parameter (the time from CAS# assertion to data valid). Note: This field is for experienced users only. Options Description 2 2 system clocks 3 (*) 3 system clocks 4.5.6 DRAM Data Integrity Mode When enabled, the BIOS will use ECC (Error Checking and Correcting) protocol to increase integrity of system data. When ECC is selected, all memory modules used by the system must support ECC. Options ECC Non-ECC (*) 4.5.7 System BIOS Cacheable When enabled, accesses to the system BIOS will be cached. Options Enabled (*) Disabled 4.5.8 Video BIOS Cacheable When enabled, access to the video BIOS will be cached. Options Enabled Disabled (*) 4.5.9 Video RAM Cacheable When enabled, access to the video memory located at A0000H to BFFFFH will be cached. Options Enabled Disabled (*) 39 4.5.10 8 Bit I/O Recovery Time This field specifies the number of clocks, which the system will delay after the completion of an 8 bit input/output request. Options 1 (*) / 2 / 3 / 4 / 5 / 6 / 7 / NA / 8 4.5.11 16 Bit I/O Recovery Time This field specifies the number of clocks, which the system will delay after the completion of an 16 bit input/output request. Options 1 (*) / 2 / 3 / NA / 4 4.5.12 Memory Hole At 15M-16M Some add-in cards need to re-map its resource to a block of main memory address range. Any host cycles that match this memory hole are passed on to the add-in cards. Options Enabled Disabled (*) 4.5.13 Passive Release When enabled, the south bridge PIIX4 will support the Passive Release mechanism when it is a PCI master. The PCI revision 2.1 compliant requires this field to be enabled. This field is for experienced users only. Options Enabled (*) Disabled 4.5.14 Delayed Transaction When enabled, the south bridge PIIX4 will supports the Delayed Transaction mechanism when it is the target of a PCI transaction. The PCI revision 2.1 compliant requires this field to be enabled. This field is for experienced users only. Options Enabled Disabled (*) 4.5.15 AGP Aperture Size (MB) This field specifies the size of system memory that can be used for AGP graphics aperture. Options 4 / 8 / 16 / 32 / 64 (*) / 128 / 256 4.5.16 Set SDRAM Timing By SPD When Enabled, the system BIOS will reference data of DIMM module EEPROM. Options Enabled (*) Disabled 40 4.6 POWER MANAGEMENT SETUP This setup page specifies suspend or power saving features. There are several modes used to save computer’s energy: Doze Mode The CPU clock runs at slower speed, and all other devices still operate at full speed Standby Mode The CPU clock runs at slower speed, and the fixed disk drive will power off, and the video will power off, and all other devices still operate at full speed Suspend Mode All devices except the CPU will shut off Each power saving mode has a respective timer. The value of the timer can be assigned or reloaded and it will count down to zero. When the timer equals to zero, the system will be forced into the related power saving mode. If any predefined signal or event is detected during the timer counting period, the timer restarts automatically. 4.6.1 Power Management This feature allows the user to select the default parameters for the power saving mode. Options Description Disable The computer always runs at full speed. No power is saved Min Saving When idle for one hour, the system enters suspend mode Max Saving When idle for fifteen minutes, the system enters suspend mode User Define (*) User can specify the time the system enters suspend mode 4.6.2 PM Control by APM When enabled, an Advanced Power Management (APM) protocol will be activated to handle the power saving mode. Options Yes (*) No 4.6.3 Video Off After This field specifies the suspend or power saving mode, which shuts off the video. Options Doze / Standby (*) / Suspend / NA 4.6.4 Doze Mode This field specifies the time the system enters Doze Mode. It is available only when the Power Management field set to User Define. Options 1 Min / 2 Min / 4 Min / 8 Min / 12 Min / 20 Min 30 Min / 40 Min / 1 Hour / Disable 41 4.6.5 Standby Mode This field specifies the time the system enters Standby Mode. It is available only when the Power Management field is set to User Define. Options 1 Min / 2 Min / 4 Min / 8 Min / 12 Min / 20 Min 30 Min / 40 Min / 1 Hour / Disable (*) 4.6.6 Suspend Mode This field specifies the time the system enters power saving mode. It is available only when the Power Management field is set to User Define. Options 1 Min / 2 Min / 4 Min / 8 Min / 12 Min / 20 Min 30 Min / 40 Min / 1 Hour / Disable (*) 4.6.7 HDD Power Down This field specifies the time the system enters HDD power down. It is available only when the Power Management field is set to User Define. Options 1 Min / 2 Min / 3 Min / 4 Min / 5 Min / 6 Min 7 Min / 8 Min / 9 Min / 10 Min / 11 Min / 12 Min 13 Min / 14 Min / 15 Min / Disable (*) 4.6.8 HDD Power Down When suspend This field specifies the time the system enters HDD power down during the suspend mode only. Options Enabled (*) Disabled 4.6.9 CPUFAN Off In Suspend When enabled, the CPU fan will shut off during the suspend mode. Options Disabled Enabled (*) 42 44.6.10 Suspend Mode Option This field specifies suspend mode options. Options Description Power-On Suspend (*) The traditional Green PC suspend mode. All devices except CPU will shut off. Suspend to Disk Saves system status, memory and screen image into hard disk, then the power turns off automatically. When you strike a key or move the mouse, the power turns on again, and the system comes back to the original screen (when the screen was last on) within just few seconds, depending on the memory size of your system. Need Utility ZVHDD.EXE to reserve disk space. 4.6.11 Throttle Duty Cycle This field specifies system performance when system is in suspend mode. The more performance required, less energy saved. Options Disabled 12.5-25% 37.5-50% 50-62.5%(*) 4.6.12 PCI/VGA ACT-Monitor When enabled, the system goes into power saving mode if there’s no activity on the monitor screen. When disabled, the system goes into power saving mode, whether or not there is activity on the monitor screen. Options Enabled (*) Disabled 4.6.13 Soft-Off by PWR-BTTN This field specifies the function of power button. Options Description Instant-Off When power button pressed, the system turns off immediately. Delay 4 Sec. After the power button has been pressed and held for four seconds, the system turns off. 4.6.14 Wake Up On LAN When enabled, the PC can power-on or “wake up” through LAN (Local Area Network). Used only when your PC is connected to a network system. Options Enabled Disabled (*) 43 4.6.15 Power-On By Ring When enabled, the PC can power-on through an external modem connected to your PC. For example, you may send an e-mail message to your PC from another location, and this will power-on your PC. When using this feature, you must have a modem, and your PC must be turned off. Note: This feature alone doesn’t allow you to power off your PC (see 4.6.10 Suspend Mode). Options Enabled Disabled (*) 4.6.16 Resume by Alarm When enabled, you can set the date and time to automatically power-on your PC (similar to an alarm clock). The alarm from RTC (real-time clock) automatically turns on the system. Options Description Disabled (*) Disables RTC alarm function Enabled Sets the date and time to power-on the PC. When date is set to 0, the alarm becomes set for every day. 4.6.17 IRQ 8 Break Suspend When disabled, this feature allows the system to go into suspend mode. When enabled, IRQ 8 (RTC) is broken, and the system cannot go into suspend mode. Options Enabled Disable (*) 4.6.18 Reload Global Timer Events This field enables the system to detect activity, and restart the timer of the power saving mode. IRQ [3-7, 9-15], NMI If enabled, timer restarts whenever any of these interrupts occurs. Primary IDE 0 If enabled, timer restarts whenever the master disk of the primary IDE channel is active. Primary IDE 1 If enabled, timer restarts whenever the slave disk of the primary IDE channel is active. Secondary IDE 0 If enabled, timer restarts whenever the master disk of the secondary IDE channel is active. Secondary IDE 1 If enabled, timer restarts whenever the slave disk of the secondary IDE channel is active. Floppy Disk If enabled, timer restarts whenever the floppy disk is active. Serial Port If enabled, timer restarts whenever the serial port is active. Parallel Port If enabled, timer restarts whenever the parallel port is active. 44 4.7 PNP/ PCI CONFIGURATION This setup page specifies Plug and Play and PCI features. 4.7.1 PNP OS Installed The field specifies whether a Plug and Play operating system is installed. Options Yes No (*) 4.7.2 Resources Controlled By The BIOS has the capability to assign system resources to all Plug and Play devices. However, this capability means absolutely nothing unless you are using a Plug and Play operating system such as Windows 95/98/NT. Options Description Auto Resources controlled by BIOS automatically Manual (*) Resources controlled by the user 4.7.3 Reset Configuration Data Sometimes when you install a new add-on, the system reconfiguration causes such a serious conflict that the operating system cannot boot. Only in this case, exit Setup and select enabled. The Extended System Configuration Data (ESCD) will clear every time the system boots. Note: Leave this field disabled unless you have a conflict similar to the one mentioned above. Options Enabled Disabled (*) 3.7.4 IRQ 3 / 4 / 5 / 7 / 9 / 10 / 11 / 12 / 14 / 15 assigned to DMA 0 / 1 / 3 / 5 / 6 / 7 assigned to If the Resources Controlled By field is set to Manual, use these fields to assign resources Options Description Legacy ISA Resources will not be assigned to any PnP device PCI/ISA PnP Resources are available to PnP devices 4.7.5 Used MEM Base Addr Some add-in cards ask for a specific address space in the system memory. This field specifies the memory base (start address) of the reserved memory space. Options N/A (*) / C800 / CC00 / D000 / D400 / D800 / DC00 45 4.7.5.1 Used MEM Length This field is available only when the Used MEM Base Addr field has been assigned a base address. It specifies the memory size for the add-in card used. Options 8K (*) / 16K / 32K / 64K 4.7.6 Assign IRQ For USB When disabled, the BIOS will not assign IRQ channel to USB controller. Options Enabled (*) Disabled 4.8 INTEGRATED PERIPHERALS 4.8.1 IDE HDD Block Mode When enabled, the IDE controller will use the faster block mode to access devices. Options Enabled (*) Disabled 4.8.2 IDE Primary Master / Slave PIO IDE Secondary Master / Slave PIO These fields configure the PIO (Programmable Input Output) transfer mode for IDE controller. The maximum transfer rates of each PIO mode are listing as follow: Note: Higher settings may cause problems for older IDE devices. Maximum transfer rate PIO Mode 0 3.3 MB/sec PIO Mode 1 5.2 MB/sec PIO Mode 2 8.3 MB/sec PIO Mode 3 11 MB/sec PIO Mode 4 16.6 MB/sec Options Description Auto (*) The BIOS negotiates with device automatically Mode 0 Use Mode 0 timing to access device Mode 1 Use Mode 1 timing to access device Mode 2 Use Mode 2 timing to access device Mode 3 Use Mode 3 timing to access device Mode 4 Use Mode 4 timing to access device 46 4.8.3 IDE Primary Master / Slave Ultra DMA IDE Secondary Master / Slave Ultra DMA If you select Auto, the IDE controller uses Ultra DMA 33 Mode to access UltraDMA-capable IDE devices. The maximum transfer rate of Ultra DMA 33 Mode is 33.3 MB/sec. Options Auto (*) Disabled 4.8.4 On-Chip Primary / Secondary PCI IDE This field enables or disables the onboard IDE controller. Options Enabled (*) Disabled 4.8.5 USB Keyboard Support This field enables or disables the USB keyboard support. Select enable only if you intend to use the USB standard port (ATX form factor) for your keyboard. Options Enabled Disabled (*) 4.8.6 KBC clock source This field sets the frequency speed for the keyboard controller clock. Please ensure you know the keyboard data rate (according to the keyboard’s specifications) before selecting frequency speed. Options 8 MHz (*)/ 12 MHz / 16MHz. 4.8.7 Onboard FDC Controller This field enables or disables the onboard floppy controller. Select enabled if you intend to use your floppy disk drive. Options Enabled (*) Disabled 47 4.8.8 Onboard Serial Port 1 / 2 These fields configure the onboard serial ports. There are several port addresses and IRQ channels to select from. Options Description 3F8 / IRQ 4(*) Port address 3F8h, IRQ 4 2F8 / IRQ 3(*) Port address 2F8h, IRQ 3 3E8 / IRQ 4 Port address 3E8h, IRQ 4 2E8 / IRQ 3 Port address 2E8h, IRQ 3 Auto BIOS assigns port address and IRQ channel automatically Disabled Disables serial port 4.8.9 Onboard Parallel Port This field configures the onboard parallel port. There are several port addresses and IRQ channels to select from. Options Description 378 / IRQ 7(*) Port address 378h, IRQ 7 278 / IRQ 5 Port address 278h, IRQ 5 3BC / IRQ 7 Port address 3BCh, IRQ 7 Disabled Disables parallel port 4.8.10 Parallel Port Mode This field configures the operating mode of an onboard parallel port. Ensure you know the specifications of your parallel port devices before selecting field. Options SPP (*) / EPP / ECP / ECP+EPP 4.8.10.1 ECP Mode Use DMA When the Parallel Port Mode field is configured as ECP, ECP+EPP mode, it needs a DMA channel for data transfer. This field specifies the DMA channel for ECP parallel port use. Options Description 1 Use DMA channel 1 3 (*) Use DMA channel 3 4.8.10.2 EPP Mode Select When the Parallel Port Mode field is configured as EPP, ECP+EPP mode, the EPP version needs to be specified. Please check the EPP specifications before selecting field. Options Description EPP1.7 Use EPP 1.7 protocol EPP1.9 (*) Use EPP 1.9 protocol 48 4.8.11 Init Display First This item allows you to decide which slot to activate first, either PCI slot or AGP slot. This function takes place during the system boot. Options PCI Slot AGP (*) 4.8.12 Power-On Function This field configures the Power-On mode of the system. If a power outage occurs, you need to reconfigure this field. To ensure proper set up, allow the system to complete its reboot process (including the Power-On Self Test) before powering off computer. Note: This feature only supports PS/2 keyboard and PS/2 mouse. It does not work with USB keyboard or serial mouse. Options Description Hot KEY You can assign a hot key through the Hot Key Power-On field. Pressing this hot key will power-on your system. Password You can assign a password string through KB Power-On Password field. Typing this password string will power-on your system. Note: The Power-On button will not function in this mode. Mouse left “Double-Clicking” the left button on your mouse will automatically power-on your system. Mouse right “Double-Clicking” the right button on your mouse will power-on your system. Button only Simply power-on your system by pressing the Power-On button on the front panel of your PC case. Keyboard 98 Enables Keyboard 98 function. This function is good only for users of Keyboard 98. 4.8.12.1 Hot Key Power-On This field specifies key selection for the Keyboard-Power-On hot key. Options Ctrl-F1 / Ctrl-F2 / Ctrl-F3 / Ctrl-F4 / Ctrl-F5 / Ctrl-F6 Ctrl-F7 / Ctrl-F8 / Ctrl-F9 / Ctrl-F10 / Ctrl-F11 / Ctrl-F12 4.8.12.2 KB Power-On Password Enter your Keyboard-Power-On password in this field if you wish to use this function. 49 4.8.13 PWRON After PWR-Fail The field configures the system status after experiencing a power failure. Options Description Former-Sts System returns to former status prior to power failure (on or off ) On System turns back on after power lost Off (*) System remains off after power lost 4.9 LOAD SETUP DEFAULTS This setup page is used for loading the manufacturer default values. 4.10 IWILL SMART SETTING Warning: Over-clocking is not guaranteed. Users must have substantial knowledge of proper Vcore settings prior to adjusting CPU speeds. Over-clocking should be done only by experienced engineers who conduct tests. In general, when adjusting the CPU frequency, you should select the frequency that matches your motherboard bus speed. The reason is that your CPU can only communicate with its external components at the same speed at which the components operate. In other words, if your motherboard bus speed is 100 MHz, you should start by selecting 100 MHz (as a “base”) to set the CPU frequency. This frequency is also referred to as the “system bus frequency” or external frequency. However, the CPU manufacturers make CPUs much faster than the speed of the motherboard system bus frequency. This is true because most of the operations are done in a small die inside the CPU chip. This is the CPU internal frequency. For example, a 400 MHz CPU actually means the internal frequency runs at 400 MHz. To understand the term multiplier, and how it applies to setting your CPU frequency, here’s an example: If you purchase a 400 MHz CPU, and your motherboard runs at 100 MHz system bus speed, adjust your CPU frequency by selecting 100 MHz (system bus frequency) x 4 (multiplier), which equals 400 MHz (your CPU frequency). Or, to install the same 400 MHz CPU into motherboard with 66 MHz system bus speed, you may be select 66 MHz (system bus frequency) x 6 (multiplier), which equals 400 MHz (your CPU frequency). However, the fact is, a higher system bus frequency runs faster and has a much better performance than a slower system bus frequency. 4.10.1 CPU Speed This field allows user to adjust CPU speed. Options 300 (66x4.5) / 333 (66x5) / 366 (66x5.5) / 400 (66x6) / 433 (66x6.5) / 466 (66x7) / 500 (66x7.5)/ 533 (66x8) 300 (100x3) (*) / 350 (100x3.5) / 400 (100x4) / 450 (100x4.5) / 500 (100x5) / 550 (100x 5.5) / 600 (100x6) / 650 (100x6.5) / 700 (100x7) / 750 (100x7.5) / 800 (100x8) / Manual 50 4.10.1.1 Manual This option sets the CPU speed. In this field, the CPU speed is indicated as such: CPU speed = CPU Frequency x CPU Ratio, select the CPU speed according the type and the speed of your CPU. CPU Frequency Option 66/75/83/100/103/105/110/112/124/133 MHz CPU Ratio: Option 3/3.5/4/4.5/5/5.5/6/6.5/7/7.5/8 4.10.2 Auto Detect DIMM/PCI Clk When enabled, the BD100 Plus motherboard will automatically disable the clock source for a DIMM socket, which does not have a module on it. This is true for all PCI slots. Options Enabled (*) Disabled 4.10.3 Spread Spectrum This item configures radiation emitted from the system. When enabled, system will release less radiation. Options Enabled Disabled (*) 4.10.4 BIOS-ROM Flash Protect The BD100 Plus motherboard provides solid protection at BIOS ROM. When set to Non-Flash, it will prevent any changes to the data in BIOS. There are two cases that you may need to configure this field to Flashable: In order to update the Extended System Configuration Data (ESCD) when you install or remove any device. You need to update the BIOS data. Note: Make sure to configure this field back to Non-Flash to avoid unexpected changes in BIOS. Options Non-Flash (*) Flashable 4.11 SUPERVISOR / USER PASSWORD SETTING These setup pages are used for password setting. When a password has been enabled and the Security Option field is set as Setup, you will be required to enter the password every time you try to enter BIOS Setup program. This prevents an unauthorized person from changing any part of your system configuration. Additionally, if the Security Option field is set as Boot, the BIOS will request a password every time your system boot. This would prevent unauthorized use of your computer. To disable a password, just press <Enter> when you are required to enter the new password. A 51 message will confirm that the password is disabled. Once the password is disabled, the system will boot and you can enter setup program freely. Note: The User Password allows you to enter BIOS setup program, but you cannot change the value of any fields. 4.12 IDE HDD AUTODETECTION This setup page detects and configures hard disk parameters automatically. 4.13 SAVE & EXIT SETUP Saves current CMOS value and exit BIOS setup program. 4.14 EXIT WITHOUT SAVING Abandons all CMOS value changes and exits BIOS setup program. 52 Chapter 5 Software and Tools 5.1 Software Installation The attached Power Installer CD contains all the necessary drivers, utilities and tools for Iwill’s full range of motherboards. It provides an easy way for users to install the needed drivers without going through a complicated process. The Power Installer CD is able to auto-detect and display the drivers, utilities and tools needed for your motherboard. Note: Not all drivers or utilities can be used on this motherboard. 5.1.1 What’s inside Power Installer CD (needed for the BD100 Plus motherboard) 1. Drivers a. Intel PIIX4 Patch Program b. Intel IDE Bus Master Driver for Windows 95 c. ZVHDD.EXE program for Suspend to Disk 2. Utilities a. McAfee Anti-Virus b. Iwill PC Doctor 3. Tools a. Adobe Acrobat Reader 4. Make Driver Diskettes 5. Manuals 5.1.2 How to use the Power Installer CD The Power Installer CD supports the Auto Run program used by Windows 98/95 and Windows NT operating systems. You may simply select the software shown on screen that needs to be installed. Then simply follow the messages displayed on the screen to complete setup. Note: Iwill PowerInstaller does not support a keyboard at this moment. You must use a mouse to install it. 53 5.2 How to make driver diskette without O.S. installed This bootable Power Installer CD also allows you to boot up your system, even when the OS has not been installed. During the boot-up process, you can perform “Iwill Diskette Creator,” which will automatically make the driver diskettes you need. Note: At least one CD-ROM drive and one 1.44M floppy drive are necessary to make “Iwill Diskette Creator” work properly. Follow the instructions below to make your own device driver floppy diskettes if you have a CDROM with IDE interface. If you have already installed SCSI CD-ROM, please make sure your SCSI host adapter supports bootable CD-ROM, and then proceed directly to step h, and then finish the procedure. a. First, power-on or “boot” your system. b. Press <Del> key during boot sequence to enter “ CMOS Setup Utility” c. Use arrow keys to select “BIOS FEATURES SETUP” on the menu, then press “Enter.” d. Select “Boot Sequence” and change the default setting from A, C, SCSI to “CDROM, C, A” using Page Up /Page Down key. e. Press <Esc> key to go back to CMOS SETUP Utility menu. f. Press <F10> to select “Save and Exit Setup” g. Press “Y” then “Enter” to complete. Now you are able to boot up the system from the CD-ROM. h. Insert the Power Installer CD into the CD-ROM drive and re-start the computer. i. Iwill Diskette Creator will now execute automatically for making your own driver diskettes. j. Make the desired driver diskettes according to the instructions displayed on screen. 5.3 CPU frequency selection by BIOS Iwill BD100 PLUS motherboard offers the Iwill Smart Setting for CPU selection. Warning: Over-clocking is not guaranteed. Users must have substantial knowledge of proper Vcore settings prior to adjusting CPU speeds. Over-clocking should be done only by experienced engineers who conduct tests. Through Software -- BIOS setting In case there is a special need for over-clocking, please … a. First, power-on or “boot” your system. b. Press <Del> key during boot sequence to enter “ CMOS Setup Utility” c. Select IWILL SMART SETTING d. Select CPU Speed e. Use page down/page up key to select 300 (66x4.5) / 333 (66x5) / 366 (66x5.5) / 400 (66x6) / 433 (66x6.5) / 466 (66x7) / 500 (66x7.5)/ 533 (66x8) 54 300 (100x3) (*) / 350 (100x3.5) / 400 (100x4) / 450 (100x4.5) / 500 (100x5) / 550 (100x 5.5) / 600 (100x6) / 650 (100x6.5) / 700 (100x7) / 750 (100x7.5) / 800 (100x8) / Manual f. After selecting CPU speed, press Save & Exit CMOS Setup to complete. The system will automatically re-boot. Should your CPU fail to over-clock, the screen will become blank and the system will hang (temporarily suspend or “freeze”) while the system attempts to re-boot. If this happens, follow the procedure below: a. Press the power button on the front panel to power off the system. b. Hold the INSERT key down, then press the power button on the case. The system will restart using 66 MHz as the CPU external frequency. c. Press <Del> key during boot sequence to enter “ CMOS Setup Utility” and repeat steps “c” through “f” (See above). 5.4 View Detailed Manual This Power Installer CD includes detailed information of all Iwill manuals for every motherboard manufactured by Iwill. Please insert the Iwill Power Installer CD into the CD-ROM drive; the Auto Run program will display the main manual automatically. Click the “View Manual” item, and select the product you want to view, and the manual will be displayed. 5.5 Installing Operating Systems This section briefly demonstrates how to install a few popular software operating systems. Use this section only as a guide. It is highly recommended that users first refer to the installation manual of their operating system for a more thorough, detailed description on how to install software. 5.5.1 Windows 98 Whenever installing Windows 98, please remember that Setup creates a new folder for Windows 98, and won’t transfer any existing system settings. Windows 98 will become your default operating system, and will use standard system settings. This procedure represents an entirely new installation of Windows, therefore you'll need to reinstall any existing programs you may want to use. There are two ways to install Windows 98. Each method depends on your current computer setup. Note: During Setup, your computer will automatically restart several times using the Windows 98 Setup wizard. 5.5.1.1 Installing the CD-ROM version of Windows 98 1. Place a Windows 98 Startup Disk into the floppy disk drive. 2. Restart your computer. The Microsoft Windows 98 Startup menu will appear. 3. Place the Windows 98 CD into your CD-ROM drive. 4. Type the number 1 and press <ENTER >. A series of scans is performed, and then the MS-DOS prompt is displayed. 5. Type the word setup at the MS-DOS display, and press <ENTER>. 55 Setup performs a check (A message will be displayed). This message won’t appear if your computer can't locate your CD-ROM drive. If you haven’t installed the correct CD-ROM driver, please consult your drive's documentation or contact your hardware manufacturer. 6. Press <ENTER>. Microsoft ScanDisk will check your disk drives for errors. 7. When ScanDisk finishes, press the X key. Setup will initialize. Then, Windows 98 Setup begins. 8. Please follow the instructions that are displayed. Note: Setup may ask you to insert your original Windows 95 or Windows 3.1 disks if you're using the upgrade version of Windows 98. 5.5.1.2 Installing the floppy disk version of Windows 98 1. Place Setup disk 1 into your floppy disk drive. 2. Restart your computer. 3. At the MS-DOS prompt, type the word setup and press <ENTER>. The Windows 98 Setup wizard will begin. 4. Please follow the instructions that appear. 5.5.2 Windows NT 5.5.2.1 Installing the CD-ROM version of Windows NT using SCSI controller 1. Prepare a 1.44MB blank diskette 2. Enable CD-ROM Bootable and Set boot sequence first priority is CD-ROM. 3. Place the Iwill Power Installer CD into the CD-ROM drive 4. Boot from Iwill Power Installer to create Windows 9x/NT driver diskette from CDROM by selecting FMS Disk1 for Win95/NT 5. Place the Windows NT 4.0 CD-ROM in the drive. 6. Press <F6> when the screen show following messages: Setup is inspecting your computer’s hardware configuration … 7. Press <S> to specify additional SCSI adapters. 8. Select <Other> to load manufacture supplied software driver. 9. Place the SCSI driver diskette for Windows NT 4.0 into the floppy drive. 10. Press <ENTER> when SCSI driver is ready. 11. From list select the proper SCSI controller driver: 12. Example: Adaptec AHA-294xU2/295xU2/395xU2/AIC-789xPCI SCSI Controller (NT 4.0) 13. Press <ENTER> to continue if you have no other SCSI controller to install. Or, repeat steps 3-7 to install all drivers as needed. 56 14. Follow all instruction to finish Windows NT installation. 5.5.2.2 Installing the CD-ROM version of Windows NT on an IDE system 1. First, power-on or “boot” your system. 2. Press <Del> key during boot sequence to enter “ CMOS Setup Utility” 3. Use arrow keys to select “BIOS FEATURES SETUP” on the menu, then press “Enter.” 4. Select “Boot Sequence” and change the default setting from A, C, SCSI to “CD-ROM, C, A” using Page Up /Page Down key. 5. Place the Windows NT 4.0 CD-ROM in the drive. 6. Follow all instructions to finish Windows NT installation. 5.6 Installing the Suspend to Disk utility on your BD100 Plus 5.6 motherboard Suspend to Disk is an energy-saving feature that allows you to temporarily power off your system (i.e. when you step away from your computer for a meeting, errand, etc.), then return to the original screen (when the screen was last on) to resume your work the next time you power-on the system. This feature is fast and efficient, especially if your system is handling a small memory size. Although the Suspend to Disk utility can be installed without an operating system, it is highly recommended that you first install an operating system before installing Suspend to Disk. You must first make a “Suspend to Disk” diskette to use for installation. Insert the Power Installer CD into your CD-ROM, select Make Driver Diskette from the menu, and carefully follow the instructions to make a driver diskette. Please see Chapter 5.2 in the BD100 Plus manual to create a driver diskette without an operating system. System Requirements for installing Suspend to Disk: 1. Suspend to Disk utility only works with IDE hard disk drives. You cannot use this utility with any SCSI device because the system BIOS controls IDE devices, but cannot control SCSI devices. 2. This feature works fine with Windows 95/98, and Windows NT FAT file systems, but does not work with Windows NT NTFS file system. This utility also does not support ACPI modes. 3. This feature works fine with APM compatible PCI/AGP VGA and Sound Blaster compatible cards and drivers. 4. The Intel Bus Master IDE driver is not fully compatible with Suspend to Disk. If this causes some problems, please uninstall the drivers, or do not use Suspend to Disk. 5. Whether you select file or partition method, please make sure that you have enough free HDD space for creating this hidden file or partition. Ex: if you have 64MB system memory and 4MB of VGA memory, you need at least 68MB (64MB + 4MB) of HDD space. You also have to reserve some free space for your future memory expansion. For example, if you plan to upgrade you system memory to 128MB in the near future, then you may reserve a 132MB (128MB+4MB) space. 6. The following are just some of the many AGP cards that have been tested and approved to work satisfactorily with Suspend to Disk: Manufacturer/model Chipset Iwill Adventure II 3Dlabs Permedia 2 Matrox G200 57 GainWard 3Dfx Banshee View Top Vulcan B 3Dfx Banshee View Top Titan 4000 S3 Trio 3D Prolink 3Dfx Banshee ATI 3D Rage Pro ATI Rage IIC ASUS Sis 6326 5.6.1 Set-Up Suspend to Disk Before installing Suspend to Disk utility, please make sure your system is running normally. More importantly, you must ensure the Suspend to Disk feature has been disabled before installing new devices, or upgrading your system memory. Enter BIOS setup Power-on the system by either pressing the Power-On button, or by using any of the power-on features provided by the BD100 Plus motherboard. Then, press the <Del> key after the Power-On Self Test (POST), and before the scanning of IDE devices. Simply look for the message “Press DEL to enter SETUP” displayed at the bottom of the screen during the boot up process. If the message disappears before you’ve had a chance to respond, you can restart the system by Turning off the system power then turn it on again, or Pressing the "RESET" button on the system case, or Pressing <Ctrl>, <Alt> and <Del> keys simultaneously. Set-Up Suspend to Disk in BIOS a. Select Power Management Setup, move cursor to “Suspend Mode Option”, select “Suspend to Disk” and move cursor to “Soft-Off by PWR-BTTN”, select “Delay 4 Sec”. b. Select PNP/PCI Configuration Setup. Then, for “PnP OS Installed” select "NO". c. Press <F10> to save your setup into BIOS. The system will then automatically re-boot. 5.6.1.1 Enter DOS mode From Windows 95/98/NT Open your “Programs” file, and select “MS DOS Prompt.” Once you’ve entered DOS from Windows a. Type the following: C:\WINDOWS>lock Press <Enter> b. The system will ask, “Are you Ready?” Press “y” for “yes.” Press <Enter>. c. Insert your Suspend to Disk diskette into your floppy disk drive. (See above). d. Type the following: C:\>A: Press <Enter> e. Creating a file or partition There are two ways to store the data into HDD: create a file or partition. You must make 58 sure you have enough disk space before selecting either option (Please refer to System Requirements above). Creating a file stores all the necessary information (you may be working on) into a hidden read-only file within the system hard disk. Creating a partition allows further protection for you by storing all the necessary information into partition separate from other files. Create a file You may select the file size, or allow the system to automatically select for you. Automatic Selection Type the following: A:\>zvhdd /c /file (Note one space is between “zvhdd and “/c”, and one space is between “/c” and “/file”) Press <Enter> The system will then automatically select file size. Then, the system will display the following message: “The C:\SAVE2DSK.BIN has been executed”. The Suspend to Disk utility has been set up. Enter File Size (Example: You select 100 MB file size) Type the following: A:\>zvhdd /c /file /m:100 (Note one space is between “zvhdd and “/c”, between “/c” and “/file”, and between “/file” and “/m:100”) Press <Enter> In this case, the system will use 100 MB file size that you’ve selected. Then, the system will display the following message: “The C:\SAVE2DSK.BIN has been executed”. The Suspend to Disk utility has been set up. Create a partition Type the following: A:\>zvhdd /c /partition (Note one space is between “zvhdd and “/c”, and one space is between “/c” and “/partition”) The system will start to create and format a partition. Whether you have selected file or partition options, once the Suspend to Disk utility has been set up, press any key, and you will automatically return to Windows. Then, you must restart your system in order to enable the Suspend to Disk feature. 5.6.1.2 Enter DOS command Directly You may also enter DOS during the re-boot process by pressing the <F8> key after powering on the system, and selecting “Command prompt only.” If your system normally runs from DOS, or you have a DOS diskette, simply boot from DOS. Then, simply follow procedures “c” through “e” (above). Since the system is not controlled by Windows, it will automatically re-boot. 59 5.6.2 Using Suspend to Disk There are two ways to use Suspend to Disk: 1. Simply press the power-on button located on the front panel of your computer chassis. Note: Do not hold the power-on button more than four seconds, because the system will shutdown immediately, and the Suspend to Disk function will not work. 2. For Windows 95/98/NT, you may use your mouse, “click” on the “Start” icon (located on the lower left hand corner of your screen). Then, “click” the “Shut Down” option. Finally, select the “Standby” option. After selecting either method, the system will automatically enter the Suspend to Disk mode. The screen will become black for several seconds. Then, the screen will display the percentage of memory as it is being saved into the hard disk. Once the percentage reaches 100%, the system will shut down automatically. To return to the original screen (last used when the system was last on), press the power-on button. The screen will display the percentage of memory as it is being restored from the hard disk. Once the percentage reaches 100%, the system will return to the original screen. 5.6.3 Removing Suspend to Disk utility This process helps disable the Suspend to Disk utility. 5.6.3.1 Delete Suspend to Disk From Windows 95/98/NT Open your “Programs” file, and select “MS DOS Prompt.” 1. Type the following: C:\WINDOWS>lock Press <Enter> 2. The system will ask, “Are you Ready?” Press “y” for “yes.” Press <Enter>. 3. Insert your Suspend to Disk diskette into your floppy disk drive. (See above). 4. Type the following: C:\>A: Press <Enter> 5. To delete file, type the following: A:\>zvhdd /d /file (Note one space is between “zvhdd and “/d”, and one space is between “/d” and “/file”) 6. To delete partition, type the following: A:\>zvhdd /d /partition (Note one space is between “zvhdd and “/d”, and one space is between “/d” and “/partition”) 7. Press any key to return to Windows. Then restart your system. 60 5.6.3.2 Delete Suspend to Disk From DOS Directly Enter DOS during the re-boot process by pressing the <F8> key after powering on the system, and selecting “Command prompt only.” Or, if your system normally runs from DOS, or you have a DOS diskette, simply boot from DOS. 1. Insert your Suspend to Disk diskette into your floppy disk drive. (See above). 2. Type the following: 3. 4. Press <Enter> Then, follow procedures “5” through “7” in 5.6.3.1 (above). Since the system is not controlled by Windows, it will automatically re-boot. C:\>A: 61 5.7 How to use the Thermal sensor Detects all heat-releasing devices. Firmly screw the connector to any device. Detects system temperature. NO NEED to contact this thermostat to any device. Leave it on the motherboard. 62 5.8 Iwill SCSI series If you want to improve I/O performance of your BD100 Plus, choose the latest Iwill SCSI controllers. The following are some Iwill SCSI controllers you may purchase, and use with your BD100 Plus motherboard: SIDE 2930C: an economical SCSI card, and connects up to 7 device - Support SCSI-1, SCSI-2 protocol - 10 MB/sec. Data transfer rate - The best choice for CD-ROM, CD-R, CD-R/W, MO, Scanner …etc. - Connects maximum 7 narrow SCSI devices - Automatic active termination control for easy plug & play installation. SIDE 2930U+: a 20MB/sec. transfer rate, this card also connects up to 7 devices - Supports SCSI-1, SCSI-2 and Ultra SCSI protocol - Up to 20 MB/sec synchronous data transfer rate - Connects maximum narrow SCSI devices - Automatic active termination control for easy plug & play installation - Supports Multi-tasking, Multi-threaded, scatter/gather, tagged queuing SIDE 2935UW: this doubles the 2930U+; a 40 MB/sec transfer rate, connects up to 15 devices - Support both Ultra Narrow (50-pin) and Ultra Wide (68-pin) SCSI - Data transfer rate up to 20 MB/sec and 40 MB/sec respectively - Able to connect up to 15 Ultra Wide SCSI devices - Active terminator - Able to boot from CD-ROM 63 SIDE 2935LVD: an 80MB/sec. transfer rate, and a 12-meter cable length connecting 15 devices - Double the data transfer rate of Ultra Wide SCSI to 80 MB/sec - Up to 12 meters cable length for Ultra 2 devices - Able to connect up to 15 devices - Able to boot from any SCSI ID - Able to boot from CD-ROM Please contact Iwill today for more information regarding our SCSI cards. 64