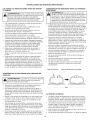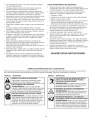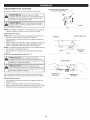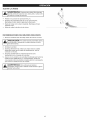
1
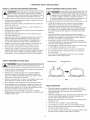
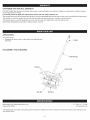
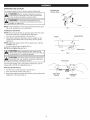
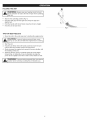
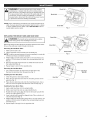
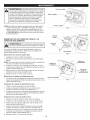
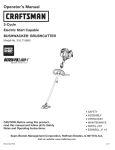
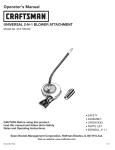
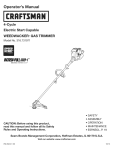
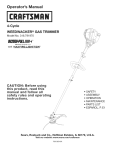
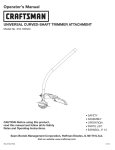
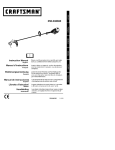
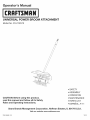
Operator's
Manual
M
UNIVERSAL POWER BROOM ATTACHMENT
Model No. 316.792570
,, SAFETY
o ASSEMBLY
OPERATION
CAUTION: Before using this product,
read this manual and follow all its Safety
Rules and Operating
instructions.
Sears Brands Management
PARTS LIST
ESPANOL, R 11
Corporation,
Visit our website:
769-08486 / 00
MAINTENANCE
Hoffman
Estates, IL 60179 U.S.A.
www.craftsrnan.com
10/12
TABLEOFCONTENTS
Safety...............................................
Warranty.............................................
KnowYourUnit........................................
Specifications
.........................................
Assembly
.............................................
Operation
.............................................
Maintenance
..........................................
Cleaning
andStorage...................................
PartsList............................................
2
5
5
5
6
7
8
9
23
Allinformation,
illustrations
andspecifications
inthismanual
arebased
onthelatestproduct
information
available
atthetimeofprinting.
We
reserve
therighttomakechanges
atanytimewithout
notice.
©Seam
Brands,
LLC
Thepurpose
ofsafetysymbols
istoattractyourattention
to
possible
dangers.
Thesafetysymbols,
andtheirexplanations,
deserve
yourcareful
attention
andunderstanding.
Thesafety
warnings
donotbythemselves
eliminate
anydanger.
The
instructions
orwarnings
theygivearenotsubstitutes
forproper
accident
prevention
measures.
SYMBOL
MEANING
DANGER:
Signals an EXTREME hazard.
Failure to obey a safety DANGER signal WILL result in
serious injury or death to yourself or to others.
WARNING:
Signals a SERIOUS hazard.
Failure to obey a safety WARNING signal CAN result in
serious injury to yourself or to others.
CAUTION:
Signals a MODERATE hazard.
Failure to obey a safety CAUTION signal MAY result in
property damage or injury to yourself or to others.
NOTE: Advises you of information or instructions
operation or maintenance of the equipment.
vital to the
Read the operator's manual and follow all warnings and safety
instructions. Failure to do so can result in serious injury to the
operator and/or bystanders.
,, iMPORTANT SAFETY iNSTRUCTiONS
READ ALL iNSTRUCTiONS
BEFORE OPERATING
SAFETY WARNINGS
WARNING:
o
o
o
o
o
o
o
o
To reduce the risk of electrical shock, use
only extension cords approved for outdoor use, such as an
extension cord of cord type SW-A, SOW-A, STW-A, STOWA, SJW-A, SJOW-A, SJTW-W or SJTOW-A. Extension
cords are available from your local retailer. Use only roundjacketed extension cords approved for outdoor use.
Carefully read and understand the operator's manual of the unit
that powers this attachment.
Read the instructions carefully. Be familiar with the controls and
proper use of the unit.
Do not operate this unit when tired, ill or under the influence of
alcohol, drugs or medication.
Children must not operate the unit. Teens must be accompanied
and guided by an adult.
All guards and safety attachments must be installed properly
before operating the unit.
Inspect the unit before use. Replace damaged parts. Check for
fuel leaks. Make sure all fasteners are in place and secure.
Replace parts that are cracked, chipped, or damaged in any
way. Do not operate the unit with loose or damaged parts.
Carefully inspect the area before starting the unit. Remove all
debris and hard or sharp objects such as glass, wire, etc.
Be aware of the risk of injury to the head, hands and feet.
Clear the area of children, bystanders and pets; keep them
outside a 50-foot (15 m) radius, at a minimum. Even then, they are
still at risk from thrown objects. Encourage bystanders to wear
eye protection. If you are approached, stop the unit immediately.
SAFETY
H_kb
WARNINGS
FOR ELECTRIC UNITS
WARNING:
When using the unit, all safety rules must be
followed. Please read these instructions before operating
the unit in order to ensure the safety of the operator and any
bystanders. Please keep these instructions for later use.
o
,,
•
CORD SETS: Make sure your cord set is in good condition.
When using a cord set, be sure to use a cord that is heavy
enough to carry the current that your unit will draw. An
undersized cord set will cause a drop in line voltage resulting in
loss of power and overheating. See the operator's manual for
the unit that will power this attachment for the recommended
cord size.
Inspect all extension cords and the unit power connection
periodically. Look closely for deterioration, cuts or cracks in the
insulation. Also inspect the connections for damage. Replace
the cords if any defects or damage appear.
Prevent disconnection of the power head from the extension
cord during operation by using a plug-receptacle retaining strap,
connector, or by making a knot (Fig. A).
Avoid dangerous environments. Never operate your unit in damp
or wet conditions. Moisture is a shock hazard.
Do not use the unit in the rain. Do not use in or around water.
Do not handle the plug or unit with wet hands or standing on
any wet surfaces.
Do not leave the unit plugged in when not in use, changing
attachments or while being serviced.
FOR GAS UNITS
Extension
Cord
Unit Power Cord
can explode if ignited.
the following
! _'ARNING:
GasolineTake
is highly
flammableprecautions:
and its vapors I
Store fuel only in containers specifically designed and approved
for the storage of such materials.
Always stop the engine and allow it to cool before filling the
tank. Never remove the fuel tank cap or add fuel when the
engine is hot. Always loosen the fuel tank cap slowly to relieve
any pressure in the tank before fueling.
Always mix and add fuel in a clean, well-ventilated outdoor area
where there are no sparks or flames. DO NOT smoke.
Never operate the unit without the fuel cap securely in place.
Fig. A
Avoid creating a source of ignition for spilled fuel. Wipe up any
spilled fuel from the unit immediately, before starting the unit.
Move the unit at least 30 ft. (9.1 m) from the fueling source and
site before starting the engine. DO NOT smoke.
Never start or run the unit inside a closed room or building.
Breathing exhaust fumes can kill. Operate this unit only in a well
ventilated outdoor area.
WHILE OPERATING
Wear safety glasses or goggles that meet current ANSI Z87.1
standards and are marked as such. Wear ear/hearing protection
when operating this unit. Wear a face or dust mask if the
operation is dusty.
Wear heavy long pants, boots, gloves and a long sleeve shirt. Do
not wear loose clothing, jewelry, short pants, sandals or go
barefoot. Secure hair above shoulder level.
Make sure the attachment is not in contact with anything before
starting the unit.
Use the unit only in daylight or good artificial light.
Use the right tool. Only use this tool for its intended purpose.
Always hold the unit with both hands when operating. Keep a
firm grip on both handles or grips.
Do not overreach. Always keep proper footing and balance. Take
extra care when working on steep slopes or inclines.
3
•
Keep hands, face, and feet away from all moving parts. Do not
touch or try to stop moving parts.
Do not operate the unit faster than the speed needed to do the job.
Do not run the unit at high speed when not in use.
Use extreme caution when reversing or pulling the unit towards you.
Do not force the unit. It will do a better, safer job when used at
the intended rate.
OTHER SAFETY WARNINGS
All service, other than the maintenance procedures described in
this manual, should be performed by a Sears or other qualified
service dealer.
Before inspecting, servicing, cleaning, storing, transporting
replacing any parts on the unit:
1. Stop the unit.
Always stop the unit when operation is delayed or when walking
from one location to another.
or
2. Make sure all moving parts have stopped.
3. Allow the unit to cool.
If you strike or become entangled with a foreign object, stop the
unit immediately and check for damage. Do not operate before
repairing damage. Do not operate the unit with loose or
damaged parts.
4. For gas-powered units, disconnect the spark plug wire. For
electric-powered units, disconnect the unit from the power source.
Never store the unit with fuel in the tank, inside a building where
fumes may reach an open flame (pilot lights, etc.) or sparks
(switches, electrical motors, etc.).
Be sure to secure the unit while transporting.
Store the unit in a dry place, secured or at a height to prevent
unauthorized use or damage. Keep out of the reach of children.
Use only original equipment manufacturer (OEM) replacement
parts and accessories for this unit, as listed in the Parts List
section of this manual. Use of any other parts or accessories
could lead to serious injury to the user, or damage to the unit,
and void the warranty.
Keep the unit clean. Carefully remove vegetation and other
debris that could block moving parts.
If the unit starts to vibrate abnormally, stop the unit immediately.
Inspect the unit for the cause of the vibration. Vibration is
generally an indicator of trouble.
Never douse or squirt the unit with water or any other liquid.
Keep handles dry, clean and free from debris. Clean after each
use, see Cleaning and Storage instructions.
Keep these instructions. Refer to them often and use them to
instruct other users. If you loan this unit to others, also loan
them these instructions.
SAVE THESE INSTRUCTIONS
,, SAFETY
& INTERNATIONAL
SYMBOLS
,,
This operator's manual describes safety and international symbols and pictographs that may appear on this product. Read the operator's
manual for complete safety, assembly, operating and maintenance and repair information.
SYMBOL
MEANING
SYMBOL
• SAFETY ALERT SYMBOL
JA
!nd cates
dange
r,war!ingorcau!!on.
Maybeusedn
conJuncti0n with other symbols or p!ctographsl
._,._
/_
/
', THROWN OBJECTSAND
CAUSE SEVERE iNJURY
ROTATING PARTS CAN
_-- _"Ib 'j
/-_J_
-_f
I
MEANING
WARNING:
Small objects can be propelled at high
speed, causing injury. Keep away from rotating parts.
_
'o READ OPERATOR'S MANUAL
WARNING:
Read the operat0r
WARNING: Keep all bystanders, especially children
t KEEP BYSTANDERS AWAY
and pets, at least 50 feet (15 m) from the operating area.
fo!low a!! warnings and safety instruction& Failure to
do so can result in serious injury to the operator
. and!or bystanders.
_
WARNING:
Thi0wn objects and ioUd noise Can
cause Severe eye injury and hearing 10ssl Wear eye
Pi0tect!0n meeting cUrrent ANS! z87:i standards and
ear protection when operating this unit, Use a fU!! face
shield when needed.
_&
_ POWER BROOMS - ROTATING BRUSHES CAN
W
CAUSE SEVERE INJURY
WARNING: Stop the engine/motor and allow all
' moving parts to stop before installing or removing any
parts or attachments, or before cleaning or performing
any maintenance. Keep hands and feet away from
moving parts.
CRAFTSMAN
TWO
YEAR FULL
WARRANTY
FOR TWO YEARS from the date of purchase, this product is warranted against any defects in material or workmanship. A defective product
will be replaced free of charge.
For warranty details to obtain free replacement, visit the web site: www.craftsman.com
This warranty does not cover the brushes and skid shoe, which are expendable parts that can wear out from normal use within the warranty period.
This warranty is void if this product is ever used while providing commercial services or if rented to another person.
This warranty gives you specific legal rights, and you may also have other rights which vary from state to state.
Sears Brands Management Corporation, Hoffman Estates, IL 60179
APPLICATIONS
As a power brush:
• Sweeping dirt, grass, snow or other debris from sidewalks and
driveways.
Hanger
NO ASSEMBLY TOOLS REQUIRED
Shaft Housing
Brushes
Brush Shield
Gear Box
Skid Shoe
Approximate Unit Weight (attachment only) ............................................................
Clearing Path Width .................................................................................
* All specifications are based on the latest product information
time without notice.
9 - 10 Ibs. (4.1 - 4.5 kg)
12 inches (30.5 cm)
available at the time of printing. We reserve the right to make changes at any
5
OPERATING THE COUPLER
90° Edging Hole
The coupler enables the use of various optional attachments.
understand the manual that came with the attachment.
_
WARNING:
using any
attachment,
Follow all safetyBefore
information
contained
within. read and
I_
damage to the unit, shut the unit off before removing or
I WARNING:
To avoid serious persona' injury and
installing an attachment.
(Trimmer
Only)
J
j
Knob
NOTE: To make installing or removing the attachment
the unit on the ground or on a work bench.
installing
easier, place
Fig. 1
the Attachment
NOTE: Remove the protective cap and gray spacer from the upper
and lower shafts prior to assembling the attachment.
1. Turn the knob counterclockwise
to loosen (Fig. 1).
2. While firmly holding the attachment, push it straight into the
coupler until the release button snaps firmly into the primary
hole (Fig. 3).
NOTE: Aligning the release button with the guide recess will help
installation (Fig. 2).
3. Turn the knob clockwise to tighten (Fig. 1).
NOTE: Do not tighten the nut (Fig. 2).
Release Button
--__7
Lu,de
Recess
c,o,,o°;
e o eo
mae esu
1ati theun,t,
ethe
release button is fully snapped into the primary hole (Fig. 3)
and the knob (Fig. 1) is securely tightened.
Fig. 2
theprimaryholeonly.Using thewrong holecould leadto
l,_ICAUTION:Thereleasebuttonshouldbesnappedinto
I
personalinjury
or damage to theunit.
Primary Hole
For decorativeedging witha stringtrimmerattachment,lockthe
releasebuttonintothe90° edging hole(Fig.
I).
\
Removing the Attachment
1. Turn the knob counterclockwise
to loosen (Fig. 1).
2. Press and hold the release button (Fig. 2).
3. While firmly holding the upper shaft housing, pull the attachment
straight out of the coupler (Fig. 3).
Upper Shaft
Housing
Lower Shaft
Housing
Fig. 3
HOLDING THE UNiT
body protection to reduce the risk of injury when operating I
Always wear eye, hearing, hand, foot and
I
this unit.
j
_WARNING:
•
•
Stand in the operating position (Fig. 4).
Hold the shaft grip with the right hand. Keep the right arm
slightly bent.
Hold the handle with the left hand. Keep the left arm straight.
Hold the unit at waist level.
Fig. 4
TiPS FOR BEST RESULTS
1.
Move the unit to the work area prior to starting the engine/motor.
!
_
J
pick-up
or carry
unit while
engine/motor
running. |
CAUTION:
To the
prevent
seriousthepersonal
injury,isnever
2. Start the unit.
3.
Hold the unit firmly with both hands and slowly lower the unit
until the skid shoe makes contact with the ground.
4. Slowly increase the engine/motor speed to become familiar with
the handling of the unit.
5. Advance with the unit at a moderate speed to sweep debris
forward (Fig. 4). Optionally, it may be desirable to angle the
power broom slightly to the left in order to direct debris to side.
J
caution when reversing
pullingpersonal
the unitinjury,
towards
_L______.[ARNING:
To prevent or
serious
use you.
extreme _
WARNING:
To prevent serious injury, never perform
maintenance or repairs while the unit is running. Always
allow the unit to cool before servicing or repairing the unit.
For gas-powered units, disconnect the spark plug wire to
prevent the unit from starting accidentally. For electricpowered units, disconnect the unit from the power source
to prevent the unit from starting accidentally.
Ji
Brush Nut
Brush Hub
NOTE: Some maintenance procedures may require special tools or
skills, if unsure about these procedures, take the unit to a Sears
or other qualified service dealer. Call 1-800-469-4663 to find a
nearby Sears service center.
REPLACING
THE BRUSH
HUBS AND SKiD
J /:;
_;X/g_
Brush Bolt
Fig. 5
SHOE
wear heavy gloves
when handling
the brushes.
WARNING:
To prevent
serious personal
injury, always
_
_
_.
j
Both brush hubs and the skid shoe should be replaced at the same
time, as they will wear evenly through normal use.
Removing
1.
the Old Brush Hubs
Make sure the unit is off.
2. Tip the unit back so that it rests upon the shaft grip.
NOTE: To aid the removal process, it may be necessary to wash dirt
off the brush hubs and related hardware.
3. While holding a brush bolt in place with a 1/2 inch wrench, use
another 1/2 inch wrench to loosen the corresponding brush nut
(Fig. 5).
4. Remove the brush bolt and brush nut. Slide the brush hub off
the output shaft (Fig. 6).
5. Repeat steps 3 and 4 for the opposite side.
Removing
1.
the Old Skid Shoe
Clean the gear box and output shafts.
Place the new skid shoe onto the two mounting screws on the
gear box (Fig. 7).
3. Place the two skid shoe nuts onto the mounting screws. Use a
3/8 inch wrench to tighten the skid shoe nuts securely (Fig. 7).
Installing
Skid Shoe
Nuts (2}
the New Skid Shoe
1.
2.
the New Brush Hubs
1. Apply a light machine oil to the output shafts.
2. Slide a new brush hub onto an output shaft (Fig. 6).
4.
Skid Shoe
Mounting
Screws
Use a 3/8 inch wrench to remove the two skid shoe nuts.
Remove the skid shoe from the gear box (Fig. 7).
Installing
3.
Fig. 6
Rotate the brush hub to align the hole in the brush hub with the
hole in the output shaft (Fig. 6).
Insert a brush bolt through the aligned holes. Place a brush nut
onto the brush bolt (Fig. 6).
5. While holding the brush bolt in place with a 1/2 inch wrench, use
another 1/2 inch wrench to tighten the corresponding brush nut
securely (Fig. 5).
6. Repeat steps 2 through 5 for the opposite side.
Gear Box
Fig. 7
CLEANING
STO RAG E
•
the unit and allow it to cool before cleaning or maintaining
To avoid serious personal injury, always stop
WARNING:
the unit.
J
Use a small brush to clean the outside of the unit. Do not use strong
detergents. Household cleaners that contain aromatic oils such as
pine and lemon, and solvents such as kerosene, can damage plastic.
Wipe off any moisture with a soft cloth.
Never store a fueled unit where fumes may reach an open flame
or spark.
Allow the engine to cool before storing.
Lock up the unit to prevent unauthorized use or damage.
Store the unit in a dry, well-ventilated area.
Store the unit out of the reach of children.
Long=term Storage
Thoroughly clean the unit and inspect it for any loose or
damaged parts. Repair or replace damaged parts and tighten
loose screws, nuts or bolts.
9
10
Manual
del Operador
M
ACCESORIO
DE ESCOBA MOTORIZADA
UNIVERSAL
Modelo No. 316.792570
o SEGURIDAD
o ENSAMBLAJE
o OPERACION
PRECAUCION: Antes de utilizar, este
producto lea este manual y siga todas
las reglas de seguridad
e instrucciones
de operaci6n.
Sears Brands Management
Corporation,
Visite nuestro
769-08486 / 00
o MANTENIMIENTO
LISTA DE PIEZAS
Hoffman
Estates, IL 60179 U.S.A.
sitio web: www.craftsrnan.corn
10/12
TABLA DE CONTENIDO
Seguridad ...........................................
Garantia .............................................
Conozca su unidad ....................................
12
15
15
Especificaciones
......................................
Ensamblaje ..........................................
Operaci6n ...........................................
Mantenimiento ........................................
15
16
17
18
Limpieza y almacenamiento
.............................
Lista de piezas .......................................
19
23
Toda la informaci6n, las ilustraciones y especificaciones que contiene
este manual se basan en la informaci6n mas reciente del producto,
existente en el momento de la impresi6n. Nos reservamos el derecho
de hacer cambios en cualquier momento, sin previo aviso.
© Seam Brands, LLC
Lea el manuaa del operador y siga todas las advertencias e
instrucciones de seguridad. No hacerlo puede ocasionar
lesiones graves al operador y/o a las personas presentes.
El prop6sito de los simbolos de seguridad es Ilamar la atenci6n
sobre posibles peligros. Los simbolos de seguridad y sus
explicaciones merecen toda su atenci6n y comprensi6n. Las
advertencias de seguridad no eliminan de por si ningQn peligro.
Las instrucciones o advertencias que dan no sustituyen las
medidas adecuadas de prevenci6n de accidentes.
SJMBOLO
SlGNIFICADO
PELIGRO:
Indica un peligro EXTREMO.
El no obedecer una sehal de seguridad de PELIGRO
TRAERA COMO CONSECUENClA que usted u otras
personas puedan sufrir lesiones graves o la muerte.
ADVERTENCIA:
Indica un peligro GRAVE.
El no obedecer una sehal de ADVERTENClA de seguridad
PUEDE conducir a que usted u otras personas sufran
graves lesiones.
PRECAUCl0N:
Indica un peligro MODERADO.
El no obedecer una sehal de PRECAUClON de seguridad
PUEDE conducir a dahos a la propiedad o a que usted u
otras personas se lesionen.
NOTA: Indica informaci6n o instrucciones de vital importancia
la operaci6n o el mantenimiento del equipo.
para
12
• INSTRUCCIONES
LEA TODAS LAS INSTRUCCIONES
LA UNIDAD
DE SEGURIDAD
ANTES DE OPERAR
IMPORTANTES
ADVERTENCIAS
ELECTRICAS
•
DE SEGURIDAD
PARA LAS UNIDADES
ADVERTENCIA:
_
•
Para reducir el riesgo de descarga
electrica, use s61o cables de extensi6n aprobados para uso
en exteriores, como un cable de extensi6n con cable tipo
SW-A, SOW-A, STW-A, STOW-A, SJW-A, SJOW-A, SJTWW o SJTOW-A. Puede adquirir cables de extensi6n en su
distribuidor local. Use s61o cables de extensi6n de camisa
cilindrica aprobados para su uso al exterior.
las normas de seguridad. Lea estas instrucciones antes de
operar la unidad a fin de garantizar la seguridad del
I
operador
y de cualquier
otra la
persona
Guardetodas I
DVERTENCIA:
AI usar
unidad presente.
deben seguirse
estas instrucciones para poder usarlas mas adelante,
j
Lea cuidadosamente y entienda el manual del operador de la
unidad que impulsa a este acople.
Lea detenidamente las instrucciones. Familiaricese con los
controles y el uso adecuado de la unidad.
JUEGOS DE CABLES: Verifique que su juego de cable este en
buenas condiciones. Cuando use un juego de cables, verifique
que el cable que usa es Io suficientemente grueso para conducir
la corriente que consumira la unidad. Un juego de cables de
menor calibre puede causar una caida de voltaje en la linea y
ocasionar la perdida de energia y recalentamiento. Vea el
manual del operador de la unidad que le data electricidad a este
accesorio para saber la medida recomendada para el cable.
Inspeccione todos los cables de extensi6n y la conexi6n
electrica de la unidad con frecuencia. Observe en detalle si
existe deterioro, cortes o grietas en el aislamiento. Inspeccione
tambien si existen da_os en las conexiones. Cambie los cables
si encuentra algOn defecto o da_o.
Evite que el cabezal motorizado se desconecte del cable de
extensi6n durante la operaci6n usando una correa de sujeci6n en
el receptaculo o enchufe, un conector, o hagale un nudo (Fig. A).
Evite los ambientes peligrosos. No opere nunca su unidad en
ambientes hOmedos ni mojados. La humedad representa un
peligro de descarga electrica.
No opere esta unidad siesta cansado, enfermo o bajo los
efectos del alcohol, drogas o medicamentos.
Los ni_os no deben operar la unidad. Los adolescentes deben
estar acompa_ados y supervisados pot un adulto.
Todos los accesorios de protecci6n y seguridad deben estar
instalados adecuadamente antes de comenzar a operar la unidad.
Inspeccione la unidad antes de utilizarla. Reemplace las piezas
da_adas. Verifique que no haya fugas de combustible. AsegOrese
de que todos los sujetadores esten en su sitio y asegurados.
Cambie las piezas rajadas, melladas o da_adas de cualquier
forma. No opere la unidad si hay piezas flojas o da_adas.
Inspeccione cuidadosamente el Area antes de encender la
unidad. Elimine todos los escombros y los objetos duros o
filosos tales como cristales, alambres, etc.
Tenga en cuenta el riesgo de lesiones a la cabeza, las manos y
los pies.
Limpie el Area a recortar antes de cada uso. Retire las piedras,
vidrios rotos, clavos, alambres, cadenas y otros objetos que
podrian salir despedidos o enredarse en el accesorio de corte.
Aleje a los ni_os, personas presentes y animales domesticos del
Area; mantengalos fuera de un radio de 50 pies (15 m) como
minimo. AOn asi es posible que se arriesguen a ser golpeados por
los objetos lanzados. Sugiera a los presentes usar protecci6n para
los ojos. Si alguien se le acerca, pare la unidad inmediatamente.
No use la unidad bajo la Iluvia. No la use dentro del agua ni
alrededor de ella.
No toque el enchufe ni la unidad con las manos mojadas ni
parado sobre superficies mojadas.
No deje la unidad enchufada cuando no se utilice, este
cambiando los accesorios o mientras se le esta dando
mantenimiento.
Cable de extensi6n
ADVERTENCIAS
GASOLINA
DE SEGURIDAD
PARA UNIDADES
Cable de alimentaci6n
de la unidad
DE
y, de prenderse, sus vapores pueden hacer expos 6n.
|
ADVERTENClA:
La gasolina es sumamente inflamable
Tome las siguientes precauciones:
J
Almacene el combustible solo en los recipientes dise_ados y
aprobados especificamente para estos materiales.
Pare siempre el motor y deje que se enfrie antes de Ilenar el
tanque. Nunca quite la tapa del tanque de combustible ni eche
combustible cuando el motor este caliente. Antes de Ilenar el
tanque, siempre afloje la tapa lentamente para disipar la presi6n
del mismo.
Fig. A
AL OPERAR LA UNIDAD
Mezcle o eche siempre el combustible en un Area exterior bien
ventilada y limpia, donde no haya chispas ni llamas. NO fume.
No opere nunca la unidad si la tapa del combustible no esta
bien asegurada en su lugar.
Evite el peligro de incendio debido a combustible derramado.
Limpie de inmediato todo combustible derramado de la unidad
antes de encenderla. Antes de arrancar el motor, aleje la unidad
a una distancia de 30 pies (9.1 m) como minimo del lugar de
abasto de combustible. NO fume.
Use gafas o lentes de seguridad que cumplan con las normas
actuales ANSI Z87.1 y esten marcados como tales. Use siempre
protecci6n para los oidos al operar esta unidad. Si la operaci6n
levanta polvo, Ileve puesta una mascara facial o contra el polvo.
Use pantalones largos y gruesos, botas, guantes y camisa de
mangas largas. No use ropa holgada, alhajas, pantalones
cortos, sandalias ni ande descalzo. Asegure su cabello por
encima del nivel de los hombros.
Antes de arrancar la unidad, asegQrese de que el accesorio no
haga contacto con ningQn objeto.
Use la unidad Qnicamente a la luz del dia o con buena luz artificial.
No arranque ni use nunca la unidad dentro de una habitaci6n o
edificio cerrados. Inhalar los gases de escape puede ser fatal.
Opere esta unidad solamente en un Area exterior bien ventilada.
13
• Uselaherramienta
correcta.
Useestaherramienta
solamente
OTRAS ADVERTENCIAS DE SEGURIDAD
conelprop6sito
previsto.
Todos los servicios, que no sean los procedimientos de
Sostenga
siempre
launidad
conambas
manos
aloperarla.
mantenimiento descritos en este manual, deberan realizarse por
Agarre
firmemente
ambos
mangos
o empu_aduras.
un centro de Sears u otto centro de servicio autorizado.
Nointente
alcanzar
demasiado
lejos.Mantenga
siempre
una
Antes de inspeccionar, dar mantenimiento, limpiar, guardar,
posici6n
y equilibrio
adecuados.
Tenga
mucho
cuidado
cuando
transportar o reemplazar cualquier pieza de la unidad:
estetrabajando
enpendientes
pronunciadas
o inclinadas.
1. Detenga la unidad.
Mantenga
lasmanos,
lacaray lospieslejosdetodaslaspartes
2. AsegQrese de que todas las piezas m6viles esten detenidas.
m6viles.
Notoqueotratededetener
laspiezas
m6viles.
3. Espere a que la unidad se enfrie.
Nooperelaunidad
a unavelocidad
mayorquelanecesaria
para
4. Para las unidades que funcionan con gasolina, desconecte el
recortar
bordes.
Nooperelaunidad
aaltavelocidad
cuando
no
esterecortando
bordes.
cable de la bujia. Para las unidades que funcionan con
electricidad, desconecte la unidad de la alimentaci6n electrica.
Tenga
mucho
cuidado
cuando
invierta
o mueva
launidad
hacia
usted.
No guarde nunca la unidad con combustible en el tanque ni
dentro de una edificaci6n en la que los gases puedan ponerse
Nofuerce
elequipo.
Elmismo
trabajara
mejoryconmayor
en contacto con una llama expuesta (luces piloto, etc.) o
seguridad
siIoutilizaalavelocidad
paralaquehasidodise_ado.
chispas (interruptores, motores electricos, etc.).
Paresiempre
launidad
cuando
posponga
eltrabajoomientras
Cerci6rese de asegurar bien la unidad al transportarla.
camine
entrediferentes
zonas
decorte.
Guarde la unidad en un lugar seco, bajo Ilave o en alto, a fin de
Sigolpea
oseenreda
conunobjetoextra,o,paredeinmediato
evitar su uso no autorizado o da_o. Mantengala fuera del
launidad
y verifique
sihayalgQn
da_o.Nopongaafuncionar
el
alcance de los ni_os.
equipo
sinreparar
elda_o.Nooperelaunidad
sihaypiezas
No moje ni rocie la unidad con agua ni con ningQn otro liquido.
flojaso da_adas.
Mantenga los mangos secos, limpios y sin suciedades. Limpie la
Utilicesolamente
laspiezas
derepuesto
y accesorios
del
unidad despues de cada uso, consulte las instrucciones de
fabricante
original
queselistanenlasecci6n
Listadepiezas
de
Limpieza y almacenamiento.
estemanual.
Elusodecualquier
piezao accesorio
no
Guarde estas instrucciones. ConsQltelas con frecuencia y
autorizado
podria
causar
lesiones
graves
alusuario
o da_osa la
utilicelas para instruir a otros usuarios. Si le presta esta unidad a
unidad
y anularlagarantia.
alguien, prestele tambien estas instrucciones.
Mantenga
limpialaunidad.
Quiteconcuidado
cualquier
restode
vegetaci6n
uotrosresiduos
quepuedan
bloquear
laspiezas
m6viles.
GUARDE ESTAS INSTRUCCIONES
Silaunidad
comienza
avibraranormalmente,
detengala
de
inmediato.
Inspeccione
launidad
paraencontrar
lacausadela
vibraci6n.
Generalmente,
lavibraci6n
esunindicador
deproblemas.
• SJMBOLOS
INTERNACIONALES
Y DE SEGURIDAD
•
Este manual del operador describe simbolos y pictografias internacionales y de seguridad que posiblemente aparezcan en este producto.
Lea el manual del operador para informarse bien sobre la seguridad, ensamblaje, operaci6n, mantenimiento y reparaci6n.
SJMBOLO
SIGNIFICADO
SJMBOLO
SIGNIFICADO
= LOS OBJETOS QUE SON ARROJADOS POR EL
AIREY LAS PARTES ROTATORIAS PUEDEN
PROVOCAR LESJONES GRAVES
i¸
Indica peligro,
precauci6n. Puede
o SJMBOLO
DE advertencia
ALERTA DEoSEGURIDAD
utilizarse junto a otros simbolos o pictografias.
_t_L
@
i_
o LEA EL MANUAL DEL OPERADOR
_
_lRl_
ADVERTENCIA:
Lea el o los manuales del
operador y siga todas las advertencias e instrucciones
de seguridad. No hacerlo puede ocasionar lesiones
graves al operador y/o a las personas presentes.
• USE PROTECCION
!
i
ADVERTI=NCIA:
Los objet0S peques0s pUeden
set lanzad0s a gran velocidad y ocasionar lesiones.
Mant6ngase a!ejado de !as partes rotatodas,
ADVERTENCIA:
Mantenga a t0dos !0S presentesl
, MANTENGA ALEJADOS A LOS PRESENTES
especialmente a los ni5os y anima!es dom6sticos, a
una distancia de al menos 50 pies (15 m).
PARA LOS OJOS Y OJDOS
fuerte
pueden ocasionar
graves a ylos
ADVERTENCIA:
Los lesiones
objetos lanzados
el ojos
ruidoy
p6rdJda de la audici6n. AI operar esta unidad, use
protecci6n para los ojos que cumpla con la normas
. ANSI Z87.1 y protecci6n para los oJdos. De ser
• necesario, use un protector facial completo.
_
_,ESCOBAS MOTORIZADAS
_ LOS CEPILLOS
ROTATOR OSPUEDEN
CAUSAR
LES ONES
GRAVES
_"_
14
AePdgtene:m°tt_Y
aAsDVE_ENoCrliaAs:
P e
o:
g ;an
ddejen qtu_; °das
, extraer cualquier parte o accesorio o antes de limpiar 0
real!zar cualquier tarea de mantenimiento_ Mantenga
• las man0 s y 10Spie s a!ejad0s de !as partes r0tat0rias:
GARANTiA
TOTAL
POR DOS AltOS
CRAFTSMAN
Este producto se garantiza POR DOS ANOS a partir de la fecha de compra, contra cualquier defecto de materiales o mano de obra. Un
producto defectuoso sera sustituido sin cargo alguno.
Para conocer los detalles de la cobertura a fin de obtener el reemplazo gratuito, visite el sitio web: www.craftsman.com
Esta garantia no cubre los cepillos y zapata de deslizamiento, por ser piezas que se gastan con el uso normal dentro del periodo de garantia.
Esta garantia se anula si el producto en alg_n momento se utiliza para prestar servicios comerciales o se alquila a otra persona.
Esta garantia le confiere a usted derechos legales especificos y usted puede tener, ademas, otros derechos que difieren de un estado a otro.
Sears Brands Management Corporation, Hoffman Estates, IL 60179
usos
Como escoba motorizada:
•
Barre la suciedad, el cesped, la nieve u otros residuos de las
veredas y los caminos de entrada particulares.
Asa para coigar
NO SE REQUIERE DE HERRAMIENTAS
PARA EL ENSAMBLAJE
Cuerpo
del eje
Cepillos
Protector
Caja de engranajes
Zapata
Peso aproximado de la unidad (s61o el accesorio) .....................................................
Ancho del trayecto de limpieza ......................................................................
de cepillo
de deslizamiento
9 - 10 libras (4.1 - 4.5 kg)
12 pulgadas (30,5 cm)
* Todas las especificaciones se basan en la informaci6n del producto mas reciente disponible en el momento de la impresi6n. Nos reservamos
el derecho de hacer cambios en cualquier momento, sin previo aviso.
15
FUNCIONAMIENTO
DEL ACOPLADOR
Orificio
El acoplador permite el uso de varios accesorios opcionales.
_
cualquiera de los accesorios, lea y comprenda el manual
que viene con dicho accesorio. Tenga en cuenta toda la
ADVERTENClA:
Antes que
de comenzar
a utilizar
informaci6n de seguridad
incluye.
_
ADVERTENOIA:
instalar un accesorio. A fin de evitar lesiones personales
de recorte
de bordes
de 90 °
(recortadora _nicamente)
graves y da_os a la unidad, apaguela antes de extraer o
Perilla
Fig. 1
NOTA: Para facilitar la instalaci6n o la extracci6n de los accesorios,
ubique la unidad en el suelo o sobre un banco de trabajo.
Instalaci6n del accesorio
NOTA: Retire la tapa de protecci6n y el espaciador gris de los ejes
superior e inferior antes de ensamblar el accesorio.
1. Gire la perilla en el sentido contrario alas agujas del reloj para
aflojarla (Fig. 1).
2. Mientras sujeta con firmeza el accesorio, empOjelo en linea recta
dentro del acoplador hasta que el bot6n de liberaci6n entre a
presi6n y quede firme dentro del orificio principal (Fig. 3).
NOTA: La alineaci6n del bot6n de liberaci6n con el embutimiento de
guia ayudara en la instalaci6n (Fig. 2).
3. Gire la perilla en el sentido de las agujas del reloj para ajustar
(Fig. 1).
NOTA: No ajuste demasiado la tuerca (Fig. 2).
_
asegOrese de que el bot6n de liberaci6n entre a presi6n
completamente dentro del orificio principal (Fig. 3) y que la
PRECAUCION:
de utilizar esta unidad,
perilla (Fig. 1) quede Antes
bien ajustada.
_
colocarse a presi6n solamente en el orificio principal. Si se
utiliza un orificio equivocado, se podrian producir lesiones
PRECAUCION:
bot6n de liberaci6n debe
personales o dados Este
a la unidad.
Lmbutimiento
de guia
Fig. 2
Orificio principal
\
Para un reborde decorativo con un accesorio de recorte, trabe el
bot6n de liberaci6n en el orificio de recorte de bordes de 90 ° (Fig. 1).
Alojamiento del
eje superior
Extracci6n del accesorio
1.
2.
3.
Bot6n de liberaci6n
Acoplador
Alojamiento del
eje inferior
Fig. 3
Gire la perilla en el sentido contrario alas agujas del reloj para
aflojarla (Fig. 1).
Oprima y mantenga apretado el bot6n de liberaci6n (Fig. 2).
Mientras sujeta firmemente el alojamiento del eje superior, tire del
accesorio de manera recta para sacarlo del acoplador (Fig. 3).
16
SUJETAR LA UNIDAD
/
puesta protecci6n
para los ojos, oidos, pies y cuerpo a fin
_ADVERTENCIA:
AI lesiones.
operar esta unidad, Ileve siempre
de reducir el riesgo de
•
1
|
Parese en la posici6n de operaci6n (Fig. 4).
Sostenga la empur_adura del eje con la mano derecha.
Mantenga el brazo derecho ligeramente flexionado.
Sujete el mango con la mano izquierda. Mantenga el brazo
izquierdo recto.
Sujete la unidad a la altura de la cintura.
RECOMENDAClONES
Fig. 4
PARA MEJORES RESULTADOS
1. Mueva la unidad al Area de trabajo antes de arrancar el motor.
_
nunca levante o transporte la unidad mientras el motor
RECAUCl0N:
Para evitar lesiones personales graves, j
esta
funcionando.
2. Arranque la unidad.
3. Sostenga firmemente la unidad con ambas manos y bajela
lentamente hasta que la zapata de deslizamiento este en
contacto con el piso.
4. Aumente gradualmente la velocidad del motor para
familiarizarse con el manejo de la unidad.
5. Avarice con la unidad a una velocidad moderada para barter los
residuos hacia adelante (Fig. 4). ©pcionalmente, puede ser
conveniente inclinar levemente el cepillo el6ctrico a la izquierda
para cotter los residuos hacia el costado.
IAi,ov,o,,oc,,
a aevtar
esones
I 'aves
personales, tenga mucho cuidado cuando invierta o gire la
unidad hacia usted.
17
ADVERTENClA:
811
Para evitar lesiones graves, no haga
nunca ningQn mantenimiento ni reparaci6n con la unidad
funcionando. Siempre deje que la unidad se enfrie antes
de darle mantenimiento o repararla. Para las unidades que
funcionan con gasolina, desconecte el cable de la bujia
para prevenir que la unidad se encienda pot accidente.
Para las unidades que funcionan con electricidad,
desconecte la unidad de la alimentaci6n electrica para
prevenir que la unidad se encienda per accidente.
Perno de cepilJo
NOTA: Es posible que algunos procedimientos de mantenimiento
requieran herramientas o habilidades especiales. Si no esta
seguro de poder Ilevar a cabo estos procedimientos, Ileve la
unidad a Sears u otto distribuidor de servicio calificado. Llame
al 1-800=469=4663 para encontrar el centro de servicio tecnico
Sears mas pr6ximo.
Fig. 5
Tuerca de cepillo
Cubo de
REEMPLAZO DE LOS CUBOS DEL CEPILLO Y LA
ZAPATA DE DESUZAMIENTO
iA!
araevita! 'esiones e sona'e
use siempre guantes gruesos para manipular los cepillos.
Los cubos del cepillo y la zapata de deslizamiento
deben ser
reemplazados al mismo tiempo, debido a que se desgastan de
manera pareja durante el uso normal.
Fig. 6
Extracci6n de los cubos de cepillo viejos
1. AsegOrese de que la unidad este apagada.
2.
Recueste la unidad de modo que descanse en la empur3adura
del eje.
NOTA: Para ayudar al proceso de extracci6n, limpie la suciedad de
los cubos de cepillo y las piezas relacionadas.
3. Cuando use una Ilave de 1/2 pulgada para mantener un perno
en el lugar, use otra Ilave de 1/2 pulgada para aflojar la tuerca de
cepillo correspondiente (Fig. 5).
4. Retire el perno y la tuerca del cepillo. Saque el cube del cepillo
desliz_.ndolo fuera del eje de salida (Fig. 6).
5. Repita los pasos 3 y 4 para el lado contrario.
Extracci6n de la zapata de deslizamiento
1.
TorniJlos de
montaje (2}
Tuercas de
zapata de
deslizamiento
(2}
vieja
Caja de engranajes
Use una Ilave de 3/8 pulgadas para retirar las dos tuercas de la
zapata de deslizamiento. Retire la zapata de deslizamiento
de la
caja de engranajes (Fig. 7).
Instaaaci6n
de la zapata de deslizamiento
Fig. 7
nueva
1.
2.
Limpie la caja de engranajes y los ejes de salida.
Coloque la zapata de deslizamiento
nueva sobre los dos
tornillos de montaje en la caja de engranajes (Fig. 7).
3. Coloque las dos tuercas de la zapata de deslizamiento sobre los
tornillos de montaje. Use una Ilave de 3/8 pulgada para ajustar
bien las tuercas de la zapata (Fig. 7).
Instalaci6n
Zapata de
desJizamiento
de Jos cubos de cepillo nuevos
1. Aplique a los ejes de salida un aceite liviano de m_,quina.
2. Coloque un cubo de cepillo nuevo en un eje de salida (Fig. 6).
3. Rote el cubo para alinear el orificio del cube de cepillo con el
orificio del eje de salida (Fig. 6).
4. Inserte a traves de los orificios alineados un perno de cepillo.
Coloque una tuerca de cepillo en el perno del cepillo (Fig. 6).
5. Cuando use una Ilave de 1/2 pulgada para mantener un perno
en el lugar, use otra Ilave de 1/2 pulgada para ajustar bien la
tuerca de cepillo correspondiente (Fig. 5).
6. Repita los pasos 2 a 5 para el lado contrario.
18
LIMPIEZA
ALMACENAiVllENTO
•
apague siempre la unidad y deje que se enfrie antes de
ADVERTENClA:
Para evitar lesiones personales graves,j
limpiarla o darle mantenimiento.
•
Use un cepillo pequer_o para limpiar la unidad pot fuera. No utilice
detergentes fuertes. Los limpiadores caseros que contienen aceites
esenciales, por ejemplo, de pino y lim6n, y los solventes como el
queroseno, pueden dar_ar el pla.stico. Seque la humedad con un
patio suave.
No guarde nunca la unidad con combustible en el tanque en un
lugar en el que los gases puedan ponerse en contacto con una
llama expuesta o chispas.
Espere a que el motor se enfrie para guardar la unidad.
Guarde la unidad bajo Ilave para evitar su uso no autorizado o dar_o.
Guarde la unidad en un lugar seco y bien ventilado.
Guarde la unidad fuera del alcance de los nitros.
Alrnacenarniento
•
19
a largo plazo
Limpie bien la unidad y compruebe que no haya piezas sueltas
o dar_adas. Repare o reemplace las piezas dar_adas y apriete los
tornillos, tuercas o pernos flojos.
2O
21
22
REPLACEMENT
PARTS - 316.792570
UNIVERSAL POWER BROOM ATTACHMENT
item Part No.
1
2
3
4
5
791-612605
841-031516S
753-08061
731-09011
618-05104S
6
7
8
9
753-08062
753-08064
753-08063
791-180288
To purchase replacement parts, call 1-800-469-4663.
Description
Accessory Hanger
Drive Shaft Housing Assembly
Guard Mounting Hardware Set
Broom Guard
Gear Box Assembly
Brush Mounting Hardware Set
Brush / Skid Shoe Replacement Kit
Skid Shoe Mounting Nut Set
Bolt
23
®