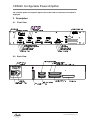
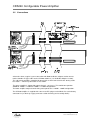
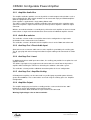
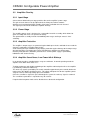
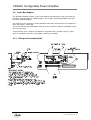
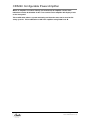
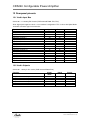
1
Audix Systems,
Station Road,
Wenden,
Saffron Walden,
Essex,
CB11 4LG.
Telephone: +44(0)1799 540888
Facsimile: +44(0)1799 541618
www.tycosafetyproducts-europe.com
www.audixsystems.co.uk
CPA240 Power Amplifier
Manual: V1.31
CPA240 Configurable Power Amplifier
Revision History
Version
1.0
1.1
1.2
1.3
1.31
Modifications
CPA240 Configurable Power Amplifier
Safety information
D805 bus adapter card and additions
Add figures
Outputs not inputs in table 13.2
Date
15/7/03
17/12/03
14/04/04
22/03/05
27/10/05
© Copyright Audix Systems. 2005
DISCLAIMER
This manual contains information that is correct to the best of Audix Systems knowledge. It is
intended to be a guide and should be used as such. It should not be considered as a sole
source of technical instruction, replacing good technical judgement, since all possible situations
cannot be anticipated. If there are any doubts as to exact installation, configuration and/or use,
call Audix Systems at +44 (0)1799 540888
ACKNOWLEDGEMENTS
Windows™, Windows 95™ and Windows 98™ are trademarks of Microsoft Corporation
All other trademarks are recognised
Page 2 of 35
21031 CPA240 manual V1.31.doc
CPA240 Configurable Power Amplifier
Models Covered
This user manual covers the following equipment
•
CPA240 Power Amplifier
Technical Support
Should you require technical assistance regarding the CPA240 Power Amplifier or any other
Audix Systems product please contact our Technical Services Department.
Audix Systems
Station Road
Wenden
Saffron Walden
Essex
CB11 4LG
Tel 01799 540888
Fax 01799 541618
Corporate website www.tycosafetyproducts-europe.com
Page 3 of 35
21031 CPA240 manual V1.31.doc
CPA240 Configurable Power Amplifier
Table of Contents
REVISION HISTORY .................................................................................................................... 2
MODELS COVERED .................................................................................................................... 3
TECHNICAL SUPPORT ............................................................................................................... 3
APPENDIX A ; AMPLIFIER FAIL DISABLE (PA ONLY)..................................................................... 5
1
SPECIFICATION ................................................................................................................... 6
1.1
SPECIFICATION.................................................................................................................. 6
1.2
BATTERY CONSUMPTION ................................................................................................... 7
1.2.1
Standby Consumption ............................................................................................. 7
1.2.2
Operational Consumption ........................................................................................ 7
2
DESCRIPTION....................................................................................................................... 8
2.1
2.2
2.3
3
FRONT VIEW ..................................................................................................................... 8
BACK VIEW ....................................................................................................................... 8
BRIEF DESCRIPTION .......................................................................................................... 9
AMPLIFIER FEATURES ..................................................................................................... 10
3.1
CPA240 SIMPLIFIED BLOCK SCHEMATIC .......................................................................... 10
3.2
CONNECTIONS ................................................................................................................ 11
3.2.1
Amplifier Audio Bus ............................................................................................... 12
3.2.2
Audio Bus selector................................................................................................. 12
3.2.3
Auxiliary Port - Direct Audio Input.......................................................................... 12
3.2.4
Auxiliary Port - Insert ............................................................................................. 12
3.2.5
Auxiliary Port - Amplifier Linking............................................................................ 12
3.2.6
Amplifier Output ..................................................................................................... 12
3.3
AMPLIFIER CIRCUITRY ..................................................................................................... 13
3.3.1
Input Stage ............................................................................................................ 13
3.3.2
Power Stage .......................................................................................................... 13
3.3.3
Amplifier Protection................................................................................................ 13
3.3.4
Amplifier Surveillance, Low Power Idle & Wakeup................................................ 13
3.4
AMPLIFIER DESIGNATION & REMOVAL AID ........................................................................ 14
3.5
AUDIO BUS ADAPTER ...................................................................................................... 15
3.5.1
Wiring and Assembly Detail................................................................................... 15
4
AMPLIFIER CONFIGURATION .......................................................................................... 16
4.1
INTERNAL SELECTOR VIEW .............................................................................................. 16
4.2
MASTER SLAVE ............................................................................................................... 16
4.2.1
Master Slave Configuration Examples .................................................................. 16
4.3
AUDIO BUS SELECTOR .................................................................................................... 17
4.3.1
Audio Bus Selector Configuration Examples......................................................... 17
4.4
FAULT MONITORING SETTINGS......................................................................................... 18
5
ADVANCED CONFIGURATION ......................................................................................... 18
5.1
CHAIN FEATURE .............................................................................................................. 18
5.2
CONNECTING SIGNAL PROCESSORS ‘INSERT’ (‘SEND’) ...................................................... 18
5.3
VOLUME CONTROL GAIN OPTION ..................................................................................... 19
5.4
LINKING AMPLIFIER FRAMES (PARALLEL GROUP) .............................................................. 19
5.4.1
Wiring Grouped Amplifiers..................................................................................... 21
5.4.2
Amplifier Group Controller & Slave Settings ......................................................... 22
5.4.3
Amplifier Group Gain Trim ..................................................................................... 22
5.5
CONNECTING LINE OUTPUTS ............................................................................................ 23
5.6
AMPLIFIER LOW POWER IDLE & W AKEUP.......................................................................... 23
6
MAINS VOLTAGE SELECTION ......................................................................................... 25
6.1
SETTING MAINS VOLTAGE SELECTOR ............................................................................... 25
Page 4 of 35
21031 CPA240 manual V1.31.doc
CPA240 Configurable Power Amplifier
7
FAULT MONITORING FEATURES .................................................................................... 26
7.1
7.2
SUPPLY MONITORING ...................................................................................................... 26
AMPLIFIER MONITORING .................................................................................................. 26
8
RACK MOUNTING THE CPA240 ....................................................................................... 28
9
WARRANTY ........................................................................................................................ 28
9.1
9.2
9.3
9.4
9.5
9.6
9.7
9.8
9.9
10
PERFORMANCE ............................................................................................................... 28
DELAYS IN DELIVERY ....................................................................................................... 28
STORAGE........................................................................................................................ 28
DAMAGE OR LOSS IN TRANSIT (UK) ................................................................................. 28
DAMAGE OR LOSS IN TRANSIT (EXPORT) .......................................................................... 28
LIABILITY FOR DEFECTS ................................................................................................... 29
ENVIRONMENT ................................................................................................................ 29
TITLE OF GOODS ............................................................................................................. 29
LAWS.............................................................................................................................. 29
SAFETY CONSIDERATIONS.......................................................................................... 30
10.1 SAFETY CONSIDERATIONS FOR SYSTEM DESIGN AND INSTALLATION.................................. 30
10.1.1 Security .................................................................................................................. 30
10.1.2 Electrical ................................................................................................................ 30
10.1.3 Environmental........................................................................................................ 30
10.1.4 Installation.............................................................................................................. 30
10.2 SAFETY CONSIDERATIONS FOR SYSTEM MAINTENANCE .................................................... 32
10.2.1 Safety and Electrical Rating Information ............................................................... 32
10.2.2 Electrical Hazards.................................................................................................. 32
10.2.3 Heat Hazards......................................................................................................... 32
10.2.4 Weight Hazards. .................................................................................................... 32
11
MAINTENANCE ............................................................................................................... 33
12
COMPONENT REFERENCE NUMBERS........................................................................ 33
13
REAR PANEL PIN-OUTS ................................................................................................ 34
13.1
13.2
13.3
13.4
13.5
AUDIO INPUT BUS............................................................................................................ 34
AUDIO OUTPUTS ............................................................................................................. 34
FMS BUS ....................................................................................................................... 35
AUXILIARY PORT (CHANNEL INSERTS) .............................................................................. 35
BACK-UP SUPPLY CONNECTOR SCHEMATIC...................................................................... 36
14
ELECTRICAL SCHEMATIC ............................................................................................ 38
15
DETAILED BLOCK DIAGRAM ....................................................................................... 39
APPENDIX A ; Amplifier Fail Disable (PA Only)
Page 5 of 35
21031 CPA240 manual V1.31.doc
CPA240 Configurable Power Amplifier
1 Specification
1.1
Specification
Audio
Power amplifier channels
Maximum Power
Amplifier power configurations (switchable)
Power amplifier channel enable
Frequency Response (-3dBu )
Distortion (1kHz at rated power)
Cross-talk
Signal/Noise (20Hz-20kHz rel to 100V)
Sensitivity (100V output)
Volume control range
CPA240 Power Amplifier
4 (configurable)
240 watts (1kHz @ 100V r.m.s)
4 x 60W
1 x 120, 2 x 60W
2 x 120W
1 x 180, 1 x 60W
1 x 240W
Channel on/off (unused channel power save)
70Hz to 20kHz
Better than 1% THD
Better than –60dB
Better than –85dBu
0dBu (+10dBu link option)
0 to –50dB
Power Supply:
Mains supply (V)
Backup supply input
Power Consumption max 4 x 60W
Amplifier idle & quiescent consumption
1 x master channel configured
2 x master channel configured
3 x master channel configured
4 x master channel configured
General:
Heat Dissipation max (W)
Dimensions(length, width, Height in :mm)
Weight (kg)
Operating temperature range (°C)
Humidity range
Standards
230V AC. +/- 10%, 50-60Hz switch options
24V DC (nominal). To be fused at source 25A max.
510W
Idle
121mA
146mA
171mA
195mA
Quiescent (wakeup)
1180mA
1210mA
1250mA
1260mA
270W
19” Rack Width 2 U High
(89mm x 480mm x 370mm)
15 kg
0°C to 40°C
90% non condensing
Meets or exceeds the requirements of BS5839.
Compliant with EMC standards,
EN 61000-6-1-2000, EN 61000-6-3-2001
Compliant with LVD safety standards; BS
EN60065:1998
Fusing:
Mains fuse rating
Battery fuse rating
Amplifier output stage fuse rating
1 off 20 x 5mm T 4A H
1 off automotive blade F 25A
4 off 20 x 5mm T 6.3A
Page 6 of 35
21031 CPA240 manual V1.31.doc
CPA240 Configurable Power Amplifier
1.2
Battery Consumption
Amplifier power consumption during a mains failure can be calculated by the duration the
amplifier remains at standby plus the additional power drawn during its operation.
1.2.1 Standby Consumption
The table below details the amplifier battery standby consumption for the four possible
master/slave configurations.
Standby consumption is the power used by an idle amplifier during a mains power failure.
During a mains failure voice alarm systems are generally expected to provide 24 hours of
standby and ½ hour of alarm broadcast. Figures for 72-hour standby operation are also
provided.
It is important that all unused channels are configured as slaves as this reduces battery
consumption to a minimum i.e. an amplifier driving a 60watt load should be configured
as a 240W
Amplifier channel
configuration
Consumption/hour
24 hours total
72 hours total
140mA
166mA
192mA
216mA
3.38A
3.99A
4.61A
5.18A
10.10A
11.95A
13.82A
15.55A
1 x master channel configured
2 x master channel configured
3 x master channel configured
4 x master channel configured
1.2.2 Operational Consumption
The operational power consumption of an amplifier is effected by a number of factors:
•
•
•
Speaker load
Broadcast level
Signal type
Where the speaker load connected to the amplifier is less than its maximum rated power, the
proportion of power drawn will be reduced. Similarly the level and signal or message type used
during an alarm broadcast can also reduce power consumption. Where a continuous signal is
employed, the consumption can be approximately calculated by the signal voltage across the
load.
However voice alarm broadcasts often contain tone and voice signals. Due to the nature of a
voice messages and the gaps of silence that generally separates the alarm tone and voice
signal the overall average consumption is further reduced.
Generally with normal site perimeters and a combined tone and voice alarm power consumption
would be 33% of the maximum.
Figures below indication the power consumption of an amplifier during nominal and fully power
conditions.
Amplifier total
load
60W
120W
180W
240W
33% consumption
Nominal power requirement
(33% for ½ hour)
Continuous tone at 100V
into a full load
1.7A
3.3A
5.0A
6.7A
0.9A
1.7A
2.5A
3.3A
5.0A
10.0A
15.0A
20.0A
Page 7 of 35
21031 CPA240 manual V1.31.doc
CPA240 Configurable Power Amplifier
The ‘nominal’ power consumption figure must not be used if a continuous tone alarm is
employed.
2 Description
2.1
Front View
2.2
Back View
25A
Page 8 of 35
21031 CPA240 manual V1.31.doc
CPA240 Configurable Power Amplifier
2.3
Brief Description
The CPA240 power amplifier provides up to four channels of amplification for both public
address and voice alarm applications.
The 100-volt line output stages are robustly designed and are protected against open circuits
and loads that exceed the channel’s rated power, including short circuits.
A thermal shutdown circuit provides further protection of the amplifier’s output stages.
The amplifier is equipped with a number of features that reduce system engineering and
assembly times.
An amplifier audio bus replaces previously hand-wired input cabling with a sixteen ‘zone’ or
‘destination’ ribbon cable.
A link matrix located within the amplifier allows the selection of a single ‘zone/destination’ from
the ribbon bus to each amplifier channel i.e. an amplifier channel may be configured to any one
output of the switching matrix.
Where the ribbon bus cannot be used due to special wiring requirements the auxiliary port ‘D’
type connector allows solder type connection to be made.
Selector switches within the amplifier chassis set the master or slave configuration of each
channel amplifier providing a range of power settings:
•
•
•
•
•
4 x 60 Watt
1 x 120 Watt & 2 x 60 Watt
2 x 120 Watt
1 x 180 Watt & 1 x 60 Watt
1 x 240 Watt
Paralleling amplifier chassis is achieved by connecting the parallel output on the auxiliary port to
the slave amplifiers. The volume control of the ‘master’ amplifier overrides the volume controls
of the paralleled slaves.
Page 9 of 35
21031 CPA240 manual V1.31.doc
CPA240 Configurable Power Amplifier
3 Amplifier Features
3.1
CPA240 Simplified Block Schematic
Channel 1.
Amplifier
Paralleling
In/Out Port
Monitor jack
Audio Bus
Selector
Link Matrix
Auxiliary Port
Audio
Insert/send
Channel 1 O/P
Line Monitor
Option
Overload
Sig Present
Ch.2 Slaving o/p Switch
Amp fault
Monitor jack
16 Way Audio
Ribbon Bus In
(from source)
Ch.2 Slaving i/p
Switch
Channel 2 O/P
Line Monitor
Option
Overload
Sig Present
Ch.3 Slaving o/p Switch
Amp fault
Monitor jack
Ch.3 Slaving i/p
Switch
Channel 3 O/P
16 Way Audio
Ribbon Bus Out
(to next amplifier)
Line Monitor
Option
Overload
Sig Present
Ch.4 Slaving o/p Switch
Amp fault
Monitor jack
Ch.4 Slaving i/p
Switch
Channel 4 O/P
Overload
Sig Present
Line Monitor
Option
Amp fault
Page 10 of 35
21031 CPA240 manual V1.31.doc
CPA240 Configurable Power Amplifier
3.2
Connections
25A
25A
Schematic shows a typical system connection with D805 audio bus adapter card to convert
matrix controller ‘D’ type cables to the CPA240 audio bus (see Audio Bus Adapter section).
The subsequent amplifiers controlled by that matrix are then connected via the 40 way audio
bus cables. A wake-up connection is also shown.
The upper amplifier is shown with output channels 1 & 2 in use. This would correspond to
2x60W or 1x60W + 1x120W or 1x60W + 1x180W configurations.
The lower amplifies output channel wiring corresponds to a 1x180W + 1x60W configuration.
The CPA240 amplifier is supplied with a one metre IEC plug to socket Mains flex and a battery
connector kit (see Back-up supply connector section for wiring and assembly details).
Page 11 of 35
21031 CPA240 manual V1.31.doc
CPA240 Configurable Power Amplifier
3.2.1 Amplifier Audio Bus
The amplifier audio bus provides a means by which 16 matrix outputs or destinations such as
those provided by the Alpha matrix controller can be connected simply to CPA240 amplifiers
within an equipment rack or suite.
Each amplifier is supplied with a single 40way-ribbon cable.
The cable is connected from the amplifier audio bus input connector to the switching matrix
(where the amplifier is adjacent to the matrix) or to the previous amplifier’s audio bus output
connector.
With the 16 matrix destinations essentially daisy chained to each amplifier an internal selector
matrix allows a single matrix destination to be connected to an individual amplifier channel.
3.2.2 Audio Bus selector
The audio bus selector enables an amplifier channel to be configured to a single matrix
destination or zone connected via the audio bus.
The audio bus selector is located inside the amplifier chassis on the D804 connection card.
3.2.3 Auxiliary Port - Direct Audio Input
Alternative means to connect audio sources to the amplifier is provided by the auxiliary port.
The ‘D’ type plug and socket arrangement allows bespoke cabling to be connected via solder
joints.
3.2.4 Auxiliary Port - Insert
In addition to the direct audio input connections, the auxiliary port provides insert points for each
amplifier channel.
This allows signal processing equipment to be connected or ‘inserted’ into the input of the
amplifier whilst retaining the efficiencies offered by the audio bus connection system.
The audio bus selector provides additional connection points for ‘insert’ configuration.
3.2.5 Auxiliary Port - Amplifier Linking
CPA240 power amplifiers can be connected in a parallel group to provide power for loads
greater than 240Watts. These connections are made using the auxiliary port. See ‘Amplifier
Configuration’.
3.2.6 Amplifier Output
The amplifier output plug and socket assembly provides screw terminals for four 100V
loudspeaker circuits and monitoring zero volt connections.
The screw terminals allow conductors of up to 2.5mm² to be connected.
Warning, high voltages exist on these terminals.
Page 12 of 35
21031 CPA240 manual V1.31.doc
CPA240 Configurable Power Amplifier
3.3
Amplifier Circuitry
3.3.1 Input Stage
A four channel balanced input stage provides drive to the amplifier’s power stage.
The gain of each channel can be adjusted via the front panel volume controls.
Signal present and overload LEDs provide signal status indication for each channel.
The signal present LED also indicates amplifier ‘wakeup’.
3.3.2 Power Stage
The amplifier power stage is designed as a removable heatsink assembly, which allows for
quick assembly and access to specialised settings.
This power block assembly includes four 60Watt power stages and input ‘master’/‘slave’
switching.
3.3.3 Amplifier Protection
The amplifier’s output stages are protected against both open circuits and loads that exceed the
channel’s rated power, including short circuits.
A non-latching thermal shutdown circuit provides protection against damage to the output stage
due to overheating. The front panel ‘Temp’ LED indicates amplifier over temperature.
Ultimate protection of the MOSFET power devices and the power supply is provided by
individual 6.3AF channel fusing.
3.3.4 Amplifier Surveillance, Low Power Idle & Wakeup
In an attempt to reduce standby battery usage to a minimum, in normal operating mode the
amplifier shuts down when not in use.
To allow continuous and reliable monitoring of the amplifier and loudspeaker lines the amplifier
is periodically enabled or ‘Woken up’.
The ‘wake up’ signal is provided by the matrix controller approximately two seconds before the
matrix routes the 20kHz surveillance pulse. This allows adequate time for the amplifiers power
stage to reach its normal operating quiescent condition.
Once the surveillance signal has passed through the system the ‘wake up’ signal is removed.
The surveillance procedure is repeated every 30 seconds.
If required the low power mode can be disabled. See advanced configuration.
Page 13 of 35
21031 CPA240 manual V1.31.doc
CPA240 Configurable Power Amplifier
3.4
Amplifier Designation & Removal Aid
The CPA240 front panel features both removal aid points and designation cut outs.
The designation feature allows a cost effective printed pager label to be fitted to the amplifier
without glues or tapes.
See method statements below:
Page 14 of 35
21031 CPA240 manual V1.31.doc
CPA240 Configurable Power Amplifier
3.5
Audio Bus Adapter
The Audio Bus Adapter provides a conversion between the two output ‘D’ type connectors on
the Alpha matrix controller or V32EBPU bypass unit, and the single 40 way ribbon connector
bus of the CPA240 amplifier.
One adapter card is required per matrix controller and is to be mounted on the first amplifier to
which that matrix is connected.
The kit also includes two CA30 ribbon cables that connect from the adapter card ribbon header
to the ‘D’ type plugs.
Screw terminals, on the adapter card provide a connection for the amplifier ‘wake up’ signal
where used (options of positive and negative switching is available).
3.5.1 Wiring and Assembly Detail
Page 15 of 35
21031 CPA240 manual V1.31.doc
CPA240 Configurable Power Amplifier
4 Amplifier Configuration
Selector Cable (4 off)
Output Stage Fusing
Fuse CH1
D804 Connector Card
Fuse CH2
Fuse CH3
SW4
CH3
Slave Master
CH2
Slave Master
16 14 12 10 8 6 4 2
Slave
CH2
Master
SW3
SW2
Fuse CH4
Slave
CH4
Master
Slave
CH3
Master
D801 Power Block
Amplifier Link Gain Trim
Amplifier Link
(remove for Slave Amp)
Not Fitted
CH2 +10dB
CH3 +10dB
CH1 +10dB
CH4
Slave Master
Mains
15 13 11 9 7 5 3 1 Audio Bus
Channel
1 2 3 4
Battery
I/P
Chain
Send
Charger
Amplifier
Channel
Internal Selector View
Monitor Enable
4.1
CH4 +10dB
Always Wakeup
Channel 1.
4.2
Channel 2.
Channel 3.
Channel 4.
Master Slave
The CPA240 amplifier is equipped with four individual 60-Watt channels.
Setting of the ‘master/slave’ selectors allows the channels to be paralleled, providing 60, 120,
180 & 240 Watt configurations.
There are two ‘master/slave’ selectors per channel they are located on the Power Block (D801)
and rear connector card (D804). ‘CH2’ selects channel 2 as a master or slave etc.
Note: Both switches on a channel MUST be set to the same position.
When wiring to a paralleled amplifier the input and output signal cabling is to be connected to
the master channel only.
4.2.1 Master Slave Configuration Examples
4 x 60 Watt.
•
•
•
•
•
Set all Master/Slave switches to ‘master’ (factory setting).
Wire/configure channel 1 input/output signals to amplifier channel 1 etc.
Wire/configure channel 2 input/output signals to amplifier channel 2 etc
Wire/configure channel 3 input/output signals to amplifier channel 3 etc
Wire/configure channel 4 input/output signals to amplifier channel 4 etc
2 x 120 Watt.
•
First amplifier group: Set CH2 M/S switch to ‘slave’ (this parallels channel 2 to channel 1
master).
Page 16 of 35
21031 CPA240 manual V1.31.doc
D800 Control Card
CPA240 Configurable Power Amplifier
•
Second amplifier group: Set CH3 M/S switch to ‘master’ and CH4 to ‘slave’ (this parallels
channel 4 to channel 3 master).
Wire/configure first amplifier group input/output signals to CH1 (master).
Wire/configure second amplifier group input/output signals to CH3 (master).
•
•
1 x 240 Watt.
•
•
Set all Master/Slave switches to ‘slave’ this parallels channels 2, 3 & 4 to channel 1 master
Wire/configure channel 1 input/output signals to amplifier channel 1 etc.
4.3
Audio Bus Selector
The Audio Bus allows an amplifier within a system to be connected to a switching matrix such
as an Alpha and/or other CPA240 amplifiers via a ribbon cables.
These ribbon cables couple the sixteen matrix outputs (destinations or zones) to the audio bus
channel pin headers located on the D804 connector card within the amplifier.
Configuring each amplifier master input channel involves linking the desired Audio Bus channel
(matrix zone) to the amplifier input channel using one of the four two way selector cables
supplied.
Note: See advanced configuration for:
•
•
Connecting two or more input channels to the same Audio Bus ‘zone’ within a single
amplifier (Chain).
Connecting (inserting) external signal processing equipment (Send).
1 2 3 4
I/P
Master
1
Chain
8
1
Zone 6
4.3.1 Audio Bus Selector Configuration Examples
Slave
Audio Bus Channel
Send
16
Slave
Master
4
Zone 8
9
Connecting matrix zone output 6 to amplifier channel 1 (180W)
•
•
•
•
Connect one end of the two way selector cable to header 6 of the Audio Bus Channel
Connect the remaining end to Amplifier Channel ‘I/P’ header 1
First amplifier group: Set CH2 & CH3 M/S switch to ‘slave’.
Wire/configure first amplifier group input/output signals to CH1 (master).
Connecting matrix zone output 8 to amplifier channel 4 (60W)
•
•
•
•
Connect one end of the two way selector cable to header 8 of the Audio Bus Channel
Connect the remaining end to Amplifier Channel ‘I/P’ header 4
Second amplifier group: Set CH4 M/S switch to ‘master’
Wire/configure second amplifier group input/output signals to CH4 (master).
Page 17 of 35
21031 CPA240 manual V1.31.doc
CPA240 Configurable Power Amplifier
4.4
Fault Monitoring Settings
The amplifier provides fault indications for its power sources.
•
•
•
Mains
Battery (backup supply)
Changer
These fault indications may be disabled by removing the appropriate link located on the D800
control card.
5 Advanced Configuration
5.1
Chain Feature
Each channel is provided with an additional header at its input so that another input channel
may be connected to it.
The feature allows a ‘zone’ connected to an input channel to then be ‘Chained’ to a second
input channel.
This can then be repeated for the other channels if required.
1 2 3 4
1
8
Audio Bus Channel
Chain
Zone 1
I/P
Send
9
16
Example shows connection of amplifier inputs 1, 2 & 3 to Zone 1. Amps 1, 2 & 3 will be set as
Masters.
5.2
Connecting Signal Processors ‘Insert’ (‘Send’)
Additional signal processing equipment can be connected into the audio bus – amplifier path.
This is achieved by using a selector cable to connect the required audio bus ‘zone’ to the
appropriate channel ‘Send’ (Do not connect to the ‘I/P’ header).
This will route the selected audio bus zone to the auxiliary port connector ‘Send’ output
terminals.
The input of the signal processing equipment can then be wired to this output. The output of the
signal processing equipment can then be wired back into the amplifier signal path via the ‘Direct
Audio Input’ connections.
Page 18 of 35
21031 CPA240 manual V1.31.doc
CPA240 Configurable Power Amplifier
1 2 3 4
1
I/P
Chain
8
Zone 8
Audio Bus Channel
Send 2
Send
9
Amp 1
Aux Port
Send
2
16
Return
2
Zone 9A
Ret 1
Zone 9B
37W
Return
1
Amp 2
Ret 2
37W
Aux Port
I/P
O/P
EQ
Example shows connection of amplifier input 1 to direct to Zone 8 and input 2 to Zone 9A/9B
via a Graphic EQ and 37W aux port.
Note: Shorting the ‘Send’ signal path will significantly reduce the signal level on the
audio bus ‘zone’. This will in turn affect all equipment connected to this ‘zone’.
5.3
Volume Control Gain Option
The nominal gain of the amplifier with the volume controls set to maximum is +42dB (0dB i/p –
100V o/p). An additional 10dB gain for each channel is available by fitting the ‘CH+10dB’ link.
Links for each channel:
•
•
•
•
CH1+10dB
CH2+10dB
CH3+10dB
CH4+10dB
The link headers are located on the D800 control card (lower front).
5.4
Linking Amplifier Frames (Parallel Group)
The CPA240 provides an amplifier linking or grouping facility via additional circuitry and the
auxiliary port connector. This allows a group of amplifiers to be paralleled giving increased
power to a speaker circuit i.e. paralleling 3 x 180 Watt amplifiers could drive a 540 Watt speaker
circuit.
The maximum permitted amplifier group is five frames i.e. up to 1200Watts
General configuration:
•
•
•
•
•
•
One amplifier within the group is set as a ‘controller’ the other as ‘slaves’.
Only channel 1 of the amplifier is ‘linked’ while the other channels are configured as slaves
(to required power) see ‘master/slave’ section.
Only channel 1 volume control of the control amplifier adjusts the group level.
The output of each amplifier within the group is paralleled using the speaker circuit output
cable (manually wired).
All amplifiers within a group must have the same power configuration i.e. 180 Watts
All amplifiers within the group must be adjusted to have an identical power output.
Page 19 of 35
21031 CPA240 manual V1.31.doc
CPA240 Configurable Power Amplifier
•
Each amplifier within the group must be connected together via the ‘link’ feature.
Page 20 of 35
21031 CPA240 manual V1.31.doc
CPA240 Configurable Power Amplifier
5.4.1 Wiring Grouped Amplifiers
Input Wiring
Each amplifier within a group should be ‘linked’ using twin-screened cable and the auxiliary port
connectors.
Two signal terminals (paralleled), two return terminals (paralleled) and a screen terminal are
provided on the auxiliary port to allow the ‘linking’ cable to be ‘daisy chained’.
Note: The screen of each link cable should only be connected at the source end, the other end
should be isolated.
Function
Amplifier Link 1
Amplifier Link 2
Signal
Return
Screen
17
18
36
37
19
N/C
Output Wiring
Output 1 of each amplifier within a group should be connected in parallel to the speaker circuit.
1 2 3 4
I/P
1
Chain
8
Zone 8
Audio Bus Channel
Send
9
16
2 x Amp
Link fitted
(default)
100V
Ch1
2 x Amp
Link
removed
100V
Ch1
17 36 19 18 37
2 x Amp
Link
removed
100V
Ch1
17 36 19 18 37
17 36 19
Aux Port
37W
37W
37W
Speakers
Page 21 of 35
21031 CPA240 manual V1.31.doc
CPA240 Configurable Power Amplifier
5.4.2 Amplifier Group Controller & Slave Settings
The amplifiers in a group must be configured as:
•
•
Group ‘controller’ (one only)
Group ‘slave’
Group Controller
One amplifier within a group must be configured as a ‘controller’.
Once configured the ‘controller’ amplifier provides the drive signal to all the other amplifiers
within that group.
Channel 1 volume control on the control frame provides signal level adjustment for the entire
group.
Group Slave
The remaining amplifiers within the group (other than the single ‘controller’) must be configured
as ‘slaves’.
These amplifiers receive their input drive signal from the group controller.
The volume controls for each input channel belonging to the ‘slave’ group are disabled.
Setting Controller or Slave Configuration
There are two ‘Amplifier link’ headers located on the D800 control card (see section 4.1)
With links fitted (factory setting) the amplifier is configured as a ‘controller’.
To configure the amplifier as a ‘slave’ to a controller these links should be removed.
5.4.3 Amplifier Group Gain Trim
To provide maximum power output and prevent damage to the group the open circuit gain of
each amplifier must be matched to within 0.1Volts.
Method:
•
•
•
•
•
•
•
•
•
Configure the amplifiers as an amplifier group as described in the previous sections.
Disconnect amplifier 100V output system cabling.
Connect a suitable test signal to input channel 1 of the group controller i.e. 0dBu @ 1kHz.
Check that output 1 of each amplifier within the group (with the volume control set to
maximum) is approximately 100V +/- 5 RMS (if not locate and repair problem).
Measure and note channel 1 output of the group controller to two decimal places i.e.
99.35V.
Now measure and adjust the second amplifiers output using the trim control located on the
D800 control card to within 0.1V of the group controllers output i.e. 99.35V
Repeat of each amplifier in the group.
Recheck that the output of each amplifier is within 0.1V of the others.
With all amplifiers matched reconnect all output cabling and test system.
If possible before connecting the system cabling, load the amplifier group to prove the maximum
power output is available.
Note: A small drop in the actual power output compared with the calculated output is
expected due to losses to the paralleling process.
Page 22 of 35
21031 CPA240 manual V1.31.doc
CPA240 Configurable Power Amplifier
5.5
Connecting Line outputs
If CPA240s are used in conjunction with the ACA100 (D805) Adaptor, line level outputs from the
Alpha are not easily wired.
To overcome this, a 40W IDC Termination Panel (Farnell 343-1915) can be used after the last
amplifier to “break-out” line level outputs. The Termination Panel can be mounted on an ODP
panel and field terminals wired direct.
D805
125.585.979
Alpha
Alpha
Requirement
ACA100
CPA240
Screw terminals
40W IDC Interface
Module
Farnell 343-1915
Line level Outputs
Line level
Outputs x 16
5.6
Amplifier Low Power Idle & Wakeup
In some circumstances the ‘low power’ mode can affect low level background music
reproduction.
To permanently ‘wakeup’ the amplifier fit the ‘Always Wakeup’ link.
Warning: Permanently ‘waking up’ the amplifier will drain battery supplies extremely
quickly.
This option must NOT be used on Voice Alarm Systems unless addressed in the system
design.
Page 23 of 35
21031 CPA240 manual V1.31.doc
CPA240 Configurable Power Amplifier
Where an amplifier is used for PA only (not monitored) the amplifier channel fault
indications need to be disabled. If this is not carried out the amplifier will display a fault
on the front panel.
This modification reduces system monitoring and therefore must not be used on life
safety systems. This modification is ONLY for amplifiers using D800 Issue B.
Page 24 of 35
21031 CPA240 manual V1.31.doc
CPA240 Configurable Power Amplifier
6 Mains Voltage Selection
The CPA240 amplifier is provided with a mains voltage selector.
This selector allows the amplifier to produce optimum power output without the risk of over
temperature shutdown due to excessive heat dissipation.
Note: It is critical that the mains voltage selector is adjusted to the correct setting.
220
230
240
Main Voltage
Selector V.a.c
Front of Amplifier
Access hole in
side of chassis
6.1
•
•
•
Setting Mains Voltage Selector
Using a DVM measure the incoming mains voltage to the amplifier (or equipment rack)
Set the amplifier voltage selector to nearest resulting position see table
Repeat setting for all other amplifiers in the equipment rack
Voltage
measured
Voltage selector setting
208 - 229
230 – 239
240 – 253
220
230
240
If the voltage selector is incorrectly set the amplifier may shutdown due to excessive
heat dissipation or even be permanently damaged. Therefore it is crucial that the selector
is set correctly.
Page 25 of 35
21031 CPA240 manual V1.31.doc
CPA240 Configurable Power Amplifier
7 Fault Monitoring Features
Audix offers the opportunity to monitor the critical audio path of public address and voice alarm
systems.
This monitoring is carried out using the Fault Monitoring System or ‘FMS’.
The FMS system offers a wide range of monitoring options:
•
•
•
•
•
Audio path.
Serial data link.
Control contacts.
Amplifier.
Mains and battery supplies
Voice alarm systems that comply with BS5839 Part 8 1998 require all of the above to be
monitored on critical paths and components. Critical paths are those paths through the voice
alarm system that rely on equipment and the connections between them to achieve a voice
alarm broadcast.
As the CPA240 amplifier forms a major part of this path it is therefore a critical component and
must be monitored.
Note: If a voice alarm system is to comply with BS5839 Part 8 1998 and any other
standard it must be specifically designed to achieve that end.
7.1
Supply Monitoring
The amplifier provides fault monitoring of the primary and secondary power supplies.
•
•
Mains
Backup supply (24V DC Battery)
Indication of supply failure is in the form of the following front panel LEDs
•
•
•
Mains supply failure
Battery supply low voltage/failure
Charger failure (fault signal from external charger)
Detection of these faults are repeated to the FMS unit.
Indication that ‘power’ is present from either of the supplies is in the form of a green ‘power on’
LED.
7.2
Amplifier Monitoring
Further to the supply monitoring the CPA240 provides the following fault monitoring:
•
•
Each power stage
Over temperature
The power stage monitoring detects the failure of critical power devices by measuring current
flow.
Should this ‘current flow’ be interrupted for more than 100 seconds a channel ‘fail’ will be
displayed on the front panel.
The over temperature indicator denotes that the amplifier has been shut down due to excessive
heat in the power block heatsink.
Page 26 of 35
21031 CPA240 manual V1.31.doc
CPA240 Configurable Power Amplifier
Although the amplifier will recover once the amplifier has cooled the over temperature indication
will remain to inform service personal of its occurrence.
These fault indications are also repeated at the FMS master panel and may be reset by
activation of the FMS fault reset.
Page 27 of 35
21031 CPA240 manual V1.31.doc
CPA240 Configurable Power Amplifier
8 Rack Mounting the CPA240
The amplifier is specifically design to be mounted into 19” equipment racks.
Four fixing points are provided to retain the amplifiers horizontal position.
However the CPA240’s weight must be supported by some means other than the aluminium
front panel. This can be achieved by fixed rails such as the Audix rack runner product
570.507.006 or a sturdy shelf.
The support system must not cover the amplifiers ventilation slots and be capable of carrying at
least three times the amplifiers weight i.e. 45kg.
With the amplifier in place it should be secured to the equipment rack using four M6 fixing screw
or similar.
Please also refer to the ‘Safety Considerations’ section.
9
Warranty
9.1
Performance
Any performance figures given by the Company are based upon Company experience. The
Company will accept no liability if those figures are not obtained unless specifically guaranteed,
subject to the tolerance and rejection limits applicable to such figures.
9.2
Delays in Delivery
If delivery is delayed at Customer request the Company reserves the right to increase its price
to cover the extra cost of storage, insurance and interest. Interest will be at the rate of 3%
above Bank of England base rate per month calculated on a day to day basis for the value of
the goods held.
9.3
Storage
Where equipment is stored on site prior to installation, it is the Purchasers’ responsibility to
ensure the safety and good condition of the equipment. Any damage to equipment on Site shall
not prejudice payment by the due date.
9.4
Damage or Loss in Transit (UK)
When the price quoted includes delivery or where this is specifically charged, the Company will
repair or replace free of charge goods damaged in transit provided that the Company and the
carriers receive written notification within 3 days of delivery. The Company must be informed in
writing within 14 days of your receipt of our advice of dispatch if any goods are not delivered.
9.5
Damage or Loss in Transit (Export)
The Company will not be responsible for any loss or damage to goods which occur beyond the
point of shipment in the case of F.O.B., F.A.S. and C & F contracts, or beyond the point of
delivery stated in the quotation in C.I.F. contracts.
Page 28 of 35
21031 CPA240 manual V1.31.doc
CPA240 Configurable Power Amplifier
9.6
Liability for Defects
Liability in respect of any defect in or failure of the goods or equipment supplied or for any loss
damage or injury attributed thereto is limited to replacement or repair of defective design
materials or workmanship, within a period of 12 months of despatch or commissioning. Provided
that the commissioning takes place within 6 months after dispatch and PROVIDED THAT such
defected parts are promptly returned carriage paid by the Customer to the Company unless
otherwise arranged. The right to make a charge for labour, handling expenses and return
carriage on the repaired or replacement parts is reserved.
The Company shall be under no liability in contract, tort or otherwise for any personal injury,
loss or damage or whatsoever kind of howsoever caused or for anything done or omitted in
connection with the goods or equipment or any work in connection therewith.
9.7
Environment
The Company cannot be held responsible for any defects arising from humidity and excessive
temperatures.
The products are designed for use at normal room temperatures, typically in the range 15°c to
21°c.
9.8
Title of Goods
All items remain property of the Company until payment for the goods is made in full. The
Company reserves the right to repossess and paid. Title of goods may not be transferred until
all monies owing are paid, full details of our retention of title clause are displayed in our sales
office.
9.9
Laws
These conditions shall be governed and construed in accordance with English Law and shall be
subject to the exclusive justification of English courts
Page 29 of 35
21031 CPA240 manual V1.31.doc
CPA240 Configurable Power Amplifier
10 Safety Considerations
10.1 Safety Considerations for System Design and Installation.
10.1.1 Security
To comply with electrical safety regulations CPA240 amplifier must be enclosed in a form of
equipment rack or housing that is secure from access by all but trained and qualified personal.
Access should be controlled by means of a key or special tools.
10.1.2 Electrical
The electrical installation of which the CPA240 unit is part must incorporate an all-pole mains
isolating switch, with contact separation of at least 3mm.
System design must provide adequate protection and insulation of both the mains and amplifier
output lines, which may exceed 100V.
The one metre IEC mains power cord supplied with the amplifier must be protected by 10A
fusing.
Where other types of mains leads are necessary they must be BASEC or HAR approved with
connectors complying with EN60320.
The lead should also have conductor area at least 0.75 mm and be rated at 10A.
Careful consideration should be directed towards both the mains supply and distribution system
loading, the capacity of which must not be exceeded.
The Audix standby battery supply units (Models SBS241, SBS242, or SBS481) all include a
separate fuse on each 24V dc output. The fuse rating on the feed to the CPA240 should be 25A
fast acting (F 25A)
Where 24V DC standby supply other than Audix range listed are used, The DC feed to the
CPA240 should be fused at source with a supply fuse rating of 25A fast acting (F 25A H).
10.1.3 Environmental
During the normal operation of the CPA240 the amplifier can dissipate up to 270W.
The design of the enclosure must ensure that adequate ventilation provide so that the internal
ambient temperature does not exceed 40ºC. Temperatures above this may cause the amplifiers
shut down impeding audio output.
A minimum of a 1U space should be allowed above and below each amplifier for cooling.
Where standby batteries are fitted, further consideration to the equipment rack internal ambient
conditions should be taken. Battery life is significantly reduced when they are subjected to
temperatures above 25ºC.
The CPA240 amplifier should not be exposed to dripping or splashing
10.1.4 Installation
Installation of the CPA240 amplifier should be carry out in safe, clean and dry conditions
The equipment rack and supporting floor must be stable and able to deal with the significant
weight exerted by the public address and voice alarm equipment.
The CPA240 must be supported by some means other than the aluminium front panel, this is
achieved by fixed rails such as the Audix rack runner product 570.507.006 or a sturdy shelf.
Page 30 of 35
21031 CPA240 manual V1.31.doc
CPA240 Configurable Power Amplifier
The support system must not cover the amplifiers ventilation slots and be capable of carrying at
lest three times the amplifiers weight i.e. 45kg.
With the amplifier in place it should be secured to the equipment rack via the front panel
mounting holes using four M6 fixing or similar screws.
Page 31 of 35
21031 CPA240 manual V1.31.doc
CPA240 Configurable Power Amplifier
10.2 Safety Considerations for System Maintenance
Only a qualified and trained electronics engineer should be permitted to make any type
of adjustment or repair to the Public Address or Voice Alarm System.
The following safety factors should be considered before attempting to maintain or repair the
CPA240.
•
•
•
Electrical
Heat
Weight
During the maintenance process all protective covers must be inspected for damage and
correct fitment.
10.2.1 Safety and Electrical Rating Information
Information regarding fuse ratings and voltage requirements is provided on the top cover of the
amplifier.
The location of high voltage terminals is indicated via British Standard high voltage flash marks
on the amplifier chassis.
10.2.2 Electrical Hazards
High Voltages exist within this apparatus:
•
•
230V mains
100V signals
The CPA240 primary supply is 230v AC 50-60Hz. This is connected by means of an IEC fused
inlet.
This equipment does not include a mains isolation switch therefore the:
Mains (and battery supply where fitted) must be disconnected from the apparatus before
any part of the casing is removed.
Mains and other high voltages can be exposed if internal covers are removed.
100V signals are present both inside the amplifier and at the 100V line output connector.
Adequate precautions must be exercised when working on or around the amplifiers,
associated output cabling and terminals.
Battery Backup:
Where the CPA240 has a secondary supply i.e. 24Volt battery backup:
The battery supply must be also be disconnected before any part of the casing is
removed.
10.2.3 Heat Hazards.
During normal operation there is a potential temperature hazard in the centre section (heatsink)
of the amplifier frame. The CPA240 power amplifier heat sinks can become Very Hot.
This heat can also be conducted through the chassis and other parts.
Heat build-up generally occurs when alarms and other high level signals have been broadcast
for a long period of time. Heat build-up may also occur if the amplifier is faulty.
Warning: The amplifier heatsink can reach temperatures of up to 80°C
10.2.4 Weight Hazards.
Page 32 of 35
21031 CPA240 manual V1.31.doc
CPA240 Configurable Power Amplifier
If the CPA240 is to be moved the appropriate lifting code of practice should be followed.
Approximate frame weight in kilograms: 15Kg
Warning: The amplifier frame is heavy!
11 Maintenance
Although the CPA240 requires little or no maintenance the Public Address or Voice Alarm
system to which it is installed may require regular scheduled maintenance.
For BS5839 compliant Voice Alarm systems please refer to BS5839 Part 1 (Code of practice for
system design, installation and servicing) for recommend maintenance levels.
It is recommended that all members of staff should be urged to report problems with the Public
Address or Voice Alarm system (i.e. distortion, speakers not operating, poor coverage) to the
department responsible for the maintenance of such equipment.
12 Component Reference Numbers.
Assembly part No. PCB No. Description
125.585.974
125.585.975
125.585.976
125.585.978
D800
D801
D802
D804
125.500.836
125.500.837
N/A
N/A
Control PCB Assy
Output / Heatsink PCB Assy
Power Supply PCB Assy
Connector PCB Assy
Output / Heatsink Power Block Assy
Power Supply Assy
Page 33 of 35
21031 CPA240 manual V1.31.doc
CPA240 Configurable Power Amplifier
13 Rear panel pin-outs
13.1 Audio Input Bus
Connector – 2 x 40 way IDC header (PCB mounted D804: PL5, PL6)
Note: Signal pairs appear to be in a ‘non-standard’ configuration. This is due to the Alpha Matrix
Controller connector type and orientation.
Function
ITP_Wake-up
/Alpha Wake Up
Input Bus Channel 1
Input Bus Channel 2
Input Bus Channel 3
Input Bus Channel 4
Input Bus Channel 5
Input Bus Channel 6
Input Bus Channel 7
Input Bus Channel 8
Input Bus Channel 9
Input Bus Channel 10
Input Bus Channel 11
Input Bus Channel 12
Input Bus Channel 13
Input Bus Channel 14
Input Bus Channel 15
Input Bus Channel 16
Signal
1
2
33
31
29
27
25
23
21
19
17
15
13
11
9
7
5
3
Return
34
32
30
28
26
24
22
20
18
16
14
12
10
8
6
4
Screen
-
Signal
Return
1
3
5
7
9
10
2
4
6
8
-
13.2 Audio Outputs
Connector - 10 way in-line socket (PCB mounted D804: PL9).
Function
Amplifier Channel 1 Output
Amplifier Channel 2 Output
Amplifier Channel 3 Output
Amplifier Channel 4 Output
Future connection
Chassis Earth.
Signal
name
FMS_OVR
CHS
Page 34 of 35
21031 CPA240 manual V1.31.doc
CPA240 Configurable Power Amplifier
13.3 FMS Bus
Connector – 2 x 16 way IDC header (PCB mounted D804: PL1, PL2)
Function
Cable monitoring daisy chain
Cable monitoring daisy chain
Cable monitoring daisy chain
Cable monitoring daisy chain
Reserved for future development
Reserved for future development
spare
Watchdog fault bus.
Memory/Misc. fault bus.
Amplifier fault bus.
Power Input (Mains) fault bus.
Surveillance (Speaker Line) fault bus.
Battery fault bus.
Accept / Test mode control bus.
Watchdog |Pulse (New Watchdog) bus.
New Fault bus.
FMS_COM (IN)
FMS_COM (OUT)
PL1
PL2
(To FMS)
1
2
3
4
5
6
7
8
9
10
11
12
13
14
15,16
-
1
2
3
4
5
6
7
8
9
10
11
12
13
14
15,16
NC(IN)
NO(IN)
NC(OUT)
NO(OUT)
FM+
FMspare
/WF
/MF
/AF
/PF
/SF
/BF
/AC
/WP
/NF
FMS_COM(in)
FMS_COM(out)
Return
21
22
24
25
27
28
30
31
Screen
1
20
4
23
7
26
10
29
13
36,37
19
(from FMS bus
terminator)
Signal
13.4 Auxiliary Port (Channel Inserts)
Connector - 37 way ‘D’ skt (PCB Mounted D804: PL4)
Function
Common (overall screen)
Channel 1 Send
Channel 1 Return
Channel 2 Send
Channel 2 Return
Channel 3 Send
Channel 3 Return
Channel 4 Send
Channel 4 Return
/ALPHA_WAKEUP
/AMP_FAIL_1
/AMP_FAIL_2
/AMP_FAIL_3
/AMP_FAIL_4
ITP_WAKEUP
n.c.
Amplifier Link (for paralleled group)
Signal
2
3
5
6
8
9
11
12
32
14
33
15
34
16
35
17,18
Page 35 of 35
21031 CPA240 manual V1.31.doc
CPA240 Configurable Power Amplifier
13.5 Back-up Supply Connector Schematic
A 24V DC backup supply can be connected to the amplifier frame to provide supply
redundancy.
The amplifier is supplied with a mating ‘free’ connector that should be wired as shown below.
The connector will accept cable cross-sections up to 4mm².
The +ve and 0V supply cables should be designed to take a minimum of 20A continuously.
The supply monitor terminal provides a means for the amplifier to detect the failure of the
backup supply charger. Where fitted the supply monitor cable may be equivalent to 16/0.2.
Note: The backup supply must be fused to 25A
Page 36 of 35
21031 CPA240 manual V1.31.doc
CPA240 Configurable Power Amplifier
Page 37 of 35
21031 CPA240 manual V1.31.doc
CPA240 Configurable Power Amplifier
14 Electrical Schematic
The following diagram shows internal connections with safety critical components and
assemblies marked.
!
!
!
!
!
Page 38 of 35
21031 CPA240 manual V1.31.doc
CPA240 Configurable Power Amplifier
15 Detailed Block Diagram
D804 Assy
OverTemp
Fault
W arning
D800 Assy
/AlphaWakeUP
ITP-WakeUp
OTNF
OTAF
-
Heatsink
Temp.
sensor
Heatsink
OverTemp
D801 Assy
D800 Assy
D804 Assy
Audio Link IO
Internal Patch-Field
for Input Configuration
(Balanced Audio)
Bus i/p 1.
Ch.1 Volume
Link
Driver
Master
Diff' Amp
I/P Stage
Chain 1
Link
Normal
Bus i/p 2.
Insert
Return
Input
Ch.1
Insert
Send
Output
Send 1
Bus i/p 3.
VCA
Ch.1 Wakeup
Ch.1
Signal
Detect and
wakeup
control
-
Bus i/p 8.
Insert
Return
Input
Bus i/p 7.
Idle current
detector
/AC
+
Ch.3 I/P
Ch.3 Volume
Insert
Return
Input
Ch.3
Insert
Send
Output
Bus i/p 12.
-
/AC
Slave
Master Ch.4
Bus i/p 14.
`
+
Ch.4 Volume
Power
Stage
+
Insert
Return
Input
Send 1
-
Ch4 Sig_Present
Ch.3
Amp Fail
Timer and
Latch
Ch.3 Slave OP Switch
Line Monitoring
Connection Points
-
Ch3 O/p
Overload
-
Ch3 Amp
Fault
Idle current
detector
/AC
Page 39 of 35
21031 CPA240 manual V1.31.doc
Ch.4
Amp Fail
Timer and
Latch
Ch.3
LS 100V
Line O/P
Ch.4 Slave OP Switch
AF3
ANF3
Ch.4
Monitor
Jack
Overload
detector
Bias Control
Ch.2
Signal
Detect and
wakeup
control
-
Ch.2
LS 100V
Line O/P
AF2
ANF2
Line Monitoring
Connection Points
Output
Transformer
Soft Start
Chain 1
Ch2 O/p
Overload
Ch2 Amp
Fault
Ch.4 Feedback
VCA
Ch.4 I/P
Bus i/p 16.
Idle current
detector
Ch3 Sig_Present
Bus i/p 13.
Ch.2
Amp Fail
Timer and
Latch
-
Overload
detector
Bias Control
Send 3
Line Monitoring
Connection Points
Output
Transformer
Soft Start
Ch.3
Signal
Detect and
wakeup
control
Ch.2 Slave OP Switch
Ch.3
Monitor
Jack
Power
Stage
+
Ch1 Amp
Fault
Ch.3 Feedback
VCA
Chain 3
Bus i/p 11.
Overload
detector
Ch2 Sig_Present
Slave
Master Ch.3
Bus i/p 9.
Bus i/p 10.
-
AF1
ANF1
Output
Transformer
Bias Control
Ch.2
Signal
Detect and
wakeup
control
Send 2
Ch1 O/p
Overload
Ch.2
Monitor
Jack
Power
Stage
Soft Start
Chain 2
Ch.1
Amp Fail
Timer and
Latch
-
Ch.2 Feedback
Ch.2 Drive
+
Ch.2 Volume
Ch.2
Insert
Send
Output
Bus i/p 6.
Idle current
detector
/AC
VCA
+
Overload
detector
Bias Control
ChX Sig_Present
Ch.1
LS 100V
Line O/P
Line Monitoring
Connection Points
Output
Transformer
Soft Start
Slave
Master Ch.2
Ch.2 I/P
Power
Stage
Ch.1 Drive
Bus i/p 4.
Bus i/p 5.
Ch.1
Monitor
Jack
Ch.1 Feedback
+
+
Ch.1 I/P
Ch.4
Insert
Send
Output
Alpha Outputs
(16 ccts.)
Bus In - Out
-
Ch4 O/p
Overload
-
Ch4 Amp
Fault
AF4
ANF4
Ch.4
LS 100V
Line O/P
CPA240 Configurable Power Amplifier
APPENDIX A
Amplifier Fail Disable (PA Only)
Where an amplifier is used for PA only (not monitored) the amplifier channel fault indications
need to be disabled. If this is not carried out the amplifier will display a fault on the front panel.
This modification reduces system monitoring and therefore must not be used on life safety
systems. This modification is ONLY for amplifiers using D800 Issue B.
Mains
Battery
Test
only
Charger
J5
Monitor Enable
To disable the amplifier channel fault indications a link wire can be connected between J4 pin 1 and J5
pin 2 on the D800 amplifier control PCB. This modification disables the channel fault timeout and
therefore the channel fault indicators.
D800 Control Card
FIT WIRE LINK
(to disable amp fail)
CH4 + 10dB
J4
Always Wakeup
Channel 4
Page 40 of 35
21031 CPA240 manual V1.31.doc