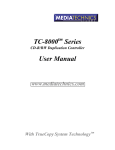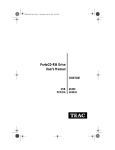
1
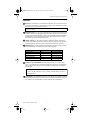
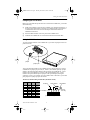
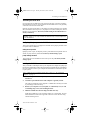
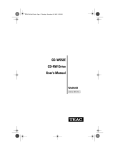
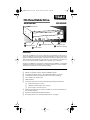
CD-W512Sshort.fm Page 1 Thursday, December 14, 2000 10:30 AM
Introduction
®
CD-Rewritable Drive
12x10x32
SCSI Interface
CD-W512S
eject button
disc tray
headphone jack
LED status indicators
volume control
emergency eject
mechanism opening
Introduction
The TEAC CD-RW drive can write to CD-R discs at a maximum of 12X speed, rewrite to CD-RW discs at 10X speed, and read CD-ROM discs at 32X speed. (It is also
capable of operating at slower speeds, if preferred.) CD-R discs enable you to create
audio or data discs for permanent archival storage. They cannot be overwritten. You
can overwrite CD-Rewritable (CD-RW) discs, typically up to 1,000 times.
The TEAC CD-RW drive is a SCSI device designed for use in IBM PC or compatible
computers that feature a SCSI adapter card. The drive features a 5.25-inch standard
chassis and a powered tray for convenient disc loading.
Recommended System Requirements
❑ IBM PC-compatible computer, Pentium 300MHz or higher
❑ PCI SCSI host adapter card (see “Recommended Adapters” on page 8)
❑ CD-ROM drive with DAE support for disc-to-disc audio recording
❑ One available 5.25 inch drive bay
❑ 64MB of RAM
❑ A hard drive that meets or exceeds the following minimum specifications:
❑ 1GB hard disk space (or more)
❑ 1.2MB/second data transfer rate (or faster)
❑ 12ms average access time (or less)
❑ Sufficient hard disk space for software installation (see the documentation for
❑
❑
the recording software)
Windows 95/98/Me/2000-Professional and NT
Recording software (see “Recommended Software” on page 8)
TEAC CD-RW Installation Guide
1
CD-W512Sshort.fm Page 2 Thursday, December 14, 2000 10:30 AM
Recommended System Requirements
Front Panel
disc tray: Use the disc tray to load CDs into the drive. You can open the tray by
pressing the eject button or by using the emergency eject mechanism. You can
close the tray by pressing the eject button.
Note: Press the eject button to eject or retract the tray. Please do not push the
tray in to close it.
headphone jack: You can connect headphones or external speakers to this jack
to listen to an audio CD being played on your TEAC drive. Use a 3.5 mm stereo
mini-plug. For external speakers, connect a stereo adapter to split the output into
separate cables for the left and right channels. Such adapters convert a male
stereo mini-jack to two female phono jacks.
volume control: Use the volume control to adjust the volume. Turning the
control to the right increases the volume. (Lower the volume before you start a
CD-ROM audio program to protect your hearing and the audio speakers.)
LED indicators: The drive features two LED indicator lights on the front panel.
Various operations are indicated as per the following table:
Operation
At tray loading
At tray eject
During write/erase
During audio play
During seek/data transfer
Left LED
off
off
green LED flashes
off
off
Right LED
green LED flashes
green LED flashes
off
green LED flashes
green LED lights
emergency eject mechanism: If the eject button fails, you can turn off the
power to the CD-RW drive and insert a small, thin rod (such as a straightened
paper clip) into the emergency eject mechanism opening and press firmly to
eject the disc.
Caution: Do not attempt to use the emergency eject mechanism when either
the Power or Busy indicator is lit or you may seriously damage the disc or
the CD-RW Drive.
eject button: Press this button to open or close the disc tray. (Some CD-ROM
titles disable the manual eject button and rely on software commands to eject the
disc. Refer to the documentation for these titles for more information.)
TEAC CD-RW Installation Guide
2
CD-W512Sshort.fm Page 3 Thursday, December 14, 2000 10:30 AM
Rear Panel
Rear Panel
INTERFACE CONNECTOR
SCSI
analog audio
connector
jumper pin
configuration block
interface
connector
▼
power
connector
frame
ground
analog audio output connector: You can use an audio cable to connect this
connector to the audio input connector on a sound card. Pin assignments are
described below:
Pin Number
1
2
3
4
Audio Signal
Left signal
Ground
Ground
Right signal
jumper pin configuration jumper: The CD-RW drive includes seven pairs of
jumper pins on the rear panel that allow you to set the SCSI ID number,
termination, and parity.
interface connector: Use a standard 50-pin SCSI interface cable to connect the
CD-RW drive to a SCSI interface adapter card installed in your computer.
power connector: Connect the power connector to the +5VDC and +12VDC
power sources. The +5VDC terminal is on the left as you face the rear panel; the
+12VDC terminal is on the right. The two center terminals are ground terminals.
FG: Frame ground. This is a ground connection for the CD-RW Drive.
TEAC CD-RW Installation Guide
3
CD-W512Sshort.fm Page 4 Thursday, December 14, 2000 10:30 AM
Setting the SCSI ID Number
Configuring the CD-RW Drive
Before you can install and operate the TEAC CD-W512S CD-RW drive, you need to
do the following:
❑
❑
Install a SCSI adapter card in the host computer. For optimum performance, a
PCI bus master SCSI adapter card (such as an Adaptec 2940 or equivalent) is
recommended. Please refer to the SCSI adapter card documentation for
installation instructions.
Set the SCSI ID number on the rear panel of the CD-RW drive
❑
Terminate the CD-RW drive if it is located at the end of the SCSI chain.
Setting the SCSI ID Number
To set the SCSI ID number on the CD-RW drive, you must set jumpers on the rear
panel of the unit.
jumper
jumper pins
You set the SCSI ID number for the CD-RW drive by placing jumpers in various
combinations on jumper pin pairs S0, S1, and S2. (“S” indicates a jumper pin pair
number.) The following table indicates the appropriate pin combinations. “Close”
indicates that you should place a jumper on the specified jumper pins. “Open”
indicates that you should not place a jumper on the specified pins (leaving the
connection “open”). For example, to set the CD-Recorder to SCSI ID 5, you would
place jumpers on jumper pin pairs S0 and S2.
The factory default setting is SCSI ID 3 (S0 and S1 closed).
SCSI
ID
0
1
2
3
4
5
6
7
0
1
2
Open
Close
Open
Close
Open
Close
Open
Close
Open
Open
Close
Close
Open
Open
Close
Close
Open
Open
Open
Open
Close
Close
Close
Close
TEAC CD-RW Installation Guide
SCSI ID
Parity Switch
Termination
“S” numbers
jumper pin configuration block
4
Factory
use only.
CD-W512Sshort.fm Page 5 Thursday, December 14, 2000 10:30 AM
Terminating the CD-RW Drive
Terminating the CD-RW Drive
If you position the CD-RW drive at the end of a SCSI chain, you must “terminate”
the CD-RW drive; however, do not terminate the CD-RW drive if it is not physically
connected at the end of the SCSI chain.
If jumper pin S4 is closed (that is, if the jumper is seated on both pins), the CD-RW
drive is terminated. If S4 is open (i.e., the jumper is not seated on both pins), the CDRW drive is not terminated. The factory default setting for the CD-RW drive is
closed (terminated).
Warning: Failure to correctly terminate the SCSI bus may result in malfunction
to the CD-RW drive.
Configuring Other Jumpers on the CD-RW Drive
This section explains how to configure the remainder of the jumper pin block on the
rear panel of the CD-RW drive.
Setting the Parity Switch
If jumper pin S3 is open, an odd parity check is performed for the input data. If S3 is
closed, no parity check is performed. The factory default setting is open.
Jumper Settings S5 and S6
These jumper pins are intended for TEAC factory use only. The factory default
setting is open.
Installing the CD-RW Drive
After you install a SCSI adapter card in your computer and configure the jumper pin
block on the CD-RW drive, follow the steps below to install the TEAC CD-RW drive
into your computer. Refer to your computer documentation for information specific
to your system.
Note: A SCSI card is not included with the drive. Please see “Recommended
Adapters” on page 8.
1.
2.
Turn off the power to the computer system and any external devices connected to it.
Touch the exposed metal frame of the computer to ground yourself.
This will prevent damage to the computer or CD-RW drive that may be caused
by a discharge of static electricity.
3.
Remove your computer’s cover, faceplate, or 5.25-inch bay cover, as well
as mounting clips, screws, and retaining brackets.
4.
Slide the CD-RW drive into the empty 5.25-inch drive bay.
Install the CD-RW drive in an orientation within ±10˚ of horizontal. The eject
button should be located on the right side of the unit. Secure the drive using
3x5mm mounting screws.
TEAC CD-RW Installation Guide
5
CD-W512Sshort.fm Page 6 Thursday, December 14, 2000 10:30 AM
Installing the CD-RW Drive
Warning: Do not use mounting screws longer than 3x5mm to secure the
CD-RW drive or you may damage the unit.
secure drive with 3x5mm screws
5.
Connect the CD-RW drive to the SCSI host adapter card using a 50-pin
interface ribbon cable.
Be certain to connect pin 1 on the CD-RW drive to pin 1 on the SCSI adapter
card. (Pin 1 on the interface cable is usually designated by a color stripe along
one edge of the cable. Also, the interface ribbon cable connector may feature a
tab on one side. Insert the cable so that the tab aligns with the notch in the
interface connector.)
Connect the opposite end of the interface ribbon cable to the interface connector
on the rear panel of the CD-RW drive.
6.
If desired, connect an audio cable to the analog audio connector on the
rear panel of the CD-RW drive and connect the opposite end to your sound
card.
Connect audio connector pin 1 on the CD-RW drive to pin 1 on the sound card.
audio cable
notch
power cable
pin 1
50-pin interface
ribbon cable
TEAC CD-RW Installation Guide
tab
6
CD-W512Sshort.fm Page 7 Thursday, December 14, 2000 10:30 AM
Installing the CD-RW Drive
7.
Connect the power cable to the power connector on the rear panel of the
CD-RW drive.
Insert the power cable plug in the correct orientation into the power connector.
The plug is shaped so that it can be easily inserted in only one orientation; do
not force the plug into the connector.
The +5v terminal is on the left as you face the rear of the panel; the +12v
terminal is on the right. The two center terminals are ground terminals.
8.
9.
Re-install your computer’s cover, faceplate, or bay cover.
Start your system.
Notes:
❑
❑
❑
The TEAC CD-RW drive is a true Plug-N-Play device; therefore, it will
be detected automatically by Windows 95/98/Me/2000-Professional.
There is no need to install any drivers.
Windows NT 4.0 does not support the Plug-N-Play feature. Therefore,
confirm that the proper drivers are installed for your SCSI adapter card.
If not, open the Control Panel, double click “SCSI Adapters,” click the
“Drivers” tab, then click the “Add” button. At the “Select a SCSI
Adapter Option” window, select the drivers for your SCSI adapter card.
Click “Install” and follow the instructions on screen.
The drive is recognized by the operating system as a typical CD-ROM
drive. Once you confirm that you can read (play) data discs from the CDRW drive, install your pre-mastering or recording software to enable
recording to CD-R and CD-RW discs. Refer to “Recommended Software” on page 8.
TEAC CD-RW Installation Guide
7
CD-W512Sshort.fm Page 8 Thursday, December 14, 2000 10:30 AM
Recommended Adapters
Recommended Adapters
You must install a SCSI adapter card in the host computer to utilize the CD-RW
drive. For optimum performance, TEAC recommends a PCI bus master SCSI adapter
card (such as an Adaptec AHA2940 or equivalent). Please refer to the SCSI adapter
card documentation for installation instructions.
Recommended Software
Before you can record data onto CD-R or CD-RW discs using your TEAC CD-RW
drive, you must first install pre-mastering or packet-writing software onto your
computer’s hard disk. TEAC recommends the following applications for Windows
95/98/Me/2000-Professional and NT:
❑
❑
Adaptec Easy CD Creator, Version 4.02e or higher: A full-featured
premastering software application that enables you to create audio CDs and data
CDs.
Adaptec DirectCD, Version 3.01e or higher: A “drag & drop” software
application that allows you to read and write to your CD-RW as if it were a
standard floppy or removable hard drive. It also provides the tools necessary to
format the media.
Note: The above mentioned software packages are part of the Easy CD Creator
Deluxe Software Suite from Adaptec, Inc. Please ensure the appropriate version is
purchased.
For more information, refer to the documentation that accompanies the software.
Recommended Media
Use only 74 or 80-minute blank CD-R and CD-RW media from TEAC or the
following manufacturers.
For optimal performance, make sure the CD-R media is rated for 12X speed
recording. CD-RW media should be “high-speed” rated (usually 4X – 10X speed).
Disc Type
Manufacturer
Disc Type
Manufacturer
CD-R
Taiyo Yuden
Mitsui Toatsu Chemical
Mitsubishi (Verbatim)
Ricoh
TDK Electronics
Kodak
Fuji Film
Hitachi (Maxell)
Pioneer
CD-R
Sony
Maxell
PVC
Mitsubishi (Verbatim)
Ricoh
CD-RW
Note: TEAC media may be purchased online at www.shopteac.com.
TEAC CD-RW Installation Guide
8
CD-W512Sshort.fm Page 9 Thursday, December 14, 2000 10:30 AM
Specifications
Specifications
Model
CD-W512S
Interface
SCSI-2 (8 bit data bus)
Transfer Rate
Write: 12X (1.8MBps)
Rewrite: 10X (1.5MBps)
Read: 32X maximum (4.8MBps)
Digital Audio Extraction 14X ~ 20X max.
Rate
Access Time
85 msec (1/3 Stroke)
Buffer Size
4MB
Write Methods
Track At Once; Disk At Once; Multi-Session; Incremental
Write Verification
Running Optimum Power Control to dynamically adjust
laser write power
Logical Recording
Format
IS09660, UDF & CDR-FS Packet Write
CD Formats Supported CD-DA; CD-ROM Mode-1, CD-ROM XA Mode-2 (Form-1
and 2); Multi-session PhotoCD; CD-ROM XA; CD-R; CDRW; CD-I; Video CD; CD Extra/CD Plus, CD Text.
Disc Loading
Power Tray (caddy not required)
Front Panel
Built-in Headphone Jack, Dual Status LEDs, Volume Control Knob, and Power Eject Button
MTBF
100,000 POH
Dimensions
5.75”(W) x 1.63”(H) x 7.56”(D)
Weight
2.65 lbs.
Power Supplies
+5VDC, +12VDC
Analog Audio
Headphone
Line-Out
0.65 ± 0.3Vrms at 32Ω
0.78 ± 0.3Vrms at 47KΩ
Headphone Jack
3.5mm diameter stereo mini-headphone jack
Installation
Horizontal, plus or minus 10°
Operating Temperature 5° C to 40° C (41° F to 104° F)
Storage Temperature
-30° C to 60° C (-22° F to 140° F)
Operating Humidity
20% to 80% (non-condensing)
Storage Humidity
10% to 80% (non-condensing)
Safety Standards
UL, CSA, TUV
TEAC CD-RW Installation Guide
9
CD-W512Sshort.fm Page 10 Thursday, December 14, 2000 10:30 AM
Specifications
Technical Support
TEAC America, Inc. (USA)
Technical Support
Telephone: (323) 727-4860 • Fax: (323) 869-8751
Monday - Friday 8:00 a.m. - 5:00 pm
http://www.teac.com/dsp/new-dsp.html
E-mail: [email protected]
TEAC CD-RW Installation Guide
10