1
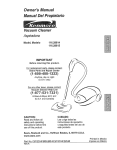
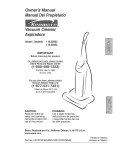
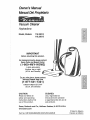
Owner's Manual
Manual Del Propietario
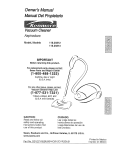
Vacuum Cleaner
Aspiradora
/
Model,
Modeio
116.28014
116.28015
IMPORTANT
Before returning this productFor replacement parts, please contact:
Sears Parts and Repair Center
(1-800-4MY-HOME)
(1-800-469-4663)
Anytime, day or night
(U.S.A, and Canada)
For any_other issue, please contact:
Vacuum Cleaner Help Line
(1-877-531-7321)
8:00am-5:00pm EST, M-F
(U.S.A. and Canada)
CAUTION:
Read and follow all
safety and operating
instructions before first
use of this product.
CUIDADO:
Lea y siga todas las
instrucciones de operaci6n
y seguridad antes del uso de
este producto.
Sears, Roebuck and Co., Hoffman Estates, IL 60179 U.S.A.
www.sears.com
Part No. CO1ZDDU_U_O-KCO1ZDDUZOUO
Printed in Mexico
impreso en M#xico
Before Using Your New
Vacuum Cleaner ......................
Kenmore Vacuum Cleaner Warranty
Important Safety Instructions
.........
Parts and Features ...................
Canister
2
. ° o3
4
5-6
Care
........................
t6
Bag Changing ....................
16
Cleaning Exterior and Attachments .....
16
Motor Safety Filter Changing .........
17
Exhaust Filter Changing ............
17-18
Dirt Sensor
18
.......................
Assembly
Instructions
..................
7-8
Pet PowerMate • Storage ..............
8
Operating Instructions ................
9
How to Start
9-I0
Vacuuming Tips ....................
1t
Suggested Pile Height Settings ........
I2
Attachments ...........................
12
Attachment Use Table .................
I3
PerformanceFeatures ..............
14-I5
How Your Vacuum Cleaner Works .......
15
.....................
Please read this guide, It will help you assemble
cleaner in the safest and most effective way,
PowerMate ®Care
...................
19
Belt Changing and Agitator Cleaning .. 19-20
Agitator Servicing ...................
21
Troubleshooting
Master Protection
Requesting
Or Service
...................
Agreements
Assistance
.................
.......
22-23
24
Back Cover
and operate your new Kenmore vacuum
For more information about vacuum cleaner care and operation, call your nearest Sears store,
You will need the complete model and serial numbers when requesting information. Your vacuum cleaner's model and serial numbers are located on the Model and Serial Number Plate°
Use the space below to record the model number and serial number of your new Kenmore
vacuum cleaner,
Model No.
Serial No.
Date of Purchase
Keep this book and your sales check (receipt) in a safe place for future reference.
One Year Limited Warranty
When assembled, operated and maintained according to all instructions supplied with
the product, if this vacuum cleaner fails due to a defect in material or workmanship within
one year from the date of purchase, return it to any Sears store, Sears Parts & Repair
Center or other Kenmore out!et for free repair.
If this vacuum cleaner is used for other than private family purposes, this warranty
applies for only 90 days from the date of purchase.
This warranty covers only defects in material and workmanship. Sears will NOT
pay for:
1. Expendable items that can wear out from normal use, including but not limited to
filters, belts, light bulbs, and bags.
2. A service technician to instruct the user in correct product assembly, operation or
maintenance.
3. A service technician to clean or maintain this product.
4. Damage to or failure of this product if it is not assembled, operated or maintained
according to all instructions supplied with the producL
5. Damage to or failure of this product resulting from accident, abuse, misuse or use for
other than its intended purpose.
6. Damage to or failure of this product caused by the use of detergents, cleaners,
chemicals or utensils other than those recommended in att instructions supplied with
the product.
7. Damage to or failure of parts or systems resulting from unauthorized modifications
made to this product.
Disclaimer of implied warranties; limitation of remedies
Customer's sole and exclusive remedy under this limited warranty shall be product repair
as provided herein, implied warranties, including warranties of merchantability or fitness
for a particular purpose, are limited to one year or the shortest period allowed by law.
Sears shall not be liable for incidental or consequentia! damages. Some states and
provinces do not allow the exclusion or limitation of incidental or consequential damages,
or limitations on the duration of implied warranties of merchantability or fitness, so these
exclusions or limitations may not apply to you.
This warranty applies only while this vacuum cleaner is used in the United States and
Canada.
This warranty gives you specific legal rights, and you may also have other rights which
vary from state to state.
Sears, Roebuck and Co., Hoffman Estates, IL 60179
Sears Canada Inc.,Toronto, Ontario, Canada M5B 2B8
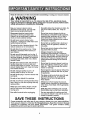
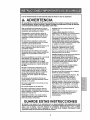
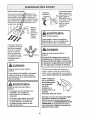
Read all instructions in this manual before assembling or using your vacuum cleaner.
WARNING
Your safety is important to us. To reduce the risk of fire, electrical shock,
injury to persons or damage when using your vacuum cleaner, follow basic
saTety precautions
including the following.
Use your vacuum cleaner only as
described in this manual° Use only with
Sears recommended attachments.
Use extra care when cleaning on stairs. Do
not put on chairs, tables, etc, Keep on
floor_
Disconnect electrical supply before
servicing or cleaning out brush area,
Failure to do so could result in electrical
shock or brush suddenly starting_
Do not use vacuum cleaner to pick up
flammable or combustible liquids (gasoline,
cleaning fluids, perfumes, etc), or use in
areas where they may be present. The
fumes from these substances can create a
fire hazard or explosion.
Do not leave vacuum cleaner when
plugged tno Unplug from outlet when not in
use and before servicing_
To reduce the risk of electrical shock - Do
not use outdoors or on wet surfaces°
Do not allow to be used as a toy. Close
attention is necessary when used by or
near children°
Do not use with damaged cord or plug. If
vacuum cleaner is not working as it should,
has been dropped, damaged, left outdoors,
or dropped into water, return it to a Sears
Service Center.
Do not pull or carry by cord, use cord as a
handle, close door on cord, or pull cord
around sharp edges or corners_ Do not run
vacuum cleaner over cord. Keep cord away
from heated surfaces°
Do not unplug by pulling on cord. To
unplug, grasp the plug, not the cord.
Do not handle plug or vacuum cleaner with
wet hands.
Do not put any objects into openings.
Do not use with any opening blocked; keep
free of dust, lint, hair and anything that may
reduce airflow.
Keep hair, loose clothing, fingers, and all
parts of body away from openings and
moving parts,
Turn off all controls before unplugging°
SAVE THESE
Do not pick up anything that is burning or
smoking, such as cigarettes, matches, or
hot ashes.
Do not use vacuum cleaner without dust
bag and/or filters in place_
Always change the dust bag after
vacuuming carpet cleaners or freshener,
powders and fine dust. These products clog
the bag, reduce airflow and can cause the
bag to burst. Failure to change bag could
cause permanent damage to the vacuum
cleaner.
Do not use the vacuum cleaner to pick up
sharp hard objects, small toys, pins, paper
clips, etc° They may damage the vacuum
cleaner or dust bag_
Do not operate vacuum cleaner without the
exhaust filter or exhaust filter door in place
(If applicable).
The hose contains electrical wires. Do not
use when damaged, cut, or punctured°
Replace if cut or worn. Do not pick up
sharp objects.
Always turn off and unplug the vacuum
cleaner before connecting or disconnecting
either hose, Handi-Mate Jr.® (if applicable),
or nozzle.
Hold plug when rewinding onto cord reel.
Do not allow plug to whip when rewtndtng_
You are responsible for making sure that
your vacuum cleaner is not used by anyone
unable to operate it properly.
INSTRUCTIONS
Proper assembly and safe use of your vacuum cleaner are your responsibilities.
Your vacuum cleaner is intended for Household use. Read this Owner's Manual
carefulJy for important use and safety information.
statements underwarning ana caution symbols.
This guide
contains
safety
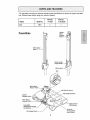
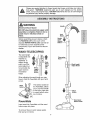
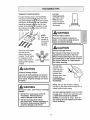
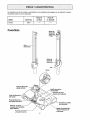
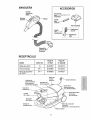
It is important to know your vacuum cleaner's parts and features to ensure its proper and safe
use. Review these before using your vacuum cleaner.
Object
Style No.
Belt
CB-6
Part No.
Part No.
in USA
in Canada
..........
Handle
Quick
Release
Button
PowerMate
i
Telescoping
Wand
Wand Length
Adjust Button
Belt
Wand
Quick
Lift-Off
Floor
Height
Handle
Release Pedal.
Brush
In dica for
Floor Brush
Release Pedal
Edge Cleaner
(Not Shown)
Model/Serial
PowerMate
(On Bottom)
Numb
Pile Height
er
/
Overload
Protector/Belt
Reset Button
Pedal--
5
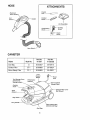
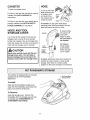
HOSE
ATTACHMENTS
Crevice
Electronic
Touch Control
Handle
rool------_.
Contour
(_ J_._
Brush-----_.
_
Pet PowerMate
I
Combination
_
Brush _
,_
.'_--- Dusting
p___
_
I
_
Brush
Fabric
Brush
L .........
Hose Swivel
CANISTER
Object
Style No,
Dust Bag
Exhaust"Fil'ter
Q
'
'
Motor safety Fi'lter
EFq
CF-i
Part No.
Part No.
in USA
in Canada
20-50557
'20-86889
20-B6883
Cord
Rewind
Button
Tool Storage Cover
(Attachment
Stora
20-50410
'
20-40324
20-4032!
Cord
Performance
Storage
Canister
Cover
-P----Exhaust
Filter Cover
(Not Shown)
Hood
Release
Bag Holde!
Carry Handle
Motor Safety Filter
(Behind Dust Bag)
Dust Bag
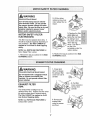
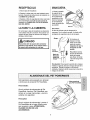
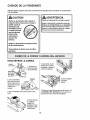
Please pay special attention to these hazard alert boxes, and follow any instructions given. WARNING statements alert you to such dangers as fire, electric
shock, burns and personal injury. CAUTION statements alert you to such dangers
as personal injury and/or property damage.
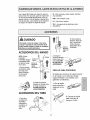
, WARNING
Electrical
Shock Hazard
DO NOT plug into electrical supply until
assembly is complete. Failure to do so
could result in electrical shock or
injury.
Before assembling vacuum cleaner, check
the PACKING LIST on the cover of the
separate REPAIR PARTS LIST. Use this list
to verify that you have received all the
components of your new Kenmore vacuum
cleaner.
Handle__/
Look
\'r
_:L
Button -_._
Handle
_
LJ
Quick
Release ,_
Button
WAND-TELESCOPING
The wand length
is adjustable and
requires no
assembly. To
adjust, simply
push or pull the
wand adjust button and slide the
upper wand to
the desired
I
m
Wand
Length
Adjust
Button
Hand
Above
Th_
Tab
w
m
height,
When adjusting the wand length you may
have to hold the PowerMate with your hand
or foot.
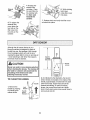
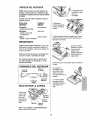
Wand
Swlvel-_
The swivel, located on
the PewerMate, allows
you to turn the handle
to the left or right side
to reach farther under
low furniture.
PowerMate
Insert wand into PowerMate until the wand
button snaps into place.
To remove: Step on wand release pedal,
then pull up on wands.
Telescoping
Wand-----._
-- Wand Length
utton
_i'_' _i_=:_¸
HOSE
CANISTER
1. Open the canister
hood
2. Check to see that the dust bag is properly
installed See BAG CHANGING for
instructions.
1. Line up tl_e hose
latch tab and notch
in canister hood
and insert hose
into canister until it
snaps into place
3. Check to see that the motor safety filter is
properly instalied See MOTOR SAFETY
FILTER CHANGING for instructions.
HOOD AND TOOL
STORAG E COVER
To remove: Do not open hood before
removing hose. With hood closed, lift hose
latch tab upward and pull on hose.
2. Insert handle
into wand until
lock button
Handle
snaps in place.
Be sure hose is
not twisted°
It is normal for the canister hood and tool
storage cover to come off when opened
further than needed. Line up the hinge slots,
insert the hinges into the slots, and close the
hood and tool storage cover to reinstall
CAUTION
Never open canister hood with the tool
storage cover open. This will help to
prevent damage from occurring
to the
canister hood andlor tool storage cover.
To remove:
Press handle
Lock
quick release
button and pull
up on handle.
Handle
Quick
To store;
Disconnect
hose form wands and
canister to prevent stress on hose during
storage_ Store hose in a loosely coiled
position on the hose covering is not stressed°
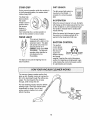
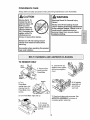
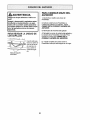
This canister is equipped with an on-board
storage area for a Pet PowerMate
attachment.
To Install:
Open the Pet PowerMate storage cover
Insert the Pet PowerMate, press down into
place, and close the lid securely.
To Remove:
Open the storage cover. Remove Pet
PowerMate from the storage area and use
as needed (see ATTACHMENTS
and
ATTACHMENT USE TABLE),
f
et PowerMate
Storage
Cover
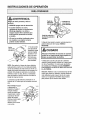
OPERATING INSTRUCTIONS
WARNING
Personal
Hazard
Injury
and Product
Damage
indicator
Handle
Release
ALWAYS turn off the vacuum cleaner
before unplugging.
The cord moves rapidly when
rewinding. Keep children away
and provide a clear path when
rewinding the cord to prevent
personal injury.
DO NOT use outlets
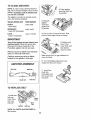
1. Pull cord out
of canister to
_
-', _
_
i
J
desired length.
rewind
until
The
cord
willthe
not
cord rewind button is pushe&
NOTE: To reduce the risk of electric shock,
this vacuum cleaner has a polarized plug;
one blade is wider than the other. This plug
will fit in a polarized outlet only one way_ If
the plug does not fit fully in the outlet,
reverse the plug If it still does not fit, contact a qualified electrician to install the proper outlet. Do not change the plug in any
way
2, Plug the polarized power cord into a 120
Volt outlet located near the floor.
To rewind:
Turn off
and unplug the vacuum cleaner. Hold
the plug while
rewinding to prevent
damage or injury
from the moving
cord. Push cord
rewind button_
V_
pedal,pressing
on the HANDLE
_'i:i_i_;_,
'_:?
above counters.
Damage from cord to items in
surrounding area could occur.
Cord
Rewind
Button
3. Lower wand from upright position by
RELEASE
,CAUTION
DO NOT leave the Powerrvlate
running
position
Damage
in one spot in the upright
for any length of time.
to carpet may occur.
4. Select a pile height setting by pressing
the HEIGHT ADJUST pedal on the rear of
the PowerMate. The pile height setting
shows on the indicator_ See SUGGESTED
PILE HEIGHT SETTING&
Attention:
Refer to your carpet manufacturers cleaning recommendations_ Some
more delicate carpets may require that they
be vacuumed with the PowerMate agitator
turned off to prevent carpet damage.
ELECTRONIC
(_
TOUCH CONTROL
Power
Level and
Selection
.-turns The
on both
the
Canister
PowerMate,
button cycles through HIGH, MEDIUM,
and LOW power levets.
5. Pressthe Power
LevelSelectionbutton to turn on both
the canisterand
PowerMatemotors,
The canister motor always starts in HIGH
power, Press the Power Level Selection
button as needed to adjust power level.
POWER LEVELS:
H - when lit indicates the canister motor is
runmng at HIGH power,.
M - when lit indicates the canister motor is
running at MEDIUM
power,.
L - when lit indicates the canister motor is
running at LOW power°
®
Power
Level Selection
CARPETIBARE
FLOOR - turns the
PowerMate motor on for cleaning of
carpets and off for cleaning of bare
floors, CARPET/BARE
FLOOR mode
will be indicated on the handle display,
Q
NOTE:
PowerMate
FF- turns motors.
off canister and
When the vacuum cleaner is in
BARE FLOOR mode, the wand light DOES
NOT function since no electricity flows to the
PowerMate,
NOTE: The hose handle display may have a
protective film, This film may be removed,
10
Suggested
sweeping
For best
pattern.
cleaning results,
use Power Level
HIGH and fully
close the suction
control located on
the handle,
For best cleaning action, the PowerMate
shouId be pushed straig,_away from you
and pulled straight bac_ot_t the end of each
pull stroke, the directio_/6f the PowerMate
should be changed to/_int into the next
section to be cleane_.Fhis pattern should
be continued acros_t_e carpet with slow,
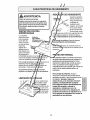
WARNING
Personal injury Hazard
__
,_.,,,__
_"
_l_"
Use care if canister is placed on
stairs. It may fall, causing personal
injury or property damage.
strokes do
not provide
comp!ete
._
....................
_'_
_'f
cleaning.
Product
for further
cleaning.
The stair grip
located on the
caster will aid in
CAUTION
preventing the
canister from
Product Damage Hazard
Use care if the PowerMate
and wand is
slipping when used
on stairs (see
PERFORMANCE
left in the upright position as it may tip
over easily° Property damage can occur
if tipped.
FEATURES),
............................ nnlul
NOTE: Be sure the canister is resting
securely on the stairs and the caster is in a
locked position before using.
WARNING
and
Product
Damage
For best cleaning results, keep the airflow
passage open. Check each assembly area
in HOWYOUR VACUUM CLEANER
DO NOT run over power cord with
PowerMate.
Personal injury or
product damage could result,
WORKS occasionally
and unplug vacuum
before checking.
DO NOT pull plug from wall by
the power cord. If there is damage to
the cord or plug, personal injury or
property
Damage Hazard
Do not pull on the hose to move the
canister from one stair to the next.
When finished cleaning in one area use
the handle grip on the canister to move
the vacuum cleaner to a new location
without moving the
canister.. This is helpful
for cleaning in small
areas. Check hose for
twisting before puiling
canister.
Injury
,11.......................
CAUTION
The hose swivel allows
the hose to turn
Personal
Hazard
i ii
damage could result.
11
for clogs. Turn off
cleaner from outlet
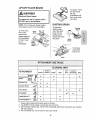
Forbest deepdowncleaning,usethe XLO
setting.However,you mayneedto raisethe
heightto makesomejobseasier,suchas
scatterrugsandsomedeeppilecarpets,
andto preventthe vacuumcleanerfrom
shuttingoff.Suggestedsettingsare:
HI - Shag,deeppile,or scatterrugs.
MED- Mediumto deeppileo
LO- Lowto mediumpile.
XLO- Mostcarpetsandbarefloors.
CAUTION
2. Press wand
m
quick release
pedal with foot and
pull the wand
straight up and out
of PowerMate
m
DO NOT attach or remove handle or
wands while vacuum cleaner is ON.
This could cause sparking and damage
the electrical contacts or electronic
controls.
ATTACHMENTS ON HANDLE
NOTE: If the
PowerMate turn
is
attached,
vacuum cleaner
off before
/ll
3. Put attachments on wand
as needed. See
ATTACHMENT
USETABLE
_ Handle
Lock _
Button
11
Handle
removing handle
from wands.
Qu_k
Release--*.
CONTOUR
m
I
m
BRUSH
1. Press handle
The contour brush wilt attach to the handle
quick release
button and pull
up on handle.
or wand for overhead cleaning of furniture
such as cabinets and shelves_
I. Rotate the contour
brush and lock into
place.
2. Slide attachments firmly
on handle as needed. See
ATTACHMENT USE
TABLE.
2. Attach the contour
brush to the handle or
wand.
ATTACHMENTS ON WAND
1, To remove
wand from
PowerMate,
lock wand in
straight-up
position.
12
LIFT-OFF FLOOR BRUSH
To replace, insert
the floor brush
intothe
PowerMate until
floor brush locks
into place.
ii .......................
WARNING
Electrical
Shock Hazard
To reduce the risk of electric shock DO NOT use on wet surfaces.
NOTE'
DUSTING BRUSH
Turn off vacuum cleaner before
removing floor brush from PowerMate.
To assemble
To remove the
dusting brush,
insert the fabric
brush into the
floor brush,
press brush
release pedal on
the PowerMateo
Lift floor brush
out of
PowerMate,
dusting brush
nozzle and press
into placed
Brush
To remove,
press latch
and lift out.
Latch
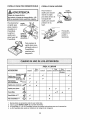
CLEANING
ATTACHMENT
Combination
Brush
Betw_.
Furniture1 Cushions1
Contour Brush
c_,p_t_d
FloorslRugs
Walls
V'
V'
V'
Floor Brush
4
PowerMate
_
Pet PowerMate 3,4
Ba_
Floers
v'
V'
V'
Jr.=3
Stairs
is'
Brush
Fabric
Dusting I__
Brush
Crevice Tool
Handi-Mate
Drapes1
AREA
_
_
I/
V'2
I
V'
V'
V'
l
V/
V'
I, Always clean attachments before using on fabrics.
2, Use BARE FLOOR setting on Electronic Touch Control.
3, Some Models; Handi-mate Jr.® and Pet PowerMate attachment
with the products.
4. Pet PowerMate can only be used on the hose handte.
13
instructions
are included
RFORI
INDICATOR
PER
WARNING
vacuum
running
al airflow,
on the
_ance
off, The
)mes on
the
becomes blocked. If that occurs,
the disposable dust bag, motor
filter and other possible clog
shown in HOW YOUR VACUUM
CLEANER WORKS.
Personal Injury Hazard
AIways turn off and unplug the vacuum
cleaner before cleaning the agitator area
as agitator may suddenly restart.
Failure to do so can result in personal
injury.
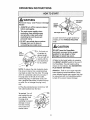
OVERLOAD
PROTECTOR
The PowerMate
has built-in
Overload Protector/
Belt Reset
protection against
motor and belt
damage should
the agitator jam If
the agitator slows
down or stops, the
overload protector
shuts off the
PowerMate and
To
SHOOTING t Lble,
See the TROUBLE-
light may come on when using
due to reduced airflow
attachment
the red light will come ono The canister
motor will continue to run.
PROTECTOR
To correct problem: Turn off and unplug
vacuum cleaner, remove obstruction, then
press BELT RESET button,
i vacuum cleaner has a thermal
automatically trips to protect
vacuum cleaner from overheating, If a
og prevents the normal flow of air to the
the thermal protector turns the
motor off automatically. This allows the
motor to cool in order to prevent possible
damage to the vacuum cleaner.
if the problem persists, have the
vacuum cleaner serviced by a Sears or
other qualified service agent.
EDGE CLEANER
Active brush edge
cleaners are on both
sides of the
PowerMate. Guide
either side of the
PowerMate along
base-boards or next
to furniture to help
remove dirt trapped
at carpet edges.
To correct problem: Turn off and unplug
vacuum cleaner to allow the vacuum
cleaner to cool and the thermal protector
Check for and remove clogs, if
Also check and replace any
led filters. WaLtapproximately
irty (30) minutes and plug the vacuum
cleaner in and turn back on to see if the
motor protector has reset,
14
STAIR GRIP
DIRT SENSOR
During normal operation while the canister is
in the horizontal position, the caster wheel
rotates freely 360°°
The dirt sensor light system is
mounted on the handle, tt
The Stair Grip
feature allows
the caster
wheel to lock in
IN OPERATION
'i_ _i/, ¸_,!i_:z:!!i_
B_IRE FLOOR
consists of a red and a green
light.
;:OIRP_
,
When the vacuum cieaner is in use, the lights
wilt change as dirt is being vacuumed. As long
as the red light is on, dirt is passing through
the handle to indicate that the surface still
position when
the vacuum
cleaner is
rotated 250
needs cleaning,
from horizontal into a vertical position in
order for the canister to rest on stairs.
When the sensor light changes to green,
the sensor is not seeing enough dirt to
warrant further cleaning of that area.
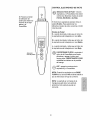
WAND LIGHT
This vacuum cleaner
equipped with a
extension wand°
will operate only
vacuum cleaner
is
_,":4 d •
light on the
This light
when the
is in
SUCTION CONTROL
The suction
control allows
CARPET mode (see HOW
TO START).. The light will
operate when attached or
not attached to the
PowerMate,
you to change
the vacuum
suction for
different fabrics
suction
suction
and carpet
weights° Opening the control decreases
suction for draperies and lightweight rugs,
while closing the control increases suction
for upholsteries and carpets.
The light can be used for lighting hard to
reach locations,
The vacuum cleaner creates suction that
picks up dirt. Rapidly moving air carries the
__
dirt to the dust bag through the airflow passages. The dust bag lets the air pass
/
_,.._/
through, while it traps the dirt.
/_//
For best cleaning results, keep the airflow ,,_iz
passage open. Check the starred areas ,**_,_'
occasionally for clogs. Turn off and
/_/
/
li
Meter
unplug vacuum cleaner from outlet
,i4y
before checking
xi_/
_ _...
,
Filter
Safety
FiEXl_o,
rust
:LkW_J
15
CANISTER CARE
For best cleaning results, the dust bag
should be changed often. The electronic
performance indicator will come on when
the bag needs to be changed or the airflow
is blocked.
NOTE: See PARTS AND FEATURES
7. The red bag mount will flip forward after
removing bag, This will prevent the hood
from closing until a new bag is installed.
Note: DO NOT bend or crease the middle
of the cardboard when installing the bag
into the bag mount slots.
for
Bag Number.
8. Rotate red bag
mount down and
1. Turn off and unplug vacuum cleaner.
Hood
Release.
2. Remove hose
from canister,
install bag into slots
per illustration,
pushing down until
the cardboard tab
3. Pull hood
locks into position
and the holes align.
release out and up,
then lift canister
hood_
9. Tuck the bag securely into the bag cavity
so that none of the bag is able to be pinched
by the hood.
4. Disengage
cardboard tab from
red bag mount by
pulling away and
lifting up,
10. Close and latch canister hood,
\
11, Insert hose into canister
place.
\
12, Plug cord into wall outlet,
5. Pull bag out of the
red bag mount,
Motor
Safety
Filter -
until it snaps in
CAUTION
NEVER REUSE A DUST BAG. Very fine
materials,
such as carpet freshener,
face powder, fine dust, plaster, soot,
new carpet lint, etc. can clog the bag
and cause it to burst before it is full and
may cause damage to vacuum cleaner
motor. Change bag more often when
vacuuming these materials.
6. Check the
motor safety filter
and replace, if
necessary,
1. Turn off and unplug vacuum cleaner. DO
NOT drip water on vacuum cleaner.
CAUTION
2. To clean exterior, or to reduce static electricity and dust build-up, wipe outer surface
of vacuum cleaner and attachments.
Use a
Do not use attachments if they are wet.
Attachments
used in dirty areas, such
as under a refrigerator, should not be
used on other surfaces until they are
washed.They could leave marks.
clean, soft cloth that has been dipped in a
solution of mild liquid detergent and water,
then wrung dry. Wipe dry after cleaning.
16
WARNING
Electrical
2. Lift the rubber
Shock Hazard
_
_L"_-_.
_-'>.:_-_-_-_-_-_-_-_-_-_
retainer and pull out
motor safety filter as
shown
Turn off and unplug vacuum cleaner
from electrical outlet. Do not operate
the vacuum cleaner without the motor
safety filter. Be sure the filter is dry and
properly installed to prevent motor
failure and/or electrical shock.
MOTOR SAFETY
ELECTROSTATIC
FILTER
white side out,
l_i_
facing the dust bag,
by sliding it back
i!_!!
IntoReplace
the l, _:; ¢_!i
3.
ace under
the fter,
ribs in the bag
!I
cavity. Tuck filter in _'_'_'_"_"_"
This filter must be replaced when dirty. It
should be replaced regularly depending on
use conditions_ The filter CANNOT be
washed
ability.
as it will lose its dust trapping
rY
NOTE: See PARTS AND FEATURES
for
so
that it fitsunder the
completely
rubber retainer.
Motor Safety Filter number,
4. Replace the bag as outlined in the BAG
CHANGING section.
I, Remove the bag as outlined in the BAG
CHANGING section
,WARNING
Fire and/or
1. Press latch
down to release
the exhaust filter
cover from slot in
canister.
Electrical Shock Hazard
Do not operate with a clogged exhaust
filter or without the exhaust filter
installed, Do not operate without filter
cover installed.
2. Pull filter
cover outward to
remove from
canister.
EXHAUST FILTER
HEPA
The exhaust filter cartridge must be
replaced when dirty Replace the filter when
the entire surface area is covered evenly.
The filter CANNOT be washed as it will
lose its dust trapping
ability.
NOTE: See PARTS AND FEATURES
exhaust filter number
Filter
Covet'
3, Remove the
exhaust filter
for
using the recess
as shown_
17
4. Replace the
_
Exhaust
cartridge°
Filter.
Place
6. While holding
latch down
rotate filter cove r
the new filter into
exhaust
filter with
the canister
the foam seal
towards the
canister.
into place.
7. Release latch and verify that filter cover
is locked into place°
5. To replace the
exhaust filter
cover place the
two tabs on the
filter cover into
the slots on the
canister,
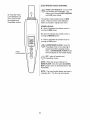
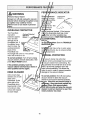
AIthough the dirt sensor feature in your
Kenmore canister is designed for years of
trouble free use, the passage of dirt through
the air passage system can coat the lens
causing the green light to come on and stay on
- never switching to red. When this happens
the ;enses must be cleaned.
i
i i,n,
I'
i,,
0
o
i ,
,CAUTION
Approx°
...,_._..,=,
5 inches
"o,_,CL°=E..__...
L
: )
',
,
Sensor
:
i
Lenses
Never use water or any cleaning solution
when cleaning the lenses. The residue of
the water or cleaners will accelerate the
recoating of the lenses and make
cleaning necessary sooner.
2. As indicated by the illustration, the two dirt
sensor Ienses are located on the inside of the
handle, approximately 5 inches/130 mm down
(note the arrows), These lenses should be
cleaned periodically, To reach the sensor
lenses, use a small brush such as a bottle
brush. Brush each sensor lens several times to
remove dust and dirt.
TO CLEAN THE LENSES
/
;*-- Handle
1. Remove the
handle by pressing
the handle quick
release button
Lock
!
Quick
Release--_
'_
I8
POWERMATE
CARE
Always follow all safety precautions
when performing
maintenance
to the PowerMate,
I wARNING
,CAUTION
Moving Parts! To
reduce the risk of
Electrical Shock Or Personal Injury
Hazard
personal injury, DO
NOT touch the
Always turn off and unplug vacuum
cleaner before performing maintenance
to the vacuum cleaner. Failure to do so
could result in electrical shock or
personal injury from vacuum cleaner
L_t%]
suddenly .starting.
.........
agitator when the
vacuum cleaner is
ON. Contacting the
agitator while it is
rotating can cut,
bruise, or cause other injuries.
Always turn off and unplug vacuum
cleaner from electrical outlet before
servicing.
Use caution when operating this product
near small children.
TO REMOVE BELT
5. Unscrew two (2)
agitator cover screws
and remove agitator
cove r.
1. Remove floor
brush from the
PowerMate.
Brush
Releas_ejf
Pedal
2. Turn
upside down and
unscrew
PowerMatefive (5)
_
screws_
PowerMate
_
cover
3. Turn PowerMate
assembly out
and
6. Liftremove
agitator
worn belt,
"-,
._
right side Upr
7. Check and clean end cap area& See
AGITATOR ASSEMBLY for picture of
complete agitator assembly.
4. TO remove
cover, grasp the
side latches and
pull out,
19
TO CLEAN AGITATOR:
NOTE: In order to keep cIeaning efficiency
high and to prevent damage to your vacuum
cleaner, _
must be cleaned every
time the belt is changed.
2. Place agitator
assembly back into
PowerMate.
The agitator must also be cleaned according to the following schedule:
Vacuum Cleaner
Use
HEAVY (used daily)
MODERATE
3. Reinstall
Clean Agitator
agitator
cover and
every week
-
replace two
(2) screws.
every month
(used 2-3 times/week)
LIGHT
4. Line up front of cover and base° Rest
cover on front edge of base as shown,
every 2 months
(used 1 time/week)
IMPORTANT
Turn off and unplug vacuum cleaner from
electrical outlet. Check and remove hair,
5. Rotate cover
back, Press
string and lint build-up frequently in the
PowerMate agitator and end cap areas.
cover firmly until
side latches
snap into place°
Remove any dirt or debris in the belt path
area or in the brush roller area,
Make sure there is no gap between the
cover and base°
Carefully remove any string or debris
located on the agitator or end caps°
6, Turn PowerMate upside down and
replace five (5) cover screws,
AGITATOR ASSEMBLY
Belt Path
7, Insert floor
brush into
PowerMate until
floor brush locks
into place.
_ End Cap
Brush Unit
TO REPLACE
End Cap _
BELT
1, Install new
belt over
motor drive,
then over
belt path,
Agitator
\
End Cap
Path
NOTE: See PARTS AND FEATURES
Belt number.
for
20
iii1.._.... H_........................................
TO REPLACE AGITATOR
ASSEMBLY
kWARNING
Electrical
Hazard
Shock Or Personal Injury
1. Remove the floor brush from the
PowerMate.
Always turn off and unplug vacuum
cleaner before performing
maintenance to the vacuum cleaner.
Failure to do so could result in electrical
shock or personal injury from vacuum
cleaner suddenlY starting.
2, Remove PowerMate cover, agitator cover,
belt and agitator assembly. See "To Remove
Belt" in BELT CHANGING AND AGITATOR
CLEANING
3. Repiace agitator assembly,
4. Reinstall belt, agitator cover and
PowerMate cover. See "To replace belt" in
BELT CHANGING AND AGITATOR
CLEANING.
TO CHECKTHE BRUSHES
__
When brushes
5, Insert floor brush into PowerMate until
floor brush locks into place,
support bars,
are worn to the
replace the
level
of the base
agitator
assembly.
__
Base
Support
Bars
21
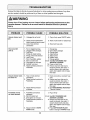
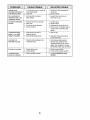
Review this table to find do-it-yourself
service needed, should be performed
solutions for minor performance problems. Any other
by a Sears or other qualified service agenL
i,,
, ii,
UlUlUlll
iii
nl nlUlll,
i
i,lu'u,nunnnl,,
ii
i
iii
i
A{ WARNING
Always turn off and unplug vacuum cleaner before performing maintenance to the
vacuum cleaner. Failure to do so could result in electrical shock or personal
injury.
Vacuum cleaner won't
start,
Poor job of dirt
pick.up.
Vacuum cleaner starts
but shuts off.
!, Unplugged at wat[outiet,
1. Plug in firmly, press ON/OFF switch_
2. Trippedcircuit breakedblown
fuseathousehold service panel.
3. Loose hose electrical
connections.
2. Reset circuitbreaker or replace fuse.
1.
2.
3.
4.
5.
6.
7.
8.
9.
I0.
tl.
Fuji or clogged dust bag
Clogged airflow passages.
Dirty filters.
Wrong pile height setting.
Wrong power levelselected.
Hole in hose
Worn PowerMate agitator.
Worn or broken belt
Dirty agitator or end caps.
Canister hood open
Tripped ovedoad protector in
PowerMale.
to Hose or hood electrical
connections.
2. Tripped overload protector in
PowerMate.
3, Trippedthermal protector
in canister,
PowerMate will not
run when attached,
1, PowerMate connections
unplugged,
2, Worn or broken belt,
3. Dirty agitator or end caps.
4. Tripped overload protector in
PowerMate,
5o Vacuum cleaner in BARE
FLOOR mode.
22
3. Reconnect hose ends,
Change bag°
Clear airflow passages,
Change filters.
Adjust setting.
Adjust control,
Replace hose,
Change agitator.
See BELT CHANGING AND
AGITATORCLEANING
10. Close and latch hood.
11. Remove any items thatmay be
caught or jammed, then reset, If
vacuum cleaner starts and stops
again, clean agitator and end caps,
then reset.
=
2.
3.
4.
5,
6.
7.
8&9.
1. Check connections, reconnect hose
ends.
2. Removeany itemsthat may be
caught or jammed,then reset If
vacuum cleaner starts and stops
again, clean agitator and end caps,
then reset
3. See PERFORMANCE FEATURES 'q'hermal Protector,"
1,
Plug in firmly
2&3. See BELT CHANGING AND
AGITATOR CLEANING,
4, Remove any items that may be
caught or jammed, then reset, tf
vacuum cleaner starts and stops
again, clean agitator and end caps,
then reseL
Press CARPET/BARE FLOOR
button to change to CARPET mode,
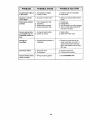
Constant
greenlighton
indirt sensor_
1. Dirt passage is clogged,
2, Lensesare dirty
I. Check for clogs in air passages
2, Clean lenses,
No green or red dirt
sensor lights°
1. No power to sensor board,
1. Take to your nearest Sears Service
Center,
Performance Indicator
activates_
1. Fullor clogged dust bag
2. Dirty filters°
3o Blocked airflow passage,
4. Certain attachment tools,
1o Change bag,
2o Change filters,
3. Clear blockage from airflow passage,
4. This is normal, Light should go off
when tool is removed.
Vacuum cleaner picks
up moveable rugs -orPowerMate pushes too
hard.
1, Wrong pile height setting_
2, Suction too strong
t, Adjust setting,
2o Select lower Power Level
Red light on
PowerMate.
1o Tripped overload protector in
PowerMate
Cord won't rewind_
1_ Dirty power cord
2, Cord jammed_
1. Clean the powercord,
2. Pull out cord and rewind,
Vacuum cleaner leaves
marks on carpet.
1o Wrong vacuuming pattern,
I. See VACUUMING TIPS,
23
Remove any items that may be
caught or jammed,then reset If
vacuum cleaner starts and stops
again, clean agitator and end caps,
then reset.
Master Protection Agreements
Congratulations on making a smart purchase Your new Kenmore® product is designed and manufactured for years of dependable operation. But like all products, it may require preventive maintenance or repair from time to time. That's when having a Master Protection Agreement can save you
money and aggravation.
The Master Protection Agreement also helps extend the life of your new product. Here's what the
Agreement* includes:
@
Parts and labor needed to help keep products operating properly under normal use, not just
defects. Our coverage goes well beyond the product warranty. No deductibles, no functional
failure excluded from coverage-- real protection.
[]
Expert service by a force of more than 10_000 authorized Sears service technicians,
means someone you can trust will be working on your product.
[]
Unlimited service calls and nationwide service, as often as you want us, whenever you
want us.
[]
"No-lemon" guarantee - replacement of your covered product if four or more product failures
occur within twelve months.
[]
Product replacement if your covered product can't be fixed.
[]
Annual Preventive
[]
Fast help by phone - we call it Rapid Resolution - phone support from a Sears representative on all products. Think of us as a '_talkJngowner's manual?
[]
Power surge protection
[]
$250 Food Loss Protection annually for any food spoilage that is the result of mechanical failure of any covered refrigerator or freezer.
[]
Rental reimbursement
[]
10% discount
parts.
Maintenance Check at your request-
which
no extra charge.
against electrical damage due to power fluctuations.
if repair of your covered product takes longer than promised.
off the regular price of any non-covered repair service and related installed
Once you purchase the Agreement, a simple phone call is all that it takes for you to schedule service. You can call anytime day or night, or schedule a service appointment online.
The Master Protection Agreement is a risk free purchase. If you cancel for any reason during the
product warranty period, we will provide a fu}l refund. Or, a prorated refund anytime after the product
warranty period expires. Purchase your Master Protection Agreement today!
Some limitations and exclusions apply. For prices and additional Information in the U.S,A.
call 1-800-827-6655,
* Coverage In Canada vsrles on some Items. For full details call Sears Canada at 1-800-3616665,
Sears Installation Service
For Sears professional installation of home appliances, garage door openers, water heaters, and
other major home items, in the U.S.A. or Canada call 1-860-4-MY-HOME®o
24
Antes de usar su aspiradora
nueva °. 1
Garantia de la aspiradora
de Kenmore .......................
Instrucciones
importantes
seguridad
.........................
2
de
3
Piezas y caracter[sticas
...........
Instrucciones
de
ensamblamiento
................
4-5
6-7
Almacenaje
del Pet PowerMate ® .....
7
Instrucciones
de operati6n
........
8
Para comenzar ..................
8-9
Sugerencias para aspirar ...........
10
Sugerencias sobre el ajuste de nivel de
pelo de la alfombra ................
11
Accesorios ....................
11-12
Cuadro de use de los accesorios .....
12
Caractedsticas de rendimiento .....
13-14
Funcionamiento de su aspiradora
.....
Cuidado del receptdculo
..........
Cambio de la bolsa ...............
15
15
Umpieza del exterior y de los accesodos 15
Cambio del filtro de seguridad det motor 16
Cambio del filtro de escape .......
16-17
Detector de tierra ..................
17
Cuidado de la PowerMate ® .........
Cambio de la correa y limpieza
del agitador ....................
Cuidado del agitador ...............
18
18-19
20
Reconocimlento de problemas ., 21-22
Acuerdos maestros de protecci6n..
23
informacl6n de assistancia
o servicio ............
Posterior Cubierta
14
Per favor lea esta guia que le ayudara a assembtar y operar su aspiradora nueva de Kenmere en una manera
m_s segura y effectiva,
Para mas informaci6nacerca del cuidado y operaci6n de esta aspirador, llame a su tienda Sears mas cercana
Cuando prequnte per informaci6n usted necisitar_ el nt_msrocomplete de serie y modelo de la aspiradora que
est_ locado en la placa de los n_meros de modelo y serie
Use el espacio de abajo para registrar el n_mero de modelo y serie para su nueva aspiradora de Kenmore.
NtJmerode Modefo
Numero de Serie
Fscha de Compra
Matenga este iibro y su recibo en u lugar seguro para referencias futuras
Garantfa
limitada
Si esta aspiradora
de un afio
falla por un defecto
en sus materiales
o fabricaciSn
en el perl'odo
de
un aP,o desde la fecha de compra, cuando se instala, maneja y mantiene siguiendo
todas las instrucciones
incluidas con el producto, devu_lvala a cualquier tienda Sears,
Sears Parts & Repair Center (Centro de Reparaciones
y Piezas Sears) u a otro
distdbuidor
Kenmore para que reparen el aparato de forma gratuita,
Si esta aspiradora se utiliza para otros fines que no sea uso familiar privado, esta
garantfa es vAlida solamente durante 90 dfas desde ta fecha de comprao
Esta garantfa cubre exclusivamente los defectos de materiales y fabricaci6n,
Sears NO pagard:
1o Los elementos desechables que puedan desgastarse con un uso normal, incluyendo
sin carActer excluyente, filtros, correas, i_.mparas y bolsas.
2. Un t_cnico del servicio t_cnico para que ensefie al usuario a instalar, manejar o
mantener correctamente el producto_
3. Un t_cnico del servicio t_cnico para timpiar o mantener este producto.
4. DaSos o aver[a de este producto si no se ha instalado, manejado o mantenido
siguiendo todas las instrucciones incluidas con el producto.
5. DaSos o averfa de este producto origtnados por accidente, abuso, uso incorrecto u
uso del producto para otros fines distintos de los indicados.
6. DaSos o aver[a de este producto causados por e! uso de detergentes, limpiadores,
productos qufmicos o utensilios diferentes a los recomendados en todas las
instrucciones que se incluyen con el producto.
7. DaSos o averfa de las piezas o sistemas causados por modificaciones no
autorizadas que se hayan hecho a este producto.
Limitaci6n de responsabilidad de las garantfas implfcitas; limitaci6n de remedios
#-I L_nicoy exclusive remedio del cliente bajo esta garantfa timitada serA la reparaci_n del
producto segt'm lo indicado en este documento. Las garant[as implfcitas, incluyendo las
garant[as de comerciabilidad o idoneidad para un propSsito especffico, se limitan a un
aSo o el perfodo m&s corto permitido por la ley. Sears no serA responsable por daSos
incidentales ni consecuencia{es, Algunos estados o provincias no permiten la exclusi6n
o limitaciSn de daSos incidentales o consecuenciales, ni timitaciones en la duraci6n de
las garantfas implfcitas de comerciabilidad o idoneidad, por Io que estas exctusiones o
limitaciones podrfan no aplicar en su caso_
Esta garantfa
CanadA.
aplica solamente
cuando
esta aspiradora
se utiiiza en Estados
Esta garant(a le otorga derechos legales especfficos, y usted podrfa
derechos que vari'an en funciSn de cada estado.
Sears, Roebuck and Co., Hoffman Estates, IL 60179
Sears Canada Inc.,Toronto,
Ontario, Canada M5B 2B8
Unidos o
tener otros
Lea las instrucciones en este manual antes de armar o usar su aspirador,
ADVERTENCIA
Su segurtdad es muy !mportante. para nosot.ros. Para reducir el riesgo de !ncendio,.
cnoque erect.rico, Lesion cor_ora= o aanos a! uulizar su asp=raaora, act_e ae acuerao
con precauclones Dasicas ue segurlaaa, entre elias:
Use su aspiradora 0ntcamente en la farina
descrita en este manual. Use 0nicamente con
accesorios recomendados per Sears.
Desconecte el cordSn el_ctrtco antes de
componero limpiar el _rea del ceptllo. De 1o
contrarEo,el ceptllo podrfa arrancar de form
imprevistao podrla producirse un cheque
el_ctdcoo
No abandone la aspiradora cuando est8
conectada° Descon_ctela cuando no la est@
usando y antes de darle servicio,
Para reducir el r}esgo de cheque el_ctrico, no
use su aspiradera al aire libra ni sabre
superficies mojadas.
No permfta que sea utiJtzada come jugueteo
Se requiere tener mayor cuidado cuando sea
utilizada en la proximldad de niSes o per
niSos,
No use la aspiradora si er cord6n o el enchufe
est_ datfado. Si la aspiradora no est_
functonando adecuadamente o s_se ha
dejado caer, est,, daSada, se ha dejado
expuesta a ta intemperie o se ha dejado caer
en agua, devu_tvala a un Centre de servicio
de Sears°
No hale ni transporte la asptradora per el
cord6n; no use el cord6n come mango; no
cierre puertassabre et cerd6n; no hale el
cord6n sabre rebordes agudos nt esquinas.
No pase la aspiradora sabre el cord6n.
Mantenga el cordSn atejado de superficies
calEentes.
No desconecte la aspiradora tirando del
cordbn el_ctrlco_ Para desconectarla, hale el
enchufe, no el cordbn.
No toque la aspiradora nt el enchufe con las
manes mojadas.
No coloque objetos en las aberturas,
No utllice la asptradora si alguna abertura
est_ bloqueada; mant_ngala libre de polvo,
petusa, cabeflos y cualquiera cosa que podrfa
disminutr el flujo de atre_
Mantenga et cabetlo, ropa suelta, dedos y
todas las partes del cuerpo alejados de Ias
aberturas y pfezas mec&ntcaso
GUARDE
Apague todos los controlesantes de
desenchufar.
"renga culdado especial at utilizar la
aspfradora en escalones. No la coloque sabre
sillas, mesas, etc° Mant_ngala en el piso.
No use Faaspiradora para aspirar Ifquidos
lnflamables o combustibles (gasolina, Ifquidos
para limpleza, perfumes,etc_) nt la use en
lugares donde 8stos podrfan estar presenteso
Los vapores de estas sustanctas pueden crear
un peligrode incendio o explosi6no
No tevante ninguna cosa que se est_
quemando o emlttendo humo, come
cigarrtllos, certllos o cenizas calientes.
No use la aspiradora sin tener tnstaladata
balsa para potvo ylo los filtroso
Curable sternpre la balsa para polvo despu_s
de aspirar ltmpiadores de alfombras o
desodorantes, talcos y pelves finos. Estos
productos atascan la bofsa, reducen el flujo de
atrey pueden causar qua _sta se rompaoSI
no cambia la balsa podr[a ocasionar daSo
permanente a la aspiradorao
No use la aspiradora para tevantar objetos
agudos, juguetes pequeSos,atfileres,
sujetapapeles, etc. Podri'an daSar la
aspiradora o la balsa para polvoo
No opere sin el filtro de escape ni Ia cubierta
del filtro de escape instatados.
La manguera conttene cables el_ctricos. No
la use cuando est& dafiada, cortada, o
perforada. Reemplace sl est_ cortada o
desgastada. No levante objetos afllados.
Slempre apagu_ y desconecte la aspiradora
antes de conectar o desconeclar la manguera
Handi-Mate Jr_® (si aplicable), o la boqui la,
SuJeteel enchufe con la mane a! enrollar el
cerdbn eI_ctrtCOo
Para desconectarla, hale en
enchufe, no el cord6n
Usted es responsable de asegurar que su
asptradora no sea uttltzada per nlnguna
persona qua no pueda manejarla
ccrrectamente.
ESTAS INSTRUCCIONES
dE_sarmadoy use segur,o de su asp!radora son su responsabilidad; E sta aspiradora ha. side
enaaa excluswameme para use o omem}co_ La asplra.aora qepera, almac.enarse en un lugar
seco yen el tmenor. Lea es_e Manual ael propie_rio ameniaament% pues contlene
inrormacion Imponame sabre seguriaaa .y use. _sta quia conttene mrormaciSn sabre
segu noao oeDajo ae s_mDoJosae aavertlenc_a cuiaaao.
Es importante conocer 1as piezas y caracter[sticas
Exam_nelas antes de usar su aspiradora
de su aspiradora para asegurar su use adecuado y seguro.
Pieza Ng
Objeto
Estilo No,
Correa
CB-6
PowerMate
en EUA
Pieza N_en Canad_
..........
Bet6n de
Itberacl6n
r_plda del
mango
I
Tube
telescopico
Bet6n de
ajuste de
extensi6n---**
LLIZ --4
Correa
Pedal de Ilberacl6n
r_plda del tube
desmentabte
de pale de la aifombra
Pedal de liberaci6n
del mange
Pedal de Ilberacf6n
del ceplllo para plsos
/
Ndmeres de eerie
y modefo de PowerMate
(ParteInferler)
Pedal de selecci6n
LImptador de erlltas
(no mestrado)
Bet6n de restauracl6n
"Reset" Protector de
sebrecarga
MANGUERA
ACCESORIOS
Control
electr6nlco
digital
Herramlenta
hendtduras
Detector
de polvo
Mango
para------"_
Ceplllo
para
__7
_._
contorno
l
Pet PowerMate
'
•
_
i
para
CeplHo_
,"
_
Cepfllo para :
sacudir
combtnacidn ,,
4-- Ceplllo para
E
, _.9
telas
L .................
,"
'
=
t
Dispositlvo
g/ratorio de ta
manguera
RECEPT.i CULO
Objeto
Estilo No,
Pieza N-°
en EUA
Pieza N_en Canada1
Bolsa para polvo
Q
20-50557
20_50410
Fiitro de escape
EF-1
20-86889
20-40324
Fiitro de seguridad
del motor
CF-1
20-86883
20-40321
Cubierta de
almacenamiento
de accesorios
(accesorios
adentro)
Bot6n de
cord6n
el_ctrico
Indicador
de
funcionamiento
atmacenamien to
para PetPowerMate
Tapa de la
Cubierta del filtro
de escape
(no mostrado)
Pes ti!lo
de la tapa
Sujetador
de la bolsa
Manija de
transportaci6n
protecci(_n
del motor
(detrds
Bolsa
de polvo
de la bolsa de polvo)
I
i
,#_
I
informaciOnle alertar_ del petigro de fuego, cheques etectricos, quemadas y tesioneso Cuidado:
Per favor ponga especialatenciOna _stos recuadros con alerta de riesgo. Advertencla: Este
I
Este informaciOnle alertara de peligros come lesiones y daOosde propiedad
I ADVERTENCIA
Peligro de cheque el_ctrico
No conecte la aspiradora hasta que termine de
armarla, De Io contrario podda causar un
cheque el_ctrico o lesion corporal
i
Antes de armar la aspiradora,chequee la LISTA
DE EMBALAJE en ta cubierta separada de la
Lista de Partes pare RepareciOn. Use esta lisle
pare verificar que ha recibido lodes las componentes de su nueva aspiradora Kenmore,
TUBe TELESCOPlCO
La extension
del tube es
,,_
===
="
extension
adjustable
del tube
la mane
arrlba
esta
lengiJeta
===
"_
ajustable y no
requiere
ensamble.
Para ajustar,
deslice hacia
arriba o aba}o
el botOndel
tube y mueva
el tube superior ala posiciOndeseada
Tube
tetescOpico
_juste de
extensibn del tube
Cuando ajuste la Iongitud de la vara hay que tenet
el PowerMalecon la mane o el pie,
La parle giratoria,
situada en el
Olsposftlvo
PowerMate, le pergiratorio
mite mover el mango
ala izquierdapara
pasar la aspiradora a
una extension m_s
large debajo de los
muebles bajos.
tube
Cuando ajuste fa
Iongitud de la vara hay que tenerel PowerMatecon
la mane o el pie,
PowerMate
Introduzca la vara en ta PowerMate hasta que e]
botOndeetube quede fijo en posici0n
Paraquitar: Pise en el pedal de liberaciOnde la
vara y jaie esta hacia arriba,
liberaciOn
raplda del tube
RECEPT, CULO
MANGUERA
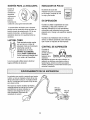
1. Abra la tapa del recept_culo
2. Examine la bolsa para polvo este instalado correctamanteoConsutte las instrucciones de instalaci6nen
[a CAMBIO DE LA BOLSA
3, Examine el filtro de seguridad de! motor este instalado correclamante, Consulte las instrucciones de
instalaci6n en CAI_BIO DEL FILTRO DE SEGURIDAD DEL MOTOR.
LA TAPAY LA CUBIERTA
Es normal qua la tapa del recept_,culose desprenda
al set abierta rn&sde 1onecesafio. Fara colocar nuevamente Fatapa, alinee las ranuras de la bisagra, ins_rtelas y cierre la tapa
,,,,,,,,
,,,,,,
,,
,,,,,
,,
,,,,
,,
,,
,,
,
,
,
1. Alinee ra pestaRa
de sujeci6n de la
manguera y ta ranura
de ta cubierta del
recept_culo e introduzca la manguera
en el recept_culo
hasta qua quede fija
en posici6n.
manguera
L_/Z_,.(_
Para retirar:
No abra ta eubierta antes de desprender ia
manguera, Con la cubierta cerrada, tire hacia arfiba
la leng0eta de seguridad y jale de la manguera
Mango
2. lntroduzca el
mango en el tubo
hasta que el bot6n
quede en posici6n,
Asegfirese de que la
manguera no est6
torctda.
I, CU'DADO
! Nunca debe abrlr ta capucha del contenedor
lestando la tapa ablerta. As[ se evitar& dafos a
[/a capucha de! contenedor y/o a la tapa.
Bot6n
de cterre._.
Bot6n de
Ilberacl6n
r_plda del
mango----*,:
==
Para retirar: Optima
et bot6n de liberaci6n
r_pida del mango
para fiberarel mango
y tire del mango hacia
arriba
Para Guardar: Para prevenir la precibn de la mangua
mientras se guarda, desuna la mangua det tubo de la
aspiradora, Guards ia magua en una pos[cibn
enrollada y flojamente de tal manera qua ]a tapa de la
mangua no se estire.
Est,. aspiradora esta equipada con almac_n
a bordo para el accesorio Pet PowerMateo
fAImacenamlento
para Pet PowerMate
Para instalar:
Abra la cubierta de almacenaje del Pet
PowerMate. Inserte ei Pet PowerMate, presi6nelo en su lugar hacia abajo, y cierre la
cubierta con seguridad_
Para quitar:
Abra la cubierta de almacenaje. Levante e]
Pet PowerMate de su lugar utilfcelo como
sea necesafio (v6ase ACOESORIOS y
CUADRO DE USO DE LOS
ACCESORIOS).
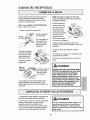
INSTRUCCIONES DE OPERATION
, ADVERTENCIA
Peligro de lesi6n personal y daSo al
_roducto
SIEMPRE apague ante de desenchufe.
E1cord6n eldctrico se mueve
r_pidamente durante el enrollamiento.
Mantenga alejados a los nines y
asegure espacio libre suficiente para
evitar lesiones personales al enrollar
el cord6n.
NO use los enchufes locatizados sobre
los muebles. Los objetos cercanos
podrian resultar da_ados_
Bot6n
del cord6n
el_cfrico.
1.Tire del cord6n
para sacarlo det
recept&culohasta
tener la fongitud
deseada. El cord6n no se enrollar_ hasta que
oprima el bot6n
para enro_larle.
NOTA: Para reducir el riesgo de cheque ei_ctrico,
estaasptradora cuenta con una clavija polafizada,
uno de los contactos es m_.sancho que el otro_La
clavija s6lo puede introducirsede una manera en e]
enchufe Si la clavija no cabe bien en el enchufe,
invi_rtala,Si a0n no cabe, llame a un eiecldcista
para que instaleun enchufe correclo. No altere la
clavija de ninguna manerao
2, Conecte el cord6n el_ctdco polarizado en un
enchufe de !20 voltios que se encuentre cerca del
piso.
Para enroflar:Apagu_
y desconect_ la
aspiradora. Sujete el
enchufe mientras
enrotla el cord6n para
impedir dafio o lesi6n
corporal per el movimiento del cord6n
Optima el control para
bot6n el cord6n
el_ctrico con la mane
o con el pie
Pedal de
Itberaci6n
Indicador de
nivel de pelo
de la alfombra
Pedal de
de nlvel de pelode la
alfombra
3, Baje el tube desde fa posici6n vertical pisando el
pedal de tiberaci6n del mango (HANDLE
RELEASE),
CUIDADO
NO deje la PowerMatefuncionando en posici6n
vertical en un lugar durante ning_n espacio de
tiempo: se puede daSar la alfombra.
4, Seleccione una altura de pelo de la alfombra
usando el pedal peque5o ubicado en la parte posterior de la PowerMate, Et nivel de pelo la aflombra
se muestra en el indicador. Consulte SUGERENCIAS SOBRE EL AJUSTE DE NIVEL DE PELO DE
LA ALFOMBRA_
Atenci6n: Refi_rase a las recomendacionesdel fabricante para ]impiarsu atfombra.Algunas alfombras
m_s delicadas pueden requerir el use de la aspiradora con el agftador PowerMate desconectado
para prevenir que la alfombra sea daSada_
CONTROL
O
5. Presione el bot6n
de selecciSn de
poder para iniciar tos
motores de la aspiradora y el
PowerMate.
ELECTRONICO
DE TACTO
eleccibn Nivel de Poder - inicia la
aspiradora y el PowerMate. Este bot6n
cambia los diferentes niveles de poder
(H) Alto, (M) Medio y (L) Bajo.
El motor de la aspiradora siempre inicia en
poder (H) Alto. Para seleccionar los
diferentes niveles de poder, presione el bot6n
nivel de poder.
Niveles
de Poder:
H - cuando iluminado, indica que e! motor de
la aspiradora esta trabajando en nivel Alto.
M - cuando iluminado, indica que el motor de
la aspiradora esta trabajando en nivel Medio.
L - cuando iluminado, indica que el motor de
la aspiradora esta trabajando en nivei Bajo.
Selecci_n
nivel de poder
®
CARPET/BARE
FLOOR - enciende el
motor de la PowerMate para limpiar
alfombras y apaga el motor para
limpiar pisos_ CARPET/BARE
FLOOR
modalidad se indicara en Ia pantalla
del mango.
Q
FF - apagay el
losPowerMate
motores de la
aspiradora
NOTA: Cuando la aspiradora es en BARE
FLOOR la luz del tubo NO enciende debido
que se interrurnpe
el flujo de corriente_
NOTA: La pantalta en el mango de la
manguera puede tenet una pel[cula
protectora. Esta pel[cula puede ser
removida
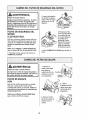
Estilo de limpieza sugerido.
Los escalones alfombrados requieren liraplaza peri6dica Use el
Nivel
de Poderen
HIGH (ALTO)y cierre
por compieto el control
de aspiraci6n para
iograr los mejores
resu_tadosde
timpieza,
Controlde
Para obtener ta mejor acci6rfCc_limpieza se recomienda empujarla PowerM_t_en direcci6n directamente opuesta a usted y j_/t_la en linea recta, AI
final de cada pasada de r_eso, cambie la direcci6n
de la PowerMate hacia l_'guiente secci6n a limpiar,
Continue as[ a trav_s d,_t_da la attombra de una
manara Isnta y desliz_l/_t
_.
pasadas
_"
.=_ _""--_,._
,_t'_
,_ -----,,.s
ADVERTENCIA
fogran una
limpieza
El dispositivo giratorio de
la manguera permits que
_sta gire sin necesidad
de mover el recept_cuic,
Esto es muy L_til
para
limpiar en &reas peque5as Asegurese de que
la manguera no est_ torcida antes de jalar e!
recept_culo
CUIDADO
Petigro de lesibn personal y dafio al
producto
No jale de la manguera para mover la
aspiradora
de un escal6n al siguiente.
Cuando termine de limpiar una &rea use
la manija en la aspiradora para moverla
a otro lugar para continuar
la limpieza,
CUIDADO
Peligro de lesi6n personaly dafio al
producto
El sost_n para ta escalera esta situado en el
cuerpo y ayudar& a evitar qua la aspiradora se
deslice cuando se est& utilizado en las escaferas
(v_ase CARACTERiSTICAS DE RENDIMIENTO)
Tenga cutdado si el PowerMate y la manguera
se dejan en posici6n vertical puss peuden
caerse f_cilmenteo Si se voltean peude haber
dafio de propiedad.
que la aspiradora
est_ descansando
NOTA: Asegt_rese
con seguridad
sobre las
ADVERTENCIA
Peligro de lesi6n personal y daSo al
_roducto
escaleras y el
echador est_ en la
No atropelle el cord6n el_ctrico con la
PowerMate. Hay un peligro do
lesi6n corporal o unos daSos de
posesiones,
posici6n
bloqueada
Mantenga el paso de airs abierte para logrer
los mejores resultados de llmpteza.
Examine de vez en cuando cada una de las
&reas de uni6n en FUNClONAMIENTO DE SU
ASPIRADORA para asegurarse de qua no
est_n bloqueadas_ Apagu_ y desconectd la
asplradora antes revlsar,
No tire del cord6n el6ctrico de la pared
para desenchufarioo Si hay danos en
el cord6n el_ctrico o el enchufe, hay
un peligro de lesi6n corporal o unos
dafios de poseslones.
i
iiiiiiiiii
i
i
,111
antes de usarla.
i1,111111,1,111,1
10
Useelajuste
XLO(bajo)paraobtener
lamejorlimpiezaafondoo
Porotraparle,quiz_s
serequiera
elevarelnivelparafacililar
algunas
tareas,
comopor
ejemplo
cuando
setratadetapetes
yalgunas
affombrasdepelolargo,
yparaimpedir
quelaaspiradora
seapague_
Sesugieren
lossiguientes
ajustes:
HI- Pelomuylargoysuello,lapetes,
alfombras
muyacojinadas.
MED - Pelo mediano a largo.
LO - Pelo corto a mediano_
XLO - La mayoria de las alfombras y pisos
descubiertos
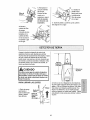
,CUIDADO
2. Pise et pedalde
liberaci6n r_pida del
tubo y tire del tubo
hacia arriba para
desprenderlo de la
PowerMate.
NO instale ni retire el mango ni los tubos
cuando la aspiradora est6 encendida. Esto
podria causar chispas y daSar los contactos
eldctricos o control etectronico,
i i
ii
,,111,
r_pida del
tubo
ACCESORIOSDEL MANGO
NOTA: Si tiene
instaladata
PowerMate, apague
la aspiradora antes
de quitar el mango Bot6n de
de los tubos,
liberaciSn
3. Coloque el
sobre el tubo, Consuite la CUADRO
DE USO DE LOS
accesorio deseado _
ACCESORIOS
A
A
J
r_pide
t. Oprimael bot6n
de liberaci6nr_pida
del mango para
liberar el mango y
tire del mango
hacia arriba
de/mango-_
CEPILLO
PARA CONTORNO
El cepilto para contorno se puede conectar
en el mango o en el tubo para limpiar
lugares elevados o en muebtes como
gabinetes o estanterias.
2, Deslice el accesorio
deseado con firmeza sobre
el mango.Consulte la
CUADRO DE USO DE
LOS ACCESORIOS
para contornos y
asegt_relo en su
;:_;:F_?:i
_: '_i_..;_
ACCESORIOS DEL TUBO
2. Conecte el cepillo
para contornos al
mango o al tubo,
1. Para retirar
los iubos de la
PowerMale,
col6quelos en
la posici6n vertical de bloqueo.
'11
CEPILLO
PARA PISO DESMONTABLE
CEPILLO
Para montar el
ADVERTENCIA
Cepilto
cepillo para sacudir
inserte el cepiIIo
Peligro de choque el6ctrico
para telas dentro de
ta boquilfa del
cepilto para sacudir
Para reducir el riesgo de choque eldtrico- NO
USE su aspiradora sobre superficies mojadas,
Para desmontar
el cepillo para
PARA SACUDIR
Ceplllo
para telas
presione en su
lugar.
Cepillo
para pisos-_
pisos presione
el pedal en el
PowerMate_
Levante el
cepillo para
pisos fuera del
PowerMate,
Para quitar,
presionar el
Pedal de
pestillo y
levantarse.
Ilberacl6n
delceplllo
Pestltlo
Para regresar et
cepillo para pisos,
col6quelo sobre el
PowerMate y
presione para
asegurarlo,
AREA A LIMPIAR
ACCESORIO
cepiil..opara_'_
Cepillopara sacumr
_j
comoinaci6n Cepillo
_
tara tetas I_
Herramienta
para hendiduras
Meubles
1
Entre
cojines1
I
Cortinas1
v'
Ceplllo para contorno
i/
I
v'
v'
v'
Ceplllo para pisos
v"
i#'2
PowerMate
Handi-Mate Jr.®3
v"
v'
Pet PowerMate 3,4
V'
V'
1,
2.
3.
4.
Plsos
_lfombradosl Paredes
Alfombras
escubtertos
v'
v'
v'
Pisos
EscaloNes
v'
8iempre limpie los accesorios antes de usar sobre telas.
Usar la opci6n BARE FLOOR de el control electr6nico,
La Handi-Mate Jr,'_y la Pet PowerMate incluyen sus propias instrucciones para uso de accesorios,
La Pet PowerMatesolo pude ser utilizada en el mango de la manguer&
12
DE RENDIMIENTO
,i tk ADVERTENCIA
Cuando la aspiradora
est_ funcionando con
el flujo normal de aire,
el indicador de
rendimiento est&
apagado Se enciende
la luz cuando el flujo
Peligro de lesiones personales
Apagu_ y desconecteslempre la aspiradora
antes de timpiar las dreas de la agitador pues
_stos podrfanarrancar de manera Imprevista_
El ho hacerlo, podrfa resultar en lesiones
personales.
%.
./_
de aire est_ obstru[do
Si esto sucede, revise
para polvo, el filtro de la seguridad det motor
iugaresposibles por residuos de basura.
le FUNCIONAMIENTO DE SU ASPIRADORA,
PROTECTOR CONTRA
SOBRECARGAS
La PowerMate
cuenta con protecBot6n de
ci6n incorporada
BELTRESET
contra daSo del
(Protectorcontra
motor y ]a correa
en caso de alascamiento del
agitador. 8i el
agilador funciona
mils despacio o se
atasca, el protector
de sobrecarga de
la PowerMale se acliva y la luz roja
motor de la aspiradora continuar,_
motor del recept_cutocontinuar_,
nando,
Para corregir el problema: Ap_
aspiradora, lim;
presfone el bot6n de BELT
sobrecarga). Puede necesitar
Si el problema persiste,
calificado que haga et se
• el problema: Verse el diagrama
RECONOCIMIENTODE PROBLEMAS,
accesorios
ue la luz encienda al usar los
el flujo de aire es reduddo por los
accesorios,
TERMAL
tiene un protector termal que
se ajusta autom_ticamente para proteger a ta
aspiradora del sobrecalentamiento_ Si una
obstrucci6n impide el flujo normal de aire at
motor, el protector termal apaga el motor
automdticamente para permitir que el motor se
enfrfe a fin de evitar posibtes daSos a la
aspiradora.
:Jesconect_la
)rotector de
un t_cnico
de la aspiradorao
Pata cotreglr el problema: Apagu_ y
desconect_ la aspiradora para permitir que la
aspiradora se enfrfe y que el protector termal
se reajuste. Busque y saque las
obstrucclones, sl es necesarlo. Examine
tambldn y reemplace/llmple cualquler
fl|tro obstruldo, Espere aproxlmadamente
trelnta (30) mlnutos y enchufe la
asplradora y voltdela para vet si el
protector del motor se ha reajustado. El
protector del motor no se reaJustard sl no
se ha apagado la aspiradora aun cuando la
asplradora se haya enfrladoo
LIMPIADOR D
los cepillos limpiade orillas a cada
la PowerMate.
Pass la PowerMate junto a
unto a los
a eli_
minar
en
la atfom-
13
SOSTi N PARA LA ESCALERA
INDICADOR DE POLVO
Durante fa
El sistema de luces del
operaciSn
normal de ta
indicador de polvo se localiza
en et mango, consiste de una
luz roja y cina verde.
aspiradora
mientras que
est_ en la
posici6n
horizontal, las
ruedas del cuerpo giren libremente 360°.
BAREFIOOR
i r_A_!'ET
EN OPERACION
Cuando se utitiza la aspiradora las luces
cambiaran, si hay polvo presente yes
aspirado. Mientras la luz roja permanece
encendida, esta indicando que polvo esta
pasando por el mango y la superficie requiere
iimpieza_
La caracterfstica del Sost_n para la Escalera
permite que las ruedas del cuerpo se traben en
posiciSn cuando la aspiradora gira 25° de una
posiciSn horizontal a vertical para que la
aspiradora descanse con seguridad sobre las
escaleras
Cuando la luz indicadora esta en verde, el
sensor no delecta suficiente potvo indicando
que el D.rea no requiere de mas limpieza.
LUZ DI=L TUBO
Esta aspiradora asta equipa
con una luz en el tubo de
extensi6n. Esta luz funcionar_
solamente cuando la
CONTROL DE ASPIRAClON
El control de
aspiraciSnle
permite cambiar la
polencia de
aspiraciSnde la
aspiraci6n
aspiraci6n
aspiradora
dependiendo del grosor de la tela o alfombra..La
aspiraciSn se disminuye, para limpiar cortinas y
tapetes ligeros, abriendo el control; para aspirar
muebfesy alfombras, el control debe cerrarse para
aumentar la aspiraci6n.
aspiradora es en modo
CARPET (ALFOMBRA)
(v_ase PARA COMENZAR)
La luz funcionar_ cuando estD,
o no unida a ta PowerMate_
La luz se puede utilizar para la iluminar
lugares diffciles de alcanzar.
La aspiradora crea succiSno aspiraci6n que levanta
_-)
la lierra,La tierra es impulsada a tray,s de ias vfas
/j _"-.-._
de ffujo aire hasta la bolsa por una r&pida corriente
///""de aire_La bolsa para polvo permite el ffujo de aire, /i_
pete atrapa la tierra.
ZF
Para lograrlos mejores resultados de limpieza, /@_//
mantenga abiertas las vlas de aire..Examine .r_.oT"
periSdicamente las _reas indicadas con
.,t_y
asteriscos para asegurarse de que no
/_._"
/
,/.
{i
\'
-
recept,cu,o de revisarlo
_fi,__
Fittrode
seguridad
de/molor
_
F#tro de
_
escape
I_ :tl_;_,_\.._,-_
_2_°-'_1"[_-.._-_
14
La boisa debe cambiarse seguido para Iograr los
mejores resuitados de limpieza El indicador
e{ectrOnicodela bolsa o de manguera enciende
cuando se necesita cambiar.
NOTA: NO doble ni pliegue el centro del
carton al instalar ta bolsa en las ranuras del
montaje de la bolsa.
8, Gire hacia abajo el
soporte para la bo[sa
roja y para insertarla
bolsa en las ranuras
NOTA: V_ase PIEZAS Y CARACTER|STICAS
para e! numero de la boisa
1. Apagu_ y desconect_ la aspiradora
empuje hacia abajo
hasta que las ]engi_etas
de carton encierren
2. Quite la manguera
de la aspiradora
seguramenteen las
posiciones apropiadas
como se ve en el diagrama
3.Tire del pestitlo de
la tapa hacia fuera y
hacia arriba; luego
levante la tapa del
recept&culo,
9, Empujela bolsa asegur_.ndoladentro de la
cavidad para evitar que sea trabada por Ia lapa de la
aspiradora,
t0. Baje la cubierta del recept&culoy cierree]
pestillo
4. Destrabe la pesta£ta
de carton del montaje
rojo de la bolsa empujando hacia afuera y
tirando hacia arriba,
11. Introduzca la manguera en el recept_culo basra
que quede fija en posiciOn
12. Conecte et cordon elOctricoen la clavija de la
pared.
5. Saque la bolsa del
montaje rojo
Fi/tro de
segurtdad
del ,
%
CUIDADO
6. Revise y cambie eE
filtro de seguridad
del motor,cuando
sea necesario,
NUNCA REUTILICE UNA BOLSA PARA
POLVO. Los materlales muy flnos, tales
como desodorantes para alfombras,
tatco facial, polvo flno, yeso, hollrn,
pelusa de alfombras nuevas, etc., pueden atascar la bolsa y causar que se
rompa antes de que est_ Ilena y puede
dahar el motor de la asplradora. Camble la bolsa m_s seguldo cuando
asplre este tlpo de materlales.
7. Et montaje rojo de fa bolsa se inclinar&hacia
adetante despu_s de que retire la botsa Esto
impedir_,que la tapa se cierre antes de instalaruna
bolsa nueva_
1. Desconecte e[ cordon ef_ctricode la clavija de la
pared. NO choree agua sobre la aspiradora,
CUIDADO
2. Para limpiar el exterior o reducir la electricidad
est_tica y acumulaciOn de polvo, fimpiela
superficie exterior de la aspiradora y los
accesofios. Use un trapo suave y limpio, mOjelo
en una soluciOn de agua y detergente I{quido, y
expri'malo seco SOquela despu_s de limpiar,
No use los accesorios si est_n mojadoso Los
accesorios que se utilicen en _reas suclas,
debajo del refrtgerador, no deben usarse en
otras superficies sin antes ser lavados°Poddan
dejar marcas.
15
ADVERTENCIA
2. Levante el dispositivo
de retenci6n de goma y
saque el filtro de seguddad come seve en e]
diagrama,
Peligro de choque ef_ctrico
Apagu_ y desconect6 ta aspiradora. No opere
la aspiradora sin el filtro de segurtdad del
motor. Aseg_urese de que el filtro est_ seco e
instalado adecuadamente para impedir que el
motor falle y/o que se produzca un choque
el_ctrico.
de retenci6n J
de goma
FILTRO DE SEGURIDAD DEL
MOTOR
ELECTROSTATICO
3. Reemptace el _tro
con la superficie blanca
en su campo de vista
per corredo debajo de
las costillas en ta
cavidad de la bolsa,
Meta el filtro para que
quepa par complelo
debajo del diepositivo
de retenci6n de gema.
Este filtro se fiene que cambiar cuando est_ sucio
Debe cambiarse periSdicamente seg_n Ias condiclones de use, El filtro no se puede lavar pues
perderia su capacidad para atrapar altrapar
polvo.
NOTA: V6ase PIEZAS y CARACTERiSTICAS
para e! re)mere del filtro de seguridad del motor,
4. Vdase CAMBIO DE LA BOLSA para cambiar la
bolsa.
1. Para quitar la bolsa, siga lasinstrucciones en
CAMBIO DE LA BOLSA
ii,,,
uullllulll,,ll,,
ii
i,i
i
i
..........
ADVERTENCIA
1, Presione el
pestillo hacia abajo
para liberar la
cubierta det filtro de
escape de la ranura
en la aspiradora.
Peligro de fuego o choque el6ctrico
No opere con un filtro de escape bloqueado o
sin et filtro de escape instalados. No opere sin
la cubierta del filtro de escape instalada.
FILTRO DE ESCAPE
HEPA
2, Jale la
cubierta del filtro
Este cartucho del filtro escape liene que cambiar
est# sucio. Cambie el filtro cuando el #,tea
superficial est_ cubierta per completoo El filtro no
se puede lavar pues perderfa su capacidad para
atrapar altrapar polvo.
hacia fuera para
removerla de la
aspiradorao
NOTA:V_ase PIEZAS y CARACTERfSTICAS
para el nt_mero del filtro de escape.
3. Remover el filtro
de escape usando la
palanca come se
nuestra.
16
4. Reemplace el
cartucho del filtro
6, Deslizar el
del escape,
Coloque el filtro
nuevo
pestillo hacia
abajo para cerrar
la cubierta del
en la
aspiradora con el
lado do esponja
en direccl6n ala
filtro do escape
en su lugar.
aspiradora,
7, Suelte el pistillo y confirme que la cubierta
esta segura en su lugar,
5_Monte
la
cubierta
del_tro
deescape
colocando
lasdos
leng_etas
enla
cubierta
delfiltro
enlasranuras
de
taaspirador
ygire
ensulugar,
Aunque la funci6n de detecci6n de polvo de la
aspiradora Kenmore est_ diseSadapara brindar
muchos aSos de funcionamiento interrumpido, el paso
de polvo a tray,s del sistema de las vias de aire
puede causar una escama en la lento, haciendo que
se encienda y contint]e encendido el indicador verde.
sin cambiar nunca a rejo, Cuando esto suceda, se
t]enen que lirnpiar las lentes,
m
O
o
Approx.
5 pulgadas
CUIDADO
(13imm)
No utilice nunca ague ni soluci6n limpiadora
pare limpiar las lentes, El restduo del ague o
del limpiador causar_ que las lentes se cubran
de tierra m_s r_ptdo, requiriendo limpieza con
mayor frecuencia=
i
Detectores
de polvo
t
.1#
.,
i
PARA LIMPIAR LAS LENTES
2, Como seve en el diagrama los dos delectores
de polvo estD.ncolocades dentro del mango 5 pulgadas o 130 mm (Observe las flechas)_Los detec*
_!_t
toresdeben ser limpiados peri6dicamente, Pare
llegar a los detectores, use un cepillo pequeSo,
il]
como pot ejemplo un cepillo pare botellas Cepille I_
cada detector vafias veces para eliminar la tierra y _'_'_;J
et polvo
Mango
1. Retire e! mango
oprimiendo et
bot6n de ]iberaci6n
r_pida y jalando
fuera del tubo,
Bot6n d_l
Bot6n de
Ilberaci6n
r_pide
_
-'_ ]
__3
_'-_
m
m
del mango--+,-_
t7
CUIDADO DE LA POWERMATE
Siempre deber&n seguirse todas las precauciones de seguridad antes de efectar el mantenimiento
a la PowerMate.
m
CAUTION
ADVERTENCIA
Peligro de choque el_ctrico o lesi6n corporal
iPartes en movimlentol Para reduclr el
rlesgo de daSos corporales, no toque el
ceplllo cuando la
aspiradora est_i
encendlda. El tocar
el ceplllo mlentras
que est_ girando
puede cortar,
contuslonar o
causar otras
leslones.
Apagu_ y desconect_ la aspiradora antes de
efectuar el mantenimlento a su asplradora,
De Io contrario podda producirse un choque
el6ctrico o causar lesi6n corporal si la aspiradora arranca de manera imprevista.
Apagu6 y desconect_ la asplradora antes
de dar mantenlmlento.
Tenga culdado al asplrar cerca de nlfios
peque5os.
PARA RETIRAR LA CORREA
Cepi/Io
para pisos--_
5. Desatornille dos (2)
torniflos de la cubierta
del agitador y levantera
cubierta del agilador
1. Desprenda el
cepilio para pisos
de Ia PowerMate
del cepillo
2_Gire la PowerMate
para mostrar ta parte
inferior hacia ardba y
desatornille cinco (5)
tornillos de la
cubierla
6. Quite el agilador
y la correa
gastada
Tomll/os
3. Gfre la PowerMatecon la parte superior hacia
arriba
7. Examine y [impielas &teas de tapa del extreme En
la ENSAMBLE DEL AGITADOR se proporciona una
ilustraci6n de redo el ensamble del agitador
4. Para remover
",
t
__
sujete los
pestillos de los
costados y jale
hacia fuerao
la cubierta,
18
LIMPIEZA DEL AGITADOR
2, Coloque otra vez
la unidad del agitm
dor en la
PowerMale.
NOTA: Para mantener una alta eficiencia de
limpieza y evitar el daSo a la aspiradora,
que ]irnpiar e! agitador cada vez que se cambia
Tambidn hay que limpiar el agitador segg_nel
siguiente horario:
El use de la
asplradora
Llmple el
Frecuente (usada dirariamente)
Moderado (usada 2 o 3 veces
per eemana)
cada semana
3, Reinstale la
cubierta de! agitador
e insertelos dos (2)
tornitlos.
_Z"
®
,,
cada rues
4. Alinee la parte frontal de la cubierta con la base.
Coloque la cubierta sobre el horde delantero de la
base come se muestra.
cada 2 meses
Llgero (usada 1 vez per semana)
IMPORTANTE
Apagu_ y desconect_ ta aspiradora. Examine frecuentemente el cepillo y las _reas de soporte det
mismo de la PowerMate y eiimine todo cabe]!o, bile
y pelusaacumulada.
5, Rote la cubierta
hacia atr&s. Apriete
con poca fuerza
hasta que las
leng6etas laterales y
traseras encierren
seguramenle
Retire rode indicio de basura o suciedad de la
zona de la correa y del rodillo de! cepillo,
Con cuidado quite las tapas y quite el hilo o
los restos ubicados en el agitador, o en los
soportes del cepillo.
ENSAMBLE
CerciSrese que no hay espacio entre la cubierta y
la base°
DEL AGITADOR
6o Coloque la
PowerMate con la
parte inferiorhacia
arribae insertelos
cinco (5) tornillos en la
cubierla_
Ruta de
la correa-
Tapadel
extreme
Unldad del
ceplllo
Tapadel_
extreme J
7o Inserte el cepillo
para pisos sobre la
PowerMatehasta que
este segura en su
lugar.
PARA RETIRAR LA CORREA
1,1nstaleuna
correa nueva
sobre el eje
del motor y
luego sobre la
polea dei agitador.
lmpulsor
del motor
de
la correa
Agltador
Tapa del
extremo
NOTA: V_ase PIEZAS Y CARACTERfSTICAS
para ei nOmero de la correa.
19
ii,ll,l,,i
................. ii ],ll Ill
PARA CAMBIAR MAZO DEL
AGITADOR
ADVERTENCIA
Pellgro de choque el_ctrlco o lesl6n corporal
1. Desmonte el cepillo para pisos del
PowerMate.
Apagud y desconect6 la asplradora antes
de efectuar el mantenlmlento a su asplradora. De Io contrarlo podrfa produclrse
un choque eldctrlco o causar lesl6n corporal sl la asplradora arranca de manera
Imprevlsta.
2. Quite la cubierta de ta PowerMate, la
cubierta del agitador y el agitador. V_ase
CAMBIO DE LA CORREAY LIMPIEZA DEL
AGITADOR.
3. Reemplace el ensamble del agitadoro
4. Reinstale la correa, la cubierta del agitador, y
la cubierta de la PowerMate. Consulte "Para
cambiar la correa" bajo CAMBIO DE LA
CORREA Y LIMPIEZA DEL AGITADOR.
PARA REVISAR LA UNIDAD DE
LOS CEPILLOS
__
_
5. Inserte el cepillo para pisos sobre la
PowerMate hasta que este segura en su lugar.
tadoslos cepillos al
nivel de las barras
de soporte en la
base, cambie Ia
Cuando
est_n
gasunidad del
agitador,
Barra de soporte
de la base
20
Revise este recuadro para encontrar soluciones a problemasque puede corregir usted mismo_Cualquier otto
servbio debe ser realizado per SEARS u otro agente de servicio califbado.
i ADVERTENCiA
Apagud y desconect_ la asp|radora antes de efectuar el mantenlmlento
a su asplradora. De
Io contrarlo podda produclrse un choque el_ctrlco o causar lesldn corporal.
SOLUC
La asplradora no arranca,
1, Est_ desconectada
2. Cortacircuitos bolado o fusible
quemado en el tablerode servicio
de la residencia
3. Conexienesel_ctricasde la
manguera suettas
No aspire
satisfactoriamenteo
1,
2,
3,
4°
5.
6°
7.
8,
9.
Bolsa pare potvo tienao atascada,
V[as de ftujo de atre atascadas
Filtros sucios
Ajuste incorrectode nivel de
pelode la alfombra
Incorrecta seieccionde nive_de poder
Manguera rote
Agi_adorde la PowerMatedesgastados
Correa desga_ladao rote
Ag}_adoro tapes del extreme de _ste
sucios
10. Tapedel recept_cutoabierta
11. Protector centresobrecargasde la
PewerMatebotado
La aspimdora arranea,
pero seapaga.
1. Conexionesel_ctricasde fa manguera
o de la tape
2_ Protectorcentresebreeargasde ta
PowerMalebotado
3. Protector termal betado
en el _ecept_cuto
La PowerMate no functona
cuando est_ instalada_
1. Conexionesde le PowerMate
desconectadas
2_ Correadesgastada o rote
3. Agitador o tapes del extremes de
_ste sucios.
4_ Proleclor centresobrecargas de la
PowerMatebotado
5o Aspiradoraen modalidad BARE
FLOOR
21
1, Conecle bien, presioneel bot6n
ON/OFE
2, Restablezcael cortacircuites
o
cambie el fusible
3. Vuelva a conectar los extremesde
la manguera
1. Cambie la bolsa
2. Limpie Iasvies de Ilujo de aire
3. Cambie el Iiltros
4, Ajuste el nbeI.
5, Ajuste ei control
6, Cambie la manguera
7. Cambie la agitado[
& 9, Consulte CAMBIO DE LA CORREAY
LIMPIEZA
DEL AGITADOR
10. Cierre bien la tape
11. Retire cualquier objeto atorado o
atascado, luego reslablezca Sita
aspiradora arranca pero se vuelve a
apagar, timpie el agitador y los tapes
del extremes de _s_e,luego restablezca
t_ Examine los conexioneeel_clricas,
vuelva a conectar los extremes
de la manguera
2_ Retirecualquierobjeto atorado o
atascado,luego restablezca SIla
aspiradoraarranca pero se vuelve a
apagar,fimpieel agitadory los tapes det
extremesde _ste, luegorestabiezca
3,
Consulte CARACTER{STtCASDE
RENDIMIENTO- "ProtectorTermal:'
1. Conecte bien,
&3. Consutte CAMBIO DE LA CORREAY
LIMPIEZA DEL AGITADOR,
4_ Retirecualquier objeto atorado o
atascado,luego restablezca Sila
aspiradoraarrancapete se vuelvea
apagar, limpie el agitador y los tapes
del extremes de _,ste,luego restablezca
5, Presloneel botSn CARPETtBARE
FLOOR pare cambiar ala modalidad
CARPET
Indicador verde
encendtdo continuamente
en el detector de tierra,
I. Laviade pasode Iierra
o labolsade
peeveest_bloqueada.
2. Lenlesucia.
2. Llmpie fas lenles
No se enciendenlos
1, No hay sunistro de energIa al
Iablerodetector
1. Acuda el Centre de Servicio de
Sears m_s car cane
Io Boise pare polvo |lenao atascada.
2. Filtros sucio
!.
2.
3.
4.
indicadores verde o rojo
de detecci6n de tierra.
E| indicador rendemiento
UrtC|Ona
3o Vies de flujo de aire atascadas
4. Clerics accesorios
1, Determinesi est_n bloqueadaslas
vies de aire
Cambie ta balsa
Cambie el filtros
Desbloquee|asvres de flujo de elre
Esto es normal EI indicadordebe set
normal cuandola herramlentaeel_.
quitada
La aspiradora levanta
tapetes -o- es diflcil
empujar a PowerMate,
1. Ajusle incorrecto de nivel de
pelode ta altombra,
2. Aspiraci6n demasiado potente.
La luz roja de Is
PowerMatese prende,
1. Prolec!or centresobrecargas de ta
PowerMaiebotado
1o Retire cualquierobjeto atorado o
alascado, iuegoreslablezca Si ta
aspiradore arranca pe_'ose vuelve e
apagar, timpie el agftadery los tapes
det extremesde _ste, luego restablezca
El cord6n no se enrolla,
1o Cord6n el_ctricosucio
2. Cord6n atascado.
I. Utopia el cord6nel_ctdco
2. Tire del co_d6ny despu_senr611elo
La asplradora deJa
marcas en Is alfombre.
1. EstiIo de limpieza incorrecta
i.
22
I, Ajuste
elnlvel
2, Seleccionar nivel de pealerbajo en
el control electr6nice.
Consulte SUGERENCIASPARA
ASPIRAR,
Acuerdos Maestros de Protecci6n
Enhorabuena por hacer una compra inteligente_ Su nuevo producto Kenmora® est_ dise_ado y fabricado para ofrecerle aSos de funcionamiento confiable. Pero at igual qua todos los productos pueden
precisar un mantenimiento preventivo o alguna reparaci6n de vez en cuando, Por este motivo, tener
un Acuerdo Maestro de Protecci6n puede ahorrarle dinero e inconvenienteso
El Acuerdo Maestro de Protecci6n tambi_n le ayuda a prolongar la vida 5til de su nuevo productoo A
continuaci6n indicamos Io qua el Acuerdo* incluye:
[]
Partes y mano de obra necesarios para ayudar a qua estos productos funcione correctamente
baJo condlclonales normales de uso, no sirnplemente defectos. Nuestra cobertura va mucho
m_s all=_de la garantfa del producto. NingOn deducible, ninguna averfa funcional queda excluida de la cobertura- proteccl6n real,
[]
Servlclo experto ofrecido por una lista de m_s de 10.000 t(_cnlcos autorizados dei servlclo
t6cnlco de Sears, Io qua significa qua alguien sn quien ustsd puede confiar estar_ trabajando
en su producto.
[]
Ndmero ltimltado de Ilamadas al servlclo tdcnlco y servlclo en toda la nacl6n, tan continuo
como usted nos to solicits, sin importar donds est,,
[]
Garantfa serla de sustltuc!6n del producto. La sustituci6n de su producto cubierto si se producen cuatro o mds avsdas en doce meses.
[]
Sustitucl6n del producto por otro nuevo si su producto cubierto no puede repararee.
[]
Revlsi6n
[]
Ayuda r=iplda por tel_fono - Nosotros to Ilamamos Resolucl6n r_iptda. Soporte telef6nico de
un representante de Sears en todoe los productos° Pisnse en nosotros como un "manual del
usuario parlante".
[]
Proteccl6n contra subldas de tensl6n qua provoquen daSos el_ctricos causados por las fluc_
tuaciones de la corriente.
[]
$250 de proteccl6n contra la pdrdida de alimentos anualmente en case de que se estropse
algSn alimento como resultado de una averfa mec,_nica de cualquier congelador o refrigerador
cubierto.
[]
Reembolso del alquller sila reparaci6n de su producto cubierto toma rods tiempo del prometido.
[]
10% de descuento en el precio regular de cualquier servicio de reparaci6n no cubisrto y de las
piezas instatadas relacionadas.
y mantenlmlento
anual preventlvo siempre qua lo deses y sin cargo alguno.
Una vez qua compre el Acuerdo, s61o bastard, una simple llamada telef6nica para qua pueda programar un servicio. Puede Ilamar a cualquier hora del dfa o de la noche, o concertar una cita de servicio
en llnea.
El Acuerdo maestro de protecci6n es una compra libra de riesgos. Si por cualquier raz6n cancela
durante el perfodo de garantfa del producto, le devotveremos todo el dinero. O, un reembolso prorrateado despues del perfodo de vencimiento de la garantfa, iCompre su Acuerdo maestro hoy!
Apllcan algunas Ilmltaclones y excluslones. Para preclos y mds Informacl6n
al 1-800-827-6655.
en EE.UU., game
* La cobertura en Canad_ varia en atgunos articulos. Para obtener todos los detalles, Ilame a
Sears Canada al 1-800-36%6665.
Servicio de lnstalaci6n
de Sears
Para la tnstalaci6n profesional por parts de Sears de electrodom_sticos, abridores de puertas de garajes, calentadores de agua y otros articulos princtpales para el hogar, en EE°UU. o Canad_ llama al 1800-4-MY-HOME®.
Get it fixed, at your home or ours!
Your Home
For expert
troubleshooting
and home solutions
manage
advice:
home
www.managemyhome,com
For repair - in your home - of all major brand appliances,
lawn and garden equipment, or heating and cooling systems,
no matter who made it, no matter who sold itl
For the replacement
parts, accessories
and
owner's manuals that you need to do-it-yourself
For Sears professional
installation of home appliances
and items like garage door openers and water heaters
1-800-4-MY-HOME
®
(!-800-469-4663)
www.sears,com
ca, anytime, day or night
(USoAo and Canada)
wwwosears,ca
Our Home
For repair of carry-in items like vacuums,
Kawn equipment,
and electronics,
call anyti me for the location of the nearest
Sears Parts & Repair Service Center
1-800.,488-1222
(U.S.A.)
1-800-469-4663
www.sears,com
To purchase a protection
1-800-827-6655
(Canada)
www.sears,ca
agreement
(U3.A)
on a product serviced
by Sears:
1-800-361-6665(Canada)
Para pedir servicio de reparaci6n
a domicilio, y para ordenar piezas.
Au Canada pour service en fran_ais:
1-800-LE-FOYER Mc
1-888-SU-HOGAR®
(1-800-533-6937)
(1-888-784-6427)
WWW
sea!'s
ca
Se llf'S
© Sears Stands, LLC
® Registered Trademark t TMTrademark
I sM Service Mark or Bears Brands, LLC
® Marca Registrada t T_ Marca de F_brica t SMMarca de Servicio
MCMarque de commerce / MDMarque d_pos_e
de Sears Brands, LLC
de Sears Brands, LLC