1
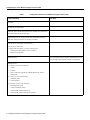
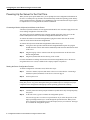
Text Part Number: 78-10385-01
Configuration Notes for Cisco Media
Convergence Server 7830
December 10, 1999
This document describes how to install and configure Cisco CallManager on the Cisco Media
Convergence Server 7830. Use this document in conjunction with the Release Notes for
Cisco CallManager, the Cisco CallManager online help System Guide, and the Cisco
Documentation CD-ROM.
Contents
This document contains the following topics:
•
•
•
•
•
•
•
•
•
•
•
•
Introduction, page 2
System Specifications, page 2
Configuring the Cisco Media Convergence Server 7830, page 3
Configuring Cisco CallManager, page 9
Configuring Carbon Copy, page 10
Configuring the Remote Insight Board, page 11
Backup and Recovery Procedures, page 11
Important Notes, page 14
Troubleshooting, page 14
Service and Support, page 14
Cisco Connection Online, page 15
Documentation CD-ROM, page 15
Corporate Headquarters
Cisco Systems, Inc.
170 West Tasman Drive
San Jose, CA 95134-1706
USA
Copyright © 1999
Cisco Systems, Inc.
All rights reserved.
1
Introduction
Introduction
Cisco CallManager on the Cisco Media Convergence Server 7830 is a network business
communications system providing high-quality telephony over IP networks. Cisco CallManager and
the MCS-7830 enable the conversion of conventional, proprietary circuit-switched
telecommunication systems to multi-service, open LAN systems.
System Specifications
This section lists the system specifications for Cisco CallManager and the Cisco Media
Convergence Server 7830.
Hardware Specifications
The specifications for the MCS-7830 are as follows:
•
•
•
•
•
•
•
Pentium III, 500 MHz, 512Kbyte Cache RAM
256 MByte ECC SDRAM
Two hot-swappable 9.1 GByte hard drives (10,000 RPM)
Two redundant power supplies
Compaq Remote Insight Board with LAN and serial port
Compaq Smart Array Controller 221
Compaq Rack Mount Kit
The following items are included as standard with the MCS-7830:
•
•
•
•
•
•
•
•
•
10/100 TX, RJ-45
SCSI-2 (Ultra-Wide), Internal
5U rack mount box
Five available 32-bit PCI slots
One serial port on the back panel
One printer port
One PS/2-type keyboard port
One PS/2-type mouse port
One VGA port
Note A monitor, keyboard, and mouse are not supplied with the Cisco Media Convergence
Server 7830. You must supply a monitor, keyboard, and mouse to use during initial startup and
configuration of the MCS-7830 and Cisco CallManager.
2 Configuration Notes for Cisco Media Convergence Server 7830
Software Specifications
Software Specifications
The MCS-7830 comes with the following software already installed:
•
•
•
•
•
•
•
•
•
Windows NT Server 4.0 with Service Pack 5
Cisco CallManager 2.4
Compaq Carbon Copy 32
Compaq Remote Insight Manager
Internet Explorer 4.01 Service Pack 2
Microsoft Data Access Components 2.0 Service Pack 1
Microsoft Option Pack 4.0. IIS 4.0
Ataman Telnet Server
Windows NT Resource Kit
Configuring the Cisco Media Convergence Server 7830
This section describes how to power up and configure the Cisco Media Convergence Server 7830.
Configuring the MCS-7830 requires the following procedures, which must be performed in the order
indicated:
•
•
Before You Power Up the Server, page 3
Powering Up the Server for the First Time, page 6
— Connecting a Monitor, Keyboard, and Mouse to the Server, page 6
— Starting the Server Configuration Process, page 6
— Entering the Server Configuration Data, page 7
•
Logging On and Changing the Password, page 8
Before You Power Up the Server
When you first power up the MCS-7830, it automatically begins installing the operating system,
Cisco CallManager, and other included software. During this initial power-up process, you are
prompted to enter important configuration information about the server, such as the server name and
IP address. You can complete the initial power-up more efficiently if you gather all the necessary
configuration information before turning on power to the server.
Note For instructions on how to mount the MCS-7830 and connect it to a power source, refer to
the documentation shipped with the server.
Table 1 lists the configuration information required during initial power-up of the MCS-7830.
Record your entries in the table and have the list with you when you first turn on power to the
MCS-7830.
Configuration Notes for Cisco Media Convergence Server 7830
3
Configuring the Cisco Media Convergence Server 7830
Table 1
Configuration Data for Cisco Media Convergence Server 7830
Configuration Data
Your Entry
Your name.
The name of your organization.
Product ID. This is the ID number found on the Windows NT Certificate of
Authenticity shipped with the MCS-7830.
Computer name. This is a unique network name for the MCS-7830. The
name must conform to Windows NT naming conventions.
How will the server participate on the network?
• Do not connect at this time.
• Computer will participate in one of the following ways:
— Wired to the network (ISDN or network adapter)
— Remote access (modem)
DHCP parameters.
SNMP properties.
• For Agent, you can set the following:
— Contact
— Location
— Service (Physical, Applications, Datalink/Subnetwork, Internet,
End-to-End)
• For Traps, you can set the following:
— Community name
— Trap destinations
• For Security, you can set the following:
— Send authentication trap
— Accepted community names
— Accept SNMP packets from any host
— Accept SNMP packets only from selected hosts
4 Configuration Notes for Cisco Media Convergence Server 7830
Cisco recommends that you program a fixed IP address for the
server through TCP/IP properties instead of using DHCP.
Before You Power Up the Server
Table 1
Configuration Data for Cisco Media Convergence Server 7830 (continued)
Configuration Data
Your Entry
TCP/IP properties.
• For IP address, you can set the following:
— Adapter
— IP address (required if DHCP is not used)
— Subnet mask
— Default gateway
• For Domain Name System (DNS), you can set the following:
— Host name
— Domain
— DNS Service search order
— Domain suffix search order
• For Windows Internet Name Services (WINS), you can set the following:
— Adapter
— Primary WINS server (required if DHCP is not used)
— Secondary WINS server
— Enable DNS for Windows resolution
— Enable LMHOSTS lookup
— Scope ID
• For DHCP relay, you can set the following:
— Seconds threshold
— Maximum hops
— DHCP servers
• For Routing, you can set the following:
— Enable IP forwarding
Workgroup or domain name for the server.
Current time zone, date, and time.
New password for the system administrator.
Configuration Notes for Cisco Media Convergence Server 7830
5
Configuring the Cisco Media Convergence Server 7830
Powering Up the Server for the First Time
When you first power up the MCS-7830, you are prompted to enter configuration information for
the server. At initial power-up, the MCS-7830 automatically installs the operating system and any
factory-supplied software, including Cisco CallManager. This section describes the steps required
to complete the server configuration and software installation.
Connecting a Monitor, Keyboard, and Mouse to the Server
A monitor, keyboard, and mouse are not supplied with the MCS-7830. You must supply these items
for use during configuration of the MCS-7830.
The mouse plugs into the standard mouse connector marked on the back of the server, but the
monitor and keyboard connect to the Remote Insight Board installed in the server.
To connect the monitor to the Remote Insight Board, plug the monitor cable into the monitor
connector on the back of the Remote Insight Board.
To connect the keyboard to the Remote Insight Board, follow these steps:
Step 1
Using the Y cable provided with the Remote Insight Board/PCI option kit, plug the
middle connector of the Y cable into the standard keyboard connector marked on the back
of the server.
Step 2
Plug the long leg of the Y connector into the keyboard connector on the back of the
Remote Insight Board.
Step 3
Plug the keyboard cable into the short leg of the Y cable.
For more information on making connections to the Remote Insight Board, refer to the Remote
Insight Board/PCI User Guide, available from Compaq Computer Corporation.
Starting the Server Configuration Process
To initiate configuration of the MCS-7830, follow these steps:
Step 1
Connect a monitor, keyboard, and mouse to the server as described in “Connecting a
Monitor, Keyboard, and Mouse to the Server” section on page 6.
Step 2
Power up the server.
Note During installation, the server reboots several times. Do not power off the server any time
during this process. Any power interruption during the installation process could prevent proper
completion of the configuration and might prevent the operating system from restarting.
Step 3
Carefully follow the online prompts and make keyboard entries only when prompted by
the system.
Step 4
At the title screen, type C to continue the configuration process.
You can also type V to view the server specifications. If you select this option, use the
Page-Up and Page-Down keys to scroll through the specifications list. When you are
done viewing the specifications list, press the Escape (Esc) key to exit the list. Then type
C to continue the configuration process.
6 Configuration Notes for Cisco Media Convergence Server 7830
Powering Up the Server for the First Time
Step 5
Type A to accept the license agreements and continue. The server takes about seven
minutes to install the operating system.
Step 6
When prompted by the system to do so, press any key to shut down and reboot the server.
The reboot takes about two minutes to complete.
Step 7
Click on I Agree to accept the Windows NT license agreement. The server then displays
the Windows NT Server Setup Wizard.
Continue configuring the server by completing the steps in “Entering the Server Configuration
Data” section on page 7.
Entering the Server Configuration Data
Using the data you entered in Table 1, complete the following steps to configure the MCS-7830:
Step 1
In the Windows NT Server Setup Wizard, enter your name and organization, then click
Next.
Step 2
Enter the Product ID number listed on the Windows NT Certificate of Authenticity that
comes with the server. Click Next.
Step 3
Enter a unique network name for the server, then click Next. The name must follow
Windows NT naming conventions.
Step 4
Click Next to begin installing Windows NT Networking.
Step 5
Select the setting that correctly describes how the server will participate on the network,
then click Next. In most cases, you will want the server to participate by being wired to
the network via a network adapter.
Note Step 6 is very important. You must turn off the checkbox for Microsoft Internet Information
Server (IIS) in order for Cisco CallManager to install properly.
Step 6
Do not install Microsoft Internet Information Server. Turn off the checkbox for this option
and click Next.
Step 7
Click Start Search to begin searching for a network adapter. After the search finds the
default adapter, click Next.
Step 8
Turn off the checkbox for NWLink IPX/SPX Compatible Transport protocol, and click
Next.
Step 9
Click Next to accept the default settings for Network Services.
Step 10
Click Next to install the selected networking components.
Step 11
Cisco recommends that you click No when prompted about the use of DHCP to set the IP
address of the server. The MCS-7830 must have a fixed IP address so that the Cisco IP
phones can register with Cisco CallManager when you plug the phones into the network.
If you use DHCP to assign an IP address to the server dynamically, this could result in a
new IP address being assigned to the server if the server is disconnected and reconnected
to the network. Returning the server to its original IP address would then require
reprogramming the IP addresses of the other devices on the network.
Step 12
Set the properties as desired for SNMP services, then click OK. If you are not using
SNMP services, click Cancel without setting any properties.
Configuration Notes for Cisco Media Convergence Server 7830
7
Configuring the Cisco Media Convergence Server 7830
Step 13
Set the TCP/IP Properties as desired. At a minimum you must set the IP address of the
server, the subnet mask, the default gateway address, and the WINS address of the
primary network adapter.
Step 14
Click Next to accept the default network bindings.
Step 15
Click Next to start the network.
Step 16
Enter the workgroup or domain name for the server, then click Next.
Step 17
Set the correct time zone, date, and time, then click Close. As soon as you click the Close
button, the server begins an installation and reboot process that takes about 30 minutes to
complete. Do not interrupt the server during this process. The log-on prompt displays
when the install and reboot are complete.
Logging On and Changing the Password
After completing the server configuration, you can log on to the server. To log on:
Step 1
Press Ctrl+Alt+Del to display the log-on screen.
The log-on screen should already contain the user name Administrator.
Step 2
Leave the password field blank and click OK.
Cisco recommends that you change the Administrator password at this time. To change the
password:
Step 1
Click Start>Programs>Administrative Tools>User Manager for Domains.
Step 2
Double-click on the Administrator account.
Step 3
Type the new password in the Password field, and then retype it in the Confirm Password
field.
Step 4
Click OK to complete the process.
Note Do not lose or forget this password. If you do, you will not be able to reconfigure the server.
For more information on changing passwords, refer to the Windows NT documentation.
8 Configuration Notes for Cisco Media Convergence Server 7830
Configuring Cisco CallManager
Configuring Cisco CallManager
When you power up and configure the Cisco Media Convergence Server 7830, Cisco CallManager
is installed automatically. However, you must set some configuration parameters and install the
optional plug-ins for Cisco CallManager before you can begin using it. This section explains how to
configure Cisco CallManager and install the plug-ins.
Setting Up Internet Explorer
When you first access Cisco CallManager on the MCS-7830, you are prompted for information to
set up an internet connection through Internet Explorer. To configure an internet connection,
complete these steps:
Step 1
Click Start>Programs>Cisco CallManager>CallManager Administration.
Step 2
Click Next to start the Internet Connection Wizard.
Step 3
If you want to set up an internet connection at this time, select the appropriate option and
enter the required information at the prompts. Otherwise, select the option that says, “I
already have an Internet connection set up on this computer and I do not want to change
it.” Then click Next.
Step 4
Click Finish to close the Wizard.
When you finish setting up an internet connection, the Cisco CallManager Administration window
displays. You can then begin configuring Cisco CallManager.
Configuring Auto Registration
Auto Registration is a Cisco CallManager feature that automatically assigns directory numbers to
phones as the phones are connected to the network. If you want to use Auto Registration, you must
first set a range of directory numbers for Auto Registration.
To set a range of directory numbers for Auto Registration, complete these steps:
Step 1
In the Cisco CallManager Administration window, click Configuration and System.
Step 2
Scroll down to Auto Registration and click the Configure button.
Step 3
Enter a range of directory numbers to use for Auto Registration. Click Update and then
click Continue.
For more information about Auto Registration, refer to the online System Guide by clicking Help or
by going to:
http://www.cisco.com/documentation/ccm/v24/index.htm
Configuration Notes for Cisco Media Convergence Server 7830
9
Configuring Carbon Copy
Installing Plug-Ins
To install the optional plug-ins for Cisco CallManager, complete these steps:
Step 1
Click Start>Programs>Cisco CallManager>CallManager Administration.
Step 2
Click Plug-Ins.
Step 3
Select each of the Cisco CallManager plug-ins that you want to install, and follow the
online installation instructions provided.
For more information about the Cisco CallManager plug-ins and how to install them, refer to the
online System Guide by clicking Help or by going to:
http://www.cisco.com/documentation/ccm/v24/index.htm
Configuring the Database
After installing Cisco CallManager and the appropriate plug-ins, you can use Cisco CallManager
Administration to begin configuring the database. The Cisco CallManager database contains
information and parameters relating to the system as a whole, to connected devices, and to individual
users. For more information about configuring the Cisco CallManager database, refer to the online
System Guide by clicking Help or by going to:
http://www.cisco.com/documentation/ccm/v24/index.htm
Configuring Carbon Copy
Compaq Carbon Copy 32 is supplied with the Cisco Media Convergence Server 7830. Carbon Copy
32 enables you to access the MCS-7830 from a remote PC.
After powering up and configuring the MCS-7830, you can install Carbon Copy 32 by following
these steps:
Step 1
Double-click on the icon for Carbon Copy 32 Host Setup. It takes several minutes for the
installation to complete and for the server to reboot.
Step 2
When prompted to do so, press Ctrl+Alt+Del and log on.
Step 3
Carbon Copy 32 should be running when you log on, and its icon should appear in the
System Tray at the bottom right corner of the screen. If Carbon Copy 32 is not running,
you can start it by clicking Start>Programs>Carbon Copy 32>Start Service.
For additional information about Carbon Copy 32, refer to the Carbon Copy 32 documentation
available from Compaq Computer Corporation.
To access the MCS-7830 from a remote PC, you must install Carbon Copy 32 on both the MCS-7830
and the remote PC. To order the Carbon Copy 32 software for the remote PC, contact Compaq
Computer Corporation.
Once you have installed Carbon Copy 32 on both the MCS-7830 and the remote computer, you can
log on to the MCS-7830 from the remote PC. You can then disconnect the monitor, keyboard, and
mouse from the MCS-7830 or leave them connected for future use.
10 Configuration Notes for Cisco Media Convergence Server 7830
Configuring the Remote Insight Board
Configuring the Remote Insight Board
If you plan to use the Remote Insight Board to access the MCS-7830 remotely, you must install the
appropriate device drivers and configure the Remote Insight Board on the MCS-7830. After
powering up and configuring the MCS-7830, you can double-click on the Remote Insight Board
Setup icon to begin the installation and configuration process for the Remote Insight Board.
For complete instructions on installing the device drivers and configuring the Remote Insight Board,
refer to the Remote Insight Board/PCI User Guide, available from Compaq Computer Corporation.
Note When installing the drivers for the Remote Insight Board, if you are prompted to enter a path
for the Remote Access Server (RAS) files, set this path to C:\i386\.
Backup and Recovery Procedures
This section describes procedures for backing up the Cisco Media Convergence Server 7830 and for
recovering from hardware or software failures.
Backing Up the Server
After you complete the Windows NT 4.0 Operating System installation and the server is operational,
Cisco recommends backing up the server using a tape backup system in conjunction with approved
tape backup software. If you have questions about backup procedures, contact your network
administrator.
Backing Up the Cisco CallManager Database
The Cisco CallManager database contains all the information you configure with
Cisco CallManager Administration. The name of the database file is SelsiusData.mdb, and it resides
in the folder C:\Program Files\Cisco\Data. Cisco strongly recommends that you make a backup copy
of this database file every time you make changes through Cisco CallManager Administration.
To back up the Cisco CallManager database, copy the file SelsiusData.mdb to a floppy disk or to
another back-up server on the network.
Creating an Emergency Repair Disk
An entry on the Start menu is provided to launch the Emergency Repair Disk Utility, which creates
or updates your Emergency Repair Diskette. This diskette contains information on the current
settings of the operating system. In case of an operating system crash, this diskette restores the server
to the last-saved configuration stored on the Emergency Repair Diskette. Refer to the Windows NT
documentation for more information on the Emergency Repair Diskette.
Note The Emergency Repair Diskette does not serve as a complete system backup. Cisco highly
recommends creating this diskette because it can be a helpful tool in the event a system repair is
needed. The Emergency Repair Diskette does not restore your data; therefore, use your tape backup
solution for complete system backups.
Configuration Notes for Cisco Media Convergence Server 7830
11
Backup and Recovery Procedures
Replacing a Hard Drive
The Cisco Media Convergence Server 7830 has redundant hard drives. If the primary drive should
fail for any reason, the secondary drive will take over automatically.
You can replace the failed drive while the server and Cisco CallManager are still running. To replace
a hard drive:
Step 1
Remove the failed drive by releasing the retaining clips at the front of the drive and
pulling the drive out of its slot in the server.
Step 2
Insert a new hard drive into the empty slot.
Step 3
Allow the server to copy the image from the active drive to the newly installed drive. This
copy process can take 20 minutes or more to complete, but the server and
Cisco CallManager can continue to operate during this time.
Note You do not have to power down or reboot the server during installation of a new hard drive.
If you reboot the server while one of the hard drives is removed from its slot, the server will display
a message similar to the following:
The following SCSI drive(s) should be replaced:
SCSI Port 1:
SCSI ID 1
Press “F1” key to continue.
If you see this message, press the F1 key to continue the reboot process.
Restoring the Hard Drive and Software
This section describes how to restore the hard drive, operating system, and software on the
MCS-7830 in the event of a catastrophe.
Caution Do not perform any of the steps in this section unless instructed to do so by Cisco
Technical Assistance Center (TAC). Restoration of the operating system and software erases
everything on both hard drives of the MCS-7830.
To restore the operating system and software to the MCS-7830, perform these steps:
Step 1
Connect a monitor, keyboard, and mouse to the server as described in “Connecting a
Monitor, Keyboard, and Mouse to the Server” section on page 6.
Step 2
Locate the Cisco MCS-7830 Installation and Recovery CD-ROM supplied with the
MCS-7830, and insert it into the CD-ROM drive.
Step 3
Shut down and restart the server by pressing Ctrl+Alt+Del. If this method does not work,
cycle power to the server. The server takes several minutes to shut down and restart.
Step 4
When the System Restore menu displays, press the F1 key to initialize the system. This
step erases everything on both hard drives.
Step 5
Read the warning message that appears, and type C if you want to continue or press Esc
to abort.
12 Configuration Notes for Cisco Media Convergence Server 7830
Restoring the Cisco CallManager Database
Step 6
When prompted to cycle power to the server, turn the power off and leave it off for about
10 seconds, then turn it on again. Under recovery conditions, the power-up cycle takes
much longer than normal. Do not cycle the power more than once during this step. When
the server is done initializing, the monitor screen appears blank except for a flashing
cursor. This power-up and initialization process takes about seven minutes.
Note Error and failure messages can be expected during initialization of the server because the
configuration information is erased from the hard drive during this phase. You can ignore these
messages.
Step 7
When the System Restore menu displays again, press the F2 key to restore the system
software.
Step 8
Type C to continue configuring the hard drive.
Step 9
Type C to continue loading the software from the CD-ROM to the hard drive. It takes
about 15 to 20 minutes to copy all the software to the hard drive.
Step 10
When you see the message “Drive image restored successfully!,” remove the CD-ROM
from its drive. Then press Ctrl+Alt+Del to restart the server.
Step 11
Beginning at Step 3 in “Starting the Server Configuration Process” section on page 6,
complete all the steps for configuring the server.
To restore the software, you must also complete all the steps in the following sections:
•
•
•
“Configuring Cisco CallManager” section on page 9 to reconfigure Cisco CallManager.
“Configuring Carbon Copy” section on page 10 to reconfigure Compaq Carbon Copy 32.
“Restoring the Cisco CallManager Database” section on page 13 to restore the database.
Restoring the Cisco CallManager Database
If you have restored the MCS-7830 operating system and software by the procedure described in
“Restoring the Hard Drive and Software” section on page 12, then you must also restore the
Cisco CallManager database. Even if you have not restored the operating system and software, you
can still restore the Cisco CallManager database from a backup copy in order to return the database
to a previous state. For a description of how to create a backup copy of the database, refer to
“Backing Up the Cisco CallManager Database” section on page 11.
To restore the Cisco CallManager database from a backup copy:
Step 1
If the Cisco CallManager Administration window is open, close it. Also close all
browsers.
Step 2
Click Start>Programs>Cisco CallManager>Cisco Process Control.
Step 3
Select all the processes and click Stop.
Note Step 3 stops all Cisco CallManager processes and interrupts Cisco IP Telephony services to
your users.
Configuration Notes for Cisco Media Convergence Server 7830
13
Important Notes
Step 4
If the C:\Program Files\Cisco\Data\ folder on the server contains a SelsiusData.ldb
database lock file, try deleting it. If you cannot delete the lock file, click
Start>Settings>Control Panel>Services, and stop the IIS Admin Service. Then start the
World Wide Web Publishing Service and try deleting the lock file again.
Step 5
Locate your backup copy of the database file SelsiusData.mdb, and use Windows
Explorer to copy it to the C:\Program Files\Cisco\Data\ folder on the server where you
want to restore the database. In most cases, you will use the backup copy to overwrite the
existing database file on the server.
Step 6
Click Start>Programs>Cisco CallManager>Cisco Process Control.
Step 7
Select all the processes and click Start.
Step 8
If Cisco CallManager services are not restored, you might have to restart the server.
Important Notes
The latest documentation and release notes for Cisco CallManager are available on Cisco
Connection Online (CCO) at:
http://www.cisco.com/kobayashi/sw-center/internet/callmgr/callmgr.html
Cisco Year 2000 product compliance information can be found at:
http://www.cisco.com/warp/public/752/2000/
A local copy of the Help is installed with Cisco CallManager and is available by clicking
Start>Programs>Cisco CallManager>Cisco Help>System Guide. However, the most current
Cisco CallManager documentation can be found on the Web at:
http://www.cisco.com/documentation/ccm/v24/index.htm
You should perform regular backups as described in “Backing Up the Cisco CallManager Database”
section on page 11.
Troubleshooting
Troubleshooting for Cisco CallManager is provided in the locally installed Help or the online System
Guide at:
http://www.cisco.com/documentation/ccm/v24/index.htm
Click the Troubleshooting book in the menu to see the troubleshooting topics.
Service and Support
Service and support is provided by the Cisco Technical Assistance Center (TAC) at:
http://www.cisco.com/warp/public/687/Directory/DirTAC.shtml
14 Configuration Notes for Cisco Media Convergence Server 7830
Cisco Connection Online
Cisco Connection Online
Cisco Connection Online (CCO) is Cisco Systems’ primary, real-time support channel. Maintenance
customers and partners can self-register on CCO to obtain additional information and services.
Available 24 hours a day, 7 days a week, CCO provides a wealth of standard and value-added
services to Cisco customers and business partners. CCO services include product information,
product documentation, software updates, release notes, technical tips, the Bug Navigator,
configuration notes, brochures, descriptions of service offerings, and download access to public and
authorized files.
CCO serves a wide variety of users through two interfaces that are updated and enhanced
simultaneously: a character-based version and a multimedia version that resides on the World Wide
Web (WWW). The character-based CCO supports Zmodem, Kermit, Xmodem, FTP, and Internet
e-mail, and it is excellent for quick access to information over lower bandwidths. The WWW version
of CCO provides richly formatted documents with photographs, figures, graphics, and video, as well
as hyperlinks to related information.
You can access CCO in the following ways:
•
•
•
•
•
WWW: http://www.cisco.com
WWW: http://www-europe.cisco.com
WWW: http://www-china.cisco.com
Telnet: cco.cisco.com
Modem: From North America, 408 526-8070; from Europe, 33 1 64 46 40 82. Use the
following terminal settings: VT100 emulation; databits: 8; parity: none; stop bits: 1; and
connection rates up to 28.8 kbps.
For a copy of CCO’s Frequently Asked Questions (FAQ), contact [email protected]. For
additional information, contact [email protected].
Note If you are a network administrator and need personal technical assistance with a Cisco
product that is under warranty or covered by a maintenance contract, contact Cisco Technical
Assistance Center (TAC) at 800 553-2447, 408 526-7209, or [email protected]. To obtain general
information about Cisco Systems, Cisco products, or upgrades, contact 800 553-6387,
408 526-7208, or [email protected].
Documentation CD-ROM
Cisco documentation and additional literature are available in a CD-ROM package, which ships with
your product. The Documentation CD-ROM, a member of the Cisco Connection Family, is updated
monthly. Therefore, it might be more current than printed documentation. To order additional copies
of the Documentation CD-ROM, contact your local sales representative or call customer service.
The CD-ROM package is available as a single package or as an annual subscription. You can also
access Cisco documentation on the World Wide Web at http://www.cisco.com,
http://www-china.cisco.com, or http://www-europe.cisco.com.
If you are reading Cisco product documentation on the World Wide Web, you can submit comments
electronically. Click Feedback in the toolbar and select Documentation. After you complete the
form, click Submit to send it to Cisco. We appreciate your comments.
Configuration Notes for Cisco Media Convergence Server 7830
15
Documentation CD-ROM
Access Registrar, AccessPath, Any to Any, AtmDirector, Browse with Me, CCDA, CCDE, CCDP, CCIE, CCNA, CCNP, CCSI, CD-PAC, the Cisco logo, Cisco Certified Internetwork
Expert logo, CiscoLink, the Cisco Management Connection logo, the Cisco NetWorks logo, the Cisco Powered Network logo, Cisco Systems Capital, the Cisco Systems Capital logo, Cisco
Systems Networking Academy, the Cisco Systems Networking Academy logo, the Cisco Technologies logo, ConnectWay, Fast Step, FireRunner, Follow Me Browsing, FormShare,
GigaStack, IGX, Intelligence in the Optical Core, Internet Quotient, IP/VC, Kernel Proxy, MGX, MultiPath Data, MultiPath Voice, Natural Network Viewer, NetSonar, Network Registrar,
the Networkers logo, Packet, PIX, Point and Click Internetworking, Policy Builder, Precept, ScriptShare, Secure Script, ServiceWay, Shop with Me, SlideCast, SMARTnet, The Cell,
TrafficDirector, TransPath, ViewRunner, Virtual Loop Carrier System, Virtual Service Node, Virtual Voice Line, VisionWay, VlanDirector, Voice LAN, Wavelength Router, Wavelength
Router Protocol, WaRP, WebViewer, Workgroup Director, and Workgroup Stack are trademarks; Changing the Way We Work, Live, Play, and Learn, Empowering the Internet Generation,
The Internet Economy, and The New Internet Economy are service marks; and ASIST, BPX, Catalyst, Cisco, Cisco IOS, the Cisco IOS logo, Cisco Systems, the Cisco Systems logo, the
Cisco Systems Cisco Press logo, Enterprise/Solver, EtherChannel, EtherSwitch, FastHub, FastLink, FastPAD, FastSwitch, GeoTel, IOS, IP/TV, IPX, LightStream, LightSwitch, MICA,
NetRanger, Post-Routing, Pre-Routing, Registrar, StrataView Plus, Stratm, TeleRouter, and VCO are registered trademarks of Cisco Systems, Inc. or its affiliates in the U.S. and certain
other countries. All other trademarks mentioned in this document are the property of their respective owners. The use of the word partner does not imply a partnership relationship between
Cisco and any of its resellers. (9911R)
Copyright © 1999, Cisco Systems, Inc.
All rights reserved.
16 Configuration Notes for Cisco Media Convergence Server 7830