1
PRO.FORM _
#
K
D
U
A
L
o
Model
M
O
T
I O
r'JI
--
CROSS
o
TRAINER
No. 831.297300
i
"
ii
OWNER'S
I,,J,
ii,
ii
....
MANUAL
SEARS"
_LWARNING:_ _ =,_, mad
and
..a_.a allsa_ precautionsand instructions
inthis
manualbeforeusingtheCROSSWALKDualMotionCross
Tmi_
Savethismanualforfuture reference.
TABLE OF CONTENTS
UMITEDWARRANTY ......................................................................
3
)IMPORTANT SAFETYPRECAUTIONS ..........................................................
BEFOREYOU BEGIN .....................................................................
OPERATION AND ADJUSTMENT ............................................................
TROUBLE-SHOOTING AND MAINTENANCE
4
5
6
....................................................
9
CONDITIONING GUIDEUNES ..............................................................
PARTUST .............................................................................
11
13
EXPLODEDDRAWING ...................................................................
ORDERING REPLACEMENTPARTS ....................................................
iiiiii
14
BackCover
i
FULL 90 DAY WARRANTY
ii
iiiiii
ON PARTS
For 90 days from the date of purchase, when proper assemblyand maintenance procedures detailed in the
Owner's Manual are followed, SEARSwil!, free of charge, repair or replace and install a replacement part for
any defective part, when the CROSS WALK is used in a normal manner.
This warranty does not apply when the CROSS WALK is used for commercial or rental purposes.
SERVICEIS AVAILABLESIMPLY BY CONTACTING YOUR NEARESTSEARSSERVICECENTER/DEPARTMENTIN
THE UNITED STATES.
This warranty gives you specificlegal rights, and you may also have olhar rights which vary from slate to slate.
SEARS, ROEBUCKAND CO., DEPT.817WA,
3333 BEVERLYROAD, HOFFMAN ESTATES,IL 60179
ii iii
i
ii
i
3
IMPORTANT
SAFETY PRECAUTIONS
A WARNING: Touce
important
safely precautions and _infarmation
ofbums,
Rr,,
before operating
shock
or injuryto persons,
read
the
following
the CROSS WALK.
1. Place the CROSS WALK on a bvel surface, with at least 8 feet of clearance behind. Do not place the CROSS
WALK near water, outdoors or on any surface that blocksair openings. Do not operate where aerosol products
are used or where oxygen is being administered.
e
Plug the power cord direclly into a grounded circuit carrying 12 or more amps. No other appliances should be
on the same circuit. (See OPERATION AND ADJUSTMENTfor proper grounding inslructions.)Keep the power
cord away from heated surfaces. If an extension cord is needed, use only a 14-gauge general-purposa cord of
approximately five feet in length with a three-wire conductor.
3. Never move the walking belt while the power is turned off. Do not operate the I_admill if the power cord or
plug is damaged, or if the CROSS WALK is not working properly. (See BEFOREYOU BEGIN if 1_ CROSS WALK
isnotworkingproperly.)
4. The roller guards must be 1/8 inch from the rear roller. Turn the power off and adjust the railer guards, If necessary.
5. Wear appropriate clothing when exercising. Never wear loose dothing that could become caught in the CROSS
WALK. Always wear running shoes; never use the CROSS WALK with bara feet, wearing only stockingsor in
sanda/s. Athletic support clothesare recommended for both men and women.
6. The pulse eardip is not a medical device. Various factors, including the user's movement while exercising, may
affect the accuracy of heart rate readings. The earclip is intended only as an exercise aid in determining heart
rate Irends in general.
7. Never start the CROSS WALK while you are standing on the walking belt. Always hold the upper body arms
when exercising on the CROSS WALK.
8. To reduce the possibility of overheating, never operate the CROSS WALK continuouslyfor longer than 1 hour.
9. Never allow more than one person on the CROSSWALK at a time. The CROSSWALK should be used only by
personsweighing 250 pounds or less.
10. Use the CROSS WALK only as described in this manual.
11. Keep small children away from the CROSSWALK at all times. Never leave the CROSS WALK unattended while
the walking belt is moving. Always turn the power off when the CROSS WALK is not in use.
12. Never drop or insert any object into any opening.
13. The CROSS WALK is capable of high speeds. Adjust I_ speed slowly to avoid sudden jumpsin speed.
14. Always unplug the power cord before performing the maintenance and adjustment procedures described in this
manual. Never remove the motor hood unlessinsh'uded,to do so by an authorized service representative.
Servicingother than the procedures described in this manual should be performed by an aulhorized service
representative
only.
A WARNING:B_
beginning this or any exercise program, consult your physician. This is especially
important for persons over the age of 35 or persons with pre-existing health problems. Readall inslructionsbefore
using the CROSSWALK. SEARSassumesno responsibility for personal injury or property damage sustained by or
through the use of the CROSS WALK.
4
SAVETHESEINSTRUCTIONS
BEFORE YOU BEGIN
Congmlulalions for selectingthe PROFORM* CROSS WALK Dual Motion CrossTrainer. The CROSS WALK combines
the best fealure_ of today's most popular home exerciseequipment in one compact unit. The nalural motion and versatilityof treadmills have made them the mostpopular way to get an effective lower body and cardiovascular workout.
Now with the dual motion design of the CROSS WALK, you can get a completeupper body workout as well. And the
adjustabilityof the CROSS WALK allows every user to work at their own level. Whether you are a beginner or a seasonedathlete, you'll enjoy the performance and uncompromisingquality that only the CROSS WALK offers.
For your safely and benefit, read ibis manual carefully before using ihe CROSSWALK. If you have additional queslions, please call our Customer Service Department toll-free at 1-800-999-3756, Monday through Friday, 6 a.m. until
6 p.m. Mountain Time (excluding holidays). To help us assistyou, please note the product model number and serial _
number before calling. The model number is 831.29730. The serial number can be found on a decal attached to the
CROSS WALK (see the drawing below far the locationof the decal).
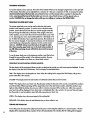
Before reading further, please review the drawing below and familiarize yourselfwith the parts that are labeled.
Upper BodyArms,
Speed Control Knob
Incline Lever
Console
PulseEarclip
FRONT
Lock
Upright Post
Tabs
Walking Belt
Serial Number
Platform
Roller Guards
Motor Hood
Power
FootRail
LEFTSIDE
BACK
Rear Leg
Rear Roller
AdjustmentBells
Note: The rear leg pad may mark some lypes of linoleum.Mild householdcleaning agenls will remove any marks.
5
OPERATION
AND ADJUSTMENT
Foryour convenience,Ibe CROSS WALK is delivered completely assembled in Ihe compact stowaway position. Set the CROSS WALK in a
cleared area and remove all packing materials. Make sum Ihat all ports
are included before disposingof Ihe packing materials. To convert the
CROSS WALK to Ihe operating position, first slide the LockKnob
Washer (78) onto the LockKnob (77). Raise lhe Upright (10) to lhe
verticalposition and tighten Ihe Lock Knob into Ihe Upright.
APPLYING SIUCONE LUBRICANT
To reducethe frictionof the walking belt and minimize wear, a non-oil-,
non-potroleum-basesilicone lubricant mustbe applied to the walking
plalform before Ihe CROSS WALK is used. WITH THE POWER CORD
UNPLUGGED, lift each side of the walking belt and spray lubricant generouslyonto the indicated area. Reapply lubricant after every ten hours
of use, or whenever performance decreases. Lubricantis available at
hardware and automotive stores.Uni'Sport TMspray is recommended.
PLUGGING THE POWER CORD IN
This product must be grounded. If it shouldmalfunction or break down, grounding provides a path of least resistance
for eledric current to reduce the risk of eledric shock.This produd is equipped with a cord having an equipmentgrounding conductorand a grounding plug. Plug the power cord into an appropriate oullet Ilmt is properly installed
and grounded in accordance with oU local codes and ordinances.
A
,_
DANGER:Improper connection of lhe equipment-groundlng
conductor can result in a risk of electricshock.
Check with a qualified electrician or serviceman if you are in doubt as to whelher the product isproperly grounded. Do
not modify the plug provided with the produd_f it will not fit lhe outlet, have a proper outlet installedby a qualified
electrician.
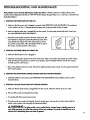
This productis for useon a nominal 120-volt circuit, and has a grounding plug as shown in Drawing 1. A temporary
adapter like Ihe adapter shown in Drawing 2 may be used to conned this plug to a 2-pole receptacleas shown in
Drawing 2 if a properly grounded outlet is not available. The temporary adapter shouldbe used only until a properly
grounded outlet (Drawing 1) can be installedby a qualified electrician. The green-calored ear, lug, or the like extending from the adapter must be connected to a permanent ground suchas a properly grounded outlet box cover. Whenever the adapter is used, it must be held in place by a metal screw. Some 2-pole receptacle oullet box covers are not
grounded. Contact a qualified electrician to determine if the oullet box cover is grounded before using an adapter.
Grounded Outlet Box
2
Grouncled Outlet Box
Grounding Plug
//'_,
6
Grounding Pin
Grounded Oullet
GAClarouPndlng
Pin
DIAGRAM OF THE CONSOLE
The CROSS WALK features lhe innovativeACCUSMART console,designed to help you get lhe mostfrom your workouts.The ACCUSMART console offers electronic speed control, finger-touchincline conlral and a motivational fitness
monitorwith five independentdisplays. Pleaseread lhe instructionsbelow before operating lhe console.
Batter),Cover
i
i
m
n
A
I
N:(:U, ,4AF:TI
m
I
Motivational FitnessMonitor -
J I
C4LO_E
I
I
DiSl"A/qCE
I I
I
SI_EDCON71tO_
INCUNE
ADJUST
- PulseEarclip Jack
Power Indicator "_PPower
Switch
[ °1
INSTALLING BA13"ERIES
The motivational fitnessmonitor requires two ",_A" batteries (not included); alkaline batteries are recommended. Slide
the battery cover open and remove the battery clip from the console. Find the markings inside the battery clip showing
the correctorientation of the batteries. Pressthe batteries into the battery clip. Replacethe battery clip in the console
and close the battery cover.
TURNING THE POWER ON
Steponto the foot rails of the CROSS WALK and hold the upper body arms. (See OPERATING THE UPPERBODY
ARMS on the following page.) Locatethe clip attached by a card to the so_ty key. Slide the clip onto the waislband of
your clothing.CAUTION: Do not stand on Ihe walking belt while turning Ihe power on. Always wear Ibe dip while
operating the CROSS WALK; if you fall, the safety key will be pulled from the power switch, instanlly turning the
power off.
Insert lhe safety key into lhe power switch. The power indicator will light. The five displays of lhe motivational fitness
monitorwill not light until lhe ON/CLEAR button is pressedor lhe walking belt begins to move. (See CONTROUJNG
THE SPEEDOF THEWALKING BELTbelow.) Note: If batteries were just installed, the five displays will be lighted already.
CONTROLUNG THE SPEEDOF THE WALKING BELT
For your safety,the walking belt will be motionless each time the power is tumed on. To start the walking belt, first tum
the speed controlknob to the "reset" position. Next, rum the knob slowlyclockwiseuntil the waling belt begins to move
at slow speed.CAUTION: After Ibe knob is tamed, Ihere will be a brief pause before Ihe walking belt begins to
move. Adjust Ibe speed slowly until you am familiar wilh Ihe operation oF111o
CROSSWALK.
Stepcarefully onto the walking belt and begin exercising. Change Ihe speed of lhe walking belt as desired by tumlng
lhe speed conlrol knob. Keep Ihe speed below 2 miles per hour for walking, or increase it up to 8 miles per hour for a
challenging run. To slop the walking belt, turn the knob to the "reset" position.
7
CHANGING
THEINCLINE
Tovarytheintensity
ofyourexercise,
theinclineoftheCROSS
WALKcanbechanged
usingtheleveronthe right side
of the console.The incline can be adjusted from a minimumof 1.5% up to a maximum of 12%. To increase the incline,
stand toward Ihe back of Ihe faot mils and pull back the lever until the desired incline is reached. To decrease the
incline, stand toward Ihe front of Ihe foot mils, lean forward, and pull back the lever until the desired incline is
reached. CAUTION: Do not change the indine while you are walking or running on the CROSS WALK.
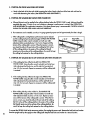
OPERATINGTHE UPPERBODY ARMS
The unique upper body arms can be used in either the dual motion
positionor the stationary position. To use the arms in the dual motion
position, remove the lock pin from the arms and the upright. Insertthe
lock pin through the safety tabs at the base of the upright. In the dual
LockPin
,-......
motion position,you can move the arms forward and back as you walk
or run, exercising your arms, back and shouldersfor a total body workout. To tailor the intensityof your upper-bady exercise, the resistanceof
the arms can be changed. To increase the resistance,tum the resistance
control clockwise;to decrease the resistance,tum the controlcounter-
Resistance
clockwise.CAUTION: Always insert Ihe lock pin through Ihe safety
tabs when using Ihe upper body arms in the dual-motion position. If
you fall while exercising, Ihe pin will limit Ihe downward movement
of thearms.
To use the upper body arms in the stationary position, insertthe lock pin
through the arms and the upright. In the stationary position, the arms
provide a stable handle as you focus on a lower-body workout.
OPERATING THE MOTIVATIONAL FITNESSMONITOR
The five displays of the motivational fitnessmonitor are designed to provide you with instantexercise feedback. To reset
the displays, pressthe ON/CLEAR button.The five displaysare described below:
TIME--Thls display shows the elapsed time. Note: When the walking belt is stopped,the TIME display will go into a
pause mode after a few seconds.
CALORIE--This display showsthe total number of nutritionalCalories that you have bumed.
PULSEmThisdisplay showsyour heart rate. Plug the pulseearclip into the jack on the console,and attach the earclip to
your leftear lobe. (When exercising with the upper body arms in the dual motion position, attach the earclip to your
right ear lobe.) Slide the clothesclip onto your collar to minimize movementof _
earclip wire. After a few seconds,
your heart rate will be displayed. If your heart rate is not displayed after a few seconds,rub your ear lobe and reposilion the earclip. It may be helpful to stand stillwhile measuringyour heart rate.
SPEED--This display showsthe current speed of the walking belt.
DISTANCE--This display showsthe total distancethat you have walked or run.
TURNING THE POWER OFF
To lum the power off, remove the safety key from the power switch.Keep the safety key in a securelocation. The five
8
displays of the motivational illness monitor will tum off automaticallya few minutesafter the walking belt is stopped.
i
TROUBLE-SHOOTING
Most _s
AND MAINTENANCE
can be solved by fonowing Ihe simple steps Wow.
CustomerService Department tall-free at 1-800-999-3756,
If further assistanceis needed, please call our
Monday through Friday, 6 a.m. until 6 p.m. Mountain Time
(excludingholidays).
I. SYMPTOM: THE POWER DOES NOT TURN ON
a. Make sure that the power cord is plugged in properly. (See OPERATION AND ADJUSTMENT.) If an extension
cord is needed, use only a 14-gauge general-purpose cord of approximately five feet in length.
b. Make sure that the safely key is insertedfully into the console.Turn the speed control knob to the "reset" position. (See OPERATIOH AND ADJUSTMENT.)
C,
Check the circuit breaker located on the front of the frame. The
circuitbreaker isdesigned to protect the electrical system.If the
circuit breaker has tripped, the switchwill protrude as shown.
To resetthe circuit breaker, allow the CROSS WAJ.K to cool for
five minutes,and then pushthe switch back in.
,Tripped
Reset
2. SYMPTOM: THE POWER TURNS OFF DURING USE
a. Make sure that the power cord is plugged in.
b°
check the circuit breaker located on the front of the frame. If the circuit breaker has tripped, the switchwill protrude. (See the drawing above.) To reset the circuit breaker, allow the CROSS WALK to cool for five minutes,
and then push the switchback in.
C. Remove the safely key from the console. Reinsert the safely key fully into the console. Turn the speed control knob
to _
"reset"position.
3. SYMPTOM: THE MOTIVATIONAL FITNESSMONITOR DOES NOT FUNCTION PROPERLY
a. Check the batteries in the console.(See OPERATION AND ADJUSTMENT.) Mast problems are the resultof
drained batteries.
4. SYMPTOM: THE PULSEEARCUPDOES NOT FUNCTION PROPERLY
a. Make sure that the pulse earclip is plugged fully into the console.Attach the clothesclip to your collar.
b. Rubyour leftear lobe and repositionthe earclip.
c. Try standingstillwhile measuring your pulse.
d. The pulse earclip may need to be cleaned. Pressthe earclip open, and wipe _
earclip, using a colton swab saturatedwith denatured alcohol.
AWARNING:
,. rdlp
o
merit whib exercising, may affect the accuracy of heart _
exercise aid in detmnining heart rate trends in goneral.
two clear circlesinside the
Vor ,factor,,
i, dingyour
movereadings. The eardip is intended only as an
g
5. SYMPTOM:
THECROSS
WALKDOES
NOTINCUNE
a. Standatthebackofthefootrailswhileincreasing
theincline.Standatthefrontofthefootrailsandleanforwardwhile decreasing the incline. (See OPERATION AND ADJUSTMENT.)
6. SYMPTOM: THE WALKING BELTSLOWS WHEN WALKED ON
a°
Silicone lubricant mustbe applied to the walking platform before the CROSS WALK is used. Lubricantshouldbe
reapplied after every 10 hours of use, and whenever a decrease in performance is noticed. (See OPERATION
AND ADJUSTMENT for application instructions.)Uni*Spod siliconespray is recommended. CAUTION: ALWAYS
UNPLUG THE POWER CORD WHEN APPLYING LUBRICANT.
b. If an extensioncord is needed, use only a !4-gauge general-purpose cord of approximately five feet in length.
C°
If the walking belt is overtightened, performance may be reduced
and the walking belt permanently damaged. UNPLUG THE POWER
CORD. Using the allen wrench included, turn both rear roller
adjustmentbolls counterclockwise1/4 of a lure. Repeat until the
tension of the walking belt is correct. When the tensionis correct,
you should be able to lift each side of Ihe walking belt 2-3 inches
off the walking platform; the center of the walking belt should
remain justat the surfaceof the walking plalform. Becareful to keeF_
the walking belt centered on the walking plalform.
7. SYMPTOM: THE WALKING BELTIS OFF-CENTEROR SUPSWHEN WALKED ON
a°
If the walking belt has shifted to the left, first UNPLUG THE
POWER CORD. Using the allen wrench included, turn the left rear
roller adjustmentbolt clockwise, and the right bolt counterclockwise 1/4 of a lure each. Repeat as necessaryuntil the walking belt
is centered.
b.
If the walking belt has shifted to the right, first UNPLUG THE
POWER CORD. Using the allen wrench included, turn the left rear
roller adjustment bolt counterclockwise,and the right bolt clockwise 1/4 of a turn each. Repeat as necessaryuntil the walking belt
is centered.
c°
If the walking belt slipswhen walked on, first UNPLUG THE
POWER CORD. Using the allen wrench included, lure both rear
roller adjustment bolls clockwise 1/4 of a lure. Repeat as necessary until the tension of the walking belt iscaned. When the tension is carred, you shouldbe able to lift each side of the walking
belt 2-3 inchesoff the walking plalform; the center of the walking
belt should remain justat the surface of the walking plalform. Be
careful to keep the walking belt centered on the walking platform.
10
To convertthe CROSSWALK to the stawawayposition,firstunplugthe powercord. Removethe lockknoband washer
fromthe uprightand lay theuprighton the walking belt.Keep_ lockknoband washer in a securelocation.
CONDITIONING
GUIDELINES
The following guidelines will help you to i:_an your exercise program. Rememberthat proper nutritionand adequate
t restare essentialfor successful results.
A WARNING:_
_i.._.g_. o,o.y.xn._rm, ..,.b your
physician. This is especially
imparlant for individuals over I_ age of 35 or individuals wilh pre-exisling heallh problems.
WHY EXERCISE?
Exercisehas proven essentialfor good health, longevity and general well-being. Studies have shown that staying in
good physicalcondition is better than any drug for helping to preventor alleviate several diseasm, including heart disease, diabetes and cancer. Americans are saying that the narrow fitnessgoals of the past have been replaced by a
desire for an overall healthier lifeslyle.
Regular participation in a well-roundedexercise program results
in: a strongerand more efficientheart, improved respiratory function, increased stamina and endurance, better weight management and body fat control, increased ability
to deal with stress,and greater self-esteem and confidence.
EXERCISEINTENSITY
To maximize the benefitsof exercising, it is important to exercise with the proper intensity.The proper intensity level
can be found by using your heart rate as a guide. For effective aerobic exercise, your heart rate should be maintained
at a level between 70% and 85% of your maximum heart rote as you exercise. This is known as your training zone.
You can find your training zone in the table below. Training zones are listed for both unconditionedand conditioned
persons according to age.
AGE
UNCONDmONED
TRAINING ZONE
(BEATS/MIN)
CONDmONED
TRAINING ZONE
(BEATS/MIN)
20
138-167
133-162
s5
127.155
122.149
25
136-166
132-160
60
126-153
121-147
30
135-164
130-158
6s
125.15i
1i9.145
35
134-162
129-156
70
123-150
118-144
40
132.161
127-1Ss
75
122-147
117-142
45
131-159
125-153
80
120-146
115-140
50
129-i56
i24-150
85
118-144
114-139
AGE
UNCOND_iONED
TRAINING ZONE
(BEATS/MIN)
CONDmONED
TRAINING ZONE
(BEATS/MIN)
During the firstfew monthsof your exercise program, keep your heart rote near the low end of your training zone as
you exercise. After a few monthsof regular exercise, your heart rate can be increased gradually until it is near the middle of your training zone as you exercise.
You can measure your heart rate using the pulse mode of the console.Exercisefor at least four minutes, and then measure your heart rote immediately. If your heart rate is too high, decrease the intensityof your exercise. If your heart rate
is too low, increasethe intensityof your exercise.
_- A WARNING:_. p.lse._,p
_,n_om_Jd._.vo_,s
k._,,,_nd_ng
your
n_vement
duringexercise,
mayalf_ IIw accuracy
of heartra_ readlngs.
Theeardipisimendedonlym _ m
miningheartra_ tremlsin general.
o_ _ _
11
WORKOUT GUIDEUNES
A well-rounded workout develops the heart, musclesand hotly compositionby including the following phases:
A warm-up phase, lasting 5 to 10 minutes.Begin with slow, controlled stretches,and progressto more rhylhmic
stretchesto increasethe body temperature, heart rate and circulation in preparation for strenuousexercise. Stretching
also guards against muscle, tendon and ligament sprains. {See SUGGESTED STRETCHESon page 13.)
A cardiovascular phase, including 20-30 minutes of exercising with your heart rate in your training zone.
A cool-down phase, consistingof 5 to 10 minutesof adivity similar to that of the worm-up phase. Thorough stretching
offsets muscle contractions and other problemsmused when you slop exercising suddenly. Stretchingfor increased
flexibility is often mosteffectiveduring this phase. This phase should leave you relaxed and comfortablytired.
Insteadof waiting for a convenienttime to exercise,plan a specifictime. The morning hourswork well for many, and
the self-discipline required to rise early and exercise often carries through the clay to help increaseproductivityin other
areas. For some, exercising before dinner initiatesa period of winding-down from the day's activities.Whatever time
you choose, be consistentand stickwith it.
To maintain or improve your condition, completethree workouts each week, with at leastone day €>frestbetween
workouts.After a few monlhsof regular exercise, you may complete up to five workoutseach week, if desired.
Remember,the key to successis CONSISTENCY.
WORKOUT, ATTIRE
Exerciseclothingshouldbe loose-tiltingand comfortable, allowing unrestrictedmovement.Do not wear rubberized or
plasticclothing that can interfere with the evaporation of sweat from your skin. Always wear athletic shoesthat are flex
ible and provide good protection and support.
ADDITIONAL SUGGESTIONS
Creating a more active lifestyle,in addition to establishinga regular exercise program, will help you to achieve your fitnessgoa!s. It'seasy to improve your lifestyleby making a few changes in your daily routine:
Keep yourself moving throughout the day. Use the stairs instead of the elevator. Park a half mile away from work, or
get off the bus a couple of blocksbefore your stop and walking the remaining distance.
increasemidday productivity,Creativityand energy by replacing a heavy lunch with a light meal. Spend the extra time
in physical activity suchas walking.
Substitutemanually operated devices for automatic equipment suchas lawn-care machinery, power toolsand snow
removers,
Stop smoking.Smoking neady doublesthe risk of coronary heart disease. (Framington Heart Study)
Reduceor eliminate alcoholconsumption. Alcohol is a major cause of liver problems and other health disorders.
.(Office of Disease Preventionand Health Promotion)
Reduce your intake of fat. Lessthan 30% of the calories you consumeeach clay shouldcome from fat. Excessive
consumptionhas been linked to numerouscausesof death, including heart disease and cancer.
Know and keep a record of your.cholesterollevel, blood pressureand Otherhealth, information: Keep your blood pres12
sure below 140/90; below 125/85
ispreferable.
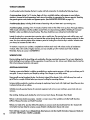
SUGGESTEDSTRETCHES
The following stretchescan provide a good warm-up or cool-down. Correct form for each stretchis shown in the drawings below. Move slowlyas you stretch--never bounce.
TOE TOUCH STRETCH
Stand with your kneesbent slightly and slowly bend forward from
your hips. Allow your back and shouldersto relax as you reach
down toward your toes as for as possible.Hold for 15 counts, then
relax. Repeat 3 times.
Stretches:Hamstrings, back of kneesand back.
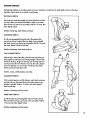
HAMSTRIhiG STRETCH
Sitwith one leg extended. Bring Ihe sole of Ihe opposite foot
toward you and restit against the inner thigh of your extended
leg. Reach toward your toes as for as possible. Hold for 15 counts,
then relax. Repeat 3 times for both legs.
Stretches:Hamstrings, lower back and groin.
CALF/ACHILLESSTRETCH
With one leg in front of the other, reach forward and place your
hands against a wall. Keep your back leg straightand your back
foot flat on the floor. Bend your front leg, lean forward and move
your hips toward the wall. Hold for 15 counts,then relax. Repeat
3 timesfor both legs. To cause further stretchingof the achilles
tendons,bend your back leg as well.
Stretches:Calves, achillestendons and ankles.
QUADRICEPS STRETCH
With one hand against a wall for balance, reach back and grasp
one foot with your otis" hand. Bring your heel as closeto your
buttocksas possible. Hold for 15 counts,then relax. Repeat 3
timesfor both legs.
Stretches:Quadriceps and hip muscles.
INNER THIGH STRETCH
Sit with the soles of your feet together and your kneesoutward.
Pullyour feet toward your groin area as for as possible. Hold for
15 counts,then relax. Repeat 3 times.
....-_ Stretches:Quadriceps and hip muscles.
13
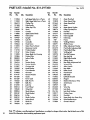
PART LIST--Model
14
Key
Reorder
No.
No.
No. 831.297300
_
lO/92
Key
Qty. Description
No.
1
2
3
110824
110825
054013
1
1
1
LeftUpper BodyArm w/Foam
Right Upper Body Arm w/Foam
Clothes Clip
43
44
45
4
101508
1
Pulse Earclip
46
5
106337
1
Safety Key/Clip
47
6
7
108080
110254
21
1
Screw
Console
48
49
8
110000
1
Speed Control Knob
Reorder
No.
101263
110828
013445
Qty. Descripllon
1
1
4
Motor Pivot Bolt
Motor Mount Plate
Motor Mount Bolt
110827
1
Motor
101630
4
Motor Mount Washer
108276
110048
1
2
Pulley/Flywheel/Fan
FootRail
50
101577
2
FootRail Screw
9
088003
1
Incline Lever
51
013293
2
InclineLeg Bolt
10
11
109957
109855
1
1
Upright
Lock Pin
52
53
109941
NSP
1
1
InclineLeg
Frame
12
13
109786
108404
1
4
Controller
Hood Screw
54
55
110822
100691
1
6
Walking Platform
PlatformScrew
14
110810
1
Motor Hoocl w/Decal.
56
014127
3
Roller Adjustment Washer
15
16
17
109511
110193
110147
1
2
2
Resistance Control
Friction Bracket
Nylon Washer
57
58
59
013275
107873
110821
1
1
1
Front Roller Adjustment Bolt
Front Roller/Pulley
Walking Belt
18
19
20
110823
109806
088005
2
2
1
Upper Body Arm Housing
Friction Plate
Incline Cable
60
61
62
109278
110407
110003
8
1
1
Foot Rail Fastener
Rear Leg Pad
Right Roller Bracket
21
22
012082
104514
7
1
Nut
Tension Spring
63
64
013300
105444
4
2
Endcap Screw
Rear RollerAdjustment Bolt
23
24
25
26
27
014041
013207
109095
109382
019084
2
1
4
1
1
Tension Washer
Carriage Bolt
Hood Bracket
Circuit Breaker
Grommet
65
66
67
68
69
016028
045010
110245
010206
013162
1
1
1
2
2
Wrench Clip
Allen Wrench
Rear Roller
Roller Guard
Guard Screw
28
29
014157
031238
1
1
Ground Washer
Choke
70
71
109265
110002
2
1
Belt Guide
Left Roller Bracket
30
31
32
33
031229
104623
110089
012108
1
6
1
3
Power Cord
Belly Pan Pin
Belly Pan
LockNut
72
73
74
75
033066
033208
107428
106939
1
1
1
1
Magnet
Reed Switch/Sensor Wire
Switch Screw
Belt
34
35
052014
103045
2
2
Front Wheel
Wheel Bolt
76
77
016055
017088
3
1
Wire Clip
LockKnob
36
37
088004
008149
1
1
Shock Release
Shock Bracket
78
79
014156
109517
1
1
LockKnob Washer
FrictionCover
38
054016
1
E-Clip
80
109515
1
PivotBolt
39
40
059019
109792
1
1
Shock Cushion
Incline Shock
81
82
110194
101049
2
4
Upper Body Arm Foam Grip
Hood Bracket Screw
41
42
101639
106334
1
1
Shock Pin
Cotter Pin
#
110084
1
Owner's Manual
qt
Note: "#" indicates a non-illustratedpart. Specificationsare subject to change without notice. See lhe back cover of this
manual for information about ordering replacement parts.
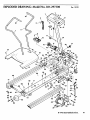
EXPLODED DRAWING--Model
No. 831.297300
Re,..
10/92
8
81
,9
6
81
6
i
10
77
78
13
9 18
i
79
8O
/
÷
/
6
58
<
55
59
49
"1
i
I
71
55
69
6
21
Q
I
68
6
"1
i
L 52
i
50......_ "_,,,, 51 i
;
33
I
i
i
37_
38
39_
40_
'_65
66
64
41
61
49
42
63
43
21
© 1'992 Sears Roebuckand Co.
15
ORDERING
REPLACEMENT PARTS
EachTREADMIll has its own MODEL NUMBER. Always mention the MODEL NUMBER when requestingserviceor
repair parts for your TREADMIll.
All parts listed may be ordered through SEARS,ROEBUCKAND CO. SERVICECENTERSand mast SEARS RETAIL
STORES.
tf pa_ you need are not stockedlocally, your order will be electronicallytransmitted to a SEARSPARTSDISTRIBUTION
CENTER for expedited handling.
WHEN ORDERING REPAIRPARTS,ALWAYS GIVE THE FOllOWING
INFORMATION:
1. The MODEL NUMBER of the product (831.297300).
2. The NAME of the product. (PROFORM* CROSS WALK Dual Motion CrossTrainer)
3. The SERIALNUMBER of the product. (See BEFOREYOU BEGIN.)
4. The REORDERNUMBER of the pad(s), from page 14 of this manual.
5. The DESCRIPTIONof the pad(s), from page 14 of this manual.
Your SEARSmerchandisehas added value when you consider that SEARS has service unitsnationwide staffedwith
SEARStrained techniciansspecificallytrained on SEARSproducts, having the parts, toolsand equipment to ensurethat
we meet our pledge to you:"We servicewhat we sell.*
SOLD BY SEARS,ROEBUCKAND CO., HOFFMAN ESTATES,IL 60179
Part No. 110084 10/92
Printed in USA


![PLAS A O ]-OR](http://vs1.manualzilla.com/store/data/005852706_1-5db0b7ed584537f0e62af161fb124638-150x150.png)