1
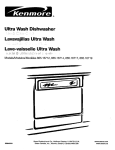
Owner's Manual
Manual Del Propietario
Vacuum Cleaner
Aspiradora
Model, Modelo
116.30412
116.30512
116.31212
116.31312
116.32212
116.32213
CAUTION:
Read and follow all
safety and operating
instructionsbefore first
use of this product.
)
CUIDADO:
Lea y sigue todas las
instrucciones de operaci6n
y seguridad antes del uso de
este producto.
Sears, Roebuck and Co., Hoffman Estates, IL 60179 U.S.A.
www.sears.com
Part No. CO1ZBCS30UOO-8175173
Printed in UoS,Ao
Before Using Your New Vacuum ........
2
Kenmore Vacuum Cleaner Warranty _, • 2
Important Safety Instructions ..........
3
Parts and Features ...................
4
Assembly
Instructions
.............
5-6
Performance Features ...............
Vacuum Cleaner
1 t-12
Care ...............
13
Vacuum Storage .........................
13
Cleaning Exterior and Attachments .....
13
Dust Bag Changing ...................
14
Fiiter Changing ......................
15
Belt Changing and Agitator Cleaning ,, 16-18
Clog Removal
!9
Light Bulb Changing ....................
20
Agitator Servicing .....................
21
Agitator Assembly ...................
2!
Operating Instructions
...............
6
Pile Height Selection and Setting ..........
7
Carpet/Bare Floor Selector ............
7
Releasing the Handle ...................
8
ONIOFF Switch ....................
8
Attachments ........................
8-I0
Attachment Use Chart ...............
t0
Vacuuming Tips ....................
11
Troubleshooting
......................
Requesting Assistance Or Service
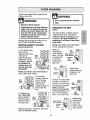
Please read this guide,
and operate your new Kenmore vacuum in
It will help you assemble
....................
22
_, • 23
the safest and most effective way.
For more information about vacuum cleaner care and operation, call your nearest Sears store..
You will need the complete model and serial numbers when requesting information. Your vacuum's model and serial numbers are located on the Model and Serial Number Plate°
Use the space below to record the model number and serial number of your new Kenmore
vacuum.
Model No.
Serial No.
Date of Purchase
Keep this book and your sales check (receipt) in a safe place for future reference,
LIMITED
ONEYEAR
WARRANTY
ON KENMOREVACUUM
CLEANER
This warranty is for one year from the date of purchase, and includes only private household
vacuum cleaner use. During the warranty year, when this vacuum cleaner is operated and
maintained according to the owner's manual instructions, Sears will repair any defects in
material or workmanship free of charge.
This warranty excludes vacuum bags, belts, light bulbs, and filters, which are expendable parts
and become worn during normal use_
For warranty service, return this vacuum cleaner to the nearest Sears Service Center in
the United States.
This warranty applies only while this product is in use in the United States. This warranty gives
you specific legal rights, and you may also have other rights which vary from state to state.
Sears, Roebuck and Co. i:)/817 WA, Hoffman
Estates, IL 60179
i iiii, i1,1,i, ,i ,11,11111,1_1
] ii
WARNING
Your safety is important to us.To reduce the risk of fire, electrical shock,
injury to persons or damage when using your vacuum cleaner, follow basic
safety precautions including the following:
Read this manual before assembling
using your vacuum cleaner.
or
Use your cleaner only as described in
this manual. Use only with Sears recommended attachments.
To reduce the risk of electrical shock Do not use outdoors or on wet surfaces°
Disconnect electrical supply before any
servicing or cleaning. Failure to do so
could result in electrical shock or personal injury.
Always
ging.
turn cleaner off before unplug-
Do not unplug by pulling on cord.r To
unplug, grasp the plug, not the cord.
Do not use with damaged cord or plug.
If cleaner is not working as it should,
has been dropped, damaged, left outdoors, or dropped into water, return it to
a Sears Service Center°
Do not pull or carry by cord, use cord
as a handle, close door on cord, or pull
cord around sharp edges or corners.
Do not run cleaner over cord. Keep cord
away from heated surfaces.
Do not leave cleaner when plugged in.
Unplug from outlet when not in use and
before servicing.
Do not allow to be used as a toy. Close
attention is necessary when used by or
near children°
Do not handle plug or cleaner with wet
hands,
SAVE THESE
Do not put any objects into openings.
Do not use with any opening blocked;
keep free of dust, lint, hair and anything
that may reduce air flow
Keep hair, loose clothing, fingers, and
all parts of body away from openings
and moving parts.
Do not use cleaner without dust bag
and/or filters in place°
Always change the dust bag after vacuuming carpet cleaners or freshener,
powders and fine dusL These products
clog the bag, reduce airflow and can
cause the bag to burst. Failure to
change bag could cause permanent
damage to the cleaner.
Do not use the cleaner to pick up sharp
hard objects, small toys, pins, paper
clips, etc° They may damage the cleaner or dust bag.
Do not pick up anything that is burning
or smoking, such as cigarettes, matches, or hot ashes.
Do not use cleaner to pick up flammable or combustible liquids (gasoline,
cleaning fluids, perfumes, etc.), or use
in areas where they may be present.
The fumes from these substances can
create a fire hazard or explosion.
Use extra care when cleaning on stairs.
Do not put on chairs, tables, etc. Keep
on floor.
You are responsible for making sure
that your vacuum cleaner is not used by
anyone unable to operate it properly.
NSTRUCTIONS
Proper assembly and safe use of your vacuum cleaner are your responsibilities. Your
cleaner is intended only for household use. Read this Owner's Manual carefully for
important use and safety information. This guide contains safety statements under
warning and caution symbols. Please pay special attention to these boxes and follow
any instructions given. WARNING statements alert you to such dangers as fire, electrical shock, burns and personal injury_CAUTION statements alert you to such dangers as personal injury and/or property damage_
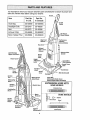
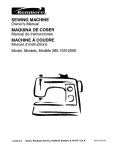
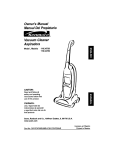
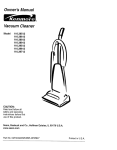
it is important to know your vacuum cleaner's parts and features to assure its proper and
safe use, Review these before using your cleaner.
Item
Dust Bag
Part No.
Part No.
In U.S.
In Canada
20-50690
20-50690C
20:5240
20-40600
Belt
20-5275
20,.40096
Exhaust F iiier
20-86889 ..... 20-86889c
Motor Safety Filter
20-86884
Headlight
Bulb
Handle_.__
_
On/Off
Switch
_ Dirt Sensor
(Some Models)
20'86884C
Bag Cover
Release
t _ ! Performance
/ t| Indicator
Bag
I
Quick Release
Nozzle
Cover
Latch
(Ins,de)
Height
AdJustment.... /
I _,,S
Lever
Lower
Cord Hooks
Nozzle Cover
_
Latch
_1
Furniture _x.,,_
Guard
_" Nozzle Base
Carry
"I _
Crevice
Tool
Ready.to.Use
Swivel Hose
Telescoping
Belt (Underneath)
Spare Belt
(Underneath Nozzle Cover,
Behind Height Adjust Assembly)
EXTENSION
Dusting
FloorSeleotor
_F'___
Stretch Hose
HOSE KITS
SOME MODELS
Extension
Hose
Combination
Brush
Motor
Protector
Handle
Release
__F;e
_-_ Adaptor
SOME MODELS
or Brush
Wand
Model/Serial
Numbers
Agitator
(Underneath)
Bonus Hose
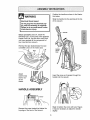
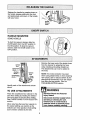
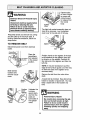
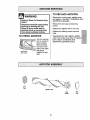
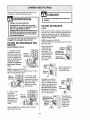
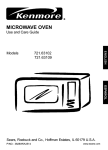
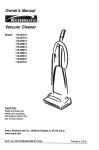
Position the handle as shown in the illustrm
tion below.
Electrical
Shock Hazard
Slide the handle into the opening at the top
of the vacuum_
Do not plug into the electrical supply until the assembly is complete.
Failure to do so could result in electrical shock or injury.
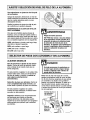
Before assembling vacuum, check the
PACKING LIST on the cover of the separate
Repair Parts List. Use this list to verify that
you have received all the components of
your new Kenmore vacuum,
Remove the tape located betow the dust
cover/filter cover on the motor case_
Tape
Attach
stretch hose
end to nozzle as
shown°
Handle
Screw
Hole
Insert the screw so it passes through the
handle into the vacuum°
HANDLE ASSEMBLY
Remove the screw located just below the
top edge of the back of the vacuum_
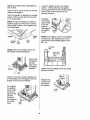
Begin to tighten the screw with your fingers.
It may be necessary to adjust the handle
slightly.
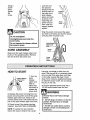
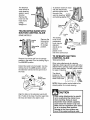
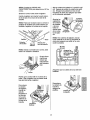
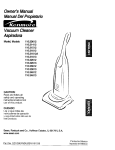
Lock the cord
into place by
forcing it into the
locking notch on
the body of the
quick release
upper cord hook
as shown, This
helps keep the
power cord out
from under the
vacuum cleaner
agitator.
Using a
screwdriver,
tighten
the
screw.
CAUTION
Wrap the power cord around the upper
and lower cord hooks and lock the power
cord plug onto the power cord.
Do not overtlghten.
Overtightenlng
screw holes.
Power
could strip the
Do not operate the cleaner without
the screw in place.
CORD ASSEMBLY
UpperCord
Hook
Power
Make sure the quick release upper cord
hook is in the upright position° Remove
the wire tie from the power cord.
Cord
HOW TO START
_Qutck
Release
er C/rd
1. Turn the
quick
release
upper cord
hook to
either side
and down to
release the
power cord.
2, Release the power cord plug from the
power cord and pull the cord off the quick
release upper cord hook. Check to be
sure the power cord is still locked into the
lock in the quick release upper cord hook.
3. Check to see if the cleaner has bag
installed. See DUST BAG CHANGING.
NOTE: To reduce the risk of electric
shock, this vacuum cleaner has a polar-
ized plug, one blade is wider than the
other. This plug will fit in a polarized outlet
only one way, If the plug does not fit fully
in the outlet, reverse the plug. If it still
does not fit, contact a qualified technician
to install the proper outlet. Do not change
the plug in any way°
4. Plug the polarized power cord into a
120 Volt outlet located near the floor°
WARNING
Personal Injury and Product Damage
Hazard
• DO NOT plug in if switch is in the ON
position. Personal injury or damage
could result.
• DO NOT use outlets above counters.
Damage to items in surrounding area
could occur.
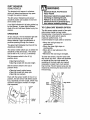
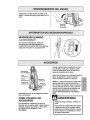
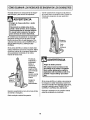
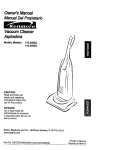
To select a pile height setting
Turn off cleaner, Select a pile height setting by tilting the cleaner back until front
wheels are lifted slightly off the floor as
illustrated_
Slide the adjustment lever to the correct
setting,
SUGGESTED
PILE HEIGHT SETTINGS
You may need to raise the height to make
some jobs easier, such as scatter rugs
and longer pile carpets, Suggested settings are:
HIGH: shag carpet, long pile, plush, scatter rugs.
MED: medium to long pile.
LOW: short to medium pile.
EX LOW: very iow pile.
WARNING
Personal injury Hazard
DO NOT place hands or feet
underneath the unit when
changing from the bare floor to
the carpet pile height setting.
The agitator begins to revolve
rapidly when the vacuum Is
turned on and Is in the carpet
setting.
I/
SOME
MODELS
Bare floor setting: Slide the carpet/bare
floor selector all the way back and down
toward the bottom of the nozzle until it
locks into place.
tn this position the brush assembly does
not revolve. This setUng should be used
for cleaning hardwood and tile floors and
when any attachments (tools) are
used.
Carpet setting: Slide the selector all the
way forward and up to the carpet
position,
In this position the brush assembly will
turn. When carpets are being cleaned the
selector should be in this position,
Attention: Refer to your carpet manufacturers cleaning recommendations. Some
more delicate carpets may require that
they be vacuumed with the agitator turned
off, to prevent carpet damage.
CAUTION
Do not allow vacuum cleaner to
remain in one spot for any length
of time when the agitator is turning. Damage to carpet may occur.
NOTE: For longer belt life, turn vacuum off
before moving selector, otherwise make
sure the selector is pushed fully and
quickly as possible to the desired position. Failure to do so can cause the belt
to rub on the selector shaft and may result
in the belt becoming hot and creating a
burning rubber smell,
Carpet/Bare
Floor Selector
To Carpet
Position
To Bare Floor
Position
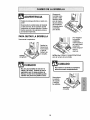
Release the handle by pressing down on
the handle release pedal with your foot
and pulling back and down on the handle
with your hand.
Release
Pedal
HANDLE MOUNTED
SOME
MODELS
"Tostart the vacuum cleaner, slide the
On/Off switch from the OFF position to
the ON position. To stop the vacuum
cleaner, slide the On/Off switch to the
OFF position.
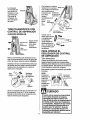
Remove the lower end of the stretch hose
from the cleaner by grasping the hose
collar, twisting and pulling straight out.
The attachments can now be added to
the hose.
Crevice
Tool _,
Telescoping
Dusting
Hose
Combination
Collar
Identify
above.
each of the attachments
NOTE: The motor protector may open
when using attachments or when cleaning
new carpet, due to reduced airflow by the
attachments themselves or by new carpet
fuzz filling the bag quickly. See the
TROUBLESHOOTING section,
shown
WARNING
TO USE ATTACHMENTS
Electrical Shock And Personal
Injury Hazard
Place the carpet/bare floor selector in the
bare floor setting by rotating the selector
back and down to the bare floor setting.
See CARPET/BARE FLOOR SELECTOR
section.
When returning the bare floor selector to
the carpet setting, use caution as the
selector can move quickly to that setting
due to tension created by the belt.
Disconnect electrical supply before
servicing or cleaning the unit,
Failure to do so could result in
electrical shock or personal injury
from cleaner suddenly starting.
i
ii
iiiiiii
J
The attached
hose swivels to
To achieve maximum
reach
with the attachments,
add the crevice tool to
make cleaning
easier in every
direction.
Remove the
hose from the
Hose
the end of the
auk.rio.
wand by inserting
ur._=ml
and twisting slightly, sil_e
Swivel
hose clip by
pulling
straight out.
TELESCOPING
WAND WITH
SUCTION CONTROL SLIDE
SOME
MODELS
_l__l
Crevice
Tool
i
Telesceplng
Wand
telescoping
wand from
Remove the
its storage
position.
Remove the crevice tool from its storage
position in the wand, Turn the locking ring to
the UNLOCK position.
Extend the wand to its full length. Turn the
locking ring to the LOCK position. Attach
the extension wand onto the open end of
the hose.
Wand _
_
Suc tion
Control Sfide
The dusting
brush or the
combination
brush may be
attached
directly to the
wand or
placed on the
end of the crevice tool,
TO OPERATE SUCTION
CONTROL SLIDE
Telescoping
Wand
When using attachments for cleaning
draperies, small rugs with low pile and other
delicate items, twist the suction control slide
to the open position. This will reduce suction
for ease of
\
s,Jctten
The slide is
located on the
telescoping wand,
close to the hose.
_onrrol
S,'ld_
NOTE: Return suction control slide to the
closed position for normal cleaning.
Upper
Wand
Align the tabs on the extension wand with
the "J" slots in the hose. Push the wand into
the hose and twist to the right to lock.
j CAUTION
When using attachments, be careful
not to overextend the stretch hose
when reaching. Trying to reach
beyond the hose stretch capability
could cause the cleaner to tip over.
Make sure the carpet/bare floor selector is in the bare floor position.
Damage to the floor surface may
occur if the carpet setting is used.
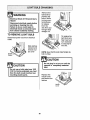
TO STORE ATTACHMENTS
EXTENSION
SOME
Remove dusting brush or combination
brush_ Snap into appropriate storage location.
Some models include an extra hose which
connects to the stretch hose on the vacuum
for a longer cleaning reach.
Remove crevice tool from the wand by twisting Lay aside.
Remove the extension
HOSE
MODELS
Unit Hose
!
wand from the hose,
_/.
Extension Hose
L=
l
Twist the wand to the left and pull from the
hose end,
Insert the two tabs on the end of the
extension
hose into the two "J"shaped
on the unit hose and twist to connect.
Wand
slots
All attachments and the telescoping wand
can be attached to the open end of the
hose.
Unlock
Locking
FLOOR BRUSH AND WAND
Ring
SOME
Upper
Wand
MODELS
Some models have an extra brush and wand
for cleaning bare floors, Twist one end of the
adaptor into the floor brush and the other
end into the straight wand, Connect the
straight wand to the telescopic wand and
then to the vacuum hose or extension hose.
Unlock the wand by turning the wand locking ring to the UNLOCK position.
Slide the lower wand into the upper wand,
Turn the wand locking ring to the LOCK
position,
Floor Brush ---_
Place the crevice tool down into the com-
,,o.,-J.
pressed wand. Snap into the appropriate
storage location.
Reinsert the hose fully into the opening on
the lower body from which it was removed.
Press firmly to assure connection
CAUTION
When using the regular hose or with
the extension hose attached, the
cleaner should be on a solid surface
on the same level or below the level
of the user's feet. DO NOT use the
hoses when the cleaner is above the
level of the user's feet,
CAUTION
DO NOT pull the vacuum cleaner
around the room by the hose.
Property damage could result.
IIIIIHII
H IIIIHHHI
CLEANING AREA
ATTACHMENT
Furniture*
DUSTING
BRUSH
CREVICE
TOOL
COMBINATION
<_
X
_
BRUSH
Cushions*
Between
Stairs
X
X
&
Drapes* i
X
X
*Always clean attachmenis beiore usim on fabrics,
10
X
X
X
Walls
X
= =
For best clean...
ing results,
keep the airflow passage
clear.
Carpet edges
Guide either side or the front of the nozzle along a baseboard° The full length
brushes help remove dirt at carpet edges.
Stairs
Put handle in full upright position. Place
the carpet/bare floor selector in the bare
floor position. Use the crevice tool or fabric brush, Set the On/Off switch to ON_
Occasionally,
check each of
the areas indicated for clogs.
Unplug the
cleaner from
the outlet before checking.
WARNING
PERFORMANCE INDICATOR
MOTOR PROTECTION
SYSTEM
SOME
When the unit is running with normal air
flow, the light on the performance indicator
is off, The light comes on whenever the
airflow becomes blocked, tf that occurs,
check the disposable dust bag, motor
safety filter and other possible clog
locations shown in CLOG REMOVAL,
This vacuum has a motor protector bypass valve which automatically opens to
provide cooling air to the motor when a
clog prevents the normal flow of air to the
motor, tf the by-pass valve opens to
prevent motor overheating and possible
damage to the vacuum, you wifl notice a
change of sound
as air rushes
through the valve
opening,
To correct
problem:
See the
TROUBLESHOOTING
chart.
NOTE: Do not
block motor
protector
To correct
problem: See
the TROU BLESHOOTING
chart,
MODELS
NOTE: The
light may
also come on
when using
attachments,
due to
reduced
airflow
through the
attachment.
Motor
Protector
NOTE: The motor protector may open
when using attachments or when cleaning
new carpet, due to reduced airflow by the
attachments themselves or by new carpet
fuzz filling the bag quickly. See the
TROUBLESHOOTING section.
11
DIRT SENSOR
SOME
WARNING
MODELS
The electronic dirt sensor is a feature
which will detect particles as they pass
through the vacuum cleaner.
Electrical Shock And Personal
Injury Hazard
Disconnect electrical supply before
servicing or cleaning the unit.
Failure to do so could result in
electrical shock or personal Injury
,from ,cleaner suddenly starting.
The dirt sensor indicators and sensor
sensitivity switch are located on the front
of the switch cover.
A red light indicates dirt is being picked up
by the cleaner. A green light indicates
most of the dirt has been picked up by the
cleaner.
TO CLEAN
As you vacuum, the red indicator light will
come on and stay on as long as the
sensor detects a high concentration of
particles passing through the cleaner.
•When the red light stays on
continuously.
•When the green light stays on
continuously°
•When dirt or dust adheres to the
optic cells.
•Whenever the dust bag is changed.
The green light indicates that most of the
cleaning is complete.
The sensor switch allows you to select the
sensitivity of the dirt sensor. The switch
can be set to HI (+) or LO (-) sensitivity.
Set the sensor switch to the HI (+)
position when:
To clean the sensor, wipe the optic cells
with a soft, dry cloth_ Never use cleaners
or liquids as they can help speed the
recoating of the optic cells and make it
necessary to clean them much sooner
than normal° The dirt sensor area can be
reached by removing the dust cover and
the dust bag.
,Cleaning bare floors_
=Cleaning carpet with low pile height.
Set the sensor switch to the LO (-)
position when:
,Cleaning heavily soiled areas.
,Cleaning carpet with deep pile.
,Cleaning new carpets.
Even with the sensor switch in the LO (-)
position, the dirt sensor will detect carpet
fuzz, especially on new carpet, which may
cause the red light to remain on longer
than expected.
Optic
J
Sensitivity
Switch
I
OPTICS
The dirt sensor optics consist of two optic
cells located inside the bag holder.
Occasionally, it may become necessary to
clean the two optic cells to assure
maximum performance. It is
recommended the optic cells be cleaned:
OPERATION
/
DIRT SENSOR
Switch
Cover
12
Holder
Always follow all safety precautions when
cleaning and servicing the vacuum
cleaner.
•
WARNING
Electrical Shock And Personal
Injury Hazard
Disconnect electrical supply before
S ervming
'
or cleaning the unit.
Failure to do so could result in
electrical shock or personal injury
from cleaner suddenly starting.
ii
Gather the cord and wrap it loosely
around the upper and lower cord hooks.
WARNING
Electrical Shock And Personal
Hazard
Store the cleaner
in a dry, indoor
area, on the floor
with the handle
locked in the
upright
position.
Wrapping the cord too tightly
puts stress on the cord and can
cause cord damage. A damaged
cord is an electrical shock hazard and could cause personal
injury or damage,
.....................
Unplug cord from wail outlet. DO NOT drip
water on cleaner.
CAUTION
Clean exterior using a clean,soft cloth that has
been dipped in a solulJonof mild liquid detergent and water,then wrung dry.Wipe dry after
cleaning.
Do not use attachments if they are
wet. Attachments used in dirty
areas, such as under a refrigerator,
should not be used on other
surfaces until they are washed.
They could leave marks.
To reduce sta_c electricityand dust build-up,
wipe outer surface of cleaner and attachments.
Wash attachments in warm soapy water, rinse
and air dry. Do not clean in dishwasher.
13
TO REMOVE DUST BAG
TO REPLACE DUST BAG
Unfold the
new dust bag.
Fold the safety
WARNING
O.st
Bag
seal tab on the !l.___/_-_.._.sa,_ty
a_'-
Pull out on the
bag cover
release located
near the top of
the bag cover.
Bag Cover
Release--F_
Bag
lilt
Cover q
_
I
Pull the bag
cover forward
and lift up.
Remove and
lay aside,
See PARTS AND FEATURES
b
for
Bag number.
Insert the dust bag
onto the bag holder
completely by holding
the bag collar.
Tuck the bag
behind each of
the four bag
retention corner
flaps shown here.
Be sure the bottom and sides of
the dust bag are
completely within
bag cavity prior to
replacing the bag
cover.
Bag
Do not reuse.
BagHolder Check the bag
holder and the
- BagCavity motor safety filter. If either is
blocked, check
safety
TROUBLEFilter
NOTE:
_f____S_al
Place the dust bag
collar into position.
Grasp the dust bag
collar and pull gently, carefully removing the dust bag.
Throw away the
used dust bag.
away from the
opening that
newon
dust
fits
thebag
bag
holder.
Slots_
Sag
Retention
Corner
Flaps
Position the bag
cover so its
positioning tabs
fit into the body
positioning tab
slot&
SHOOTING.
Close the bag
cover.
3 CAUTION
You will hear a
distinct snap
when cover is
securely closed.
NEVER REUSE A DUST BAG.Very
fine materials, such as carpet
freshener, face powder, fine dust,
plaster, soot, etc. can clog the bag
and cause it to burst before it is
full. Change bag more often when
vacuuming these materials.
Check to see
that the dust
bag is fully enclosed in the bag cover.
14
Check motor safety filter frequently and
change when dirty.
WARNING
WARNING
Electrical Shock Hazard
EXHAUST FILTER
Unplug power cord from electrical
outlet. Do not operate the cleaner
without the motor safety filter. Be
sure the filter is dry and properly
installed to prevent motor failure
and/or electrical shock.
HEPA
The exhaust filter cartridge must be
replaced when dirty, It should be
replaced regularly depending on use
conditions. The filter CANNOT be
washed as it will lose its dust trapping ability.
Remove the dust bag as outlined in the
DUST BAG CHANGING section.
MOTOR SAFETY FILTER
NOTE: See PARTS AND FEATURES
for the exhaust filter number°
ELECTROSTATIC
1. This white & grey
filter must be
replaced when dirty.
It should be
replaced regularly
depending on use
conditions, The filter CANNOT be
washed as it will
lose its dust trapping ability.
Slide the
exhaust filter
cover release
down_ Pull out
on exhaust filter cover to
remove from
bag cover,
Motor
safety
Filter
" "_
z -,.-._ _
3. Replace the
filter, white side
up, by sliding it
back into place
under the ribs in
the bag cavity=
Cover---_
I
Remove the
exhaust filter cartridge from the
bag cover.
Exhaust
2. If the filter,
located in the bottom of the bag
cavity, is dirty,
remove it by
pulling forward out
from under the
ribs,
Replace the exhaust filter
cartridge, carefully positioning it so that it fits into
the bag cover. The grey
edge of the filter
should be facing away
from the operator. Push
only on filter cartridge
frame, not on filter itself.
Motor
Safety
/rot
Exhaust
Filter
H
Cover
Exhaust
Replace the bag as outlined
BAG CHANGING
section,
cover._,
in the DUST
15
"_
Exhaust Filter
/!
Exhaust
Filter
Cover
Release--_" _
Cover /
Bag
NOTE: See PARTS AND FEATURES for
motor safety filter number.
Filter_
Bag
}J
"
_
_"_4J
Cover--€,-"
Exhaust[
I1
__
Replace the
exhaust filter
cover and
secure the
latch by pushing it upward.
•
RN,N'G
............................
Electrical Shock Or Personal Injury
Hazard
_
Disconnect electrical supply before
servicing or cleaning the unit,
Failure to do so could result in
electrical shock or personal injury
from cleaner suddenly starting.
i,ii
i
iqlll=llllll!l!=l
i
I
on rear of agitator cover and
rotate forward
to epress
releasetabs
from
the nozzle
body.
Cover
The light bulb socket assembly does not
have to be removed. Lay the agitator
cover over to the side out of the way.
i
Frequently check and remove hair, string
and lint build-up in the brush area, If
build-up becomes excessive, follow the
steps below.
TO REMOVE BELT
A
Disconnect power cord from electrical
outlet.
B_lt "_
upare
Belt
I
Carpet/Bare
Floor Selector
_.
o Carpet
Position
_
Place the
carpet/bare
floor selector
Jn the carpet
Position hands on the agitator. If the belt
is still attached to the agitator, there will
be tension on the agitator. Carefully lift
the right end of the agitator and then the
left end,
position.
NOTE: It may be necessary to pull the
edge of the furniture guard out of the way
to allow the ends of the agitator to be
removed easily.
Slide latches
outward and
remove nozzle
cover.
Remove the belt from the motor drive
shaft.
A spare belt is provided, See above illustration for location of spare belt. You may
keep a spare belt in this location any
time.
Cover"
Furniture
Guard
Retainer
Agitator
Cover
Unfasten the
furniture
guard retainers from the
posts on
both sides of
the agitator
cover,
•
WARNING
Personal Injury Hazard
Be careful when removing the agitator as the belt tension is high,
Failure to do so could result in
personal injury from the agitator
releasing quickly and snapping
away,
16
TO CLEAN AGITATOR
TO REPLACE BELT
NOTE: In order to keep cleaning efficiency
high and to prevent damage to your vacuum, the agitator must be cleaned every time
the belt is chan eo__dd,
Make sure that the carpet/bare floor selector is in the carpet position,
Loop the new belt on the motor shaft.
The agitator must be cleaned according to
the following schedule:
Vacuum Use
HEAVY
(used daily)
Clean Agitator
every week
MODERATE
every month
,f
Shaft
I
Motor
(used 2-3 times/week)
LIGHT
Belt
Pulley
every 2 months
_w
Belt
Carpet/Bare Floor
Selector Shaft
(used 1 time/week)
Remove ant dirt or derbris in the belt path
area or in the agitator area.
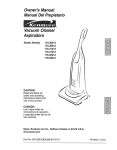
BELT ROUTING
Correct Routing of Belt
Exploded View - Agitator
Assembly
(Selector In Carpet Posltlon)
Agl__!:
_ Floor Pedal
Carpet/Bare Floor
Selector Shaft
End
Cap
Agitator
Unit
Belt
I
End
Pulley
Cap
Incorrect
Shaft
Routing
of Belt
(Belt on Selector Shaft)
\
Carefully remove
the brush end
" Carpet/Bare
iFloor Pedal
caps and remove
any string or
debris located on
End Cap
Agitator
Motor
Carpet/Bare
Floor
Selector Shaft
the agitator
assembly, end
caps. washers or
agitator shaft,
Shaft
Incorrect Routingof
Belt
(Selector m uare Floor e'osttlon)
/ _._
Carpet!Bare
_'
, ['} Floor Pedal
NOTE: Replace the end caps. See the
exploded view for correct assembly,
Agitator
17
Belt
Carpet/Bare Floor
Selector Shaft
NOTE: See PARTS AND
belt number.
FEATURES
for
Lower the agitator cover to its original
position. After positioning the agitator
cover, push forward on the two (2) locking
tabs in order to ensure that they are
securely in place.
Loop the other end of the belt on the belt
pulley on the agitator.
Insert the agitator by placing the rounded
portion of the end cap down into the slot
in the nozzle base.
Re-fasten
the furniture
guard retainers to the
posts on
both sides of
the agitator
cove r_
NOTE= It may be necessary to hold the
furniture guard out of the way in order to
allow proper insertion of the agitator into
the nozzle base.
Furniture
Guard
Retainer
Agitator
Cover
NOTE: If the agitator cover is not installed
correctly, you may experience a loss of
performance and possible agitator vibration, etc.
oo.o
Guard
End
Cap
Slot
,
NOTE: Care must be taken due to the
belt tension during reassembly.
Press firmly,
checking to
see that
each end is
completely
inserted.
Make sure the headlight
securely in place.
Check to see that the belt is centered on
the belt pulley. Turn the agitator with your
fingers to see that it turns freely.
To re-attach
the agitator
cover, insert
the six (6)
tabs into the
six slots
along the
front edge of
the nozzle
base.
Replace the
nozzle cover
and secure
the latches.
Nozzle
Cover
Tabs/
Slots
18
wires
are tucked
Always follow all safety precautions when
cleaning and servicing the vacuum
cleaner.
Re-insert the hose into the opening on
the lower body from which it was
removed. Press firmly to assure
connection.
WARNING
Electrical Shock Or Personal Injury
Hazard
Disconnect electrical supply before
servicing or cleaning the unit.
Failure to do so could result in
electrical shock or personal injury
from cleaner suddenly starting.
If the cleaner does not seem to have adequate suction, first check if the dust bag is
full or if a filter is clogged. See DUST
BAG CHANGING and FILTER CHANGING.
Hose
Hose
Collar
If the bag and filter areas are free of
clogs, check the hose area. Remove the
lower end of the stretch hose from the
cleaner by grasping the hose collar, twisting, and pulling straight out.
Stretch
Hose In
and O,t
•
Plug in the
vacuum and
turn it on.
Stretch the
hose to
maximum
length and
then allow
the hose to
return to its
storage
length.
WARNING
Personal Injury Hazard
DO NOT place hands or feet
underneath the unit at any time.
The agitator will be revolving
rapidly when the vacuum Is turned
on and is In the carpet setting.
i
ii
ii
ii
i
If the bag and filter areas and the hose
areas are free of clogs, check the nozzle
area. To check this area, see the section
on BELT CHANGING AND AGITATOR
CLEANING.
Turn the unit
off and
unplug the
unit.
Return the cleaner to the upright position
before plugging into an electrical outlet.
Visually inspect the hose and the base
area into which the hose is inserted.
Remove any visible clog.
19
•
Remove the
light bulb by
pushing the
bulb in while
turning counterclockwise
to release
from the
slot,Then pull
the light bulb
straight out.
WARNING
Electrical Shock Or Personal Injury
Hazard
Disconnect electrical supply before
servicing or cleaning the unit.
Failure to do so could result in
electrical shock or personal injury
from cleaner suddenly starting.
TO REMOVE LIGHT BULB
To replace the
light bulb carefully insert and
turn clockwise
to securely fit
into slot.
Disconnect power cord from electrical
outlet.
l(
Slide latches
outward and
remove nozzle cover
NOTE: See PARTS AND FEATURES
bulb number.
Nozzle
CAUTION
Do not use a bulb rated over 15W
(130 V). During extended use, heat
from the bulb could overheat sup
rounding plastic parts.
Replace the
nozzle cover
and secure the
latches.
Covor
20
for
TO REPLACE AGITATOR
•
WARNING
Remove the nozzie cover, agitator cover
and agitator. See BELT CHANGING AND
AGITATOR CLEANING.
Electrical Shock Or Personal Injury
Hazard
Remove the end caps and bearing
covers,
Disconnect electrical supply before
servicing or cleaning the unit.
Failure to do so could result in
electrical shock or personal injury
from cleaner suddenly starting.
Replace the agitator with a new one.
Replace the bearing covers and end
caps.
TO CHECK AGITATOR
__
= =====ll
Base Plate
Belt Guard
Reassemble the belt, agitator, agitator
cover and nozzle cover. See q'o replace
belt" tn BELT CHANGING AND
Turn the vacuum
over to check for
worn brushes,
When brushes
are worn to the
level of the base
belt guard,
replace the agitator,
AGITATOR CLEANING section.
_
End
Cap
Be#
Pufley
21
End
Cap
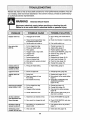
Review this chart to find do-it-yourself solutions for minor performance problems° Any service needed, other than those described in this owner's manual, should be performed by
an authorized service representative.
WARNING
Electrical
Shock
Hazard
Disconnect electrical supply before servicing or cleaning the unit.
Failure to do so could result in electrical shock or personal injury,
Cteaner won't run,
Poor Job of dirt
pick-up,
1, Unplugged at wall outlet.
t.
2. Tripped circuit breaker/b!own fuse
at household service panel.
3. Onloff switch not turned on.
2. Reset circuit breaker or replace fuse.
1_ Full or clogged dust bag.
2. Wrong pile height setting.
3, Worn agitator.
4. Clogged nozzle or bag holder.
5. Clogged hose°
6. Hole in hose.
1. Change bag, (page 14).
2_ Adjust setting, (page 7).
7. Broken/misplaced belt.
8. Hose not inserted fully,
9. Motor protection system activated.
10. Dirty filters.
Plug tn firmly, push on/off switch to
on.
3. Push on/off switch to one
3.
4.
5.
6.
Replace agitator, (page 21).
Check CLOG REMOVAL, (page 19).
Check for clogs, (page 19)o
Rsptace hose.
7. Replace/fix belt, (page 16-18)o
8. Insert hose fully, (page 10),
9. Check for clogs, (page t9).
10. Change filters, (page 15)o
Cleaner picks up
moveable rugs or
pushes too hard,
1, Wrong pile height setting.
1. Adjust setting, (page 7).
Light won't work°
1. Burned out light bulb.
1. Change light bulb, (page 20).
Agitator does not
turn,
1. Broken belt.
2. Bare floor selector in bare
floor setting,
3, Belt Installed Incorrectly,
t.
Performance indicator.
some models, Is red.
1, Full or clogged dust beg,
2, Dirty filters.
!_ Change bag, (page 14).
2. Change filters, (page 15).
3, Clogged airflow passage.
3. Clear clog from airflow passage,
(page 19).
4. Thls Is normal Light should go off
when tool ls removed.
4. Certain attachment tools.
Replace belt, (pages t6-t8).
2. Move selector to the carpet setting,
(page 7).
3. Check BELT CHANGING AND
AGITATOR CLEANING,
(pages 16-18).
Air flow restricted
with attachment use.
1. Attachment use restricts air flow.
1, CheckATTACHMENTS,(page 8)
Sound changes,
2. New carpet fuzz clogged air path.
2_
Excessive noise as
vacuum Is shut off,
1. Belt rubbing on carpet!bare floor
selector shaft.
Dirt Sensor, some
models, will not work,
1, Dirty optic ceils.
Check CLOG REMOVAL and clean
hose, (page 19),
Push selector all the way forward,
(page 7).
1o Clean optic cells, (page 12).
22
Antes de usar su aspiradora nueva
.....
1
Garantia de la aspiradora de Kenmore .... 1
lnstrucciones importantes de
seguridad ............................
2
Piezas y caracteristicas ..................
lnstrucciones de ensamblamiento .....
lnstrucciones de operaci6n ...............
Ajusto y setecci6n de nivel do pelode la
alfombra
................
.............
Selector de pisos con alfombra y
sin alfombra
..........
3
4-5
5
6
6
Dosprendimiento del mango ..............
7
Interrupterde encendido/apagado ............
7
Accesorios .........................
7-9
Cuadro de use de fos accesorios ..........
9
Sugorencias para aspirar ...............
Caracter(sticas de rondimiento ........
Cuidado de la aspiradora ..............
12
Almacenamiento do la aspiradora ........
12
Limpieza del exteriory de Josaccesorios . •. 12
Cambio de la bolsa para polvo ..........
!3
Cambio dei filtros ......................
14
Cambio do la corroa y limp[eza det
agitador ...............................
15-17
CSmo eliminar los residues de basura
en los conductos ......................
18
Cambio de ia bombil]a .................
19
Cuidado del agitador ...................
20
Ensamble del agitador .................
20
Reconocimiento
de problemas
.........
21
10
10-11
Per favor lea esta guia que le ayudaraa assemblar y operar su aspiradora nueva do Kenmoro on una manera
m&s segura y effectiva.
Para mas informaci6nacerca del cuidado y oporaci6n de esta asptrador, Ilame a su tienda Sears mas corcana.
Cuando prequnte per informaci6nustsd necisitar_ el n_mero complete de serie y modelo de la aspiradora que
est_ locado en la placa de losn_meros de modeto y serie.
Use el espaciode abajo para registrarel numero de modelo y serie para su nueva aspiradora de Konmore.
N_mero de Modelo
Numero de Serie
Fecha de Compra
Matenga este libro y su recibo on u lugar seguro para referencias futuras.
GARANTIA LIMITADA DE UN AI_O DE LA ASPIRADORA KENMORE
...........
Esta garantfa es per un a_o desde la fecha de compra, e incluye solamente el use de la aspiradora en
hogares pdvados..
Durante et aSo de garantfa, cuando la aspiradora es operada y mantenida de aeuerdo al
manual de instrucciones del dueSo,Sears reparar_,cualquier defecto en materiales o fabricaciSnlibre de cargo_
Esta garantia excluye tas bolsas de colecciSn, correas, lamparillas, y filtros, las cuales son partes gastab_esque
se deterioran con el use normal
Para el servicio de garanfia, retorne esta aspiradora al Centre de Servicto Sears mds cercano en los
Estados Unidos.
Esta garantia se apt[casetamente mientras este producto est_ en use en los Estados Unidos, Esta garantia le
da a usted derechos legales especificos, y usted puedetener tambi_n otros derechos Ios cuales var{an de
estado a estado
Sears, Roebuck and Co. D/817 WA, Hoffman Estates, IL 60179
=
ADVERTENCIA
Su seguridad es muy importante pare nosotros_Para reducir el riesgo de incendio,cheque
el_ctrico, lesi6n corporal o da_os al utilizar su aspiradora, act_e de acuerdo con precauciones
bdsicas de seguridad, entre elias:
Lea esle manual antes de armar o utilizar su
aepiradora.
Use su aspiradora unicamenteen la forma
descrita en este manual. Use _nicamente con
accesofios recomendados per Sears.
Pare reducir el riesgo de cheque el_ctdco, no use
su aspiradora a] aire libre ni sobre superficies
mojadas_
Desconecte la fuente de electricdad antes de
dar servicio o limpiar. De Io contrario podr[a
causer un cheque el_ctrico o ]esi6n corporal.
No utiiice la aspiradora si alguna abertura est,.
bloqueada; mant_ngala libre de polvo, pelusa,
cabellos y cualquiera cosa que podrfa disminuir
el flujo de aire.
Mantenga el cabello, ropa suelta, dedo_ y todas
las partes del cuerpo alejados de las aberturas y
piezas mec_nicaso
No use ta aspiradora sin tenet instaladala balsa
para polvo y/o los filtros
Cambie stempre ta bolsa para polvo despu6s de
aspirar limpiadores de alfombras o desodorantes,
talcos y pelves fines. Estosproductos atascan la
boise, reducen e] flujo de aire y pueden causer
que 6sta se rompaoSi no cambia fa boise podria
ocasionar daSo permanente ala asp]radora,
Siempre debe apagar su aspiradora antes de
desconectar[a.
No desconecte la aspiradora tirando del cord6n
el_ctrico.Pare desconectarla, hale el enchufe, no
el cord6n.
No use la aspiradora si el cord6n o el enchufe
est,. daSado Si la aspiradora no est&
funcionando adecuadamenle o sise ha dejado
caer, est,, daBada, se ha dejado expuesta ala
intemperieo se ha dejado caer en ague, devu61vala a un Centre de servicio de Sears°
No use ta aspiradora para levantar objetos agudos, juguetes pequeSos,allileres, sujetapapeles,
etc, Podrian daSar la aspiradorao la bolsa pare
potvo_
No tevante ninguna cosa que se est6 quemando
o emitiendo humo, come cigarrillos, ceritlos o
cenizas calientes
No hale ni transportela aspiradora per el cord6n;
no use el cord6n come mango; no cierre puertas
sobra el cord6n; no hale el cord6n sobre rebordes agudos ni esquinas.No pase ia aspiradora
sobre el cord6n, Mantenga el cord6n a]ejado de
superficies calientes.
No abandone la aspiradoracuando est_ conec°
tada_Descon_ctela cuando no la est_ usando y
antes de darle servicio.
No use Ia aspiradcra para aspirar tiquidos
inflamableso combusiibles (gasolina, l[quidos
para limpieza, perfumes, etc.) ni fa use an
lugaras deride _stos podrlan ester presentes, Los
vapores de estas sustancias pueden crear un
peligrode incendioo explosi6nr
Tenga cuidado especial al utilizer laaspiradora
en escalones. No la coloque sobre sillas, mesas,
etc, Mant6ngala en el piso.
No permita que sea ulilizada come jugueteoSe
requiere tenet mayor cuidado cuando sea
utilizada en la proximidad de niSos o per niSos
No toque la asp[fedora ni el enchufe con las
manes mojadas.
No coloque objetos en las aberturas
Usted es responsable de asegurar que su aspiradora no sea utilizada per ninguna persona que no
pueda manejarla correctamente.
GUARDE ESTAS INSTRUCClONES
El armado y use seguro de su aspiradora son su responsabilidadoEsta aspiradora ha side diseSada
exclusivamente pare use dom6stico, La aspiradora deber_ almacenarse en un lugar seco y en el interioroLea este Manual del propietariodetenidamente, pues contiene tnformaci6nimportantesobre seguridad y use. Esta quia contiene informaci6nsobre seguridad debajo do simbolos de advertiencia
cuidado_ Per favor ponga atenci6n especial a estas instruccionesdadas_Advertencia: Este
informaci6nle alertar_ con el poligro do fuego, cheques e]ectricos, quemadas y lesiones. Cuidado:
Este informaci6nte alertara a peligros come tes]onesy daSosde propiedad.
2
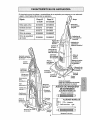
Es importante concer
y seguro.
Exam/nelas
las piezas y caracterfsficas
de su aspiradora
antes de usar su aspiradora.
Pieza N-°
en EUA
Objeto
para asegurar
su uso adecuado
Pieza Ng
en Canad_
Bolsa para polvo
20-50690
20-50690C
Bombilla de farol
20-5240
20-40600
Correa
20-5275
20-40096
Filtro de escape
20-86889
20-86889C
Filtro de seguridad
del motor
20-86884
20-86884C
Mango
de encendldo/
apagado
polvo (algunos
modelos)
Seguro de la
cublerta do
la
•lndlcador de
rendtmlento
(algunos modelos)
Cublerta de
Llberacl6n de
ia cublerta del
flltro de escapeLlberacl6n
do la cublorta
Sujetador superior
de/iberaci6n r&pida
del cord6n
ds
escape
(dentro)
Selector de plsos
con alfombra y
sin alfombra
Palanca
para ajustar
la cublerta de
Mango para
transporfar
Herramientas
para
le_
hendiduras --_
Tubo
_'o .
telescop/co-_'_
"Manguera
.
. o
[ gtratona list
| para usar
Cepitlo para | _
sacudir_!
|
I
Ceplllo para I J
combinact6n ! I
Pedal de
I!
boqullla
Correa
(abajo)
Cubterfa de
la boquflla
Farol
tll
_
I=
_1
||
||
_--Manguera
t_ expansible
11
t|
--
--
IL
Correa de repuesta
(abaJo de la cublerta de la boqullla
detrds (]el aJustador de a/tufa)
JUEGOS DE MANGUERA
DE EXTENSION
ALGUNOS MODELOS
=
Manguera de extensl6n
t
!t!ltttIllllUtlIt!llt(lilli
Protector
_ce
ALGUNOS
_'_--
Adeptador
pilloparapisos
N_meros de series'1
I#oIL_l
_
..._; _,,'_J_.
(,
,j)
M-O-D-EL.O
S"
TUL
JIiiitItttlI(lllIIllIIUliliiliiIilIIiii
Manguarade la prima
Coloque et mango como se ve en el diagrama
abajo+
ADvERTENciA
AI mantener la manguera de manera que no inter+
fera, mueva et mango a la abertura en la parte
superior de la aspiradora+
Peligro de choque el_ctrico
No conecte la aspiradora hasta que termine de armada. De Io contrario podria
causar un choque el_ctrico o lesi6n corporal.
AntAntes de armar la aspiradora, chequee la USTA
DE EMBALAJE en la cubierta separada de fa Lista
de Partes para Reparaci6n. Use esta fista pare verF
ficar que ha recibido todas tas componentes de su
nueva aspiradora Kenmom.
Retrar la banda adhesiva ubicada debajo de la
cubierta de polvo en ta caja del motor.
Orlficio del
tornllio en
Fije el cabo de
expansible a la
boquilLacomo
se
fa manguera
muestra,
I1_,
p'
_+,
Inserte et tornillopara que pase par el mango de la
aspiradorao
MONTAJE DEL MANGO
Tornilto
Quite el tornillodel mango Iocatizadojuslo debajo
del borde superior de la parte posteriorde la aspiradora, vet ilustraciSnde arriba+
Empiece a apretar el tomitlo con los dedos+ Qutz_
sea necesario ajustar un poco el mango.
Aprieteel
tornillo
Fije et cord6n en
posici6n,
forzdndolo en la
ranura de bloqueo
ubicada en el
cuerpo del
sujetador superior
del cord6n, como
se muestra. Esto
ayuda a qua el
cord6n no se
enrede debajo del
agitador de la
aspiradorao
con un
destornillador.
C'UIDADO
......
Hendidura
Cord6n
Enrolle el cord6n el6ctrico atrededor de los
sujetadores superior y inferior y presione la
ranura del enchufe sobre el cord6no
No apriete demasiado el tornlllo.
Si Io aprleta demaslado podrfa arruinar
los orifictos para el tornillo.
No opera la aspiradora sin tarter tnstalado el tornillo.
Sujetador superior
de Ilberac/6n r_Jp/da
de/cord6n
Cord6n
COLOCACIONDELCORD6N
AsegL_rese de qua el sujetador superior del cord6n de liberaci6n rdpida se encuentre en posici6n vertical Quite el alambre con el qua est,.
atado el cord6n el8ctrico.
PARA COMENZAR
_daddel
Sujetad°r
upedor de
eracl6n
1. Gire el
sujetador
del cord6n
de lado a
lado y
hacia abajo
para liberar
el cordSn
el_ctrico.
2, Desprenda el enchufe del cord6n el_ctrico y
quite e! cord6n del sujetador superior.
Compruebs qua el cord6n eldctrico sigue fijado
en la ranura de bloqueo del sujetador superior.
3. Verifique qua la aspiradora tenga instalada
una bolsa. Consulte la CAMBIO DE LA
BOLSA PARA POLVO_
Sujetadors
inferior
del
NOTA: Para reducir el riesgo de choque
el_ctrico, esta aspiradora cuenta con una
clavija polarizada, uno de los contactos es
rods ancho qua el otro. La clavija s61o puede
tntroducirsede una manera en el enchufe. Si
la clavija no cabe bien en el enchufe,
invi_rtalaoSi a_n no cabe, llama a un
electricista para qua instale un enchufe
correcto. No altere la clavija de ninguna
manera,
4. Conecte el cord6n el_.ctrico polarizado en _-_=_
un enchufe de !20 voltios qua se encuentre
cerca del piso.
c,.
Peltgmde lesl6n personal y da_o al producto
• NO conecte la asptradora sl el Interruptor estd en la poslcl6n ON. Podrfa
resultar en lesl6n personal o da_io.
• NO use los enchufes Iocallzados sobre los muebles. Los obJetos cercanos
podr{an resultar datiados.
Pare seleccionar un aJuste de nlvel de pelo
de la alfombra:
Apague ta aspiradora. Selsccione un nivel de
ajuste inclinando la aspiradora hacia atr_.s hast
qua las ruedas delanteras est_n un poso
despegadas del piso,
Deslice la palanca de ajuste de nivel de pelo
de la alfombra ala posici6n deseada.
ii! ii iiiii,
¸ii!ii'i!
i iii!,iiii!
!iiii!i!i
iiil,iiiii,
ii!ii'i
ii i!i
!iii!ii!!i
i' ii !i!iiii i!
SUGERENCIAS DE AJUSTE DE NIVEL DE
PELO ALFOMBRA
Pare qua sele faciliten algunas tareas de
limpieza, como por ejemplo tapetes aueltos y
alfombras de pelo large, puede qus sea necesario elevar ajuste de nivel de pelo de la atfombra. Los ajustes sugeddos son los suguientes.
HIGH: pelo dspero y lanudo, peto largo, felpa,
alfombras o tapetes irregulares.
MED: pelo mediano o poco largo.
LOW: pelo corto o medianoo
ADVERTENCIA
!
Peltgro de lesl6n personal
NO PONE las manos o los ples debaJo
de la asplradora cuando cemble de ia
seleccl6n de plsos sin alfombra haste
Is seleccl6n de nlvel de peio de la
alfombra. El agltador glre rapldamente
cuendo la asplradora estd encendlda y
estd en la seleccl6n de plsos con
alfombra.
EX LOW: pe]o muy corto.
ALGUNOS MODELOS
Pare de secclonar el aJuste de plso descublerto: Oprima el bot6n de selecci6n haste
atras y debajo de la boquitla haste qua se
sienta asegurado.
En esta posici6n el agitador no da vuiltas. Esta
posicibn debe ester usada pare limpiamiento
de piso de madera y mosaico y cuando se
usan algunos atachamlentos
(herramlentas),
Seleccl6n de plsos con alfombra: Oprime el
boron completamente haste el frente y por
arriba haste ta posici6n de pisos con alfombra,
En esta posici6n el agitador da vueltas.
Cuando se limpia alfombras, e! selector tiene
qua ester en esta posici6n.
Atencl6n: Refi_rase alas recomendaciones
del fabricante para limpiar su aifombra.
Algunas alfombras m_s delicadas pueden
requerir el uso de la aspiradora con el agftador
desconectado pare prevanir qua la alfombra
sea daSada.
No deJe permanecer la asplradora en
un solo lugar durante nlngdn tlempo
cuando el agltador est_ rotando. Se
puede daSar ia alfombra.
Note: Pare la vida m_s larga de la correa,
apague la aspiradora antes de mover el selec_
tot, de otra manera, aseg0rese de qua apriete
por completo y tan r_.pido como posible el
selector ala posicibn deseada. Si usted no Io
hace de esta manera, puede causer qua la
correa frota e! eje del selector y puede calentar
y causer qua se queme la correa qua causerie
un olor quemado°
Selector de plsos
con alfombra y
sin alfombra
Haste la
poslci6n de
pisos sin
alfombra
\
Haste la
poslc/6n de
plsos con
alfombra
Desprenda et mango pisando el pedal de liberaciSn y tiranda del mango hacia abajo con la
mano,
Pedal de
Ilberacl6n
del mango
MONTADOEN EL MANGO
ALGUNOS MODELOS
Para arrancar la aspiradora, deslice el
interruptor de encendido/apagado de la
posici6n OFF ala posici6n ON. Para detenerla,
coloque el interruptor en la posici6n OFF.
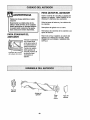
Herramienta
pare hendidura
Cuando regress haste la seiecci6n de pisos
con alfombra, cuida que el selector puede
moverse rdpidamente haste la selecci6n a
cause de la tensibn de la correa.
=.
Tubo
Cepillo
-Manguera
expansible
Cepillo para
Identifique cada uno de los accesorios mostrados a continuaci6n.
COMO UTILIZAR LOS
ACCESORIOS
Pare selectionar la selecci6n de pisos sin
alfombra, gira el selector altr_.s y abajo haste la
selecci6n de pisos sin alfombrao Ver secci6n
de PISOS CON ALFOMBRA Y SIN
ALFOMBRA.
Saca la parts inferior de la manguera expansible de la aspiradora y tirando por atr_.s.
Ahora se puede conectar la mangusra,
NOTA: La v_.lvula de desviaci6n puede ester
abierta mientras se usan los accesorios o
pare limpiar una alfombra nueva a cause de
un flujo reducido de airs por los accesorios
mismos o por la pelusa de la alfombra qus
!lens la bolsa rapidamente. Consults el
cuadro RECONOClMIENTO DE PROBLEMAB.
c,.
Peligro de cheque el_ctrico o lesf6n corporal
Desconecte la unidad antes de limpiarla
o darle servlcio. De Io contrario podrla
producirse un choque eldctrico o causar
lesi6n corporal si la asptradora arranca
de manera imprevista,
_
_'_
,,_
_
_o_
_'_'_
La manguera
tncorporada gira
pare facilitar la
limpieza en cualquier direcci6n.
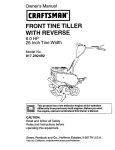
Para quitar la
manguera, tire
de la manguera
del collar.
Pare obtener la m_xima
longitud con los acceso- Mang '_era.
rios, instale la herramienta
pare hendlduras en
el extremo de{ Desliz_dor
tubo. Para
de ¢o,qtrol de
hacerlo,
introd_zcala en el
tubo y
gffela
Tubo
un
poco.
Giratoria-
TUBO TELESCOPICO CON
CONTROL DE ASPIRACION
ALGUNOS MODELOS
Saque el tubo
_
Herramlenta telescbpico
pare
de su lugar
hendiduras de alma
cenamiento.
Tubo
telesc6pico
Cuando use el
cepillo para sacudir
o el cepillo para
combinaci6n,
puede inetalarlos
directamente en et
tubo o en extremo de
la herramienta para
hendiduras,
PARA OPERAR EL
DESLIZADOR DE CONTROL
DE ASPIRACION
Retire la herramienta para hendiduras de su
lugar de almacenamiento dentro del tubo. Gire
el aro de bloqueo haste la posici6n UNLOCK.
Despliegue el tubo completamente. Gire el aro
de bloqueo det tubo haste la posici6n LOCK,
Instale el tubo de extensi6n en el extremo
abierto de la manguera.
Tubo
Desllzador
de control
Tubo
superior
Alinee las pestafias del tubo de extensi6n con
las ranuras en forma de "J" de la manguera.
Empuje el tubo dentro de la manguera y gire
hacia la derecha pare bloquearlo.
Tubo telesc6pico
Cuando use accesoflospare limpiar corUnas,
tapetes pequefos de pelo corto y otros artfculos
delicados, gire el deslizador de control de aspiraci6n
ala posici6n abierta. Este selector se encuentra en
e! tubo telesoSpico,cerca de la manguera.
Esto reducir_ la potenda de aspirad6n parafacilitar
la limpieza.
NOTA:
Coloque el
deslizador de
control de
asptraciSn a la
posici6n
cerrada para
la limpieza
normal.
\
Deslizador
de control
de aspiraci6n
CUIDADO
Cuando use los accesorlos, tenga culdado
de no estlrar demaslado la manguera
expansible para tratar de alcanzar m_ts
leJos.SI tra_ de estlrar la manguera m_s de
Io deblde, podrfa causer que la asplradora
se venga abaJo. Aseg_irese de que el selector pare alfombralsln aifombm e.st_en la
poslcl6n para"sln alfombm". Se puede
hacer defio a la superficle det plso sl el
selector pare alfombrNsln alfombra estd en
iii iiiiiii iiiiiiiiii ii
_
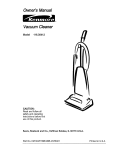
ALMACENAJE DE LOS
ACCESORIOS
MANGUERA DE EXTENSI6N
Retire el cepillo pare sacudir o el cepitlo para
combinaciSn. Col6quelos firmemente en su lugar de
almacenamiento correspondiente.
Unos modelos incluyen una manguera auxiliar que
conecta con la manguera de estirar en la aspiradora
pare una extensi6n m_s larga para !impiar.
ALGUNOS MODELOS
Retire la herramienla pare hendiduras del tubo
gir_,ndola.P6ngala a un lado.
Manguera de la unldad
Manguera de exfensl6n
Retire el tubo de extensi6n de la manguera.Gire el
tubo hacia la izquierday tire del extremode la
manguera.
,Tubo
Inserte tas dos leng_etas en el extremo de ta
manguera de extensi6n en las dos ranuras formadas
como ta lelra J en la aspiradora y gire para conectar.
Abr/r
Cerrar
Se puedeconectar todas las herramientasy et tubo
telesc6pico con el extremo abierto de la manguera,
btoqueo
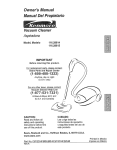
CEPILLO PARA PISOS Y TUBO
ALGUNOS MODELOS
superior
Desbloquee el tubogirando el aro de bloqueo hasta
ta posici6n UNLOCK.
Unos modelos tienen un cepillo y un tubo auxiliares
para limpiar los suelos sin alfombrasoGire el extremo
del adaptador hacia el cepillo de suelo y el otro
extremo hacia el tubo recto. Conecte el tubo recto
con el tubotelesc6pico y luego con ta manguera en
Ia aspiradorao con la manguera de extensi6n.
Deslice el tubo inferiordentro det tubo superior. Gire
el aro de bloqueo del tubo ala posici6n LOCK_
Cepfllopara ptsos _=___
Introduzca la herramienta para hendiduras denlro
del tubo comprimido, fnstale bienen su posici6nde
aFmacenamiento.
AsegSrese de que la unidad est_ apagada Inserte
nuevamente fa manguera completamente denlro de
la abertura ubicada en la parle inferiorde la
aspiradora, de donde la sac6 inlcialmente,
CUIDAD0 ......
NO tire de la aspiradora por la manguera
en la habitaci6m Podrfanocurrir daSos a
sus pertenenclas.
T
Tubo -j'
Adapfador O_ _=_
CUIDADO
Cuando use la manguera en forma normal o con la manguera de extensl6n instalada, la aspiradora debe mantenerse
sobre una superficie firme al mlsmo
nfvel o a un nivel inferior que los pies
del usuario. NO use las mangueras
cuendo la aspiradora est6 a un nivel
rodsalto que los pies del usuario_
i_111111
AREA A LIMPIAR
ACCESORIO
Muebles*
Entre
cotjines*
Cortinas*
Escalones
X
HERRAMIENTA
HENDIDURAS
CEPtLLO
PARA
COMBINACION
PARA_
_
X
Siempretimpielos accesoriosantes de usar sobretelas
X
X
X
X
Paredes
X
Orillas de alfombras.
Gufa uno de los costados o la parts anterior
de Ia boqutlla a Io largo del borde de la pare&
Los caplllos largos ayudan a aspirar ta tierra en
las orillas de las alfombras.
Para obtensr los
mejores resultados de limpieza,
mantenga desbloqueados los
conductos de
flujo de air&
Escatones.
Coloque el mango en la posici6n vertical.
Musva el selector de piso con alfombras y sin
alfombras a la posici6n sin alfombras. Use la
herramienta pars hendiduras o el cepllto pars
telas. Coloqus el intsrruptor de
encendido/apagado en ON,
Examine de vez
en cuando cads
una de las zonas
que ss indica
podrfan causar
bloqueo.
Desconecte la aspiradora del enchufs antes de
examinarla,
ADVERTENCIA
Pellgro de lesl6n personal
Actde con precaucl6n sl coloca la
asplradora sobre escalones. SI se cae,
podHa causar lesl6n personal o dafio a
la propledad.
SISTEMA DE PROTECTION
DE MOTOR
INDICADOR DE RENDIMIENTO
ALGUNOS
Cuando la unidad estd funcionando con el flujo
normal de airs, el indicador de rendimisnto estd
apagadoo 8e enciende la luz cuando el flujo de
airs est_ obstrufdo. Si esto pass, revise la
boles disponsible pars polvo, el filtro de la
seguridad del motor y otros colocaciones
pesibles pars los reeiduos de basura. Ve#,se
COMO ELIMINAR LOS RESIDUOS DE
BASURA EN LOS CONDUCTO&
Esta aspiradora tiene una vdlvula de
desviaci6n que sirve como protector de motor
qua se abrs automaticamente pars proveer un
flujo de sire af motor cuando un zueco impida
qua circule el airs al motor. Si sa abre la v#Jvula
bypass para impedir
qua se recalente el
motor y qua no hags
dafio a la aspiradora,
se notadd un cambio
de sonidomlentras el
aim porta abertura d
la vdlvula.
Nots: No obstruye
el protector de
motor,
MODELOS
Pars correg!r el problems: Vedse el diagrama
RECONOCIMIENTO DE
PROBLEMAS.
Pro
de motor
NOTA: Es
posib!e qua la
luz encisnda al
usar los
accesorios
porque el flujo
de airs es
reducido por
los accesorios.
Pars correglr el problema: Consults el cuadro
RECONOC1MIENTO DE PROBLEMA&
NOTA: La vdlvula de desviaci6n puede estar
abierta mientras sa usan los accesorios o pars
limpiar una alfombra nueva a causa de un flujo
reducido de airs por los accesorios mismos o
por la pelusa de la alfombra qua liens la bofsa
rapidamente_ Consults el cuadro
RECONOCIMIENTO DE PROBLEMAS.
10
INDICADOR
DE POLVO
ADVERTENCIA
ALGUNOS MODELOS
El indicadorde polvo y el indicador de sensibilidad
est_n localizados en la part° delantera de la cubierta det indicador.
Peligro de choque eldctrico o lesi6n corporal
El indicadoret_ctrico de polvoes una caracteristica
qua averigua el pofvo mientras qua pasa per ia aspiradora,
Desconecte la untdad antes de limplarla
o darle servicio. De Io contrario podria
productrse un choque eldctrico o causar
lesi6n corporal sl la aspiradora arranca
de manera imprevista.
La tuz roja indicaqua la aspiradora aspira e! polvo,
La luz verde indica que ta mayorfa del polvo ya es
aspirada por la aspiradora_
I
I
i
i
i
iii
i, ii,
iii ,11,1111,111
ii
PARA LIMPIAR LAS CELDAS
OPTICAS
OPERACl6N
Los 6pticos del indicador de polvo consist°en
dos celdas 6pticas localizadas dentro del compartimiento para la bolsa. De vez en cuando es
necesario limpiar las dos celdas 6pticas para qua
funcionen a su capacidad m_xima Se recomienda limpiar las celdas 6pticas:
AI pasar la aspiradora, la luz roja del indicador de
polvo enciende y sigue encendida mientras que
el indicadoraverigua una concentraci6n alta de
polvo pasando per la aspiradora.
La luz verde indica qua ta mayoffa de la timpieza
est,. compteta
°Cuando se enciende continuamente la luz
rojao
•Cuando se enciende continuamente ta luz
verde,
°Cuando se adhieren la tierra o e! polvo en las
celdas 6pticas.
°Cuando se cambia la bolsa para polvo.
El indicador de polvo le permite qua seleccione la
sensibilidad, Se puede poner el indicador para la
sensibilidad en ta posici6n alta (+) o baja (-)4
Ponga el indicadorde poivo en la posici6n
alta (+) cuando:
oAspira sobre los suelos sin atfombras.
oAspirasobre una alfombra con el pelo bajo.
Para limpiar el indicador, ffmpielo con un trapo
suave y seco. Nunca use los detergentes o liquidos porque ellos pueden ensuciarfo m_.sr&pido
las celdas 6pticas y ser_, necesario limpiarlas
m&s pronto qua normal, Se alcanza el compartimiento para el indicador de polvo por quitar la
cubierta de polvo y la bolsa para polvo
Ponga el indicador de polvo en la postci6n
baja (-) cuando:
•Aspira sobre &reas muy sucias.
•Aspira sobre una alfombra con el pelo alto.
oAsptra sobre una alfombra nueva.
Con el indicador de polvo en la posici6n "ON",
el indicador de polvo averiguar& la pelusa de la
alfombra, asp°claimant° en una alfombra
nueva qua puade cauear qua la luz roja
eneienda mds tiempo qua normal.
/
Celdas
6ptlcas-_
11
Su]etador
de la bolsa
Siga stempre todas las instrucciones de
seguridad al limpiar y darle servicio a su
aspiradora.
ADVERTENCIA
Peligro de choque eldctrico o lesi6n corporal
Desconecte la unidad antes de limpiarla
o darle servicio. De Io contrarto podria
producirse un cheque eldctrico o causer
lesi6n corporal si la aspiradora arranca
de manera imprevista,
Recoja el cordSn y enrrSllelo an los sujetadores superior e inferior, sin qua queda muy
apretado,
•
ADVERTENClA
Pellgro de choque eldctrico o lesl6n
corporal
Guards la aspiredora bajo techo en
un lugar ssco, con
el mango en posici6n vertical.
S! enrolla el cord6n muy apretado pusde tensario mucho y causarle dafios.
De dafiarse, el cord6n podrfa causer
descargas el_ctricas y leslones o
dafios personales.
Desconecte el cordSn el_ctdco de la clavija de
la pared. NO chorea ague sobre la aspiredora.
enjuague y deje secar al aire. No los lave en
lavadora de platoso
NO USE LOS ACCESORIOSSI ESTANMOJADOS.
Limpie el exterior con un trapo suave y limpio,
qua ha sido exprimido despu_s de remojar en
una soluciOn de ague y detergents lfquldo
ligero° Seque e! extedor con un trapo seco despu_s de limpiaro
CUIDAD 0
Los accesorlos que se utlllcen an
dreas suclas, deba]o del refrlgerador,
no deben usarse en otras superficies
sin antes ser lavados. Poddan deJar
marcas.
Limpie la supsfficie exterior del recept_.culo y
de los accesodos pare reducir la electricldad
est_,tica y la acumulaci6n de polvo,
Lave los accesodos en ague tibia jabonosa,
12
PARA QUITAR LA BOLSA
PARA POLVO
[
PARA CAMBIAR LA BOLSA
Desdoble la bolsa
para polvo nueva,
Doble la teng_eta
ADVERTENCIA
LengiJetade
..... _,_,_
de seguridad de la
.1%,_
/-_y
....
nuevabolsapara
S_\_
"_'''_
polvo en direcci6n [
\ \ _'---_
contraria a la aber- 1/j
\\
turaquevaone!
//
/
_.J
//
sujetador de ia
/
/
_
._
bolsa.
/
/ /
NOTA: Consulte [as PIEZAS Y
CARACTERJSTICAS para determinar el N°-,de la
bolsa para polvo.
Slempre desconecte el eorddn dlectrico antes de reparar alguna parte de la
aspiradora.
Tire hacia adetante de la liberaci6n situada
cerca de la parle
superior de la
cubierta de bofsa
Bolsa para
polvo
Ltberacl6nde_.
Cublertade/_Jt
Inserte la bolsa para polvo
completamente sobre el
suietador de la bolsa sujetando la bolsa per el collar.
labolsa.-_/_
Tire de la cubierta
de ta bolsa hacia
el frenteoRetirela
y d_jela a un lade
Coloque el collar de la bolsa
en posici6n.
Asegurese qua la botsa se
queda detras de
Leng_Jetas
tas leng_etas de
derelenci6n
retenci6n de cada
deta bolsa,
lade demostradas
aqui. Asegurese
do qua la parle
inferior de la bolsa
para polvo est_
completamente
dentro de la
cavidad para la
bolsa antes de instalar la cubierta do la bolsa.
Tome el collar de la
bolsa para polvoy tire
con cuidado para retirar
Ia bolsa para potvo
.Bolsa
Tire la bolsa usada a ia
baeura.NO ta vuelva a
para
polvo
usaL
Sujetadorde
bo_a
-Cavidadpara
bo_a
seguridad
detmotor
Revise el sujetador
de ta bolsa y el filtro
de seguridad del
motor.
/
Si estuvieran
blequeados,
consulte la labiade
diagn6stico de
problemas.
cubierta
Coloque de
la la
bolsa de manora qua las
pestaSas entre en las ranura de posiciOn del cuer*
po.,
CUIDADO
Cierre la cubierta de
la botsa.
NUNCA REUTILICE UNA BOLSA PARA
POLVO. Los materiales muy fines, tales
come desodorantes para atfombras, talco
facial, polvo fine, yeso, hollin, pelusa de
alfombras nuevas, etc., pueden atascar la
botsa y causar que se rompa antes de que
estd liana. Cambie la bolsa mds seguido
cuando aspire este tipo do materiales.
i ii i1,11
AI escucharun
chasquido
caracter_stico ser,_
indicaci6nde qua la
cubierta ha cerrado
bien.
AsegSrese de que la bolsa para polvo estd
Instalada per complete en la cubierta de
bolsa,
iii
13
Examine
elfiltrodeseguridad
detmotordevez
encuandoy cambio cuando est_ sucio.
•
ADVERTENClA
No opera la asplradora sin el flitro de
escape.
,
Pellgro de cheque el_ctrlco
Desenchufe el cord6n de Is corrlente
el(_ctrlca. No opere Is ssplrsdora sin el
flltro de segurldad del motor,
Aseg_urese de que el filtro est_ seco e
Instalado adecuadamente para tmpedlr
qua el motor falle y/o que se produzca
un cheque el6ctrlco.
Este cartucho det filtro escape se tiene que cambiar est_ sucio. Debe cambiarse periSdicamente
seg5n las condic[ones de use, El fittro no se
puede lavar pues prderifi su capacidad para
atrapar altrapar polvo.
NOTA: Consulte las PIEZAS Y
CARACTERJSTICAS para determinar el N°. de la
fittro de escape.
DEL
Mueva hacia aba)o
la liberaci6n del
cubierta del filtro
de escape, Tire
hacia adelante del
cubierta del filtro
de escape para
quitar la cubierta
de la bolsa,
Filtm de
seguridad
seguridad
3. Vuelva a cotecar el filtro
deslizfindolo de
nuevo
ell SU
Cublertade
la bolsa,_l _'_ Llberacl6n de
_ "_1 t
la cublerta del
I_ I I
filtro de escape--:-_,_J_l
"',o"e--oape2
Cubierfa /_
/:a
_3! l
NOTA: Consuite las PIEZAS Y
CARACTER[STICAS para determinar el N° de la
filtro de seguddad del motor,
Filtro de
,
HEPA
ELECTROST ,TICO
1. Este fittro se tiene
qua cambiar cuando
est_ sucio. Debe cambiarse peri6dicamente
segt]n las condiciones
de uso_ El filtro no se
puede lavar pues
prderfa su capacidad
para atrapar attrapar
polvo°
,,
FILTRO DE ESCAPE
Para quitar la boisa, siga las instruccionas en
CAMBIO DE LA BOLSA PARA POLVOo
FILTRO DE SEGURIDAD
MOTOR
CUIDADO
Flltro de ] _
2. Si el filtro, localizado al rondo de la
cavidad para ta bolsa,
estd sucio, sdquelo tirando de _1 hacia
adetante per debajo
de las estrfas.
Reemplazca eI cartucho
del filtro escape, coloc_.n.
dole con cuidado para qua
quepa en la cubierta de la
bolsa, El file plomo del
filtro debe estar opuesto
del operario. Empuje t)nicamente el cartucho de filtre, no el filtro mismo.
Filtro de
seguridad
LIberacl6n de la /_'_
lugar debajo de
las estrfas en la
cavidad para la
bolsa,
Cubtertadel
filtro de
V_ase CAMBIO DE LA BOLSA PARA POLVO
para cambiar Eabolsa
14
"l_-
J- \11
Quite el cartuche del
filtro escape de la
cubierta de bolsa
Cublerfa
dela
FIItro
Reemplazca el
cubierta del filtro
de escape y
empuje hacia
abajo la liberaci6n para
asegurarlo_
/_
ADVERTENClA
Pellgro de choque eldctrlco o lesl6n
corporal
Desconecte la unldad antes de Itmplarla o darle serviclo. De Io contrario
podrfa produclrse un choque etdctrlco
o causar lesl6n corporal el la aspiradora arranca de manera lmprevlsta.
Leng_etas
Tire hacia abajo de
las leng_etas en la
parle atrasera del
agitator y ruede
hacia adelante para
liberar de la unidad
de boquilta,.
Del agttador
No es necesario quitar el ensamble de portal&mparas. Coloque al lado ta cubierta det agitador.
Frecuentemente revise et drea del cepillo y quite todo pe!o, cord6n o pelusa que se haya acumulado. Si la acumulaci6n es excesiva, siga las
instrucciones a continuaci6n.
PARA QUITAR LA CORREA
Ag
Desconecte el cord6n el_ctrico del enchufe,
;orrea de
Corre
Selectorde plsos
con alfombra y
sin alfombra
Mueva et
selector de
pisos con
alfombra y
Hasta la
sin alfom+
poslcl6n d_ bra a la
p/SOS COB
posici6n a
aifombra
la posici6n
con alfombra,.
Coloque fas manos en el agitator, Si la correa ya
est_ instalada en et agitador, habr_ tensi6n en el
agitator. Tenga cuidado cuando levanta et agitator de la boquillar
NOTA: puede ser necesario tirar del horde del
protector de muebles para que los extremos del
rotor se puedan sacar con facilidad°
Quite la correa o rota del eje de transmisi6n del
motor.
I 1f l
Una correa de repuesta est,_disponible. V_a a la
ilustraci6npara la locaci6n de la correa de
repuesta. La correa de repuesta se puede
guardar en e! mismo sitio.
Pestillos
Deslice las
liberaciones
hacia afuera
y quile la
cubierta de
la boquilla
repuesta
!
ADVERTENCIA
Peltgro de lesl6n personal
Sujetador
del protector
de meubtes
Cubierta
del agita dot
Suette los
sujetadores
del protector
de muebles
de las pestafias en
ambos lados
de la cubierta del agitador
Tenga culdado al quitar el ceptilo clIfndrlco, la tensl6n de la correa es
grande. SI no tlene precaucl6n podrfa sufrlr una lesldn personal sl el
ceplllo se llbera rdpldamente y sale
disparado,
15
NOTA: Para mantener una alta eficiencia de
limpieza y evitar et daSo a la aspiradora,
_gitador
cada vez que,,,sec_a_
correa
PARA CAMBIAR LA CORREA
Asegurase que el selector de pisos con y sin alfombra este en la posici(_nde pisos con alfombra.
Co]oque la nueva correaalrededor del eje de transmtsi6n del motor.
El agitador se debe Iimpiar despu_s de habeflo
usado de 7 a 10 veces,
The agitator must be cleaned
the following schedule:
according to
EJe de transmlsl6n
del motor
Utilisation de
I'asptrateur
Nettoyage de
1_3Litateur
FRI_QUENTE (utilisation quotidienne)
MODERI_E(utilisation 2 _ trois fois
par semaine)
Lf:GERE (utilisation hebdomadaire)
hebdomadaire
Mensuel
Bimensuef
p_ra
CORTEZ
Remove ant dirt or derbris in the belt path area or
in the agitator area,.
Correa Est_ Centrada
Sobre la Ranura Guia
(Selector deptsos con y sin alfombra
este en la poslcl6n de plsos con alfombra)
A
.
_
Selector
PerspectivadespiezadaAgitador
Unidaddel
agitador
/
Polea
para
correa
rlMeVa
CORREA SOBRE LA RANURA GUIA
Retire todo indiciode basura o suciedad de la zona
de la correa y del agitador,
Tapadel
extremo
Eje de selector
de pisos con y
sin alfombra
glt or
._
I"
_f
deplsos
-_ -"2""---.-.-.._._' "_ conalfom_- /
t'r_'_'J
_ bray sin
_. SL'-°rrea
_' _lfmmbra
EJedel selector de
Eje de
plsos con y sin transmlsl6n
alfombra
del motor
Correa No Estd Centrada
Sobre la Ranura Guia
(Correaaldrededordet eje del selector
de pisos con y sin alfombra)
Tapade/
extremo
-._,
Con cuidadoquite
las tapas y quite el
hi[o o los restos ubir
cados en el agitador, en los soportes
del cepillo, o en er
eje del agitador.
con alfombray sfn
affombra
Eje de
transmisi6n
de! motor
Ejeedel selector
pisos con y
sin alfombra
Correa No Est=i Centrada
Sobre la Ranura Guia
(El selector d.eplso.scon y sin alfombra
este en la posml6n as plsos sm alfomora)
Selector de
I_lsoscon
Agltador
Correa / _,
alfombray
Taps del
extremo
Cambie lae tapasdel extremooVea la perspectiva
despiezada para seguir el orden eorrecto de colocaci6n de las piezas,,
}
,
\
r_sm
alromora
Eje de
Eje del selector
transmlsl6n de plsos con
del motor
y sin alfombra
16
NOTA: Consulte las PtEZAS AND
CARACTERfSTICAS para determinar el N_.de
correa.
Baje la cubierta del agitador ala posiciOnoriginal. Despu_s de colocar la cubierta del agitadoc Empuje hacia adelante en las dos (2)
leng0etas de cierre para asegurar que est_n
en su co!ocaci6n apropiada.
Ensarte la correa nueva sobre el agitador.
lnserte el agitador por insertar la parle redonda de la tape en la ranura de ta base de la
boquilla.
NOTA: Puede ser necesario sacar o arrimar el
protector de muebles pare poder insertar con
facilidad el agitador en la base de la boqui!la.
Agltador
Protector
de meubles
de maubles
Cublerta
del agttador
NOTA: SI la cubierta del agitador, empuje
hacia adelante en las dos (2) lengeetas de
clerre para asegurar qua est_n en su colocaciOn apropiada.
Base
Tapo del
extremo
Sujetador
Abroche los
sujetadores
del protector
de muebles
alas pestafias en
ambos lados
de la cubierta del agitadoro
Ranura de la
base de boqullla
E! cable
de la luz
r
NOTA: Debido ala tension de la correa, debe
actuar con cuidado al instalarlao
_
I
/
_
0_
I_
Asegurarlas
_._i
lenglJetas est_Jn I_--_
en su colocaclOnI_
aproplada
_-
Empuje firmemente para
revisar qua
cada extremo
est_ instalado
bien.
AeegL_rese qua los cables de la luz est_ bien
instalada.
Revise qua la correa est_ en el centro de la
poleao Gire el agitador con sus dedos haste
que gire libremente el agitador.
Reemplazca
la cubierta de
boquilla y
asegure las
pestillos.
Pare colocar
la cubierta
del agitador,
inserte las
seis (6)
lengOetas en
lee ranuras
en la parte
adelante de
la base de la
boquilla.
la boqullla
Leng_etas/
Ranuras
17
Proceda siempre con precauciones de seguridad a! limpiar y dar servicio la aspiradora.
Inserte nuevamente la manguera en la abertura
de fa parts inferiorde donde la retirS, Empuje con
firmeza pare asegurarse de qua quede bien
conectadao
[.,3,owc,,
Peligro de cheque eldctrlco o tesi6n
corporal
Desconecte la unldsd antes de llmplarla o darle servlclo. De !o contrerlo
podrfa produclrse un cheque el_ctrlco
o causar lesl6n corporal sl la asplradora arranca de manera lmprevlsta.
Si considers qua la aspiradora no aspire bien
aseg[_rese primero de qua la boise no est_
liens y de qua el filtro no est_ atascado. Consults las instrucciones sobre CAMBIO DE LA
BOLSA PARA POLVO y LIMPIEZA DES
FILTROSo
t Manguera
!
|
expansible
Collar
II d la
Si las zonas del filtro y la bolsa no estdn atascadas, examine la zona de la manguera_ Retire
el extreme inferior de la manguera expansible
de la aspiradora tomdndola per el collar y
tirando de hacia arribao
guera
Enchufe la
aspiradora y
snci_ndala.
Estire al
mdximo la
manguera y
luego permits
que se sncoja
hasta su
tamaSo normal
de almacenamiento.
Extienda y
afloje la
manguera
ADVERTENCIA
Pellgro de leslSn personal
NO coloque nunca lea manes ni los
ples debaJo de la unldad, E! agttador
dard vueltas rdpldamente cuanda la
asplradora est6 encendida y est6 en la
poslcl6n "carpet setting" (con alfombra).
Apague la
unidad y
descondctela,
8i las zones del filtro y la bolsa y las zones de
la manguera no estdn atascadas, examine la
zona de la boquilla. Pare examinar dicha zona,
consults la secci6n sobre CAMBtO DE LA
CORREA Y LIMPIEZA DEL AGITADOR.
Coloque la asplradora en la posici6n vertical
antes de conectada en el enchufe°
Examine visualmente la zone de la base donde
se inserts la mangusra.
Retire cualquisr matedal bloqueante.
18
•
Remueva Ja
bombilla empujandola y vails
dandola vuelta
para la izquierda pars sacaria
de la abertum,
Despu_s saque
la bombilla
pars afuera,
ADVERTENCIA
Peligro de choque el_ctrtco o lesl6n corporal
Desconecte la unidad antes de limpiarla
o darle servicioo De Io contrario podr_a
productrse un choque eldctrico o causar
lesi6n corporal si la aspiradora arranca
de manera imprevista.
PARA QUITAR LA BOMBILLA
Desconecte la aspiradora.
Par remplacarl
_.
_I
s
,%;,',
l
libsraciones
hacia
afuera
Deslice
las
y quite la
cubierta de
ta boquifla,
Par remplacar
la bombilla,
cuidadosamente inserts y
de vuelta hacia
la derecha
hasta asegurarla en la
abertura.
NOTA'- Mire PIEZAS Y CARACTERISTICAS
pare el numero de la bombilla,
[ CU,oA00
CUIDADO
No use una bombllla de mds de 15
vatlos (130 volts), Cuando se use la
asplradora pot un largo perlodo de
tlempo, el calor de Is bombltla puede
calentar las partes de plastlco cerca.
! lll
Pestlllos
Reemplazca
la cubierta
de boquilla
y asegure
las pestillos.
la boqullla
19
PARA QUITAR EL AGITADOR
Quite la cubierta de la boquilla, la cubierta del
agitador y el agitador. V_ase CAMBIO DE LA
CORREA Y LIMPIEZA DEL AGITADOR.
Pellgro de cheque el6ctrlco o lesl6n
corporal
Desconecte la untdad antes de llmplarla o darle servlclo. De Io contrarlo
podrfa produclrse un cheque eldctrlco
o causer lesl6n corporal sl la aspiredora erranca de manera Imprevlsta.
PARA EXAMINAR
AGITADOR
Protector
de la place
de la correa
de la base
Quite las tapas del extreme y las cubiertas de
los cojineteso
Reemplazca el agitador con un nuevo,
Reemplazca las cubiertas de los cojinetes y las
tapas del extremo_
EL
Rearme la correa, el agitador, la cubierta dal
agitador y la cubierta de la boquilla. V_ase
CAMBIO DE LA CORREAY LIMPIEZA DEL
CEPILLO°
Coloque la aspiradora
con la base hacia
arriba para revisar si
los cepillos est_n en
malas condiciones.
Cuando los cepillos
est_n gastados al
nivel del protector de
laplaca de base,
reamplazca el
agitador.
Tapa del
extreme
agitador
Polea
para
corTea
20
Tapa del
extreme
Consulte este cuadro pars encontrar soluciones qua usted mismo puede realizer cuando tenga problemas menores de rendimiento, Cualquier serviclo qua necesite sparta de otros descritos en este
manual tienen qua ser hechos per un represetante de servicio autodzado,
ADVERTENCIA
Desconecte la asptradora antes
de de
darle
serviclo
o Ilmplarla. De !o contrarlo
Pellgro
choque
el_ctrlco
podrfa produclrse un choque eldctrlco o causer lesl6n corporal,
Estd dssconectads,
La asplredors no
funclons.
2° Cortactrcultosbotado o fusible
quemsdo an el tablero de serviclo
de Isresldencla,
Interrupter de enc_mdtdotspsgado
no ss_ en Is poslcl6n ON.
Noaspire
sattsfsctorlaments_
1. Boise pare.polvo liens o atascads_
2. AJuste tncorrscto de nlvsl de pslods
]a stfombrs.
3, Agflador desgsstado.,
El ensembledel ag|tsdor
no gtra,
18).
El Indlosdor de rsndlmlento, slgunos
medelos, eat6 to|e.
Coloque el Interrupter de encendtdo/
apagado en [e pos_cl6nON.
eatable {aboise. (p6glna 14)
2. AJusts el nlvel, (pdglns 7).
3_ Csmbis s{ sgltador, (pdglna 21)
4. Revise COM(5 ELIMINAR LOS RESIDUES
DE BASURA EN LOS CONDUCTOS,
(pdglna 19)o
5. Manguera stascadoo
5. Llmptar tubs pare s] mugre, (pdg{na 19).
6. Msnguem tof_.
7, Cortes rots.
6. Csmbls Is msngusrs.
8o La msnguem no es_ bten Insertads.
8, theatre bten la manguera, (p_glna 19).
I0.
La luz no funclons.
3.
4. BoquItla, o suJetador de !s boles, stascada.
7. Csmbie lacorres, (prig|nee 16-18).
9. Ac{fvaci6n del slstema de protect[6n
del motor.
Le asplradors Isvanta
tapstes o es dlflcul
empuJsro
1. Conscts bien, optima selector de
encendldo/apagado a la pos_cl6nON.
2, Restablezca st sortsclrouttoso
cambls et fusible.
Ftltros de segurldad
1. AIuste Incormcto de nivel de pete
de la al{ombm.
g. Dsterm}ne st axlstsn bloqusos,
(pdglna t0).
10, Csmbls el filtros, (pdglna t5).
1. Ajuste el nlvel, (pdglne 7).
BombIlls fundlds.
Cambie Is bomblIFs, (pdglna 20)
Cortes rote
2. Selector de plsocon all'ombra y
plsosin alfombra en la se!sc_16n
de plso sinalfombrao
Cortes lnstafada lncorrsctarnente.
1. Csmbis Is corrss, (pdgina16-18)o
2, Camb?eel seiector en la selecclSn
con elfcmbra, (pdglna 7)r
Revise CAMBIO DE LA CORREAY
LtMPtEZA DEL CEPILLO, (psglnas 16-
1. eolsaparapolvo liana o atas_da.
2, Fntrosde segurldad.
Cembla laboise, (p_iglna 14).
2. Csmb]s el flltros, (pdglna 15).
3, Conduoto de fluJo de atre atascado.
3. Retire el materiel bloqueanta dsl
conducto de sire, (pdglns 19),
4. Esto es normal Le luz dabs apagerse el
qultar la herramlenta.
4. Clertos accesorlos.
Restrlccl6n del flujo de
el use de los scceaorloao
1. El use de Ice accesorlos limits el
ffuJo de elre.
t.
Cemblo de eonldo.
2o Ls peluse de una slfombra nusvs
obstruysel paso de sirs.
2. Revise COMe ELIMINAR LOS RESIDUOS DE BASURA EN LOS CONDUCTOS y Ilmple Is manguera, (pdglna 19).
Ruldo exceslvo ¢uando se
spsga Is ssplradora,
1. Selector de plsotalfombtano est&
smpuJando completamente elfrsnts,
I.
Opdms el boron comp[et_mente
hss_, el frsnte, (pdglns 7).
lndlcador de polvo, algunos
mode|os, no funelons,
1. Celdas Gptlcas estdn suclas.
I.
Llmp[e las celdas 5ptlcas, (pdglna 12)
21
Revise USO DE LOS
ACCESORIOS, (p6glna 8).
For repair of major brand appliances in your own home...
no matter who made it, no matter who sold it!
1-800-4-MY-HOME
®
Anytime, day or night
(1-80D-469-4663)
(US.A and Canada)
www, sears.com
www.sears.oa
For repair of carry-in products like vacuums, lawn equipment, and
electronics, call for the nearest Sears Parts and Repair Center,
1-800-488-1222
Anytime, day or night (USA. only)
www, sears.com
For the replacement parts, accessories and owner's manuals
that you need to do-it-yourself, call Sears PartsDirectSM!
1-800-366-PART
(1-800-366-7278)
6 a.m.-
11 p.mo, 7 days a week
(USA. only)
www.sears.com/partsdirect
To purchase
or inquire about a Sears Service Agreement
or Sears Maintenance Agreement:
1-800-827-6655
7 a.m-
(U.S.A.)
5 p.m, CST, Mort - Sat
1-800-361-6665
(Canada)
9 am. - 8 p m EST, M - E 4 prm.rSat
k
Pare pedir servicio de reparaci6n a
domicilio, y pare ordenar piezas:
1-888-SU-HOGAR s_
(1-888-784-6427)
Au Canada pour service en frangais:
1-SO0-LE-FOYER_c
(t-800-533-6937)
wwwsears.ca
© Seam, Roebuck and Co
® RegisteredTrademark/ TM Trademark/ SM Service Mark of Sears, Roebuckand Co.
® Marca Registrada / "rMMarca de F_brlca/ s_ Marcade Servicio de Sears, Roebuckand Co
MCMarquede commerce/ MoMarqued#pos6ede Sears, Roebuckand Co.