1
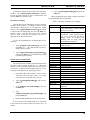
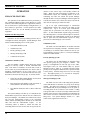
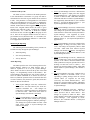
Installation & Operation EDACS Site Interface Module (SIM) ericssonz AE/LZB 119 1889 R1A NOTICES NOTICE! This Manual covers Ericsson and General Electric products manufactured and sold by Ericsson Inc. NOTICE! Repairs to this equipment should be made only by an authorized service technician or facility designated by the supplier. Any repairs, alterations or substitution of recommended parts made by the user to this equipment not approved by the manufacturer could void the user’s authority to operate the equipment in addition to the manufacturer’s warranty. NOTICE! The software contained in this device is copyrighted by Ericsson Inc. Unpublished rights are reserved under the copyright laws of the United States. This manual is published by Ericsson Inc., without any warranty. Improvements and changes to this manual necessitated by typographical errors, inaccuracies of current information, or improvements to programs and/or equipment, may be made by Ericsson Inc., at any time and without notice. Such changes will be incorporated into new editions of this manual. No part of this manual may be reproduced or transmitted in any form or by any means, electronic or mechanical, including photocopying and recording, for any purpose, without the express written permission of Ericsson Inc. Copyright July 1996, Ericsson Inc. 2 CONTENTS AE/LZB 119 1889 R1A TABLE OF CONTENTS Page SPECIFICATIONS ..................................................................................................................................... 4 INTRODUCTION....................................................................................................................................... 5 DESCRIPTION........................................................................................................................................... 5 HARDWARE....................................................................................................................................... 5 ENHANCED FEATURES................................................................................................................... 6 Dynamic Site Reconfiguration ...................................................................................................... 6 Monitoring & Reporting................................................................................................................ 6 INSTALLATION ........................................................................................................................................ 7 SYSTEM REQUIREMENTS .............................................................................................................. 7 System Manager............................................................................................................................ 7 GETCs........................................................................................................................................... 7 Repeaters....................................................................................................................................... 7 SITE DATABASE SETUP.................................................................................................................. 8 Site Reconfiguration...................................................................................................................... 8 Group Definition ........................................................................................................................... 8 Unit State Enable/Disable ............................................................................................................. 8 SIM EQUIPMENT MOUNTING........................................................................................................ 9 SIM Shelf ...................................................................................................................................... 9 SIM Modem Shelf......................................................................................................................... 10 Cable Connections ........................................................................................................................ 10 MODEM SETUP ................................................................................................................................. 12 SIM SETUP ......................................................................................................................................... 12 Programming Setup....................................................................................................................... 12 System Manager Communications ................................................................................................ 13 Messages Displayed on SIM ......................................................................................................... 14 Station GETC Communications .................................................................................................... 15 OPERATION .............................................................................................................................................. 16 ENHANCED FEATURES................................................................................................................... 16 Dynamic Site Reconfiguration ...................................................................................................... 16 Monitoring & Reporting................................................................................................................ 17 SYSTEM MANAGER DATA TRANSFERS...................................................................................... 18 Modem Connection ....................................................................................................................... 18 Password Exchange....................................................................................................................... 18 Initialization Sequence .................................................................................................................. 18 MAINTENANCE........................................................................................................................................ 19 APPLICATION SOFTWARE UPDATE............................................................................................. 19 SET TIME & DATE ............................................................................................................................ 20 INITIALIZATION OF DRAM TEST FAIL AND POST-MORTEM INFORMATION .................... 20 GLOSSARY ................................................................................................................................................ 21 PARTS LISTS............................................................................................................................................. 22 INTERCONNECTION DIAGRAMS ......................................................................................................... 26 3 AE/LZB 119 1889 R1A FIGURES / SPECIFICATIONS LIST OF FIGURES Page Figure 1 - Standard Mounting Location....................................................................................................... 9 Figure 2 - SIM Modem Shelf Connections .................................................................................................. 10 Figure 3 - Standard Cable Connections ....................................................................................................... 12 Figure 4 - SIM Programming Setup............................................................................................................. 13 Figure 5 - SIM Download Programming Setup ........................................................................................... 19 SPECIFICATIONS Mechanical: Width.............................................................19 in. (483 mm) Height ............................................................3.5 in. (89 mm) Depth .............................................................12.5 in. (318 mm) Environmental: Temperature Range .......................................−30° to +60° C (−22° to +140° F) Electrical: Power.............................................................21 watts (1.5 A) @ 13.8 Vdc 4 INTRODUCTION / DESCRIPTION INTRODUCTION The Site Interface Module (SIM), when used with GETCs with Enhanced Features enabled, adds enhanced features to a Basic EDACS repeater site or an EDACS SCAT site, by providing an interface that allows the site to be connected to a System Manager. The resulting Basic E/S system provides more features than a Basic EDACS system, but less features than with a Site Controller. The SIM allows activity reports and alarm information to be sent from the site to the System Manager, and allows the reconfiguration of the system configured GID database by the System Manager. Information for the installation and maintenance of the SIM is included in this manual. Additional information may be obtained from one or more of the following related manuals: • LBI-38636 MASTR® III Base Station Installation Manual • LBI-38775 MASTR® III Base Station Maintenance Manual • LBI-30246 12/24 VDC Fuse Panel Maintenance Manual • LBI-38550 Base Station Power Supply Maintenance Manual • LBI-38987 EDACS® SCAT/Downlink GETC Configuration Manual • LBI-38988 EDACS® Station GETC Configuration Manual • LBI-38894 GETC Trunking Card Maintenance Manual • LBI-38822 GETC Turbo Board Maintenance Manual • LBI-33031 Modem Maintenance Manual • LBI-38984 EDACS® System Manager User’s Guide AE/LZB 119 1889 R1A DESCRIPTION HARDWARE The SIM option consists of a SIM Shelf, a SIM Modem Shelf (when needed), a DC Fuse Panel (when needed), and the necessary interconnect cables. The SIM Shelf consists of a 19-inch wide by 3.5-inch high (2 RU) rack-mounted chassis, containing a Backplane, Power Module, and Controller Module. The Backplane connects the Power Module to the Controller Module, and supports the connectors for all permanent inputs and outputs to other equipment. The Power Module supplies ± 12 Vdc and + 5 Vdc to the Controller Module. The Controller Module consists of a frame supporting the SIM Interface, Controller, and SIM Display boards. The SIM Interface Board is used as the interface between the Controller Board and the serial ports on the Backplane (to the Downlink, System Manager, and the GETC BSL). Two additional serial ports are available on the front of the Controller Board, for reconfiguring parameters in the personality and for downloading new application software. The Controller Board is used to accumulate activity records for periodic downloading to the System Manager, to receive alarm messages from the GETCs and report them to the System Manager, and to receive reconfiguration information from the System Manager and send it to the Control Channel GETC (or SCAT GETC). The SIM Display Board is a small circuit board that plugs into the front of the Controller Board. The Display Board contains a two-line (eight characters per line) LED display and is used to alternately display various information (such as time and date) to indicate that it is operating normally. The SIM Modem Shelf consists of a 19-inch wide by 3.5-inch high (2 RU) rack-mounted chassis, containing a modem for the connection to the System Manager (when needed) and a DC power supply for the SIM (when needed). The DC Fuse Panel consists of a 19-inch wide by 3.5inch high (2 RU) rack-mounted panel used as a power distribution point for the SIM option at a DC-powered site. If you are unable to resolve a problem or need additional technical assistance, contact the Ericsson Technical Assistance Center (TAC) at the number shown on the last page of this manual. 5 AE/LZB 119 1889 R1A INTRODUCTION / DESCRIPTION ENHANCED FEATURES A site containing GETCs with Enhanced Features enabled (using Release 6 or later software), and a SIM (using Release 1 application software) that is connected to a System Manager (using Release 6 or later software), has the following features in addition to the standard features offered by a Basic EDACS or SCAT site. • Poll Alarm - Indicates that poll responses from a Working Channel or Downlink GETC are not being received by the Control Channel GETC). • Carrier Alarm - Indicates the presence of an RF carrier without proper signaling (possible interfering signal or deliberate jamming). • Auxiliary Alarm - Indicates the detection of a Test Unit alarm by the TUAI at a Simulcast transmitter site. • Phone Alarm - Indicates the absence of data from a Voter in Voted or Simulcast System (possible line noise or breakage on link from Voter to GETC). • MASTR III PA Failure Alarm - Indicates that a specific repeater’s output power has dropped below the threshold level. (Note: See System Requirements for upgrading sites.) • Voter Alarm - Indicates that error messages are being received by GETC from Voter. • MASTR III Synthesizer Unlock Alarm - Indicates that a specific repeater’s synthesizer is not locked. (See System Requirements for upgrading sites.) • GETC Turbo Board Failure Alarm - Indicates a disruption in communication between a specific GETC’s main processor and Turbo Board. • BSL Failure Alarm - Indicates that no polling message has been received (by the SIM) from the Control Channel GETC for 15 seconds. Dynamic Site Reconfiguration Parameters for the following trunking features may be reconfigured remotely through the System Manager when needed, without disrupting service on the system: • Unit Enable / Disable by LID - The Unit Enable / Disable feature allows the System Manager to remotely enable or disable individual radio units. • Validation by GID - The GID validation feature allows the site to deny call requests to GIDs not defined in the database. GIDs may be added or deleted from the database by the System Manager. • • • Priority Queuing by GID - The priority queuing feature allows the site to assign queued calls to available channels using a system of priorities. The priority for each call type (Voice, Data, and Digital Voice) for each defined GID may be reconfigured by the System Manager. Message Trunking by GID - GIDs with a Hang Time greater than 0 are message trunked (the same channel will be used for each transmission). The Hang Time for each GID may be reconfigured by the System Manager. (This feature is not supported in a SCAT site.) Confirmed Call by GID - The confirmed call feature allows the site to assign each radio logged into that GID to a Working Channel before the caller is allowed to talk. This feature may be enabled or disabled for each GID by the System Manager. (This feature is not supported in a SCAT site.) Monitoring & Reporting Alarm Reporting The SIM reports the following alarms to the System Manager: 6 Site Activity Monitoring Alarm and trunking activity at the site may be monitored in real time on the System Manager’s Alarm Display and Acknowledge screen, and Site Monitor screen. Activity Records Activity records for alarm and trunking activity at the site are periodically sent to the System Manager for use in making reports. INSTALLATION INSTALLATION SYSTEM REQUIREMENTS If you are installing a SIM in an existing EDACS system, a minimum hardware and software configuration is required to assure that the Enhanced Features will function as described in this manual. Check the following equipment before installing the SIM, and upgrade if necessary. For more information about upgrading a specific piece of equipment, see the applicable instruction manual listed in the Introduction of this manual. System Manager The software for a VAX System Manager must be 344A4583G2, version 5.xx or later, to support the SIM. However, it must be version 6.xx or later to support the features described in this manual. If the distance between the SIM and the System Manager is more than 50 feet, an audio circuit with a modem on each end must be used for the data link between them. However, if the distance between the SIM and the System Manager is 50 feet or less, a standard RS-232 circuit may be used for the data circuit between them, and all references to the modem may be ignored. GETCs • Install a 19C337712G1 Turbo Board Harness between the Turbo Board (J2 & J3) and a bracket behind the GETC shelf (J103 & J104). • Install a REG70469/1 Ferrite RFI suppresser (boxshaped ferrite toroid clamp) around the Turbo Board Harness (approximately 3 1/2 inches from its connection point with the Turbo Board) to suppress EMI spurs at 74 MHz. Software Each SCAT and Station GETC connected to the SIM, must have the following minimum GETC 1e software platform: • Logic Board software must be 349A9607Gx, where x = 6 or higher (EPROM media). • Turbo Board software must be 344A4414Gx, where x = 6 or higher (diskette media). Each Downlink GETC connected to the SIM, must have the following minimum GETC 1e software platform: • Logic Board software must be 344A4895Gx, where x = 6 or higher (EPROM media). • Turbo Board software must be 344A1121Gx, where x = 6 or higher (diskette media). Personality Hardware Each SCAT, Station, and Downlink GETC connected to the SIM, should be either a 19D901868G4 GETC Shelf with a 19D902104G1 Rev F or 19D904266G4 GETC Logic Board, or a 19D901868G6 GETC Shelf with a 188D6500G4 GETC Logic Board. Earlier 19D902104G1 and 19D904266Gx GETC Logic Boards may be used if you check and change the following components: • Microprocessor U1 must be Dallas Semiconductor 80C320 (RYT12160060/A). • The 19A704727P4 Amps Modem Chips ,U4 and U19, must be made by Texas Instruments. • Resistor R60 must be 12K ohms. Earlier 19D901868Gx GETC Shelves may be used if you add a 19D903536P1 Turbo Board as follows: • AE/LZB 119 1889 R1A Install a 19D903536P1 Turbo Board above the GETC Logic Board in place of U3. Each SCAT and Station GETC connected to the SIM, must have the Enhanced Features enabled. Each SCAT, Station, and Downlink GETC connected to the SIM, must have the BSL baud rate programmed to 38,400 bps (bits per second). It is recommended that the same personality be loaded into all Station GETCs. Use the GETC PC programmer TQ-3357 (with Version 5.0 software) along with the “gtc_9506.mac” field macro file (from the Downlink Turbo Board software diskette). Repeaters To support MASTR III alarming on UHF and 800 MHz MASTR III repeaters, the backplane must be rev. C or later, the Interface Board must be rev. C or later, the Station Harness must be 19B802401P3, the MASTR III System Module software must be G17 or higher, and the MASTR III PC programming software must be G13 or higher. See the MASTR III maintenance manual for station setup. This is not required for Enhanced Features, only to support station alarming and reporting. 7 AE/LZB 119 1889 R1A INSTALLATION SITE DATABASE SETUP Group Definition The following parameters, configurable through the System Manager, affect the operation of the SIM or the Enhanced Feature GETCs used with the SIM. Note that screen and panel locations given here are for changes to the site database stored in the System Manager. To reconfigure any parameters in the SIM or the Enhanced Feature GETCs you must send the reconfigured site database to the SIM (see the System Manager manual, LBI-38984, for details). GROUP DEFINITION Screen (Menu Item 12) Site Reconfiguration SITE RECONFIGURATION Screen (Menu Item 10) Selected Group Panel • Group Id - Enter number of GID. • Group Name - (Optional) Enter name of group. Group Parameters Panel (2:4) • Voice - Enter the dequeuing priority for conventional (analog) voice calls for this GID. • Data - Enter the dequeuing priority for data calls for this GID. • Digital Voice - Enter the dequeuing priority for digital voice calls for this GID. • Hang Time - (Optional) Enter the time delay between an unkey command and a channel drop for this GID. A hang time of more than 0 allows message trunking (using the same radio channel for each transmission of the call). Selected Device Panel • Device Number - Enter number of site. • Device Name - (Optional) Enter name of site. • Device Type - Enter “SITE”. Channel Configuration Panel (1:4) • RF bitmap - Enter “Y” for each radio channel installed at the site, and “C” for the one channel to be the Control Channel. • Digital Voice Bitmap - Enter “Y” for each radio channel equipped for digital voice calls. • Data Bitmap - Enter “Y” for each radio channel equipped for data calls. • Allowed CC bitmap - Enter “Y” for each radio channel allowed to be used as a Control Channel. • Wide Area Enable - Enter “Y” to enable this GID for wide-area coverage (group calls involving more then one site). • Confirmed Call Enable - Enter “Y” if you want all units logged into this GID to be assigned to a Working Channel before the caller is given channel access (allowed to talk). Site Parameters Panel (2:4) Unit State Enable/Disable • UNIT STATE ENABLE/DISABLE Screen (Menu Item 50) Activity Dump Threshold - Enter the number of activity records that must accumulate in the SIM activity file before the SIM automatically downloads the file to the System Manager. System Mgr. Communications Parameters Panel (4:4) 8 Wide Area Panel (3:4) • Device Password - Enter the same password that was programmed into the SIM. • Prim Line Phone No. - (Dial-up line to SIM only) Enter the telephone number of the subscriber line connected to the SIM modem. Selected Unit Panel • Unit Number - Enter number of LID. • Unit Name - (Optional) Enter name of unit. Current State Panel • Desired State - Press F7 to enable, or F12 to disable the radio. INSTALLATION AE/LZB 119 1889 R1A SIM EQUIPMENT MOUNTING Use this procedure to mount the SIM equipment in an existing system. If the SIM equipment was mounted in the factory, skip this part of the installation instructions. Mount the SIM equipment in the Basic EDACS cabinet containing channel 1, (or in the cabinet for the SCAT channel). The standard mounting position for the SIM equipment in a 69-inch MASTR III Basic EDACS repeater cabinet, is shown in Figure 1. When installing the SIM in an existing system, you may have to improvise. Mounting the equipment in other locations may require longer cables than those supplied. The SIM Shelf requires 3 1/2 inches (2 RU) of vertical rack space. The SIM Modem Shelf (when needed) requires an additional 5 1/4 inches (3 RU) of vertical rack space. The DC Fuse Panel (when needed) is mounted in the back of the cabinet. Downlink GETC L1L2L3L4L5L6L7 SIM 1-RU Blank Panel SIM Modem Shelf SIM Shelf ❏ Turn Off All Power to Cabinet: Before starting the installation of the SIM, make sure that all Power is removed from the cabinet where the installation is to take place. ❏ Mount SIM Shelf: • Mount the SIM Shelf just below the Downlink GETC Shelf. Fasten the front panel of the SIM Shelf to the front mounting rails of an enclosed cabinet using the following hardware: (4 ea.) 7160861P33 Tinnerman Clips • (4 ea.) 19A134011P2 Panel-Mounting Screws For an open rack, use the following hardware: • L1L2L3L4L5L6L7 DC Power Supply • • Station GETC MASTR III Repeater Station GETC L1L2L3L4L5L6L7 MASTR III Repeater (4 ea.) N663P19008B6 Screw & Washer Asm. Use two SXA 120 4303 right-angle brackets to support the back of the SIM Shelf. Fasten the back of the shelf to the brackets using the following hardware: • (2 ea) SBA 120 040/0080 Screw (M4x8) • (2 ea) SCL 100 136/24 Lock Washer (M4) • (2 ea) SCA 101 040/03 Flat Washer (M4) DC Power Supply Figure 1 - Standard Mounting Location 9 AE/LZB 119 1889 R1A INSTALLATION Fasten the brackets to the back mounting rails of an enclosed cabinet or open rack using the following hardware: • (4 ea.) 7160861P33 Tinnerman Clips • (4 ea.) 19A134011P2 Panel-Mounting Screws Support Bracket DC POWER SUPPLY MODEM SIM Modem Shelf Power Switch q Mount SIM Modem Shelf (skip this step if not using modems between the SIM and the System Manager, and if not using the DC power supply): • Mount the SIM Modem Shelf 1 3/4 inches (1 RU) below the SIM Shelf. Fasten the front panel of the assembled Modem shelf to the front mounting rails of an enclosed cabinet using the following hardware: • (4 ea.) 7160861P33 Tinnerman Clips • (4 ea.) 19A134011P2 Panel-Mounting Screws For an open rack, use the following hardware: • • (2 ea) SBA 120 040/0080 Screw (M4x8) • (2 ea) SCL 100 136/24 Lock Washer (M4) • (2 ea) SCA 101 040/03 Flat Washer (M4) 10 SIM DC AC q Mount Blank Panel (skip this step if not using modems between the SIM and the System Manager, and if not using the DC power supply): • Use two SXA 120 4230 flat brackets to support the back of the SIM Modem Shelf. Fasten the brackets to the back of the shelf using the following hardware: • PHONE Figure 2 - SIM Modem Shelf Connections (4 ea.) N663P19008B6 Screw & Washer Asm. Fasten the brackets to the back mounting rails of an enclosed cabinet or open rack using the following hardware: • PWR Mount the 1 3/4-inch (1 RU) Blank Panel between the SIM Shelf and the SIM Modem Shelf. Fasten the Blank Panel to the front mounting rails of an enclosed cabinet using the following hardware: • (4 ea.) 7160861P33 Tinnerman Clips • (4 ea.) 19A134011P2 Panel-Mounting Screws For an open rack, use the following hardware: • (4 ea.) N663P19008B6 Screw & Washer Asm. q Mount DC Fuse Panel (skip this step if the cabinet is AC powered): • • (4 ea.) 7160861P33 Tinnerman Clips Mount the DC Fuse Panel in the back of the cabinet. Fasten the DC Fuse Panel to the back mounting rails of an enclosed cabinet or open rack using the following hardware: • (4 ea.) 19A134011P2 Panel-Mounting Screws • (4 ea.) 7160861P33 Tinnerman Clips • (4 ea.) 19A134011P2 Panel-Mounting Screws If the SIM Modem Shelf contains a DC power supply, connect the SIM Power Cable (part # RPM 113 2512) to the front of the power supply and route the cable to the back as shown in Figure 2. • Push in the “I” end of the power switch on the back of the modem. • Push in the “I” end of the power switch on the back of the power supply. Cable Connections Connect the following SIM cables. Figure 2 shows the location of cable connections to the SIM Modem Shelf. Figure 3 shows the location of SIM cable connections to the standard AC-powered MASTR III Basic EDACS repeater cabinet. INSTALLATION AE/LZB 119 1889 R1A q Connect DC Power Supply Power Cord (skip this step if the site is DC powered): Plug the AC power cord (attached to the DC power supply) into the AC power strip. EDACS Interface Panel q Connect Modem Power Cord (skip this step if not using modems between the SIM and the System Manager): Serial Module J14 If the site is AC-powered, connect the power cord with the attached 20V transformer module (supplied with the Modem) from the Modem to the AC power strip. If the site is DC-powered, connect the power cord with the attached 20V transformer module (supplied with the Modem) from the Modem to the inverter (not currently available). q Downlink GETC X8 X9 X10 X11 X12 X13 X14 X1 X2 X3 X4 X5 X6 SIM X7 Leased Line Connect SIM Power Cable: DTE/EIA-232D If the site is AC powered, connect the RPM 113 2512 SIM power cable from the 3-pin connector, X14, on the backplane of the SIM to the 3x3 Molex-type connector, J801, on the front of the DC power supply. If the site is DC powered, connect the RPM 113 2511 SIM power cable from the 3-pin connector, X14, on the backplane of the SIM to the DC Fuse Panel. Power Jack SIM Modem Shelf STATION GETC MASTR III Repeater TX q Connect SIM Modem Cable: If the System Manager is remotely located, connect an RPM 113 2485 SIM modem cable from the 8-pin modular connector, X4, on the backplane of the SIM to the DB-25 connector on the back of the Modem. Then connect the audio data link from the remote System Manager to the 8pin modular connector, marked “Leased Line”, on the back of the modem. DC Power Supply AC Power Strip STATION GETC If the System Manager is located locally (within 50 feet of the SIM), connect the System Manager to the 8-pin modular connector, X4, on the backplane of the SIM using an RS-232 adapter cable (part # 19D903880P903). If additional cable length is needed, use an RS-232 extension cable (part # 19A149575P18 is 18 feet long, -P19 is 25 feet long, and -P20 is 50 feet long). MASTR III Repeater TX DC Power Supply q Connect SIM BSL Cable: Connect the SIM BSL cable (19D903880P161) from the 6-pin modular connector, X10, on the backplane of the SIM to the 6-pin modular connector, J14, on the 19C852447G1 Serial Module in the EDACS Interface Panel. (If a cable is already connected to J14 on the Serial Module, connect this cable to J7, J8, J9, J12, or J13.) Figure 3 - Standard Cable Connections 11 AE/LZB 119 1889 R1A INSTALLATION MODEM SETUP If a pair of modems is used to connect the SIM to the System Manager, the modems must be configured for the type of audio circuit that they are connected to. The 19A149786 drawing in the modem maintenance manual, LBI-33031, lists parameter sets for several applications of the ZyXEL U-1496 modem (standard modem supplied with the SIM Modem Shelf, when ordered). For a 4-wire leased telephone line application, use the parameter set for the “Site Controller 4-Wire Leased Line” for the SIM end, and the parameters set for the “System Manager 4-Wire Leased Line (to site)” for the System Manager end. For a 2-wire dialup telephone line application, use the parameter set for the “Site Controller 2-Wire Dialup Line” for the SIM end, and the parameter set for the “System Manager 2-Wire Dialup Line (to site)” for the System Manager end. For other audio circuit applications, determine the correct parameter set from the ZyXEL manual supplied with the modem. Use the following procedure to make changes to the parameters in the ZyXEL U-1496 modem: 1. Press the up arrow key to enter the configuration mode. 2. Press the down arrow key to go to a parameter group. 3. Press the left or right arrow key to select the desired parameter group. 4. Press the down arrow key to go to a parameter in the selected parameter group. After all parameters in all parameter groups have been verified or reconfigured, use following procedure to save the changes: 1. Press the up arrow key until a parameter group is selected. 2. Press the right arrow key until “SAVE TO = PROFILE 0” is displayed. 3. Press the down arrow key twice. 4. Press the right arrow key until “RESET = PROFILE 0” is displayed. 5. Press the down arrow key. SIM SETUP Regardless of whether the SIM was installed at the site or the factory, you must program the SIM to obtain the desired operational characteristics for your specific system. NOTE Note that in the character strings used to program the SIM, the symbol ∧ is used for a single space between characters. Also note that letters used in these character strings are case sensitive. Programming Setup 5. Press the left or right arrow key to select the desired parameter. 6. Press the down arrow key to view the current value for the selected parameter. 7. If the current value is the desired value, press the up arrow key and go on to the next parameter. If the current value is not the desired value, press the left or right arrow key to select the desired value. 8. When the desired value has been selected, press the down arrow key to change the parameter to the selected value and go on to the next parameter. Use the following procedure to set up a customersupplied IBM-compatible PC with terminal emulation software (or a dumb terminal). 1. 9. 12 If the next parameter is in this group of parameters, return to step 5. If the next parameter is not in this group of parameters, press the up arrow key and return to step 3. Configure PC (or Terminal): Select the serial COM port to be used (generally COM1 or COM2), and configure as follows: Baud Rate = 19,200 Start Bits = 1 Data Bits = 8 Stop Bits = 1 Parity Bits = None 2. Connect PC (or Terminal): Connect the supplied programming cable (Ericsson # RPM 113 2514) from J4 on the front of the SIM to the serial COM port of the PC (or terminal), as shown in Figure 4. If the serial COM port of the PC (or terminal) is not equipped with a male 9-pin, D-subminiature (DB9) connector, a customer-supplied adapter will be required. INSTALLATION J4 3. Type set∧ ∧siteP,siteName∧ ∧“Xx” (replacing Xx with the Site Name - up to 8 characters), and press the Enter key. (Quotation marks are required.) 4. Type set∧ ∧siteP,password∧ ∧“Xx” (replacing Xx with the Site Password - add spaces at end for a total of 12 characters), and press the Enter key. (Quotation marks are required.) 5. Type run∧ ∧siteP,verifyAndLoad∧ ∧(∧ ∧)∧ ∧ and press the Enter key. The SIM should respond by displaying the word OK. If the word OK is not displayed, a failure in the SIM is indicated and this programming procedure should be aborted. 6. Type set∧ ∧scc4P,modemType∧ ∧BX (replacing X with a number listed below), and press the Enter key. Use 0 for direct connections between the SIM and the System Manager (such as RS-232 or T1). J3 IBM-Compatable Personal Computer Programming Cable RPM 113 2514 Serial COM Port Figure 4 - SIM Programming Setup 2. Power Up SIM: Make sure that the power switch on the front of the SIM shelf is turned on. 3. Check SIM Display: Verify that the SIM is alternately displaying a time and date (correct values for time and date are not important). Other information may also be alternately displayed. If a time and date are not displayed, a failure in the SIM is indicated and this programming procedure should be aborted. System Manager Communications If customer-specific values for the SIM Personality are not available in the factory, a generic personality is installed for test purposes. Customer-specific values for the following parameters must be programmed into the SIM Personality before the SIM will be able to communicate with the System Manager: • Site ID • Site Name (optional) • Site Password • Modem Type • Telephone Number (dialup modem type only) Use the following procedure to program these parameters in the SIM Personality: 1. Press Ctrl + E to get the SIM to echo the typed characters, so that you will be able to see (on the screen of the PC or terminal) what you type. 2. Type set∧ ∧siteP,siteID∧ ∧BXx (replacing Xx with the Site ID - up to 3 integers), and press the Enter key. AE/LZB 119 1889 R1A X 0 1 5 6 7 Modem Type No Modem Transparent ZyXEL 2-wire leased line ZyXEL 4-wire leased line ZyXEL Dialup line 7. (Required for dialup modem type only.) Type set∧ ∧scc4P,phoneNumber∧ ∧“Xx” (replacing Xx with the phone number of the System Manager - up to 32 integers), and press the Enter key. (Quotation marks are required.) 8. Type set∧ ∧scc4P,protocol∧ ∧B2 and press the Enter key to set up the SIM’s scc4 port to run the System Manager protocol. 9. Type set∧ ∧scc4P,baudRate∧ ∧LX (replacing X with the baud rate of the System Manager interface), and press the Enter key. The SIM presently supports baud rates to the System Manager of 9600 and 19200 (default), but the System Manager is generally set to 9600. If a direct connection is used between the SIM and the System Manager, both must be set to the same baud rate. 10. Type run∧ ∧scc4P,verifyAndLoad∧ ∧(∧ ∧)∧ ∧ and press the Enter key. The SIM should respond after about 3 seconds by displaying the word OK. If the word OK is not displayed, a failure in the SIM is indicated and this programming procedure should be aborted. 11. Type run∧ ∧PersonalityObject,programFlash∧ ∧(∧ ∧)∧ ∧ and 13 AE/LZB 119 1889 R1A INSTALLATION press the Enter key. The SIM should respond in less than 10 seconds by displaying the word OK. If the word OK is not displayed, a failure in the SIM is indicated and this programming procedure should be aborted. 12. Type run∧ ∧global,Reset∧ ∧(∧ ∧)∧ ∧ and press the Enter key. The SIM should then reboot with the new SIM Personality parameters in effect. Messages Displayed on SIM The display on the front of the SIM consists of two 8character lines. The top line is used to show a userconfigurable, continuously repeating sequence of up to 32 steps for various items, such as time, date, alarms, and customized 8-character messages. The bottom line is used to show if the BSL to the GETCs has failed, if the System Manager connection has failed, if a GID upload has been started from the System Manager, if a GID upload has been completed from the System Manager, and various trunking activities. Alarm messages for the top line of the SIM display can be in either of two forms. If no alarm is being detected by the SIM, the alarm message will be No Alarm. If an alarm is being detected by the SIM, the alarm message will be of the form !Xxx CH Y , where Xxx represents the name of the detected alarm (see Table 2) and Y represents the number of the channel where the alarm is being detected. Table 2 - Alarm Messages for Top Line of Display Xxx Pol Car Aux Phn Top Line of Display PA To modify what is shown on the top line of the display, Press Ctrl + E to get the SIM to echo the typed characters. Then type setat∧ ∧X∧ ∧miscP,displayChoices∧ ∧BZ and press the Enter key for each step in the sequence you wish to change. Replace the X with an integer from 0 to 31 to represent the position in the sequence. Replace the Z with an integer from 0 to 12 to represent the type of message (see Table 1) to be displayed in that position in the sequence (note that the first 0 or invalid value for Z will return the sequence to the first step). Table 1 - Message Types for Top Line of Display Z 0 1 2 3 4 5 6 7 8 9 10 11 12 14 MESSAGE TYPE End (used to return to first step of sequence) Alarm (see text) Time Date Version (of SIM software) Idle (no message shown for step) ERICSSON PRISM String1 (see text) String2 (see text) String3 (see text) String4 (see text) Site ID Vot Syn Tur DESCRIPTION Poll Alarm - Indicates that poll responses from a Working Channel or Downlink GETC are not being received by the Control Channel GETC). Carrier Alarm - Indicates the presence of an RF carrier without proper signaling (possible interfering signal or deliberate jamming). Auxiliary Alarm - Indicates the detection of a Test Unit alarm by the TUAI at a Simulcast transmitter site. Phone Alarm - Indicates the absence of data from a Voter in Voted or Simulcast System (possible line noise or breakage on link from Voter to GETC). PA Failure Alarm - Indicates that a specific repeater’s output power has dropped below the threshold level. Voter Alarm - Indicates that error messages are being received by GETC from Voter. Synthesizer Unlock Alarm - Indicates that a specific repeater’s synthesizer is not locked. GETC Turbo Board Failure Alarm - Indicates a disruption in communication between a specific GETC’s main processor and Turbo Board. If the SIM is detecting only one alarm, the same alarm message will be shown each time an alarm step is reached in the sequence. If the SIM is detecting two or more alarms, only one alarm message will be displayed per alarm step in the sequence, but the messages will rotate so that a different alarm is shown each time an alarm step is reached in the sequence. String1 through String4 are user-configurable messages of up to 8 characters each. To change these messages, type set∧ ∧miscP,displayStringX∧ ∧“Yyy” (replacing X with a string number from 1 to 4, and Yyy with the desired message up to 8 characters), and press the Enter key. To change the amount of time each step in the sequence is shown, type set∧ ∧miscP,displayOnTime∧ ∧LX (replacing X with the desired amount of time in milliseconds), and press the Enter key (default is 1000). INSTALLATION To change the amount of time between each step in the sequence, type set∧ ∧miscP,displayOffTime∧ ∧LX (replacing X with the desired amount of time in milliseconds), and press the Enter key (default is 500). Bottom Line of Display The bottom line of the SIM display is used to show the messages shown in Table 3. To change the amount of time each message is displayed if it is not replaced by another message, type set∧ ∧miscP,displayPersistance∧ ∧LZ (replace Z with the time in milliseconds), and press the Enter key (default is 5000). Note that when two or more activities occur in rapid succession, the messages may not be displayed for the full amount of time. 2. AE/LZB 119 1889 R1A Type set∧ ∧siteP,highSpeedBSL∧ ∧B0 and press the Enter key. When programming of the SIM is complete, disconnect the programming cable from the SIM. Table 3 - Messages for Bottom Line of Display MESSAGE BSL Fail SMDisct To save the programming for the SIM display, do the following: 1. 2. Type run∧ ∧miscP,verifyAndLoad∧ ∧(∧ ∧) and press the Enter key. The SIM should respond by displaying the word OK. Type run∧ ∧PersonalityObject,programFlash∧ ∧(∧ ∧) and press the Enter key. The SIM should respond by displaying the word OK. Station GETC Communications The default baud rate for BSL communications between all GETCs and the SIM is 38,400 bps. If a “BSL Fail” message is seen on the SIM display, the baud rates may not be the same. To make sure that the BSL baud rate is set to 38,400 bps in the SIM, use the following procedure: 1. Press Ctrl + E to get the SIM to echo the typed characters, so that you will be able to see (on the screen of the PC or terminal) what you type. 2. Type set∧ ∧siteP,highSpeedBSL∧ ∧B1 and press the Enter key. 3. Type run∧ ∧siteP,verifyAndLoad∧ ∧(∧ ∧)∧ ∧ and press the Enter Key. 4. Type run∧ ∧PersonalityObject,programFlash∧ ∧(∧ ∧)∧ ∧ and press the Enter key. 5. Reset the SIM (push button in hole in front panel). GIDUpLod GID Done MONMorse MONGrpCA MONDtGCA MONDtICA MONSpcCA MONIndCA MONSyACA MONLgnAk MONStsAk MONSysId MONUnkey MONCanDR MONIniTC MONStatus MONWCSID MONLogin MONPage MONConGC MONConIC MONCTISG MONSDrop MONCConf MONWCKey MONWCUKy MONWCDrp MONDpCar DESCRIPTION No polling message has been received by the SIM from the Control Channel GETC for 15 seconds. The System Manager interface is disconnected. If this message appears every 15 to 30 seconds, the System Manager cannot be contacted and something must be wrong with the System Manager connection. The System Manager has started a GID upload to the site. The GID upload to the site is complete. Morse Code ID was transmitted. Group Channel Assignment. Data Group Channel Assignment Data Individual Channel Assignment Special Channel Assignment Individual Channel Assignment System All Call Channel Assignment Login Acknowledge Status Ack System Id message Radio Unkey Cancel Dynamic Regroup Initiate Test call Status Message Working Channel System Assigned ID Radio Login Paging channel assignment Confirmed Group Channel Assignment Confirmed Indiv Channel Assignment Central Interconnect Group Channel Assignment Short Drop Channel confirmed Working channel Key Working Channel unkey Working Channel drop Drop with carrier If it is necessary to set the BSL baud rate to 19,200 bps in the SIM, use the same procedure but change step 2 as follows: 15 AE/LZB 119 1889 R1A OPERATION OPERATION ENHANCED FEATURES The operation of the additional features provided by a site containing Enhanced GETCs (using Release 6 or later software), and a SIM (using Release 1 application software) that is connected to a System Manager (using Release 6 or later software) is given here. For the operation of a Basic EDACS or SCAT site, see the manuals provided for that equipment. Dynamic Site Reconfiguration Parameters for the following trunking features may be reconfigured remotely through the System Manager when needed, without disrupting service on the system: • Unit Enable/Disable by LID • Validation by GID • Priority Queuing by GID • Message Trunking by GID • Confirmed Call by GID Unit Enable / Disable by LID The Unit Enable / Disable feature allows the System Manager to remotely enable or disable individual radio units. This feature is intended to be used when a radio is lost or stolen (to prevent unauthorized use), when a radio is disrupting communications on the system (due to some malfunction in the radio), or when the radio users don’t pay their bills (to motivate them to pay up). To use this feature: 1. Select the Unit State Enable/Disable screen (menu selection 50) in the System Manager. 2. Enter the desired Unit Number, LID, Unit Name or Serial Number in the Selected Unit panel. 3. Press F12 to disable the radio, or F7 to enable the radio. The System Manager will then try to communicate the enable/disable request to the SIM at each site connected to the System Manager. The SIM at each contacted site will in turn send the enable/disable request to the controlling GETC, and the controlling GETC will then try to contact the radio and send the enable/disable request. If the controlling GETC is unable to contact the radio, the controlling GETC will wait for the radio to log into the site 16 (until it is reset, told to stop, or successfully contacts the radio). When the radio acknowledges compliance to the enable/disable request, the controlling GETC at the site controlling the radio will inform the System Manager through the SIM. The System Manager will then update the Current State field in the Current State panel, and tell the other sites to stop trying to contact the radio. Up to 64 open (unacknowledged or uncanceled) enable/disable requests may stored by the SIM at each contacted site. Up to 16 of these open enable/disable requests may be processed at one time by the controlling GETC. As each enable/disable request being processed by the controlling GETC is closed (acknowledged or canceled), any remaining open enable/disable request in the SIM will take its place until all enable/disable requests are being processed, are acknowledged, or are canceled. Validation by GID The GETC uses the GID database to validate each GID call request before assigning a channel. Validation consists of checking to see that the GID is defined for the site (see System Manager screen 12, panel 1). The System Manager default is no GIDs defined. Priority Queuing by GID The GETC uses the GID database to determine when each queued group call gets assigned a channel. The priority is reconfigurable for each call type (Voice, Data, and Digital Voice) for each defined GID (see System Manager screen 12, panel 2). A queued call with a higher priority will be assigned a channel before a queued call with a lower priority. Priorities range from a low of 0 to a high of 7. The highest priority of 7 is reserved for emergency calls. The System Manager default is 0. Message Trunking by GID The GETC uses the value of the Hang Time parameter in the GID database to determine if a group call is message trunked. The Hang Time parameter is reconfigurable for each defined GID (see System Manager screen 12, panel 2). The Hang Time can be set from 0 to 255 seconds. A Hang Time greater than 0 is said to be message trunked (the same channel will be used for each transmission provided that the time between successive transmissions does not exceed the Hang Time. The System Manager default is 0. (This feature is not supported in a SCAT site.) OPERATION AE/LZB 119 1889 R1A Confirmed Call by GID • The GETC uses the Confirmed Call Enable parameter in the GID database to determine if a group call must be confirmed before the caller is given channel access (allowed to talk). This parameter is reconfigurable for each defined GID (see System Manager screen 12, panel 3). Enabling the Confirmed Call parameter, for a GID that is not Wide-Area enabled, ensures that all radios logged into the group have tuned to the assigned channel before the caller is given channel access (allowed to talk). Enabling the Confirmed Call parameter, for a GID that is Wide-Area enabled, ensures that at least one radio logged into the group at each site is tuned to the assigned channel before the caller is given channel access (allowed to talk). Y is for enable; N is for disable. The System Manager default is N. (This feature is not supported in a SCAT site.) Power (System Manager screen 40) - Indicates that MASTR III repeater’s output power has dropped below threshold level - state changes are reported by GETC to SIM over BSL - SIM marks channel as failed and sends Power Alarm to System Manager first supported by GETC Release 6, Site Controller Release 7, and System Manager Release 6. (See System Requirements to upgrade sites.) • Synth (System Manager screen 40) - Indicates that MASTR III repeater’s synthesizer is not locked state changes are reported to SIM over BSL - SIM marks channel as failed and sends Synth Alarm to System Manager - first supported by GETC Release 6, Site Controller Release 7, and System Manager Release 6. (See System Requirements to upgrade sites.) • Voter (System Manager screen 40) - Indicates that error messages are being received by GETC from Voter - state changes are reported by GETC to SIM over BSL - SIM sends Voter Alarm to System Manager (but channel is not failed) - first supported by GETC Release 6, Site Controller Release 7, and System Manager Release 6. • Phone (System Manager screen 40) - Indicates the absence of data from a Voter in Voted or Simulcast Systems at the GETC’s Rockwell Modem 9600 baud synchronous serial port (possible line noise or breakage on link from Voter to GETC) - state changes are reported to SIM over BSL - SIM sends Phone Alarm to System Manager (but channel is not failed). • Poll (System Manager screen 40) - Indicates that a Working Channel or Downlink GETC is not responding to polling messages from the Control Channel GETC (or responses are not being received by the Control Channel GETC) - state changes are reported to SIM over BSL - SIM marks channel or downlink as failed and sends Poll Alarm to System Manager. • Turbo (System Manager screen 40) - Indicates a disruption in communication between the main GETC processor and its Turbo Board - state changes are reported to SIM over BSL - SIM marks channel as failed and sends Turbo Alarm to System Manager - first supported by GETC Release 6, Site Controller Release 7, and System Manager Release 6. Monitoring & Reporting The following alarm and trunking activity features are available remotely through the System Manager: • Alarm Reporting • Site Activity Monitoring • Activity Records Alarm Reporting The SIM reports the state of the following alarms to the System Manager whenever an alarm changes state, or whenever requested to do so by the System Manager. (These alarms can also be shown on the top line of the SIM display - see Programming section in this manual). The System Manager then displays the state of these alarms on screen 40 (names underlined are as shown on screen 40). However (unlike the operation of the site under the direction of a Site Controller), only the Power, Synth, Poll, and Turbo alarms are used to fail channels. • • Auxil (System Manager screen 40) - Indicates the detection of a Test Unit alarm by the TUAI at a Simulcast transmitter site - state changes are reported (by Control Point GETC for that channel) to SIM over BSL - SIM sends Auxil Alarm to System Manager (but channel is not failed). Carrier (System Manager screen 40) - Indicates the presence of an RF carrier without proper signaling (possible interfering signal or deliberate jamming) state changes are reported to SIM over BSL - SIM sends Carrier Alarm to System Manager (but channel is not failed). 17 AE/LZB 119 1889 R1A OPERATION Site Activity Monitoring The SIM monitors the activities of the site by monitoring the activity information on the BSL. The SIM continually reports this data to the System Manager when the System Manager’s Site Monitor screen (screen 32) is being viewed (so that the screen can be continually updated). 5. The SIM continues testing the DCD line ten times per second for the period of time specified by the connectTimeout variable (default = 300 seconds). 6. If a response is not detected on the DCD line by the time the connectTimeout interval expires, the SIM issues a Hang-Up command to the modem and starts a waiting interval specified by the connectRetryTimeout variable (default = 30 seconds). 7. During the connectRetryTimeout interval, the SIM tests the DCD line one time per second, looking for a response from the System Manager. 8. If no response from the System Manager is received by the time the connectRetryTimeout variable has expired, the connection process is restarted. Activity Records The SIM monitors the activities of the site by monitoring the activity information on the BSL. From this activity information, the SIM generates activity records (for events such as channel assignments, unit enable/disable requests, or alarm state changes). Activity reporting can be turned on or off for each category of activity. Activity records are generated and stored by the SIM for later batch retrieval and processing by the System Manager. The default value for the maximum number of records that can be stored by the SIM is 16,384. The value of the Activity Dump Threshold parameter specifies the number of records that must accumulate before the System Manager is notified to retrieve the records (SIM default is 1000 records). SYSTEM MANAGER DATA TRANSFERS The sequence of events involved in data transfers between the SIM and the System manager depends upon whether modems are used or not, and whether the connection is a dedicated or dial-up line. Modem Connection The following sequence describes the steps required to establish a SIM-initiated modem connection between the SIM and the System Manager. 18 1. The SIM resets the DTR low. 2. After a one second wait, the modem is put into the command mode and initialized. 3. A dial-up process is performed. If the modem interface is a dedicated line, no phone number is dialed. 4. After a one second wait, the SIM sets the DTR high and starts testing the DCD line ten times per second. Password Exchange Once the modem or direct connection between the SIM and the System Manager is established, the password exchange takes place. If the SIM initiated the connection, it will send the password to the System Manager. If the System Manager initiated the connection, it will send a login message containing the password to the SIM. Initialization Sequence If (for a SIM-initiated connection) the SIM receives a positive acknowledgment from the System Manager, or (for a System Manager-initiated connection) the System Manager login message is valid, the initialization sequence can start. The initialization sequence consists of requesting the following information from the System Manager: Time Special Bitmap RF Bitmap Data Bitmap Digital Voice Bitmap Modem Bitmap Site Parameters Site Device Database GID Database MAINTENANCE AE/LZB 119 1889 R1A MAINTENANCE J4 NOTE Note that in the character strings used to program the SIM, the symbol ∧ is used for a single space between characters. Also note that letters used in these character strings are case sensitive. Programming Cable RPM 113 2514 J3 IBM-Compatable Personal Computer APPLICATION SOFTWARE UPDATE Program Disks Serial COM Port Use the following procedure to download new application software into a SIM using a customer-supplied IBM-compatible PC with terminal emulation software (or a dumb terminal). Skip step 1 if the PC is already set up. 1. Set up the PC as follows: • • • Turn on the PC and wait until the DOS command prompt appears (generally C:\). Type md diagpc to create a subdirectory named diagpc under the main (or root) directory of the PC. (This subdirectory will be used for the SIM Diagnostic PC program file and the new application software program file.) 3. • Run the terminal emulation program in the PC. • Select the serial COM port to be used by the PC (generally COM1 or COM2), and configure it as follows: Copy the new application software program file (generally ending in -----.hex) from the supplied diskette to the new diagpc subdirectory in the PC. Select the Download Mode as follows: • • Press Ctrl + E to get the SIM to echo the typed characters, so that you will be able to see (on the screen of the PC or terminal) what you type. • Type set∧ ∧bbr,bootMode∧ ∧B6 and press the Enter key. • Type run∧ ∧global,Reset∧ ∧(∧ ∧)∧ ∧ and press the Enter key. • After the SIM has finished rebooting and is in the Download mode of operation, the following message will be shown on the SIM display: Copy the newdiag.exe file from the supplied diskette to the new diagpc subdirectory in the PC. (This is the SIM Diagnostic PC program file.) Baud Rate = 19,200 Start Bits = 1 Data Bits = 8 Stop Bits = 1 Parity Bits = None 2. Figure 5 - SIM Download Programming Setup Connect the supplied programming cable (Ericsson # RPM 113 2514) from J4 on the front of the SIM to the serial COM port of the PC (or terminal), as shown in Figure 5. Boot OS Idle • 4. Exit the terminal emulation program in the PC. Download the Application Software to SIM as follows: • Start up the Diagnostic PC program by running the file newdiag.exe located in the diagpc directory of the PC. The Diagnostic PC Application Window will then appear on the PC screen. • From the Options pull-down menu, select Setup to display the Serial Port Configuration window. • In the Serial Port Configuration window, select the serial COM port to be used (generally COM1 or COM2), and configure it as follows: Baud Rate = 19,200 Start Bits = 1 Data Bits = 8 Stop Bits = 1 Parity Bits = None 19 AE/LZB 119 1889 R1A • MAINTENANCE is used for a single space between characters, and note that letters are case sensitive): From the Download pull-down menu, select Application. Next, select the new application software program file (generally ending in ----.hex) to be downloaded. Finally, select OK. The download process will then begin. The SIM display should show Received along with a running record count. When the download is complete (should take 7 or 8 minutes), the SIM will automatically reboot into the new application. A repeating sequence of messages (similar to the following example) should eventually be shown on the SIM display: Idle 95 No Alarm 09/01/95 No Alarm 12:00:00 No Alarm • Exit the Diagnostic PC program in the PC. • Disconnect the programming cable from the SIM. SET TIME & DATE • Press Ctrl + E to get the SIM to echo the typed characters, so that you will be able to see (on the screen of the PC or terminal) what you type. • invoke∧ ∧TimerThread,setTime∧ ∧(∧ ∧Wyear∧ ∧Wmo ∧Wda∧ ∧Whr∧ ∧Wmn∧ ∧Wsc∧ ∧Wmsc)∧ ∧ Replace year with the 4 digits of the year (0000 to 9999), replace mo with the number of the month (1 to 12), replace da with the number of the day (1 to 31), replace hr with the hour (0 to 23), replace mn with the minute (0 to 59), replace sc with the second (0 to 59), replace msc with the millisecond (0 to 999), and press the Enter key. INITIALIZATION OF DRAM TEST FAIL AND POST-MORTEM INFORMATION The DRAM Test Fail and Post-Mortem information is initialized using the following procedure: 1. Run the terminal emulation program in the PC. 2. Select the serial COM port to be used (generally COM1 or COM2), and configure as follows: The time and date in the SIM is generally set via the System Manager (see manual for System Manager). The time and date in the SIM may also be programmed directly using the following procedure: 1. Run the terminal emulation program in the PC. 2. Select the serial COM port to be used (generally COM1 or COM2), and configure as follows: Baud Rate = 19,200 Start Bits = 1 Data Bits = 8 Stop Bits = 1 Parity Bits = None 3. Connect a programming cable from the serial COM port of the PC to the Diagnostic PC port of the SIM (J4). 4. Type the following string of characters (replace time and date variables as indicated, note that the symbol ∧ 20 Baud Rate = 19,200 Start Bits = 1 Data Bits = 8 Stop Bits = 1 Parity Bits = None 3. Connect a programming cable from the serial COM port of the PC to the Diagnostic PC port of the SIM (J4). 4. Type the following string of characters (replace time and date variables as indicated, note that the symbol ∧ is used for a single space between characters, and note that letters are case sensitive): • Press Ctrl + E to get the SIM to echo the typed characters, so that you will be able to see (on the screen of the PC or terminal) what you type. • run∧ ∧BBR,preShip∧ ∧(∧ ∧)∧ ∧ Press the Enter key. GLOSSARY AE/LZB 119 1889 R1A GLOSSARY Backup Serial Line ....................................... The Backup Serial Line (BSL) is a data bus connected to all Station and Downlink GETCs at a site. The BSL is used for communications during Failsoft Trunking. For SIM applications, the BSL is also connected the SIM. BSL............................................................... See Backup Serial Line. Control Channel............................................ A Control Channel is any allowed radio channel (only one at a time) at an EDACS Trunked Site that is used for call requests and Working Channel assignments for trunked calls. EDACS ......................................................... EDACS, short for Enhanced Digital Access Communications System, is a registered trademark of Ericsson Inc. It is used by Ericsson to describe specific communications systems and their specific equipment which meet or exceed the needs of the Public Service, Industrial, Commercial, and Utility markets worldwide. EDACS Trunked Site.................................... An EDACS Trunked Site is a location having three or more EDACS Repeaters operating together under the direction of a Site Controller computer or the Control Channel GETC. Frame Sync Line ........................................... The Frame Sync Line is a +13.8 VDC bus, with periodic negative pulses (to 0 VDC), originated by the Control Channel GETC and used by the Working Channel GETCs to synchronizing messages to mobiles. FSL ............................................................... See Frame Sync Line. GID ............................................................... See Group ID. Group ID....................................................... A Group ID is a unique number used to identify a specific collection of radio units that normally communicate with each other in an EDACS trunked system. SCAT ............................................................ Single Channel Autonomous Trunking is the name of a trunked system consisting of a single Failsoft repeater and a Downlink GETC. SIM ............................................................... See Site Interface Module. Site Interface Module ................................... The Site Interface Module provides an interface between a System Manager and the controlling GETC in a system that does not have a Site Controller. Working Channel.......................................... A Working Channel is any radio channel at an EDACS Trunked Site that is available or in use to carry trunked calls. 21 AE/LZB 119 1889 R1A PARTS LISTS PARTS LISTS SIM OPTION (Actual parts supplied depend on how option is ordered.) ITEM PART NO. DESCRIPTION EACH SITE DC AC ** REMOTE ** SIM ** POWERED POWERED SYSTEM MODEM SITE SITE MANAGER SHELF 1 SXK 107 3826 *** SIM Shelf Assembly *** 1 ------------ ------------ ------------ ------------ 2 KEP 813 72 *** Controller Module Assembly *** 1 ------------ ------------ ------------ ------------ 3 RPM 113 2514 SIM Programming Cable 1 ------------ ------------ ------------ ------------ 4 19D903880P161 SIM BSL Cable 1 ------------ ------------ ------------ ------------ 5 19C327027G10 DC Fuse Panel (DC Powered Site) ------------ 1 ------------ ------------ ------------ 6 RPM 113 2511 SIM Power Cable (DC Powered Site) ------------ 1 ------------ ------------ ------------ 7 19A704647P11 Power Supply, 12 Vdc (includes power cord for 120 Vac) ------------ ------------ 1 ------------ ------------ 8 RPM 113 2512 SIM Power Cable (AC Powered Site) ------------ ------------ 1 ------------ ------------ 9 19A149786P6 Modem, ZyXEL model U-1496, 120 Vac (includes power cord and step-down transformer for 120 Vac) ------------ ------------ ------------ 1 ------------ 10 SXA 120 4255 Retaining Bracket, SIM Modem ------------ ------------ ------------ 1 ------------ 11 RPM 113 2485 SIM Modem Cable ------------ ------------ ------------ 1 ------------ 12 SXA 120 4256 SIM Modem Shelf, sheet metal only ------------ ------------ ------------ ------------ 1 --- NTM 2011084 Shelf Support Kit ------------ ------------ ------------ ------------ 1 13 19C336871P1 Blank Panel, 1 3/4 inch ------------ ------------ ------------ ------------ 1 ** A single SIM Modem Shelf is required for an AC Powered Site and/or a Remote System Manager. *** Further breakdown of this part is shown in another parts table. SHELF SUPPORT KIT NTM 2011084 ITEM QTY 22 PART NO. DESCRIPTION A 2 SXA 120 4303 Bracket, Support, SIM Shelf B 2 SXA 120 4230 Bracket, Support, SIM Modem Shelf C 5 SBA 120 040/0080 Screw, M4x8 D 7 SCL 100 136/24 Lock Washer, M4, External Tooth E 7 SCA 101 040/03 Flat Washer, M4 F 2 SBM 146 040/03 Nut, M4 PARTS LISTS AE/LZB 119 1889 R1A 23 AE/LZB 119 1889 R1A PARTS LISTS SIM Shelf Assembly SXK 107 3826 ITEM QTY PART NO. DESCRIPTION 1 1 SXA 120 4207 SIM Shelf, sheet metal only 2 1 BKV 301 216/02 Fan, 12 Vdc 3 4 80/SBA 120 035/0120 Screw, M3.5 x 12 4 4 SCA 101 035/03 Flat washer, M3.5 5 4 SCL 100 130/24 Lock washer, M3.5 6 1 RNV 259 220/2 Connector, housing 7 2 SND 205 10/1 Connector, contact 8 1 SXA 120 4214 Cover, sheet metal 9 30 86/SBF 226 035/0060 Screw, M3.5 x 6 10 1 RMF 908 1003/1 Switch, rocker 11 1 RPM 113 2513 Cable, power switch 14 2 SEV 403 06/1 Card Slide 15 1 ROA 117 2244 Backplane Assembly 16 14 86/SBF 226 035/0080 Screw, M3.5 x 8 17 1 ROA 117 2246 Power Module Assembly 18 4 80/SBA 120 035/0060 Screw, M3.5 x 6 19 4 SCL 100 136/24 Lock washer, external tooth, M4 15 16 11 14 6 7 1 2 3 4 5 17 18 19 10 24 9 8 PARTS LISTS AE/LZB 119 1889 R1A CONTROLLER MODULE ASSEMBLY KEP 813 72 ITEM QTY PART NO. DESCRIPTION 1 1 SXA 120 4185/2 Controller Chassis, sheet metal only 2 1 ROA 117 2204 *** Controller Board Assembly *** 3 1 ROA 117 2245 SIM Interface Board Assembly 4 1 ROA 117 2253 SIM Display Board Assembly 5 12 SBA 123 030/0060 Screw, M3 x 6 *** Further breakdown of this part is shown in another parts table. 5 5 5 4 3 1 2 5 5 CONTROLLER BOARD ASSEMBLY ROA 117 2204 (Partial Listing) ITEM QTY PART NO. 5 D40 DESCRIPTION D20 D20 1 RYT 919 6001/2 IC, DRAM, 1Mx32 D40 1 RON 107 763/1 IC, Flash EPROM 25 AE/LZB 119 1889 R1A INTERCONNECTION DIAGRAMS Repeater Cabinet for Channel #1 - Enhanced Basic EDACS Site (AC Powered) AC Power Strip SIM Modem Shelf Audio Data Link to Remote System Manager (Over 50 Feet) ZyXEL Modem Phone Cable (Customer Supplied) Leased Line Power Jack DTE/EIA-232D SIM Modem Cable RPM 113 2485 DC Data Link to Local System Manager (Within 50 Feet) DC Power Supply DC or AC X4 X10 X14 J4 Programming Cable RPM 113 2514 EDACS Interface Panel DWNLINK DATA Downlink to CEC / IMC Switch BSL / FSL to Serial Module in Next Cabinet In Same Row BSL / FSL to Serial Module in First Cabinet In Next Row J14 Downlink GETC J1 SERIAL MODULE J1 J2 Power Cable (Part of Power Supply) SIM Power Cable RPM 113 2512 SIM RS-232 Cable (Customer Supplied) 20V Xfmr Power Cable with 20V Transformer (Comes with Modem) TB10 J102 To PC or Terminal (Customer Supplied) TB10 EDACS Repeater J14 J13 J12 J9 J8 J7 Station GETC J102 J10 DC Power Supply J801 AC MASTR III Repeater P102 PA F801B J10 DC Power Supply J801 EDACS Repeater Station GETC J102 AC MASTR III Repeater P102 PA Interconnection Diagram Enhanced Basic EDACS Site (AC Powered) 26 F801B INTERCONNECTION DIAGRAMS AE/LZB 119 1889 R1A Interconnection Diagram Enhanced Basic EDACS Site (AC Powered) 27 AE/LZB 119 1889 R1A INTERCONNECTION DIAGRAMS Repeater Cabinet for Channel #1 - Enhanced Basic EDACS Site (DC Powered) SIM Modem Shelf Audio Data Link to Remote System Manager (Over 50 Feet) ZyXEL Modem Phone Cable (Customer Supplied) Leased Line Power Jack DTE/EIA-232D SIM Modem Cable RPM 113 2485 or DC Data Link to Local System Manager (Within 50 Feet) Inverter DC AC 20V (Not Currently Available) Xfmr SIM RS-232 Cable (Customer Supplied) X4 X10 X14 J4 DWNLINK DATA BSL / FSL to Serial Module in Next Cabinet In Same Row BSL / FSL to Serial Module in First Cabinet In Next Row J14 Downlink GETC J1 SERIAL MODULE J1 J2 TB10 J102 To PC or Terminal (Customer Supplied) TB10 EDACS Repeater DC Fuse Panel J14 J13 J12 J9 J8 J7 Station GETC J102 J10 MASTR III Repeater P102 PA EDACS Repeater DC Fuse Panel Station GETC J102 J10 MASTR III Repeater P102 PA Interconnection Diagram Enhanced Basic EDACS Site (DC Powered) 28 SIM Power Cable RPM 113 2511 Programming Cable RPM 113 2514 EDACS Interface Panel Downlink to CEC / IMC Switch Power Cable with 20V Transformer (Comes with Modem) DC Fuse Panel INTERCONNECTION DIAGRAMS AE/LZB 119 1889 R1A Interconnection Diagram Enhanced Basic EDACS Site (DC Powered) 29 AE/LZB 119 1889 R1A INTERCONNECTION DIAGRAMS Equipment Cabinet - Enhanced SCAT Site (AC Powered) AC Power Strip SIM Modem Shelf Audio Data Link to Remote System Manager (Over 50 Feet) ZyXEL Modem Phone Cable (Customer Supplied) Leased Line Power Jack DTE/EIA-232D SIM Modem Cable RPM 113 2485 DC Data Link to Local System Manager (Within 50 Feet) DC Power Supply DC or AC X14 J4 X4 X10 Programming Cable RPM 113 2514 EDACS Interface Panel DWNLINK DATA Downlink to CEC / IMC Switch J14 Downlink GETC J1 SERIAL MODULE No Connection No Connection J1 J2 TB10 J102 To PC or Terminal (Customer Supplied) TB10 SCAT EDACS Repeater J14 J13 J12 J9 J8 J7 SCAT GETC J102 J10 30 DC Power Supply J801 AC MASTR III Repeater P102 PA Interconnection Diagram Enhanced SCAT Site (AC Powered) Power Cable (Part of Power Supply) SIM Power Cable RPM 113 2512 SIM RS-232 Cable (Customer Supplied) 20V Xfmr Power Cable with 20V Transformer (Comes with Modem) F801B INTERCONNECTION DIAGRAMS AE/LZB 119 1889 R1A Interconnection Diagram Enhanced SCAT Site (AC Powered) 31 AE/LZB 119 1889 R1A INTERCONNECTION DIAGRAMS Equipment Cabinet - Enhanced SCAT Site (DC Powered) SIM Modem Shelf Audio Data Link to Remote System Manager (Over 50 Feet) ZyXEL Modem Phone Cable (Customer Supplied) Leased Line Power Jack DTE/EIA-232D SIM Modem Cable RPM 113 2485 or DC Data Link to Local System Manager (Within 50 Feet) Inverter DC AC 20V (Not Currently Available) Xfmr SIM RS-232 Cable (Customer Supplied) X14 J4 X4 X10 DWNLINK DATA J14 Downlink GETC J1 SERIAL MODULE No Connection No Connection J1 J2 TB10 J102 To PC or Terminal (Customer Supplied) TB10 SCAT EDACS Repeater DC Fuse Panel J14 J13 J12 J9 J8 J7 SCAT GETC J102 J10 MASTR III Repeater P102 PA Interconnection Diagram Enhanced SCAT Site (DC Powered) 32 SIM Power Cable RPM 113 2511 Programming Cable RPM 113 2514 EDACS Interface Panel Downlink to CEC / IMC Switch Power Cable with 20V Transformer (Comes with Modem) DC Fuse Panel INTERCONNECTION DIAGRAMS AE/LZB 119 1889 R1A Interconnection Diagram Enhanced SCAT Site (DC Powered) 33 Ericsson Inc. Private Radio Systems Mountain View Road Lynchburg, Virginia 24502 1-800-528-7711 (Outside USA, 804-528-7711) AE/LZB 119 1889 R1A Printed in U.S.A.