1
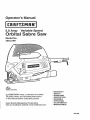
Operator's
5.0 Amp
IVlanuan
Variable Speed
Orbital Sabre Saw
Model No.
320.2190
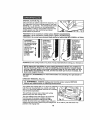
z_ CAUTION
Read, understand and follow
all Safety Rules and Operaling Instructions
in this Manual before using this product
Sears Brands Management Corporation
Visit our Craftsman webslte: wwwocraflsmanocom
. WARRANTY
• SAFETY
• UNPACKING
• DESCRIPTION
• ASSEMBLY
, OPERATION
, ADJUSTMENTS
• MAINTENANCE
9-8-06
Warranty ..................................................
Page
2
Safety Symbols ...............................................
Safety Instructions
..........................................
Glossary of Terms ...........................................................
Page
Pages
Pages
3
4-9
9-10
Unpacking .................................
Pages 10-11
Description
....................................................
Pages 11-12
Assembly
......................................................
Pages 13-14
Operation ............................................................
Pages 14-20
Maintenance ............................................................................
Pages 20-21
Accessories ...............................................................................
Page 21
Exploded View and Part List ................................................................... Page 22-23
Seats Repair Parts Phone Numbers ................................................... Back Cover
CRAFTSMAN
FULL WARRANTY
ff this Craftsman product fails to provide complete satisfaction within one
year from the date of purchase, return it to any Sears store, or other
Craftsman outlet in the United States for free replacement
This warranty does not include expendable parts such as blades
This warranty applies for only 90 days from the date of purchase if this
product is ever used for commercial or rental purposes.
This warranty gives you specific legal rights, and you may also have other
rights which vary from state to state.
Sears. Roebuck and Co, Hoffman Estates, IL 60179
Z_ WARNING: Some dust created by using power tools contains chemicals
known to the state of California to cause cancer and birth defects or other
reproductive harm
SAVE THESE INSTRUCTIONSI
READ ALL INSTRUCTIONST
The purpose of safety symbols is to attract your attention lo possible dangers,
The salely symbols, and the explanations with them, deserve your careful attention
and understanding, Tile symbol warnings DO NOT by themselves eliminate any
danger.The instructions and warnings they give are no substitutes for proper accident
prevention measures
'T
menusl, Including all safety alert symbols such as "DANGER","WARN1NG'"
end
BEFORE
saw,and
Failure
to followellellsafety
instructions
listed inbelow
I "CAUTION",
Z_ WARNING:
BE using
SURE this
to reed
understand
instructions
this
may result in electric shock, fire and/or serious personal injury=,
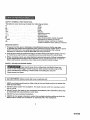
SYMBOL
I
|
MEANING
SAFETY ALERT SYMBOL: IndicatesDANGER, WARNING,
OR
CAUTION_ May be used in conjunction with other symbols or plctogrsphso
DANGER: Failure to obey this safety warn|ng WILL result in
death or serious Injury to yourself or to others, Atweys follow
the safety precautions to reduce the risk of tire, electric shock
end personal Injury.
] _WARNING]
Failure to obey this safety warning CAN result In death or
serious Injury to yourself or to others,, Always follow the safety
precautions to reduce the risk of fire, electric shock and
personel injury.
l z_ CAUTION
Failure to obey this safety warn?ng MAY result in persona!
Injury to yourself or others or property damage, Always follow
the safely precautions to reduce the risk of ffrs, electric shock
and personal injury,
t
l
l
l
DAMAGE PREVENTION AND INFORMATION MESSAGES
These [ofotm user of fmportent Information end/or instructions that could lead to
equipment or other properly damage i! not followed Each me.,;sage Is preceded by tits word
"NOTE:" ae }n the example below:
NOTE: Equipment andlor property damage may resull Lr these tnatructlona
not followed,
WEAR
are
!
!
YOUR
in foreign objects being thrown Into your eyes, which can
result In severe eye damage, Before beginning power tool
operation, ALWAYS wear safety goggles or safety glasses
with side shield and a full-face shield when needed.We
recommend
Safety
Meek
for use
z_WAFINtNG: a Wide
The Vision
operation
of any
sabre
sawover
con result
eyeglasses or standard safety glasses with side shield,
available at Sears Stores or other Craftsman Outlets,
9-8-06
1
before using
sabre
to follow
i manual
Z_WARNING:
BEthis
SURE
to saw,
read Failure
and understand
result In eleclrlc shock, fire and/or serious personal
WORK
t
AREA
all instructions
Instrucllons in
may
all
this
injury.
J
|
SAFETY
Keep your work area clean and well lit, Cluttered workbenches and dark areas
invile acctdenls,
2. DO NOT operate power Iools In explosive almospheres,
such as in Ihe presence
of flammable liquids, gases, or dual Power lools create sparks which may ignite
the dusl or fumes,,
3, Keep bystanders, children end visitors away while operating a power tool,,
Distractions can cause you to lose control.
4 Make your workshop chlldproof
tools away when nol in use,
with padlocks and master switches
Lock
5 MAKE SURE the work area has ample lighting so you can see the work a_d lhal
there are no obstructions that will interfere wilh sale operation BEFORE using your saw
PERSONAL
SAFETY
1 KNOW your power tool Read the operator's manual carefully. Learn the saw's
applications and limitations, as well as the specific potential hazards re_ated to this Ioo[
2, STAY ALERT, wafcil what you are doing end use common sense when operaling
a power tool
3 DO NOT use tool while tired or under lhe Influence of drugs, a!cohol or medication
A moment o! Inattention while operating power tools may resull in serious personal
injury..
4 DRESS properly. DO NOT wear loose clothing or jewelry. Puil back long hair, Keep
your hair, clolhing, and gloves away from moving parts. Air venls oilsn cover moving
arts and should also be avoided, Loose c!otbing, jewelry or long hair can be caught
moving paris,
5 AVOID accidenlal alerting. Be sure swtlch is in "OFF" postlton before
plugging in. DO NOT carry fools with your linger on the switch, Carrying tools
with your finger on lhe switch or plugging in tools that have the switch in the
"ON" position inviles accidents,
6 REMOVE adjusting keys or wrenches bolero turning the lool "ON". A wrench
thai is left allaehed lo a rotating part of the lool may resull in personal injury,
7 Do riot overreach, Keep proper footing and balance at all times. Proper footing
and balance enables better control o! Ihe loo! tn unexpecled situations.
8 ALWAYS SECUREYOUR WORK. Use clamps or a vise to hold work when practical
I1is safer than using your hand and frees both hands to operate feel
g USE SAFETY EQUIPMENT, Always wear eye proteclton. Dust mask, non-skid safety
shoes, hard hat. or hearing protection musl be used for appropriate condilions
10 DO NOT USE ON A LADDER or unstable support, S_able footing on a solid surface
enables belter conlrel o! the too! in une×pecled situations
TOOL
USE AND
CARE
SAFETY
,_WARNING:
BE SURE to read and understand all Instructions before
operating this saw. Failure to follow all Instructions listed below may result in
electric shock, Ilre and/or serious personal Injury.
ALWAYS use clamps or other practical ways to secure and support the
workplace to a stable platform,, Holding the work by hand or against your body is
unstabts and may lead to loss of control
2 DO NOT force the tool.Use the correct tool and blade for your application,,
The correct toot and blade witl do Ihe job better and safer al the rats for whicil it is
designed
3, DO NOT use the tool it switch does not turn tl "On" or "Off", Any tool thai cannot
be controlled with the switch is dangerous and must be repaired
4 DISCONNECT the plug from the power source before making any adjustments,
changing accessories or storing the toot. Such preventive saiety measures reduce
the risk of starting the tool accidentally,
5 NEVER leave the tool running.
comes to a complete stop
ALWAYS turn It oil DO NOT {save the tool unlIl It
6 STORE idle tools out of the reach of children and other untrained persons.
Tools are dangerous in the hands of untrained users.
7 MAINTAIN tools with care. Keep cutting tools sharp and clean, Properly maintained
tools with sharp cutting edges are less Jikely to bind and are easier to control,
8 CHECK for mlsaltgnment
or btndlrtg of moving parts, breakage of parts, and any
other condition that may attect the tool's operation. If damaged, have the tool seP.,iced
before using Many accidenls are caused by poorly malnlained tools.
9 USE ONLY accessories
that are recommended
for this tool. Accessories that may
be suitable for one tool may become hazardous when used on another tool.
10 Keep handles dry. clean.and free from oil and grease
ELECTRICAL
I
SAFETY
_WARNING:
Do not
fingers
to touch the termlnals
installing
or removing
the permft
plug in_m
1he outlet,
1 Double insulated tools are equipped with a
polarized plug (one blade is wider than the other).
This plug wilt fit in a polarized outlet only one way.
_tthe plug does not fit luliy in lhe outlet, reverse the
plug. if i_still does not fil, conlact a qualified electrician
1o inslalf a polarized outlet Do not change the plug in
any way..
2. DoubIe _nsu_aIIon_]e[imlnates the need for the
three-wire grounded power cord and grounded power
suppty system. Applicable only to Class II
(double-insulated} toots This sabre saw Is s double
insulated tool
of plug when
co.o,
ll [l
9-8-06
17235
ELECTRICAL
]
SAFETY conL
_WARNING:
Doubte insulation
precaul[ens
when operating
this IDol.DOES NOT take the place of normal safety
3,, BEFORE plugging in the tool. BE SURE that the outlet voltage supplied is within Ihe
voltage marked on the tool's data plate. DO NOT use "AC only" raled too_s with a DC
power supply.
4 AVOID body contact wllh grounded surlaces, such as pipes, radiators, ranges and
relrigeralors
There is an increased risk of electric shock it your body is grounded
5. DO NOT expose power tools to rain or wet conditions or use power tools In wet
or damp locations. Water entering a power tool wit] increase the risk of electric shock,
6 INSPECT tool cords for damage. Have damaged tool cords repaired at a Sears
Service Cen!er. BE SURE to stay constantly aware of the cord ioca_ion and keep it wel!
away tram the moving blade
7 DO NOT abuse the cord. NEVER use the cord to carry the idol by or pull the plug
lmm the ouUeL Keep cord away from heal, oil, sharp edges or moving parts. Replace
damaged cords immediately. Damaged cords increase the risk of e_ectric shock.
EXTENSION
CORDS
Use a proper extension cord. ONLY use cords listed by Underwriters Laboratories (UL)
Other extension cords can cause a drop in line voltage, resu][ing in a loss of power and
overheating of IDoL For this 1ool an AWG (American Wire Gauge) size of a! teas!
14-gauge is recommended for an exlensfon cord of 25°ft or Jess in length. Use 12-gauge
for an extension cord el 5g-it, Extension cords 100-I1. or longer are not recommended°
Remember, a smaller wire gauge size has greater capacity than a larger number
(14-gauge wire has more capacity than f6-gauge wire; 12-gauge wire has mare capacity
than 14-gauge) When in doubt use Ihe smalter number,
When operating a power Iool outdoors, use an outdoor extension cord marked "W-A" or
"W". These cords are rated for ouldoar use and reduce the risk of electric shock
CAUTION: Keep the extension cord clear of the working area, Position the /
cord so thai It wlll not gel caught on lumber, tools or other obstructions while you
are working with e power tool.
Z_WARNING:
Check extension cords before each use. If damaged replace
immediately,, Never use tool with a damaged cord since touching the damaged
area could cause electrical shock, resu!llng In serloua Injury,
]
J
/
SAFETY SYMBOLS
FOR YOUR TOOL
s
Vo_t
.........................................
V
The label on your tool may include the following symbols,.
A ...............................................
Hz .......................................................
W ..................................................
mtn ......................
i ...............................
Amps
Hedz
Walls
Minuies
...............................................
_ __-= ..................................................
no ........................................................................
_J .......................................................
Jmln
.....................................
Z_ .................................................................
Alternaltng current
Direct currant
NoJoad speed
Class il construction Double Insulated
Revolulions or Strokes par minute
Indicates danger, warning or caution
It means attention! Your salety is Involved
SERVICE SAFETY
t If any part of Ihls saw is mFsstng or should break, bend, or fall in any way;
or should any elsclrlcal component fall to perform properly: SHUT OFF the power
switch and remove tile saw plug from the power source and have the missing.
damaged or fa+Fedparts replaced BEFORE resuming operation
2 Toot service must be performed only at a Sears Parts and Repair Center° Service
or maintenance pedormed by unqualified personnel could result in a risk el injury
3+When servicing a too!, use only' identical replacement
parts, Follow Inslructtons
in the maintenance
section of this manual. Use of unauthorized parts or failure to
fellow maintenanc_ instructions may craale a risk of electric shock or injury
SAFETY RULES FOR SABRE SAWS
_Keep
hands away from cutting area and blade+ Keep one
hand on the handlellrigger
switch and your other and on the front, top of the
saw's handle/meier housing. If both hands ere holding the saw, the
blade cannot cul them+
I Z_ CAUTION:
Blades coast after saw is switched off.
I
|
!
t
KEEP your body positioned
with the saw blade,
to eilher
2 DO NOT reach under the workplace.
saw is cutting
side of the saw blade and not In direct line
The blade extends under the workplace when
3 DO NOT touch the blade or the workplace immediately
be ex!remely hot and could burn your skins
4 DO NOT cut an oversized
after operation;
they may
workplace+
5. CHECK for the proper clearance under the workplace before cutting so thai lha
blade will not strike the workbench or malerial under the workplace..
9-8-06
SAFETY RULES FOR SABRE SAWS conL
6 MAKE SURE the blade is not contacting the workplace
turned on_
before the switch is
7 HOLD TOOL by insulated gripping surfaces (handles) when performing an
operation where the cutting tool may contact hidden wiring or its own cord.
Contact with a "live" wire will make the exposed metal paris ol the tool "live r and
shock Ihe operator.
8 SECURE MATERIAL before cutting,. Never hold a workplace in your hand or
across your legs,. Small or thin material may flex or vibrate with the blade,
causing loss of control°
9 When ripping, ALWAYS USE n rip fence or straight edge guide° This improves the
accuracy of the cut and reduces the chance o! the blade binding.
10 NEVER cut more than one piece at a time. DO NOT STACK more than one
workpieee on the worktable at a time.
1! AVOID awkward operatlons and hand positions where a sudden slip could
cause your hand to move into the blade
12 NEVER reach into the culling path of the blade.
13 BLADE GUIDE ROLLERS must SUpport ihe blade when cutltng The toilers must rest
against the back edge of biade THE ONLY cutting operallonwhen rollers DO NOT
support the blade is the scroIfing mode, WHEN SCROLLING the blade must swivel as
it is guided 1o follow scroff patterns. ALWAYS move the base back and blade guide up
and back away from biade in scrolling mode
14 ALAWYS use blades that llave the correct size and shape Blades that do nol match
Ihe mounting hardware of tl_g saw will run erralically and will cause toss of control
15 ALAWYS BE SURE that oil adjusting screws and the blade holder are [aslened tightly
BEFORE making a cut. Loose adjusting screws can cause the tooi lo slip and loss o!
control may result
i_ WARNING: Use of this tool can generate dust containing chemicals known
to cause cancer, birth defects or other reproducltve harm Some examples of these
chemicals are:
" Lead from lead-based paints.
, Crystalline silica from bricks and cement and ottler masonry products..
, Arsenic and chromium, from chemicaify Ireated lumbar.
Your risk from these exposures varies, depending upon how often you do this type
of work.To reduce your exposure to these chemfcals:
, Work in a well-venlilaled area,
• Work wflh approved safely equipmst_t, such as those dust masks that are specially
designed to liller out microscopic particles
Avoid prolonged contact wlth dust from power sanding, sawing, grinding, drilling
and other construction activities.Wear protective clothing and wash exposed areas
wilh soap and water.
Allowing dust to get into your mouth, eyes. or lay on the skia may pmmole absorption of
harmtul chemicals,
cause serious and permanent respiratory or other Injury Always use NIOSHiOSHA
approved
respiratoryUse
protecllon
appropriate
tar the
dust disburse
exposure.dust,
Direct
particles
Z_ WARNING:
of this tool
can generate
and;or
which
may
away from face and body,
ADDITIONAL
RULES
FOR SAFE OPERATION
,_ WARNING: BESURE
follow all Instructions
personal Injury_
to read and understand ell instructions. Failure to
/
listed below may result in electric shock, fire and/or serious
J
t Know your power tool. Read operator's
manual carefully. Learn the applications
and ffmttat_ons,as well as the specific potential t_azards related to this laal Following
tilis rule wilt reduce the risk at electric shock, fire or serious Injury
2 ALWAYS wear safety glasses or eye shields when using this saw. Eve_day
eyeglasses have only impacFresistant lenses; they are NOT safety gtasses.
3 PROTECT
your lungs., Wear a face mask or dust mask it the operation is dusty
4, PROTECT your hearing. Wear appropriate personal hearing protection during usa
Under some conditions noise from this product may contribute to heating toss
5 ALL VISITORS AND BYSTANDERS
operator o! lbe saw wears.
MUST wear the same safely equipment that 1he
6 INSPECT the too! cords periodically
and tl damaged have them repaired at your
nearest Sears Service Center, BE AWARE of the cord location,,
7, ALWAYS check the tool for damaged parts,, Before further use of the tool a guard or
other part tbal is damaged should be carefully checked to dete`rmlne if it wtlt operate
properly and perform its inlended function. Check for misalignment or binding of
moving parts, breakage of parts, and any artier condil{on that may aifect the tool's
operalion. A guard or ether part that is damaged should be properly repaired or
replaced at a Sears Service Center.
8 INSPECT and .remove all nails lrom lumber before sawing_
9. SAVE THESE INSTRUCTIONS, Refer to them frequently end use them to instruct
others who may use lhts tool,. If someone borrows this tool, make sure they have
these Instructions
also.,
Saw Blade Path
The area over, under, behind or in lmnI el the blade, as it applies to the workpiece That
area which will be or has been cut by the blade,,
Set
The distance that the saw blade tooth is bent (or set) outward from the face of the blade
Strokes per Minute or Stroke Speed
The blade speed o| a sabre saw, which can ba varied, us_a!_y from 800 to 3000 strokes
per mlnule
Cross cut
A culling or shaping operation made agatns! lhe grain el the work piece
Bevel Cut
A cutting operation made wilh Ihe blade al any angle other than 90 ° lo lhe base
Ripping or Rip Cut
A cutting operation along the length el Ihe werkpiece
9-8-06
17235
Freehand Cul
Performing a cut wiflloul using a fence, miter gauge, fixture, work clamp, or other proper
device to keep the werkpiece from twisltng or movtng during the cut
Orbital Sawing
tn addition to the up and down movemenl of a sabre saw's blade, there ts orbtlal action
which ihrusts lhe blade forwa_d on the culling stroke and greal]y increases the culling
speed over convenllonal sabre saws
Scrolling
Allows the blade to swivel for tn|ricate pattern cutting
Through Sawing
Any cutting operation where the blade extends completely through the thickness of lhe
workpiece
Kerr
The mateflal removed by the blade in a through cut or the slot produced by the blade in a
non-through or partial cut,
Workplace or Meferlal
The item on which the coiling operation is being done. Tl_e surfaces of a workplace a_e
commonly referred to as faces, ends and edges
Gum
A sticky, sap-based residue kern wood products,
Restn
A sticky, sap-based substance
that has hardened
when you are assembling
parts, making adjustments, Installing or removing
blades,
cleaning
or Your
when saw
It is should
not in use..
Disconnecting
the tosaw
prevenl
Z_ WARN
ING:
NEVER
be connected
the wll]
power
source
accidental starling, which could cause serious personal lnJu_.
I The Two Blades are stored in lhe blade storage ¢_,.ompartmen!located in lhe rear el Ihe
saw's base
2. The Vac Adapter is attached to the saw
3 Carefully rift the saw out of the color box and place on a stable flat surface
4 Inspect the saw carefully to make sure Ihat no breakage or damage has occurred
during shipping., if any of the items mentioned are missing (refer lo Fig, 1 on page
11) return ihe saw to your nearest Sears slore or Craftsman outle! to have the saw
replaced
z_ WARNING:
If any parts are broken or missing, DO NOTattempt to plug
In the power cord or operate saw until the broken or missing pads are replaced.
Failure to do so could result in possible serious InJury_
10
]
/
(Fig. 1)
2,,Two wood cutting blades
(stored in blade
storage compartment)
_
1oSaw
3_Vacuum Adapter
(attached Io saw)
4, Carry bag
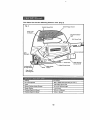
KNOWYOUR
SABRE SAW (Fig, 2)
NOTE: Before
altempttng
to use
your saw, femlflarlze yourself with all of the
operating
features
and safety
requirements,
1
Your sabre saw has a precision buflt electric motor and it should only be connected to a
120-volt. 60-Hz AC ONLY power supply (normal household c_n'ent), DO NOT operate on
direct current (DC). This large vcllaga drop will cause a loss of power and the motor will
_verheat. If the saw does not operate when plugged into a correc1120-volt, 60-Hz AC
ONLY curtal, check the power supply This saw has an 8Jr, 2_wire power cord (no adapter
needed),
This Sabre Saw has lhe following features:
t, 5.0 Amp, Variable Speed Motor, 800 lo 3000 SPM strokes per minute
(no-load speed).
2 Variable Speed is conlroiled by the speed dial located on the lop trent of the trigger
switch handle
3 3 Poslllon Orbital Action
4 Blade Guide Support Roller provides added blade control 1_/I6 inch bIade stroke
tot smooth culling,
5, Durable Epoxy Coated Steel Base glides smoothly over workplace., Bevel scale for
easy adjustments,
6 Bevel Culling Capacity 0 ° to 45" left and right.
7, Quick Blade Changes with No Tools_
8 LED Workllght illuminates culling area
9 "LlveTool Indicator" Light is green when saw is plugged into power source
t0 Extended Length Trigger Switch with Power Lock-On Button.
It
Sawdust RemovahVacuum
adapter on bottomof saw attaches to 11/,_.inchadapter
and then to weVdry vac (both sold separately) tor removal of sawdust and chips Item
the cutting area
12, Permanently Lubrfcated 100% Ball Bearings lor smooth operation,
13 Includes carry bag lor easy carrying and storage.
long tile,
11
9-8-06
This
Sabre
Ffg
Saw has
the following
features:
conto
(Ftgo 2)
!
2
Variable Speed Di,_f
On/Off Triggor .,Sw_t_h
8-ll. Power Card
.•.,;7__-,_'_
T,
RaIlng
....
No Losd Speed
H
'
5.0 Amps .................................................
B0O - 3000 SPt-,_ (slrokes
Input
120-vottm
Bevel Cutting
Blade Slmke
Angle
Range
60-Hz
c,,i,_ D_'hi_
Weed
Culling
Deplh
in Steel
AC
.....
0." !0, 45 _ left and right
11116-Inch
"I!4-tn,
12
(6ram)
per rain,)
........
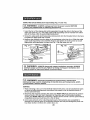
BLADE STORAGE (Ftg_ 3 and 4)
Your sabre saw comes wtlh 2 wood culling blades that are stored In the blade storage
compartment _cated on the very back of the saw under Ihe power cord inlet (see Fig 3),,
To open blade sloraga door. remove the vae adapter tube (see Fig.,4) Lift the vac adapter
tube up stight]y (io release qab from base plate) and pull vac adapter tube straight out to
remove, Pull tab on blade storage door down to open and turn saw upside down lo
_. y
Remember
to always
use the proper
blade for the material
T.b
Tobo
be
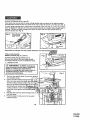
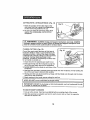
TOOL-LESS BLADE
INSTALLATION (Fig,, 5, 6 and 7)
Tool-less blade change allows you to
remove and replace the saw blade quickly
and easily without lhe use of addtllonal tools,,
1
Unplug thesaw
Z_ WARNING: ALWAYS unplug saw
from the power source before changing
blades or making any adjustments,
Fatlure to unplug the s_w _:outd result in
accidental starting whlch can cause
ser|ous personal injury,
Fig, 6
2, Turn lhe saw upside down so you can access
1o lhe blade clamp
3, Lift the tool-less blade.change lever
[Fig, 7a). then tnsert the blade
tool-less blade change holde= (Fig 7b), T_
teeth o! the blade should be_acing to Ih_fr
and pointing up (when saw i__g_e
uttt,,g
pes t onl,
addthe
4
5
must rest In the groove el the blade_g_lld_ _
rollers
'Releesalhetoot-lessblade_chenge
tevartc
lock the blade
Pull the blade to make sure it is securely
locked in place.
13
9-B-06
17235
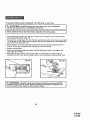
TOOL-LESS
BLADE
INSTALLATION
cent.,
6 Pull down on the blade 1o make sure the blade is securely locked in place
NOTE: For use with beth "T' and "U" shanked blades°
L_ CAUTION:
Once the blade Is tnstslfed in the saw, tt Is always exposed°
There is no lower blade guard° Use caution when hsndlfng the saw so that the
blade does not catch clothing, skin, etc. Each time you set the saw down take
care not to bend the blade,, Always set saw down on l_s side when blade is
Inslsfledo ALWAYS remove b|ade when saw ts not being used.
REMOVING THE BLADE
t
Unplug the saw.,
changing
I
blades or making shy adjustments. Failure to unplug the saw could
ALWAYS
saw cause
Item the
power
source Injury.
before
starting unplug
which can
serious
personal
I result
_ WARNING:
in accidental
2 Follow slops t through 4 on the tool-_ess blade inslaliatton
I
(see pages I3 and 14).
3 Carefully remove the blade (or change the blade}.
NOTE:When
storing your saw, ALWAYS remove the cutting blade,,
I
|
Rg,8
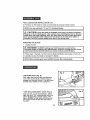
LED WORKLIGHT (Fig. 8)
Your sabre saw lies an LED woddlghl lhst
lurns "ON" automatically when the Saw tS
pfugged into a power source, The light
helps
provide easy visib{liiy el the culling !ine..
"LIVE TOOL INDICATOR "_LIGHT (Fig. 9)
Your saw has s "Live Toot Indicator Ygreen
light that turns "ON" automatically when the
saw is plugged into a power source. The
light is Iocaled on both sides of the base of
Ihe Iriggm'-swilch handle near the body of
lhe sew
14
POWER ON-OFFTRIGGER
1
2,
3
4.
SWITCH and POWER "LOCK-ON"
BUTTON
Connecl the plug of your saw to a standard household power outial
Start the tool by squeezing the on!elf trigger switch (see Fig t0)
To stop the toot. ferease the on/elf trigger swtlch,
To lock the onteff trigger swilch in lhe "on" position, press tdgger switch and white
holding it "on", press in the lock-on button, located on the }eft side of tt_e handle
(see Fig, 10}
5 The power tack-on button allows the operator to keep lhe sable saw running without
squeezing the trigger switcf_, This is useful for conlinuous sawing applications
6, To release the power lock-on button, press and release the _rigger swilch. This will turn
the tool off.
trigger
switch cannot
be lock-on
released.button is cont,nuousfy
I Z_
WARNING;
l' the
Fig,, 10
be,rig depressed,
FIg_ 1t
variable
the
!
___
S_ee
Power Lock.On Bulloll
ADJUSTING
THE CU rrlNG
.....
SPEED WITH THE VARIABLE
SPEED DIAL (Fig 11)
The variable speed lealure ef Ibis saw allows you to malcl_ the proper culling speed !o
the mafedal betng cut, enhancing the overall performance of your saw and helping to
save the blades from undue wear
The speeds can be adjusted Ifam 8001o 3000 SPM (strokes per minute) no*load speed,
by adjusting the variable speed dial tocaled on top of Ihe trigger switch handle,
The speed dial is numbered '1" Ihrough '_6".with number "1" the sfowasl speed and
number "6" the fastest speed (see Fig 1t}.
The proper blade speed will difler depending on lhe type and thickness of the werkptece
As a general rule, slower speeds are for denser materials and faster speeds are for soil
malerials
High speeds will allow you 1o cut workpieces taster, but blade life will be reduced
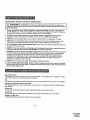
The Iollowlng charl can help you pick the proper speed
Workplace
1o be cut
Number
Wood
Mild Steel
Stainless Sleel
Aluminum
Plastics
on Variable
5-6
Speed
Dial
3-6
..........
i .........................................
3-4
3"6
2-5
Remember lo ALWAYS use the proper cutting blade for lhe cutting application and the
maledat you ere culling
15
9-8-06
17235
ORBffAL
ACTION (Fig. 12)
This saw t_asan orbital control [ever (see Fig. 12)
that regu_lates lhe Ihree cuf_ing modes of the saw,
Positions "!", _2" and "0". The orbital blade aciion
thrusts the blade forward on the cutting stroke
(see position t and 2), and greatly increases the
curling speed over the norma_ up and down
blade action of position 0
POSITION
POSITION
POSITION
Fig. 12
-
2 Is for maximum orbital action (MOST AGGRESSIVE)
1 is for minimum orbital action (LEAST AGGRESSIVE)
0 is normal up and down blade mellon of sabre saw (NO ORBITAL ACTION
POSITION 0
No Orbital Action
For normal up and
down actron in nil
materials,
Usa fine wood,
20 teeth per
inch, or
smooth metal
36 teeth
cutgng
per
Inch blade,
A
_j_
|
_
POSITION 1
Stow Orbital
AoUon
For minlmum
orbllal action.,
Ideal for
culling metal,
plastics,
hardwoods.,
POSITION 2
Fast Orbital
Action
For maxtmum
orbital so|ton
for the fastest
cutting In
plywood,
softwoods and
softer materials
suchas wallboard
Use blades _f
for wood
and metal
outltng with
10 - 12 tooth
per inch°
_
l
Use wood, mel_l
and wallboard
cutting biados
w[Ib 6, S, "_2loath
per inch.
ALWAYS test thecultlng modes on a piece of scrap matertai before making your finished cut
NOTE: Select the right blade for your culling application. Blades are available for
fine woodculflng, medium and last woodcutting, and fast metal or smooth metal
culling, A general guide to usa when selecting a blade is: The more teeth per inch
on the blade, the smoolher the cuts, end lhe Jess teeth per Inch on the blade, the
faster and rougher the culs,
See page 21, ACESSORIES,
the Job.
SAWDUST
for more Information
on selecting the right blade for
REMOVAL (FIg_ 13)
_making
WARNING:
ALWAYS
unplug saw
from the power
any adjustments
or attaching
accessories.
source BEFORE
tube thai can be attached 1o a woUdry vac hose
with a 1V4°lnch hose adapter and then to a wet/dry
vac (all said separately)..
This witl help remove dust, chips and curling
debris
awaysaw
from
the calting
Your sabre
comes
with aarea
_V,-Inch vac adapler i
The vac adapter tube will need to be removed
from the saw for access to blade siorage
compartment and when setting and cutting
Fig, 13
bevels.To remove the vac adapter lube, lift up to
release tab from saw's base and pull straigh_ ouL To re-attach, just slide back inio
posilton and engage tab
16
]
i
GENERAL
CUTTING TIPS
t, Always place _he best or "finished" side of your workplace "face down" So it does not get
scraped or abused white sawing ALWAYS CLAMP workplace securely betere sawing,
2 Draw your cutting lines, patterns or designs on the "backside lacing you This moans
they would be reversed or backwards from the way they will appear on the
'=finished" slde..
3 Always select the co=.rectblade type for your curling application
4 Place front edge el saw base on the material to be cut and line up the b_ade with your
culling line.
5 Hold saw I}_mly and _urn ii on Let blade reacll se_ecled speed before slafting cut,
6 Press down (to keep saw base flat against lhe workpiece) as ymz slowly push tI_e saw
in the direction of the cut
7 Gradually bultd up tile blade speed, cutting as close le the line as pessibte (unless you
want Io leave enough roam for finished sanding)
8, As you cut. you may need to repositlon tile vise or damps to keep lhe workplace slabte
9 DO NOT force the saw because the blade teeth may rub and wear wilhmd culling.
which may result in breaking the blade
10 Let lhe saw do most ot Ihe work
11 ALWAYS cut s!owly when following culves, so ff_eblade can cul lhro_gh cross grain
This wltt provide an accurate cut and will prevent Iho blade from wandering
I NOTE:
applywill
a steady
firmsaw
"DOWN"pressure
on theout
front
and workplace.
body of the
saw ss ALWAYS
you cut.This
keep the
blade from JUMP|NG
o! the
I
I
Z_ WA RNING:
ALWAYS clamp and support workplace securely. ALWAYS
maintain proper control of saw. Failure to clamp and support workplece and
loss of control el saw could result In serious injury,
CU"I-IrlNG METAL
When culling metal ALWAYS clamp down the metal workpiece and ALWAYS use a
METAL cutting blade. Be extremely careful 1o move the saw ve_ slowly as you cut, Use
the LOW speeds (Posi_ioa 1.2 or 3 on lha variable speed dial) Also use lhe "LOW"
position on the orbital control lever, DO NOT twisL bend or force lhe blade, if the saw
jumps or bounces as you cuL change to a blade with liner teelh, I! lhe blade begins le
clog when cutting soft metal, change Ioa b_ade with coarser teelh..
For easter cutting, _ubr$cale the blade wi[h a stick of culling wax (_l avatlabte) or cutting oil
when cutting steel, Thin melal should be sandwiched between two pieces o! wood or
tightly clamped on a single piece of wood (wood on top of the metal). Draw l!_e cul lines
or design on the lop piece ot wood,
When culling aluminum extrusion or angle iron. damp the work in a bench vise and saw
close to the vise jaws.
When sawing tubing with a diameler larger than the blade is deep. cut Ihrough the wall of
tile tubing and than insert the btada into the cul. rotating the tube as you saw
1 When cutting metals, a suitable coo_ing / cutting oil must be used.,
2 Spread the oit onto the btade or workpiece at regutar intervals during cutting in order- to
=educe wear or overheating of tile blade
3 Don't make bevel cut when cutting mela_
t Z_
WARNING: ALWAYS
making any adjustments
or
BEFORE
unplug saw from the power source
nllachlng accessories.
!
!
17
9-8-06
CUTTtNGWITH
A STRAIGHTEDGE
(Ftgo14)
1 Mark the pesiIion of the side edge of the
saw base and then clamp the straighledge
on the mark and paraliet to the cut.
2 As you cut, keep the saw base edge Itush
against llle straightedge and ttat on the
workptece
Z_ WARNING:
ALWAYS clamp and support workpiece securely, ALWAYS
malnlaln proper control of sew. Failure to clamp and support workplece and
lose of contro! of saw could result in serious Injury.
PLUNGE CUTTING
(Fig,15)
One of the most useful features of this type of
tool Is the abilify to start a cut anywhere on the
workplace surface - without the need of drilling
a starting hole, Plunge cutting is useful and limb
saving ter making rough openings in soil
materials, It makes it unnecessary to drill a ho_e
for an inside or pocket cut,
t Draw lines for lhe opening you want to cuL
2. Hold saw firmly and fitl It forward so only the
toe of Ille saw base reels on g_e workplace
3,, MAKE SURE that the blade is well clear o! the
workplace.
4. Slart the saw and then gradually tower the blade into the workplace, firmty holding lhe
tee el' the saw base to prevent side wobble.
5 Slowly pivot the saw downward like a hinge unlII the blade cuts through and tile base
rests flat on lhe workplece..
6 Begin sawing in the usual manner along the cut line.
I NOTE: DO NOT usa a scroll blade for plunge cutting
]
IMPORTANT; DO NOT try lo plunge cut into hard malefials, such as hardwoods like oak 1
or maple, or melats such as sleet.
1
TO MAKE SHARP
CORNERS
1 Cut up lo the corner, then back up s_ightly before rounding shor! of the corner
2 Attar the opening is complete, go back to each corner and cut from the opposite
direction to square it elf
18
TO ADJUST
BASE PLATE FOR BEVEL CUTI'ING (Ffgo 16 and 16a)
Z_
WARNING:
ALWAYS
unplug saw
from the
making
any adJuslmenta
or attaching
accessories.
' NOTE: ALWAYS remove the blade before adjusting
power source BEFORE
I
the cutting angle.,
1 After removing the blade from the saw. remove the vac adapter from under the base
(see Sawdust Removal, Page 16).
2 To adjust the cutting ang_a, first turn lhe tool upside down and use lhe hex key provided
on the power cord to loosen lhe hex screws that hold ,,he bfade guide rotlerstassemb_y
and saw base in p_ace (Fig 16)
3 Move the base ol the saw slightly ton,yard and tilt il to 1he desired angle between O"
and 45" left or right, using fhe scale marked on Ihe base bracket
4. install a cutt{ng blade
5 Slide lhe blade guide rollers/assembly
back edge of the blade
until the b_ade guide reliefs rest against lhe
6. Re-tighten the hex screws. For accurate work, it is necessary to make a trial cul.
measure the work, and reset the angle until the correct setting ts achieved (Fig 'f6a}
Z_ WARNING:
ALWAYS clamp and support workplace securely. ALWAYS
maintain proper control of saw. Failure to clamp and support workplace and
oss of control of saw could result In serous Injury.
I
J
19
9-8-06
17235
USING THE EDGE GUIDE (Sold separately)
I
(Fig, 17 and t7a)
_ WARNING:
ALWAYS unplug saw from the power source BEFORE
making any adjustments
or attaching accessories.
1
1 tnsed the bar of the edge guide (sold separately) lhrough the stets in the base of the
sabre saw (see Fig, '17). The edge guide (sold separately) can be inserted from either
side of the base, with the guide edge facing down,
2 Screw the edge guide (sold separately)
to tighten the edge guide bar in place
locking knob into the threaded hole in the base
3 Measure the distance from the edge of the workpfece lo lha line of cut. Slide the edge
guide (sold separately) to ll_ts desired distance and tighlen the locking knob _o secure
edge guide (sold separately) In place (see Fig t 7a) and make your cut,
Z_ WARNING:
ALWAYS clamp and supporl workpleee securely, ALWAYS
maintain proper control or saw. Failure to clamp end support workplace and
toss of control of saw could result in serious injury.
1
personnsl may result in misplacing of internal wires end components,
I Z_
WARNING: Preventive maintenance performed by unauthorized
could
which
cause a serious hazard,
J
|
SERVICE
t. When servicing a tool. usa oniy identical replacement parts. Use of unauthorized parts
or fatlure to follow mainlenance instructions may create a risk el electrical shock or
serious personal injury
2 Atl service that requires opening the sabre saw MUST ONLY be performed by a Sears
Service Center, All meier parts represent an Important part of the double insulation
system and MUST ONLY be serviced by a Seers Service Center Service performed by
unqualified personnel could result in a risk of injury
3 Avoid using solvents when c_eantng ptaslic parts, Most ptastics ere susceptibIe Io
damage from various types of commercfaf solvents and may be damaged by their use,,
Use clean cloths to remove dirt, carbon dust. etc,
2O
GENERAL
Z_
WARNING:
ALWAYS
cleaning
or performing
any
_
disconnect
maintenance, the tool from the power source
BEFORE
roleum-based products, penetrating oils, etc, came In contact with plastic
ts.
Chemicals can
weaken
plastic,
which may result in
WARNING:
Do damage,
NOT at any
lime or
let destroy
brake fluids,
gasoline,
Ious personal Injury.
It has been found that electric tools are subject to accelerated wear and possible
premature failure when they are used Io work on fiber glass boals and sports cars,
wallboard, spackffng compounds or piaster. The chips and grindings from these materials
are highly abrasive to electrical tool paris, such as bearings, brushes, commutators, etc.
Consequently. it is nol recommended that this tool be used for exlended work on any
tlbergfass malarial, wallboard, spackling compound or piaster During any use on these
materials, it is extremely important Ihat the tool is cleaned frequently by blowing with an
air jel.
shields during power fool
,_
WAR NING" Always
operations, or when blowing dusL tf operation is
wear safety goggles or safely glasses with side
dusty, also wear s dusl mask.
LUBRICATION
Att of the bearings [n _his too! ate lubricated with a sufficient amoun! of high_rada
lubrican[ for the life of the tool under normal operating conditions Theretore. no furfflar
lubrication is _'eqt_lred
I
WARNING:
I recommended
The use of attachments
or accessories
for this tool might be dangerous
l
that are not
and could result in serious Injury. I
Sears and other Craftsmen outlels have a large selection
blades designed for specific cutting applications.
of Craftsman
sabre saw
Sabre saw blades are available for super fine wood scrolling, and smooth, medium
and fast wood cutling_ Select metal cutting blades for fast or for smooth cuffing,
or knife blades designed to cut vinyl, laalher, rubber, cork and carpet.
There are special blades available for culling abrasive materials such as piaster
and wallboard, and most all blades are available in tndEvldual packs or variety and
assorted sets_
Sears and olher Craftsman outlets also offer safety equipment, sawhorses, work
stands, straight edges, cutting guides and a large selection of clamps to help you
with sit your sawing needs.
Visit your local Sears store or other Craltsman
outlets or shop wwwocraltsmamcom
21
9,8-06
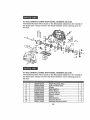
5,0AmpORBITAL
SABRE
SAW MODEL NUMBER 320.2190
The Model Number wilt be found on the Nameplate attached to the handle of
the Sabre Saw Always mention the Model Number when ordering parts for
this tool,,
5.0 Amp ORBITAL SABRE SAW MODEL NUMBER 320,2190
The Model Number will be found on the Nameplate attached to the handte of
Ihe Sabre Saw. Always mention the Model Number when ordering parts for
this toot,
1
2
3
4
5
6
7
8
3320276000
RRJ_g_
_oA_s_
33202750 _
Left Housin_Assv
2740101000
Stator
5700004000
Bal! Bearing.
3700491000s____,_Flash Board
__
4960015000
Carbon Brush
2600022000
Brush Holder
2750854000
Rqtpr
10
11
5610044000
2820114000
T_a,_p_0g_Screw
__
Bearina SuPport ASSY
22
:
ii
I
!
t
t
2
2
2
1
2=
3700214000Washer
Pendulum
17
18
2j__
_22
23
_24
25
26
27
__28
29
30
31
32
33
34
_335.o.38
37
.__3._8
....
39
40
41
42
43
44
45
46
47
48
49
50
51
52
53
54
55
56
57
58
Plate
Needle Bearinq.
Needle Pin
_
5700184000
{
{
3700147000
3550216000
{
i
5660004000
3520126000
Washer C
Gear
Gear Pin
Washer
For Shaft
Crank Roller
2820854000
Guiding Rod Set
....
3520060000
3520061000
3123014000
3660245000
4870099000
5610024000
3120234000
4540017000
3121733000
3121732000
3700231000
3124601001
561Q021Q,00...........
3650097000s
3660060000
3550194000
2821972008
3700164000
3550146000
3400175000
2821924000
3700232000
3700149000
5620011000 ........
5610106000
4900253000
3320385000
3121734000
3121682000
4930004000
3121037000
4810002598
2820752000
4360001000
3120470000
Block
Switch Lock
Switch
T_P#J,EgScrew
Cord Anchorage
' Indicator
Left Indictor Cover
Pendulum Lever
Pendulum Lever Shaft
Cover
Screw
Wire Guard
R£1[eroSupportSet
Located Pin
Base Plate Assy.
.31amj_Washer
Square Washer
Screw
Speed Ad._usto[
¢accum Adapter
indictor Cover
E31adeCover
Connecter
Cord Guard
Power Cord & Plug
Internal Wire ASSY 1
LED
)arent Guard
23
941,06
Your Home
For troubleshooting, product manuals and expert advice:
managemylife
wwwmanagarny[tfe,,com
For repair - in your home- of all major brand appliances,
lawn and garden equipment, or healing and cooling systems,
_iii!i:i:i:.i:i!
no matter who made it, no matter who sold itl
For the replacement parts, accessories and
owner's manuals that you need to do-it-yourself
For Sears professional installation of home appliances
and items like garage door openers and water heaters.
1-800-4-MY-HOME ® calIanytime,
dayornight
¸i! i iii
(1-800-469-4663)
_,.5eaTG
(U S,A andCanada)
COrn
W_P_,GOa]_'S
_Ca
Our Home
For repair of carry-in ilems like vacuums, lawn equipment,
and electronics, call anytime for lhe location of the nearest
Sears Parts & Repair Service Center
1-800.488-1222
_rW3N
(u SA)
1-800..469-4663
S_a rs,,com
(Canada)
www,srt_.,ca
_:;,::_:_ To purchase a protection agreement on a product serviced by Sears:
!-800-827-6655
......
(USA.)
!-800-361-6665
a domicilio, y para o_'denarpiezas:
1.800.LE.FOYER_C
(l-eSaq84-64ZT)
_" Re_g_,lerad
® Mnrca
Mmq_o
Trodematk
Repislro_Ja
I
TM
de, commerce
/
TM
Trodemlttk
of KCD IF
M_ _:n de F_b Ic_ de KCD
t u_ Mm_t_e
_
LLC in the U_e_
St_fes,
IP, LLC on E_Ia_o,_ Unidoe_
d_pr_s6e de Sears
(Canar_)
Btntt_,
LLC
:
seatsca
m Set_,_ 8ran_s,
o Seers
Bmr_dt;
LLC in elher
LLC tn elms
co[mldo
p_h=es