1
IMPORTANT
MANUAL
Do Not Throw
Away
Operator's
Manual
Model No.
358.795620
Always
Wear gye
Protection
SE_Ai_-_.._;/__
RRFTS.MI:iNo
.GASOLINE
HEDGE
TRIMMER
WARNING:
Read the Operator's Mandrel and
FoIlow All Warnings and Safety
Instructions.
Failure To Do So
Can Result in Serious Iujur_
S_rs,
530-082436-05/05/94
• Assembly
• Maintenance
• Operation
e Repair
Roebuc& and Ce., H_ff'mar_-Es_tes,
_
Parts
_9!?@4/SA
© 1994, Sears, Roebuck andCb.
FULL
ONE-YEAR
WARRANTY
ON
CO.
CRAFTSMAN
HOFFMAN
HEDGE
TRIMMER
ESTATES
TABLE OF CONTENTS
WARNtNC_SAND SAFETY INSTRUCTIONS ..
KNOW YOUR UNIT .........................
ENGINE INFORMATION ................
_..
ACCESSORtES_ENANCE
ITEMS.._...
3
5
6
7
USING'fOUR LrNIT .........................
8
CUSTOMER RESPONSIBILITY -GENERAL MAINTENANCE ............
10
PARTS AND SERVICE ..............
Back Cover
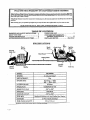
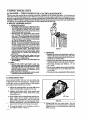
SPECIFICATIONS
Air
Throttle
L_-Out
Front
Spark
Handle
Plug_,_
Choke
Lever
Filter
Ignition
Switch
Rear
Haudle
Hand Guard
CuttingBlade
Thro_le
Starter
HanclIe
Trigger
Muf_r
MODEL:
...,
--.L
358.795620
,,,
,
,..
.................
coo:e,a
DISPLAC_,_-_-_:
21cc
ENGINE RPM:
Operating--
9000
I_e-- _O0..3aoo.....
SPARK
PLUG
SPARK
PLUG
CHAMPION
GAP:
....
.024"
..,,
|
.
....
.,.,.,,
IGNITION:
FUEL
Gasoline/Off
........
TANK
..,
.010" to .0t4"
MI_
I._ER:
,
Solid Slate
MODULE AIR GAP:
FU_L
CY-SY
to .028"
CAPACIT_
_ ....
_
:Mixture
40:1. (see
Fueling
Lo Tone (SpexkArresfin_)
207 cc (7 ft. oz.)
Your _ngine)
Fuel Ca!_
A
WARNINGS
AND SAFETY
INSTRUCTIONS
(See Additional Safety Instructions throughout this Manuvi)
_k
DANGER
-
THIS POWER
TOOL
CAN BE DANGEROUS!
This unit can cm*se serlous
imjm_yiueludiug
amputation or blindness to the operator and others. The warnings and sa---_etyinstructions
in this mamuaI must be followed to provide reasonable safetyand efl_ciencyinusingthis
unit. The operator
is responsible for following the warnings and instructions
in this manual and on the unit. Read the entire
Operator's
M_ual beforeassembling
andusingthis
unit!Restrict
theuseofthispowertool
topersonswho read,understand,
_d followthewarningsandinstructions
inthismamml and on thetu_it.
AlwaysWear
Eye Protection
Eye
Protection
A WARNING
C_G
BLADE
OBJECTS
VIOLENTLY.
CAN THROW
- YOU C_
BE BLINDED
OR INJURED.
- ALWAYS WEAR EY_ PROTECTION.
A WARNING
HAZARD
CUTTING
ZONE
FOR
BLADE
- THE CUTTING BLADE CAN
SERIOUSLYCUTYOU OR OTHERS.
- OTHERS CAN BE BLINDED
OR INJUEED.
- KEEP PEOPLE AND ANIMALS
15 FEET (5 METE!_) AWAY.
K6ADEMO'_S
AFr_;t __JGG_
IS P,_I2,ASED.
BLADE TO STOP
SEFO_aEMOVZNG
_o_, _ c_z
BLADE
AFTER
-
THE CU2_ING BLADE CAN
SERIOUSLY CUT YOU OR OTHERS.
ALLOWCUTTING
BLADE TO
STOP BEFORE REMOVING IT
FROM THE CUT..
-
A
MOVES MOME_NT__J_LY
TRIGGER IS RELEASED.
WARNING
READ
OPERATOR
"S M_LNUAL:
o- FOU_OWALL
WAm_GS
AND INSTRUCTIONS.
Operator's
l_gnual
Labels
-
FAtLDI_E TO DO SO CAN
RESULT IN SERIOUS INJUR"L
WARNINGS
_k
OPERATOR
AND SAFETY
INSTRUCTIONS
SAFETY
1. DRESS PROPERLY--Always
wear eye protection when operating, servicing, or performing
maintenance onyour unit. Always wear heav_, long
.pants, boots, and gloves. Do not go barefoot or wear
sho_. pants, sandals, jewek3; loose clothing, or
clothing With loosely hanging stra_, t_es, tassels,
etc.;
theycanbe caughtin moving parts_Secure
hairsoitisaboveshoulder
length.
Beingfully
coy.
el_i wilt help protect you from pieces of toxic plants
su.cn as poison ivy tkrown by the cutt_mg blade,
which could be more of a hazard then touching the
plan_ itsel_
2. STAY ALERT- -Do not operate the unit when you
are tired, ill, or under the imCbaence of alcohol,
drugs, or medication.
3. DANGER--RISK
OF CUT--KEEP
IZ_NDS
AWAY FROM BLADE--Do
not a_empt to clear
away cut material when the blade is in motion.
Make suretheswitchisintheSTOP position,
the
spark plug wire is disconnected, and the blade has
stopped moving before removing jammed material
fromthecuttiagblad_
De notgraborholdtheunit
by thecutting
blade.
4. WARNING--blade
moves momentarily a_
the
trigger is released.
5_ Wear hearingprotec_ien
when using fills unit.
A
UN/T SAFETY
L I_<pec_entire
nilit before eao__use.Always :ma_e
sure
all
trundles
and
guards
are
properly
and
se_
ctu_ly
fastened
when usingtheurdt.Have damaged
parts replaced by your SEARS Service CenSer/Department. Mnke sure all fasteners
areinplace and
securely
fastened.
2. Do not use a cu_t2ng blade that is bent, warped,
cracked, broken, or damaged in any other way.
Have partsthatarecracked,
ch_pped,broken,or
damaged in any other way replaced byyour SF_A_R
S
Service Center/Department before using the urdt.
3. Use only SEARS cutting blades.
4.
i.
2.
3.
4.
5.
6.
4
....(Continued)
7. Empty the fuel tan_ before sgorlngthe uni_. Use up
fuel left in the carburetor by startlngthe engine and
letting the engine run until it stops.
8. Store unit andfuelin an area where fuel vapors canngt reach sparks or openflames from water heaters,
elect_e motors or switches, Parnaces,e_.
A
T_G
SAFETY
I. Inspect the area tobe trimmed before each use.Remove objects (rocks, broken glass, nails, wire,
strLug, etc.) which can wrap around or be thrown by
the cutting blade.
2. KEEP CH]I_REN AWAY--Keep others including children, animals, bystanders and helpers outside the 30 foot (I0 meter) _
Zone. Stop the
unit immediately ifyou are approached.
8. Always
keep
the
unit
in front of your body.
4. DON'T OVEPJ{EAOH OR STAND ON UNSTABLE SUPPORT--Keep firm footing and balance
atall
times.
5. Dono_raisetheunltaboveyourshoulders.
Thecuf_
ringbladecancome dangerously
close
toyourbody.
6. Keep aN partsefyourbody away fromthecutting
blade.
7. USE UNIT PROPERLY--Use
only for jobs e_phinedinthis manual.
_k MAINTENANCE
SAFETY
t. MAINTAl_ UNIT WITH CARE--Maintain
the
unit according to r_ommended procedures.
2. Keep the cutting blade and air ve_ts free of debris.
3. DISCONNECT THE SPARK PLUG before performing maintenance.
4.
Use only genuine SEARS replacement parts as recommende&
5. Have eli maintenanceand service not exphined in
this manual performed by your SEARS Service
CenterfDep_ent.
A
TRANSPORTING
AND
STORAGE
1. Hand carry the unit With the engine stopped and
the mm_fler
andcutting bladeaway from your body.
Use only
genuine S_
accessories as recom2. Allowtheengiaetococ_emp_ Lh_e
._ tank,a_d
m_aded fo_ _
unih
securetheunitbeforestoring
ortransper_ingit
ina
vehicle.
FUEL SAFETY
3. Empty the fuel tank before storing the unit. Use up
Mix andpour fueloutdoors andwhere there are no
fuel lef_ in the carburetor by star_gthe engine and
sparks orflames.
letting the engine run unti! it stops.
Use a container approved for fuel.
4. Store the unit and fuel in an area where fuel vapors
Do no_ smoke or alJow smokingnear fuel or the unit
cannot reach sparks or open flames from water
or w_fle using the unit.
heaters, electric motors or switches, furnaces, etc_
Wipe up _v_fuel spi!ls before starting engh_e.
6. Stere _t so the cutting blade cannot accidenf_lly
Move at least 10 feet(3 meters) away from fueling
site before sta_ing engine,
cause injury. The unit can be hungby thehandle.
7. STORE UNIT INDOORS--Stere
the unit in a
Stop engine before removingfuet cap. Allowengine
to cool before refue2in_
cool, dry place out of the reach ofch_dren.
If situations
occur which are not covered in this manua_
rtse care and good judgment.
Contact your SEARS Service Center/Department
if you _eed assistance.
IIIIIIIIIIIIIIIIHII
,,,,,,i
ill,ll
IIIIII
,
ill
:
IIII]1111111
I
IIII
,,,,,,,,,,,,,,,,,,,,,,,,,,
ITlll
i
I
i
,
,imll
IIII
I
..........
KNOW YOUR UNIT
..........
ii
i
ii
i
i
I
I
illiill
I
I
I i
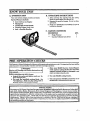
"four unit will trim hedges precisely
Features
i
.
B. UNPACKING
A. INTRODUCTION
Special
ill
21ec
i
Handgaerd
•
Comfortable
•
•
Throttle
Trigger Lock-out
Anti-vibration
Handles
2. Examine
(1.28 _a. in.) Engine
Front
ImlIHI I
iii
HI
II
PRE-OPERATION
J
i
iJil
lIHlIH
I
Ilillllli II
INSTRUCTIONS
the parts for damage.
Do not use dam-
3. Notify your BEA _S Store immediate2y
missing or damaged.
Handle
--
i il i
I
_parts.
C. CARTON
i
li
I. After removing 0ae contents
from the carton,
check the parts agein_ the adjacent list.
and nea_ly.
Include:
e
illillli
--
liil i
iiiiiiiiii iiii
,,,,
.................
T
if a pgrt is
CONTENTS
Hedge Trimmer
Operator's
Manual (not shown)
i
iiiiiiiiiiii11111]/i
iii I i
.....
,,
,,,,,llllllllllllllllll
I Ill
1
1
....
I
CHECKS
HHHHHHHHI
.
]
Ill
HI
I I
I
HNUlItUUI II
This Operator's M_nualis designed to help you safely operate and maintain your unit. It is important that you read the
entire manual
to become familiar
with the unit before you begin operation.
A WARNING
Review
all Warnings
and Safety
this manual.
[
Instructions
in]
[
operating
your unit, always:
Inspect
the entire unit before
each use. Re' place damaged parts.
b. Use only the specified
cutting
blade.
See
_Specifications?'
Make sure the cuttiug blade is
properly installed and securely fas_ened.
c. Have your SEARS Service
Center]Departmerit _place
cutting
blades
that are bent,
warped,
cracked,
broken, or damaged
in any
other way before using the uniL
]Before
Hi
iHll
i
i
liiili i i
d*
Use only SEARS cutting blades.
Use only_nuine
SEARS accessories or z_o
tachnmrLts _ recommended for this unit.
i
SPECIAL NOTICE
For users on U.S. Forest Land and in some states, including California(Public
Resources Codes 4442
and 4443), Idaho, Maine, Minnesota,
New Jersey, Oregon, and Washington: Certain internal combustion enginez operated on forest, brush, and/or grass -covered tands, in the above areas, must be equipped with a
spark arrestor, maintained in effective working order, or the engine muss be constructed, equipped, and maintained for the prevention of fire. Check vcith your state or local authorizes for regulations pertaining to these
requirements.
Failure to follow these requirements is a violation of the law. This unit is factory-equlpped
with a spark a_'Testor. If a spark arre_r is r_u_ed in your area, you are legally responsible for _ain_h_ug
the operating condition of these parts.
-5-
IIIIIIIII
IHI
I III ,1111
II
I
I
ENGINE
i
A.BEFORE
IIIII1[1/I
I
IIII IIIIIIIIIIII
I I
IIII
III
Irll
II
"
1"'_'u"
,"_ .........
,HIIII IIIII
I
"
'I?""....
INFORMATION
iiiii
iii i
STARTING
i
..i
ii
i,i
iii
f.
i
i
YOUR ENGINE
WARNING:
BE SURE TO READ THE FUEL SAFETY
INFORMATION IN THE SAFETY RULES
SECTION ON PAGE 4 OF THIS MANUAL
BEFORE YOU BEGIN.
IF YOU DO NOT UNDERSTAND THE
FUEL SAFETY SECTION DO NOT ATTEMPT TO FUEL YOUR UNIT; SEEK
HELP FROM SOMEONE THAT DOES UNDERSTAND THE FUEL SAFETY SECTION
OR CALL THE CUSTOMER ASSISTANCE
HOTLINE AT 1-800-235-5878.
GASOLINE
The two-cycle engiue on this preduct requires a fuel
mixture of regular unleaded gasoline and a high quality
2-cycte engine off (AIR-COOI_D)
for lubrication of
the bearings and other moving parts. The correct fuel]
oll _e
is 40:I (see Fuel Mixture Chart). Too tlttle off
or the incorrect oil type wi]] caUse poor performance and
may cause the engine to overheat and seize.
Ga_line and o_ must be premixed in a clean approved
fuel container. Always use fresh regular unleeded gasoline.
IMPORTANT:
Experience indicetes that alcohol
blended fuels calledgasoho! (orusingethanolor methanol) can attract moisture, which leads to oi!/gas separation and formation of aoids during storage. Acidic gas
can damage the fuel system of an engine whilein storage. To avoid engine problems, thefuet system should
be emptied before storagefor 30 days or longer. Drain
the gas tank, then run the fuel out of the carburetor and
fuel lines by starting the eng{ne and letting it rununtil it
sL,'_s, Use fresh f,_ ne_ se,_-',s_'_.8Be STOF_AGE
instructionsfor additbnal information. Never useengine
orca,.'buretor
cleaner p_oductsin the fuel tankorpermanent damage may occur.
FUEL
!!"""'..... '
I
,I,nll,II II
•
,11
I _
J,
,,,,,,,,,,11,,1
"
"
increased fuel stability (extends fuel life up to 5 times
longer) and reduced _moke.
I£ CRAFTSMAN 2 cycle oil is not available, use a good
quality 2 cycle AIR-COOLED engine oil that has a
recommended fuel mix 40:1.
]34PORTAN_
Do not use:
• AUTOMOTIVE OIL
• BOAT OILS (NMMA, BI& etc.)
These oils do net have proper edditives for 2-cyate0
AIR-COOLED engines and can cause engine damage.
GASOLINEANDOIL_
Mix g_oRne and offas fellow_
•
Con_:l%cha_t for cc,rre_
*
Do not mix gasoline
tank.
_:ti_es.
and o2 directly
in the fuet
FOR ON_ GALLON:
-
Pour 3.2 ounces ofbSgh qual_W,2- cycle engine oil
into an erupt., approvedone gaJlon
easoline
con_iue=
Add one gallon of regular un]ead edgasoline to the
galIon container, then securely _eptace the cap.
Shake the confiner mo_en_;_,_:
The mixture is now ready for us_-. Fuel stabilizer
can be added at _his time ff desir.ed; foltow mixing
_zsffz'uc_J.ons
on the label.
ST._IIJZER
Fuel stabilizer
is an acceptable
alternative
in
n_nimizing the formation of fuelgum deposits during
storage.
Add stabilizer
to_asoline
infee!tankorstorage
containen A_ways follow _hefuel mix ratio
foundon the
stabilizer container.
Run engineat least 5 minutes after
adding stabilizer to allow the stabilizer to reach the
c_rbureter. You do not have to drain the fuel tank for
storage if you are using fuel stabilizer.
CP_FTSMAN 40:I2 cycle engineoilis specially blended
with fuel stabilizers. If you do not use this Sears oil, you
toyourfueltank.
CRAFTSMAN 40:12 cycie oil_sstrongly
recommended.
This oilis specially blended with fuelstabilizers for
5
FUEL
MIXTURE
CHART
40:1 Fuel:Oil Mix _a_o
1 gallon
3,2
1_ gallons
2,'5 gallons
-4.0
8_ .....
One gallon
one gat!o_L
fuel containers
J
cm_ hold more than
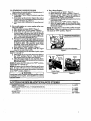
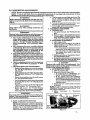
B. STARTING
(For location
INSTRUCTIONS
of controls_
refer
to "Specifications.')
1. Before starting the engine:
a. Fuel eng_me, Move 10 feet (3 meters) away from
fudlng rite.
b. Rest engine on the ground. Support the unit so
the blade is off of the ground and away from trees,
bushes, onlookers, etc. Figure 1.
c. 8t_ engine before tif_ng unit to operating poslf_on.
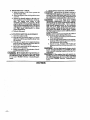
2. For a cold engine or a warm engine after running out of f_el:
w Move ignition switch to _RUN. _ Figure 2.
b. Move choke to the "FULL" pa_ifiom Figure 3.
c_ Push down the throttle lock-out, squeeze the
throttle trigger fury, press and hold the thro_tle
lock, then slowty release the throttle tri._er: Figure 2. Keep the throttle lock e_, aged until the engine runs smoothly (through step g._).
do Pullsto_r_r
ropesharply
untilengine attemptsto
run,butnomore than8pulls
atfullchoke
toavoid
flovding_he en_ue. The "att_npt
_o run" may
be ha_ to h_r.
The operator _tst listen
eare_lly.
After 8 pulls, proceed tostep _e." even
if the engine has not attempted to run.
e. Move choke to _HALF" positicm Figure 3.
£ _
the starter
rope sharply until the engine
runs, but no more than 5 pulls.
If the enginedoesnot start af_ 5 pulls, repeat
steps _*a."through 'T."
g. Allowenginetorun5 s_onds,thanmov_ choke to
the "OFF" Uodtion. Fig._'e 3, Keep the throt_e
a_gage_ until the eugenerunssmoothly.
tL After the engine begins to run smoothly, disengage the throttle lock by squeezlngthen relea_ng
the t31rotfle trlgger.
NOTE: If engine dies with choke at the "OFF" port,on,
repeat steps"e." through _g._
If engine doesnot start,
pull starter rope5 more
pulls. If engine still does not ran, it is probably flooded.
Wait a few minutes and r_peat the procedure
withchoke
at the "OFF" position, Figure 3.
[
Aw a
I
I IIIlUlIIIIIIIII
III
III"111I
,,,,,,, ==
=
ACCESSORIES/MAINTENANCE
SAFETYGOGGLES
SEARS CRAFTSMAN® 40:1, 2-CYCLE ENGINE OIL
--3.2 oz.............................................................................
--8 oz...............................................................................
SPARK PLUG ...........................................................................
AIR FILTER ............................................................................
L
[ STAETING POSITION
Figurei
Throttle Lock
STOP
Throttle Trigger
Figure 2
|Avoid any bodily contact Wi'th *hem,.fffler when I
|s_inga
_vattu eng_e. A uo$ mu_Ier can cause i
]serious burns,
i
, i.i .Ill=
3. For a Warm Engine_
m Move _ switch t_ "RUN." Figure 2.
b. Move choke to the _HALF" posit_o_L F_gure3:
c. Squeeze throttle trigger
fully and ene_ _ the
throttle lock. Figure 2. Keep the throttle vck e_g_ged until the eng_ runs smoof_y.
d. Pulls_rterropesharply
untUengineruns,butno
morn thau5 pulls.
e. Move choketothe"OFF rposition.
Figure3.
£ _
the engine be_
f,o run smoothly,
d_an.
_e the throttle tockby squeezing then releasing
the thrvttl_ trigg_n
NOTE: If engine does not start a_er 5 pulis, it is probably flooded. Wait a £ew minutes and repeat procedure
withchoke at "OFF" position.
Figure3.
, ,J
,
,
IIIIIIII
Figure 3
,,,,,,,,,,,,,,,,,,,,,,,,,,,,
,,,,
• • :
......
ITEMS
71-85707
7!-36552
71-36555
71-8_8_3
530-_36664
USING YOUR UNIT
A DANGER
- THIS POWER
TOOL CAN BE DANGEROUS!
unit can cause serious injury _nduding amputation or hlin_ess
to the operator and others. The warnings and
safety instructions in this mauuvt must be followed to provide reasonable safety and efficiency in us_ug this unit, The
operatorisresponsfoleforfollowingthewarnings and instructions
inthismanual and on thev_t. Read the entire
Operator's
Manual before using this unitl Restrict
the use of this unit to persons who read, understand,
aud fol!ow the warnings
and instructions
in this manual
and on the unit.
A.HEDGE
TRIMMER
SAFETY
1. OPEttATOR
SAFETY
a.Read
the entL_e Operator's
Manual before
assembH-g
and using this unit! Restrict the
use of this unit to persons who read, understand,and fellow the warnings and instructions
in thismanual and on the _.
b.Always
wear eye protection
when operating, servicing,
or performing ma_tenance on
your unit. The cuttingbladescan cause debris
tobe thrownorricochet
intotheeyesand face
Which canresultinlossefvisionorseriousinjury. See the "Access_es" sectier_
c..Always wear heavY, longpants, boots, and
gloves, Do net gobarefootor wear shortpants,
sandals,
jewelrzlooseclething,
or clo_
with
looselyhanging straps,ties,tassels,
etc.;
they
can be caught inmevingparts. Securehairsoit
is above shoulderlength.
Belug fully covered
help protect you from pieces of toxic p_nte
suc_ as poison ivythrown by the bhdes, Which
could be more of a hazard than touching the
plant i_eli:
d_Do not operate
this unit when you are
tired, ill, or under the influence
of alcohol, drugs, or medication.
e. Always
keep both hands firmly gripped
on
the handles.
2. UNIT
Inspect
the entire
unit before
each use.
Always
make sure all bandies
and guards
are properly
and sec_,_xc]y fzstened
when
tl_eunit,Replace damaged parts.Make
svxe allhandles,_,
and fastenersare in
place and securely fastened.
b.M_e
sure the cuttingblades
are` properly
_talled
and securely
fastened.
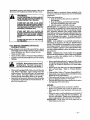
B, OPF_RA_G
3. TRIMMING
a.Inspeet the area to be cut before each use.
Remove objects (recks, broken glass, n,_s, wire,
string, etc.) which can be thrown or become entaughd in the cutting blades.
b. Always keep the unit in front o£your bo_v.
Held handle firmly with both hands. Figure 4.
c. Keep firm footing and balance.
Do not
over -reach.
d.Do not raise engine above your sho_ders.
The cu_t_ng
bl_s ca_come dangerously
dose
toyourbody.
e, Use only for jobs explained in this manual.
T_S
As you become familiar with your unit, you will be able
to determine ymrr own opexatir_pace.Conditionssuch
as the type and sizeof mater_ being cut willregulate
the speed and time requiredforyour job.
1. Allow
before
the cuttingblades
to reach full speed
entering
the material
to be cut.
2..always
work going away from
solid objects
such as walIs, large
automobiles,
etc.
people
and
stones, trees,
3. If the blade s_aIls, immediately
stop the engh_.
Make sure the ignition switch is off, the
spark plug is disconnected,
and the blade has
stopped
moving before c_aring
jammed
debris
age and have it repaired
4. To stop the engine,
the "STOP" position-
or replaced
as needed.
move the ignition
Figure 2.
switch
to
_r Vent_
Figure 5
5, Always
keep the air vents clean_
Stop the
unit, make sure the cutting blade has completely
stopped moving, and disconnect
the spark plug
before cleaning.
C. TRIMMinG
METHODS
A
B
Do not try to cut stems larger than 3/8"
thick.
1. TOP CIYlWING
a_ For New or Young Growth:
When trimming new or young growth, use a
wide, sweepingmotiom th'gm"e6A. A ahght,
downward tilt of the cutting bl_es in the vhre.on
of motion gives the bestcutting
results.
b. For Older, Thicker GrowtJa:
older, thicker growth by using a sawing
motion. Figure 6 B.
c. For Precise, Level Cuts:
Ifa precisely
level
cutisdesired,
stretch
apiece
of string across the length of the hedge. Guide
the cut'dngbladesslowly
acrossthe top of the
string. Figv_re 7.
2. SIDE CUTTING
When trimming the sides of the hedge, be_in at the
bo_m and cutupward,tapering
_lehedge inward at the top. Figure 7 (inset). Cu_ngin this
method w_t leave the body of the hedge narrower
atthe top. This shape wz31e_pose more of the
hedge,resulting in more uniferm_rewth.
NOTES
-9-
CUSTOMER
RESPONSIBILITY
GENERAL
A. MAINTENANCE
MAINTENANCE
SAFETY
1. Maintain
the unit
mended procedures.
according
to
recom-
2. Disconnect the spark plug before performln_
maintenance
except for carburetor adjustments7
& .Make carburetor adjustments
with the cutring blade clear of any object.
4. Keep others away when making carburetor
adjustments_
5. Be sure blade stops turning when
lines. _ee _Carburetor Adjustments/
B. AIR
--
engine
6. Have your SEARS Service Center/Depart_
ment replace a cutting blade that is cracked,
ehipped, broken, or d_maged
in any other
way before using unit.
7. Use only genuine SEARS replaeementparts
as recommendeeL
8. _t
the entiretool. Replace damaged parts.
Check for fuel lea.ks
and make sure all fasteners are
in place and se_xely f__ned_
9.-IL_ve all maintenance
and se1_ice not explained
in tiffs manual performed
by your
EARS Service Center/Department.
FILTER
A dlrty air F_ter decreases life and perf0rmonce of engine and increases fuel consumption.
1. Cleau the air Filter:.
• Always after G tanks of fuel or 5 hours of
operation, which ever is less.
• More frequentl_ zn dusty condLmns.
Loosen the two screws on the air filter cover
enough to remove the cover from the en_ne.
Figure 8.
b. Remove the air _Iter. Figure 8.
e. Wash ffli_x
insoapandwater.
d. Squeezefilter
dryandreinstall.
[CAUTION: IDo not clean the air filter in gasoline or other flammable solvent to avoid ereatiag a ftre hazard.
e. Reinstall the air filter cover. Figure 8.
Cover
Figure 8
_CAUTION; 1 Make sure air filter is fitted into
the corners of the cover to keep dust from entering engine and causing engine damage.
,
C. BLADE
............
MAINTENANCE
WAR
G
I
The cuttingblade wil! continue to move momen. ]
tariIy after trigger is releesed.
Make sure theJ
blade has stopped and the spark pIug has been|
disconnected
bef0re performing maintenance%
|
Always replace a blade that is bent, warped, J
_Te_ek:d, broKe_, Or damaged
in any other way.[
_e er a_empt to straighten
and reuse adam-!
aged blade. Use only the specified replacement[
blade.
,..............]
] CAUTION: | Wear protective
gloves when haudiing or performing maintenance
on the cutring blade to help avoid injury.
•
,,, .
, ......................................
1.LUBRICATING THE CUTTING BLADE
Check eutt_mgbIade for flatness periodieall_
Throw away a blade that is not flak
.Lubrication of the cutting blade _ter each use will
lengthen blade Life and mMce operation easier. To lubricate the cuttin_ blade, do the fotlowiug:
Make sure the ignition switch is in the "STOP" portion and the blade has _mpped moving. Disconnec_ the spark plug.
b. F..emow any debris
from fJmcutting
blade.
c. Cleanal!partsend checkfordanmge:,Have damage_par_ repaired
orrepheedby qualified
service
personnel.
cL Apply a light machine oil along the edge of the top
strap as shown inFigure9.
2. CLEANING
Use mildsoap anda damp cloth
tocleanfximraer
housLuganddecal_Do notusesolvents
orpetroleum
based
cldaners
ofany kindor _
to theuni_canoccur.
Do not allow wa_er or other Iiqulds to get into the trimmer housing, and never immerse any part of the unit
....into wat_ or any other liquid.
I
• Do not use soIvents or petroleum
base cleaners of any kind or damage to the unit can occ_o
•
Donor _lIow water or other iiquids to gettnto
the trimmer housing. Never immerse anypar_of
theunitintowaterorany otherliquid.
Top St-rap
_/
unit near fertilizers
or Choral
calswhich cancorrodemetalparts.
Fi_e
• - 10
9
D. CARBURETOR
ADJUSTMENTS
This is a complicated
task. Read all warnings
and instructions
thoroughly
before _xting
If you do not tBi_
that you completely
understand
atI warnings
and instructlons,
Service Center/Department
perform
these adjustments,
ments.
SEARS
A wAp: a
Make carburetor
ported
to prevent
object,
Keep others
_justments.
away
when
[
e. Turnlow speedscrew endhighspeedscrew(l_g-
sup- [
any]
[
screws un_ they are tight a_ damage _ needle
.
adjustments
with the umt
the blade from contacting
........
making
A WAR Cn O
carburetor
ad-
!
i
Serious
injury to the operator
and others can occur if the carburetor
is no t properly
adjusted.
•
Poor engine performance
can be a result of
other causes
such as dirty air filter, carbon
build-up
on muffler
outlets,
clogged fuel fiIte_ etc..
See the "Trouble
Shooting
Chart _
before
proceeding
with carburetor
adjustl_leltts.
•
The carburetor
has been careSd]y
adjusted
at the factory.
However,
the operator
must be
sure that adjustments
are made when any of
the conditions
occur
as mentioned
in the
"Trouble Shooting
Suggestions
_ sectiom
• Verysmall
adjustments
eanaffeet
engineperformance.
It isimportaut
to,rathe
screwavery
small amount per adjustment and test performance
before making further adjustments.
Each adjust_
ment should be no more than the width of the slot in
the adjusting screw.
• This is a complicated
task and it is important
to follow
instructions
in sequence
as in_tl.
cared.
1, TROUBI_
SHOOTING
SUGGESTION'S
- Engine w_ not continue to run at idle positiom
See _Idle Speed Adjustment"
and "I_w Speed
Adjustment."
- Blade continues to move when the en#ne idles.
See _Idle Speed Adjustment" and "DeceIeration
Check_ _
- EnL_me dies or hesitates When i_ shouldaccelerate_ See _Accele_tion
Check. _
- Loss of cutting power which cannot be corrected
by cleaning the air filter. See '_qigh Speed Adjustmeut."
- Engine does not rehlrn to idle from filll thro_tle
within 2 seconds. See "Decvleration
Chec'_u"
-- Engine w_! not run.
See _Trouble Shooting
Chart. _ Then, if the carburetor reqvSres adjustment, begin with _BasicCarburetorSettings.
ure 10 ) clockwiseuntil
$_a_8
they
stop.
uo no_ turn
C_zn o_r.
b. Turnthe
low speed sc_ewbetween
thr_-quarters and one full turn countarctock_se.
e. Turn the high speed screw one to one and onequarter full turns counterclodcwise.
3. ADJUSTING
PROCEDURE
m PREPARATION
1, U_e a fresh fad mi_ See _Fue]_ngYour Engine/'
2. Star_ the engine, Trim hedges for 3 minutes
to warmengine. The engine must be at o.per,
a_g
temperat_e
before exzrburetor adjuztmerits can be performed eorrec_y,
b. IDLE SPEED
ADJUSTMENT
1. Allow engine to idle,
2. Adjust idle speed screw (Figure t0 ) un_ the
enginecontinues to run without stalling
ano
without blade moving.
- Turn id/e _peed _
doc_ise
to increase
engine speed if the e_gin_ _a]Js or dies.
- _r_
idle _eed ,crew eounterdoekwise
to
slow engine down and/or to keep blade
from turn_ng.
3, Follow instructions
in '_kccelera_ion Check"
and "Deceleration
Check,"
4. No further
adjustments
are necessaryif
the blade does not move at idle speed
and ff performance
is satisfactory.
Recheck
idle speed after each adjustm _e!at. Thel
blade must not move at idle speed to avoid serious ]
injury to the opiate
r and others.
!
c. ACCELERATION
CHECK
L Allow the engine to idle.
2. Squeeze the throttletriggerfully.
If performance
is satisfaetor_
proceed to _d. Deceleration
Check."
b. If the engine
does
not accelerate
smoothi_
t_rn the low speedscrew (Pigure 10 ) counterclockwise
a small amount
(no more than the width oftheslotinthe
adjusting screw).
3. Repeat_p
_2.b."un_fl smooth acceleration
is obtained,
I_ may be necessary to repeat "I_e Spe_d
Adjustment"
_hrough _Aceelemtion
Check,' to obtaia correct adjustments.
4, Follow
instructions
in
"Deceleration
Chec!_"
,,,,,,
The blade will be moving during most of thispro- I
cedure, Wear your protective equipment and ob-]
serve all safe_y instructions,
2. BASIC CARBURETOR
adjustlet your
Low Speed
,,
S_ew
Idle S_ed
Screw
SETTINGS
run uroperly with minor
adjustments.
Refer to "Trouble Shooting Suggestions" for the
condition you are experiencing and follow the ins_xuetions. The basic carburetor settings are provided in the following
_ctions,
Figure
10
- 11-
£ HIGH SPEED MIXTURE _S_
[ CAI_ION: t Adjustments as small as _t6 of a
turn can _ect
engine performance, l_ _ tin.
portent to turn the screwonly
1t}6 or a
per adjustment and test ti_e pertorm_xce oz
the unit before making further aajustmenr_
d_ DECELERATION CHECK
1. AUow the engiue to idle, then squeeze the
t_o_e
t_gger _dly
2_ A]lowthee_netoruua_fldlspeedforabout
Isecond.
3. Releesethethrot_te t_gge! to the idle position end listen to the deceleration of the e_gine. The engine must return to idle
smo?thlyand within I to 2 seconds.Ifthe
engine slowly or e_aticaHy
returns to
idle or idles erra%icaH_ repeat _Y_]IeSpeed
Adjust_en_
or continue through Low Speed
and _
Speed _us_ents
_
i CAUTION:I A too lean high speed serf'.rag
damage to any2-eycle
engine irom overney_i_g and lack of lubrleation_
_ever se_ _.ne
high speed mixture screw so _ar CtOCKW_e
that you have high spee 9 bur lac_ I_ower
while cutting. Never set the high speea _m_tare screw less than 3/4 turns 0pe_ Adjust
the high speed mixture screw 1/16 of a turn at
a time as follows:
1/16 of a O_n is approximateJYthe widthof
the screwdriver slot in the top of the screw.
L Turn thetdgh speedmixtm_ screw clockwise
ffthe unit loses power.
Z. Tm_n the high speed_
_re_v _unter7
clock_seffthe v_t has @e_ ou_o_me cu_
butlackspowerwhilecutting.
3. Repeat t_-t cut. Cont_ue 1/!6ofaturnadjust_nents un_il _he unit runs smoothlyin the
obtah
properdeceleratior_
4. Recheck idle speed.
e. LOW SPEED IVi_TURE ADJUSTMENT
1. Allow the engine to idle.
2. Turnthelowspeedscrew(Figare
10 )sIowIy
clockwise until the speed sterts to drop. Note
this posi_o_
3. Turn the low speed screw counterclockwise
until the speed iuqeesesaud then starts to
drop_
Noteth_spos_tio_
4. Set the tow speed screw at the midpoint be_een the two posltions.
5. Follow iz_ru_ion_ in _Accelerat_on Check_
and _D_'on
Check__
If the engine does not operate acthese instructions after repeating
the adjusting
steps, do not use the tool. Take
it to your SEARS Service Center/Depart-
Cut,
| CAUTION: I Set the high speed _
screw
far _tere]ocl_e
_s possible _o provide a smooth running engine and proper aecelaratlon.
If the engine does not operate aecording to these instructlons v_er retreating
the adjusting steps, do not use the _ogL -rathe
it to your SEARS Serwee
Centor/Depat_
ment.
Inent.
_.
.
:
NOTES
.:" 12 -
.....................
,
,,,.
ii
i
iiiiii
Immediately prepare your unit for storage at the end of
the season or if it wiil not be used for 30 days or more.
WARNING:
ALLOW THE ENGINETO COOt, AND SECURE THE UNIT BEFORE STORING OR
TRANSPORTING IT IN A VEHICLE.
STORE UNIT AND FUEL IN AN AREAl
WHE RE FU ELVAPORS CAN_{OTREACH
SPARKS OR OPEN FLAMES FROM WATER HEATERS, ELECTRIC MOTORS OR I
SWITCHES, FURNACES_ETC.
STORE UNIT WITH ALL GUARDS IN
PLACE. POSITION SO THAT ANY SHARP
OBJECT SUCH AS BLADES CANNOT
ACCIDENTLY CAUSE INJURY TO PASSER BY
STORE THE UNIT OUT OF THE REACF
OF CHILDREN.
GAS
HEDGE
TRIMMER
STORAGE
INSTRUCTIONS
If your trimmer is to be stored for a period of tim e, cleau i_
thoroug_y prior to storage. Remove any dirt, sawdust,
leaves, oil, grease, e_c. Store in a clean <L_ are_
° Clean the entire unit.
• Cleauair filter. Referto _Ov_-_omerRespensibititles".
- Lightly oilexternalmetal
s_xfaces to prevent rus_ from
forming.
CAUTION: Wear protective gloves when
handling blade, The blade is sharp and
can cut _ou even when it is not moving,
•
Ifyour unit i_equipped with a blade, removeit from the
unit. Refer to "Assembly =. Apply a coating of oil to the
entire surface of the blade and wrap it in heavy paper,
cloth, or plastic. Also apply a light coat of oil to gear
housing threads, then tighten blade nut for storage.
• Reassemble all loose parts, being sure that alI handles
and guards are in place and are securely fastene_L Replace any damaged parts.
ENGINE
Never use engine or carburetor cleaner products in the
fuel tank or permanent damage may occur to fuel system
components.
Fbllow these _ctians:
1. Drainthefuelfrom the unit into an approved
fuel container.
2. Drain the fuel lines and carburetor by starting
the engine and letting it run until it stops.
3. Allow the engine to cool before storage.
IMPORTANt. It is important to prevent gum deposits
from forming in essenth] fuel system parts such as the
carburetor, fuel filter, fuel line or tank during storage.
ALso, exparience indicates that alcohol blended fuels,
those that _se ethanol or methanol (called gasohol or _ygartered fuel), can attract moisture and form widle gas
which will damage your engine. To avoid engine problems, the fuel system should be emptied before storage of
30 days or longen
NOTE:
Fue! s_bi]izer is a_ acceptable alternative in
minimizing the formationof fuel gum deposits during
storage.
Add stabilizer
tothegasoline
inthefueltankor
fuel storage
container.
Always follow the mix _ns
found on stabilizer container. Run engine at least 5 minutes after addlngstabilizer
to allow thestabilizer
to reach
the carburetor.
Cra_man 40:1 2-cyete engine oil is specially
blended wi_ fuelstabilJzan_. Ifyoudo notuse this SEARS
oil, you can add a fuel stabilizer (such as Craftsman
#33500) to your fueI tank.
• Remove sparkplugand pourI teaspoon
of40:loilmix
throughthesparkplugopening.Slowlypullthestar_er rope 8 to 10 timesto distribute oiltoin_er engine
surfaces.
• Replace spark ptugwith a new one ofthe recommended
type and heat range. Refer to "Product Specifications".
. Clean air filter. Refer to "Customer ]gesponsibfllties _.
• Reinstall all covers and hardware removed for access;
t_oh_n _ servers
asd fas%e_em.
• Check entireunit
forloosescrews,
nuts,andbolts.
Replace any damaged, broken, or worn par_.
• Use fresh fuethaving the proper gasoline to off ratio at
%he beginning of the next season.
OTHER
• Do not store gasoline from oneseason to another.
• Replace your gasoIine can ffyour can starts to rust.
Rustand!or _
in your fuelsystemwillcauseproblems.
- Storeyour unit in a well ventilated area and covered, if
possible, to prevent dust and dirt accumulation.
Do
not cover with plastic. Plastic cannot breathe and
induce condensation and eventual rust or corrosior_.
iMPO_:_kN_.
Never cover unit whileengine and ex
haust areas are still warm.
-- 13 -
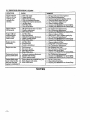
E.
TROUBLE
SHOOTING
....
Engine will not
start or will nm
only for a few
_secondsaf_er
s_rt_ng.
CHART
cAusE
I.
Fuel
........
pv.
.........i
EnB'_newill not
idIe proper]/_
accderate_laeks
power, or dies
under a load_
En_me smokes
excessively,
En_ne runs hot.
Curing attachment
moves stidle speed.
,,,
i ,
=
,,,,, L
L
2.
3.
4.
5.
, u,,,
3,,
3. ContactyourS-_V_
' Service
Cen_jmept.
,,
Airff!_erdir_o
Spark plug route&
Carbure_r re_ires adjustment,
Muffler outlets plugged.
None of the
shove.
..............
f
,
,,,,.
L
2.
3,
4.
5,
L
2.
3.
1..AAr_ter_.rt_.
2. Fuelincorrect,
3..Requires
adjustment.
1. Fuel incorrect.
Settoolow (Le2_).
3. Sparkplugincerrect.
4. None of the shove.
,,,
,,
,,,,,,,,,,,,,
11 Carburetor
requires adju_tznent.
2. Throi_ecable binding.
,
,,,
,,
,,,
,,,,
1. Forcing
bhde into material being cut.
2. Blade dogged with debris.
3. None of"the shove,
=1 NI
,
NOTES
Clean or repIace air filter.
Clean and re-gaporreplace spark plug.
See _Oarburetor Adjustment."
Confac_ your SEARS Service Center/DeFt.
Contact your SEARS ServiceConVex/Dept....
Clean or rep!_e eir filter,
Refuel with correct fuel mixture,
See "C_u'e_r
Adjustments. _
'L" See "Fueling Your Unit?'
2, See _Carbmcetor
AAjustments."
3, Replace wi_h correct plug,
...........
4. Confnct Four SEAI_._erv_ce
Cen_a'me'pl;.
3. C!_t_ requiresrep_
Cutting Btade stops
under a Mad or does
not_rn when the
engine is a_elerated_
eo= thef o
2. See"Sfnrting Irish-actions. _
3, Install
new plug/check
_nifionsystem4. Clean fuel filter; inspec_ fud line.
5. See"CarburetorAdjustments,"
6. Clean or replace air filten
7, Conta_your SEARS Service CenterfDept.
! 8. Contactyom'SEABSService
Center/Dep..t:
] !. See _Cerbure_r Adjus_'men_sY'
! 2, See =Carbure_ee Adjustments. _
1. Idle speedset too fast or too slow.
2. Requires adjustment.
3. None of the above.
i,
Eu__uewill not
........... i. m
2. Engine flooded.
Sparkplugnotfiring.
4. Fuel not reaching carburetor.
5. Carburetor _res
adjustment.
6. Air filter
7. Fuel filter dirty.
8. Noneofthe above.
1,
2.
3.
L
2.
8.
See "C_rburetor
Adju_tment_."
ContactyourSEARS Service
CentexiDept.
Contact your SEARS Service Center/Dept.
Cut at e sIower pace.
Clea_ debris from blade.
Conta_tyour SEARS Service Center/Dept.-
SEARS GAS I DGE
TR!MMER
REPAIR PARTS LIST - MODEL 358.795620
10.
37.
31.
,_a WARNING
All repairs,
adjustments
and m_ntenm_e
not de_
sc_bed in the Operator's
Manual
n_st
be perfo_edbyqualified
service pexsonneL
,
,J
D_on
i_ew
530-015935
530-037631
1Shroud
530-029929
Cre_ce.seCover
530-019181
Gesket
530-O14307
Cr_
_.
$30-032125
lunerB_dng
535-0159_6
530-019179
_e
Seal
530-03212_ Outer B_ring
,_0-014861
Crankc_Ass_
O_ur!.6--9)
530-015941
$30-015382
S_ew
530-039149
FlywheelAss'_
530-036145
Sp_r
530-039163
l_ni¢ion
Module
530-0L_954 _crew
53O-029940
330-029939
S ',after
Dog
530-015828
W_sh_r
539-0!5930
FI3,wh_-1
Spacer
_E3_-O68232 ROve Kit
Ret2h_er
530-015963
530-015495
_ew
53O-069353 Sta_er Pulley
ii
I!.
12.
13.
14.
15,
E
1.9.
20.
25.
26.
27.
28.
29.
30.
31.
32.
33.
34.
35.
36.
37.
38.
39.
.40.
4L
]°.
413,
47.
5_0-027569
_0-0L5810
530-014396'
5_0-014947
5_-019!82
53O-0L4397
530 -029930
53O-02_119
5_0-036180
53O-024475'
53O-069352
_0-019186
53O-03_404
53O-069387
580-015953
5_;0-012309
530-030073,
530 -01.91B5
530-037632
530 -014384
5S0-015775
530-019183
_rew
5L
Fan Housing
53.
Com_eddngRod,L_
55.
Ch_Val_e
MuffL_ Screen
Ve_tPitting
MufflerYd:it
6_
Gasket
Phton _
Piston_t
(IncL38 & 55)
Screw
57.
58.
69.
60.
530-035306 ! _etor
A_rBo_
530-036192
Screw
530-015849
530-028934 !._ F_ex Foam
Air Filter Cover
530-036193
530-015635
Screw
530-015162 Piston Pm P_er
530-014973
C'case & C'_l_f_ _
_nc!. 5& 10)
530-'069374 GaskeLKit
(I_d. 4, 37, 43 & 48)
530- 069_o47 Pad Line
530-069216
Ven_ Li_e
530-014382 FuelPick-up Assay.
Not 8ho_
Spark Plug
Gasket
_xb. Adaptor
_Scre_
Throttle Cabte Ass'_
Gasket
Op_a_rMa_al
530-0_1860
SF_ARS GAS HEDGE
TRIMMER
REPAIR PARTS LIST - MODEL 358.795620
_wretor
#530.035306
Assembly
Part
- WT-221
Nnmber
o
19.
/
36.
_
-._-e
e---_ b
Des_ptlon
•
•
:
2. I 5a0-0864_ II,_alVt_-_Assy.
3. I 530-015775 ]_¢rew
4. | 530-0_58
/ Try, get Lever
&
| 530-0Z,_940 |Screw
6. 153o-ozs7701Screw
7.
I 5_0-0_S_60_I_m4Ie(_r
I 53.
[ 24.
i 25.
I 26.
| 27.
!
[
I
]
I
[ 2& I
_o-o59555,
5"30-036046
330-0._4678
530-0L59F_ ;
530-01_6051
_0-ot4899,,
:
t0. ! _30-0,3e_3I_SP_
! 30. I 5_0-0_2
•
1L
I 530-0159;_4/Screw
I
I
i 3z I _o-oss_
I
Drive
GeexBeer_gs
Drive
Gear
Asst..
Isolator
Pl_te
4L
par_ Np.
5,_0-035319 WelchPlug
530-0353Z_
i%ac_ Ass'_.
42.
_30-4)35306Carburetor._s'y
Screw
Screw
Bo_ Ass°S
(Inch 21, 22 & 27)
Me_g
D_aphragm
i MeteringDiaphragm
; Casket
PumpC_._ket
i
13.
14.
I ._s'$
[ 530-094992
|P_ntHanSle
i 530-029946 |[sola_rSpriug
_5. [ _30-048n3/Cb_tchnrum
-
16.
17.
18.
19.
20.
/ 530-015886
|Screw
| 530-029918
IGe_B_Pl_te
] 530-032121 _BusbingBlade
|530-0950741BIadeAss'y.(22")
{ $30-029948 |BladeSea]
I 33.
] 34.
[ 35,
| 36.
| 37.
"
I 38.
[
I 530-0_Y28
[ 530-035031
M_ermgPm
MetzringLever
I 53o-o35P','8FttdIrdetScreen
InletNeedle Valve
I 530-035223
[ 530-035139
Me_erin_ Lever
I 530-0352_6
I
530--035312
S_r_
Met_,£ugLever
_rb=re_or
& 4O)
,
16
Pin
Repair
me (Ind. 29-32)
illlllllll
ii
i .....
NOTES
- t7-
illl
i ml illll i
ii
NOTES
• - 18-
illl
ii
i
•
i
i
illl ii
i
i
! i
•
ii! i
i
illll
NOTES
- 19 -
The Model Number will be found below the top handle with the Serial
Numhen Always mention theModeI Numberwhen requestingservies
or repair parts for your unit
All parts listed herein may be ordered from any Sears Service Center
and most Sears Stores.
Operator's
Manual
WHEN ORDERING REPAIRPARTS ALWAYS GIVETHE FOLLO
ING INFORMATION AS SHOWN LNTHISLIST:.
I.
The PART l_r_ER
3.
The PART DESCRIPTION
2.
The MODEL NUMBER
4.
The NAME OF ITEM --
358.795620
Gasoline
Hedge
-
Trimmer
Ifthepar_syou need are not s_ockedloc_!ly,
your order_
be transmittedto a Sears RepairParts D_n'bution Center forhandlir_.
Model No.
358.795620
How to Order
Repair Parts
SEARS
SERVICE
IS AT YOUR SERVICE
When you buy merchandise from
Sears you get an extra value that
notmdy else can offer -Sears Service.
Across town or across the courtSears Service is always near,
pro_Aing
trustworthy,
c_petent service tech_eians
using
only Sears specked factor] parts.
Your Sears Merchandise tak_ on added value when you discover
that Sears has Service Units throughout the coun_
Each
s'_,_'fed
by Seam-TmLned, professional tecSxLic_ns
usingSears
approved methods.