1
OWHER'S
MANUAL
SELFoCLEANENG
BUILT-IN
WALL
OVEN
MODEL
NOo
911.47465
911.47466
911.47469
CAUTION:
Before
read
using
th_s
this
manual
follow
all
its
and
Operating
linstruct[ons.
Sears,
Roebuck
Safety
and
range,
and
Rules
Co.,
Hoffman
o
-
Safety
Instructions
Operation
Care
and
Cleaning
Problem
SoJving
Estates,
229C4020P
IL
601
108
79
U.S.A.
(SR- 10335)
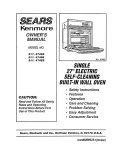
27" SELF-CLEANING OVEN
Removal
of Packaging
Tape ..... 5
Features
of Your Oven ..............
5
Oven Control,
Clock,
Timer
_..... 6
Control
Display
................................. 7
Clock
.................................................
8
Kitchen
Timer .................................. 8
Tones .................................................... 9
F Codes
............................................... 9
Oven Cooking
Tips ...................10-1 1
Setting
Bake ...................................... 12
Broiling
....................................................13
Special
Features
....................... 14-15
Self-Cleaning
Cycle ............ 16-17
Self-Cleaning
Oven Interior
.... 18
Control
Panel ................................. 18
Broiler
Pan and Grid ..................... 18
Oven Light Bulb .................................18
Oven Racks ..........................................19
Oven Door'. ...........................................19
Before
Calling
for Service
.............
................................................................
20-21
Temperature
Adjustment
.............
22
Warranty
..................................................
23
Consumer
Service
Numbers
....24
For your
convenience
and
future
reference,
your
model
and
serial
numbers
in the
space
located
on the
front
frame
behind
the oven
MODEL
NUMBER=
SERIAL
please
write
down
provided.
They
are
door.
NUMBER=
IMPOflTANT SAFETY
iNSTflUCT'iOHS
SAVE
THESE
Read
allll _nstructions
before
gas
or eliectr_cail
appliances,
be followed,
_ncnud_ng
the
I_NSTRUCTRONS
using
this
appW[ance.
When
basic
safety
precautions
foggow_ng:
o HEVER
USE
a towel or other
bulky cloth as a potholder
and
make sure the potholder
is dry..
Moist potholders
could
cause
steam burns.. DO HOT
let
potholders
touch
hot surfaces,.
IIMPORTAHT:
To insure
safety
for
yourself,
family
and home,
please
read your Owner's
Manual
carefully.
Keep it handy
for reference.,
Pay
close attention
to Safety
Sections,.
BE SURE:
your appliance
is
installed
and grounded
by a qualified
technician..
o DO HOT
unattended
o ALWAYS
KEEP
the appliance
area free from things
that will burn°
Food, wooden
utensils,
and grease
buildup
could
catch
fire.. Plastic
utensils
could
melt and canned
foods
could
explode..
Your
appliance
should
never be used as
a storage
area,.
leave children
alone or
near an appliance
in use.,
o ALWAYS
KEEP
your appliance
clear of things
that. will burn
(gasoline
and other flammable
vapors
or liquids).
o TEACH
CHltlLDREH
not to play
with controls
or any part of the
appliance,
and not to sit, climb
or
stand
on the door or any parts of
the appliance.
o CAUTliOH:
HEVER
STORE
items of interest
to children
in
cabinets
above
the appliance,.
Children
climbing
on the appliance
could
be seriously
injured.
o KEEP
THIIS
o HEVER
any part
instructions
manual
done by
o HEVER
warming
book
for later
,, HEVER
HEAT
unopened
food
containers_
Pressure
buildup
can
cause
the container
to burst and
cause
injury.
HEVER
LEAVE
jars or cans
or drippings
in your oven,.
o HEVER
surface.
noxious
sponges
use..
TRY
to repair
or replace
of the appliance
unless
are given in this
All other work should
be
a qualified
technician..
USE your
or heating
appliance
the room..
us_n9
shouBd
TRY
Some
fumes,
could
of fat
to clean a hot
cleaners
produce
and wet cloths
or
cause
steam
burns.
o EtE SURE
the oven is secur.e]y
installed
in a cabinet
that is firmly
attached
to the house
structure.,
for
° ALWAYS
KEEP
combustible
watt
coverings,
curtains,
dishcloths,
towels,
potholders,
and other linens
a safe distance
from the appliance
3
° NEVER
TRY
to clean utensils,
cookware,
removable
parts or' broiler
pan and grid in the self-clean
cycle.
IMPORTANT SAFETY
INSTRUCTIONS
o DO NOT
USE oven cleaners
- No
commercial
oven cleaner
should be
used in or around
any part of the
oven..
• DO NOT touch heating
elements,
surfaces
near them, or interior oven
surfaces.
These may be hot enough to
cause burns even though they are
dark in color. During and after use, do
not touch or let clothing
or flammable
material
contact
the elements
or hot
surfaces
until they have had time to
cool. Other surfaces
near the oven
vent openings,
oven door, or window
may al_;o be hot enough
to cause
burns.
- PLACE
desired
cool.. If
oven is
contact
IMPORTANT
NOTICE!
The
California
Safe
Drinking
Water
and
Toxic
Enforcement
Act
requires
the governor
of
California
to publish
a list of
substances
known
to the
state
to cause
birth
defects
or other
reproductive
harm
and
requires
businesses
to warn
their
customers
of potential
exposure
to such
substances.
The fiberglass
insulation
in a
self-cleaning
oven
will give
off
a very
small
amount
of carbon
monoxide
during
the
cleaning
cycle,
Exposure
can
be
minimized
by venting
with
an
open
door
or window
or using
a ventilation
fan or hood.
OVEN
RACKS
in the
position while the oven is
racks must be moved while
hot, do not let potholder
the hot oven element_
° AFTER
BROiLiNG,
always take the
broiler pan and grid out of the oven
and clean them.. Leftover
grease in the
broiler pan could catch fire the next
time you use your oven..
READ
THIS
NOW!
- ALWAYS
USE care when opening
the oven door: Let hot air and steam
escape
before moving
foods.
° NEVER
USE
aluminum
oven bottom,
improper
could start a fire.
• NEVER
BLOCK
foil to line the
OVEN
Do not
vent
opening.
o CLEAN
ONLY
the parts
manual
Follow all cleaning
instructions.
listed
AND
UNDERSTAND
iNFORMATION
Be sure
everyone
in your
home
knows
what
to do in case
of
fire.
Never
use water
on a
grease
fire;
it will
only
spread
the flames.
use of foil
the oven
SAFETY
in this
- NEVER
RUB,
move or damage
the
door gasket on self-cleaning
ranges.
4
FIRE=
try to
move
door
the
and
pan!
1.
Close the oven
controls
off.
turn
2,
If fire continues
carefully
open the
door, throw baking
soda on the
fire, or use a dry chemical,
foam,
or halon type extinguisher.
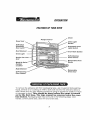
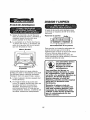
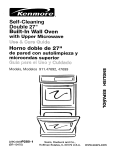
OPERATION
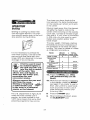
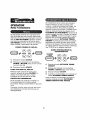
FEATURES OF YOUR OVEN
Clock
Range
Oven
Control
Vent
Oven
Switch
Light
Self-Clean
Automatic
Door Latch
Automatic
Oven
Light Switch
Broil
Element
Oven
Oven
Light
Broiler
Grid
Pan
Guides
Self-Cleaning
Oven Interior
And
Removable
Racks
Model
& Serial
Number
Lo_.ation
Bake
Rack
Oven
Element
Removable
Oven Door
Self-Cleaning
Door Gasket
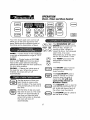
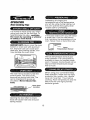
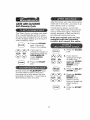
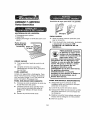
To remove
the adhesive
left from packaging
tape, use household
dishwashing
liquid, mineral
oil or cooking
oil. With a soft cloth rub into the area and allow to
soak. Rinse and dry ,Nell. Repeat
procedure
using an appliance
polish to insure
no damage
is done. This
should
be done
before
the
range
is turned
on for the
first
time.
The
tape
cannot
be removed
once
the
oven
has heated.
Packaging
tape may be found
in the following
areas:
door
handle,
control
panel area, door trim and oven area
5
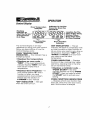
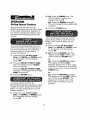
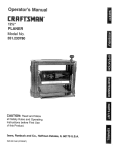
OPERATION
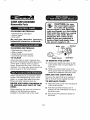
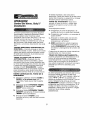
Clock, Timer and Oven Control
TEMP
G
Your new touch
allow you to set
ease_ Below are
functions
and a
TIMED
GG
HOUR
HOUR
MIN
in the traditional
range of 170°F
BROIL
-- Cooks foods at 550°F Hi
broil or 450 ° LO broil from the direct
heat of the upper' element.
Broiling
should be done with the door opened
the broil stop position.
CLEAN
-- Cleans the inside area of
the oven for you, When the cycle is
finished,
the oven will turn off
automatically,,
KITCHEN
TIMER
MIN
pad oven control will
oven functions
with
the different
types of
description
of each,,
BAKE
-- Cooks foods
oven with a temperature
to 550°Fo
OVEN
TEMP
The HOUR/"dllN
UP and
DOWN
arrow pads
set the
time of day, length
of
cooking
time, length
of
cleaning
time, the delayed
start time, the oven
temperature,
and the time
set on the Kitchen
Timer.
The TEMP
temperature
cooking°
pad sets the
used for
to
The START
pad must be
pressed
to activate
any
oven function..
The CLEAR/OFF
pad is
used to cancel
any oven
function
and the end of
cycle tone.. It will
not
cancel
the Clock
or
Kitchen
Timer.
Set the amount
of time you
want foods to cook or the
oven to clean. The oven turns
off automatically
at the end of
this time..
The ON/OFF
pad is used to
turn the Kitchen
Timer on or
off. tt will not control
any of
the other oven functions.
Set the time of day you want
the oven to turn on. The oven
The CLOCK
set the time
will turn on automatically
at
the time you have set and
when the function
is finished,
the oven will turn off
automatically.
6
pad is used
of day.
to
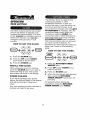
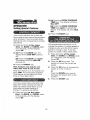
OP£RAT#ON
Control Display
Oven
gndicator
To Let You
Know
the Oven
Has
Temperature
Dndicator
FRashing
\
/ Turned
On
Location
For The
Time
Of Day Clock,
Kitchen
T_mer,
ST_ CLOCK
CLEAN
I Delay Start Time,
COOK"_TOPI /TIMER_
Or Oven
Cooking
AIo_ You To sez_l f P.--IP_--B
P_--O
tgt f I J L--O'O--O0 -_.
or'_.':r;'m_-....
] .SLAY
_AKECLE_
_OIL\,LOCKED
DOOR
....
_"
Oven
Function
gndicator
The Control
Display
is an easy
reference
for using your oven control.
Below are descriptions
of how the
Control
Display
works.
OVEN
TEMPERATURE
mNI_)gCATOR
--This
multiple
purpose.
o Displays
the
indicator
has
SET _NDHCA'_'ORS
_ The set
indicator
will flash in combination
with
an oven function
or timed function
to
let you know you need to set a time or
temperature.
Example:
"SET"
and
"i_A_E"
will Fgash
to let you know
you need to set the bake
temperature_
a
temperature
"IirgME_
gNDgcATOR
-- Displays
the time of day, cooking
time, delay
start time, cleaning
time or the time
set on the kitchen
timer_
o Dispgays
an error
code
-"ERR"
- If the oven temperature
indicator
flashes
"U=RR", then you
have set an invalid
time or
temperature.
° Dispgays
Oven
Probge_syour control
flashes
"F" and a
number
or letter, you have
experienced
an oven problem..
Please read the section
on
F-COD_S
in your manual,
"ON"
when
IINDgCATOR
the oven turns
--Will
on.
,,
Oven
Function
Bndicator
o D_sp_ays
a reminder
code
-"PUSH
START"olf
the time
indicator
flashes
the word "PUSH
START",
then you need to press
the ST_&RT
pad to activate
your
setting..
If
OVEN
FUNCTEON
Ii_DgCATORS
Displays
which
oven function
has
been set, when the oven door locks,
and if the function
is delayed
light
7
The Kitchen
Timer is used to time
cooking
processes
or" other
household
activities.
It does not
control
the oven.
It can be set for up
to 9 hours and 59 minutes,
it will
count
down in minutes
until the LAST
60 SECONDS
is reached,
then the
control
will beep
once. When the
countdown
reaches
ZERO,
the
control
will beep 3 times followed
by
one beep every 6 seconds
until the
KITCHEN
TilMER
pad is pressed
The 6 second
beep can be removed
for future cycles
if desired.,
For
directions
on removing
this continous
beep, see Tones
on the following
page..
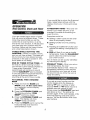
OPERATION
Clock and Timer
The clock must be set for the correct
time of day before
a delayed
oven
funotion
can work properly.
The time
of day cannot
be changed
during
a
timed oven function,
but can
be
changed
during
a bake or broil
function_
HOW
TO
SET
THE
HOUR
MIN
CLOCK
HOW
@@
Press
the CLOCK
2.
Press
arrow
the UP and/or
DOWN
pads to set the time.
3.
Press
the START
THE
pad°
pad.
11. Press the
ON/OFF
CLOCK
While using your oven for cooking,
press the CLOCK
pad if you wish
check the time of day. The current
time of day will show in the display°
POWER
THE
HOUR
MIN
TIlMER
If you have experienced
a power
failure,
the time will flash in the display
and wi!l be incorrect.
Reset your
€lock_
function
that was
to be reset.
KITCHEN
pad.
TIMER
2.
Press UP and/or
pads to set time.
3.
Press
4.
When the countdown
has reached
zero, press
the KITCHEN
TIMER
ONIOFF
pad to turn off
the beep.
to
FAILURE
Any oven cooking
process
will need
SET
KITCHEN
tl,
RECALL
TO
the
START
DOWN
pad..
To cancel
the timer during
the
countdown,
press the KITCHEN
TIMER
ON/OFF
pad TWICE.
in
8
arrow
If you would
like to return the 6 second
beep, repeat steps above until the
display
shows your choice
and press
StarL
OPERATION
Oven Confrol Clock and Timer
ATT_:NTlllON
"tONE--This
tone will
sound if you make an error or an
oversight
is made while setting
an
oven function
Your new control has a series of tones
that will sound at different
times.
These
Examples
tones may sound while you set the
control for an oven function,
or at the
end of the oven function., It wi!l also alert
you there may be a problem
with the
functions.
Below are the types of tones
and a brief description
of each
TONES
WHIILE
SETTING
THE
CONTROL--When
you press a touch
pad you will hear a beep. This beep wil!
let you know you have placed enough
pressure
on the pad to activate
it. (The
arrow pads do not beep,.)
THE
be:
bu
Setting
Start.,
function
and
not pressing
C.
Pressing
an additional
function
pad
without first setting a temperature
or
time,
d. ERR will flash if you set an invalid
temperature.,
Press the CLEARIOFF
pad to clear the control and reset
your oven function,
Any of these
by watching
END OF TltMED
CYCLE
TONE--At
the end of a timed cooking
function,
you will hear 3 short beeps followed
by
1 beep every 6 seconds,,
This 6
second
beep will continue
to sound
until the CLEAR/OFF
pad is pressed
or you may select the special
feature to
cancel this 6 second
beep from
sounding
at the end of future cycles,.
TO CANCEL.
BEEIP
would
a. Setting a clean cycle and the oven
door is not properly
closed,
can be quickly
the display,,
identified
IPREHE:AT
TONIE--When
you set an
oven temperature,
the oven
automatically
sta_s to heat, When the
temperature
inside the oven reaches
the temperature
you have set, a tone
will sound to let you know the oven is
ready for baking°
6 SECOND
If you set an oven function
and the
control
beeps while the display
is
flashing
"F" and a number
or letter
such as "F.4"
or "Fit" there may be a
problem
with the control
or oven,
Simply press the CL.IEAII_OFF
pad and
wait about an hour, Try setting the
function
again, If the code repeats, write
down the flashing
code and call for
service,
Tell the technician
what code
was flashing.,
1t. Press and hold the BAKE
and
BROIIL
pads, at the same
t_me
for 3 seconds,
until the display
shows "SF'.
2.
Press the KITCHEN
TIIMER
The display will show "CON
BEEP"
(continous
beep)
pad,
3.
Press the KITCHEN
TIIMER
again, The display
will show
"BEEli _' (beep canceled),
pad
4.
Press the START
pad to cancel
6 second
beep and leave the
special
feature mode.
the
9
Preheating
is bringing
the
temperature
up to the temperature
you will be using during
baking.
Let
the oven preheat
thoroughly
when
recipes
call for preheating.
OPERATION
Oven Cooking
Tips
It is normal to have some odor when
using your oven for the first time.. To
help eliminate
this odor, ventilate
the
room
by opening
a window
or using
a vent
hood.
in the back of the oven you will notice
a small tube. This is a heat sensor'
that maintains
the temperature
of the
oven.
Never move or bend this tube.
IMPORTANT=
Never cover
the oven
bottom
or' oven rack with aluminum
foil. Improper
use can cause
poor
heat flow, poor baking
results,
and
may damage
the oven finish.
C_
_emp
Overt
erature
Sensor
The low temperature
zone of your
oven (between
170 ° and 200°F)
is
available
to keep hot cooked
foods
warm,. However',
foods should
not be
kept at these temperatures
longer
than 2 hours.
When using your" convenient
Delay
Start operation,
foods
such as dairy
products,
fish, poultr-j,
etc., should
never sit more than 1 hour before
cooking,,
Room temperatures
and the
heat from the oven light promote
bacterial
growth,
The oven vent is located
under the
control
panel.
This area could
become
hot during
oven use,. The
vent is important
for" proper
air
cir'culation.
Never
block
this
vent.
Oven Vent
Location
Opening
the
door
foods will cause
baking results_
often
to check
heat loss and poor'
10
GLASS,
DARK
IN!OH-STUCK
OR
DARKENED
BY AGE BAKEWARE,
absorb heat, and can be used
for yeast breads,
pie crust or foods that
need a brown crust° The oven
temperature,
when
should be reduced
The Oven Temperature
Sensor at the
back of the oven continuously
senses
and controls
the temperature
inside the
oven. To keep a constant
set
temperature,
the elements
wilt cycle or
turn on and off during cooking,.
using these
by 25°E
pans
The oven racks are designed
with stop
locks, a convenience
as well as a safety
precaution,
The guides
have a bump to
prevent
the racks from tilting when
racks are pulled out of the oven,,
Bump
rack
g
If baking with more than one pan, place
the pans so each has at least 1 to 1 1/2"
of air space around it. Place pans so
one is not directty above the other..
in
Your oven has four (4) rack
Above the top guide cannot
a rack position,
positions,
be used
for
Gu_,_e
2
2
1
Always
proper
cool
FLAT
COOKIIE
SHESTS,
without
sides, allow air to circulate
all around
the cookies
for even browning,
I
pllace
position
oven
racks
in the
while
oven
is
i
You may feel that your new oven cooks
differently
than the oven it replaced..
We
recommend
that you use your new oven
a few weeks to become
more familiar
with it, following
the times given in your
recipes
as a guide. See Do It Yourself
Temperature
Adjustment
in the back of
this manual to make the adjustment
if
you feel your oven is too hot or too cool
for your cooking
preference..
SH_HY
PANS
reflect heat, and are
perfect for cakes and quick breads that
need a light brown crust..
11
OPERATION
To set the oven to turn on at a later
time of day, cook for a specific
amount
of time and turn off automatically_
Baking
11. Press
Press
pad.
lm
1
TEMP
3.
the BAKE
pad.
Press the TEMP
UP
and/or
DOWN
arrow
pads to set the oven
temperature
you
prefer-to
use..
Press
pad,,
the
2. Press the TEMP
UP
and/or
DOWN
arrow
pads to set the oven
temperature
you
prefer to use,.
TEMP
START
3.
OOKING!
TIME
j/
To set the oven to cook for a specific
time and turn off automatically,,
tl. Press
pad.
11
TEMP
the
HOUR
HOUR
BAKE
@@
5.
Press
pad
the
Press the
COOKING
pad.
OVEN
TIME
Press the HOUR/
MIN
UP and/or
DOWN
arrow pads
to set the amount
of
time you prefer yourfoods
to cool
Press the DELAY
START
TIME
pad,
OVEN
TIME
HOUR
Press
the HOURI
MIN
UP and/or
DOWN
arrow pads
to set the amount
of
time you prefer your
foods to cook,
MIN
MIN
Press the TEMP
UP
and!or DOWN
arrow
pads to set the oven
temperature
you
prefer to use,.
Press the
COOKING
pad,.
the BAKE
MIN
6. Press the HOUR/
MIN
UP and/or
DOWN
arrow pads
to set the time of day
you prefer the oven
to turn on_
7. Press
pad_
These
used
oven
when
operations
roasting.
the START
may
be
The oven wilt cut off at the end of the
cooking
time unless the cook and
hold feature
has been activated..
START
12
The closer
you place foods
to the
broil element,
the faster foods
brown
on the outside
yet remain
red to pink
in the center_
Moving
meats
away from the element
will allow the meat to cook to the
center
while browning
on the outside_
Cook side 1 at least 2 minutes
longer
than side 2. If your oven is connected
to 208 volts, you may want to use a
higher
rack position
and/or
broil
foods
fonger.
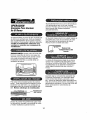
Broiling
is cooking
by direct
heat
from the upper
element.
The oven
door should
remain
open to the broil
stop position
during
broiling..
j
_-"__b_
_++
The size, weight,
thickness,
starting
temperature
and your preference
of
the doneness
of the meat will affect
broiling..
This chart is based
on meats
at refrigerator
temperature
It is not necessary
to preheat
the
oven when broiling..
Use the broiler
pan and grid that came ,with your
range.
Both are designed
for proper
drainage
of fat and liquids.,
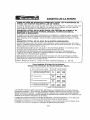
FOOD
Steak
Ground
The US, Department
of Agriculture
notes that meat cooked
rare is
popular,
but meat cooked
to only
140°F (rare) means
that some food
poisoning
organisms
may survive.
13
(MIN.)
9-11
3
16-18
Pork
Chops-l/2"
thick
3
Fish
3
27-29
11-13
45-55
(fillets)
Chicken
and
TOTAL
TIME
beef
patties
1" thick
be monded
tighUy
to
Sf foJO
it must
the
gridis used
and
sBits
cut
into
the
foill to match
those
of the
grid.
This
aBBows
fats
and
Diquids
to
drain
into
the
broiBer
pan,
preventing
fire and
excessive
smoke.
Always
remove
the
pan
grid
from
the
oven.
Storing
or forgetting
a soiDed
broiler
pan
in the
oven
is a potLential
smoke
or fire
hazard.
1" thick
RACK
POSITION
3
(pieces)
2
I a.
Press the BROIL
win! automatically
BroiR),
lb.
While
the set. indicator
is flashing
in the display,
press
the 113ROI_L
pad again
if you prefer
to use Lo
Broil.. Use Lo Broil to cook foods
such as poultry
or thick cuts of
meat thoroughly
without
overbrowning
them.
2_
Press
3.
When broiling
the CLEAR/OFF
the START
pad.
(This
set
HE
pad+
is finished,
pad,
press
2.
oPERATION
(a) Press the BROIL
pad. The
control display
will show the
degrees
sign and F..
(b) Press the BROIL
pad again.
This will change
F (Fahrenheit)
to C
(Celsius).
Setting Special Features
"four new touch pad control has
additional
features that you may choose
to use. After making your selection,
if
you want to change
that setting,
follow
the steps until the display
shows your
choice.
3,
Press
the START
pad,.
Your control is set to use the 12 hour'
clock. If you prefer to use the 24 hour"
Military Time clock or black out the
display:
1.
The control is automatically
set to turn
off the oven after 12 hours baking or3
hours broiling
should you forget and
leave the oven on. If you want to
remove this feature:
tu
2,
Press and hold, at the
same
time,
the BAKE
and BROIL
for 3 seconds,
until the display
shows SF.
Press the BELAY
pad The display
(12 hour' shut-off).
2.
pads
Press
Your oven control is set
Fahrenheit
temperature
recipes
are given using
scale° You can change
Celsius selection.
_m
Or
(c)
Press the CLOCK
pad again°
The display
will show OFF, If this is
your choice
press START.
The
display
will not show time, (The
Delay Start Time feature will not
operate.)
pad.
for the
selections.
Most
the Fahrenheit
this to use the
Press and hold, at the same
time,
the BAKE
and BROIL
for3 seconds,
until the display
shows SF
(a) Press the CLOCK
pad. The
display
shows 12hr., tf this is your
choice
press the START
pad.
(b) Press the CLOCK
pad again.
The display
will show 24hr,.
Example:
5:00 on the 12 hour clock
will show 17:00 hours on the military
clock, if this is your choice
press the
START
pad.
START
TIME
shows 12shdn
the START
pads
or
Press the BELAY
START
TIME
pad again° The display
will show no
shdn
(no shut-off),
3.
Press and hold, at the
same
time,
the BAKE
and BROIL
for3 seconds,
until the display
shows SF.
pads
14
2. (a) Press the OVEN
COOKIHG
TIME
pad, The display
will show
HLd OFF_
OPERATIOH
(b) Press the OVEN
COOKRHG
TIIMIE pad again
to activate
the
feature, The display
will show HILd
Setting Special Features
3. Press
the START
pad
Your control will allow you to lock the
touch pads so they cannot be activated
when pressed.
If you're worried
about
leaving the oven unsupervised,
activate
this feature,
11. Press and hold, at the same
time,
the BAKE
and BROnL
for 3 seconds,
until the display
shows SF.
This special
feature will allow you to
change the speed;
#1 means speed of
change
is slow up to #5 which means
speed of change
is fast,, To set the
speed you prefer, follow these steps:
pads
2. (a) Press the CLI_AN
pad,, The
display
shows ILOC OFF (lockout
off),
(b) Press the CLEAN
The display
wilt show
(lockout
on),
3.
Press the START
t.
pad again,
LOC ON
2,
pad°
This feature
can engy be set
when
the oven
is not _n use,
3.
When this feature is on, the display will
show _--OO, if a touch pad is pressed.,
(This feature will not affect the Clock,
Timer or Oven light pads )
Press the UP arrow pad. The
display
will show the current
set
speed_
Press the UP arrow to increase
the
speed up to the number 5.,
Press the DO_VN
arrow pad to
decrease
the speed down to the
number
1.
Your new control has a cook and hold
feature for timed cooking
only that will
keep hot cooked
foods warm up to 3
hours after the timed cooking
is
finished,
To activate
this feature:
Press and hold, at the same
time,
the BAKE
and BROIL
for 3 seconds,
until the display
shows SF.,
pads
or
4.
t.
Press and hold, aS the same
t_me, the BAKIE
and BROIL
for 3 seconds,
until the display
shows SF,
pads
15
Press
the START
pad,
CARE AND CLEANING
Self-Cleaning
Cycle
tl.
Remove
the broiler' pan and grid,
oven racks,
utensils
and any foil
that may be in the oven.
2.
Soil on the front frame,l"
inside
the oven,
and outside
the door
gasket
wilt need to be cleaned
by hand..
Front
i
:
The door gasket
is designed
to have
a 5-6" gap at the bottom
of the door.
This allows for proper
air' circulation.
Door
Door
Door
3_
_
Liner
Ctean these areas with hot water,
soap-filled
steel wool pads or
cleansers
such as Soft Scrub®
to
remove
any soil, Rinse well with clean
water and dry.
Wipe up any heavy
the oven bottom.
Gasket
Liner
It is normal for your oven door to give
the appearance
of not having
a good
seal against
the range.. This is due to
the gasket.
The location
of the gasket
on the oven door" maintains
a good
seal and prevents
any heat loss.
Frame
_;_oor
/ _'_
Pane_
spiltovers
be left in the oven
tensils a self-clean
should
never
during
cycle.
The
oven
racks
may
be
cleaned
during
the
self-clean
cycle,
but will
lose
their
luster
and
become
hard
to slide.
If you choose
to leave
them
in during
the
cycle,
wiping
thenz
down
with
vegetable
oil after
the
cycle
will
help
them
slide
easier.
on
Do not clean the door gasket°
The
fiberglass
material
of the oven
door gasket
cannot
withstand
abrasion.
It is essential
for the
gasket
to remain
intact,
if you
notice
it becoming
worn, frayed
or
displaced
on the door-, it should
be
replaced.
For the first
clean
cycle,
vent
the room
with
an
opened
window
or hood
vent.
This
will
reduce
the
odor
when
heating
new
parts.
16
After the cycle,
you may notice
some
white
ash in the oven,, Just wipe it up
with a damp
cloth or sponge,,
If white
spots
remain,
scrub
them
with a soap-filled
steel wool pad. Be
sure to rinse thoroughly,
These
are
usually
deposits
of salt that cannot
be removed
during
the cycle,
The Clean Cycle,
including
cool down
time, is automatically
set for 4 hours,
but you may change
this from 3 hours
if oven is lightly soiled up to 5 hours if
oven is heavily
soiled°
Press
gf for any
reason
you are
not
satisfied
with
the
cgeaning
resugts,
just
repeat
the
cycBe.
the CLEAN
pad, 4 hours will
show in the display,.
FLOUR
If you want to
change
the length of
clean time press the
HOUR/MRN
UP
and!or
DO_tVN
arrow pad.
MIN
3,
Press
pad,,
the
HOUR
1.
Press
pad,
2=
If you want to
change
the length
of clean time
press the HOUPJ
MIN
UIP and/or
DOWN
arrow
pads°
3.
Press the DELAY
START
pad°
4.
Press the HOUR/
M]IN UP or
DO_YNI arrow
pads to set the
time you prefer the
clean cycle to
start.,
5o
Press
pad,
MIN
START
Simply
press
the CLEAR/OFF
pad.
You will need to wait for the oven
temperature
to drop below the lock
temperature
(approxo
1 hour) before
attempting
to open the door.,
HOUR
17
MIN
the CLF=AN
the
START
CARE AND CLEANING
Removable
CLEANING
use
:
:
the
oven
light Be switch
CAUTION:
sure
is in the off position.
Do not touch
a hot light
bulb
with
wet
hands
or a wet
cloth.
Wait
until
the bulb has cooled
and use a dry cloth.
Never
touch
the live collar
of the
detergent
abrasive
cleaners
bulb.
broken
cleaners,
or bleach.
the
if you
light
power
are replacing
bulb
make
supply
Bulb
CLEANING
Bulb
Allow the pan to soak° Sprinkle
the
grid with dishwashing
detergent
and
cover with a damp
cloth or paper"
towel.. Rinse and dry well.. Scour
as
needed.
You may also place both the
pan and grid in the dishwasher..
TO
OVEN
ANY
THE
Bail
Wire
COVER
1.
Disconnect
electrical
power to the
oven at the main circuit breaker' or
fuse box.
2.
Hold your hand under' cover and
firmly push back the bail wire, until it
clears and releases
the bulb cover°
REPLACE
Clean only as touch up between
clean
cycles_ Use dishwashing
liquid, warm
water, or a soap-filled
steel wool pad.,
Rinse well after cleaning
and dry,.
Socket
Cover
REMOVE
a
sure
is off.
Uve
Collar
MATERIALS
,, Dishwashing
detergent
o Warm water
* Soap-filled
scouring
pad
° Commercial
oven cleaner
TO CLEAN
NEVER
USE
OR AROUND
OVEN.
iii1,1,1111,1,111,,
'1'1 i,
Parts
MATERIALS
- Dishwashing
- Warm
water
o Soft cloth
Do not
industrial
_r-
THE
LIGHT
BULB
Unscrew
the light bulb and replace it
with a 40-watt
home appliance
bulb.
TO
CLEANERS
IN
PART
OF THE
When cleaning,
be sure not to bend or
displace
the temperature
sensor
located
on the back wall of the oven_
REPLACE
COVER
1.
Place the bulb cover
of the bulb socket.,
2.
Pull the bail wire
into the groove
forward
snaps into the indentation
the bulb cover_
3.
18
Reconnect
the oven.
the electrical
until it
on top of
power-to
Broil
o Dishwashing
o Warm water
o Scouring
pad
1.
Position
Hinge
pad or soap4illed
Raised
of The
TO
detergent
Stop
TO
steel wool
Back
Rack
REMOVE
1.
Open the door
position,
to the broil
stop
2.
Grasp the door at each side and lift
up and off the hinges.. DO NOT
LIFT
DOOR
BY THE
HANDLE.
TO
REPLACE
REMOVE
Pull the racks
position,
out to the stop
lock
2.
Pull up the front of the rack and
slide under the bump off the rack
guide
TO CLEAN
Clean with warm water and detergent.
For hard to remove
stains, gently scrub
with a scouring
pad or a soap-filled
steel wool pad,, Rinse well,
TO
t.
Make sure the hinge
broil stop position1
2.
Lift the door
REPLACE
are in the
by the sides.
1.
Place the raised back
onto the rack guides,
3.
2
Lift the front of the rack until the
raised back slides under the bump
of the rack guides.
Line up the slots at the bottom edge
of the door with the hinge arms
4.
Slide
5.
Slide the door down onto the hinge
arms as far as it will go.,
Close the door_
3.
the rack
of the rack
arms
all the way
back,
19
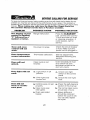
BEFORE CALLING FOR SERVICE
To save you time and .money, before making a service call check the list below for any
problem you may feed you have with the performance
of your range. If the problem
is
something
you cannot fix use the Consumer Service Numbers
located at the back of this
rnanual.
When
making
an]/ calls have the Model
No., Repair
Paris
list,
Use and Care
Manual
and the Date of Purchase
available.
PROBLEM
ILLI
POSSIBLE
The
d_splay
of your
control
is flashing
"F" followed
by a
number
or letter.
Range
Oven
and
oven
control
will
not
work.
No power
Oven
seems
Thermostat
temperature
inaccurate.
Oven
will
unlock.
Oven
work.
CAUSE
POSSIBLE
SOLUTION
..........................
light
not
will
malfunction.
Check
the circuit
breaker
or fuse_ Make sure the
power
cord is plugged
in.
to range.
calibration°
Clean
cycle
finished
not
Press the CLEAR/OFF
pad
Let the oven cool for
1 hour and enter an oven
or cleaning
operation_
If
code
repeats,
call for
sen,ice.
Light switch
position_
b.
Oven light bulb
burned
out..
Oven
clean
did not
or results
a.
were
poor.
b. Clean cycle
interrupted.
c. Oven was
heavily.
were
in off
not
was
soiled
20
this
Oven temperature
must
drop below
the lock
temperature
before
the
door ,,,viii unlock.
is not
a.
Controls
properly,
See the adjustments
described
following
section..
set
a.
Check
switch
panel_
oven light
on the control
b.
Check
bulb.
the
a.
Check
section
oven
light
the self-cleaning
of this manual.
b. The normal
clean
cycle
should
last 4 hours.
c.
Heavy spiltovers
should
be removed
before
the cycle
is set,
You can also repeat
the cycle.
Oven
smokes.
a. Dirty
oven.
b. Improper
aluminum
c. Broiler
grease
-.
:
Foods
bske
,r, "" ";;'._,,,,;,,,,
'
use of
foil.
pan containing
left in the oven
.............................. r,rr.,_,
...................
do not
properlly.
a. Oven
rack
c.
Oven vent
covered,
d.
Improper
e.
........
broi]t
I
I
after
:: ......
a. Be sure to preheat
the tone sounds_
blocked
until
uniform
air
b° Maintain
space around pans and
utensils.
See oven
cooking
section.
or pan
or
Cm
use of foi!,,
Keep
vent clear.
d.
Racks should not be
covered
during baking..
Improper
temperature
setting for utensil used.
e.
Reduce
temperature
25
degrees
for glass or
dul!/darkened
pans..
f.
Recipe
f.
Check recipe
measurement.
g.
Improper
calibration
not followed
oven
control
h. Range and oven
not. level.,
not
c° Clean pan and grid
each use.
is not preheated_
b. Improper
placement
Foods
do
properly,
a. Check for heavy
spillover
b. Use of foil not
recommended,
llli
]
am
i
b. Oven
c,
n
preheated.
use of foil..
door closed
broiling.
e, Low voltage
Volts).
f,
Improper
time..
h, Check the installation
instructions
for leveling.
:,;;
rack
improper
d, Oven
during
g. Check the temperature
adjustment
following
this
section,,
rack
iIir _11_ _ .........
Improper
position.
(208
broiling
21
and
.........
i_
...........
I
I
a, Check broil pan
placement;
see broiling
section.
b, Do not preheat
broiling
c, Check broiling
d, Open
door
when
section..
to broil
stop.
e, Use higher rack position
and/or longer cooking
timer
f,
Check broiling
chart
broiling
section..
in
"DO IT YOURSELF"
TEMPERATURE
ADJUSTMENT
You may feel that your new oven cooks
differently
than the oven it replaced.
We
recommend
that you use your new oven
a few weeks to become
more familiar
with it, following
the times given in your
recipes
as a guide_
If you think your new oven is too hot
(burning
foods) or not hot enough
(foods are undercooked)
you can
adjust the temperature
yourselfl
The
appearance
and texture of foods is a
better indicator
of oven accuracy
than
oven thermometers,
to check the
temperature
setting of your new oven.
These thermometers
can vary by 20-40
degrees,
In addition,
the oven door'
must be opened
to read these
thermometers..
Opening
the door will
change the temperature
of the oven..
To decide how much to change
the
temperature,
set the oven temperature
25 degrees
higher (if foods are
undercooked)
or 25 degrees
lower (if
foods are burning)
than the temperature
in your- recipe, then bake.. The results of
this "test" should give you an idea of
how much the temperature
should be
changed.
Press and hold down
both the BAKE
and
BROIL
pads for' 3
seconds,
until the
display
shows SF,
lm
+
Ro,0
m
3a.
Press the BAKE
pad,.
A factory
set 2 digit
number
will show in the
display,
usually 00
If you think
oven
is not
enough,
the
hot
Press
ar_ow
the UP
pad to increase
the temperature
+35°F,
TEMP
(+)
up to
3b.
Press the DOWN
arrow pad to
decrease
(-) the
temperature
down to
.35°F
4.
Press
This increased
the START
pad..
or decreased
temperature
setting will remain in
memory
until the above steps are
repeated.
A power' failure will not affect
this setting.
The broil and self-clean
will not be affected.,
temperatures
RANGEWARRANTY
FfFULLONE YEAR WARRANTY
PARTS
ON THE FUNCTIONING
OF ALL PARTS EXCEPT GLASS
If, within one year from the date of installation, any part, other than a glass part, fails to function
properly due to a defect in material or workmanship, Sears will repair or replace it, free of charge,,
FULL 3g-DAY WARRANTY ON GLASS PARTS AND FINISH OF PORCELAIN ENAMEL,
PAINTED OR BRIGHT METAL FgHISHED PARTS
If, within 30 days from the date of installation, any glass part or the finish on any porcelain enamel,
painted or bright metal part is defective in material or workmanship, Sears will replace the part, free
of charge..
FULL 90-DAY WARRANTY ON MECHANICAL ADJUSTMENTS
For 9D days from the date of installation, Sears will provide, free of charge, any mechanical
adjustments necessary for proper operation of the range, except for normal maintenance.
If the range is subjected to other than private family use, the above warranty coverage is effective for
only 90 days°
WARRANTY SERVICE IS AVAILABLE BY CONTACTING THE NEAREST SEARS SERVICE CENTER/
DEPARTMENT IN THE UNITED STATES
This warranty applies only while this product is in use in the United States. This warranty gives you
specific legal rights, and you may also have other rights which vary from state to state.
..._..
Sears Roebuck and Co. Dept. 817 WA Hoffman Estates, IL 60179
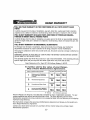
To
fu_her
add
_uy
a Sears
Years
of Ownership
to the
value
Maintenance
Coverage
of your
Range,
Agreement.
1st Year
1
Replacement
Part_ other
or Glass
of Defective
than Porcelain
2
Mechanical
Adjustment
3
Porcelain
_./
2nd
Year
I 3rd Year
W
90
DAYS
W
30 DAYS
and Glass
Parts
V¢
Annual Preventive
Maintenante Check at your request
W
rvIA
- Werr_nty
MA
MAIMA
- Ma)nlon_nco
Agrooment
Kenmore Ranges are designed, manufactured and tested for years of dependable operation. Yet, any
modern appliance may require service from time to time. The Sears Warranty plus the Sears
Maintenance Agreement provides protection from unexpected repair bills and assures you of enjoying
maximum range efficiency.
The chart above compares the warranty and Maintenance Agreement and shows you the benefits of a
Sears Range Maintenance Agreement..
Contact your Sears Sales Associate or Local Sears Service Center today and purchase a Sears
Maintenance Agreement
23
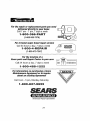
For the repair or replacement parts you need
delivered directly to your home
Call 7 am - 7 pm, 7 days a week
1 =800=366=PART
(1-800-366-7278)
For in-home major brand repair service
Call 24 hours a day, 7 days a week
t =800-4=RmEPAgR
(1-800-473-7247)
For the location of a
Sears parts and Repair Center in your area
Call 24 hours a day, 7 days a week
11-800.,488=
1 222
For information
on purchasing a Sears
Maintenance
Agreement
or to inquire
about an existing Agreement
Call 9 am - 5 pro, Monday-Saturday
1 =800=827=6655
America's
Repair
24
Specialists
MANUAL
DE_L COHSUMIIDOR
H@RN@
DE
CON
Sears,
pot
Roebuck
prinlera
and
vez.
Co.,
Hoffrnan
NO.
91 t. 47465
911. 47466
9t 1 ° 47469
o I]nstrucciones
Seguridad
Funcionaeniento
Lea y siga
todas
gas
reglas
y llas instruct[ones
para
ell funcionaeniento
antes
de usar
este
producto
['aODELO
PARED
DE 27"
AUTOLmMPIIEZA
de
o Cuidado
y L[mpieza
o C6mo
Resolver
Problen_as
Estates,
IlL 60179
U.S.A.
229C4020P
108
(SR- 10335)
HOR#O DE 27" CON AUTOLIMPIEZA
Indice
Seguridad
el uso de la estufa
El ciclo de autolimpieza
.................
16-17
Panel de control ............................................
18
Cacerota y parrifla para asara la
parrilla .......................................................................
18
Foco de la luz del homo ...........................
18
Parriflas del homo ....................................
19
Puerta del horno ......................................
19
..... 3-4
C6mo sacar la cinta de empaque _. 5
Caractedsticas
de su horno ...............5
Control de horno-reloj,
cron6metro
6
Dial de control ...........................................
7
Reloj ......................................................................
8
C[onSmetro
de la cocina .....................8
Tonos ................................................................
9
Cddigo F ......................................................................
9
Consejos pata cocinar en el
homo .............................................................
10-1 1
C6mo hornear, ..............................................
12
C6mo asar a la parrilla ............................
13
Programas
especiales
....................
14-15
Para
su conveniencia
y referencia
mode|o
y serie
en el espacio
que
frontal
detr_s
de la puerta.
N_mero
.....
de
:
modelo:
:
:
I'I'H'III'II
Antes de llama[' para un servicio ......
.........................................................................
20-21
Ajustes a la temperatura
.........................
22
Garantia .............................................................
23
NOmeros para servicio del
consumidor
............................................ 24
futura,
pot favor
se provee.
Est_n
NOmero
II
IIII1'111 I
I
" "
_:,=_
......
de
escriba
ubicados
el nt_mero
de
en el marco
serie:
==:m
GUARDE £STAS IAISTRUCCIOAtES
Lea todas
llas _nstrucciones
antes
de usar
es_e
aparato.
Cuando
use aparatos
a gas o eR_ctricos,
se deber_an
seguir
precauc_ones
de seguridad,
incguyendo
ao sigu_ente:
HUNCA
USI5 una toalla u otro paso
abultado
como agarradera
y aseg0rese
que la agarradera
est_ seca. Las
agarraderas
hL)medas
poddan
causar
quemaduras
por vapor.
NO P_:RMilTA
que las agarraderas
toquen
las
superficies
para cocinar
ca]ientes..
UMIPORTAIHITE=
Para garantizar
su
seguridad,
la de su familia y la de slu
hogar,
por favor lea su Manual
del
Consumidor
cuidadosamente.
Mant_ngalo
a la mano para referenciaso
Ponga mucha
atenci6n
alas
secciones
de seguridad..
ASEG_RES;E
que su estufa
sea
instalada
por un t_cnico
especializado
y
que haga tierra adecuadamenter.
SgERIIPRE
M,ANTENGA
el Area de la
estufa
despejada
de cosas
que se
podrian
quemar..
Los alimentos,
los
utensilios
de madera,
la acumulaci0n
de grasa,
la gasofina
y otros vapores
o
![quidos
inflamabtee
se podrian
incendiar.
Los utensilios
de pl&stico
se
podrian
derretir
y las comidas
en
conservas
podrian
explotar..
Su homo
nunca
de deberi'a
usar para almacenar
cosas,
o NO BE,lIE
a los niSos sin vigitancia
cerca
de una estufa
que se est# usando.r
o E]HISEI_E
A LOS
NItNOS
,6, no jugar
con los controles
o cuatquier
parte de
estufa,
no sentarse,
subirse
o pararse
sobre la puerta
det homo o cualquier
otra parte de este aparato,.
o SIIEMPRE
g_IAINITENGA
la estufa
despejada
de cosas que se podrian
quemar (gasolina y otros vapores o
ll'quidos inflamables).
la
o PRECAUCMON:
HUNCA
GUARE)E
articulos
que sean de interns
para los
ninos en los gabinetes
sobre la estufa..
Los ni_os que se suban
sobre
la estufa
podrfan
resuftar
gravemente
heridos,.
- GUARDE
futuro.
r:STI_
libro
para
o NUINCA
CA, LEEN'rlE contenedores
de
alimentos cerrados.. El aumento
de la
presi6n puede causar que el
contenedor
explote y cause heridas.
NUNCA
DE,JE frascos o latas con
grasa o goteaduras
dentro del homo.
un uso
o NUNCA
"rRA'rE
de limpiar una
cubierta caliente.. Atgunos
limpiadores
producen
vapores t0xicos, y los paSos
o esponjas
mojadas podrian
causar
quemaduras
por vapor..
o NUNCA
TRAT'E de reparar o
reemplazar
una parte de fa estufa a
menos que las instrucciones
se den en
este manual
Todo otro trabajo deberfa
ser hecho pot un tecnico especializado..
° NU_IICA
calentar
USI5 su estufa
una habitaciOn.
para entibiar
o NUNCA
USE
e! estufa..
o
ropa suelta
cuando
o A,SEGORESE
que el homo est_
instalado flrmemente
en un gabinete
este bien pegado a la pared..
o SIIEMIPRE
MANTENGA
los
revestimientos
combustibles
de las
paredes,
cortinas y otros panos a una
distancia
prudente de ]a estufa
3
use
que
- NUNCA TRATE de limpiar los utensilios,
ollas, partes removibles o ta cacerola y la
pacrilla para asar en el ciclo de autolimpieza.
o NO USE limpiadores para homos - No se
debeda usar ninguna clase de limpiador para
homos dentro o alrededor de cualquier parte
del hornoo
INSTRUCCiONES
DE SEGURIDAD
IMPORTAiVTES
;ADVERTENC|A
DE
SEGURiDAD
IMPORTANTE!
o NO TOQUE las superficies para calentar, las
superficies cerca de elias o fas superficies
interiore& Estas podrfan estar suficientemente
caiientes para quemar aunque se vean de
color OscUrOrDucante y despues de! uso, no
toque o permita que ta ropa o materiales
inflamables hagan contacto con tas
superficies calientes hasta que hayan tenido
tiempo de enfriarrse. Las otras suprficies
cerca de las ventanitlas de ventilaci6n del
homo, puertas, ventanas y las superficies
para cocinar tambi6n podrfan estar
suficientemente calientes para causar
quernaduras.
Califomia
Safe
Drinking
Water
and
Toxic
Enforcement
Act requiere
que
el gobernador
de California
publique
una lista
de substancias
que el
estado
sepa
que producen
defectos
de nacimiento
u otros
da_os
reproductivos
y requiere
que los
hombres
de negoci0s
adviertan
a
sus clientes
del contacto
potencial
a tales
substancias.
El aislante
de
fibra
de vidrio
en el homo
con
autolimpieza
emitir_
una muy
peque_a
cantidad
de mon6xido
de
carbono
durante
el ciclo
de
autolimpieza.
E! contacto
se puede
minimizar
ventilando
con una puerta
o ventana
abierta
o usando
un
ventilador
o una campana
de
ventilaci6n.
• COLOQUE
LAS PARRILLAS
DEL
HORNO en la posici6n deseada mientras et
homo este frio Si las parrillas se deben mover
mientras el homo est6 caliente, no pe[mita
que la agarradera haga contacto con el
quemador caliente del homo
• DESPUES DE ASAR A LA PARRILLA,
siempre saque la cacerola y ta parri]ia para
asar del homo y l_mpielas, Los sobrados de
grasa en la cacerola para asar podrfan
incendiarse la pr6xima vez que usted use el
herrlo.
o SIEMPRE TENGA CUIDADO cuando
abra la puerta del homo Deje que et aire
caliente y el vapor escapen antes de mover
los alimentos.
;LEA Y COMPRENDA
ESTA
INFORMACION
AHORA!
Asegtirese
que todos
en su hogar
sepan
qu_ hater
en caso
de
incendio.
Nunca
use agua
sobre
un
incendio
de grasa,
esto
solamente
e_tender_
las llamas.
FUEGO
EN EL HORHO:
;No trate
de mover
la cacerola!
1. Cierre la puerta del homo y apague los
controles.
2. Si el incendio continQa, cuidadosamente
abra la puerta, arroje soda para cocinar
sobre el fuego, o use un extintor de
qufmico seco, espuma o "haton",
o NUNCA USE papel de aluminio para forrar
eI fondo det homo El uso inadecuado det
pape! de aluminio podria resultar en un golpe
de cotdente o en un incendio,,
o NUNCA OBSTRUYA
la abertura de la
ventilaci6n del homo.
- LIMPIE SOLAMENTE
tas partes que se
tistan en este manual, Siga todas las
instrucciones para la limpieza.
° NUNCA FRIEGUE, mueva, o da_e eI sello
de la puerta en las estufas con autoiimpieza..
4
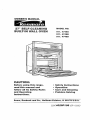
OPERACIOIV
CARACTERISTICAS
Ventilaci6n
homo
dei
•Reloj
Control
estufa
autom_tico
para
autolimpieza
de la
lnterruptor
de
la luz del homo
In terruptor
autom#ti#o
de la
luz del horno
Elemento
para
ia parrilla
Luz del
homo
DE SU HORHO
Gufas para
parrillas
del homo
__
Interior del homo
con autolimpieza
Cacerola y
parrilla para
asar a la
parrifia
Parrillas de homo
removibles
Ubicaci6n
del
ndmero
de
modelo
y serie
Elemento
hornear
Puerta
removible
del homo
para
Sello
para
de la puerta
autolimpieza
Para sacar el residuo de] adhesivo de la cinta de empaque,
use detergente
Ifquido para
platos, aceite mineral o aceite para cocinar. Con un paNo suave fr6telos sobre el Area y
permita que se remoje. Enjague y seque bien. Esto se dleber_a
hacer
antes
de
encender
a| estufa
por prirnera
vez. La cinta
no se puede
sacar
una vez
que el homo
se haya calentado.
La cinta de empaque
se puede encontrar en las
siguientes Area: manilla de la puerta, =firea del panel de control, rnoldura de la puerta y
Area del homo,,
5
OPERACION
Control Del Homo, Re/oj Y CronSmetro
De La Cocina
J
TEMP
GG
@Q
HOUR
Immmmmmmml===l_
_MEDOVEN
MIN
J
Su nuevo cont{oi de homo a botones le
permitirA programar las funciones del horno
con facilidad. MAs abajo est_n los diferentes
tipos de funciones y la descripci6n de cada
uno,,
HOUR
HORNEAR
-- Cocina
los alimentos
homo tradicionai
a una temperatura
varia de 170°F a 550°F,
en el
que
ASAR
A LA PARRILLA
--Asa
los
alimentos
en ALTO
a 550°F o en 18AJO a
450°F a ca_or directo del elemento
superior,,
El asado a la parritla se debe hacer con Ia
puerta abierta en la posici6n
de tope para
asar a ta parrilla.
UMIPIIEZA
-- Limpia el Area interior de[
homo por usted. Cuando
el eiclo tetmina,
horno se apagar_
automAticamente.
KITCHEN
TIMER
TEMP
MIN
Los botones
con las flechas
HOLIBZIMIN
UP y DOWI_I
programan
la hora del dia, la
cantidad
de tiempo para
eocinar,
la cantidad
de tiempo
para limpiar,
la hora para un
comienzo
demorado,
la
temperatura
del horno y la hora
del cron6metro
de la cocina
Los botones
TEMP
con las
flechas
sefeccionar
la
temperatura
para cocinar,
El bot6n START debe
empujarse para activar
cualquier funciOn del homo,.
el
El bot6n CLIEAR/OFF
se usa
para cancelar cualquier funci6n
det homo y el tono de fin de
ciclo. No cancelar_
el Reloj
o ei Cron6metro
de la
Cocina.
El botOn ON/OFF
(ENCENDIDO/APAGADO)
se
usa para encender o apagar el
Cron6metro de la Cocina,, No
controlarA ninguna otra funci6n
del homo,
El bot6n del RELOJ se usa
para poner la hora del dfa,.
Programa la cantidad de tiempo
en que usted desea cocinar Ios
alimentos o en que el homo se
timpie_ El homo se apaga
automAticamente
al final de esta
cantidad de tiempo.
Programa la hora del dfa en la
cual usted desea que el homo
se enciend& El homo se
encenderA automAticamente
a la
hora que usted ha programado y
cuando la funci6n terrnine, el
homo se apagarA
automAticamente.
6
OPERACIOH
Panel De Control
_ndicador
que De
avisa
que el borne
se ha encendido
0 Q-Co Co T
START CLOCKCLEAN I
COOK_TOP TIMERs/
8ndicador
funciones
autom_ticas
El Dial de Control es una referencia f&cil
para utilizar el control del homo., MAs
abajo est_&n las descripciones
para indicar
c6mo funciona el Dial de Control
aNE)ICADOR
DE LA Te=i_PERATURA
DEL
HORHO
-- Este indicador
tiene
prop6sito
mQltipte,
o Muestra
BNDICADORES
DE PROGRAMA
-- Et
indicador
de programa
pestaSear& en
combinaci6n
con una funci6n del homo o
una funci6n automAtica
para, avisarte que
necesita programar
un tiempo o una
temperatura,1 Ejemplo: "SE_'
y "E_AKE"
pesta_ear_,
para avisarie que necesita
programar
la temperatura
del homo,
liI_DIICADOR
DE ILA HC:)RA _ Muestra
fa hora del dfa, la cantidad
de tiempo para
cocinar, la hora para comenzar
una
funci6n demorada
para cocinar, limpiar, o
la hora programada
en el cron6metro
de la
cocina,
un
aa Lemperatura
- _rtuestra
un c6digo
de error
-"ERR"
- Si el indicador
de temperatura
de! homo pesta_,ea
"ERR",
entonces
usted
ha programado
un tiempo
o una
temperatura
incorrecta
o _iuestra
probRemas
eli homo
-- Si
el control
pestaSea
"F" y un nL3mero o
letra, usted est_i experimentando
un
problema
det homo, Por favor lea la
secci6n
CODIIGOS.F
en su manual,
EHCEHDBDO
se programe
Muestra
un c(_d[go
para
recordar-"PUSH
START"
- Si el indicador
de la
hora del homo pesta_ea
las palabras
"PUSH
START",
entonces
usted tiene
que empujar
el bot6n START
para activar
su programao
--Se
una
HNDICADORES
DE LAS
FUHCgONES
DEL
HORNO
_ Muestran
qu_ funci_n
ha sid0 programada,
cuando
la puerta
del
homo est_ enganchada,
y si ]a funci_n
es
demorada_l
o UNDBCADOR
DE
encender,_
cuando
funci6n
del homo
de
Ubicaci6n
para
Ja
hora
del dia en e!
teioj,
cron6metro
de ia cocina,
hora
de comienzo
demorado,
cocci6n
en eJ horno
o
tiempo
de lirnpieza.
El cron6metro
de la cocina se usa para
medir et tiempo de los procesos para
cocinar u otras actividades
det hogar.. No
controla el homo,. Se puede programar
hasta 9 horas y 59 minutos. ContarA hacia
atr_s en minutos hasta que Ilegue a los
ULTIMOS
60 SEGUNDOS,
entonces el
control sonata una vez.. Cuando la cuenta
Ilegue a CER@, el control sonata 3 veces
seguido de un son!do cada 6 segundos
hasta que el bot6n KITCHEN
TIMER
OIN/OFF se empuje. El son!do de cada 6
segundos
se puede eliminar para ciclos
futuros si se desea Para fas instrucciones
de c6mo eliminar estos sonidos continuos,
yea TONOS en la p_.gina siguiente
OPERACION
Reloj Y CronGmetro
El reloj debe ponerse a la correcta hora
del dfa antes que una funci6n demorada
del horno funcione correctamente.
La hora
del dfa NO SE PUEDE
cambiar durante
una funci6n autom_.tica de! homo, pero
SE PUEDIE cambiar durante una funci6n
para hornear o para asar a la parrilta..
COMO
PONER
EL
RELOJ
COMO
HOUR
Empuje
et bot6n
2.
Empuje
SUBIR
correcta
los botches
o BAJAR
dR] d[a_
Empuje
et bot6n
PARA
VOLVER
CLOCK,.
con
para
las flechas
poner
la hora
START,
DE
1.
Empuje et bot6n KITCHEN
ON/OFF_
2.
Empuje
SUBIR
los botches
o BAJAR
3.
Empuje
el bot6n
4.
Cuando
la cuenta
bot6n KITCHEN
AlL RELOJ
Mientras
est_ usando
el homo para
cocinar,
empuje
el bot0n CLOCK,
si
desea
ver la hora del dia, La hora
presents
del dfa se verA en el dial,,
CORTE
EL
MIN
1.
3.
PROGRAMAR
CRONOMETRO
Si ha ocurrido
un corte de corriente,
ia
hora pestaSearA
en el dia! y estar&
incorrecta,
Ponga nuevamente
et refoj a la
hora,
cocinar
tendrb,
del
que
las flechas
porter la hora.
START
Ilegue a :0, empuje
TIMER
ON/OFF,,
Para cancelar
el cron6metro
durante
cuenta,
empuje
el bot6n KIlTCHEN
TIMER
ON/OFF
DOS
VECES
CORRIENTE
Cualquier
funci6n
para
que estaba
en proceso
reprogramadao
con
para
TIMER
horno
ser
8
la
el
Si desea regresar a los tonos de 6
segundos,
repita los pasos de arriba hasta
que el dial muestre su selecciOn y empuje
el botOn para el comienzo
(start)_
TOHO
DE ATENCIION--Este
tono
sonarA si hace un error u omite algo
mientras
programa
una funci0n
det
homo.
OPERACIOH
Control De/Homo,
CronOmetro
Reloj Y
lJnos ejemplos
El nuevo control tiene una serie de tonos
que sonar&n a tiempos diferentes_ Estos
tonos pueden sonar mientras usted
programa una funciOn del homo, o al final
de una funciOn det horno, Tambi_n fe
avisarA si existe un problema con una de
las funciones
M_s abajo est&n los tipos
de tonos y una breve descripciOn
de cada
b. Programar
una funci0n
botOn START
Ce
d_
uno..
TONOS
MEIENTRAS;
PROGRAMA
EL
CONTROL---Cuando
empuje
un botOn
usted escuchar_
on tono
Este tono le har,_
saber que aplicO suficiente
presiOn
sobre
e! botOn para activarlo,,
(Los botones
con
las flechas
no suenan..)
EL
TONO
DE
Empuje y sujete los botones BAKE y
BROIlL, a ia misma
vez por 3
segundos,
hasta que el dial muestre
"SF"
2.
Empuje el botOn KilTCHEH
ON/OFF,. El dial mostrarb,
BEEP" (tono continuo),,
8.
Empuje el bot0n KilTCHEN
TIIMER
ON/OFF
nuevamente
El dial mostrar_
"BEEP"
(tono cancelado),
4.
Empuje el bot0n START,
para
cancetar el tono y safir de este modulo
especial,
el
de
estos se puede
con mirar el dial
identificar
TOHO
DE PRECALEiHITAP_IIENTO--Cuando
programa
una temperatura
en el
homo,
el homo empieza
a calentarse
automAticamente.,
Cuando
la temperatura
dentro
del homo llega a la temperatura
que usted
program0,
sonar_
un tono para
avisarle
que el homo ester listo para
hornear.
Si usted programa una funciOn det homo y
el control suena mientras el dial hace
pesta_ear
una "F" y un nQmero o letra tal
como "F-4 _' o "'F-t", es posible que
exista un problema con el control o con et
homo., Simplemente
empuje el botOn
CLEARJOFF
y espere una hora., Trate de
programar
esa funciOn nuevamente,, Si el
cOdigo se repite, escriba el cOdigo que
pestaRea y llame para un servicio, D[gale
al t_cnico qu_ cOdigo estaba
pesta_eando,,
6
lw
y no empujar
Empujar un bot6n para una funci6n
adicional sin programar
primero la
temperatura
o el tiempo,,
ERR pesta_earA
si usted programa
una temperatura
invAlida, Empuje el
bot0n CLEAP4'OFF
para poner el dial
en blanco y reprogramar
la funciOn del
homo.
Cualquiera
r&pidamente
TONO
AL FINAL
DE UN CaCLO
AUTOMATlCO---Despues
de una
funci0n
para cocinar
automb.tica,
usted
escuchardt
tres tonos cortos
seguidos
por
un tono cada 6 segundos..
El tono de cada
6 segundos
seguirA
sonando
hasta que
empuje
el botOn CLEAR/OFF
ousted
decida
seleccionar
e! programa
especial
para cancelar
y evitar que el tono de 6
segundos
suene
al final de un ciclo futuro.
COEVJO CANCELAR
SEGUNDOS
sedan:
a. Programar
un ciclo de limpieza y la
puerta del homo no estA bien cerrada.
TttMER
"CON
9
El precalentamiento
es subir la temperatura
a la temperatura que va a usar cuando
hornee.. Permita qua et homo se precaliente
bien cuando las recetas requieren
precalentamiento_
OPERACION
Consejos Para Cocinar
En E! Homo
Es normal sentir un poco de olor cuando use
su homo por primera vez. Esto es causado
pot el calentamiento
de las partes nuevas y
del aislante.. Para ayudar a eliminar este olor,
ventile
la habitaci6n
abriendo
una
ventana
o usando
una campana
de
ventilaci6n
En la parte trasera del horno usted notarA un
pequer_o tubo. Esto es un sensor de calor
qua mantiene la temperatura del homo.
Nunca mueva o doble este tubo.
__t
TM
Sensor
emperatura
homo
iMPORTANTE:
Nunca cubra el fondo del
horno o la parritla del homo con papel de
aluminio, El uso inadecuado puede causar
una mala circulaci6n del calor, pobres
resultados al hornear, y podria darhar el
acabado del homo°
The oven vent is located
de
del
La zona de temperatura baja de su homo
(entre 170 ° y 200°F) estA disponible para
mantener los alimentos tibios. Sin embargo,
los alimentos no se debertan mantener a
estas bajas temperaturas
por mAs de 2
horas.
Cuando use su conveniente operaci6n de
Comienzo Demorado, los alimentos tales
como productos IActeos, pescado, ayes,
etc., nunca se debedan dejar expuestos pot
m_s de una hora antes de set cocinados.+ La
temperatura ambiente y el calor de la luz del
horno promueven el crecimiento de
bacterias.
under the control
panel
Esta Area se podrfa calentar
mucho
durante el uso del horno., La ventiiaci6n
es
importante
para la correcta
circulaci6n
del
aire,, Nunca
obsiruya
la ventilaci6n,,
Ventilaci6n
dei horno
Si abre ia puerta frecuentemente
para mirar
los alimentos, causar& una p_rdida de calor
y malos resultados cuando horneeo
10
Consejos Para Cocinar
En E! Homo
UTENSILUOS
DE VIIDRSO, OSCUROS
CONTRA
PEGADURAS,
U OPACOS
POR LA EDAD, absorven el calor
y pueden ser usados para panes con
levadura, cortezas para pasteles o alimentos
que tengan una corteza cafe. La
temperatura del homo se deberia reducir en
25oF..
El Sensor de Temperatura del Homo en la
parte trasera del homo mide y controla
continuamente
la temperatura dentro del
homo.. Para mantener una temperatura
programada
constante, los elementos har&n
un ciclo de encendido y apagado mientras
el homo cocina_
Las parrillas
del homo estAn diseihadas
topes, una conveniencia
y tambi_n
una
precauci6n
de seguridad
cuando
las
parrillas
est&n colocadas
correctamente
el homo, las guias tienen un tope para
prevenir
que las parriltas
se den vuelta
cuando
se sacan del horno_
OPERACION
con
en
Tope en las gu[as
para ias parrillas
Si estA horneando con mdts de un utensilio,
col6quelos de manera que cada uno tenga
por Io menos de 1" a 1 1/2" de espacio de
aire a su alrededor.. Coloque los utensilios de
manera que ninguno quede directamente
encima de otto..
Su homo tiene cuatro (4) posiciones. La
posici6n de mAs arriba es sotamente una
guia. La gula de m&s arriba no se puede
usar como una posici6n para la parrilla..
_4
_3
_2
4_
3_
2_
::z
=•
_.._ ...........
_-
Siempre
coloque
ias
homo
en Ua posici6n
cuando
el homo
est_
BANDEJAS
BAJAS PARA GAILLETAS,
sin lados,
permiten que el aire circule
alrededor de las galletas para que se doren
en forma pareja.
°
,.
.j
-. - -.i = -_=__._;_
parriHas
correcta
frio.
del
Usted podr¿a pensar que su homo nuevo
cocina diferentemente
al homo que
reemplaz6.. Le recomendamos
que use su
homo nuevo por varias semanas para que
se familiarice mAs con el, siguiendo los
tiempos que se dan en la receta como una
guia. Vea Ajustes-HAgalos
Usted Mismo en
ta parte de atr_s de este manual para hacer
los ajustes si cree que su homo est_
funcionando
demasiado caliente o frio para
su preferencia..
l.as bandejas
briliantes
reflejan el calor,
y son perfectas para los queques y
panecillos r&pidos que deben quedar con
una corteza de color care claro..
1!
OPERACION
CSmo Hornear
Para programar que el horno se encienda a
una hora posterior del dfa, cocine por una
cantidad de tiempo especifica y se apague
autom&ticamente_
1. Empuje et bot6n BAKE.
1. Empuje el bot6n BAKE
2m
2.
TEMP
3.
TEMP
Empuje los botches
con las
flecha TEMP
SUBIR
y
BAJAR,
para programar
la
temperatura
del homo que
desea usar,
Empuje
el botOn
F'6VE:.
I COOKING I
L TIM E.J
3. Empuje el bot6n OVEN
COOKING
TIME,
START.,
HOUR
Empuje et bot6n con las
flechas HORAS y/o
MINUTOS
SUBIR y/o
BAJAR
para seleccionar fa
cantidad de tiempo en que
desea cocinar los
alimentos,
MIN
Para programar que el homo cocine por un
tiempo determinado y se apague
automAticamente:
Empuje
START
Empuje el bot6n
BAKE,
Empuje et bot6n con
las flechas
TEMP
2_
HOUR
I COOK.tG I
HOUR
MIN
7.
3. Empuje el botdn
OVEN COOKING
THME,,
MIN
m
Empuje
Estas operaciones
pueden
usar para
Empuje el botdn con
las flechas HORAS y/o
MINUTOS
SUBIR
yio BAJAR
para
seleccionar la cantidad
de tiempo en que
desea que los
alimentos se cocinen,,
el bot6n
TIME,,
DELAY
Empuje el bot6n con las
flechas HORAS y/o
MINUTOS
SUBIR y/o
BAJAR
para programar
hora del dia en ]a cual
desea que el homo en
enciend&
SUBIR
y/o BAJAR
para seleccionar
la
temperatura
del horno
que usted desea usar.,
TEMP
Empuje el botdn con las
flechas TEMP SUBIR y/o
BAaAR para seleccionar la
temperatura del homo que
prefiere usar,
el bot6n
de! homo
asar.
la
START,.
se
El horno se apagar_ al t_rmino del tiempo
para cocinar a menos que el prog_ama para
mantenci6n de temperatura se haya
activado.
Empuje el botdn
START,,
12
Mientras m&s cerca coloque los alimentos
del elemento para asar. m_s rb.pido se
dorar_tn por afuera, pero quedando rojo o
rosado en e! centro..
OPERACION
Colocando las carnes lejos del elemento
permitirA que las cames se cocinen en el
centro mientras se doran por afuera,
Usando estas posiciones, cocine et lado 1
por Io menos 2 minutos m_s que el ]ado 2..
Si su homo est& conectado a 208 voltios,
usted podria usar una posici0n de parrilla
mAs alta y/o cocinar los alimentos por mAs
tiempo.
C6mo Asar A La Parrilla
Asar es cocinar al calor directo det elemento
superiors. La puerta del homo deberia
permanecer abierta en ta posici6n de tope
para asar cuando ase a la parrilla.,
El tama_o, peso, grosor, temperatura inicial
y su preferencia personal afectar_ el asado
a la parrilla.. Esta tabla estA basada en
carnes a la temperatura del refrigerador,.
ALIMENTO
No es necesario precalentar el homo cuando
ase a la parrilla. Use la cacerola y ta parrilla
para asar que viene con su estufa.. Ambas
est&n diseSadas para drenar
adecuadamente
la grasa y los l_quidos.
Bistec
1" de grueso
Tortas
de carne
molida-1"
de grueso
Chuletas
aBuminio,
e! papel
de
_
alumin_o
uando
use
debepapel
estar de
moldeado
firrnemente
la parr_Jla y los cortes
en el
pape!
deben
coincidir
co. los
cortes
de _a parlriRga. Esto
!a
grasa
1/2"
a
Polio
que
!iquidos
evitando
incendio
ca!!an
a !a caceroia,
que se produzca
un
y humo
excesivo.
Siempre
saque
_a ¢aceroia
y la
parrilla
de! homo.
Guardar
y
olvidar
u.a cacerola
para asar
sucia en ei homo
/
es un peiigro
para
producir
un
incendio
o humo.
El Departamento
de Agricultura
de los
Estados Unidos nota que las carnes
cocinadas
crudas son populares,
pero
que la came que se cocina hasta s61o
140°F, (cruda) significa que atgunos
organismos
venenosos
podr[an sobrevivir.
!3
TIEMPO
TOTAL
(minutos)
3
9-11
3
16-18
3
27-29
cte cerdo-
de grueso
Pescaclo
y Jos
peFrn_e
POSICION
DE
PARRILLA
(filetes)
(presas)
3
11-13
2
45-55
la.
Empuje el bot6n BROML (EstLo
autorn_ticamente
programa
ASABO
en HE-ALTO),,
lb.
Mientras el indioador
de programa
pestanea
en el dial, empuje
nuevamente
el bot6n BROP
si
prefiere asar en BA,$O (LO). Ase en
1l.O (BAJO)
para cocinar bien
alimentos tales como aveso cortes de
came gruesos sin que se doren
demasiado,.
2.
Empuje
3.
Cuando termine de asar. empuje
botQn CLEAR/OFF.
el bot6n
START..
el
2.
OPERATION
3.
El nuevo control a botones tiene
programas
adicionales
que usted puede
seteccionar,. Despu6s de hacer su
seleccidn,
si desea cambiar esa posicidn,
siga los pasos hasta que el dia! muestre
su seleccidn,.
Empuje
El control se prograrna automAticamente
para apagarse despu_s de hornear pot 12
horas o despu_s de asar a la parrilla pot 3
horas en caso que sete olvide y deje el
homo encendidoo Si desea eliminar este
programa:
1. Empuje y sujete, al mismo
tLiempo,
el botdn BAKE y BROIL
pot 3
segundos,
hasta queet dial muestre
$F.
2.
(a) Empuje el bot6n CLOCK.
El dial
mostrarA 112hr Si _sta es su
selecci6n,
empuje el bot6n START.
or
(¢) IErnpuje et bot6n CLOCK
nuevamente,.
El dial ahora mostrar&
OFF.
Siesta
es su selecci6n,
empuje
el botdn
START,.
La hora no se
mostrar&
en el dial. (La funcidn
delay
start no funcionarA,)
START..
El control del horno estA programado
para
la seleccidn
de temperaturas
en Fahrenheit. La mayorfa de las recetas se dan
usando la escafa Fahrenheit. Usted puede
cambiar esto y usar una selecci6n en
Cent[grados,,
1.
Empuje y sujete, a lla misma
vez, el
botdn BAKE
y BROIIL por3
segundos,
hasta que el dial muestre
SF
o
Empuje
el botdn DELAY
START
TIME
nuevamente.
El dial mostrarA
no shdn
(no apagado).
el bot6n
START,,
(b) Empuje el bot6n CLOCK
nuevamente,
E1 dial mostrarA 24hr,,
Ejemplo: 5:00 en el refoj de 12 horas
leerA 17:00 en e! reioj de 24 horas,.
Empuje el bot6n START,
Empuje
el bot6n
BELAY
START
TIME,,
El dial muestra
112shdn
(apagado
en 12 horas).
Empuje
et bot6n
Su control estA programado
para usar el
reloj en 12 horas, Si usted prefiere usar
Hora Militar de 24 horas o poner el dial en
blanco, se hace asi:
1
3.
El dial
para
(b) Empuje el bot6n BROIIL
nuevamente,. Esto cambiar& F
(Fahrenheit)
a C (Centfgrado).
CGmo Seleccionar
Programas
Especiales Del Control
2.
(a) Empuje el bot6n BROIL.
del control mostrar_ el signo
grado y F,,
Empuje y sujete, aI mismo
tiempo,
los botones BAKE
y BROIL
pot 3
segundos,
hasta que el dial muestre
SF.
14
21
(b) Empuje el bot6n OVEN COOKnNG
TIME nuevarnente
para activar este
programao El dial mostrar_ HLd OH.
OPERACION
C6mo Seleccionar
Programas Especiales
3_
El control le permitir&
cerrar los botches de
manera que no se puedan
activar cuando
los empuje,, Si se preocupa
de dejar el homo
sin supervision,
active este programa.
t.
Empuje
y sujete, a ia wJisma
vez por 3
segundos,et
bot6n BAKE
y BROSL,
hasta que el dial muestre
SF.,
2.
(a) Empuje el botd)n CLEAN_
El dial
muestra
LOC OFF (cierre inactivo).,
(b} Empuje el bot6n CLEAN
nuevamente.,
El dial mostrarA
LOC
ON (cierre activado)_
Empuje el bot6n START°
3.
Este
pltograma
se
soliamente
cuando
en
Empuje
el bot6n START,.
Este Programa
Especial
ie permitir&
cambiar
la velocidad;
#t significa
que el cambio
de
velocidad
es lento hasta #5 que significa
que el cambio
de velocidad
es rApido.
Para
seleccionar
la velocidad
que prefiere,
siga
estos pasos:
puede
seliecciOrllar
eli homo
no est_
1.
Empuje y sujete, alia
misma
vez,
botones
BAKE
y BROBL
por 3
segundos,
hasta que el dial muestre
SF,,
2.
Empuje
el bot6n con la flecha SUBIIR.,
El dial le mostrar_
una posici0n
de
velocidad
entre 1 y 5..
3.
Empuje
la flecha SUBIIR
para aumentar
la vetocidad
hasta el ntJmero 5.1
USO.
o
Cuando
este programa
est_ activado,
e!
control sonar_ y el dial mostrar&
LOC, si se
empuja
un bot6n., Los botches
Clock, Timer
o Oven Light no son afectados,,
Empuje el bot6n con la flecha BAJAR
para disminuir
ta velocidad
hasta et
n0mero
1,
4a
Su nuevo control tiene una funciOn para
cocinar y mantener la temperatura para
cocinar autom_,ticamente
sotamente que
mantendr& los alimentos tibios hasta 3 horas
despues que el cocinado autom&tico haya
terminado.. Para activar esta funci6n:
1,
(a) Empuje el bot6n OVEH COOKtlHG
TIIME, Et dial mostrardt HL.d OFF,
Empuje y sujete, a Ba misma vez, los
botones BAKE y BROIIIL por 3
segundos, hasta que e! dial muestre SF..
15
Empuje
el bot6n
START..
los
CUIDADO Y LIMPIEZA
E1 Ciclo De Autolimpieza
El sello de ta puerta estA diseSado para
que tenga un espacio de 5-6" en el fondo
del homo.
1.
Saque la cacerola
y ta parrilla para
asar, la parrilta del horno, utensilios,
cualquier
papel de aluminio que
podfla quedar en el horno,
2.
Panel
y
La suciedad
en el frente del marco.
1" dentro del horno, y altededor
del
sefto de la puerta def horno tendrA
que ser limpiada
a mano.
Marco
!
3.
Limpie
fondo
m
de
de la
puerta
pesado
....................
....................
-,q
Las parriilas
del horno
se
podrian
iimpiar
durante
el ciclo
de autolimpieza,
pero
perder_n
su brillo
y se pondr:_n
dificiles
de
deslizar.
Si decide
dejarlas
dentro
durante
el ciclo
de
limpieza,
p_seles
aceite
vegetal
para
que se deslicen
m:$s
f_cilmente.
con agua caliente,
limpiadores
como
Soft
cualquier
suciedad,,
agua timpia y seque,
derrame
Sello
Los utensilios
nunca
se deberian
dejar
dentro
del
horno
durante
un cic|o
de
autolimpieza.
Sel]o---__
cualquier
def homo,.
puerta
Esto permite
Ja circulaci6n
adecuada
del
aire. Es normal
que su homo de la
apariencia
de no tenet un buen sello sobre
ei homo,, Esto se debe at sello., La
ubicaci6n
del sello sobre la puerta del
horno mantiene
la puerta
sellada
y previene
cualquier
p_rdida
de calor,.
#,_
Limpie
estas _reas
lanillas
con jabdn
o
Scrub®
para sacar
Enjuague
bien con
la
Revestimento
fronta!
_--_ Revestimento
la puerta
de
de!
No limpie el sello de la puerta del
homo,, El material de fibta de vidrio de
la puerta del homo no soporta la
abrasi6n. Es esencial que el sello
permanezca
intacto, Si nora que se
est_ gastando, trizando, o saliendo de
la puerta, deberia set reemplazado,
Durante
el primer
ciclo
de
iimpieza,
ventile
la habitaci6n
con
una ventana
abierta
o una
campana
de ventilaci6n.
Esto
evitar;_
el olor
fuerte
producido
por el calentamiento
de las
partes
nuevas.
16
Despu_s de] ciclo usted podr[a notar un
poco de cenizas btancas en el homo.
Simptemente
ifmpiefas con un paRo o
esponja h_meda_
CUtDADO Y LIMPIE
Ciclo Be Autolimpieza
Si atgunas manchas blancas persisten,
fri_guelas con una lanil]a de acero con
jab6n.. AsegOrese
de enjuagar
bien° Estas
son generalmente
dep6sitos
de sal que no
se pueden saoar durante el ciclo.
El Ciclo de Limpieza, incluyendo
el tiempo
de enfriamiento,
estA programado
automAticamente
por 4 horas, pero usted
puede cambiar esto de 3 horas si el homo
est& levemente sucio a 5 horas si el homo
estA muy sucio..
1,
Empuje
et bot6n
CLEAN,
Mostrar&
horas en el dial..
$_ IPOr aRguna
raz6n
usted
no queda
satisfecho
con llos resuitados
de Ua
girnpieza,
simpRemente
repita
el
C_C|O,
4
t.
m
HOUR
MtN
3.
Empuje el bot6n con
las flechas HORAS/
MgHUTOS
SUBgR o
BA,L&R
para ta Hora y
los Minutos para
seleccionar
ta cantidad
de tiempo que usted
desee que dure el
cicloo
HOUR
Empuje el bot6n
START,
HOUR
Simplemente
empuje e! botOn CLEAR/
OFF. Usted necesitar& esperar a que la
temperatura
del homo baje mAs que la
temperatura
de enganche
(aprox. 1 hora)
antes de tratar de abrir la puerta. "Locked
door" desaparecer_
del dial..
3.
Ernpuje el bot6n
BELAY
START
T]IME,,
Empuje los botones con
las flechas HORAS/
MIINUTOS
SUBaR y/o
BA,JAR para
seleccionar la hora del
dfa en que prefiere que
el ciclo de limpieza
empiece.
MIN
5w
17
et bot6n
Si usted desea cambiar
la cantidad de tiempo
para limpiar, empuje los
botones con las flechas
HORAS/MgNUTOS
SUBIIR
y/o BAJAR.
MIN
_
Empuje
CLEAN,
Empuje el bot6n
START..
CUIDADO Y LIMPIEZA
Partes
r
Removibles
MATIERIALIES
- Detergente
° Agua tibia
- PaSo suave
DE
tlquido
que el interruptor
de la luz
del horno
est_ en posici6n
de apagado,
No toque
on
foco
caliente
con las manos
o con
un paso
mojado,
Espere
hasta
que
el foco
est_
frlo y use un paso
seco.
Nunca
toque
el collar
de un
!foco
que tenga
electricidad.
Si estd
reemp|azando
un foco
quernado,
asegtirese
que Ja electricidad
est_
desconectada.
PnSCAUClO.: Aseg ,ese
LIMPiEZA
para
ptatos
No use lirnpiadores
abrasivos,
limpiadores
industriaies,
o
blanquedores
(€loro).
Collar
con
electricidad
Foco
MATERIALES
DE
LIMPIEZA
• Oetergente
iiquido para platos
• Agua tibia
o Lanillas de acero con jab6n
o Limpiador
oomercial para hornos
COMO
LIMPIAR
Cubierta
del foco
COMO
Permita que la cacerola
se remoje,. Ponga
detergente
para platos sobre la parrilla y
cubra con un paso o una toalla hQmeda
pot un rato. Friegue a medida que sea
necesario.
Lave, enjuague, y seque bien.
Usted tambien podria poner la cacerola y
la parrilla en la lavadora de platos,
SACAR
LA CUBP:RTA
Desconete la electricidad hacia el homo
en el circuito principal o en la caja de los
fusibles..
2.
Coloque la mano bajo la cubierta y
empuje el alambre sujetador firmemente
hacia atr_s, hasta que pase pot encima
y suelte la cubierta del foco.
EL FOCO
DE LA LUZ
Desatornille el foco de la luz y reemplAceto
con un foco para hornos residenciales
de 40
watts,.
Limpie solarnente como un toque entre
ciclos de limpieza. Use detergente
liquido,
agua tibia, o lanilla de acero con jab6n
Enjuague bien despues
de lirnpiar y
seque,,
NUNCA
USE L|MPIADORES
DE
HORNOS
DENTRO
O ALREDEDOR
DE CUALQUIER
IPARTE DEL
HORNO.
limpie,
asegQrese
de no doblar
el sensor
de temperatura
en la pared
trasera
del homo,
Alambre
sujetador
1.
REEMPLACE
Cuando
despiazar
ubicado
Soquete
COMO
o
18
REEMPLAZAR
LA CUEII=RTA
1.
Coloque la cubierta del foco en la ranura
del soquete del foco,
2.
Tire el atambre sujetador hacia adelante
hasta que caiga en la indenciQn sobre la
cubierta del foco.
3.
Reoonecte
la electricidad
hacia el homo.,
CUIDADO Y IJIV/PIEZ 2
Partes
Posici_n
de tope para asar a la parrilla
Removibles
MATERIIALES
DE
o Detergente
para platos
= Agua tibia
a Lanas para fregar o lanilta de acero
jab6n
Parte trasera
_evanZada
de
lla parrHla
Tope
°fi
[I]ii
LOMPBEZA
1 Jt
PARA
con
SACAR
1.
Abra la puerta hasta la posiciOn
asar a la parrilla
2.
Tome ta puerta de cada ]ado, fevAntela
y sAquela de las bisagras,
NO
LEVANTE
LA PUERTA
DE LA
MANILLA.
en
PRECAUCIIOH:
COMe
1.
hasta la posici6n
de
2.
Levante el frente de ta parriJla y
deslfcela bajo el tope de la gu[a para
las parrillas.,
PARA
LHMP_AR
Limpie con agua tibia y detergente,
Para
sacar manchas duras, friegue levemente
con lana para fregar o con una lanilla de
aoero con jab6n,, Enjuague bien,,
PARA
COLOCAR
NUEVAMIENTE
1.
2,
3.
Cuando
brazes
de gas b_sagras
ila puerl_a se saca y Jos
est_n
en ma posici6n
de
tope
para asar a la
parriHa,
come precauci6n
cubra
gos brazes
de las bisagras
con
_oaHas
o con un rogle de toaUas
vacio.
No pase a Nevar
o trate
de mover
gos brazes
de gas
bisagras
n_[entras
est_
trabajando
en eg _rea
de! hoe'no.
Se podrJan
devoBver
violentamente
y causarge
heridas
en gas manes
o da_ar
e!
acabado
de porcelana
en eg
frente
deB marco.
SACAR
Tire las parrillas
tope,.
para
_:
PARA
,_,
COLOCARLA
: .............
:: :
HUEVAMENTE
11, AsegQrese
que los brazos
de las
bisagras
estAn en la posici6n
de tope
para asar a la parrilla.
Coloque la parle levantada de atrAs de
la parrilla sobre las gufas,
Levante el frente de ta parrilla hasta
que la parte levantada
de atrAs se
deslice pot debajo del tope de las
gu[aso
Deslice la parrilla hasta arras.,
2,
Levante
3,
Cotoque
en linea las ranuras
en la orilla
del fondo del homo
con los brazos
de
las bisagras..
41., Deslice
brazos
5, Cierre
19
la puerta
de ambos
la puerta
hacia
de ]as bisagras
[a puerta..
lados.
abajo
sobre los
Io mAs posible.
-_
ANTES DE ILLAMARPARA UN
SERVICIO
Para ahorrar tiempo y dinero, antes de llamar para un servicio, revise la lista de mAs abajo
para cualquier problema que usted crea que tiene con el funcionamiento
de su estufa.. Si
el problema es algo que usted no puede reparaz, use los NQmeros de Servicio para el
Consumidor
que se encuentran
al final de este manual. Cuando
haga un Iiamado,
tenga
disponible
el nt_mero
de modelo,
lista
de partes
para reparaciones,
manual
de uso y cuidado
y la fecha
de compra.
PROBLEMA
POSIBLE
El dial
deJ control
pesta_ea
una _'F"
seguida
pot un n_mero
o Jetra.
El homo
y los
controles
de| horno
funcionan.
CAUSA
Mal funcionamiento
estufa
no
No pasa
electdcidad
estufa.
Calibraci6n
termostato.
La puerta
de!
homo
no se
d_sengancha.
El ciclo de limpieza
terminado.,
La luz del
homo
no
funciona.
a.
El horno
se limpi6
los
resultados
fueron
malos.
no
o
SOLUCION
Empuje el botSn CLEAR/OFF.
Permita que la estufa se
enfrie pot una hora y ponga
nuevamente
el homo en
funcionamiento,
Si eJ
problema
se repite, Ilame
para un servicio.
Revise
la caja del circuito
o
los fusibles,
AsegQrese
que et
cord6n
de la corriente
est_
enchufado
a la
La
temperatura
de! homo
parece
estar
inexacta.
b.
de fa
POSIBLE
del
Vea los ajustes descritos
siguen esta secci6n,,
no ha
Interruptor
de la luz
en posici6n de
apagado,
Foco de la luz est&
quemado,,
que
La temperatura
del homo
debe
bajar a menos
de la
temperatura
de enganche
antes que la puerta
pueda
abrirse,.
a.
b.
Revise la posici6n del
interruptor
de ta luz del
homo,,
Revise el foco de la luz
del horno_
a, Los controfes no se
pusieron bien..
a. Lea la secci6n de
autolimpieza
de este
manual.
b. Et ciclo de limpieza
fue intertumpido.
c. El homo estaba
demasiado
sucio.
b. El ciclo de limpieza normal
deber[a set de 4 horas
c. Los derrames grandes se
deberfan limpiar antes de
programar
un ciclo, Usted
tambi_n podria repetir el
ciclo..
20
b. Matuso de papel de
atuminio.
Los
alimentos
se hornean
adecuadamente.
no
c.
Cacerota
para asar
con grasa se dej6 en
el homo
a.
El homose
precalent&,
Posici0n incorrecta
de la parrilla o la
cacerola.
b.
c.
e.
f.
b.
c,
",m,',
a.
,,llll
I'
"lr"ll' ,ll'li
Posicidn incorrecta
la parritla,
de
b. El homo se
precatent6
c. Mal uso de papel
aluminio,
de
dl. La puerta del homo
cerrd durante el
asado a la parrilla,
e. Bajo voltage (208
Voltios)
fm
Cantidad
incorrecta
de tiempo
para asar,
2!
No se recomienda
papel de aluminio,
Limpie
parrilla
uso,,
la cacerola
y la
despues
de cada
AsegOrese
de precalentar
hasta que suene
el tono
Mantenga
un espacio
de
aire uniforme
alrededor
de
las ollas y utensilios.
Vea
la secci6n
para cocinar
en
el horno_
Mantenga
despejada,
la ventitaci6n
:
a,
Revise
ia posici6n
de las
cacerolas;
yea
la secci6n
para asar a la parrilla.
b.
No precaliente
a la parritta
c. Lea la secciSn
parrilla,
se
el
dt. No cubra ias parrilfas
cuando homee
e. Reduzca la temperatura
en 25 grados para
utensilios de vidrio,
oscuros u opacos
f.
_,Es la receta confiable
y
probada?
ej. Revise la secci0n de
ajustes a la temperatura
que sigue esta secci6n,
h. Vea las instrucciones
de
instalaci6n
para la
nivelaci6n.
La estufa o la parritla
del homo no estb.n
niveladas,
hm
Los alimentos
no se asan
adecuadammente.
a,
No se sigui6 la
receta
Mala calibraci6n
del
control del homo°
g.
,,,,,,,,,,,I,,_L ,,,
Cn
La ventilaci6n
del
homo est& obstruida
o cubierta.
Uso incorrecto
dei
papel
de aluminio
Temperatura
incorrecta
para el
utensmilio
usado.
d.
.............
b.
cuando
ase
para asar a ta
d. Abra la puerta a la posici0n
de tope para asar
e.
f.
Use una posici6n de parrilla
m_s alta y/o ase por m&s
tiempo
Vea la tabla para asar en la
secci6n de c0mo asar a ta
parrilla,
lm
AJUSTES DE TEMPERA TURA -
"HAGAL OS lISTED MISMO"
Usted podrfa pensar que su nuevo homo
cocina diferentemente
al homo que
reemplaz&
Recomendamos
que use su
homo nuevo unas pocas semanas para
que se familiarice
con el, siguiendo los
tiempos que se dan en las recetas como
una g ufa.,
Si cree que su nuevo homo estA
funcionando
demasiado
cafiente (quema
la comida) o no calienta Io suficiente (la
comida no queda bien cocida) usted
mismo puede ajustar ta temperatura,,
La
apariencia
y la textura de los alimentos
son mejores indicadores
de la exactitud
de un homo que un term6metro
barato,
como los que se venden en tas tiendas,
para controlar la posicbn
de la
temperatura
de su nuevo homo. Estos
term6metros
pueden variar entre 20-40
grados,. AdemAs, la puerta se tiene que
abrir para leer estos term6metros.
Abrir ta
pueTta cambiarA la temperatura
del homo,
Para decidir en cuAnto cambiar la
temperatura,
suba la temperatura
deÁ
homo en 25 grados (si los alimentos no
quedan bien cocidos) o baje la
temperatura
en 25 grados (si la comida se
quema) de la temperatura
de la receta,
luego hornee,, Los resultados de esta
"prueba"
le debedan dar una idea de
cuAnto se deberia cambiar la temperatura,,
Empuje y sujete los botones
BAKE y BROIL
pot3
segundos,
hasta que el dial
muest_e SF,
Empuje el bot6n BAKE,.
Un nQmero puesto en
f&brica de dos digitos
aparecer_ en el dial,
generatmente
oo.
$i piensa
que
no est_
suficientemente
TEMP
e|
homo
flecha UP TEMP
para
3a.Ernpuje
bot6n
con la
aumentar el (+)
la temperatura
hasta +35°R
3b.Empuje el bot6n con la
flecha DOV#N TENIP para
bajar (-) la temperatura
hasta -35°R
4.
Empuje
el botd)n S1"AR'lr.
Este aumento o disminuci6n
en ta posici6n
de fa temperatura
permanecerA
en la
memoria hasta que los pasos de arriba
sean repetidos,, Un corte de corriente
no
afectar& esta posicbn,.
Las temperaturas
para asar a la parrilfa o
para la autolimpieza
no serAn afectadas,
6ARANTIA DE LA ESTUFA
TODO
UN ANO De= GARANTIA
TODAS
LAS PARTES
EXCEPTO
COMPLETA
PARA
LAS DE VliDRIO
LAS
FUNCgONES
DE
Si, dentro del lapso de un aSo a partir de ta fecha de instalaci6n,
cualquier
parte que
no sea de vidrio funciona real debido a un defecto en el material o en la mano de
obra, Sears la repararA o la reemplazarA
sin costo atguno..
GARANTIA
TOTAL
DE 30 DIAS PARA
LAS IPAIRTES DE VIlDRltO Y EL
ACABADO
DE ESMALTE
PORCELANIZADO,
PARTES
DE METAL
PINTADO
0 BRIILLANTE
Si, dentro de los treinta d[as posteriores
a la instalaci6n,
cualquier
parte de vidrio o el
acabado
de cualquier
esmalte porcelanizado
o parte de metal pintado o brillante
tiene defectos
en el material o mano de obra, Sears reemplazarA
la parte sin costo
alguno.,
GARAHTllA
TOTAL
DE 90 DDAS EH A,JUSTES
MECAHICOS
Durante 90 d[as a partir de la fecha de instalaci6n,
Sears proporcionara,
sin costo
alguno, cualquier
ajuste mecAnico
necesario
para la correcta operaci6n
de ta estufa,
exceptuando
el mantenimiento
normal
Si la estufa estA sujeta a otro uso que no sea el privado familiar, la cobertura
de ta
garantia mencionada
arriba serA efectiva s6fo durante 90 dias.,
EL SERVlClO DE GARANTIA
ESTA DISPONIBLE
CON SOLO PONERSE EN
CONTACTO
CON EL CENTRO O DEPARTAMENTO
DE SERVlCIO SEARS MAS
CERCANO
EN LOS ESTADOS UNIDOS,
Esta garantia se aplica s61o cuando este producto
se use en los Estados Unidos.
Esta garant[a le brinda derechos
legales especfficos,
y tambi_n
puede tener otros
derechos
que varian de un estado a otro.
Sears,
Roebuck
and
Co,,
Para
Con_pre
A_,o=
Un
Dept.
Hoffman
Estates,
Ampi_ar
E, Vaaor
De Su Estufa,
ContLrato
De Mantenim_ento
dm coboMu_
que
817 WA,
no Sean
_o
|_
propled_d
do porcel_na
1or
_Ro
2 _ a_o
IL
60I79
Sears.
3or
_ti_o
I
i
o vldrlo
9O DAYS
30 DAYS
3
Po,-,°={,opo,.=,,,=,.oy,,|d,o
4
Rovis|e,n
anuat
de manlon|rn|on|o
p_vo..,,o,,_o.o.., dou=|.,_
G
* G-mra_m
G
AM
AM
AM
AM
AM
AJlA
-
COtl_;_tO
d0
Ma_tenlmlen[D
Las estufas Kenmore estAn disehadas,
fabricadas
y probadas
para brindarle
afios de
operaci6n confiable
Sin embargo,
cualquier aparato moderno puede requerir de alg0n
servicio de vez en cuando,. La garantia Sears, ademAs del contrato de Mantenimiento
Sears, te brinda protecci_n
contra cuentas de reparaciones
inesperadas
y te asegura que
disfrute de la maxima eficiencia
de la estufa..
La tabla de arriba compara
et contrato de Garantfa y de Mantenimiento
y le muestra los
beneficios de tenet un Contrato de Mantenimiento
para su estufa Sears
P_ngase en contacto con su vendedor
de Sears o con el centro de servicio Sears de fa
localidad
hoy mismo y compre un contrato de Mantenimiento
Sears..
23
Sears
se comp|ace
en ofrecer
a sus clientes
servicio
de reparaci6n
de aparatos
electrodom_sticos
y electr6nicos
de todas
marcas.
En Sears,
espa_oi,
Para
servic;o
a dornicilio,
Llame 24 horas
semana
usted
puede
contar
con
operadores
en
a los que
puede
Ilamar
sin cargo
alguno.
de
reparacl6n
al dfa, 7 dias
I 800-676-58il
Para
ordenar
a domiciiio,
Llame de 7 am
semana
las
piezas
a 7 pm,
a la
11
con
entrega
7 di'as a la
1 800-659-7084
24