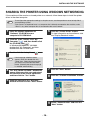
1
MODEL
AR-NB2
AR-NB2 N
NETWORK EXPANSION KIT
SOFTWARE SETUP GUIDE
(for network printer)
Page
• SAFETY STANDARDS
• INTRODUCTION
• BEFORE INSTALLATION
• SETUP IN A WINDOWS
ENVIRONMENT
• SETUP IN A MACINTOSH
ENVIRONMENT
2
4
6
11
25
AR-M160/M205
SAFETY STANDARDS
<AR-NB2>
This is a Class A product. In a domestic environment this product may cause radio
interference in which case the user may be required to take adequate measures.
<AR-NB2/AR-NB2 N>
This equipment complies with the requirements of Directives 89/336/EEC and 73/23/EEC as amended by
93/68/EEC.
Dieses Gerät entspricht den Anforderungen der EG-Richtlinien 89/336/EWG und 73/23/EWG mit Änderung
93/68/EWG.
Ce matériel répond aux exigences contenues dans les directives 89/336/CEE et 73/23/CEE modifiées par la
directive 93/68/CEE.
Dit apparaat voldoet aan de eisen van de richtlijnen 89/336/EEG en 73/23/EEG, gewijzigd door 93/68/EEG.
Dette udstyr overholder kravene i direktiv nr. 89/336/EEC og 73/23/EEC med tillæg nr. 93/68/EEC.
Quest’ apparecchio è conforme ai requisiti delle direttive 89/336/EEC e 73/23/EEC, come emendata dalla
direttiva 93/68/EEC.
Este equipamento obedece às exigências das directivas 89/336/CEE e 73/23/CEE, na sua versão corrigida
pela directiva 93/68/CEE.
Este aparato satisface las exigencias de las Directivas 89/336/CEE y 73/23/CEE, modificadas por medio de
la 93/68/CEE.
Denna utrustning uppfyller kraven enligt riktlinjerna 89/336/EEC och 73/23/EEC så som kompletteras av
93/68/EEC.
Dette produktet oppfyller betingelsene i direktivene 89/336/EEC og 73/23/EEC i endringen 93/68/EEC.
Tämä laite täyttää direktiivien 89/336/EEC ja 73/23/EEC vaatimukset, joita on muutettu direktiivillä
93/68/EEC.
The CE mark logo label is affixed on an equipment in case that the directives
described in the above sentence are applicable to the product. (This sentence is
not applicable in any country where the above directives are not required.)
Shielded cables must be used with this equipment to maintain compliance with
standards.
-2-
SAFETY STANDARDS
<AR-NB2>
WARNING:
FCC Regulations state that any unauthorized changes or modifications to this equipment not
expressly approved by the manufacturer could void the user is authority to operate this equipment.
Note:
This equipment has been tested and found to comply with the limits for a Class A digital device,
pursuant to part 15 of the FCC Rules. These limits are designed to provide reasonable protection
against harmful interference when the equipment is operated in a commercial environment. This
equipment generates, uses, and can radiate radio frequency energy and, if not installed and used in
accordance with the instruction manual, may cause harmful interference to radio communications.
Operation of this equipment in a residential area is likely to cause harmful interference in which
case the user will be required to correct the interference at his own expense.
Notice for Users in Canada
This Class A digital apparatus complies with Canadian ICES-003.
Cet appareil numérique de la classe A est conforme à la norme NMB-003 du Canada.
<AR-NB2 N>
♠♠♠♠♠♠♠♠♠♠♠♠♠♠♠♠♠♠♠♠♠♠♠♠♠♠♠♠♠♠♠♠♠♠♠♠♠♠
For users in the USA
This device complies with Part 15 of the FCC rules. Operation is subject to the following two conditions: (1)
This device may not cause harmful interference, and (2) this device must accept any interference received,
including interference that may cause undesired operation.
WARNING:
FCC Regulations state that any unauthorized changes or modifications to this equipment not expressly
approved by the manufacturer could void the user’s authority to operate this equipment.
Note:
This equipment has been tested and found to comply with the limits for a Class B digital device, pursuant
to Part 15 of the FCC Rules. These limits are designed to provide reasonable protection against harmful
interference in a residential installation. This equipment generates, uses and can radiate radio frequency
energy and, if not installed and used in accordance with the instructions, may cause harmful interference
to radio communications.
However, there is no guarantee that interference will not occur in a particular installation. If this equipment
does cause harmful interference to radio or television reception, which can be determined by turning the
equipment off and on, the user is encouraged to try to correct the interference by one or more of the
following measures:
● Reorient or relocate the receiving antenna.
● Increase the separation between the equipment and receiver.
● Connect the equipment into an outlet on a circuit different from that to which the receiver is connected.
● Consult the dealer or an experienced radio/TV technician for help.
♠♠♠♠♠♠♠♠♠♠♠♠♠♠♠♠♠♠♠♠♠♠♠♠♠♠♠♠♠♠♠♠♠♠♠♠♠♠
♠♠♠♠♠♠♠♠♠♠♠♠♠♠♠♠♠♠♠♠♠♠♠♠♠♠♠♠♠♠♠♠♠♠♠♠♠♠♠♠♠♠♠♠♠♠♠♠♠♠♠♠♠♠♠♠♠♠♠♠♠♠♠♠♠
♠♠♠♠♠♠♠♠♠♠♠♠♠♠♠♠♠♠♠♠♠♠♠♠♠♠♠♠♠♠♠♠♠♠♠♠♠♠♠♠♠♠♠♠♠♠♠♠♠♠♠♠♠♠♠♠♠♠♠♠♠♠♠♠
♠♠
Notice for Users in Canada
This Class B digital apparatus complies with Canadian ICES-003.
Cet appareil numérique de la classe B est conforme à la norme NMB-003 du Canada.
Notice for Users in U.S.A.
Declaration of Conformity
This device complies with Part 15 of the FCC Rules. Operation is subject to the following two
conditions: (1) This device may not cause harmful interference, and (2) this device must accept
any interference received, including interference that may cause undesired operation.
Model Number:
AR-NB2 N
Responsible Party: SHARP ELECTRONICS CORPORATION
Sharp Plaza, Mahwah, New Jersey 07430-1163
TEL:
1-800-BE-SHARP
-3-
INTRODUCTION
This manual explains how to configure network settings and install and configure the software to
enable the machine to be used as a network printer.
Trademark acknowledgments
• Microsoft® Windows® operating system is a trademark or copyright of Microsoft Corporation in the
U.S.A. and other countries.
• Windows® 95, Windows® 98, Windows® Me, Windows NT® 4.0, Windows® 2000, and Windows®
XP are trademarks or copyrights of Microsoft Corporation in the U.S.A. and other countries.
• Acrobat® Reader Copyright© 1987- 2002 Adobe Systems Incorporated. All rights reserved. Adobe,
the Adobe logo, Acrobat, and the Acrobat logo are trademarks of Adobe Systems Incorporated.
• IBM and PC/AT are trademarks of International Business Machines Corporation.
• Macintosh, Power Macintosh, Mac OS, LaserWriter, and AppleTalk are trademarks of Apple
Computer, Inc.
• PostScript® is a registered trademark of Adobe Systems Incorporated.
• PCL is a trademark of the Hewlett-Packard Company.
• All other trademarks and copyrights are the property of their respective owners.
SOFTWARE LICENSE
The SOFTWARE LICENSE will appear when you install the software from the CD-ROM. By using all
or any portion of the software on the CD-ROM or in the machine, you are agreeing to be bound by the
terms of the SOFTWARE LICENSE.
Note
• The explanations of screens and procedures in this manual are primarily for Windows® XP in
Windows® environments, and Mac OS X v10.2 in Macintosh environments. The screens may
vary in other versions of the operating systems.
• The explanations in this manual are based on the North American version of the software.
Versions for other countries and regions may vary slightly from the North American version.
• This manual refers to the digital multifunctional system AR-M160/M205 as "the machine".
• Where "AR-XXXX" appears in this manual, please substitute the name of your model for "XXXX".
For the name of your model, see "DIFFERENCES BETWEEN MODELS" in the operation
manual for copier.
• The PS3 expansion kit (AR-PK1) mentioned in this manual is an option.
The display screens, messages, and key names shown in the manual may differ from those on the actual
machine due to product improvements and modifications.
-4-
CONTENTS
SAFETY STANDARDS.......................................................................................................... 2
INTRODUCTION.................................................................................................................... 4
BEFORE INSTALLATION
USING THE MACHINE IN A WINDOWS ENVIRONMENT ................................................... 6
● CD-ROMS IN THE NETWORK EXPANSION KIT ...................................................................... 6
● HARDWARE AND SOFTWARE REQUIREMENTS ................................................................... 7
USING THE MACHINE IN A MACINTOSH ENVIRONMENT ............................................... 8
● CD-ROMS IN THE NETWORK EXPANSION KIT ...................................................................... 8
● HARDWARE AND SOFTWARE REQUIREMENTS ................................................................... 8
CONNECTING TO A NETWORK .......................................................................................... 9
● HOW TO RESET THE NETWORK EXPANSION KIT ................................................................ 9
INSTALLATION ENVIRONMENT AND INSTALLATION PROCEDURE ........................... 10
SETUP IN A WINDOWS ENVIRONMENT
SETTING THE IP ADDRESS OF THE MACHINE............................................................... 11
CHECKING THE IP ADDRESS ........................................................................................... 13
INSTALLING THE SOFTWARE .......................................................................................... 14
●
●
●
●
●
●
INSTALLING THE PRINTER DRIVER (Standard installation).................................................. 14
CUSTOM INSTALLATION........................................................................................................ 16
SHARING THE PRINTER USING WINDOWS NETWORKING ............................................... 18
INSTALLING THE PRINTER STATUS MONITOR ................................................................... 20
INSTALLING THE PRINTER ADMINISTRATION UTILITY ...................................................... 21
INSTALLING THE PS DISPLAY FONTS.................................................................................. 22
USING THE PPD FILE......................................................................................................... 23
● Installing the resident font information for PPD (only when the PPD file is installed in Windows
95/98/Me).................................................................................................................................. 23
CONFIGURING THE PRINTER DRIVER ............................................................................ 24
SETUP IN A MACINTOSH ENVIRONMENT
APPLETALK SETTINGS..................................................................................................... 25
INSTALLING THE PPD FILE .............................................................................................. 25
● INSTALLATION IN MAC OS X ................................................................................................. 25
● INSTALLATION IN MAC OS 8.6 - 9.x....................................................................................... 27
● INSTALLING THE SCREEN FONTS (Mac OS 8.6 - 9.x) ......................................................... 27
CONFIGURING THE PRINTER DRIVER ............................................................................ 28
● MAC OS X v10.2.x .................................................................................................................... 28
● MAC OS X v10.1.5.................................................................................................................... 30
● MAC OS 8.6 - 9.x ...................................................................................................................... 31
-5-
BEFORE INSTALLATION
USING THE MACHINE IN A
WINDOWS ENVIRONMENT
CD-ROMS IN THE NETWORK EXPANSION KIT
The network expansion kit contains the following three CD-ROMs: "Software", "Network Utilities", and
"Sharpdesk LT".
1. "Software" CD-ROM
The "Software" CD-ROM contains the following software programs:
• Printer driver
The printer driver enables you to use the printer function of the machine.
The CD-ROM contains the PCL6 and PCL5e printer drivers*1 and the PS printer driver*2.
• Printer Status Monitor
This allows you to check the status of the network printer on your computer screen.
• Printer Administration Utility*3
This is a utility that allows administrators to check the status of the printer and change settings.
• NICManager
This is used to configure and check the IP address of the machine, which is used when the
machine is connected to a network.
• Acrobat Reader 5.0
Software that allows you to view the online printer manual on your computer.
Caution
The printer driver, Printer Status Monitor, Printer Administration Utility, and NICManager
utility on the "Software" CD-ROM cannot be used when the machine is connected to your
computer by a USB or parallel cable.
*1 It is recommended that you use the PCL6 printer driver. If you have a problem printing from older software
using the PCL6 printer driver, use the PCL5e printer driver.
*2 To use the PS printer driver, the PS3 expansion kit must be installed.
*3 If you are installing the Printer Administration Utility in Windows 95, a system file must be updated before
the utility can be installed. For more information, click the "Display Readme" button in the Software
Selection window of the installer. (p.21)
-6-
USING THE MACHINE IN A WINDOWS ENVIRONMENT
2. "Network Utilities" CD-ROM
This CD-ROM contains "Quick Setup" and "Standard Setup (NICManager)" which are used to
configure network settings, "SC-Print2000" which is used to create an LPR port, and an online manual
that explains network settings.
The online manual on the CD-ROM explains how to configure settings on a network other than a
TCP/IP network, such as a Netware, AppleTalk, or NetBEUI network.
Note
Caution
• SC-Print2000 is only used to create an LPR port in Windows 95/98/Me. If the printer driver is
installed as explained in this manual, the LPR port is created automatically and thus there is
normally no need to use SC-Print2000.
• NICManager is also contained in the "Software" CD-ROM. If the network settings are configured
as explained in this manual, NICManager in the "Software" CD-ROM is used to configure
machine settings.
• The term "Print Server Card" appears in the "Network Utilities" CD-ROM. Where "Print
Server Card" appears, please substitute "Network expansion kit".
• If you use the "Network Utilities" CD-ROM to configure network settings, be sure to check
the machine's Ethernet address (MAC address) by printing out the Printer Setting List as
explained in "CHECKING THE IP ADDRESS". (The message that appears in the CD-ROM
utility is not relevant.)
3. "Sharpdesk LT" CD-ROM
Install Sharpdesk LT (for Windows) from this CD-ROM. Sharpdesk LT is a desktop document
management application that makes it easy to start applications and file documents and images.
For information on the "Sharpdesk LT" CD-ROM and the procedure for installing Sharpdesk LT, see
operation manual for network scanner (PDF format).
HARDWARE AND SOFTWARE REQUIREMENTS
Check the following hardware and software requirements before installing the software.
Computer type
IBM PC/AT or compatible computer equipped with a 10Base-T/100Base-TX LAN
board
Operating system
Windows 95*1, Windows 98, Windows Me,
Windows NT Workstation 4.0 (Service Pack 5 or later)*2,
Windows 2000 Professional*2, Windows XP Professional*2,
Windows XP Home Edition*2
Other hardware requirements An environment that allows any of the above operating systems to fully operate
*1 If you are installing the Printer Administration Utility in Windows 95, a system file must be updated before the
utility can be installed. For more information, click the "Display Readme" button in the Software Selection
window of the installer.
*2 Administrator's rights are required to install the software using the installer.
-7-
USING THE MACHINE IN A
MACINTOSH ENVIRONMENT
To use the machine as a printer for the Macintosh, the PS3 expansion kit AR-PK1 must be installed.
Install the PPD file needed to use the machine as a printer from the "Software" CD-ROM that
accompanied the network expansion kit.
CD-ROMS IN THE NETWORK EXPANSION KIT
In a Macintosh environment, use the "Software" and "Network Utilities" CD-ROMs that are contained
in the network expansion kit.
1. "Software" CD-ROM
The "Software" CD-ROM contains the following software programs:
• PPD file
A Macintosh computer refers to the PPD file when using a printer driver for printing.
• Acrobat Reader 4.05
Software that allows you to view the online printer manual on your computer.
Caution
The PPD file on the "Software" CD-ROM cannot be used when the machine is connected to
your computer with a USB or parallel cable.
2. "Network Utilities" CD-ROM
The "Network Utilities" CD-ROM contains the following software programs:
• PSC Setup Utility
This is a utility that lets you configure the machine's network settings from a Macintosh.
Caution
The term "Print Server Card" appears in the "Network Utilities" CD-ROM. Where "Print
Server Card" appears, please substitute "Network expansion kit".
HARDWARE AND SOFTWARE REQUIREMENTS
You will need the following hardware and software in order to install the PPD file for Macintosh.
Operating system
CPU and RAM
Note
Mac OS 8.6 to 9.x, 10.1.5, and 10.2 to 10.2.8 (except 10.2.2)
Requirements of the operating system must be satisfied.
If you are using Mac OS 8.6 to 9.x, make sure that LaserWriter8 has been installed and that the
"LaserWriter8" checkbox is selected (
) in "Extensions Manager" in "Control Panels". If not,
install it from the system CD-ROM supplied with your Macintosh computer.
-8-
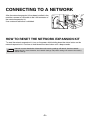
CONNECTING TO A NETWORK
After the network expansion kit has been installed in the
machine, connect a LAN cable to the LAN connector of
the network expansion kit.
Use a network cable that is shielded.
HOW TO RESET THE NETWORK EXPANSION KIT
To reset the network expansion kit, turn on the power while holding down the status button on the
network expansion kit. Continue to hold down the status button until a beep sounds.
Caution
Network scanner destination information and scanning settings will remain after the network
expansion kit is reset, however, the network settings and printer settings will revert to the factory
default settings.
-9-
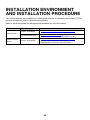
INSTALLATION ENVIRONMENT
AND INSTALLATION PROCEDURE
This manual explains the procedures for installing the software in a Windows environment (TCP/IP
network environment) and in a Macintosh environment.
Refer to the following table for the appropriate procedure for your environment.
Function
Operating system
Windows environment
Printer function
Macintosh environment
Network scanner
function
Windows environment
Procedure to follow
1.
2.
1.
2.
1.
2.
"SETTING THE IP ADDRESS OF THE MACHINE" (p.11)
"INSTALLING THE SOFTWARE" (p.14)
"INSTALLING THE PPD FILE" (p.25)
"CONFIGURING THE PRINTER DRIVER" (p.28)
"SETTING THE IP ADDRESS OF THE MACHINE" (p.11)
Settings required for the network scanner function
(See operation manual for network scanner)
- 10 -
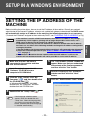
SETUP IN A WINDOWS ENVIRONMENT
SETTING THE IP ADDRESS OF THE
MACHINE
Before installing the printer driver, be sure to set the IP address of the machine. Consult your network
administrator for the correct IP address, subnet mask, and default gateway to be entered. If a DHCP server
will automatically assign an IP address to the machine, the following procedure is not necessary.
(To check the IP address assigned to the machine by DHCP, see "CHECKING THE IP ADDRESS" (p.13).)
Caution
1
Make sure that the LAN cable is
connected to the machine and then
turn on the machine.
2
Insert the network expansion kit
"Software" CD-ROM into your
computer's CD-ROM drive.
3
4
Click the "start" button, click "My
Computer" (
), and then double-click
the CD-ROM icon ( ).
In Windows 95/98/Me/NT 4.0/2000,
double-click "My Computer" and then
double-click the CD-ROM icon.
Double-click the "setup" icon (
Note
).
If the language selection screen
appears after you double click the
"setup" icon, select the language that
you wish to use and click the "Next"
button. (Normally the correct language
is selected automatically.)
- 11 -
5
The "SOFTWARE LICENSE" window will
appear. Make sure that you understand
the contents of the license agreement,
and then click the "Yes" button.
6
Read the message in the "Welcome"
window and then click the "Next"
button.
7
Click the "Administrator Tools" button.
Windows
• If the machine is used in a DHCP environment, the machine's IP address may change
automatically. If this happens, printing will no longer be possible. In this event, use a
WINS server or do not use the machine in a DHCP environment.
• If it becomes necessary to move the machine to a different network after the IP address
has been set, use either of the following methods to change the IP address setting before
moving the machine:
1) Set the IP address for the new network while the machine is still connected to the old network.
2) Reset the network expansion kit (see "HOW TO RESET THE NETWORK EXPANSION
KIT" on page 9).
If the machine is moved to the new network while the old IP address is still set, the
machine will not be detected and it will not be possible to set the new IP address.
SETTING THE IP ADDRESS OF THE MACHINE
8
9
Click the "NICManager" button.
Note
10
If the machine is not found, make sure
that the machine is powered on and
connected to your computer and then
search again.
Restart the machine.
Power off the machine and then power it
back on.
14
Select "Search" from the "File" menu,
select the machine, and then click the
"Print Server Card Setup" button.
15
Enter your password in the password
entry screen and click "OK".
The Print Server Card Setup window will
appear.
The password for this product has been
initially set to "Sharp".
If the "Guest user" checkbox is selected, the
settings can be viewed but not configured.
16
Click the "TCP/IP" tab.
17
Configure the settings and then click
the "Update" button.
Click the "Print Server Card Setup" button.
If the machine is being used in a DHCP
environment or the IP address has
otherwise already been set, go to step 15.
Be sure to ask your network administrator
for the correct IP address, subnet mask,
and default gateway to be entered.
11
12
If the IP address has not been set (the IP
address is set to "0.0.0.0"), a message
will appear prompting you to set the IP
address. Click the "Yes" button.
Enter the IP address and click the "OK"
button.
The machine's IP address is changed.
A password entry screen will appear while
the IP address is being changed. Enter the
password and click the "OK" button.
The password for this product has been
initially set to "Sharp".
18
Your changes to the settings appear.
Make sure that the changes are correct
and then click the "OK" button.
19
Restart the machine.
Power off the machine and then power it
back on.
20
Select "Search" from the "File" menu.
The IP address that you entered will
appear. Make sure that it is correct.
The completes the IP address settings.
- 12 -
Windows
The printer or printers connected to the
network will be detected. Click the
printer to be configured (the machine).
Select the "AR-XXXX".
13
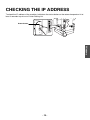
CHECKING THE IP ADDRESS
To check the IP address of the machine, hold down the status button on the network expansion kit at
least 2 seconds to print out a Printer Setting List.
Status button
Windows
- 13 -
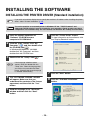
INSTALLING THE SOFTWARE
INSTALLING THE PRINTER DRIVER (Standard installation)
Note
If you wish to install the display font or specify the machine's IP address when installing the printer
driver, select "Custom installation" (p.16).
Caution
To use the machine as a network printer in Windows NT 4.0, "TCP/IP Protocol" and
"Microsoft TCP/IP printing" must be installed in your computer. Check to make sure these
components are installed. If they are not installed, see Windows NT 4.0 Help to install them.
Insert the network expansion kit
"Software" CD-ROM into your
computer's CD-ROM drive.
2
Click the "start" button, click "My
Computer" (
), and then double-click
the CD-ROM icon ( ).
In Windows 95/98/Me/NT 4.0/2000,
double-click "My Computer" and then
double-click the CD-ROM icon.
3
Double-click the "setup" icon (
Note
6
Click the "Printer Driver" button.
To view information on the software, click
the "Display Readme" button.
7
Click the "Next" button.
8
Click the "Standard installation"
button.
Windows
1
).
If the language selection screen
appears after you double click the
"setup" icon, select the language that
you wish to use and click the "Next"
button. (Normally the correct language
is selected automatically.)
4
The "SOFTWARE LICENSE" window
will appear. Make sure that you
understand the contents of the license
agreement, and then click the "Yes"
button.
5
Read the message in the "Welcome"
window and then click the "Next"
button.
- 14 -
INSTALLING THE SOFTWARE
9
Printers connected to the network are
detected. Select the machine and click
the "Next" button.
12
Select whether or not you wish the
printer to be your default printer and
click the "Next" button.
If you are installing multiple printer drivers,
select the printer that you wish to use as
your default printer.
If you do not wish to set either printer
driver as the default printer, select "No".
13
Click the "Next" button.
Begin installation of the printer driver.
Caution
Note
11
A confirmation window appears. Check
the contents and then click the "Next"
button.
14
When "The installation of the SHARP
software is complete" appears, click
the "OK" button.
15
Click the "Close" button.
Note
When the printer driver selection
window appears, select the printer
driver to be installed and click the
"Next" button.
Select the checkboxes of the printer
drivers to be installed.
This completes the installation of the
software.
• After installation, see "CONFIGURING THE
PRINTER DRIVER" (p.24) to check the
printer driver settings.
• To install the Printer Status Monitor or Printer
Administration Utility, see the following
pages:
Printer Status Monitor: p.20
Printer Administration Utility: p.21
Note
Note
After the installation, a message
prompting you to restart your
computer may appear. In this case,
click the "Yes" button to restart your
computer.
To use the PS printer driver, the PS3
expansion kit must be installed.
- 15 -
If you installed the PS printer driver,
the PS display font can be installed
from the "PRINTER UTILITIES"
CD-ROM that accompanied the PS3
expansion kit. (p.22)
Windows
10
If the machine is not found, make sure
that the machine is powered on and
connected to your computer and then
search again. If the machine is still not
found, use the custom installation
procedure to directly specify the IP
address (p.16).
If you are running Windows 2000/XP
and a warning message appears
regarding the Windows logo test or
digital signature, be sure to click
"Continue Anyway" or "Yes".
INSTALLING THE SOFTWARE
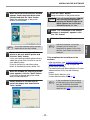
CUSTOM INSTALLATION
If you wish to install the display font or specify the machine's IP address when installing the printer
driver, select "Custom installation".
1
Insert the network expansion kit
"Software" CD-ROM into your
computer's CD-ROM drive.
2
Click the "start" button, click "My
Computer" (
), and then double-click
the CD-ROM icon ( ).
In Windows 95/98/Me/NT 4.0/2000,
double-click "My Computer" and then
double-click the CD-ROM icon.
3
Double-click the "setup" icon (
Click the "Next" button.
8
Click the "Custom installation" button.
9
Select "LPR Direct Print" and click the
"Next" button.
10
Printers connected to the network are
detected. Select the machine and click
the "Next" button.
).
If the language selection screen
appears after you double click the
"setup" icon, select the language that
you wish to use and click the "Next"
button. (Normally the correct language
is selected automatically.)
4
The "SOFTWARE LICENSE" window will
appear. Make sure that you understand
the contents of the license agreement,
and then click the "Yes" button.
5
Read the message in the "Welcome"
window and then click the "Next" button.
6
Click the "Printer Driver" button.
To view information on the software, click
the "Display Readme" button.
If you wish to specify the IP address, click
the "Specify address" button, enter the IP
address, and click the "Search" button.
11
- 16 -
A confirmation window appears. Check
the contents and then click the "Next"
button.
Windows
Note
7
INSTALLING THE SOFTWARE
12
Caution
Select whether or not you wish the
printer to be your default printer and
click the "Next" button.
If you are installing multiple printer drivers,
select the printer that you wish to use as
your default printer.
If you do not wish to set either printer
driver as the default printer, select "No".
When the window for entering a printer
name appears, click the "Next" button.
If you wish to change the printer name,
enter the desired name.
15
Select whether or not you wish to
install the display font and click the
"Next" button.
If you are running Windows 2000/XP
and a warning message appears
regarding the Windows logo test or
digital signature, be sure to click
"Continue Anyway" or "Yes".
17
When "The installation of the SHARP
software is complete" appears, click
the "OK" button.
18
Click the "Close" button.
Note
To use the PS printer driver, the PS3
expansion kit must be installed.
14
Click the "Next" button.
Begin installation of the printer driver.
After the installation, a message
prompting you to restart your
computer may appear. In this case,
click the "Yes" button to restart your
computer.
This completes the installation of the
software.
• After installation, see "CONFIGURING THE
PRINTER DRIVER" (p.24) to check the
printer driver settings.
• To install the Printer Status Monitor or Printer
Administration Utility, see the following
pages:
Printer Status Monitor: p.20
Printer Administration Utility: p.21
Note
- 17 -
If you installed the PS printer driver,
the PS display font can be installed
from the "PRINTER UTILITIES"
CD-ROM that accompanied the PS3
expansion kit. (p.22)
Windows
Note
13
16
When the printer driver selection window
appears, select the printer driver to be
installed and click the "Next" button.
Select the checkboxes of the printer
drivers to be installed.
INSTALLING THE SOFTWARE
SHARING THE PRINTER USING WINDOWS NETWORKING
If the machine will be used as a shared printer on a network, follow these steps to install the printer
driver in the client computer.
Note
To configure the appropriate settings in the print server, see the operation manual or help file of
your operating system.
"Print server" as explained here, is a computer that is directly connected to the machine, and a
"Client" is any other computer that is connected to the same network.
Insert the network expansion kit
"Software" CD-ROM into your
computer's CD-ROM drive.
2
Click the "start" button, click "My
Computer" (
), and then double-click
the CD-ROM icon ( ).
In Windows 95/98/Me/NT 4.0/2000,
double-click "My Computer" and then
double-click the CD-ROM icon.
3
Double-click the "setup" icon (
Note
4
5
6
Click the "Printer Driver" button.
To view information on the software, click
the "Display Readme" button.
7
Click the "Next" button.
8
Click the "Custom installation" button.
9
Select "Shared Printer" and click the
"Next" button.
Windows
1
).
If the language selection screen
appears after you double click the
"setup" icon, select the language that
you wish to use and click the "Next"
button. (Normally the correct language
is selected automatically.)
The "SOFTWARE LICENSE" window will
appear. Make sure that you understand
the contents of the license agreement,
and then click the "Yes" button.
Read the message in the "Welcome"
window and then click the "Next" button.
- 18 -
INSTALLING THE SOFTWARE
10
13
For the port to be used, select the
machine set as a shared printer, and
click the "Next" button.
You can also click the "Add Network Port"
button and select the printer to be shared
(the machine) by browsing the network in
the window that appears.
Note
This completes the installation of the
software.
• After installation, see "CONFIGURING THE
PRINTER DRIVER" (p.24) to check the
printer driver settings.
• To install the Printer Status Monitor or Printer
Administration Utility, see the following
pages:
Printer Status Monitor: p.20
Printer Administration Utility: p.21
If the shared printer does not appear
in the list, check the settings in the
printer server.
Note
11
When the model selection window
appears, select model name of your
machine and click the "Next" button.
12
When the printer driver selection
window appears, select the printer
driver to be installed and click the
"Next" button.
Be sure to select the same printer driver
as the printer driver used in the print
server (the machine).
After the installation, a message
prompting you to restart your
computer may appear. In this case,
click the "Yes" button to restart your
computer.
- 19 -
If you installed the PS printer driver,
the PS display font can be installed
from the "PRINTER UTILITIES"
CD-ROM that accompanied the PS3
expansion kit. (p.22)
Windows
Note
Follow the on-screen instructions.
INSTALLING THE SOFTWARE
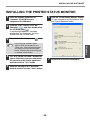
INSTALLING THE PRINTER STATUS MONITOR
1
Insert the network expansion kit
"Software" CD-ROM into your
computer's CD-ROM drive.
2
Click the "start" button, click "My
Computer" (
), and then double-click
the CD-ROM icon ( ).
In Windows 95/98/Me/NT 4.0/2000,
double-click "My Computer" and then
double-click the CD-ROM icon.
3
Double-click the "setup" icon (
Note
5
Click the "Printer Status Monitor" button.
To view information on the software, click
the "Display Readme" button.
7
Follow the on-screen instructions.
).
If the language selection screen
appears after you double click the
"setup" icon, select the language that
you wish to use and click the "Next"
button. (Normally the correct language
is selected automatically.)
Windows
4
6
The "SOFTWARE LICENSE" window will
appear. Make sure that you understand
the contents of the license agreement,
and then click the "Yes" button.
Read the message in the "Welcome"
window and then click the "Next" button.
- 20 -
INSTALLING THE SOFTWARE
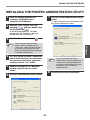
INSTALLING THE PRINTER ADMINISTRATION UTILITY
1
Insert the network expansion kit
"Software" CD-ROM into your
computer's CD-ROM drive.
2
Click the "start" button, click "My
Computer" (
), and then double-click
the CD-ROM icon ( ).
In Windows 95/98/Me/NT 4.0/2000,
double-click "My Computer" and then
double-click the CD-ROM icon.
3
Double-click the "setup" icon (
Note
Click the "Printer Administration Utility"
button.
To view information on the software, click
the "Display Readme" button.
).
If the language selection screen
appears after you double click the
"setup" icon, select the language that
you wish to use and click the "Next"
button. (Normally the correct language
is selected automatically.)
Windows
4
7
The "SOFTWARE LICENSE" window will
appear. Make sure that you understand
the contents of the license agreement,
and then click the "Yes" button.
5
Read the message in the "Welcome"
window and then click the "Next"
button.
6
Click the "Administrator Tools" button.
Note
8
- 21 -
If you are installing the Printer
Administration Utility in Windows 95, a
system file must be updated before
the utility can be installed. For more
information, click the "Display
Readme" button.
Follow the on-screen instructions.
INSTALLING THE SOFTWARE
INSTALLING THE PS DISPLAY FONTS
The fonts used by the PS printer driver are contained in the "PRINTER UTILITIES" CD-ROM that
accompanied the PS3 expansion kit (AR-PK1). Install these fonts as needed for the PS printer driver.
Insert the PS3 expansion kit AR-PK1
PRINTER UTILITIES CD-ROM into your
computer's CD-ROM drive.
If your computer is configured for auto
start on the CD-ROM, proceed to step 4.
2
Click the "start" button, click "My
Computer" (
), and then double-click
the CD-ROM icon ( ).
In Windows 95/98/Me/NT 4.0/2000,
double-click "My Computer", and then
double-click the CD-ROM icon.
3
Double-click the "setup" icon (
Note
4
5
).
If the language selection screen
appears after you double click the
"setup" icon, select the language that
you wish to use and click the "Next"
button. (Normally the correct language
is selected automatically.)
Select the "PS Display Font" checkbox
and click the "Next" button.
Caution
Follow the on-screen instructions.
Windows
1
Do not select "PS Printer Driver".
The PS printer driver for the
machine should only be installed
from the CD-ROM that accompanies
the network expansion kit.
- 22 -
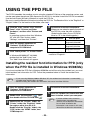
USING THE PPD FILE
The PPD file enables the machine to print using the standard PS driver of the operating system, and
can be used when the optional PS3 expansion kit AR-PK1 is installed. Install the PPD file as needed.
Use the Add Printer Wizard in Windows to install the PPD file.
Be sure to read the Readme file before installing the PPD file. The Readme file is in the "EnglishA" or
"English" folder. For the location of the folder, see step 4.
1
2
Follow the on-screen instructions.
When you are asked to specify the path of
the PPD file, enter the path as follows.
(Substitute the letter of your CD-ROM
drive for "R" in the following paths.)
Operating system
Windows 95/98/Me
Insert the network expansion kit
"Software" CD-ROM into your
computer's CD-ROM drive.
Windows NT 4.0
Windows 2000/XP
Click "Add a printer" in "Printer Tasks".
PPD file path
R:\Drivers\Printer
\EnglishA\PPD\9XME
R:\Drivers\Printer
\EnglishA\PPD\NT40
R:\Drivers\Printer
\EnglishA\PPD\2KXP
* In regions other than the U.S., enter "English"
instead of "EnglishA".
In Windows 95/98/Me/NT 4.0/2000,
double-click the "Add Printer" icon.
The "Add Printer Wizard" will appear.
Installing the resident font information for PPD (only
when the PPD file is installed in Windows 95/98/Me)
If you have installed the PPD file in Windows 95/98/Me and will be using the resident font, you must
install resident font information for PPD. Follow the procedure below to install the resident fonts
information.
Note
• If you are using Windows 2000 or Windows XP, the resident font information is automatically
installed when the PPD file is installed.
• Before installing the resident font information, be sure to install the PPD file.
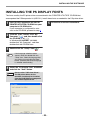
1
Insert the network expansion kit
"Software" CD-ROM into your
computer's CD-ROM drive.
2
Double-click "My Computer" ( ), and
then double-click the CD-ROM icon ( ).
3
4
Follow the on-screen instructions.
5
After the resident font information has
been installed, restart your computer.
Note
Double-click the "Drivers" folder, the
"Printer" folder, the "EnglishA" folder
(for regions other than the U.S.,
double-click the "English" folder), the
"PPD" folder, the "9XME" folder, and
"PFMSetup.exe".
- 23 -
If printer resident fonts cannot be
specified from the application
software, the resident font information
has not been installed or the
information is not correct. In this case,
reinstall the resident font information.
Windows
3
4
Click the "start" button, click "Control
Panel", click "Printers and Other
Hardware", and then click "Printers and
Faxes".
In operating systems other than Windows
XP, click the "Start" button, select
"Settings", and then click "Printers".
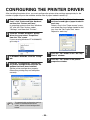
CONFIGURING THE PRINTER DRIVER
After installing the printer driver, you must configure the printer driver settings appropriately for the
number of paper trays on the machine and the size of paper loaded in each tray.
1
Click the "start" button, click "Control
Panel", click "Printers and Other Hardware",
and then click "Printers and Faxes".
In operating systems other than Windows
XP, click the "Start" button, select
"Settings", and then click "Printers".
2
Click the "SHARP AR-XXXX" printer
driver icon and select "Properties"
from the "File" menu.
If you are using Windows NT 4.0/2000/XP,
go to step 4.
4
In Windows 95/98/Me, click the "Setup"
tab.
Click the "Configuration" tab and set
the printer configuration based on the
options that have been installed.
Set the printer configuration properly.
Otherwise, printing may not take place
correctly.
Note
To automatically configure the settings
based on the detected machine
status, click the "Auto Configuration"
button.
- 24 -
Click the "Set Tray Status" button and
set the size and type of paper loaded in
each tray.
Select a tray in the "Paper source" menu,
and select the size of paper loaded in that
tray from the "Set Paper Size" menu.
Repeat for each tray.
6
Click the "OK" button in the "Set Tray
Status" window.
7
Click the "OK" button in the printer
properties window.
Windows
3
5
SETUP IN A MACINTOSH ENVIRONMENT
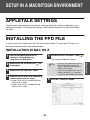
APPLETALK SETTINGS
After connecting the machine to the network, configure AppleTalk settings as required for your
network environment. To configure the settings, see the online manual on the "Network Utilities"
CD-ROM.
INSTALLING THE PPD FILE
In order to print from a Macintosh, the PPD file must be installed. To install the PPD file to your
Macintosh computer, follow the procedure below.
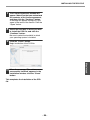
INSTALLATION IN MAC OS X
1
5
Insert the network expansion kit
"Software" CD-ROM into your
computer's CD-ROM drive.
Double-click the "AR-NB2-1" icon (
).
The installer window will appear.
Double-click the CD-ROM icon (
the desktop.
3
Double-click the "MacOSX" folder.
4
Double-click the folder of the operating
system version you are using.
• In Mac OS X v10.1.5, double-click the
"Version 10.1" folder.
• In Mac OS X v10.2.x, double-click the
"Version 10.2" folder.
) on
Note
6
- 25 -
• If you are using Mac OS X v10.2.x,
the "Authenticate" window will
appear. Enter the password and
click the "OK" button.
• If you are using Mac OS X v10.1.5,
click the lock icon ( ), enter the
password, and click the "OK" button.
Click the "Continue" button.
Macintosh
2
INSTALLING THE PPD FILE
The License Agreement window will
appear. Make sure that you understand
the contents of the license agreement,
and then click the "Continue" button.
A message will appear asking you if you
agree to the terms of the license. Click the
"Agree" button.
8
Select the hard disk in which you wish
to install the PPD file, and click the
"Continue" button.
Be sure to select the hard disk in which
your operating system is installed.
9
Click the "Install" button.
Begin installation of the PPD file.
10
When the message "The software was
successfully installed" appears in the
installation window, click the "Close"
button.
Macintosh
7
This completes the installation of the PPD
file.
- 26 -
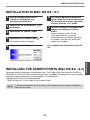
INSTALLING THE PPD FILE
INSTALLATION IN MAC OS 8.6 - 9.x
1
Insert the network expansion kit
"Software" CD-ROM into your
computer's CD-ROM drive.
2
Double-click the CD-ROM icon (
the desktop.
3
Double-click the "MacOS" folder.
4
Double-click the "Installer" icon (
) on
).
The installer window will appear.
5
6
The License Agreement window will
appear. Make sure that you understand
the contents of the license agreement,
and then click the "Yes" button.
7
Read the message in the window that
appears and click the "Continue"
button.
Begin installation of the PPD file.
After the installation, a message
prompting you to restart your computer
will appear. Click the "OK" button and
restart your computer.
This completes the installation of the PPD
file.
Click the "Install" button.
The screen fonts for Macintosh are contained in the "Font" folder of the PS3 expansion kit AR-PK1
PRINTER UTILITIES CD-ROM. Install the screen fonts as needed. The screen fonts are installed by
copying the required screen font suitcase folders to your Macintosh.
Copy the screen fonts to the following folder:
• Mac OS 8.6 to 9.x: "Fonts" folder in the "System Folder"
Note
If you experience problems that may be due to the installed screen fonts, delete the copied font
folder from the system.
- 27 -
Macintosh
INSTALLING THE SCREEN FONTS (Mac OS 8.6 - 9.x)
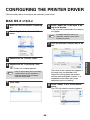
CONFIGURING THE PRINTER DRIVER
Follow the steps below to configure the machine's printer driver.
MAC OS X v10.2.x
1
Make sure that the machine is powered
on.
2
Select "Applications" from the "Go"
menu.
6
Select "AppleTalk" in the menu at the
top of the window.
A list of printers connected to the network
will appear.
Note
7
Double-click the "Utilities" folder.
4
Double-click the "Print Center" icon
( ).
The "Printer List" window appears.
Note
5
Click the machine's model name in the
list.
The name of the machine that appears is
the name that was entered in the
AppleTalk settings when the network
settings were configured ("xxxxxx" is a
sequence of characters that varies
depending on your machine).
If this is the first time you are installing
a printer driver on your computer, a
confirmation message will appear.
Click the "Add" button.
Click "Add".
8
- 28 -
Select "Sharp" in the "Printer Model"
menu.
The PPD file selection window appears.
Macintosh
3
If multiple AppleTalk zones are
displayed, select the zone which
includes the printer.
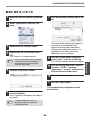
CONFIGURING THE PRINTER DRIVER
9
Select the PPD file of the machine.
10
Click the "Add" button.
13
Set the printer configuration based on
the options that have been installed,
and then click the "Apply Changes"
button.
Set the printer configuration properly. If
not, printing may not be executed
properly.
14
Close the window.
The machine is added to the list of
printers.
11
This completes the configuration of the
printer driver.
Select "Installable Options" in the
menu.
- 29 -
Macintosh
12
Click the name of the machine in the
"Printer List" window, and select
"Show Info" from the "Printers" menu.
The "Printer info" window will appear.
CONFIGURING THE PRINTER DRIVER
MAC OS X v10.1.5
1
Make sure that the machine is powered
on.
2
Select "Applications" from the "Go"
menu.
3
Double-click the "Utilities" folder.
4
Double-click the "Print Center" icon
( ).
The "Printer List" window appears.
Note
6
Click the machine's model name in the
list.
The name of the machine that appears is
the name that was entered in the
AppleTalk settings when the network
settings were configured ("xxxxxx" is a
sequence of characters that varies
depending on your machine).
If this is the first time you are installing
a printer driver on your computer, a
confirmation message will appear.
Click the "Add" button.
8
Click the "Printer Model" menu and
select "Other" in the list of PPD files.
The PPD file selection window will appear.
9
Click the startup disk name, "Library",
"Printers", "PPDs", "Contents",
"Resources", "en.lproj", and select the
PPD file with your model name.
10
Click the "Choose" button.
11
Click the "Add" button.
Click the "Add Printer" button.
This completes the configuration of the
printer driver.
Select "AppleTalk" in the menu at the
top of the window.
A list of printers connected to the network
will appear.
Note
If multiple AppleTalk zones are
displayed, select the zone which
includes the printer.
- 30 -
Macintosh
5
7
CONFIGURING THE PRINTER DRIVER
MAC OS 8.6 - 9.x
1
Select "Chooser" from the Apple Menu.
2
Click the "LaserWriter 8" icon.
• The model name of your
network-connected machine
("SCxxxxxx") appears in the "Select a
PostScript Printer" list on the right.
The name of the machine that appears
is the name that was entered in the
AppleTalk settings when the network
settings were configured ("xxxxxx" is a
sequence of characters that varies
depending on your machine).
• If multiple AppleTalk zones are
displayed, select the zone which
includes the printer.
Click the machine's model name
("SCxxxxxx") in the "Select a
PostScript Printer" list.
4
Click the "Create" button.
• If the "Select a PostScript™ Printer
Description File" dialog box appears,
select the PPD file of the machine and
then click the "Select" button.
• If the "Select a PostScript™ Printer
Description File" dialog box does not
appear, follow these steps to select the
PPD file manually when you return to
the Chooser dialog box.
1) Verify that the machine is selected in
the "Select a PostScript Printer" list,
and then click the "Setup" button and
the "Select PPD" button.
2) Select the PPD file of the machine,
and then click the "Open" (or "Select")
button.
3) Click the "OK" button.
Verify that the machine is selected in
the "Select a PostScript Printer" list,
and then click the "Setup" button and
the "Configure" button.
6
Set the printer configuration based on
the options that have been installed,
and then click the "OK" button.
Be sure to select the correct printer
configuration. If not, printing may not take
place correctly.
7
Click the "OK" button to close the
dialog box.
8
Click the Close box (
Chooser.
) to close the
This completes the configuration of the
printer driver.
- 31 -
Macintosh
3
5
AR-NB2/AR-NB2 N
SHARP CORPORATION


![2 Fare clic sul pulsante [start]](http://vs1.manualzilla.com/store/data/006118559_1-173242b46b2c9da737019e0375b2825a-150x150.png)