1
nby
°
•
i
.............
III
I
IIIII II II
I I
I II
II
I
II ....
I IIIII "
USEANDCARE
MANUAL
MANUEL
D'UTILISATION
i
....
!
_i
,i'
"1
III
IIIIIII
........................
I IIII
IIII
I/
IIIIIIII II
llllllll
II II I
!
llll i
.......
:iF
i
a
II
I
I
I
IIIII
I
II
.......
IHI
,H,= II
I IIIIIIIIIIII
I
II
II
I
IILU[_i'Ii
IIII _111
ilill
I
iii
I
IIII
Model, M0dSle
I
I IJ
I
....
I "
DAC7003
DAC6020
Danby"
ReadendFollowAI!SafetyRutes
andOperating
Instructions
Before
Rrs!Useof'fhTaProduct,
PRI_CAUTION:
Vaulirez
lirantlentlvament
leecone!ones
des_cud[6etlee
Insltucgons
d'uttffsagon
t_vant
I'utttlsatlon
tnillalade
caproduft,
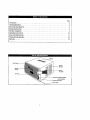
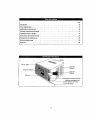
Room Air Conditioner
Table of contents
DallI_
.......................
1
_
Climatiseur de piece
Tabte of contents
.......................
DanbyProductsLimited,
Guelph,OnladoCanadaNIH 6Z9
DanbyProductsInc.,Findlay,OhioUSA 45840
14
Page
Introduction ........................
: ........................................
Unit Specifications ..................
' ...............................................
Electrical Specifications ......................................................
2
2
3
Energy-Saving Tip€ ................................................................
Window Instaltalior_ ...................................................................
4
4
Operating Instructions
Care and Maintenance .......................................................
..............................................................
_
0
11
Trouble Shooting Guide ......................................................
12
Warranty ..................................................................
13
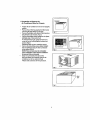
Exterior
Air i'ntBt
Air _nlet
Fnterror
Air Oul!et
Thank _/oufor choosing a Danby Room Air Condilioner to cool your home. This Use and Care Manual
provides information necessary for the proper care and maintenance of your new Room Air Conditioner,
propedy maintained, your air conditioner will give you many years of trouble free operation. To avoid
installation difficufties,read these Instructions completely before Jnstallingloperating your unit,
If
NOTE: This unit Is NOT designed for through-the-wall Installation,,
For easy reference,you may want toattacha copyof yoursalesreceiptto this page, Note following
informationprovided (on the manufacturer'snameplate located on the rightside of the unit above the power
cord),, This informationwill be needed when you con!act a Customer Service Representative,
Model Number:
Serial Number:
Date o[ Purchase:
Dealer's Name and Address:
Refer to the trouble shooting section of this Use end Care Manual if the unit Is not operating correctly,
If these suggestions do not solve the problem, contact an authorized serv[ce representative or
call Danby TOLL FREE: 11-800-26i1_'
Do not leave a room air conditioner unattended in
a space where people or animals who cannot
react to o failed unl_:are located° A failed unit can
cause extreme overheating or death in such an
enclosed, unattended space.
Keep those instructions for future reference.
This symbol denotes a caution or warntng
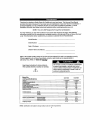
Model No.
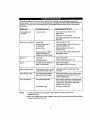
Unit Specificaficatlons
Voltage
Coot!rigCapacity(atulh)
InputWattage
E_ner_ly
Efi!c!encyRating (EER}
FanlCoolta_Speeds
€oottrl9 Area Coverage(Sq:rL)
No}soLevel (dB)
Unit Dimensions
Window Kit Dimensions
Width
...................
p_p!h
Height
Maximum Width
Minimum Width
Minimum Height
_
Shipping Weight
NOTE; Specil'icationsare subject to change without notice for fucthorimprovsmenL
2
DAC7003
DAC8O2O
i 15VI6OHz
7,000
710
9,8
3/3
......
250
47
'115Vt60Hz
6,000
'
610
9.8
3t3
200
47
't7.75"
22,5"
13°5"
t7.75"
22.5 "°
13,5"
37"
t5.S"
97 Ib
37"
24.5,-__
15.5"
97 Ib
Table
All wiring must comply with local and national
electrical codes and must be installed by a
qualified elecViclan. If you have any questions
regarding the following instructions, contact a
qualified electrician.
2_ Check available power supply and resolve any
wiring problems BEFORE installing and
operating this unit,
3,, This 115V air cond{fioner uses 12.0 or less
nameplate amps and may be used in any
properly wired, general purpose household
receplacle See Table 1 for specifications for
individual branch circuit.
4,
For your safely and protection, this unit is
grounded through the power cord plug when
plugged into into a matching wall outleL If
you are not sure whether your wall oulret _s
properly grounded, please consult a
qualified electrlclan.
5. The walt outlet (3-pin) must match the plug (3_
pin) on the service cord supplied with the unit.
DO NOT use plug adapters, See "Table2 for
receptacle and fuse information° if [t fs necessary
to use an extension cord to connect your air
conditioner, use an approved "air condilfoner"
extension cord only. (available at most local
hardware stores)
6. The rating plate on the unit contains electrical
and other technical data. The rating plate
is located on the right side of the unit, above the
power cord,
1:
Suggested
Nameplate Ampa
5.0 to 12
Individual
Branch Clrcull
AWG Wire Size"
14
AWG- American Wire Gage
"Based on copper wire at 60 "C temperatore
Table
2:
Receptacle
and FuseTypes
Rated Vo_ls
125
Amps
15
Wall Oultel
Fuse Size
Time Delay Fuse
(or circuit breake0
15
Plug Type
rating..
Your Room Air Conditioner Is designed to be
highly efffiolenttn erte_gysavings, Followthese
recommendations for greater efficiency,,
t. Select thermostat setting that suite your
comfortneedsand leavethermostatat that
chosensetting.
2. The filterlsvery efficient In removing airborne
particles.Keep air fillerclean. Normally, filter
should be cieanedevery2 weeks. More
frequentcteantngmay be necessarydepending
on outdoor end Indoorair qualty.
4. Startyourair conditionerbefore outdoor air
becomes hot and uncomforlsble. This avoids an
Inffial periodof discomfortwhileunit is cooing
off the room.
5. Whenoutdoortemperaturesare cooleheugh,
use HIGH, MED, or LOW FAN only(depending
on yourmodel)oThis circulatesindoor air,
providingsome coolingcomfort,and utilizes
tese electdclty than when operating on a
coolingsetting.
3. Usedrapes,curtains,or shadesto keep
direct sunlight from heatingroom,but DO NOT
obstructthe airconditioner.Allow air to cfrculate
aroundtheunitwithoutobstruction.
_"[[mt_E'_,,.
_F.t¢JRF_
injury,
To
avoid
disconnect
the possiblly
powerto
of personal
the Unit
before installingor servicing°
1/4" Seraws (18)
(_
Top Channel (1)
,, .l_;[",Lr',]_ -
_;_huts
r Brackets (2)
Side Curtain,RH (1)
Side Cudain LH (1)
Bottom Channel (_)
Both Phillpsand flat head
1/8 inchdiameter drill bit
Measuring'rape
Scissors
Carpenters Level
Adjustable Wrench
Flat Washers
(8)
3'4"
Screws
(8)
(_t
Tools Needed for Window Installation
Screw Drivers:
Power Drill:
Pencil
,;
E_
(_)
_1_
,,.-
LockWashers
(4)
1_1/2_ x 1/4" Bolts (4)
'_)
t/4" Nuts (4)
Foam S_tal(4)
"_ 90 _ ,Alglt
Brackets(2)
YourRoom Air ConditionerIs designed for easy
installationin a single or double-hungwlndowo
NOTE:
This unitle NOT designedfor vertical(slider type)
windowsand/orthrough-the-wal applications.NOTE:
Save the shippingcarton and packingmaterialsfor
futurestorage or transport of the unit_Removefrom
carton, the plastic bag containing the tnstalation
hardwarekit necessary for the instataton ofyour air
conditioner.
Please check the contents o_'hardware
kil egoistthe corresponding model check list, priorto
instellalono(the uniL
See Fi'g.1
Leveling Legs (2)
Because the compressor is located on the
controls side of the unit (right side), this side will
be heavier and more awkward to manipulate,
Inadequate support on control side of the unit
can result In personal injury and damage to your
unit and properl_ Therefore, it is recommended
to have someone assist you during the
installation of this unit.
Your unit Is designed to evaporate condensation
under normai conditions. However, under
extreme humidity conditions, excess condensation
may cause basepan to ovedlow to the outside°
The Unit shouId be installed where condensation
run-elf cannot dr_p on pedestrians or neighboring
properties,
A drain tube connection (excluding hose) is provided
to redirect condensalion ovediowo See Fig. 25,
Select the Best Location
A. This room air conditioner is designed to fit easily
into a single or double hung window. However,
since window designs vary, it may be necessary
to make soma modifications for safe, proper
installation,
2O"
MIn,
B. Make sure window and frame are structurally
sound and free from dry and rotted wood,
C. For maximum efficiency, Install the alr conditioner
on a side of a house or building which favors
more shade than sunlight. If the unit is in direct
sunlight, ff Is advisable to provide an awning over
the unit,
D. Provide sufficient clearance around the cabinet to
allow for ampte air circulation through the unit.
See Fig,2. The rear of the unit should be
outdoors and not in a garage nor inside a
building. Keep unil as far away as possible from
obstacleslobstructtons and al least 30" above the
floor or ground. Curtains and olher objects within
a room should be prevented from blocking the air
flow.
E, Be certain the proper electrical outlet is wtlhln
reach of the tnstailafion. Use only a single
outlel circuit rated at 15 amps. Ail wiring should
be in accordance wilh local and national
electrical codes.
E DO NOT USE "REGULAR"
EXT,_NSION CORDS
WITH THIS UNIT If it is necessary to use an
extension cord to connect your air conditioner,
use an approved "air conditioner" extension cord
only. (available at most local hardware stores)
G. DO NOT instatf unit where leakage of combustible
gas is suspected. Your air conditioner may fail to
operate in air containing oils (including machine
dis), sulfide gas, near hot springs, etc...
30"
Mtn
Side
ob_truclloa
Ground ._
Fig,2
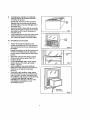
1. Preparation to Remove the
Air Cond[tloner Slide-Out Chassis
•
•
•
•
•
.
Position the air conditionerIn the normal (upright)
position,,
Remove the air fitter by grasping the filler handte
(on front grill) and sliding it to the right.
Remove the phillips screw (behind filter) securing
the grill frontto the chass[s_(Fig.,2)
Remove the phiilips screws located on the (lower
left/right) edge of front grill, (Fig,l)
To remove the frontgrill, grasp the lower front
corner of 'thegrill, pulling (gently) oulward and
upward. (Fig3)
Repeat this step on the 3 remaining corners,
Remove the two IJhtllIps screws (lower left/rlght
side of cabine't)seeudng the slide-out-chassis
to the cabtneL (Fig,5)
NOTE:These screws must be reinstalled
upon completion of the window installation.
(to secure slide-out-chassis) •
Grasp the pull handle at the front of the
slide-out-chassis and carefully slide the air
conditioner out of the cabinet. (Fig.4)
Please seek assistance for this procedure,
Fig, 1
GRItJL FRONT 8 CRE'W
Fig. 2
Fig,4
Fig. S
Fig. 3
5.
•
•
•
Completing the Inslsllatlon for All Models
Carefully slide the air conditioner back into
the cabinet, (in window)
(please seek assistance for this procedure)
Reinstall (slide-out-chassis) secudly screws
removed earlier on the (lower left]right) side of
Ihe cabinet, Fig. 7
Expand Ihe shutter frames (fully) on each side
and secure the top of the frames to Ihe window
sash using one 314" screw & flat washer on
each side. Fig. 23
Install shutter clamp on each s]de of the Oower)
shutler and secure to window sill using one
3/4" screw & flat washer on each side. Figo23
58, Reinstalling
e
e
o
che_l_
Fig,7
Clamp
Front Panel Grill:
Position the front panel assembly on the
cabinet starting at the top. The front panel lock
labs must be inserted inlo the retaining slots in
the cabinet.
Fig. 23
Repeat this procedure on al[ sides, making sure
the fresh air ventilation lever arm and power
cord are properly installed back to their original
positlon_
Secure the front gdfl to the cabinet using the
phillips screws removed eartier_ Flg'xo 1 & 2
install the air filtar_
Cut the second foam seal Is fit the opening
between the lop of the inside and outside
window. (Fig..24,)
Some Installations may require additional
sealing around the window and air conditioner..
Check for any air teaks and seal where
necessary.
LJndervery humid conditions, water removai
may be excessive enough to overflow from Ihe
rear of the unit or increase noise levels of the
air conditioner° If this occurs, consider attaching
a standard drain (garden) hose (not
included) to the drain plug at the rear of the
unit, allowing condensation to run off
conveniently (Fig° 254)
2nd Fo_n
Seal
Fig, 24
,
iii
Drain Hose
(nbt Included)
Fig. 25
6_
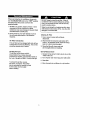
SELECTOR Switch Function
The selector swltch conti'otsfan speed and/or
cooling speed. To set desired cooling
temperalura, simply rotate the SELECTOR
knob to the appropriate setting.
LOW FAN will circulate air at minimum speed
without cooling.
4 _|
tl
I
A
MEO FAN will circulate air at medium speed
without cooling.
HiGH FAN will circulate air at maximum speed
without cooling_
Thermostat
LOW COOL provides cooting with minimum alr
circulation. Recommended for night-time use..
Selector
Switch
MED COOL provides cooling with lntermediale
air circulation. Recommended for average
summer-time cooling, Once room Is cooled,
reduce setting to LOW COOL.
HIGH COOL provides cooling with maximum
air ctrculatfon. Recommended for qutck cooling
or for extremely hot days, Once room Is
cooled, reduce selling to LOW COOL.
NOTE: Always allow 3 minutes before
switching from one mode to another.
OFF shuts.down 1he unit comptetely_
7_
8_
THERMOSTAT
The thermostat automatically controls the
(compressor) cooling cycle and maintains the
selected room temperature. To set the
thermostat, rotate the thermostat knob 1o the
desired cooling setting (1 warmest _ 9 coldest)°
The fan motor will continue to operate alter the
compressor (cooling) has cycled off, This Is
normal,
When using FAN control, turn selector switch
slowly allowing unit to adjust.
When ustng THERMOSTAT, be sure to allow three
minutes before changing temperature. Adjusting
too qu[ckly may cause en overload resulting In a
b!own fuse.
Fresh Air Ventitation is usually kept in the closed
position. Use onIy when clearing smoke and/or
odors from the room,.
AUTO AIR SWING
(Model DAC7003 & DAC6020):
When the Auto Air Swing switchis "ON", the
verticallouvers oscillate (side to side)
automaticallysweeping coldair alternatefy
provldIngmore comfortablecooling,
0
The vertical louvers can be stopped in any
position when the Auto Air Swing switch ts
turned "OFF",
FreshAir
- Ventiialion
Switch
10
l
, [_-
, _ o
-l-I
"
When servicing the air conditioner, be sure to
turn the SELECTOR knob to the "OFF" position
and disconnect the power cord from the
electrical outlet+
DO NOT forget to instal[the a_rfilter. _tthe air
conditionerIslelt to operate withoutthe air filter,
dustisnot removed from the room air and may
resultin machine lailure.
1. DO NOT use gasoline, benzine, thinner or other
chemicals on the air conditioner as these
substances may cause damage to the paint finish
and delormation of p]astic pads.
When the air inletgrilland cab}net are dirty, wipe
wtthlukewarm water (be!ow 40°C). Use of a mild
detergent is recommended,
2. Never atlempt to pour water directly on unit as
this w!ltcause deterioration of theelectrical
[nsulat_on.
Cleaning Air Filter
l r USe e vacuumcleaner withsoft brush
attachment+
2. Wash the fiIler _nlukewarmwaterbelow40°C
(104_F):To get better results,washwithsoapy
water or a neutralcteaningagent,
Air Filter Information
if the air filler becomes clogged with dust, air flow
_sobstructed and reduces efficiency, 3"he air filter
shoutd be cleaned every 2 weeks+
3. Rinsethe l+lterwllhclean waterand
dry thoroughly before re-installing.
End-of-Season Care
Air Filter Removal:
The air filter on the above mode[ is
1. Operatethe fanalone for halfa day to dry out the
Inside of the unit,
located behind the air }ntake Iron! grill
To remove the air filter, grasp the filter handle on
the front of the grill and slide - [t (out) to the dght.
2, Turn off power and remove plug fromwall socket
3+ Clean filter,
To reinstall the air filter, reverse
the above procedures. The air filter
may be vacuumed or washed by-hand
in warm water. Dry thoroughly
bolero installing.
4+ Store (covered) air conditionerin a dry location+
I1
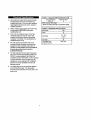
Frequently, a problem is minor and a service call may notbe necessary, use thistroubleshootingguide for e
_osslble solutton_ If the unit continues to operate Improperly, call Daaby's Toll Free Number 1-800-263-2629 Ior
assistance, or call one of our service depots listed In the enclosed "Authorized Service DepoC listing provided
wilh this unit.
Possible
Air condlltoner will
not operale,
Cause
Suclqested
Solution
Check connection of power cord to
power sou rce,
Check fuse or circuit breaker.
No power to unit.
Set SELECTOR SWITCH to position olher
than "OFF".
Dirty air filter.
Clean or replace air filter,
Unit size inappropriate
for application.
Blocked air flow.
Check with dealer to determine proper unit
capacity for application.
Power inEerruptton, settings
changed too quickly, or
compressor overload tripped.
Turn the unit off and wait 5 minutes before
attempting to re-stsrL
Loose partso
Tighten loose parts.
Inadequate support.
Provide additional support to unit
Formation of mold, mildew, or
algae on wet surfaces.
Clean unit Ihoroughly,
Place algaecide tablet in base pan.
Water dripping outside.
Condensation run.off is normal
duflng hot and humid weather,
Add flexible tubing to redirect water flow,
see Fig,25
Water dripping inside.
Unit is not properly angled to
allow water to drain outside.
Unit must be Installed on an angle for proper
condensation run.off. Check the unit and
make any adjustments,
Ice or frost buifd-up_
Low outside temperature,
Inefficient or no cooling_
Noisy unit.
Odors°
Remove obstruction from grill or
outdoor louvers,,
,
, ,,,
,,, ,,,
,,,,,,
,,
,,
.......
,
When ouldoor 'lemperature ls epproxlmately
65°F or below, frost may form when unit is in
coolir_gmode., Switch unit to FAN (only)
operation until frost melts.
Remove and clean filter.
Unit air filteris dirty
NOTES:
, J,
I. If circuttbreaker is tripped repeatedly, effuse is blown more than once, contact a
qualified technician.
2., When unit is fnslallsd using proper installation steps, unit Is properly tipped towards the outdoors
to allow for condensation run-off.
12
I: rll:
LIMITED
°'
AIR CONDITIONER
WARRANTY
_I Yeu
F;_Year
To_a_
_ep_s_stwa_anl_s
option,
atno_a_ga[o_ ORiGiNAL
purchaser,
Ou_n9
f_ nedloutyoa_s
(4)an)'p_P.of
_ sealed
s_Tsm
foundlo
bedstsc_[v_
(consisting
ofcorep_.,:.,sor,
condenser,
evapot_To_,
deter
_ aJ]
misled
lub_g)
y_]b_re_lace_
w_sutcharge..
Thepo_ci_Lser
sha_
pay_orailia_rand_olum
f_e_ghl
doing
lhtsfou_
yo_r
(4)psi,dietrep_ff
ormptsce_nent
ofanysealed
syst_componenL%
A_yunitbeing
diagnosed
as_n-fun_onaid_b
Insealed
sy_Zom
failure
end
warranlino
onexchange
dufe_
theo_s_r_[ou_'(4)
ye_ w_ibesubjaol
toan_pt_op_ate
_eprecl_ztlon
o_u,ver
fee,insiuding
any_d dlf_hl chs_'ge_;
boJng
l_e_agalnsl
the_nsume[.
Conlaclyour
dealo_
from'_om
yoelu_!was
purchased,
orc_n_ctyour
ee_rest
aolhorized
D_bysen_co
d_p01,
Y/n_rO
serv'ioe
mustbepedorme{t
byequa_Klse_cotechnician,
ifsez_eIspedormed
onIbouniL_
byany_eolber
than
er!autho_,od
_Ioe
depot,
_fhe Lmil
isUS_foroomm_l app_ca_[_,
allo_gatisns
ofDar_"_ndsr
Ih_s
yram_nly
shah
beetanm_d.
EXCLUSIO?tS
Saveash_refn
p{ovided,
Dan_ Products
ILimlled
[Cnn_a)otDanbypnxi_'tsInc_{U_,_.A),
bsreeranooLhe_
wsrranli_,co.ill.s, _eprosenta!!_ns
o,
9uallmtenn,
e_,s orli'_li_l,marieor.IntonedbyDanbyR'_d sLlmiled
orits_.uS_orized
dis]dbutors
_d _JJ
ot_erwamanli_,m_lilio_n,_ep_o_nlations
or
guaean_ees,
t_ud_ng_y wa_ranliss,
con_f_ons,
_ep_esenl_ons
or guaranlons
endelany,_s el G_ds/_I or l_ [e_.L_alisn
ors_ua tsherebye_I),
e_ud_ Saraoshorein
_rovkl_d,D_I_ P_o_ud_
LimJled
(Canada)
orD_by P_oducL_
Inc.(U,SA),d'allm_lberesponsl_foranydamag_topatenso,plopBi{'i,
Inct_i_ 9"_tm_i_se_,
h_,vsoave_
_e_e_I_ anyconsn_sn_lI_amagr_s
l_bg from_ m_tfundJon
oitheunitandt}yIhe_mhassel_ _ _b_
pu_a.se_
dDBshsmby
egroe[olnd_mnily
e,_ savei_umtsss
Danb,/Prude.s
Lfre'_ f_nmanyc{alm
fordamages
topnr_nsor pmpn_caused
Lyre unit
GENERAL
PEOVisIOtlS
i_ovran'a_ly
ollnso_an_e
herein_n_inedu_seee_=
shsllapply
whendamage
o_mpalrIscaused
_,any ellheIollowtP,
g:
1)
P_m_Falters.
2) OamageIntransitor_en m_;_ Ihoapp]_n_e.
3) Improper
tx)_'ersuF,_ly
suchealowvottEge,
dsfeciive
hsus_
w}ri_g
orincriminate
rubes.
4) _e.'c_danI_aI_era_n_useO_mi_a_oapp]_n_;esu_nas_nadequa_rd_r_n_n_hom_m_rabeonn_sraiingcondi_i_n_'
(odremol_hlg_
=to_v_c.mmlempnr,_re),
B| U,_Io_commo_'_l
min_tffat po_9os_,
6) Fuo,vralordama_e,_el[,_var,
fiot,hnslit$1y,
a=_ofGodsuehashu_ic_es,fleodsotc,
7) Ser,'icacaJts
_es_]]_incuslomar
education.
Pmolofp'amhase
dab wiltber_ed
AUTHOEIZED
SEBVICEDEPOT
forwarranty
cl_m_on,pis_etol_tahiltsofsale.Inlhseven1
wa_an__r_ce L_result, pre_,enl
_iS_o_nt
Ioour
W_rranlt'
S_lco
Air_ondilior_eWilh,ln
Canad_l
Wilh.ln
Unllod
States
inHomo
I_Homo
I_ Ooz1T/B,_0 Y'iillt_l,_Bt)_G_/lp_l,Onlolto,{;l_d_l Illlt OZ_l
Td_ItOnl_:(_1§}_74)920 FAX:(Sl911_7_
PO_
el/or
i_g, 101B_tle)' CouP,Fln_ley,Ohlo,IJ,SJL4,$840
la_e_ho_o:(4|9}4_P_
FAX:{,_19}
4E,,=,,,8629
Page
Introduction
..................................................................
15
FEchesignal_tique .............................................................
Sp_ctficalions _lectrlques
15
......................................................
Conseils d'_conomie d'_nergie *.t_=,.=
...................
Installation darts la fen_lre .......................................................
Instructions de fonctionnemenl
Precautions et maintenance
'16
._°
J,*_,.**_,t*_
i.,.
..................................................
D,
17
17
23
....................................................
24
Guide de d_pannage ..........................................................
Garantie ....................................................................
25
26
Entr_a d'alr
ext_rleure
Sortie d'alr
[nl_deum
Cornmutalsur de vent{la_iond'air rrais
Oscillationautom_Uquede I'atr
Porte du _bleau de commands
___.___,...___Co_don
)
14
d'allmentatton
Nous vous remerctons d_avotrchotsiun ellmatiseurdacharnbraDanby pour rafroidirvotre Iogement, Ce manuel
d'utilisaltonet d'entrelienfoumttles renseignemenls n_o_ssairespourprendre solnet antretantr volta nouvsauclirnatiseur
de chambre, $'tl est ad_qualament entrelenu, votrecllmatiseurvous donnara de nornbreusss armies d'utilisaUonsans
probl_meo Pour _viter route dif_cult_ d'inslallalion, veuiltezlira los pr_sentes instructions,compt_temant,avon! d'instaflsrel
de fairs fc_noltonnarvotre apparefL
REMARQUE: Cel eppareIIn'a PAS _t_ con_upouruneinstallalion_,travelsuna paroL
A tltre da r_16rance,vous pouvez ag_afer_ celia pageunacople de yurts fiched'achat de I'apparettofnscrivsz los
renseignements suivanls fournis (sur fa plaque signal_tiquadu fabricant llgurant sur le c6t_ dfoil de l'appareii au-dessus
du cordond'atimentatien),, Vousaurez besoln de cos renselgnementss[ vous eontactezun rapr_sentant du Service_ {a
clienteles
Num_ro de mod_le:
Num_rode s_rla:
Date de l'achat:
Nora el adresss du conceselonnaire:
Veuitlezvous reporter _ la section du d_pannage ltgurant dens ce manual d'utilisattan et d'entretien, si I'appareilne
Ionclionne pas correctement SIcarts suggestionne r_sout pas la probI_ma,contactezun repr_senlant autoris_des
services ou eppstez dlrectement Danby, sans frals, au humors: 1-800-26 Iglal'il=nJ"
VeuilIezconservercos instruclions
pour de lutures r_,.f_rences.
Ce symbola Indique une mice en gerde ou un
averltseement.
Modble No.
Fiche signal_t_que
Voltage
Capaott_de refroldlssement(9tu/h)
Puissanced'entr_e
R_lme nom!na!d'efncactt__ner_t!que {EER)
Vantflateurtvttessade r_frold}ssament
Dlmenslon_;
del'atre de refroidissemeni(pl8ds2)
Nlveaudu bruit (dB}
Nalaissezpasun climattseur
decharnbra
sans
surveillance
dansun espaeaobsetrouventdesgena
ou desanimauxqui nepa_ent pasr*}agtr
_.unappareil
d_faitlsnt.Unapparetld_fatIlant
poutcauserune
surchauffaextremeouentra_ner
la mortdensun tel
espaceconfin_et sanssurveillance,
DAC70O3
DAC602O
1"t5V/60Hz
7,000
710
9,8
3/3
250
47
115W60Hz
a,0O0
* 610
9,8
313 •
200
47
Dimensions de l'apparetl
Largaur
Protondeur
Hauteur
! 7,75 po.............
22 _5po
13,5 po
17,75 po ._
22,5 _o
.
13,5 po
Window Kil Dtmensi_n_
La/geur maximum
Largeur minimum
H_uteur minimum
37 po
24,5 po
"t5,5 po
97 Ib
3;' pc,
24,5 po
15,5p0
97 Ib
Polds d'exp_dltio'n
Remarque : Los sp_cifieallonspeuvent _!re chang_esssns avis, & tltre d'am_tloratlon_
15
Tab[eau I : Circuit de d6rivatlon Indtvlduel sugg6r_
Tousles o_blages doivent ¢_lreconformes aux codes
_lectriques tocauxst nafionaux el dolvent _tre
tnstall_s par un _lectdclen quallfl_ Sf vous avez ta
moindre question au sujet des Instructions cl-dessoue,
contaclezun _lectrlclen qualif_.
2. V_riflez la fourn[lurad'allmentalIon_lectrlque
d]sponlble st r_soiveztoutpmb]_mede c_blage
AVANTd'lnstellerat de lai_efoncttonner cot appar_IL
3.
Ce oHmattseurtt 1t5 V utiUset2 amperes ou mo]ns de
puissance nomtnaleel paul _lre utifis_danetouts
prisede courantdomestique de but g_n_ral,
ad_quatemenl c_.bl6e.Volrre Tableau 1 pour lee
specifications pour circuitde d_dvation Individual
Pourvotre s/acudt_et votreprotection,cot eppareil est
mls t_Ia mass,#parla lichedu cordond_alimenlation
lorsqu'elleesl branch_edens uneprisemuralsqui lul
correspond.Si vousn'_tespes certainquavotreprise
decourantmurals est miss _.la massead_quatement,
veuifiezconsulterun _]eetdcien qualifi_.
Laprise murals (pour 3 broches) dolt correspendre
]a fiche _ 3 brochessuple cordonde servicefournl
avec I'appareiL N'utilisez PASde fiches d'adaptat_on_
VoirTableau 2 pour lee rense[gnsments sur lee prises
de couranlel losfusibles. S'il estn_cessaira d'u_itiser
une ratlongff_tsctflque pourbrancher votre
climatiseu_',
ufiltsez une rellonge_Iectrique approuv_e
pour. climatiseur,_,exclusivemen! (disponlble dane
la plupartdes magasins Iocauxde quincatllede).
La plaque signal_liquesur I'appareii contientdes
donn_es _}ectrlquee el techniques;eriese Irouve sur
le c6t_ droil de rapparei], au-dessusdu cordon
d'alimenlation.
Puissancenominate: amperes CalibreAWG"
5_0b "[2
14
AWG American
WireGage
"gas_ sur un Ill deculvre_ unevalourlimitadetemperature
do60PC.
Tableau2 :Types de prises de coursnt st de faslbles
Vollagenemlnat
Arnps
125
t5
P_isede courantmurals
e_
D
du fusible
FasCIat_retardement
(oudI_jonc_eu
0
15
Typede fiche
Votre cilmatiseurde chambre a dt_ con_u pour _tre
d'une grands eff]caclt6 dsns I'(_conomled'dnsrgie.
Pouri'augmenter
encore,
vsui_ez
sulvre
lea
recommendations cFdessous;
3_
Uttllsezdesdraperies,rideauxoustemspour
empOcherlosrayonsdu soieildirectsde r_chaullsr
ta
piece,malen'obstruezPASIsclimatlseurPormettez
lairde circular
cutoutde!'apparell,sansobstacle
4_
Commencez _.fairs fonctionner voltsclimaltseur
event que I'air ex!6rieurne soil chaud et inconfortable,
afind'_viter une p_rlode d'inconlort Iorsque rappareil
commence_.refrotdlrla chambre.
5=
Quand lee temperaturesext_deuressent assez
freTches,utilisez eeulement]e venti]ateur_ la viteese
_LEV_E, MOYENNEOU FAIBLE(solon votre
mod_le). Cola fall circulerI'alr int_rieurel produ[lun
certainrefroidissementconlorlableen ut[lisantmoins
d'_leclrlctt_queIorsqu'on fall fonollennerle
cllmatiseur en mode refroidissement.
1. S_tectionnezunr_glagedutl_ermostat
qul
conviennentauxbBsoinsde votrecontortet laissezce
thermostat
au r_glagechoisi.
2,
Le filtreeat tr_sefftcacedarts I'_ttrninatlon
des
parl[cules on suspension densI'air_ Gafdez toujours
le fillre propre. Normalement, ts flltredevrail _tre
neltoy_ touleSlos deux semaines_ Un nettoyage plus
frequent pourrait _tre n_cessalre en tenor;onde la
qua!it6 de I'air ext_rieur et Inl_Heur.
quincaillededfnstallattenen le competent
& la lisle de
v_rilicationdumod_iecorrespondent,
el be,event
l'Jnstallal[on
de t'eppareil,
Vo]rfig,I
corporelle,
Pour _viter d_branchezf'ai[mentationde
la possibtlit_d'une blessure
I'appareil avant son inslallation ou son
entretten_
_I_
Outlls n_.cessairespour installationdane une fen_tre
Toumevis
_ t_tePhiilpsel plate
Perceuee 61eclflque
M_che de 1/8 pe de diem
(_)
Rondel_plaice(8)
(]:_- VIede314pc(S)
Crayon
Ruben &mesure
Clseaux
(_
Viedo114pc(1_)
_;_
Canals_Jp_rieur(l)
Csn_]hi,dour
(1)
CI_ r_,giabla
Niveau _ bulls
Pour_vlter lee dlfflcult'_s
d'instelletlonotde
foncttonnement,
veulllezfire lee Instrucllons
attenttvement,
(_
Rondelles
des(_cudt(_
(4)
"_
_cmusI/4 pc(4)
mousse(4)
_upporls
'-_.
oh_
armfuls,
ires90=(2)
Votre climatiseurde ohambrea _t_ conqu pour une
Instal!alien facile daneune ten6tm _ ch&ssie&guillotine
simpleou double_
REMARQLIE: Cet epparetl n_apas _t_ con;u pour des
ten,Ires verllcates(de type coulissanl) ou pour _tre
tns_all__ !ravers unepanel REMARQUE: Conservoz le
carton d'exp_dition st le mal_riel d'emballage pour futur
enlreposegeou transportde l'sppsrelL (_tez]'eppsrei]du
carton, le sac en plastique qui contlentla Iroussede
qu_nca[lterien_cessaire pour I']nstallation de re!re
climatiseur Veuillez v_rif[er le contenu de la trousse de
Sup_ndefermBIum
(2)
t7
pattos
n[veleuses
(2)
Votre appareil a _l_ conQupour que la condensation
s'_vspore dana des conditionsnormalss Cepsndant, en
presence d'unehumldit_ extreme, un surplus de
condensat{onpoutprovoquer un d_bordement de la
cuvettede base vers {'ext_rleur. Uapparell dart_lre
]nstell_ de telle sortsqua L'_coulomertt
de la condensation
ne se d_versepas sur des passsnls ou sur des propfl_t_s
avoislrtantes.
Commale compresseur
se trouveducGt_des
commandes
deI_unit6(cGtddrolt),cocGt_eatplus
Iourdel plusdifflclle
_.msnipuleroUnsoulian
]napproprt_
du cGt_descommandes
de I_appareil
paul
causerdesblessures
el endommagsrt'epparetlat.
d'autres
blancmobiliers,C'estpourquoiil sat
recommends
quequslqu'unvousaidsau coursde
t'inslallaUon
de catapparefL
Uneconnexion
de tuyaude drainage(_ I'exclusion
du
tuyau)eatfourntepourr_achemtner
ted6bordemsntde la
condensation.Voirlig,25°
N'UTILISEZ PAS DE RALLONGES I"_LECTRtQUESORDINAIRES =,POURCET APPAREIL S']test
n_cassalre d'utillser une rallongepour brancher votre
climatiseur,utilisezuniqueman!unerallongs
approuv_e pour. climaliseur,, (disponlble dana la
ptupaddes mageslnsde qulncaiilerle Iocaux)
Choix du mellleur endrolt
A
Ce climsfiseurpour cllambre e _t6 con_upourOtre
Inslail_,fscIlement dens une ten,ire _,chassis
guillotine simpleoudouble, Cependant,comma ]e
destgrtde la fen_trepeutvarlet,tl pout _.tren_cessaire
d'y fairs quelques modifications pour uneInstaTlation
s_curitaire et appropri_eo
G N']nstallazPAS I'eppsreil &un endroit ou on
soup_onneuna fulta de gaz combustibles..
Votre
ellmatiseurpout tomber en pannedana una
atmospherequ] conltenldes huiles (y compiledes
hui_espour machines),des gaz sullur_s, ou s'i] eat
prt_sde sources d'eau chsude,etc.
B, Assu{ez-vaus que Is len_tre et son chassis aunt
struclursHementsolideset exemptsde bois sec et
pourrtr
Co
D_
Poutun maximum d'efficactt_, tnstallezle ciimaltseur
sur |e cbt_de ta matson ou de I'immeubla qut se
trouveplus souvent & I'ombre qu'au solell. Si
rappareUeat dfrsctement sous los rayonsdu so]ell, It
esl recommandabte d']nstaller un auventpour
prot_agerl'unil_.
I
Laissezsuflisammsnt d'aspace libra autourdu
caissonpoutpermettre urteample drculal!ond'air
traveratJapparetLVoirfig 2.. L'ard_[e de rapparell
doll donnersur l'exl_rleur de la matson et non pas
darts un garage ou& ['tnt_fleur d'un immeub[e.Tenez
l'appereiteussJloin que pos_Iblede tout obstacleou
obstructionet _ au mains 30 pc au-dessus du
plancher ou du col I[ ne foul pea qua los rideauxou
d'aulresobjats_.llnt_rieur de Is piece pulssertt
btoquer le flux d'air.
Obslacle
E. Assuzez-vous que la prise _lectrtque eppropri_ese
trouva& la port_a de rtnstallation. N'_tillsez qu'urt
circuit _ prise uniquecatcul__ 15 emp_res. Tout le
c_blagadoil_tre conformsaux codes 6lsclriques
locaux et nationaux.
rain.
Sol
18
Cad_dola[enSUe
oooo0oooo
CanNdo
mot"l_g8
form_ de.
4. Installation du caisson
(_el_bom eel sueT)
Bandsmousse
etl
L _.
Fig. 14
4a Placaz Ie caissondu climaflseurdens TBfs,n_treavec le
canal de montage en forms de ,, L ,, (an haul)
posi{tonn__.l'avant du cadre sup_fleur do [a fan,ira.
Le cana! en forms de, U, au bas du caisson dolt_tre
posillonn_ dane te retraitde ]a vole qui se trouva
t'avantdes ensemblesdo supports de la fenStre. Tirez
lafen_tre versle bae jusqu',_coqu'ells reposejusts
derriere re rsbord frontaldu canalde montage en forms
de ,, L ,, (sup_rieur). Voir Fig 14.
4b. Aitgnez un trou eu bas du caissonavec un trou de
t'ensemble supports.Fixez le caisson au supporten
utJJtsant
onevls de 1/4 pc, fournie. R_p_tszla m§me
procedure sur le cSt_ oppost')du caisson.(Fig. 15)
4c. V_rifisz pour vous assurer qua le caissonest
l_g_rementpench6 versle bas _ I'ex|_flauro S1
n_cassalre,_'_ajusteztss vie nivsleuses dens los
supports.
4d, Coupezla premiere
[isi_re_ calfeutrer
enmoussepour
qu'ellesofixead_quatement
au dessousdubaadu
chassisde la [en_tre.Otez{s dosd_tachablede ]a
mousseetio fixeraucadre.VolrFIg_13.
21
PourcompI_lerl'installalionde tous{esmodules
Remettre,enle gIIssantavecsoln, le climat_eeur
i'int_rreurdu caisson(danela [en_li'e}.r
(Veulliezdemander de I'aidepourcarte_tape)
R_tnstatiezleavie de s_curil_ (ch&ssiscoulissant)
sur
lec6t_ (en bas, _ gaucheet _.drolte) du caisson.F_g7_
t_endez les cadresdes volets [compl_lemenl)de
cheque cOl_,et tixez le haul des structures au cadre
dela fan,Ire enut]llsanl une vie de 3/4 po el une
rondelle de s_curtt_surchequec6t_. Fig.23.
Instatlezla bride de fixationsur chequec61_(an bas)
des velars, e_iixezau rebord de la fan,Ire en ulilisant
unevie de 3/4 pc st une rondelle de s_curil6 sur
ohaquecOt_. Fig.23.
Figo7
FtXA310N
5e, R_lnstallatlon dela grilledu panneaaftonta!
Posiltonnezl'ensemble panneaufronlal cur le caisson
en commen_nl parIs sommet. Les languettes de
verroulllage du panneau frontal dolvent _tre ins_r_es
dane lee fentes de retenuedu caisson.
R6p6_ezcarte _tape sur touslee cSt_sen vous
assurantqua le brae du levierde la ventilationd'alr
finis et le cordon d'aUmentattonson! lnstall,§s
ad0quatement de nouveau dens leur position Initiale.
Ftxez la gdlle fronta/e au caisson en ulilisanl leevie _,
t_le Phtlips enlev_,esant_rteuremenLFig. I el 2.
Instaltez le llltre _ alr..
Ceupez ]a deuxf_me bande mousse afin qu'elle
s'aJuste ad_quatement _,I_ouvertureentre le haul de
!_tnl_rieuret de _'ext_rteurde la fen_tre. (Fig. 24)
Certatnes instaltal[cns peuven! exfgerun scailernent
suppl_mentatreaulour de fa fen61reet du climaliseuc
V_riliez qu'll n'y air aucune fuite d'air et ecellez I& o5
c'est n,_cessaire_
S'il y a beaucoup d'humidit_ dane I'alr, 1'61]mination
de
I'aau paul _tre suflleamment excessive pour d_border
parltr de I'arri_re de I_apparellou augmentertee
n]veaux de bruit du climaliseur.Dans ce cae, U
faudrait fixer un tuyau de drainage e_dlnafre(de Jardin)
et qul n'est pas _nclUsavec I_apparell,t_la prise du
drainage se Irouvanl ,_l'arri_re du clirnatiseur,alin de
permettre _ la condensation de s'_couter de re;on
approprl_e.(Fig. 25}
Fig, 23
CAt F_U.'rt3ER
Fig, 24
"-_,, TUYAUIL_
DRAtNJ_G_
(P_ _CLUS_
22
Rg° 25
1
I I
! •
s l
t I
t_ll
"
i
-g
6. FonoUon
ducommutateur
deSt-'-LECTION
LBcommutateur
dem}leclloncommando
lavitessedu
vontllateurat/cata vitessodu relroldlssemsnLPour
fixerla temperature
d_sir_edu refro[disssment,
tt suffit
deroamerle boutonde SI_LEOTION
au r_glsgo
appropri_o
VITESSEDU VENTILATEUR:
FAIBLE-L'afroircula_.unevltesssminimum,
sans
retroldisssment.
MOYENNEo
Ualrelroule
t=unevitessomo_yenne,
sans
refrotdissement.
t_LEVI_EL'alrelrcule_.unavitesssmaximum,sans
refroidissament
REFROIDISSEMENT:
FABLE.Ref_o_itavecun minimum
de circulation
d'air.Re.remandS,pourla huff.
MOYEN-Refroidilave.;unectmulation
d'alr
interm_dfatm,
Rscornmand_
pourunrefroEdtssemont
en_t_, Unefatsla piecerelroldfe,
IIfaut r_duirele
r6glaga_.FAtBLE_
INTENSE-Rsfroidlt
avecunecirculation
d'air
maximum.Recommand_.
pourunrefrotdissement
rapidsou ontempsdeeanlculesUnefolsla piece
mfmldte,il foulr_duireletefroidJssement
_,FAIBLE.
REMARQUE:tl foultoujoum
attendre3 minutesavant
de passerd'unr_giagatt unsuite.
ARRP.T-Fermaleollmatlsaur
compi6tement.
7. THERMOSTAT
L_thermostat
contr61e
compl6tement
lecyctsde
rofmldtssement
{compresseur)
st malntisntla
tsrnp_raturo
cho_sfe
pourlachambre+
Pourr_glerle
thermostat,
tournoz_ebou!ondu thermostat
au
r_glagede _efroldtssement
d_sir(_(1 ts pluschaud- 9
Ieplusfroid),Le motsurdu ventlIateur_ntinuem
&
fonct[onner
apr_squa+ecompreseeur
(refroidissement)
a termin_soncycte.Colaeat
normal.
8.
_,
."_',
_IF|
''1+
|'_L"
"+I+- + ....
,;' " _t_gl;._lFI
/,,+'
_J _t'_
r_li,_:[_.,€001, ,':
,'t]L) --tj `+,
]!-L_,_'
+: ':_+ " V"
Thermostat +
.+'_"+ ,
Commutateur
de
s_loctlon
Quandvousutilisezla commaade
du VENTILATEUR,
toumezle commutateur
de s_lsction
lentement
pour
que lecltmat_seur
se r6gleblanc
QuandvousutillsezteTHERMOSTAT,
assurez-vous
d'attendretroisminutesavantdepasserd'uns
temperature
_ uneautro. En _ar_glanttrapmpidement,
on poutprovoquerunesumhargequi poutgd+Ierun
tuslble+Ventliation
d'sirtrois ; Habttualloment
ellataste
ferrule et n'estutffis_e
quapour_limlnerde_afum_e
at/cadesodeursde tapt6ce.
OSCILLATIONAUTOMATIQUEDE L'AtR
(Mod_e DAC71}03
& DACe02(})
Qusndte commutataur
au!omallquedeI'a+reatsat ,,
MARCHE,,,lealamesvsrticalss
oscil_ent
(d'unc6t_,&
un autre)on balayantt'airaltemativement,
fournissant
alnslun mfroldissemsnt
plusconforlable+
+
0
Comrnutataur
_ourventilation
d'al_f_s
LosIamosvertlcalespeuvent6irearrat_esdons
n'tmportequoitsposition
Iomquele commutateur
d'oscltlal+on
automalique
de Palrest_ourn__...ARRET,,
23
N'oub]tezPAS dlnslatler te llltret_air. Si on fail
fonolJonnerle cllmsfiseursane fillre _ air, Is peussi_re
n'est pes _llmin,_ede i'elmosph_re de la pl_ce el pout
enlraTnetune d_laiilance de la mschlneQuand la grille
de I'entr&ed'airel le caisson sent seres,essuyez-lee
Avantde preceder_.]'enlrettendu dimaliseur,assurszvous de toumer le boulon de SELECTION en posIlien ,,
ARRC_.T.at d_branchezle cordond'allmentatien dela
prise _lecldque_
t.
avec de l'eau li_de(au-dessous de 40° C On
recommends I'ullflsation d'und_lersif doux.,
N'utilLsezPAS de ressence, un pfoduil chimlque,
diluentou suite sut un climaliseur,car tee subelencee
peuven! endommager[a finitlon de la pelnture e!
d_former dee prices en piaslique.
nettoyage,
3. Rtncezle lillfeavecde ]'eaupropreel s_chez-te
fondeventde Ior_inelallero
2. N'essayez Jamaisde verser de L'eaudirectement our
le cilmaliseur, car cela provoqueune d_t_rloration do
lleofat!en _teclrique_
Entret[enhers saison
Information sur le flltre i_air
1. Fsiles fenctionneruntquementle vonti]aleur pendant
une demi-journ_epour s_cher rlntdrieurdu
ciirnaltseuro
Si fe fi]lre_.air eat bouch_ parde la pousel_re,la
circulationd'alr est obstru_eet perd do son efficacit_.
Le fiIlre& air dolt_lre nettey_ routeslee 2 semaines
2, Coupezlecourantel enlevezIs fichede laprise
rnurale.
Enlbvementduflltreb air
LBtiitre_ airdu rnodSle
cl-deseus
se t_ouve
derrierela
grillefronlelede laprised'air.Pouron[overIs filtre_.
air,saieieeez
la poign_eduflll_esurt'avantde la grille
et gflssez-le
(vatst'ext_rieur)_,droiler
Pour r_inslaller le fiIlre ,_air, laites rinverse des
procedures cf-de_us Le llilre ,_alr peut _tre p.ass__.
raeplrateur eu lav_ _ Ia main dens de reau chaude.
S_chez-le bien avant de linefailer.
Nettoyagedu flltre _ air
1. Ulitieez un aspimteur de pouss1_re
muni d'unebresse
deuce.
2.
Lavez le flllredens de l'eau tilde de moins de 400 C
(104° F). Pour ebtenirde me[lleurs r_su_tats,lavez
ayes une eau savonneuse ou un agent neulre de
24
3,
Nettoyez le filtreo
4.
Rengezlo cllmallseur (couver_)dane un endroil sac.
Fr_uemment,unprobl_me
n'estquamineuret ne n_CeSSlIB
peaI'appeld_n technicianpourle r_soudre;utiltsez
ce
guidede d_pannagBpourunesolutionposs]breo
Si l'eppareilcontinua_ realfonctionnar,compoeezle numerosanstrain
de Danbyat,,1-800-262-2629
pourdemanderde l'atde,ouappelezquelqu'unde nosd_petsde services,@num_r_s
dens la lists feurnte aveocat epparell,, D_p_t eutoris_ de services ,.
Difficult_
Cause
Lecl_nallseur
neveutpss
fonciionnero
Possible
Solution
Aucuncou_ant
branchd
& l'appare]L
Suggeree
V_rtIiezlebranchemen!ducordond'alimenlel_on
_ _a
BoUJ'CB(_acoutanL
V_rifieziafusibleeute dis[encteuro
PlacerioCOMMLfTATEUR
DESELECTION& une
peeillonautrequa. ARR_T..
Inefficaceouaucun
_ef_'oid
Issement.
F_traAairsale.
Netleyazeurempfecezi'efiltre_ air,,
LosdimensionsdeI'eppaueltnoconvien
nent
pas& senappflcatlon
V_dfJez
aveole concesslonna}ra
silacapaclt_de
roppBrellest apptopd_a_ son applioation_
Cimulationd'a_;r
bloquee.
Enlevez!'obJet
qul obelrueIa grilleoulosvoters
ext_eu_s.
eI attendez5 rninu¿eB
eventde
IntBr;up_ion
du courant,
_gioges changesimp Arr_lezledfmatiseu_
le rerne!.trB
an marcha,
mpidemenl,
eucompresseurd_clench6par
surcharge,
Apporell
bruyanL
Odeurn
Pi_es desserr_es.
Ser_ezlospissesqui sentdesserr_eseu ont duJeu..
Supportinad_quet,
Foumlssez
unsuppndsuppl_mentalra_ I'appareiL
Formationdemeislssufaoud'algues
nut lee
surlacesmouilt_ee..
NettoyezAfondt'apparei!.
Meltez
unetableite
ang-alguas
denslacuvette
de
base,
Dereau s'_}goutte
._t'ex_deur. U_couIernent
delacon_ensaltone_tnormal,
quand_slampsesl chaudet hum|dee
Ajeu_ezun lube llexibiopourr_acheminerI'_coulement
da l'eau.VolrFig_25
ed_ua{emen!pour CapparnlIdolt_treinstall__uncerlaInangIapour
DeI'eaus'dgoutte_ I'int_r_eur.Uapporelln'estpanInclFn_
permetlm
t_roeu des'_ceuler_ l'ext_deuro' permettm
un_ccu[smsnted_qualde _acondensation
V_dflez
I'sppareltet ex_cuteztoutajustemenL
l_t_s(re]de_ I'ext_rieuro
Formation
degioceou degtwe Temperature
Lefiltmb airdeI'appare]testsale.
REMARQUES:
Lemque la temperature ex1_rtBureest d'env_mn85_F
ou mains, du g_vrepout Beformer quand |'apparetleat
en mode rei_old[ssement,Reglez I'apperei! en mode
VENTtLATEUR (seulement) jusqu'_ ce qua le givre
fonde,,
Enlevezel netloyezlefiltreb al_
1o Sile dlsJoncIeur
se d_clenche
A maintesreprises,
ousi
le fusibfe
a grll]_,plusd'unelots,contaetezuntechnlden
qualiil_.
2. Quandl'apparelleslinslalt_en suivantlee_lapes
d'insfalt_llonsd_quates,
l'appareilest inclinede fagonappropd_evers rext_rleurpour permetlre
t'_eoulement
de]a condenser
25
I nby
GARANTIE
LIMITI_E
DE
CLIMATISEUR
Cetappareil
deq_a_r_
estgardnl]_)
exempt
detout
vicedem_lJ_re
p_emi_m
eldef_dc_tion,,_ii_t
uf_is_
clans
tescon_;_ns
r_aIes =eco_mand_,s
p_t
lela_fcant
r_..elt
egaranl_a
n'est
olIar{a
qu'_l
I'achai_euf
Initial
{_e
i'spp_le_
ver_p_rDanby
ouparfund_ssosdistnbuteu=s
agr_selellanepBul
_Lra
ttensf6{de.
I:0_tOl]']0NS
Ftemi_r_
an_e
Oefade_me_
I_c_nq_ean_es
CIlmefise_r
Cenm_a Eo.U.
d'A
S_ca DomicileDoml_[er
sous._aranli{)
l
_nby
Frod_
Llmlte_
PD 8€x 1778,5070 W;'_fa]e__O_ G_J_Jph,
Ontez_o_
C_ne_
_el@hone:(G19)_1,,0_0 FAX:{519)83T.0.I@
_Jlit _Z;e
o,I/01
I:=anby°
ModeloModble
DAC7003
DAC6020
Room Air Conditioner
The model number of your room air conditioneris foundon the serial
platetocated on the fight side of the unit above the powercord_
All repairpartsare available for purchaseor specialorderwhen you
visit your nearest service depot. To request service and!OFthe
[ocallon ofthe servtcs depot nearest you,call the TOLL FREE
NUMBER: 1-800-263-2629
When requesting service or orderingparts,always providethe
following information:
• ProductType
• Model Number
,Patl Number
• Part DeserEpt|on
Fors_,icB, coldsct
yournantes|
send,co
depotor_tl:
1-8oo-2e-=mrzW.
(1-800-263-2629)
Pourobten[rleservice,censL,_loz
votresuccursale
r_g[ona]_
de
se_cs out6i6phone:':
1-eoo.26{1-800-263-2629)
Cllmatlseur
de plbce
Le num6ro de mod_le de volta cfimatiseL_r
se trouvesurla plaque
d'lnformationqui so lmuve sur ]e oot_ dmit de t'appareilpardeseus la
cordond'ar[mentatton,,
Toules |as pl,_cesde mchenge ou commandossp_ctatsssent
dispon_rbles
de volre centre r_gionalde serviceaulorls_,, Pourexlger
Io serviceel-ou is norade votrscentrede service r_gional, sfgnalezla
NUM_RO SANS FRAIS: 1-800-263-2629
Ayez los ronseignementa suivants_ la port,s de la main Iors de la
commendsde pieceou service:
•
•
•
•
Genrede produit
Num6m de mod_te
Num_ro de pit_ce.
Description de la p_ce
Danby ProductsL[rni[ed,Guelph,OntarioCanada NIH 6Z9
Danby ProductsInc., Flnd[ay,Ohio USA 45840