1
Instruction Manual
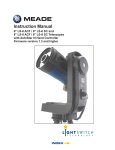
20" MAX-ACF Advanced Coma-Free Telescope on MAX Robotic
German Equatorial Mount
MEADE.COM
DANGER
Read this manual carefully before
attempting to assemble the
MAX-ACF mount and attaching the
OTA. Follow steps as outlined in
this manual in order to assemble
the telescope safely.
Failure to follow steps may result
in injury or death, and/or damage
to the telescope and mount.
CONTENTS
WARNING!
®
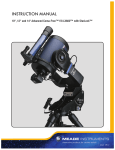
Never use a Meade MAXACF™ Telescope to look at
the Sun! Looking at or near
the Sun will cause instant
and irreversible damage to
your eye. Eye damage is
often painless, so there is
no warning to the observer
that damage has occurred
until it is too late. Do not
point the telescope or its
viewfinder at or near the
Sun. Do not look through
the telescope or its
viewfinder as it is moving.
Children should always have
adult supervision while
observing.
If you have never focused a
MAX-ACF telescope before,
go to pages 25 to 27 for
detailed information.
® The names "Autostar," "Meade" and the Meade logo are
trademarks registered with the U.S. Patent and Trademark
Office and in principal countries throughout the world.
"MAX-ACF" is a trademark of Meade Instruments
Corporation.
Patents:
US 6,304,376
US 6,392,799
US 6,563,636
D 422,610
Patent Pending.
© 2010 Meade Instruments Corp.
Telescope Features ...................................................... 4
Autostar II Features ........................................................11
Assembly ........................................................................14
Tripod Assembly ........................................................14
Pedestal Assembly and Adjusting Latitude ..............14
RA Assembly ............................................................16
Dec Saddle Assembly ..............................................16
Attach Counterweights ..............................................18
Low Latitude Counterweights....................................18
Attach OTA to Dec Saddle ........................................20
Attach Autostar II ......................................................21
Electrical connections, Align Viewfinder with OTA ....22
Home Position and Balancing the OTA ..........................23
Balance RA Axis ......................................................23
Balance Dec Axis......................................................24
Getting Started ..............................................................25
Attach Handbox Holder ............................................25
Mounting, Focusing & Aligning the Viewfinder..........25
Focusing the Telescope ............................................25
To Change Focus Speed ....................................25
To Focus the Eyepiece ........................................26
Presets ................................................................26
To Define a Preset ............................................26
To Focus with a Microfocuser ............................26
To Focus the MAX-ACF and a Microfocuser ....26
To Select a Preset ............................................27
To Sync on a Preset ..........................................27
Slew Speeds ..................................................................27
To Align for the First Time ..............................................28
Automatic Alignment ................................................28
Drift Align ..................................................................29
Collimation ................................................................29
Align the OTA ............................................................30
Calibrate Home ........................................................31
Basic Autostar II Operation ............................................32
Autostar II Menus ........................................................34
Menu Tree ................................................................34
Objects Menu ............................................................35
Event Menu ..............................................................36
Glossary Menu, Utilities Menu ..................................36
Setup Menu ..............................................................38
Hot Button Menus ....................................................41
Advanced Autostar II Features ......................................42
Adding Observing Sites ............................................42
Creating User Objects ..............................................43
Observing Satellites ..................................................44
Identify ......................................................................44
Browse ......................................................................45
Alternate Polar Alignment Methods ..........................46
To Download the Latest Autostar II Software............46
Periodic Error Correction ..........................................47
Optional Accessories......................................................48
Maintenance ..................................................................51
Specifications ................................................................52
Meade Consumer Solutions ..........................................53
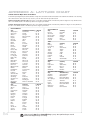
Appendix A: Latitude Chart ............................................54
Appendix B: The Moon ..................................................55
Appendix C: Smart Mount ..............................................56
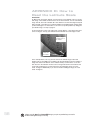
Appendix D: How to Read the Latitude Scale ................58
TELESCOPE FEATURES
Note:
Your telescope and
mount may look
slightly different
from the one shown
in some of the
images in this
manual. However,
your telescope will
still operate as the
one described in
this manual.
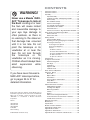
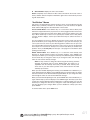
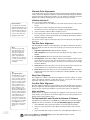
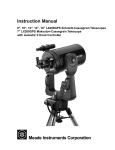
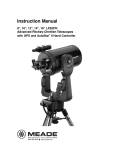
Components of MAX
MAX features a unique modular design that allows a couple of
individuals to assemble, either permanently or transportably, a
mount twice the size of any other commercially available mount.
The mount breaks down into a Portable Pier (tripod), Pedestal,
RA Housing Assembly, and DEC Housing assembly. Together all
of the components and an OTA assembly fit easily into a station
wagon, SUV, minivan or small truck. When assembled, quick
release, but rock solid, dovetail plates allow OTA and instrument
packages up to 250 lbs to be quickly mounted and de-mounted.
Viewfinder
Assembly
Optical Tube
Assembly
(OTA)
Declination
Housing
Assembly
Counterweight
Assembly
Eyepiece
Assembly
RA
Housing
Assembly
Pedestal
Assembly
Low Latitude
Counterweight
Assembly
[Optional:
Required if within
20° of the
Equator]
Tripod
4
Looking at or near the Sun will cause irreversible damage to your eye. Do not point this telescope at or near the
Sun. Do not look through the telescope as it is moving.
RA Lock
Knob
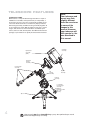
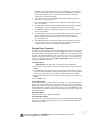
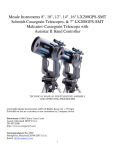
Pedestal Assembly
MAX's Pedestal assembly can be configured to
cover three latitude ranges without the need of
disassembly. Together, the three ranges allow
the mount to operate anywhere on the planet.
Latitude
Lock
Knobs (x4)
Dovetail
Ejector
Knob
Latitude
Scale
Latitude
Range
Bolts (8x)
Azimuth
Adjustment
Knob
Azimuth
Lock
Knobs (x5)
Tripod/Pier
Interface
Plate
PEDESTAL
(WEDGE)
ASSEMBLY
RA Female
Dovetail
Dovetail
Ejector
Knobs (2)
Azimuth
Adjust
Knob
Latitude
Adjust
Knob
Looking at or near the Sun will cause irreversible damage to your eye. Do not point this telescope at or near the
Sun. Do not look through the telescope as it is moving.
5
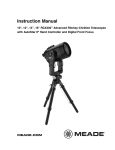
Right Ascension Housing Assembly
The RA Housing mates to the Pedestal easily,
sliding firmly into a dovetail block that measures
over 100 square inches. When locked in place,
this broad footprint assures that your mount will
operate as a single rigid block delivering accurate and repeatable pointing and tracking performance. The RA Housing contains Meade's
patented Autostar II telescope control system, a
massive 13.625" pitch diameter worm gear
attached to a 3.84” diameter 6061-T6511 aluminum alloy main shaft supported by one 6020
Ball bearing (5.9055 OD x 3.9370 ID x 0.9449
wide) & one 6013 ball bearing (3.9370 OD x
2.5591 ID x 0.7090 wide) .
Declination
Lock
Knobs
Declination
Safety
Lock
THE RA
ASSEMBLY
Declination
Female
Dovetail
(not visible, on bottom side)
DB-25 connector
Control Panel
(see page 10)
Low Latitude
Counterweight plug
RA Male Dovetail
6
Looking at or near the Sun will cause irreversible damage to your eye. Do not point this telescope at or near the
Sun. Do not look through the telescope as it is moving.
Declination Housing Assembly
DEC
ASSEMBLY
The Dec Housing mates to the RA Housing
using another huge dovetail block. The RA
Housing, DEC Housing and Pedestal are all
designed to allow you to track more than 6
degrees past meridian without interference.
This mount will let you cover the whole sky. In
addition to accepting quick change dovetail
plates, MAX has two generous wing mount platforms that will allow you to attach guide scopes,
piggy back cameras, short focal length refractors
and a wide variety of secondary instruments
without interfering with Max's "all sky" design.
OTA Safety Lock
OTA Lock
Knobs (2x)
OTA
Female
Dovetail
Dec
Balance
Hard Stop
Bolt
Accessory
Wings (2x)
DB-25 connector
Saddle
Panel
Looking at or near the Sun will cause irreversible damage to your eye. Do not point this telescope at or near the
Sun. Do not look through the telescope as it is moving.
7
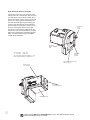
pedestal attachment lever
course adjustment
lock lever
fine adjustment
turnbuckle
THE TRIPOD
MAX Tripod
The MAX-ACF tripod can be transported or permanently installed. It provides a wide stance to assure that it can safely
carry MAX's massive payload in all orientations, but still collapses down to a size that is easy to handle. Its design
assures that despite its wide stance, it will not interfere with optical systems observing on the meridian. Like Max, it sets
up, knocks down, and adjusts without the need of tools.
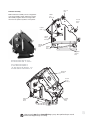
Counterweights
The MAX counterweights are beautifully
crafted with sure locking, but quick
release, buttons. They allow you to quickly locate balance so you can get back to
work.
Matching
Slots
Counterweight
Quick Release
Buttons
Fixed
Counterweight
Knobs (8)
Safety Cap
Fixed
Counterweights
(2)
Counterweight
Shaft
Adjustable
Counterweights
THE COUNTERWEIGHTS
8
Looking at or near the Sun will cause irreversible damage to your eye. Do not point this telescope at or near the
Sun. Do not look through the telescope as it is moving.
Optical Tube Assembly
MAX-ACF is delivered with a 20” Advanced Coma-Free™ Optical
Tube Assemblie. Its 20” OTA integrates seamlessly with MAX-ACF
German Equatorial Mount. Together you get pinpoint stars from
Meade's unique Advanced Coma-Free optical system:
•
•
•
•
•
•
Zero expansion carbon fiber body
Advanced Coma-Free optics
Electronic Collimation
Integrated Dew Heater
OTA fan for quick cool down
Digital Electronic Focus with Presets
Viewfinder
Optical
Tube
Assembly
(OTA)
2"
Eyepiece
Dust Cover
2"
Accessory
Adapter
OTA Alignment
Bolts
(concentric)
2"
Star
Diagonal
Visual
Back
OTA
Panel
OTA
Male
Dovetail
THE OTA
Looking at or near the Sun will cause irreversible damage to your eye. Do not point this telescope at or near the
Sun. Do not look through the telescope as it is moving.
9
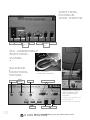
CONTROL
PANELS
AND PORTS
Off/On
12vDC In
USB Port
12VDC
Switched
Out
AUX port
HBX port
(Handbox
port)
Serial port
RA ASSEMBLY
CONTROL
PANEL
SADDLE
CONTROL
PANEL
Reticle Port
12VDC
Switched
RA TO DEC
JUMPER CABLE
Focuser
Smart Accessory Ports
JUMPER CABLE
BETWEEN OTA
AND SADDLE
PANEL
(may use either of
the Smart
Accessory ports)
USB Ports
10
Auto Guider
HBX port
Looking at or near the Sun will cause irreversible damage to your eye. Do not point this telescope at or near the
Sun. Do not look through the telescope as it is moving.
AUTOSTAR II FEATURES
�
�
�
�
�
�
쐈
�
�
�
쐅
Fig. 2: The Autostar II Handbox.
Tour the Cosmos with Just the Push of a Button
Control of MAX-ACF telescope is through the operation of the standard Autostar II
system. Nearly all functions of the telescope are accomplished with just a few pushes of Autostar II’s buttons.
Because the Autostar II system uses flash (rewritable) memory, your system will be
able to grow when new features and enhancements become available. Download the
latest satellite data, star and object catalogs, tours, serial commands list, and software
revisions, directly from the Meade website (www.meade.com).
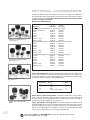
Some of the major features of the Autostar II system are:
쩦
Automatically move the telescope to any of the more than 180,000 objects stored
in the object library, including:
Library
# of Objects
New General Catalog (NGC):
7,840
Index Catalog (IC):
5,386
Messier Catalog (M):
110
Caldwell Catalog:
109
Named Objects:
227
Herschel Catalog:
400
Abell Catalog of Galaxy Clusters:
2,712
Arp Catalog of Irregular Galaxies:
645
Uppsala Galaxy Catalog:
12,940
Morphological Catalog of Galaxies:
12,939
General Catalog of Variable Stars:
28,484
SAO:
17,191
Hipparcos Star Catalog:
17,325
....plus more than 10,000 other objects from the Lunar 100, the Washington Star,
Gliese, Hickson, PK, Landolt, Lunar Features, and other catalogs!
Looking at or near the Sun will cause irreversible damage to your eye. Do not point this telescope at or near the
Sun. Do not look through the telescope as it is moving.
11
The Autostar II system provides control of virtually every telescope function. The
Autostar II handbox has soft-touch keys designed to have a positive feel. The LCD
(Liquid Crystal Display) is backlit with red LEDs (Light Emitting Diodes) for easy viewing in the dark. The backlit display, key arrangement, and sequential menu structure
make Autostar II extremely user friendly.
B
c
d
e
f
2-Line LCD Display: This screen displays Autostar II's menus and information
about the telescope.
• Top line: Lists the primary menu.
• Bottom line: Displays other menus that may be chosen, menu options,
telescope status, or information about a function that is being performed.
ENTER Key: Press to go to the next menu level or to choose an option in a menu.
The ENTER key is similar to the RETURN or ENTER key on a computer.
MODE Key: Press to return to the previous menu or data level. The top menu
level is “Select Item." The MODE key is similar to the ESCAPE key on a computer.
Note: Pressing MODE repeatedly while in the “Select Item” level moves
Autostar II to the topmost screen: “Select Item: Object.”
Note: If MODE is pressed and held for two seconds or more, information
about the telescope's status displays. When the status displays, press the
Scroll keys (7, Fig. 2) to display the following information:
• Right Ascension and Declination (astronomical) coordinates
• Altitude (vertical) and Azimuth (horizontal) coordinates
• Local Time and Local Sidereal Time (LST)
• Timer and Alarm Status
• Date
• Site coordinates
• Battery status
Press MODE again to return to the previous menu.
GO TO Key: Press to slew (move) the telescope to the coordinates of the currently selected object. While the telescope is slewing, the operation may be aborted at any time by pressing any key except GO TO. Pressing GO TO again
resumes the slew to the object. Also, press during the alignment or GO TO procedures to activate a "spiral search."
Arrow Keys: The Arrow keys have several functions. Press an Arrow key to slew
the telescope in a specific direction (up, down, left, and right), at any one of nine
different speeds. See SLEW SPEEDS, page 26. Use the Up and Down Arrow keys
to move the telescope vertically up and down. The Left Arrow key rotates the telescope horizontally counterclockwise, while the Right Arrow key rotates it clockwise
(unless reversed for Southern Hemisphere use).
Also, use the Arrow keys to scroll through numbers 0 through 9 and the alphabet.
The Down Arrow key begins with the letter "A;" the Up Arrow key begins with digit
"9."
Additionally, use the Arrow keys to move the cursor across the display: Use the
Right or Left Arrow key (5, Fig. 2) to move the cursor from one number to the next
in the display.
g
12
Number Keys: Press to input digits 0 to 9. Each Number key also has a specific function, which is printed on each key (these are commonly known as "hot buttons"—see page 40):
1 SPEED: Changes the slew speeds. To operate, press Speed and then a
Number key (1 is the slowest speed, 9 is highest speed).
2 CALD (Caldwell): Press to display the Caldwell catalog on the Autostar II
handbox.
3 M (Messier): Press to display the Messier catalog library.
Looking at or near the Sun will cause irreversible damage to your eye. Do not point this telescope at or near the
Sun. Do not look through the telescope as it is moving.
4 FOCUS: Toggles between two functions. The first press allows you to
change the focus and focus speed. The next press allows you to create
presets that tell the telescope where to focus.
5 SS: Press to display the Solar System library.
6 STAR: Press to display the Star library.
7 RET (Reticle): Press to display the Reticle Control menu.
8 IC: Press to display the Index Catalog library.
9 NGC (New General Catalog): Press to display the NGC catalog library.
0 LIGHT: Press to turn on and off the red utility light on the top of the handbox.
h
Scroll Keys: Press to access options within a selected menu. The menu is displayed on the first line of the screen. Options in the menu are displayed, one at a
time, on the second line. Press the Scroll keys to move through the options. Press
and hold a Scroll key to move quickly through the options.
The Scroll keys also control the speed of text scrolling on the Autostar II display.
When text is scrolling, press and hold the Up Scroll key for a faster display speed
and the Down Scroll key for a slower display speed.
i
? Key: Press to access the "Help" file. "Help" provides on-screen information on
how to accomplish whatever task is currently active.
Press the ? key and then follow the prompts on the display to access details of
Autostar II functions in the Help feature. The Help system is essentially an onscreen instruction manual.
If you have a question about an Autostar II operation, e.g., INITIALIZATION,
ALIGNMENT, etc., press the ? key and follow the directions that scroll on the second line. When satisfied with the Help provided, press MODE to return to the original screen and continue with the chosen procedure.
j
1)
1!
Coil Cord Port: Plug one end of the Autostar II coil cord (10, Fig. 2) into this port
located at the bottom of the Autostar II handbox.
Coil Cord: Plug one end of the Autostar II coil cord into the HBX port (F, Fig. 1d)
of the computer control panel of the telescope and the other end into the Autostar
II coil cord port. See j above.
Utility Light: Use this built-in red light to illuminate star charts and accessories
without disturbing your eye's adaptation to darkness. Press "0" to turn the light on
and off.
Looking at or near the Sun will cause irreversible damage to your eye. Do not point this telescope at or near the
Sun. Do not look through the telescope as it is moving.
13
ASSEMBLY
Refer to images pages 4 to 10 for location of various
telescope features.
A screwdriver or other
1/4" shaft that can be
used as a lever will be
useful during assembly.
Pointing to ± 5°
of the pole
1
2
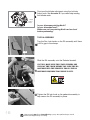
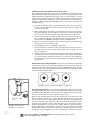
Tripod Assembly
Before you pull legs out of collapsed tripod, notice the
pattern of the pins on top of the tripod (photo). Set the
legs so the leg opposite the single pin is pointing North.
Above 20° latitude (or South in Southern hemisphere)—
if less than 20°, use the Low Latitude kit; see step #26.
Set up on a surface of concrete, or if on the ground,
must be a solid surface (such as granite).
CAUTION: AVOID GRASS AND DIRT. THE MAX
ASSEMBLY WILL SINK INTO GROUND, NOT REMAIN
LEVEL AND TIP OVER, CAUSING SERIOUS INJURY
TO THE ASSEMBLY AND OBSERVERS.
3
4a
Turn the three coarse adjustment leg lock levers to
unlock the legs of the tripod. See Photo 5 for a close up
of a lock lever.
Extend the legs outward. Note that the legs need not be
extended fully. Extend them so that the base of the tripod coarsely level with the horizon. You can make fine
leveling adjustments later.
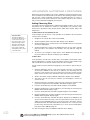
Pedestal Assembly and Adjusting Latitude Position
Mount Pedestal onto the tripod...
CAUTION: THE PEDESTAL REQUIRES TWO PEOPLE TO
LIFT THE ASSEMBLY.
4b
...Using the 3 lock pins on the base of the tripod as a
guide, place the Pedestal over the lock pins. Note that
these pins are spring-loaded and are self-locating.
14
Looking at or near the Sun will cause irreversible damage to your eye. Do not point this telescope at or near the
Sun. Do not look through the telescope as it is moving.
5
Tighten (rotate) the lock knobs below the Pedestal to a
"tight" feel. First loosely tighten all three knobs, then
tighten all three securely.
6
Back off the ejector knobs on the Pedestal.
7
Adjust legs until they are level. Adjust the turnbuckle for
fine adjustment of level.
The bubble levels will assist you. in determining level.
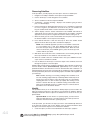
Latitude
Lock
Knob
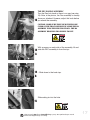
8
Latitude Range Bolts
"Porthole"
Latitude
Lock
Knob
9
A
Move and line up
latitude tick mark
with indicator
Latitude Adjustment
The telescope comes set for mid-range latitudes (30° to
60°).
If you need to set for low range or high range,
loosen all four latitude lock knobs (2 on each side)
remove the 4 latitude bolts from each side of the
pedestal (8 total) using a supplied hex wrench (see
photo above). The pedestal will now swing freely.
Swing the pedestal so that the bolt portholes match up
with another set of bolt holes on the underneath plate
(there are three sets of bolt holes, one for each latitude
range).
Move the pedestal until it lines up your latitude tick
mark with the indicator on the latitude scale.
Replace and tighten the latitude bolts. Note: If you are
setting for low-range latitude, you will need to replace
only three bolts on each side. There isn't a fourth hole
on either side. Relock latitude locks knobs.
Looking at or near the Sun will cause irreversible damage to your eye. Do not point this telescope at or near the
Sun. Do not look through the telescope as it is moving.
15
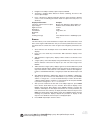
9
B
Fine tune the latitude adjustment using the Latitude
Adjust knob. See APPENDIX D if you need help reading
the latitude scale.
Latitude
Adjust
Knob
Is your telescope pointing North?
Is your telescope level?
Make sure you are pointing North and are level
before proceeding.
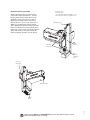
THE RA ASSEMBLY
Turn the Dec Lock knobs on the RA assembly until there
is NO a gap in the clamps.
10
no gap
Slide the RA assembly onto the Pedestal dovetail.
11
CAUTION: MAKE SURE THAT YOUR FINGERS ARE
CLEAR OF THE TRACK BEFORE YOU SLIDE THE RA
ASSEMBLY INTO THE PEDESTAL TRACK. THE RA
ASSEMBLY REQUIRES TWO PEOPLE TO LIFT.
the RA lock knob on the pedestal assembly to
12 Tighten
help secure the RA assembly in place.
16
Looking at or near the Sun will cause irreversible damage to your eye. Do not point this telescope at or near the
Sun. Do not look through the telescope as it is moving.
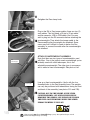
THE DEC SADDLE ASSEMBLY
Turn the Dec lock knob so there is no gap (see step
10). Note, in the photos, the Dec assembly is already
shown as attached. However, adjust this knob before
13 you attach the assembly.
CAUTION: MAKE SURE THAT YOUR FINGERS ARE
CLEAR OF THE TRACK BEFORE YOU SLIDE THE RA
ASSEMBLY INTO THE PEDESTAL TRACK. THE RA
ASSEMBLY REQUIRES TWO PEOPLE TO LIFT.
14
A
14
B
With a person on each side of the assembly, lift and
slide the DEC assembly in from the top...
...Slide down to the hard stop.
Slide safety pin into the hole.
15
Looking at or near the Sun will cause irreversible damage to your eye. Do not point this telescope at or near the
Sun. Do not look through the telescope as it is moving.
17
17
Retighten the Dec clamp knob.
18
Plug in the RA to Dec jumper cables; there are two (2)
such cables. The first being a 25 pin to 25 pin cable
and the second a USB to USB cable. Hint: You may
wish to plug into the RA connector before attaching the
counterweights. Then attach the jumper cable to the
Dec assembly after the weights are attached. Some
users may find it difficult to reach in below the Dec
assembly to connect the cable after the counterweights
are attached.
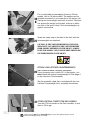
ATTACH COUNTERWEIGHT ASSEMBLY
Note that there are two types of counterweights used
with Max. One is the typical round counterweight you're
19 probably used with other telescopes; this is the
adjustable counterweight. The other type is uncommon
and is called a fixed counterweight. See photo at left.
fixed
counterweights
adjustable
counterweights
Line up a fixed counterweight's 4 bolts with the four
threaded holes in the Dec assembly base. The weights
can only be positioned with indentations facing the front
and back of the assembly (see photos 21A and 21B).
20 CAUTION: DUE TO THE WEIGHT OF THE FIXED
COUNTERWEIGHTS, ATTACHING THESE PIECES
REQUIRES TWO PEOPLE. ONE PERSON MUST HOLD
THE FIXED COUNTERWEIGHT WHILE THE OTHER
PERSON TIGHTENS IT IN PLACE.
18
Looking at or near the Sun will cause irreversible damage to your eye. Do not point this telescope at or near the
Sun. Do not look through the telescope as it is moving.
close up of
Indentation on
fixed counterweights
21
A
21
B
22
Slide the bolts into the threaded holes and tighten each
securing knob by hand until it reaches the top. Then
use a 1/4" shaft, such as a Phillips screwdriver, as a
lever, to turn the knob very tight.
Screw in counterweight shaft into the bottom of the
fixed counterweight assembly until it reaches the hard
stop.
Slide a screwdriver or shaft into into the hole on the
23 head of the shaft (see photo). Using the screwdriver as
a lever, rotate the counterweight shaft until it tightened.
24
A
CAUTION: PAY ATTENTION TO YOUR HANDS AS YOU
ATTACH THE COUNTERWEIGHTS SO NOT TO PINCH
THEM DURING ASSEMBLY. ALSO TAKE CARE NOT TO
DROP COUNTERWEIGHTS. THE COUNTERWEIGHTS
CAN CAUSE SERIOUS INJURY IF DROPPED,
ESPECIALLY ON THE FOOT.
Looking at or near the Sun will cause irreversible damage to your eye. Do not point this telescope at or near the
Sun. Do not look through the telescope as it is moving.
19
Put on adjustable counterweights (three for 20 inch
models, two for 16 inch models). The weights can be
more easily if you make this a two person job.
24 attached
One person holds weight and holds in button. Other perB son pushes the weight up the shaft; slide up to within
one inch of the end of travel. Push counterweights up
against one another.
25
Screw the safety cap on the end of the shaft after the
counterweights are attached.
CAUTION: IF THE COUNTERWEIGHT(S) EVER SLIP,
THE SAFETY CAP PREVENTS THE COUNTERWEIGHT
FROM SLIDING ENTIRELY OFF THE SHAFT. ALWAYS
LEAVE THE SAFETY CAP IN PLACE WHEN THERE ARE
COUNTERWEIGHTS ON THE SHAFT.
ATTACH LOW LATITUDE COUNTERWEIGHTS
(ONLY IF USING A TRIPOD—OPTIONAL ACCESSORY)
26 If your observing site is within 20° of the equator, you
must attach the optional counterweight kit. See page 4
to see overview of the assembly.
See the assembly sheet that is included with the Low
Latitude Counterweight kit for assembly instructions.
ATTACH OPTICAL TUBE TO THE DEC SADDLE
27 Turn the OTA lock knobs on the Dec Assembly so that
there is NO a gap.
no gap
20
Looking at or near the Sun will cause irreversible damage to your eye. Do not point this telescope at or near the
Sun. Do not look through the telescope as it is moving.
The OTA should have its dust cover attached when left
stored on the ground in an upright position. You can
also store it on its side.
28
A A minimum of four people are needed to lift the optical
tube.
DANGER!: MAKE SURE THAT THE COUNTERWEIGHTS
28 ARE ATTACHED BEFORE PROCEEDING WITH THIS
B STEP. SEE STEPS 17 THROUGH 22.
IMPORTANT! DANGER!: DUE TO THE WEIGHT AND
SIZE OF THE 20" OPTICAL TUBE, PLEASE USE
EXTREME CAUTION WHENEVER ASSEMBLING, DISASSEMBLING, LIFTING, TRANSPORTING OR STORING
THIS PRODUCT. FOUR OR MORE PERSONS (TWO ON
SIDE) SHOULD ALWAYS BE USED WHEN ASSEM28 EACH
BLING OR DISASSEMBLING THE TUBE TO THE DEC
C SADDLE. DISREGARD FOR THE ABOVE WARNING
COULD RESULT IN SERIOUS INJURY OR DEATH.
Not necessary to
lift all the way over
top end of Dec
Assembly
Close up: Drop into slide
When end of
dovetail clears
clamp, drop
OTA into slide
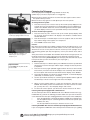
Before performing this step, make sure that the OTA
lock knobs are loosened as described in step 27.
Lift the tube up over the low end (the rear) of the Dec
28 assembly and drop it into the dec assembly track. Hint:
D It is not necessary to lift the OTA all the way over the
top end of the slide (as depicted in Fig. 28D). You will
only need to lift the OTA so that the rear of the OTA
dovetail clears the clamps—at which point you will be
able to drop the OTA dovetail into the slide (as depicted in Fig. 28E; inset shows close up view). In other
28 words, this trick allows you drop the OTA into the slide
at a lower point and requires less lifting stress and
E energy.
OTA
lock knob
clamp
Looking at or near the Sun will cause irreversible damage to your eye. Do not point this telescope at or near the
Sun. Do not look through the telescope as it is moving.
21
29
A
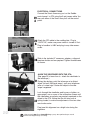
ELECTRICAL CONNECTIONS
Connect the Smart Accessory port on the Saddle
control panel to OTA using the 9-pin jumper cable. You
may use either of the Smart Acc ports on the control
panel.
the OTA cable to the saddle plate. Plug in
29 Attach
"12VDC IN;" make sure power switch is turned off first.
B Plug in handbox to HBX and plug in any other accessories.
Slide in the included 2" accessory adapter, a diagonal
30 eyepiece holder and an eyepiece. Tighten thumbscrews
to secure.
31
spring loaded knob
ALIGN THE VIEWFINDER WITH THE OTA:
(See page 25 to learn how to attach the viewfinder to
the telescope.)
During the daytime, point the telescope at a distant
object (at least 200 yards away), such as a telephone
pole or a street sign. Center the object in the telescope's eyepiece.
Look through the viewfinder and loosen or tighten, as
appropriate, one or more of the collimation screws until
the viewfinders crosshairs are precisely centered on the
object in the OTA. Notice that the left rear knob is
32 spring-loaded, to make the adjustment of the two other
rear knobs easier.
Fine tune this alignment on a bright star during the
nighttime.
22
Looking at or near the Sun will cause irreversible damage to your eye. Do not point this telescope at or near the
Sun. Do not look through the telescope as it is moving.
HOME POSITION AND BALANCING THE OTA
After power is applied and Autostar has initialized, press
MODE to move to the vertical home position (see photo
at left).
33
A C A U T I O N: BEFORE D I S A S S E M B L I N G, THE TELE-
SCOPE MUST BE
PUT INTO THE
HOME POSITION.
Before using the telescope, you will need to balance it in
both the RA and Dec axes. Before you balance, attach
the eyepiece assembly, the viewfinder and all the accessories you will be using with the telescope (cameras,
33 guide scopes, etc.). In other words, you need to balance
the unit with all the "weight" that will be attached to it.
B
TO BALANCE THE RA ASSEMBLY:
First you will balance the RA axis. You will balance it,
first, with the telescope positioned at a 45° angle and
then at a 90° angle perpendicular to the home position).
Use the scroll keys to position the RA axis at 45° (Photo
33).
34
Go to the Utilities menu. Scroll down to "Balance
Scope." Press the down arrow key to see the two
choices available: Balance RA and Balance Dec. With
"Balance RA" displayed, press ENTER.
With "Balance RA" displayed, press ENTER (Photo 34).
The telescope assembly will move back and forth
slightly on the RA axis. It is now determining the torque
needed to move on this axis.
35
A balance readout will be displayed on the handbox. The
readout will display fractions close to the number one.
For example, ".95" and ".91."
Move the bottom adjustable counterweight one-half to
one full turn. You will only need to move the weights in
small increments. Then move the other adjustable
counterweights to butt up against it (Note: The
telescope will continue to move back and forth, while
you adjust the counterweights).
Looking at or near the Sun will cause irreversible damage to your eye. Do not point this telescope at or near the
Sun. Do not look through the telescope as it is moving.
23
Perpendicular to home position
When the display readout is close to "1" (perhaps .99
1.01) and remains close to 1 while it is moving, it is
36 or
balanced. Press MODE. This stops the Balance
procedure.
Next move the telescope so that it is 90° perpendicular
to the Home Position. Select Balance RA once again
and press ENTER.
Repeat the same procedure in the perpendicular position. Once again, move the weights to get the balance
readouts to get close to 1.
37
Home or 90° position
Dec Balance Hard Stop bolt
24
BALANCE THE DEC AXIS
DANGER!!! YOU WILL NEED 4 PEOPLE TO PERFORM
THIS PROCEDURE.
Next move the telescope so that it is 90° perpendicular to the Home
Position (Photo 36).
Select "Balance Dec" and press ENTER. The Dec axis
will move back and forth, like the RA axis did. Check
38 and see how close the Dec axis is from balance.
A Press MODE. Move the telescope to the home position.
Position 4 people to hold onto the tube securely and
loosen the Dec lock knobs. See Photo 37.
Move the OTA forward or backward within the female
dovetail track and tighten the lock knobs. Move the telescope back to the position that is 90° perpendicular to
the Home Position, as shown in Photo. 36. Select
Dec" and press ENTER. Check and see how
38"Balance
close the Dec axis is from "1" in the Dec Balance menu.
B Move the OTA back to the Home position. Move the OTA
forward or backward again. Continue this procedure,
moving back and forth between both the home (Photo.
38A) and the perpendicular position (Photo 36), and
adjust the OTA until the telescope is balanced in this
axis. Make sure you tighten the lock knobs after each
adjustment of the OTA.
When the axis is finally balanced, press ENTER.
38 Tighten the lock knobs and turn the Dec Balance hard
bolt so that it butts up against the OTA plate—it
C stop
remembers your Dec Balance point. You should not
have to balance the telescope again unless you change
the amount of weight attached to the scope.
Looking at or near the Sun will cause irreversible damage to your eye. Do not point this telescope at or near the
Sun. Do not look through the telescope as it is moving.
GETTING STARTED
c
b
To Attach the handbox holder:
Remove the handbox holder from the plastic bag. If necessary, loosen the lock
knob (1, Fig. 39a) and place the clamp (2, Fig. 39a) about one of the telescope's
handles. Tighten the lock knob to a firm feel. Slide the AutoStar II handbox into
the holder (3, Fig. 39a).You may also snap the handbox into the holder: Slide one
side of the handbox into the holder and then firmly press the other side of the
handbox into the holder until it snaps in place. Adjust the tilt of of the holder by
loosening the lock knob and then moving the holder clamp to the desired angle.
Retighten the lock knob.
d
Fig. 39a: Handbox holder: (1) Lock
knob; (2) Clamp; (3) Holder.
To attach the visual back and diagonal mirror:
Attach Visual back and Diagonal mirror: Thread the ring of the 2" accessory
adapter over the rear cell and rotate the ring, tightening to a firm feel. Slide the
diagonal into the 2" accessory adapter and secure it in place using the visual
back thumbscrew.
e
f
To Insert eyepiece:
Remove the UltraWide 24mm eyepiece from its container and slide it in the
diagonal mirror. Tighten the thumbscrew located on the diagonal mirror to a firm
feel only.
Fig. 40a: Viewfinder mounting
bracket assembly : Mounting screws
(4), locking screws (5). Remove back
locking screw so you can thread in
and tighten mounting screws.
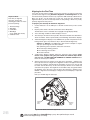
Mounting and Focusing the Viewfinder for the First Time
The first time you mount and focus the viewfinder, follow the these steps:
1.
Attach the viewfinder mounting bracket assembly: The mounting bracket assembly is shipped attached to the viewfinder bracket. Loosen the thumbscrews (5,
Fig. 40a) and slide the bracket out of the mounting assembly (the photo depicts
one thumbscrew removed for the sake of clarity).
2.
Place the bracket assembly over the pre-drilled holes on th back outer rim of the
telescope, Thread and tighten the two supplied locking screws (4, Fig. 40a).
3.
Attach the viewfinder bracket: Slide the track on the bottom of the viewfinder
bracket into the slot in the viewfinder mounting assembly. See Fig. 40b. To secure
the viewfinder to the mounting assembly, tighten the two thumbscrews to a firm
feel only.
4.
Slide the viewfinder tube (see Fig. 40c) into the viewfinder bracket. Loosely tighten the adjustment screws (12, Fig. 40d). You will use the adjustment screws to
align the viewfinder (see page 21).
5.
Look through the viewfinder. Rotate the eyepiece/focuser until you sharply focus
the crosshairs. Rotate the tube so that the crosshairs align with the Dec and RA
axes.
Fig. 40b: Viewfinder bracket assembly: Slide the track (7) into the mounting slot (6). Tighten the thumbscrews
(8) to secure.
6.
Loosen (rotate clockwise) the objective lens locking ring (11, Fig. 40c).
7.
Rotate the objective lens (9, Fig. 40c) until you sharply focus on an object
located at infinity.
8.
Tighten the locking ring (11, Fig. 40c).
j
9.
You may now rotate the eyepiece (10, Fig. 40b) to focus on objects.
g
ih
1)
Align the Viewfinder
During the daytime, point the telescope at a distant object (at least 200 yards away),
such as a telephone pole or a street sign. Center the object in the telescope's eyepiece.
1!
Fig. 40c: 8x50 Viewfinder tube:
Objective lens (7), eyepiece/focuser
(8) and locking ring (9).
Look through the viewfinder and loosen or tighten, as appropriate, one or more of
the collimation screws (12, Fig. 40d) until the viewfinders crosshairs are precisely
centered on the object in the OTA. Notice that the left rear collimation screw is
spring-loaded (12, Fig. 40d)—you don't need to adjust it—to make the adjustment of
the two other rear knobs easier.
Fine tune this alignment on a bright star during the nighttime.
Looking at or near the Sun will cause irreversible damage to your eye. Do not point this telescope at or near the
Sun. Do not look through the telescope as it is moving.
25
Focusing the Telescope
All focusing is performed digitally, using AutoStar II’s Focus key
(number key 4). The Focus key functions as a toggle key:
1@
쩦 Press the Focus key the first time to focus the telescope eyepiece and to control
the speed at which you focus.
1#
Fig. 40d: Viewfinder adjustment
screws (12); spring loaded screw (13)
Fig. 40e: Align the viewfinder on a
distant object, such as a light or
telephone pole.
Important Note:
Press MODE at any time to exit
Focus modes.
쩦 Press the Focus key again to set and adjust up to nine focus presets.
To change the focus speed:
1. Press the Focus key once. “Focuser: Fast (or the current speed)” displays for two
seconds. Use one of the Scroll keys to scroll through the list of 5 available focus
speeds: Fast, Medium, Slow, Fine, S. Fine. Scroll through the list until the speed
you desire displays. Choose a focus speed with which you feel comfortable.
To focus the telescope eyepiece:
1. Press the Focus key once. “Focuser: Fast (or the current speed)” displays. After
two seconds, “Focuser: Position = XX” displays. “XX” stands for a number value in
decimal millimeters.
2. Point the telescope at a distant object. Look in the eyepiece and use the Arrow
keys until the image in the eyepiece is in sharp focus.
3. Press MODE to leave Focus menu.
Presets:
Nine preset focus positions are available, and they operate much like presets on a car
radio—everyone can have their own favorite station, or in this case, their own personalized focus. You can set one preset to take into account your own eyesight, one for
your observing partner (who may wear glasses), one for your camera’s focus, and so
forth.
Three preset menus are available. Use the Define Preset menu to assign a preset, use
the GoTo Preset menu to select a preset you have previously assigned, and use
Sync On Preset menu if you do not park your telescope (this menu will reset all your
focus presets after you turn off and turn on your scope again ).
To define a preset:
1. Point the telescope at a distant object, press FOCUS and use the Up and Down
Arrow keys to focus the telescope until the object is sharply focused as previously explained.
2. Press the Focus key again (FOCUS toggles between the Focus menu and the
Preset menu). “Focuser Preset: Go To” displays. Use a Scroll key and scroll down
the list of options until “Focuser Preset: Define Preset” displays. Press ENTER.
3. A list of presets displays. If no preset is currently assigned, “1- Unnamed” displays
(followed by 2- Unnamed, up to 9 - Unnamed).
4. Use the up and down Scroll keys to scroll through the alphabet and the right and
left Arrow keys to move to cursor right or left across the display.
5.
6.
When you have finished typing in a name and focusing the telescope, press
ENTER. That number preset is now defined. You can enter 9 names. For example, you may enter “Joe,” “Jill,” “Deep Sky Imager” and so forth.
To select one of these presets, you will use the “Focuser Preset: Go To” menu.
Focusing Telescopes Equipped with a Microfocuser
To focus telescopes other than an MAX-ACF with one of Meade's microfocusers (e.g.,
LX200 GPS 16"), perform the following procedure. Make sure you have the microfocuser attached to the telescope and plugged into the Focuser port on the saddle plate:
•
Press the Number Key 4 and Autostar displays "Saddle Focus: Speed Fast."
•
Use the Up/Down keys to scroll through the four microfocuser speeds (fast,
medium, slow, fine).
•
Use the Up and Down arrow keys to move the focus in or out.
Focusing both MAX-ACF focusers and Telescopes Equipped with Microfocusers
If you are using both an MAX-ACF and a telescope with a microfocuser (as a guiding
26
Looking at or near the Sun will cause irreversible damage to your eye. Do not point this telescope at or near the
Sun. Do not look through the telescope as it is moving.
scope), you can use Autostar to control both the MAX-ACF and the microfocuser.
Make sure you have connected the saddle plate to the MAX-ACF and the microfocuser to your telescope and also the saddle plate's Focuser port. Follow this procedure:
•
Important Note:
Press MODE at any time to exit
Focus modes.
Press the Number Key 4 and Autostar displays "OTA: Fast" displays. You are
now in control of the MAX-ACF focuser.
•
Use the Up/Down keys to scroll through the MAX-ACF focuser speeds.
•
Press the Number Key 4 again and "Define Presets" displays. Define the
MAX-ACF presets as described earlier.
•
Press the Number Key 4 and Autostar displays "Saddle Focus: Speed Fast."
You are now in control of the microfocuser focuser.
•
Use the Up/Down keys to scroll through the four microfocuser speeds.
•
Use the Up and Down arrow keys to move the focus in or out.
Press MODE to exit the Focus menu at any time.
To select a previously defined focus preset
1. Press the Focus key twice. “Focuser Preset: Go To Preset” displays. Press
ENTER to select this menu.
2. Use a Scroll key and scroll down the list of previously defined presets. When the
desired preset displays (for example, “Deep Sky Imager”), press ENTER.
Important Note: If you do not park your telescope, you will need to select
one of the presets and refocus your telescope using the Sync On menu. See
TO SYNC ON A FOCUS PRESET below.
To sync on a focus preset
If you park your telescope, AutoStar II remembers all the focus positions you defined
as presets and you will not need this menu.
If you do not park your telescope, you will need to select just one of the presets and
refocus your telescope using the Sync On menu. Then AutoStar II will reset all the
other presets back to the focus preset positions you previously defined.
1. Press the Focus key twice. “Focuser Preset: Go To Preset” displays. Use a Scroll
key and scroll until “Focuser Preset: Sync On Preset” displays and press ENTER
to select this menu.
2. Use a scroll key to choose one of the previously entered presets from this list (the
most likely preset you will choose will be one that accounts for your own
eyesight).
3. Use the Up or Down Arrow keys to focus the eyepiece.
4. Press ENTER. AutoStar II now “remembers” the relative focus positions of the
eyepiece.You can now choose any preset and it will be correctly focused.
To exit the focus operation at any time:
1. Press MODE.
Slew Speeds
Autostar II has several slew speeds that move the optical tube at rates that are directly
proportional to the sidereal rate and have been calculated to accomplish specific functions. Press the Speed key (Number key "1") and then press a Number key to change
the slew speed, which is shown for about two seconds on Autostar II’s display.
The available speeds are:
Number
Number
Number
Number
Number
Number
Number
Number
Number
Key
Key
Key
Key
Key
Key
Key
Key
Key
1
2
3
4
5
6
7
8
9
=
=
=
=
=
=
=
=
=
0.01x to1.0x sidereal, variable in 0.01x increments Guide Rate
2x
=
2 x sidereal (0.5 arc-min/sec or 0.008°/sec)
8x
=
8 x sidereal (2 arc-min/sec or 0.033°/sec)
16x =
16 x sidereal (4 arc-min/sec or 0.067°/sec)
64x =
64 x sidereal (16 arc-min/sec or 0.27°/sec)
128x =
28 x sidereal (32 arc-min/sec or 0.25°/sec)
5°
=
45 arc-min/sec or .5°/sec
1°
=
60 arc-min/sec or 1°/sec
Max Slew Speed (2°/sec)
Looking at or near the Sun will cause irreversible damage to your eye. Do not point this telescope at or near the
Sun. Do not look through the telescope as it is moving.
27
Aligning for the First Time
Important Note:
First time you align the
telescope, perform the
following procedures to insure
precision pointing:
1. Automatic Align
2. Drift Align
3. Collimation
4. OTA Align
(if non -MAX-ACF model)
5. Calibrate home.
If you wish to have precise pointing accuracy, the first time you align your telescope
you will need to align it to using Automatic Alignment and Drift Alignment. You will
then electronically collimate the telescope, square the OTA and finally calibrate home.
Once you do this. you will need only to park your scope and you will keep this
alignment. When you turn the telescope back on after parking, it will be very nearly
perfectly aligned from this point on.
To prepare your telescope for Automatic Alignment:
1. Connect Autostar II to the HBX port of the RA Control Panel (or Dec Control
Panel).
2.
Flip the power switch of the RA Control Panel to the ON position.
The Autostar II screen is activated and a copyright message displays briefly.
3.
"Press 0 to Align or Mode for Menu" displays. Press 0.
4.
The telescope will seek the home position. Autostar II initializes the Smart Drive.
The R.A. and Dec. motors operate briefly and "Initializing: Smart Drive" displays.
5.
"Automatic Alignment" displays. Press ENTER. The system now performs the following routines (press any Autostar II key to abort Automatic Alignment) :
Attempts a "GPS Fix." The MAX-ACF's GPS receiver attempts to acquire
and sync up with signals from GPS satellites.
After performing these operations, Autostar II now knows:
쩦 The telescope's limiting positions
쩦 The observing site's location
쩦 The date and time
"CTR Polaris: Slewing" displays. When the telescope stops slewing, center
Polaris in the eyepiece using only the latitude and azimuth adjust knobs
(see Fig. 41a). DO NOT USE THE HANDBOX TO CENTER POLARIS. When
Polaris is centered, press ENTER.
6.
9.
Autostar II then chooses another star to align upon. "Searching...." displays. The
telescope then slews to a bright star for alignment. If it does not appear in the field
of view in the eyepiece, look through the viewfinder—in most cases, the star will
be visible. Use the Arrow keys to move the telescope until the star is visible and
centered in the eyepiece. The alignment star should be easily recognized and be
the brightest star in the area of the sky where the telescope is pointing. Press
ENTER. "Align Successful" displays. If "Align Unsuccessful displays," repeat the
procedure.
Next, you will drift align the telescope.
Azimuth
Adjust
Knob
Latitude
Adjust
Knob
Fig. 41a: The latitude and azimuth adjust knobs.
28
Looking at or near the Sun will cause irreversible damage to your eye. Do not point this telescope at or near the
Sun. Do not look through the telescope as it is moving.
How to Drift Align Max (Northern Hemisphere)
Important Note: You will need a reticle to perform this procedure
Note:
See:
http://www.astrocruise.com
/polarnew.htm
for a website dedicated to
drift alignment of Meade
telescopes. Site offers
extensive tips from an
experienced drift align
specialist.
1.
Center your reticle on a bright star near the Eastern horizon.
2.
Look through the reticle while pressing Autostar's right and left Arrow keys.
This will slew the mount back and forth in the R.A. axis.
3.
Loosen and rotate the reticle until one of the crosshairs matches the right-left
path of the star as you press the Arrow keys. This crosshair is now on the R.A.
axis. The other axis is therefore on the Dec. axis. Carefully secure the reticle in
place (do not move the crosshairs).
4.
Observe the bright star you have chosen. If, over time, it drifts off the R.A. axis,
use the latitude adjustment knob to bring it back past center. Experience will
teach you how much to move the alt knob. If the star drifts slowly, use only a
small amount of correction; if it moves quickly, use a much larger amount of
correction.
5.
Use Autostar's up and down keys to bring the star back to center. Perform step
4 repeatedly until it does not drift on the Dec axis for a few minutes.
6.
Next, center on a bright, Southern star. This star should be within 10° to 20° of
the celestial equator.
7.
If the star drifts above the RA axis, use the Azimuth adjustment knob to move
the star to the right and down until the star is almost out of the field of view. If it
drifts below the R.A. axis, use the Azimuth adjustment knob to move the star to
the left and up.
8.
Use Autostar arrow keys to center the star again. Repeat steps 7 and 8 until
the star no longer drifts off the R.A. axis for a few minutes.
9.
Go back and check the first star and see if it is drifting again. And then recheck
the second star also. Keep repeating steps 4, 7 and 8, until there is no more
drift in either of the stars you have chosen for a few minutes.
Your telescope is now drift aligned. Next, collimate your telescope.
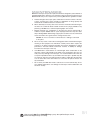
Collimation
This collimation procedure is for Meade MAX-ACF models only. The optical collimation (alignment) of any astronomical telescope used for serious purposes is important, but in the case of the MAX-ACF design, such collimation is absolutely essential
for good performance. Take special care to read and understand this section well so
that your telescope will give you the best optical performance.
As part of final optical testing, every Meade MAX-ACF telescope is precisely collimated at the Meade factory before shipment. However, vibrations in shipping can
cause the optical system to become misaligned. Re-aligning the optics is, however, a
straightforward process with the MAX-ACF.
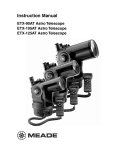
Test your Collimation
Before collimating an MAX-ACF model, you will need to test your collimation.
To test the collimation, center a bright star that is overhead, or use a “hot spot” of
reflected Sunlight from a chrome car bumper, with the supplied 24mm eyepiece. Allow
the telescope to adjust to the temperature of your observation site before proceeding;
temperature differences between the optics and the outside air can cause distortion
in the images. Autostar II offers two options in the Utilities menus that take temperature readings: “OTA Temperature” (the temperature of the corrector plate) and
“Ambient Temperature” (the temperature of the air around the fork arms).
When the star or hot spot is centered, de-focus the image. You will notice that the out
of focus star image looks like a ring of light surrounding a dark central spot; the dark
central spot is in fact the shadow of the secondary mirror. You may notice multiple
rings; these are called diffraction rings. Focus until the diffraction rings fills about 10%
of the eyepiece field-diameter. If the dark central spot is offset in (i.e., not concentric
with) the diffraction rings, your telescope’s optical system is misaligned and requires
collimation.
Looking at or near the Sun will cause irreversible damage to your eye. Do not point this telescope at or near the
Sun. Do not look through the telescope as it is moving.
29
Follow these steps for collimation of the optical system:
The only adjustments possible, or necessary, on the MAX-ACF models is performed
with the AutoStar handbox. No adjustment screws are necessary (or provided), as with
traditional telescopes. A high-powered eyepiece, such as a 9mm eyepiece, or a 9mm
eyepiece with a 2x barlow, is required for collimation. A good rule of thumb to follow is
to select the highest power eyepiece you will use with your telescope, and double it (a
2x barlow is ideal for doubling). See Fig. 42a below, to see images of an aligned and
misaligned image.
a.
Select the “Collimation” option in the Setup/Telescope menu. Once this option is
selected, you will be able to use Autostar’s Arrow keys to adjust the image of the
star you have selected.
b.
While looking through the eyepiece, Use Autostar II's Arrow keys at the slowest
slew speed, begin to move the defocused center ring so that the rings become
more concentric. You will most likely need to press more than one Arrow key.
c.
You will notice that the star image will move across the field of view of the eyepiece. If while using the Arrow key, the defocused star image moves out of the
eyepiece field, press MODE to temporarily leave the collimation menu.
d.
When you have left the “Collimation” menu, use the Arrow keys to bring the image
back to the center of the eyepiece field.
e.
Press ENTER to select the “Collimation” option again.
f.
Use the Arrow keys to continue to adjust the image until it becomes concentric. If
the image moves out of the eyepiece field, perform steps c through e as many
times as necessary.
g.
Carefully examine the concentricity of the diffraction rings. Always double check
the image in the center of the field of the eyepiece. The star point should appear
as a small central dot (commonly referred to as an “Airy disc”) with a diffraction
ring surrounding it. You now have the best alignment of the optics possible with
this telescope.
Set Default and Restore Default Options: The factory has collimated your telescope
and saved the settings in the Restore Default option. You may retain this setting and
recall it if the telescope needs collimation. Or you may overwrite this setting using the
Set Default option after performing precise collimation and recall it again when needed with the Restore Default option.
1
2
3
Fig. 42a: Defocused star images. Misaligned (1, 2), Aligned (3).
Align (Squaring) the OTA: If you are using a non-MAX-ACF telescope or if you have
changed your MAX-ACF collimation or mounting significantly from the factory defaults,
you must align the OTA. When you select this menu, Autostar will ask you to center
two stars in the telescope that are on opposite sides of the sky.
OTA Alignment
Bolts
Fig. 42b: The OTA align bolt.
Misaligned (1, 2), Aligned (3).
30
Once you have centered them, the telescope will slew back to the first star. You will
then be asked to center the star using the OTA align bolt. These are two bolts, with
one in the center of the other. Using a 9/16 flat wrench, loosen the center bolt and hold
this one so it doesn't move. Then place 13/16 open ended or combination spanner
wrenches on the outer bolt. Turn the outer bolt until the star is centered in the vertical
direction (perpendicular to the plane of the saddle). Note: The vertical direction is
when the 90° diagonal is positioned as shown in image #30 on page 22. The OTA
alignment bolt will only move the OTA in this direction. The horizontal direction cannot
be adjusted using the alignment bolts and is compensated for during the electronic
Looking at or near the Sun will cause irreversible damage to your eye. Do not point this telescope at or near the
Sun. Do not look through the telescope as it is moving.
alignment routine. When centered, tighten just the center bolt. This will hold the bolts
securely in that position.
Note that there is a bolts on either side of the OTA align bolt (Fig. 42b). These bolts
must be loosened during the procedure and tightened afterward.
Calibrate Home:
After aligning your telescope, select this menu and the alignment settings—North,
time, alignment stars—are stored in Autostar II's memory and are remembered after
you power off the telescope. After Calibrating Home, you may park your telescope any
time you wish and the next time you turn on the telescope, you will be precisely
aligned.
Parking the Scope
Designed for a telescope that is not moved between observing sessions. Align the
telescope one time, then use this function to park the telescope. Once parked, the
screen prompts to turn off power.
The advantage of parking is that you do not need to align the telescope the next time
you turn on Autostar; it remembers your alignment. Tip: When waking their telescope,
some users select a bright star from the Objects menu and perform a Go To on that
star. If the star is not in the exact center of the eyepiece, move the star to the center
using the arrow keys and then hold ENTER down for more than two seconds. This activates the Enter to Sync function and fine tunes and improves the telescope's alignment.
Important Note: When the "Park Scope" option is chosen and the display
prompts you to turn off the telescope's power, Autostar II is unable to be
returned to operation without turning the power off and then back on.
Most users just need to place the telescope in the home position (default park position) and select Park from the Autostar II menu to park their scope.
However if you are storing your telescope in a location where it cannot be stored in
the home position, for example, such as an observatory with a top that slides back,
just move your telescope to the position you want to store it. Choose "Park Position"
from the Setup: Telescope menu. When "Park Position" displays, use the down arrow
key to scroll through the choices. Select "Use Current" if your position is anything
other than the Home Position. If you are using the Home Position, select "Use
Default."
Looking at or near the Sun will cause irreversible damage to your eye. Do not point this telescope at or near the
Sun. Do not look through the telescope as it is moving.
31
BASIC AUTOSTAR II
SETUP MENU
Automatic alignment
permits all telescope
operations with only
minimal setup.
Select Item:
Object
Select Item:
Setup
UTILITIES MENU
Calculate eyepiece
magnifications;
set timer alerts;
create your own
landmark survey.
The Universe o f
Autostar
utostar I I
Select Item:
Utilities
Object
Event
Guided Tours
Glossary
Utilities
Setup
GLOSSA RY
What is an elliptical galaxy?
How far away is the Sun?
Expand your knowledge of
astronomy by displaying terms
and definitions, and other information.
OBJECT MENU
Want to see Mars? The Orion nebula?
The Andromeda galaxy? Select from
over 180,000 objects and press
GO TO to move the telescope
automatically to an object.
Select Item:
Event
EVENT MENU
Display the time of
past, present, and future
astronomical events,
such as Moon phases
or meteor showers.
Select Item:
Guided Tour
Select Item:
Glossary
GUIDED TOUR
Autostar II escorts you
on a tour of tonight's
best celestial objects
at your viewing location.
Fig. 45: The Autostar II Universe: The six primary categories listed in the Select Item menu
of Autostar II.
It is important to understand that menu selections are set in a loop (Fig. 44). This means
that pressing the Scroll Down key cycles down through all the available options within a
given category, then returns to the first option. The Scroll Up key cycles up through the
options in the opposite order. Note that this capability is a quick way to get to an option
that is near the bottom of the list. The following example demonstrates this capability.
Fig. 43: Menus set in a loop.
Select Item
Objects
Event
Guided Tour
Glossary
Utilities
Setup
Example:
To navigate to the “Select Item: Setup” menu option when the “Select Item: Object”
menu is displayed:
1.
Press the Scroll Down key five times or the Scroll Up key once.
The screen in Fig. 44a displays two lines of information. The top line shows the current menu, "Select Item." The second line displays an option within that menu,
"Object."
Fig. 44a: The menu displays on the
top line and Menu options display
on the second line. Use the Scroll
keys to move up or down through the
list of options. Press ENTER to
select the desired option.
Objects
Solar System
Constellations
Deep Sky
Star
Satellite
User Objects
etc.
Some options are choices that select the next menu level down. The Scroll keys move
up and down within the list of available options, showing one option at a time. The
example in Fig. 44a shows the Select Item menu with the Object option displayed on
the second line.
When the desired option (Object) is displayed on the second line, press the ENTER
key to choose that option and move down one menu level. In the example, press Enter
and the display now reads "Object: Solar System." You have moved down to the
Object menu level. See Fig. 44b. You can now use the up and down keys to scroll
through the other options available for the Objects menu: Constellations, Deep Sky,
etc.
Press the MODE key to leave a menu level; e.g., the wrong menu option is chosen.
Important Note: No matter how many levels into Autostar II are traveled,
each press of the MODE key moves up a level, until the top level, "Select
Item," is reached. Once in the Select Item level, press MODE to return to
the topmost level, "Select Item: Object."
Autostar II Navigation Exercise
Fig. 44b: Object menu is selected by
pressing ENTER. Use the Scroll
keys to move up or down through the
list of options for the Object menu.
Press ENTER to select the desired
option.
32
To demonstrate how the Autostar II menu structure works, the following exercise calculates Sunset time so an evening observing session can be planned.
To Calculate Sunset time:
1. Press the MODE key several times, until “Select Item: Object” is displayed.
2.
Press the Scroll Down key once to display the “Event” option in the “Select Item”
menu.
3.
Press the ENTER key to choose the "Event" option and move down a level.
"Event: Sunrise" is displayed..
Looking at or near the Sun will cause irreversible damage to your eye. Do not point this telescope at or near the
Sun. Do not look through the telescope as it is moving.
4.
Press the Scroll Down key once to display the "Sunset" option in the Event menu.
5.
Press the ENTER key to choose the "Sunset" option and move down another
level.
6.
Autostar II calculates the Sunset time based on the current date, time, and location. Autostar II then displays the results of the calculation.
7.
Press MODE once to start moving back up through the Autostar II levels. The first
level up is the Event menu.
8.
Press MODE again to move up another level. This is the top level, "Select Item."
9.
Press MODE again to return to the starting point of "Select Item: Object."
Example of Locating a menu
Display
MODE
ENTER
Arrow
keys
As you typically will be using menus after you initialize and align your telescope, this example
will assume you have just completed aligning your scope. AutoStar II displays “Select Item:
Object” after the alignment procedure; this will be our starting point. In this example, we will
locate the “Owner Info” option. See Fig. 45 for the location of the Autostar II keys used in this
example.
1.
2.
3.
4.
Scroll
Up
Scroll
Down
Fig. 45: Some of the features of the
Autostar II handbox.
5.
6.
7.
8.
9.
10.
11.
12.
13.
“Select Item: Object” displays.
As the Owner Info option is in the Setup menu, you will have to use one of the Scroll keys
to navigate through the list of menus. Press the Scroll Down Key. “Select Item: Event” displays
Keep pressing the Scroll Down key. Notice that all the menus display as you press the key:
Guided Tour, Glossary, Utilities, Setup. Stop when “Select Item: Setup” displays. If you press
the Scroll Down key one more time, “Select Item: Object” will display again. This is because
the list of menus or options cycles through each choice over and over again when you press
one of the Scroll keys.
With “Select Item: Setup” displayed, press ENTER. Pressing ENTER selects the menu or
option currently displayed.
“Setup: Align” displays.
Press the Scroll Down key again. “Select Item: Telescope” displays. Press ENTER. Autostar
II will now display all the choices that are available with the Telescope menu.
Continue to press the Scroll Down key until “Setup: Owner Info” displays.
Press ENTER. “Owner Info: Name” displays. Press ENTER again. “Name” displays, with the
second line blank. On this line you may enter your first and last name into Autostar II’s memory.
Press the Up or Down Arrow key. Notice that a letter of the alphabet displays. Continue to
press one of the Arrow keys until the first letter of your name displays.
Use the Right Arrow key to move to the next position so you can choose the second letter
of your name. Continue to use the Arrow keys to enter your full name.
Press ENTER when you are finished. Your name is now entered into AutoStar II’s
memory.
“Owner Info: Name” displays again (if you wish, you can press the Scroll Down key—“Owner
Info: Address” will display and you can enter your address if you wish).
Press MODE and “Setup: Owner Info” displays. Press MODE again. “Select Item: Setup”
displays. MODE allows you to backup and exit through the menu structure.
Navigating Autostar II
Autostar II's menus are organized for quick and easy navigation:
Tip:
When multiple choices
are available within a
menu option, the current
option is usually displayed first and highlighted by a right pointing
arrow (>).
쩦
Press ENTER to go deeper into Autostar II's menu levels.
쩦
Press MODE to move back toward the top menu level.
쩦
Press Number key "1" to engage the Speed mode, and then press Number keys
1 through 9 to change speeds.
쩦
Press Number key "4" to access the Focus menus.
쩦
Press Number key "7" to access the Reticle menu.
쩦
Press the Scroll keys to move up and down through the options or lists.
쩦
Press the Arrow keys to move the cursor across the display.
쩦
Press the Help (?) key to access on-line help.
Looking at or near the Sun will cause irreversible damage to your eye. Do not point this telescope at or near the
Sun. Do not look through the telescope as it is moving.
33
34
Looking at or near the Sun will cause irreversible damage to your eye. Do not point this telescope at or near the
Sun. Do not look through the telescope as it is moving.
Moon
Overview
Landing Sites
Apollo 11
etc.
Craters
Abbot
etc.
Mountains
Mons Bradley
etc.
Mare, Lakes
Lacus Aestatis
etc.
Valley, Rills
Rima Agatharchid
etc.
Select Item
Guided Tour
Tour Objects
Tonight's Best
How Far is far
etc.
• Right Ascension and Declination coordinates
• Altitude and Azimuth coordinates
• Local Time and Local Sidereal Time (LST)
• Timer and Alarm Status
• Date
• Site coordinates
• Battery status
Hold down MODE for two seconds and the
following data displays:
Select Item
Event
Sunrise
Sun Transit
Sunset
Moonrise
Moonset
Moon Phases
Next Full Moon
Next New Moon
Next 1st Qtr
Next 3rd Qtr
Meteor Showers
Quadrantids
etc.
Solar Eclipse
Lunar Eclipse
Autumn Equinox
Vernal Equinox
Winter Solstice
Summer Solstice
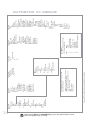
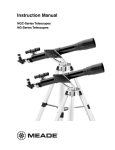
Figure 46: The Complete Autostar II Menu Tree Structure.
Select Item
Object
Solar System
Mercury
Venus
etc.
Moon
Asteroids
Comets
Constellations
Andromeda
etc.
Deep Sky
Named Objects
Galaxies
Nebulas
Planetary Neb.
etc.
Star
Named
SAO Catalog
etc.
Satellite
Select
Add
Delete
Edit
Identify
Browse
Start Search
Edit Parameters
Select Item
Utilities
Balance OTA
OTA Fan
Dew Heater
OTA Temperature
Ambient Temperature
Timer
Set
Start and Stop
Eyepiece Calc
Field of View
Magnification
Suggest
Brightest Star
Brightness Adjust.
Contrast Adjust.
Panel Light
Aux. Port Power
Beep
Temperature
Battery Alarm
Sleep Scope
Park Scope
Key
1
2
3
4
5
6
7
8
9
Menu
Speed
Caldwell catalog (C)
Messier catalog (M)
Focus
Solar System (SS)
Star library
Reticle (RET)
Index catalog
New General catalog (NGC)
Hot Buttons
Press the following keys to display
the corresponding menu:
Select Item
Glossary
A
Accretion Disk
etc.
B
C
etc.
Select Item
Setup
Align
Easy
One-Star
Two-Star
Align on Home
Telescope
Telescope Model
Collimation
Max Past Meridian
Focal Length
Max Slew Rate
Park Position
Calibrate Home
Anti-Backlash
Train Drive
Tracking Rate
Guiding Rate
Dec Guiding
North and South
Off
North Only
South Only
Reverse L/R
Reverse U/D
Home Sensors
GPS Alignment
RA PEC
High Precision
Targets
Astronomical
Terrestrial
Date
Time
GPS-UTC Offset
Smart Mount
Configuration
Off
On
Train
Load
Save As
Delete
Erase
Owner Info
Clone
Download
Statistics
Reset
AUTOSTAR II's MENUS
Object Menu
Almost all observing with Autostar II is performed using the Object menu category.
(Note: Exceptions include Guided Tour and Landmark Survey.)
Autostar II contains many libraries of viewable objects, such as stars, planets, comets,
nebulae and so forth. When one of these objects is selected from a library, Autostar II
moves your telescope (if properly aligned) and points it at the selected object. Six of the
most popular libraries can be accessed directly using the hot buttons.
The Object Menu options include:
Solar System: A library of the eight planets (Earth is not included) in order out from
the Sun, followed by the Moon, asteroids, and comets (Number key "5").
Constellation: A library of all 88 Northern and Southern Hemisphere constellations.
When this menu option is chosen and a constellation name appears on the first line
of the screen, press GO TO and the telescope goes to the center of the constellation
and will display coordinates. Then, use the Scroll keys to cycle through the list of the
most significant stars in the constellation. Then it will display deep space objects and
so forth in the constellation.
Deep Sky: A library of objects outside our Solar System such as nebulae, star clusters, galaxies, and quasars.
Star: A catalog of stars listed in different categories such as named, double, variable,
or nearby. Also included are the Hipparcos, SAO, HD, and HR catalogs. The Star catalog may also be accessed directly by pressing Number key "6."
Satellite: A library of Earth-orbiting objects such as the International Space Station,
the Hubble Space Telescope, Global Positioning System (GPS) satellites, and geosynchronous orbit satellites.
Other Catalogs are accessed directly using the Autostar II "hot keys": Caldwell (key
"2"), Messier catalog ("3"), Solar System ("5"), IC ("8"), and NGC ("9").
To slew the telescope to catalog objects:
Enter the catalog number of the object using the Number keys and then press ENTER.
For example: To slew to NGC 6720, press Number Key "9," then using the Number
keys, enter the digits "6-7-2-0." Then press ENTER.
Autostar II displays the common name and alternate names of the object, if available.
Press one of the Scroll keys to display some or all of the following information about
that object: Type of object (galaxy, nebula, etc.), Dec. and R.A. coordinates, constellation it is located within, magnitude, size, distance, and star-type classification, if the
object is a star. If further information is available, it displays as scrolling text.
Press GO TO. The telescope, if aligned, will slew to that chosen object. Press MODE
repeatedly to return to previous menu levels.
User Objects: Allows the user to define and store in memory deep-sky objects of specific interest that are not currently in the Autostar II libraries. See CREATING USER
OBJECTS, page 42, for more information.
Identify: An exciting feature for an observer who wants to scan the night sky and start
exploring. After the telescope has been properly aligned, use the Autostar II Arrow
keys to move about in the sky. Then follow this procedure:
Important Note: Only use the Arrow keys to move the telescope during
the Identify procedure. Do not loosen the telescope locks or move the
base or alignment is lost.
1.
When a desired object is visible in the eyepiece, keep pressing MODE until the
“Select Item: Object” menu is displayed. Press ENTER to select this menu.
2.
Scroll through the Object menu options until the “Object: Identify” screen appears.
3.
Press ENTER. Autostar II searches the libraries for the identity of the object being
observed.
4.
If the telescope is not directly on an Autostar II library object, the nearest library
object is located and displayed on the screen. Press GO TO and the telescope
slews to that object.
Looking at or near the Sun will cause irreversible damage to your eye. Do not point this telescope at or near the
Sun. Do not look through the telescope as it is moving.
35
Browse: Allows you to search the library for objects with certain parameters, much
like a search engine. "Edit Parameters" lets you set various parameters for the search,
such as: Object Type, Minimum Elevation, Largest, etc. Once you have set the parameters of the search, select "Start Search" and press ENTER. Autostar II will display the
results of the search.
Event Menu
The Event menu provides access to dates and times of astronomical events. The
Event database includes:
Sunrise, Sun Transit, and Sunset: Calculate the time of Sun rise, Sun transit, or Sun
set on the current date. Find rise and set times for other dates by entering a new date
into the “Setup: Date” menu.
Moonrise, Moon Transit, and Moonset: Calculate the time of Moon rise, Moon transit, or Moon set on the current date. Find rise and set times for other dates by entering a new date into the “Setup: Date” menu.
Moon Phases: Displays the date and time of the next Full, New, 1st Quarter, and 3rd
Quarter Moon.
Meteor Showers: Provides information on upcoming meteor showers, such as the
Perseids, the Leonids, etc. Also lists the dates of the showers and when they reach
maximum.
Note: Meteors are fast moving objects that cover large areas of the sky and
are usually best observed with the naked eye.
Solar Eclipse: Lists upcoming Solar Eclipses, including the date and type (total,
annular, or partial) of eclipse. Use the Scroll Up and Down keys to display the available data. This option is dependent on your location.
Lunar Eclipse: Lists upcoming Lunar Eclipses, including the date and type (total, partial, penumbral) of eclipse. Use the Scroll Up and Down keys to display the available data.
Min. (Minimum) of Algol: Displays the minimum brightness of the dramatic eclipsing
binary star system, Algol. It is relatively close at a distance of 100 light years. Every
2.8 days during a 10-hour period, Algol undergoes a major change in apparent magnitude as one of the two stars passes behind the other. The combined magnitude of
the two stars thus dips from +2.1 to a minimum of +3.4 halfway through the eclipse as
the second star is hidden. Autostar II calculates minimum magnitude time at mideclipse.
Autumn and Vernal Equinox: Calculate the time and date of the fall or spring equinox of the current year.
Winter and Summer Solstice: Calculate the time and date of the winter or summer
solstice of the current year.
Glossary Menu
The Glossary menu provides an alphabetical listing of definitions and descriptions for
common astronomical terms and Autostar II functions. Access directly through the
Glossary menu or through hypertext words embedded in Autostar II. A hypertext word
is any word in [brackets], usually found when using the Autostar II Help function or
when reading a scrolling message such as a description of a planet or star. Press
ENTER whenever a hypertext word is on screen and Autostar II goes to the glossary
entry for that word.
To access directly from within the Glossary menu, use the Scroll keys to scroll through
the alphabet. Press ENTER on the desired letter. Scroll to the desired entry and then
press ENTER to read the description.
Utilities Menu
The Utilities menu provides access to several extra features within Autostar II, including a countdown timer and an alarm. The Utilities functions include:
Balance OTA: Use while you're balancing the OTA (see pages 22 - 23 for complete
procedure). Allows to balance on both axes.
36
Looking at or near the Sun will cause irreversible damage to your eye. Do not point this telescope at or near the
Sun. Do not look through the telescope as it is moving.
OTA Fan: Allows you to turn the fan off or on if you have an MAX-ACF model. The fan
assists with the stabilization of the optics. The fan should be activated at the beginning of an observing session and run until the optics have achieved an equilibrium
with the environment. Fan operation time should range from about 5 to 25 minutes.
Note that the fan may introduce a slight vibration and this may cause noticeable movement observed with sensitive optics.
Dew Heater: Allows you to adjust heater level, setting from 0 to 100.
OTA Temperature: Provides a temperature reading at the edge of the corrector plate.
Ambient Temperature: Provides a temperature reading at the fork arm.
Timer: Selects a countdown timer. This feature is useful for functions such as
astrophotography and tracking satellites. To use the Timer, press ENTER, then
choose “Set” or “Start/Stop."
쩦
Set: Enter the time to be counted down, in hours, minutes, and seconds, then press
ENTER.
쩦
Start/Stop: Activates the timer set previously. Use the Scroll keys to toggle between
ON and OFF. When ON is displayed, press ENTER to activate the timer. When the
timer runs out, four beeps sound and the timer is deactivated.
Alarm: Selects a time for an alarm signal to sound as a reminder. To use the Alarm,
press ENTER, then choose "Set" or "Start/Stop."
쩦
Set: Enter the time of day for the alarm to sound, in hours, minutes, and seconds,
then press ENTER.
쩦
Start/Stop: Activates the alarm set previously. Use the Scroll keys to toggle
between ON and OFF. When ON is displayed, press ENTER to activate the
alarm. When the alarm time arrives, Autostar II beeps. Press ENTER to deactivate the alarm.
Eyepiece Calc: Calculates information about an eyepiece for the specific telescope
to which Autostar II is connected.
쩦
Field of View: Scroll through a list of available eyepieces. When an eyepiece is
selected, the field of view is calculated.
쩦
Magnification: Scroll through a list of available eyepieces. When an eyepiece is
selected, the magnification is calculated.
쩦
Suggest: Autostar II calculates and suggests the best eyepiece for viewing,
based on the telescope and the object being viewed.
Brightest Star: Gives you a choice of Autostar displaying "CTR Bright Star" or identifying the star by name during alignment.
Tip:
The Contrast Adjustment
feature is usually only
required in very cold
weather.
If you adjust the contrast so
that you can no longer
read the display, turn off
the power and turn it on
again. When Version
appears on the display (the
initial display screens are
not affected by the
Contrast control), press
MODE.
Contrast Adj: Adjusts the contrast of the display using the Scroll keys. When complete,
press ENTER.
Panel Light: Allows you to turn off LED panel light.
Aux Port Power: Allows you turn off and on the 12vDC OUT power port.
Beep: Turns the beep alerts on or off.
Temperature: Gives a temperature reading of the ambient air. This reading is not always
available.
Sleep Scope: A power saving option that shuts down Autostar II and the telescope
without forgetting its alignment. With "Sleep Scope" selected, press ENTER to activate the Sleep function. Autostar II goes dark, but the internal clock keeps running.
Press any key, except ENTER, to re-activate Autostar II and the telescope.
Park Scope: Designed for a telescope that is not moved between observing sessions.
Align the telescope one time, then use this function to park the telescope. The next
time it is powered up, pressing ENTER causes the telescope to move to its predetermined Park position. Once parked, the screen prompts to turn off power.
Important Note: When the "Park Scope" option is chosen and the display
Looking at or near the Sun will cause irreversible damage to your eye. Do not point this telescope at or near the
Sun. Do not look through the telescope as it is moving.
37
prompts you to turn off the telescope's power, Autostar II is unable to be
returned to operation without turning the power off and then back on.
Setup Menu
There are numerous other features available within the Setup menu, including:
Align: Let's you choose a method of alignment.
Align on Home: If Calibrate Home has been performed, power up your telescope and
select this menu to return the previously calibrated home position. In other words, the
telescope is fully aligned according to the setting that were stored in Autostar II's
memory during the Calibrate Home procedure. See CALIBRATE HOME, below, for
more information.
Telescope: Accesses several options, including:
쩦
Telescope Model: Allows you to select the type of OTA mounted on Max.
쩦
Collimate: Allows you use the Arrow keys to collimate the telescope. See pages
28 - 29 for more details.
쩦
Align OTA: Allows you to align the OTA properly if you are not using an MAXACF model or if you have changed your MAX-ACF collimation or mounting significantly from the factory defaults. When you select this menu, Autostar will ask
you to center two stars in the telescope that are on opposite sides of the sky.
Once you have centered them, the telescope will slew back to the first star. You
will then be asked to center the star using the OTA align bolt. See page 30 for
more information.
쩦
Max Past Meridian: Allows you to set how far the OTA axis can tilt past the
meridian. 2° is the default setting.
쩦
Focal Length: Displays the focal length of the selected telescope.
쩦
Max Slew Rate: Sets the upper limit for the slew rate. 2.4° degrees per second is
the fastest setting.
쩦
Park Position: After aligning your telescope, select this menu and power down
the telescope. The alignment settings—North, time, alignment stars—are stored
in Autostar II's memory and are remembered after you power off the telescope.
When you power on the telescope, "Automatic Alignment" displays after the start
up routine. Press MODE (do not press ENTER). The telescope remembers its
alignment and you can continue viewing or performing other operations without
aligning the telescope again.
Park Position provides two options. Use Current Position uses the last position set
by the user. Default Position places scope in the home position.
38
쩦
Calibrate Home: For permanently mounted telescopes only. After aligning your
telescope, select this menu and the alignment settings—North, time, alignment
stars—are stored in Autostar II's memory and are remembered after you power
off the telescope. You can enable Autostar II to retrieve and automatically align
your telescope using these settings the next time you power up by choosing the
Align on Home menu. This menu helps improve auto alignment.
쩦
Anti-Backlash: This option allows you to change the backlash along either the
R.A. and the Dec. axes by entering a number from 0% to 199%. This sets the backlash in the way the Arrow keys move the telescope along an axis. If you enter a
value near 199%, telescope responds more quickly as you hold down an Arrow
key. If you enter a value near 0%, it takes longer for the tube to respond as you
hold down an Arrow key. Experiment with this option: Try changing the values until
the motion of the telescope (while holding down an Arrow key) feels comfortable
to you.
쩦
Train Drive: All telescopes have a certain amount of "backlash" (looseness in the
interplay of gears). This menu allows you to compensate for the backlash in the
the R.A. and Dec motors—which helps locate objects with more precision.
쩦
Tracking Rate: Changes the speed at which the telescope tracks targets
Looking at or near the Sun will cause irreversible damage to your eye. Do not point this telescope at or near the
Sun. Do not look through the telescope as it is moving.
in the sky.
a.
b.
c.
c.
Sidereal: The default setting for Autostar II; sidereal rate is the standard rate
at which stars move from East to West across the sky due to the rotation of
the Earth.
Lunar: Choose this option to properly track the Moon over long observing
sessions.
Solar: Choose this option when observing the Sun.
Custom: Allows entry of user-defined tracking rates.
Note: Custom Tracking Rate allows you to enter values from -999.999 to 999.999.
The lower the number, the slower the rate; the higher the number the faster the rate.
If you enter -999, the telescope will move so slow as to appear to be stopped. If you
enter 999, the telescope will be moving at approximately twice the tracking rate.
쩦
Guiding Rate: Allows you to change the base slew speed, 1x. Enter a percentage of the speed (less than 100%) and press ENTER. This function may be useful in guiding the telescope during CCD and long-exposure photography. See
SLEW SPEEDS, page 26, for more information.
쩦
Dec Guiding: Allows a user using an autoguider to disengage autoguider inputs.
Allows you to select N & S, North only, South only, and off.
쩦
Reverse L/R: Reverses the functions of the Left and Right Arrow keys for controlling the telescope's motion (i.e., the Right key moves the telescope to the left).
쩦
Reverse U/D: Reverses the functions of the Up and Down Arrow keys for controlling the telescope's motion (i.e., the Up key moves the telescope down).
쩦
Home Sensor: Turns off or on the True North sensor, if preferred, for Easy, OneStar, and Two-Star alignment. The default setting for this menu is "On."
쩦
GPS Alignment: Allows three options. Select "Off" if you wish to align the telescope manually (turns off GPS). Select "On" (default setting) if you wish to automatically align your telescope and want the telescope to get the GPS fix when it
is needed during alignment. Select "At Start Up" if you want the telescope to get
a GPS fix when the telescope is powered up.
쩦
R.A. PEC: Allows you to perform periodic error correction on the R.A. drive worm
gear. Must be performed with a high-power reticle (eg., 9mm). You may restore
the factory default setting by selecting “On.”
쩦
High Precision: If High Precision is turned on, when looking for a faint celestial
object (e.g., a nebula or galaxy), Autostar II first slews to a nearby bright star and
displays "ENTER to Sync." Center the star in the eyepiece, then press ENTER.
At that point the telescope has a high precision alignment to that part of the sky
and it then slews to the object that was originally requested.
Time: Changes the time entered into Autostar II. Setting the correct time is critical for
Autostar II to properly calculate locations and events. Time may be set to "AM," "PM,"
or 24-hour mode (military time). To select the 24-hour mode, press ENTER when the
the "blank" option displays (i.e., neither "AM" nor "PM" is displayed).
Targets: Switches between Astronomical targets and Terrestrial targets. If
"Astronomical" is selected, the telescope tracking motor is activated and any object
you observe in the sky will remain centered in the eyepiece. If "Terrestrial" is selected, the tracking motor is turned off.
Tip:
If the "ENTER to Sync" feature is accessed by mistake
(holding the ENTER key for
more than 2 seconds),
press MODE to return to
the previous screen.
Date: Changes the date used by Autostar II. This function is useful to check events in
the past or future. For example: Set the Date menu for a day three months in the
future. Then check the "Select Item: Event" menu for the Sunset time on that date. See
EVENT MENU, page 35.
Daylight Saving: Enables or disables the Daylight Savings time setting.
Note: Daylight Savings Time may be referred to by different names in various areas of the world. Check local time to verify.
Smart Mount: See page 55 for detailed information.
Looking at or near the Sun will cause irreversible damage to your eye. Do not point this telescope at or near the
Sun. Do not look through the telescope as it is moving.
39
GPS-UTC Offset: Universal Time (UTC) allows you to add leap seconds to its time
calculations, GPS does not. The offset is the number of leap seconds added since the
establishment of GPS.
Site: Site provides access to several options including:
쩦
Select: Displays the currently selected observing site. Use the Scroll keys to cycle
through all available sites (see ADD below). Press ENTER when the site you wish
to select displays. Use this option when you move to a different geographic location.
쩦
Add: Allows you to add new observing sites to the database. Scroll through the list
of Countries/States. Press ENTER when the site you wish to add displays. Then
choose the desired city in the same manner.
However, when the GPS signal is received, the site is normally selected automatically and the site list is updated automatically. Use of this option is not necessary
and is included for the convenience of those users who may wish to enter a site
manually. You may edit the name of a site using the Edit option (see below).
Time Zone
Atlantic
Eastern
Central
Mountain
Pacific
Alaska
Hawaii
Shift
-4 Hours
-5 Hours
-6 Hours
-7 Hours
-8 Hours
-9 Hours
-10 Hours
쩦
Delete: Deletes a stored site from the database.
쩦
Edit: Edits a selected site, including: the name, latitude, longitude, and time zone.
Time Zone refers to the Greenwich Mean Time (GMT) time zone shift. Users West
of Greenwich, England use “-” hours, East of Greenwich use “+” hours. For the
United States, look up the time zone shift in Table 1.
Note: Autostar II compensates for daylight savings time, if selected. See
SETUP MENU: DAYLIGHT SAVING, above.
Owner Info: Accesses the owner information menu, including:
Table 1: Time Zone Shift.
Calculations are for standard
time.
쩦
Name: Users may enter both their first and last names using the Up and Down
Arrow keys to cycle through the alphabet. Use the Right and Left Arrow keys to
move through the text. Press ENTER when the entry is complete.
쩦
Address: Use the Up and Down Arrow keys to enter your street address, city,
state, and zip code. Press ENTER when the entry is complete.
Clone: Uploads information from one Autostar II handbox to another. Three options
are available:
Note:
The Download function
requires the USB cable supplied with the MAX-ACF
telescope. See page 49 for
more information on how to
download.
Important Note:
If your download fails in the
middle of the download
attempt (e.g., your PC
crashes), turn off the telescope. Turn the telescope
back on and as soon the
Autostar II display lights up,
press "999." Then attempt
the download again.
40
쩦
Catalogs: Sends only user-defined object information, such as new satellite
orbits or comet data to another Autostar II handbox.
쩦
Software: Sends only the basic Autostar II software. This is useful if one user has
downloaded a new version of Autostar II software from the Meade website
(www.meade.com) and wants to pass this software along to friends.
쩦
All: Everything—user-defined information and Autostar II software—is sent to
another Autostar II.
Download: Transfers information from another Autostar II. During the operation, the
warning “Downloading Do Not Turn Off” appears.
쩦
Catalogs: Receives only user-defined object information, such as new satellite
orbits or comet data to another Autostar II handbox.
쩦
Software: Receives only the basic Autostar II software. This is useful if one user
has downloaded a new version of Autostar II software from the Meade website
(www.meade.com) and wants to pass this software along to friends.
쩦
All: Everything—user-defined information and Autostar II software—is received
by another Autostar II handbox.
Statistics: Provides basic statistical data about Autostar II, including:
쩦
Characters Free: Displays how much room is available in user-defined object
memory.
쩦
Version: Displays the current version of the Autostar II software.
Looking at or near the Sun will cause irreversible damage to your eye. Do not point this telescope at or near the
Sun. Do not look through the telescope as it is moving.
쩦
Serial Number: Displays the unit's serial number.
Reset: Completely resets Autostar II. Most values entered into the menus revert to
factory defaults. Autostar II requires initialization again after a Reset before proceeding with observations.
"Hot Button" Menus
Two menus, six object libraries and two functions can be accessed directly using the
Number keys (commonly referred to as "hot buttons"). The two functions, the Speed
mode and the Utility light are described earlier in the manual.
Focus Control Menus: Press Number key "4" to select these menus directly from
Autostar II's keypad. Each time you press Focus, the key toggles between focus/focus
speed menus and the preset control menus. When “Focuser: Fast” displays, press the
Up or Down Scroll keys to select a focus speed (fast, medium, slow or fine). When
“Focuser: Position” displays, use the Up or Down Arrow keys to achieve fine focus of
the object.
You can toggle the Focus key to display the “Focuser: Preset” menus. The Focuser
preset menu allows you to assign nine focus positions. If you “park” the telescope, you
can set your own focus, focus for your observing partners and the focus for your camera or imager. Other Preset menus allow you to select a focus you have assigned and
also to Sync on a Focus Preset. The Sync on a Focus Preset allows you retrieve focus
positions when you do not park your telescope. See page 37 for information about
parking your telescope.
Reticle Control Menu: Press Number key "7" to select this menu directly from
Autostar II's keypad. "Reticle Control: Set Intensity" displays. Press ENTER. The
Intensity menu allows you to change the intensity of the Reticle Eyepiece Illuminator.
Use the Scroll keys to change the value. As you change the value, look through the
reticle to note how the Intensity changes.
Note: You may continue to change the values using the Scroll keys (and thus
changing the intensity) until you press ENTER again. This allows you to
experiment with the intensity level until you decide which intensity level
works best for you. This feature operates in the same manner in the Rate
and Duty Cycle menus.
When you have finished adjusting the intensity, press ENTER. Press Number key "7"
again and the Rate menu displays. Press ENTER again. Use the Scroll keys to change
the value of the the rate at which the Reticle Eyepiece blinks. As you change the value,
look through the reticle to note how the Blink Rate changes.
When you have finished adjusting the rate, press ENTER. Next, Press Number key "7"
again and the Duty Cycle menu displays. Press ENTER again. The Duty Cycle menu
controls how long the Reticle Eyepiece Illuminator is on during a blink cycle. Use the
Scroll keys to change the value. As you change the value, look through the reticle to
note how the Duty Cycle changes. When you have decided on a Duty Cycle value,
press ENTER.
To exit the Reticle menu, press MODE once.
Looking at or near the Sun will cause irreversible damage to your eye. Do not point this telescope at or near the
Sun. Do not look through the telescope as it is moving.
41
ADVANCED AUTOSTAR II FEATURES
Before trying out the examples in this section, familiarize yourself with the basic operations of Autostar II described earlier in this manual. The following examples assume
that you have a basic knowledge of Autostar II and understand how to scroll to a
desired menu or menu option, and how to enter numbers and text. It also assumes
that you have initialized and aligned your telescope.
Adding Observing Sites
If you plan to observe using Autostar II at different geographic locations, you can store
observation sites in Autostar II's memory to help simplify your telescope setup.
Perform these procedures using the Site options (Add, Select, Delete, Edit) of the
Setup menu.
To Add a Site to the user-defined site list:
Important Note:
The Site information is
stored in the Site menu. If
you move the telescope
more than 5 miles of your
initial observing location,
Autostar II automatically
determines your location
when it gets a GPS Fix,
and adds the new location
to the Site menu.
In this example, you will choose a city and add it to the database list. You will then
select the site to enable it.
1.
Navigate to the "Setup: Site" menu. Press ENTER,
2.
Scroll through the options until "Site: Add" displays. Press ENTER.
3.
Scroll through the list of countries/states. Press ENTER when the country/state
you wish to add displays.
4.
Scroll through the list of cities. Press ENTER when the city you wish to add displays. The Site is now added to the database. You may add sites using this
method.
5.
To choose a site, navigate to "Setup: Select." Press ENTER. Scroll through the
list of sites. When the desired site displays, press ENTER.
To Edit a Site:
In this procedure, you will enter a location that is not available in the Autostar II database by editing data of a nearby site. You will edit the location's name, latitude, longitude, and the time zone shift. You will then select the site to enable it.
You will need to know the latitude and longitude of your location to perform this procedure.
1.
Using the Add option, choose a site on the list that is closest to your observing
site and press ENTER so that the site is added to your observing sites list.
Choosing a site already on the list (as opposed to using the "Custom" feature)
makes it easier to edit, as the "Time Zone" value may not need to be changed.
2.
Scroll to "Site: Edit" and press ENTER. "Edit: Name" displays. Press ENTER.
3.
The name of the site you have just entered to your list displays; if it does not,
scroll to the site.
4.
Using the Arrow keys, change the name of the site so that it now reads the name
of your observing location. Press ENTER. "Edit: Name" displays again.
5.
Press the Scroll Down key and "Edit: Latitude" displays. Press ENTER.
6.
Using the Number Keys, enter the latitude of your observing site and then press
ENTER. "Edit: Latitude" displays again.
7.
Press the Scroll Down key and "Edit: Longitude" displays. Press ENTER.
8.
Using the Number Keys, enter the longitude of your observing site and then press
ENTER. "Edit: Longitude" displays again.
9.
Press the Scroll Down key and "Edit: Time Zone" displays. Press ENTER. (If the
site you chose from the list in step 1 has the same Time Zone as the site you are
editing, just press ENTER again to go on to the next step.) "Time Zone" refers to
the Greenwich Time Zone shift. Users West of Greenwich, use "-" hours (one hour
per time zone) and users East of Greenwich use "+" hours. For the United States,
look up the shift in TABLE 1, page 39.
10. After entering the shift, press ENTER. "Edit Time Zone" displays.
42
Looking at or near the Sun will cause irreversible damage to your eye. Do not point this telescope at or near the
Sun. Do not look through the telescope as it is moving.
42
11. Press MODE. "Site: Edit" displays.
12. Using the Arrow keys, scroll to "Site: Select." The site you have just edited displays. Press ENTER to select the site.
Creating User Objects
In this procedure, you will enter coordinates of celestial objects that do not appear in
any of the Autostar II libraries.You will enter the object's name and R.A. and Dec. coordinates (required information). You may also enter the object's magnitude and size
(optional information).
Although Autostar II contains an extensive database of celestial objects (stars, nebulae, planets, etc.) that you can observe, you may eventually want to view objects that
are not part of a library. Autostar II provides a feature that allows you to enter an
object's R.A and Dec. coordinates in the "User: Objects" option of the Object menu
and allows automatic slewing of the telescope to the user-entered coordinates.
In order to use this menu option, you first need to look up the R.A and Dec. coordinates of the object or objects you wish to observe. Check your local library, computer
store, or bookstore for astronomy books, CD Roms, or magazines (such as Sky &
Telescope or Astronomy), to find coordinates of celestial objects. The objects/coordinates you enter become part of your own permanent database, called "User Objects."
To enter coordinates of an object into the "User: Objects" option of the Object
menu:
1.
Make sure Autostar II has been initialized and the telescope has been aligned.
2.
After the telescope is aligned, "Select Item: Object" displays. (If necessary, use
the Scroll keys to scroll through the menus, as previously described, to find this
option.) Press ENTER.
3.
"Object: Solar System" displays. Keep pressing the Scroll Up key until "Object:
User Object" displays and press ENTER.
4.
"User Object: Select" displays. Press the Scroll Down key once. "User Object:
Add" displays. Press ENTER.
5.
"Name" displays on the top line and a blinking cursor on the second line. Use the
Arrow keys, as previously described, to enter the name of the object you wish to
add to the database. When you are finished, press ENTER.
6.
"Right Asc.: 00.00.0" displays. Use the Number keys to enter the digits for the
Right Ascension coordinate of your object. When you are finished, press ENTER.
7.
"Declination: +00°.00'" displays. Use the Number keys to enter the digits for the
Declination coordinate of your object. If necessary, use the Scroll Keys to change
"+" to "-." When you are finished, press ENTER.
8.
Autostar II then prompts you to enter the size of the object. This step is optional.
Use the Number keys to enter the size (in arc-minutes), if so desired, and press
ENTER to go to the next display. If you do not wish to enter this information, simply press ENTER.
9.
Autostar II then prompts you to enter the magnitude of the object. This step is also
optional. Use the Number keys to enter this information, if so desired, and press
ENTER to go to the next display. "User Object: Add" displays again.
To GO TO a user-entered object:
In this procedure, you will choose an object from the User Object list and GO TO the
object.
1.
With "User Object: Add" displayed, press the Scroll Up key once. "User Object:
Select" displays. Press ENTER.
2.
Use the Scroll keys (if necessary) to scroll to the desired object. Press ENTER.
3.
The name of the object and the Right Ascension and Declination coordinates display.
4.
Press GO TO and the telescope slews to the object.
Looking at or near the Sun will cause irreversible damage to your eye. Do not point this telescope at or near the
Sun. Do not look through the telescope as it is moving.
43
Observing Satellites
In this procedure, you will prepare your telescope to observe a satellite pass.
1. Navigate to the "Object: Satellite" menu option and press ENTER.
2. Use the Scroll keys to scroll through the list of satellites.
3. Select a satellite from the list and press ENTER.
4. "Calculating...." and then "Tracking..." displays. If the satellite is going to make a
pass, "Located" displays.
5. Use the Scroll keys to display data about the pass: aos—acquisition of signal and
los—loss of signal. If you subtract the aos from the los, you can calculate how
long the satellite will be visible. Location information also displays.
6. "Alarm" displays after the location information. Press ENTER and Autostar II
automatically sets the alarm to sound a minute before the satellite's scheduled
appearance. You may return to regular observations until the alarm goes off.
7. When the alarm goes off, return to the Satellite menu and press a Scroll key until
the desired satellite is on the top line of the display.
8. Press GO TO. Autostar II slews the telescope to where the satellite should
appear. The motor drive stops and a countdown is displayed.
NOTE: If the scheduled appearance position of the satellite is obstructed
(i.e., by a building, tree, or hill), press ENTER and Autostar II starts to
move the telescope along the expected satellite track. When the track
clears the obstruction, press ENTER again to pause the telescope, then
continue with this procedure.
9. With about 20 seconds left on the countdown timer, start watching through the
telescope viewfinder for the satellite to enter the field of view.
10. When the satellite enters the viewfinder field of view, press ENTER. The telescope starts to track with the satellite.
11. Use the Autostar II Arrow keys to center the object in the viewfinder, then look
through the eyepiece to view the object.
Satellite orbits change and new satellites (including the Space Shuttle) are launched.
Visit the Meade website (www.meade.com) approximately once a month to get
updated information and instructions on how to download this data to Autostar II. If
orbital parameters are more than one month old, the satellite pass may not happen at
the time predicted by Autostar II. Downloading requires the USB cable supplied with
your telescope.
Note: Satellite observing is an exciting challenge. Most satellites are in
low orbit, travelling at approximately 17,500 mph. When visible, they move
quickly across the sky and are only in the field of view for a few minutes,
requiring Autostar II to slew the telescope rapidly. Best viewing is near
Sunrise or Sunset when the sky is still dark. Viewing in the middle of the
night can be problematic because a satellite may pass overhead, but not
be visible as it is in the Earth's shadow.
Identify
This procedure allows you to use Autostar II to identify objects you have found in the
night sky using the Arrow keys. If the object is not in Autostar II's database, Autostar
II displays information about an object in its database that is closest to the one you
queried about.
Important Note: For this function to operate properly, you must first initialize and align Autostar II. If you physically move the telescope after initialization, this function will fail to operate properly.
In this procedure, you will center an object you wish to have identified by Autostar II
in the telescope eyepiece and use the "Identify" menu to find out information about
the object or the nearest object to it in the Autostar II database.
1.
44
Center the object you wish to have identified in the telescope's eyepiece.
Looking at or near the Sun will cause irreversible damage to your eye. Do not point this telescope at or near the
Sun. Do not look through the telescope as it is moving.
2.
Navigate to the "Object: Identify" option and press ENTER.
3.
"Searching..." displays. When Autostar II finishes calculating, the name of the
closest object displays.
4.
Press a Scroll key to display information about this object. Autostar II displays
some or all of the following information about the object with each press of a
Scroll key:
Displayed information:
Catalog or common name of object
Type of object
Right Ascension
Declination
Constellation
Magnitude
Size
Scrolling message
Example:
Messier 107, NGC6171, Orion Nebula, etc
Globular Cluster, Nebula, Black Hole, etc.
16:32:4
13°03'
Virgo, Orion, etc.
3
2'
"This Globular Cluster is 10,000 light years
away...."
Browse
This menu allows you to search the libraries for objects with certain parameters, much
like a search engine. "Edit Parameters" lets you set various parameters for the search,
and "Start Search" activates the search. A typical search might be performed as follows:
1.
Select "Browse" from the Object menu. Press ENTER. "Browse: Start Search"
displays.
2.
Press one of the Scroll Keys and "Browse: Edit Parameters" displays. Press
ENTER.
3.
"Edit Parameters: Largest (mins)" displays. "Mins" stands for arc-minutes. Press
ENTER.
4.
"Largest (mins)" and a value displays. Using the Number keys, enter a size in arcminutes. Autostar II will search for objects up to this size and no larger. Press
ENTER.
5.
"Edit Parameters: Largest (mins)" displays again. Press the Scroll Down key. "Edit
Parameters: Smallest (mins)" displays. Enter the value for the smallest size of an
object that Autostar II will search for in the database. Continue with "Brightest,"
Faintest," and "Minimum Elevation," using the procedure described in steps 3 and
4.
6.
After "Minimum Elevation," "Object Type" displays. Press ENTER." "+Black Hole"
displays. If you do not wish to have "Black Holes" in your search, press ENTER
and the "+" changes to a "–." Press the Scroll Down key to scroll to the next item.
"+Diffuse Nebula" displays. Continue to scroll through the list and press ENTER
if you wish to change the "+" to a "–" or vice-versa.
7.
After you have scrolled to the last item on the "Object Type" list, press MODE
twice and the Scroll Down key once. "Browse: Start Search" displays. Press
ENTER. "Start Search: Next" displays. Press ENTER. Autostar II searches the
database and displays the first object that matches the search parameters you
have entered. Use the scroll keys to display information about the object. Press
MODE and "Start Search: Next" displays again. Press ENTER and the next item
matching the parameters displays. Repeat this procedure to display all the
objects. Press GO TO to slew telescope to a displayed object.
8.
Press MODE repeatedly to leave this menu.
Looking at or near the Sun will cause irreversible damage to your eye. Do not point this telescope at or near the
Sun. Do not look through the telescope as it is moving.
45
Alternate Polar Alignments
If you would rather set up your telescope without using automatic alignment, Autostar
II offers alternative alignment methods for equatorial mounting. During the One-Star
and Two-Star alt/az alignment procedures, you will (unlike the Automatic and Easy
alignment procedures) manually place the telescope in the home position.
Initialize Autostar II
Important Note:
If you disable the automatic
alignment/GPS function and
then use the alternate alignments described in this section, you will be prompted to
enter the Time, Date, and
Daylight Savings status.
First, you need to initialize Autostar II.
1. Connect Autostar II to the HBX port of the RA Control Panel (or Dec Control
Panel).
2. Flip the power switch of the RA Control Panel to the ON position.
The Autostar II screen is activated and a copyright message displays briefly.
3.
"Press 0 to Align or Mode for Menu" displays. Press 0.
4.
The telescope will seek the home position. Autostar II initializes the Smart Drive.
The R.A. and Dec. motors operate briefly and "Initializing: Smart Drive" displays.
5. "Automatic Alignment" displays.
You are now ready to align your telescope using one of the alternate polar alignment
procedures.
Two-Star Polar Alignment
Note:
Autostar II locates alignment stars based on the
date, time, and location
entered. The alignment
stars may change from
night to night. All that is
required is for the observer
to center the selected stars
in the eyepiece when
prompted.
Tip:
Try a Spiral Search
The GO TO key also allows
you to perform a "spiral
search." A spiral search is
useful when the telescope
slews to an object, but that
object is not visible in the
eyepiece after the telescope finishes its search.
(This sometimes occurs
during an alignment procedure.) Press GO TO when
the slew is finished and the
telescope starts slewing in
a spiral pattern at a very
slow speed around the
search area. Look through
the eyepiece and when the
object does become visible,
press MODE to stop the
spiral search. Then use the
Arrow keys to center the
object.
46
Two-Star Alignment requires some knowledge of the night sky. Autostar II provides a
library of bright stars and two stars from this library are chosen by the observer for
alignment.
1. Alignment Option Screen. "Align: Automatic" displays.
2. Select Alignment. Press the Scroll keys until "Align: Two Star" displays. Press
ENTER.
3.
Set Home Position. Place the telescope in the home position.
4 . Star Alignment. "Select Star" displays. Autostar II then displays a library of stars
for the observer to choose from. Use the Scroll keys to scroll to a star on the list
that you wish to align upon. Select a star that you can easily locate in the night
sky. Press ENTER.
5.
Center Star. The telescope slews to the star. Use the Arrow keys to move the telescope until the star is centered in the eyepiece. Press ENTER.
6.
Center Star. Repeat procedure for the second alignment star. The telescope is
aligned and you are now ready to use Autostar II's GO TO capabilities for a night
of observing.
Easy Polar Alignment
Easy Alignment is similar to Two-Star Polar Alignment, except it requires no knowledge of the night sky. Autostar II, rather than the user, chooses two stars its library
and merely asks the user to center them in the eyepiece.
One-Star Polar Alignment
One-Star Alignment requires some knowledge of the night sky. Autostar II provides a
library of bright stars. One-Star Alignment is identical to Two-Star Polar: Alignment,
except only one star from the database is chosen by the observer for alignment.
Align on Home
Allows recovery of alignment. Selecting this alignment slews telescope to sensor
home position. It then performs an automatic alignment on the telescope based on a
GPS fix and the home position sensor.
To Download the Latest Version of Autostar II Software
Included with your telescope is a CD ROM and a USB cable. You need to install the
USB drivers, that are included on the CD ROM, BEFORE plugging in the cable:
1
Select MAX-ACF Users (the fourth selection on the list) from the CD Rom.
2
Follow on screen instructions (click “Next” and “Finish” buttons when asked to
do so).
3
Plug in the USB cable. Plug one end into one of the MAX-ACF USB ports on a
Looking at or near the Sun will cause irreversible damage to your eye. Do not point this telescope at or near the
Sun. Do not look through the telescope as it is moving.
computer control panel/ Plug the other end into a USB port of your PC Next,
you will install the Autostar Suite software from the CD ROM. This software provides a menu that allows you to download the latest version of Autostar II
software into the Autostar II handbox.
4.
Select Autostar Suite on the CD ROM to install Autostar Suite onto your PC.
Follow the on-screen instructions.
5.
Once the Autostar Suite software installs, double-click the new “Autostar Suite”
icon on the desktop.
6.
Go to the Telescope menu and select “Update Autostar.” The “Autostar Update”
screen displays. Click the “Upgrade Autostar Software Now” button.
7.
The application detects your telescope type and the version of Autostar software on your handbox.
8.
A window displays asking if you wish to download the latest version of Autostar
from your hard drive (if you previously downloaded it separately from the
Meade website) or from the internet. Select one of the choices and follow
on-screen instructions.
9.
The download will take several minutes (download time depends on your internet connection, speed of your computer and so forth). When the download is
complete, the new version of the Autostar software displays.
Periodic Error Correction
If you wish to perform high-precision astrophotography, you may wish to "train" your
telescope in order to keep objects that you are imaging dead center in the telescope's
field of view during the photographic exposure. Periodic error correction (PEC) helps
to remove the slight perturbations from center that occur due to the mechanical
nature of a telescope. To perform this procedure, you need to use a high-power reticle, such as the 9mm reticle (see OPTIONAL ACCESSORIES, pages 48 - 50). PEC
training is available for both drives.
Train Menu Option
Important Note: The Train option overwrites any previous PEC data.
1. Select "Train" from the RA PEC menu (in the "Setup: Telescope" menu) and press
ENTER.
2. Look through the reticle. Use the Arrow keys to keep the star centered in the reticle
cross-hairs. Autostar II displays a count of the 64 positions of the worm gear. When
the count reaches 64, one cycle is complete. A full cycle takes about 2 minutes.
3. Select "Train" from the R.A. PEC menu (in the "Setup: Telescope" menu) and press
ENTER.
4. Press MODE to exit.
Update Menu Option
Use the Update option to further refine your training; it is recommended that you
update your original training two or three times when first using your telescope.
Update does not overwrite the data, but updates the training using information gathered from both the last and the current training sessions. Press the MODE key to exit
from this option. If you wish to further refine your training, select this menu again and
repeat the procedure.
Erase Menu Option
Select this option to erase all PEC training data.
On and Off Menu Options
Select "On" when you want the telescope to use the training information. Select "Off"
when you do not want for the telescope to use the training information. Select "On" to
enable the Smart Drive.
Looking at or near the Sun will cause irreversible damage to your eye. Do not point this telescope at or near the
Sun. Do not look through the telescope as it is moving.
47
OPTIONAL ACCESSORIES
A wide assortment of professional Meade accessories is available for the MAX-ACF
telescope models. The premium quality of these accessories is well-suited to the quality of the instrument itself. Consult the Meade General Catalog for complete details
on these and other accessories.
Meade Series 4000 Eyepieces:
16” f/8
Power/Actual Field
Eyepiece
20” f/8
Power/Actual Field
Plössl Eyepieces (5 elements; 1.25” O.D., except as noted)
Fig. 46: Series 5000 5 Element
Plossl Eyepieces.
5.5mm (6-elements)
9 mm
14mm
20mm
26mm
32mm (2" O.D.)
40mm (2" O.D.)
591/0.10°
361/0.17°
232/0.26°
63/0.37°
125/0.48°
102/0.59°
81/0.74°
739/0.08°
452/0.13°
290/0.21°
203/0.30°
156/0.38°
127/0.47°
102/0.59°
Super Wide Angle Eyepieces (6-elements; 1.25” O.D., except as noted)
16mm
20mm
24mm
28mm
34mm (2" O.D.)
40mm (2" O.D.)
203/0.33°
163/0.42°
135/0.50°
116/0.41°
96/0.59°
81/0.74°
254/0.27°
203/0.33°
169/0.40°
145/0.47°
120/0.57°
102/0.67°
Ultra Wide Angle Eyepieces (8-elements; 1.25” O.D., except as noted)
Fig. 47: Series 5000 Super Wide
Angle Eyepieces.
Fig. 48: Series 5000 Ultra Wide
Angle Eyepieces.
4.7mm
6.7mm
8.8mm
14mm
18mm
24mm (2” O.D.)
30mm (2” O.D.)
2x
3x
5x
2x
48
865/0.09°
607/0.14°
462/0.18°
290/0.28°
226/0.36°
169/0.49°
135/0.61°
Series 5000 TeleXtenders: An advanced 4-element design flattens the field of view,
and the fully coated lenses deliver the maximum light transmission, the highest contrast and an image free of color fringing. Maintains a comfortable eye relief of longer
focal length eyepieces, while increasing magnification.
Magnification
Fig. 49: Series 5000 TELEXTENDERS.
691/0.12°
485/0.17°
369/0.22°
232/0.35°
181/0.45°
135/0.60°
108/0.76°
Barrel Size
1.25”
1.25
1.25
2.00 (w/1.25” adapter)
# of elements
4
4
4
4
Series 4000 8 - 24mm Zoom Eyepiece: The internal zoom optics of this eyepiece
move on smooth, precisely machined surfaces which maintain optical collimation at
all zoom settings. A scale graduated in 1mm units indicates the zoom focal length in
operation. An excellent addition to any eyepiece set.
Series 4000 Photo-Visual Color Filters: Color filters significantly enhance visual
and photographic image contrast of the Moon and planets. Each filter threads into the
barrel of any Meade 1.25" eyepiece, and into the barrels of virtually all other eyepiece
brands as well. Meade filters are available in 12 colors for lunar and planetary applications, and in Neutral Density as a lunar glare-reduction filter.
Looking at or near the Sun will cause irreversible damage to your eye. Do not point this telescope at or near the
Sun. Do not look through the telescope as it is moving.
Series 4000 Nebular Filters: A modern boon to the city-dwelling deep-space
observer, the interference nebular filter effectively cancels out the effects of most
urban light pollution, while leaving the light of deep-space nebular emissions virtually unattenuated. Meade Series 4000 Nebular Filters utilize the very latest in coating
technology, and are available with threaded cells for eyepieces or for attachment to
the rear cells of Meade Schmidt-Cassegrain models.
Fig. 50: Series 4000 8 - 24mm Zoom
Eyepiece.
Variable Tele-Extender: For eyepiece-projection photography of the Moon and the
planets, a Tele-Extender is required. The Variable Tele-Extender threads onto the
telescope's eyepiece-holder, into which is inserted an eyepiece of typically about
26mm focal length; the 35mm camera body couples to the tele-extender by means of
a T-Mount. The Meade Variable Tele-Extender permits a range of projection images.
#928 45° Erect-Image Diagonal Prism: Diagonal mirrors and prisms result in images
that are correctly oriented up-and-down but reversed left-for-right. For terrestrial
observing a fully correctly oriented telescopic image is desirable; the #928 Diagonal
Prism accomplishes this image correction and places the eyepiece at a convenient
45° viewing angle. The #928 is for use with the 1.25" Eyepiece-Holder.
Fig. 51: #905 Variable Polarizer and
#1A Skylight Filter.
Series 4000 Plössl 9mm Illuminated Reticle Eyepiece: The most advanced commercially-available illuminated reticle eyepiece, the Series 4000 Plössl 9mm model,
powered by an internal battery, includes micrometric x-y positioning controls which
greatly facilitate locking onto the guide star: Turn the finely-threaded controls and
place the reticle’s crossline pattern precisely at the desired position in the field. The
sharp, high-power imaging of the 4-element, multi-coated Plössl optical system is
complemented by a rubber eyecup (foldable for eyeglass wearers) that shuts out distracting stray light from the observer’s eye. The upper (lens) section of the eyepiece
rotates on a fine thread for precise diopter adjustment to the user’s eye. Reticle pattern is a double crossline with two concentric circles.
#62 T-Adapter: The T-Adapter is the basic means of prime-focus photography through
all Meade Schmidt-Cassegrain models. Thread the T-Adapter on to the rear cell of
your telescope, followed by a T-Mount for your 35mm camera, and the camera body
is rigidly coupled to the telescope.
Fig. 52: Illuminated Reticle Eyepiece.
#777 Off-Axis Guider: The Off-Axis Guider provides a means during long-exposure
astrophotography for the photographer to monitor the tracking of the telescope to
assure that the telescope remains precisely positioned on the object being photographed. Like the T-Adapter, the Off-Axis Guider couples the camera body to the
telescope but it also causes a small amount of the guidestar’s incoming light to be
diverted at a right angle, where the star’s position can be examined for tracking errors
with an illuminated reticle eyepiece; position corrections can then be effected using
Autostar II.
Piggyback Brackets (not available for 20" model): Piggyback photography is one
of the most popular and easiest ways to get started in astrophotography. Attach your
35mm camera, with its own 35mm-to-250mm lens, atop your MAX-ACF in equatorial
mode, and guiding the camera through the main telescope, wide-field photos of the
Milky Way of remarkable detail and clarity can be taken.
Dew Shields (not available for 20" model): In moist climates, water particles suspended in the atmosphere may condense on the front surface of the telescope's correcting plate. This dew formation may be inhibited to a significant extent by the addition of a dew shield, essentially an extension tube attaching to the front-cell of the telescope.
Fig. 53: #62 T-Adapter.
#905 Variable Polarizer (1.25"): #1A Skylight Filter: The #905 system includes 2
Polarizer filters mounted in a specially-machined cell, for glare-reduction in observing the Moon. Rotate the thumbscrew at the side of the unit to achieve light transmission between 5% and 25% of its original value. The #905 inserts into the diagonal mirror of the telescope, followed by an eyepiece. The #1A Skylight Filter threads
onto the rear cells of all Meade MAX-ACF models and effectively seals the interior of
the telescope from dust. All other rear cell accessories may then be threaded to the
Looking at or near the Sun will cause irreversible damage to your eye. Do not point this telescope at or near the
Sun. Do not look through the telescope as it is moving.
49
#1A filter. The filter increases visual and photographic contrast, decreases glare, and
helps to penetrate haze.
MAX-ACF AC Wall Adapter: Permits powering from a standard home (115v AC) outlet.
Cigarette Lighter Adapter: Powering the MAX-ACF telescope by means of an automobile cigarette lighter plug.
#644 Flip Mirror System: Has an X/Y adjustment mechanism for the diagonal mirror
with locks for the precise centering, and multiple rotating adapters for T-thread and
1.25” camera attachment. Accepts 1.25” O.D. eyepieces and has a clear aperture of
22mm. Use with small to medium size chip CCD cameras.
#647 Flip Mirror System: Has an X/Y adjustment mechanism for the diagonal mirror
with locks for the precise centering, and multiple rotating adapters for T-thread and
1.25” camera attachment. Accepts 1.25” O.D. and 2.00” eyepieces and has a clear
aperture of 40mm. Use with medium to large size chip CCD cameras. CCD Framing
Ocular: Displays rectangular frame of all popular CCD chip sizes. Inserts directly into
the eyepiece holder or flip mirror. Includes variable LED illumination control and batteries.
Astrometric Eyepiece: A high-precision 3-element achromatic eyepiece for a wide
range of astronomical measurements. Measure double star separations, position
angles, planetary diameters, lunar crater diameters and so forth. Includes variable
LED illumination control and batteries.
Deep Sky Imager: The Deep Sky Imager combines the power of an electronic astronomical imager with the simplicity of a web cam, allowing you to capture deep sky
images on your PC.
Low Latitude Counterweight Kit: This optional feature is necessary if you wish to
use the mount if your site is 0° to 30° away from the equator. Contact your Meade dealer for more information.
Mounting Plate: This optional feature allows you to mount non-MAX-ACF models to
Max. Contact your Meade dealer for more information.
More accessories will soon be available for your MAX-ACF model. To find out more
about these and other accessories available for your telescope, check out the new
Meade General Catalog or contact your local Meade dealer. Also check out Meade’s
latest ads in Sky and Telescope and Astronomy magazine.
Fig. 54: The Deep Sky Imager.
50
Looking at or near the Sun will cause irreversible damage to your eye. Do not point this telescope at or near the
Sun. Do not look through the telescope as it is moving.
MAINTENANCE
MAX-ACF telescopes are precision optical instruments designed to yield a lifetime of
rewarding applications. Given the care and respect due any precision instrument, your
MAX-ACF will rarely, if ever, require factory servicing. Maintenance guidelines include:
a.
Avoid cleaning the telescope’s optics: A little dust on the front surface of the telescope’s correcting lens causes virtually no degradation of image quality and
should not be considered reason to clean the lens.
b.
When absolutely necessary, dust on the front lens should be removed with gentle strokes of a camel hair brush or blown off with an ear syringe (available at any
pharmacy). DO NOT use a commercial photographic lens cleaner.
c.
Organic materials (e.g., fingerprints) on the front lens may be removed with a
solution of 3 parts distilled water to 1 part isopropyl alcohol. You may also add 1
drop of biodegradable dishwashing soap per pint of solution. Use soft, white facial
tissues and make short, gentle strokes. Change tissues often.
Caution: Do not use scented or lotioned tissues or damage could result
to the optics.
d.
Do not, for any reason, remove the correcting plate from its machined housing for
cleaning or other purposes. You will almost certainly not be able to replace the
corrector in its proper rotational orientation and serious degradation of optical
performance will result. Meade Instruments assumes no liability for damage
incurred to the telescope in this way.
e.
If the MAX-ACF is used outdoors on a humid night, water condensation on the
telescope surfaces will probably result. While such condensation does not normally cause any damage to the telescope, it is recommended that the entire telescope be wiped down with a dry cloth before the telescope is packed away. Do
not, however, wipe any of the optical surfaces. Rather, simply allow the telescope
to sit for some time in the warm indoor air, so that the wet optical surfaces can
dry unattended.
f.
Do not leave your MAX-ACF inside a sealed car on a warm summer day; excessive ambient temperatures can damage the telescope’s internal lubrication and
electronic circuitry.
Looking at or near the Sun will cause irreversible damage to your eye. Do not point this telescope at or near the
Sun. Do not look through the telescope as it is moving.
51
TELESCOPE SPECIFICATIONS
Total instrument capacity . . . . . . . . . . . . . . . . . . . . . . . . . . . . .
Aperture . . . . . . . . . . . . . . . . . . . . . . . . . . . . . . . . . . . . . . . . . .
Optical design . . . . . . . . . . . . . . . . . . . . . . . . . . . . . . . . . . . . .
Optical coatings . . . . . . . . . . . . . . . . . . . . . . . . . . . . . . . . . . . .
Mount . . . . . . . . . . . . . . . . . . . . . . . . . . . . . . . . . . . . . . . . . . . .
Gear pitch diameter . . . . . . . . . . . . . . . . . . . . . . . . . . . . . . . . .
Periodic error . . . . . . . . . . . . . . . . . . . . . . . . . . . . . . . . . . . . . .
Latitude . . . . . . . . . . . . . . . . . . . . . . . . . . . . . . . . . . . . . . . . . .
No. of drive gear teeth . . . . . . . . . . . . . . . . . . . . . . . . . . . . . . .
MAX-ACF
Optical Design
Clear Aperture
UHTC™ Coatings Standard
Resolving Power (Dawes Limit)
Focal Length, Focal Ratio
Telescope Mounting
Periodic Error Correction
Both axes
Control Panel
Focus 4-speed front focusing
mechanism
GPS, North sensors included
Pointing Precision
Autostar® II Hand Controller
Alignment
North electronic sensors
Temperature Control
Power
Slew Speeds:
Tracking Rates
Primary, Secondary Mirrors
Correcting Plate/Lens
Adjustable Counterweights
Fixed Counterweights
Accessories
Net Weight
52
500 lbs.
20"
Advanced Coma-Free
UHTC™
Robotic Equatorial
13.625"
2 arc sec.
0-90°
652 (RA & DEC)
Advanced Coma-Free
20"
Ultra-High Transmission Transmission Coatings (UHTC™
.228 arc seconds
4064mm, f/8
MAX Robotic Equatorial Mount
Ten (10) arc seconds (raw); Two (2) arc seconds with PECTOOL
2 multi-function, multi-port panels
included
16-channel GPS receiver (on Mount)
High Precision Mode 1-arc min.
Included (147,541 object database)
Equatorial
Included
Thermal stabilization fan
12VDC, 5amp power supply required
RA and Dec: 0.01x to1.0x sidereal, variable in 0.01x increments; 2x, 8x, 16x, 64x, 128x
sidereal; 1°/sec. to 2°/sec., variable in 0.1° increments All models
Sidereal, lunar, solar or custom-selected from 2000 incremental rates All models
Pyrex® glass, fine-annealed
Borofloat
Requires 3 - 35lb.
Counterweights (included)
Requires 2 - 43lb.
Counterweights (included)
8 x 50mm viewfinder, 2.0" diagonal mirror with 1.25" adapter,
UltraWide 24mm eyepiece.
694 pounds
Looking at or near the Sun will cause irreversible damage to your eye. Do not point this telescope at or near the
Sun. Do not look through the telescope as it is moving.
Weights and Dimension
RA Housing Assembly
Dec Housing Assembly
Counterweight Shaft Assembly
Individual Counterweight
Portable Tripod
Footprint radius: 30 inches
Permanent Pier
Optical Tube Assembly (OTA)
20” MAX-ACF OTA
20" OTA + MAX-ACF + Counterweights
Optional Accessories
Weights
66 pounds
75 pounds
Dimensions
L = 20.75"; W = 18.85"; H = 20.34".
L = 18.25"; W = 15"; H = 20.45".
35 pounds
81 pounds
L = 5.9"; W = 5.9"; H = 2.96".
Height: 26.5 inches;
39 pounds
Minimum Height: 22"; Maximum
Height: ??
Tube Diameter: 11.9"
190 pounds
694 pounds
20 pound Counterweight
Dovetail Instrument mount assembly
L = 40"; W = 25.7"; H = 25.7".
L = 40"; W = 25.7"; H = 99.67".
Advanced Autostar II System Specifications
Processors ........................................................10 processors arranged in a Distributed
Intelligent Network Architecture to
facilitate parallel task management
(U.S. Patent 6,304,376)
Flash Memory ............................................4 MB, reloadable
Database......................................................180,000 objects
Drive Control ................................................Smart Mount, plus
185-speeds on both axes
Autostar II Handbox Specifications
Keypad ........................................................20 key alphanumeric
Display ........................................................2 line, 16 character LCD
Backlight ......................................................Red LED
Utility Light ..................................................Yes
Coil Cord ......................................................24"
Length ..........................................................6.56" (16.6cm)
Width (LCD end) ..........................................3.19" (80cm)
Width (Connector end) ................................2.25" (57cm)
Depth ..........................................................0.81" (21cm)
Autostar II net weight ..................................1.12 lbs (0.51kg)
Meade Consumer Solutions
If you have a question concerning your Max-ACF contact the Meade Instruments Consumer Solutions Department at:
Telephone: (800) 626-3233
Consumer Solutions hours are 8:00 AM to 5:00 PM, Pacific Time, Monday through Friday. In the unlikely event that your MAXACF requires factory servicing or repairs, write or call the Meade Consumer Solutions Department first, before returning the
telescope to the factory, giving full particulars as to the nature of the problem, as well as your name, address, and daytime telephone number. The great majority of servicing issues can be resolved by telephone, avoiding return of the telescope to the factory. If factory service is required, you will be assigned a Return Goods Authorization (RGA) number prior to return.
Looking at or near the Sun will cause irreversible damage to your eye. Do not point this telescope at or near the
Sun. Do not look through the telescope as it is moving.
53
APPENDIX A: LATITUDE CHART
Latitude Chart for Major Cities of the World
To aid in the polar alignment procedure, latitudes of major cities around the world are listed below. To determine the latitude of an observing
site not listed on the chart, locate the city closest to your site. Then follow the procedure below:
Northern hemisphere observers (N): If the site is over 70 miles (110 km) North of the listed city, add one degree for every 70 miles. If the
site is over 70 miles South of the listed city, subtract one degree per 70 miles.
Southern Hemisphere observers (S): If the site is over 70 miles (110 km) North of the listed city, subtract one degree for every 70 miles. If
the site is over 70 miles South of the listed city, add one degree per 70 miles.
NORTH AMERICA
54
SOUTH AMERICA
City
State/Prov./Country Latitude
City
Country
Latitude
Albuquerque
Anchorage
Atlanta
Boston
Calgary
Chicago
Cleveland
Dallas
Denver
Detroit
Honolulu
Jackson
Kansas City
Kenosha
Las Vegas
Little Rock
Los Angeles
Mexico City
Miami
Minneapolis
Nashville
New Orleans
New York
Oklahoma City
Ottawa
Philadelphia
Phoenix
Portland
Salt Lake City
San Antonio
San Diego
San Francisco
Seattle
Washington
EUROPE
New Mexico
Alaska
Georgia
Massachusetts
Alberta
Illinois
Ohio
Texas
Colorado
Michigan
Hawaii
Mississippi
Missouri
Wisconsin
Nevada
Arkansas
California
Mexico
Florida
Minnesota
Tennessee
Louisiana
New York
Oklahoma
Ontario
Pennsylvania
Arizona
Oregon
Utah
Texas
California
California
Washington
District of Columbia
35°
61°
34°
42°
51°
42°
41°
33°
40°
42°
21°
32°
39°
45°
36°
35°
34°
19°
26°
45°
36°
30°
41°
35°
45°
40°
33°
46°
41°
29°
33°
38°
47°
39°
Bogotá
São Paulo
Buenos Aires
Montevideo
Santiago
Caracas
ASIA
Colombia
Brazil
Argentina
Uruguay
Chile
Venezuela
4° N
23° S
35° S
35° S
34° S
10° N
City
Country
Latitude
Beijing
Hong Kong
Seoul
Taipei
Tokyo
Sapporo
Bombay
Calcutta
Hanoi
Jedda
AFRICA
China
China
South Korea
Taiwan
Japan
Japan
India
India
Vietnam
Saudi Arabia
40°
23°
37°
25°
36°
43°
19°
22°
21°
21°
City
Country
Latitude
City
Country
Latitude
Amsterdam
Athens
Bern
Copenhagen
Dublin
Frankfurt
Glasgow
Helsinki
Lisbon
London
Madrid
Oslo
Paris
Rome
Stockholm
Vienna
Warsaw
Netherlands
Greece
Switzerland
Denmark
Ireland
Germany
Scotland
Finland
Portugal
England
Spain
Norway
France
Italy
Sweden
Austria
Poland
52°
38°
47°
56°
53°
50°
56°
60°
39°
51°
40°
60°
49°
42°
59°
48°
52°
N
N
N
N
N
N
N
N
N
N
N
N
N
N
N
N
N
N
N
N
N
N
N
N
N
N
N
N
N
N
N
N
N
N
N
N
N
N
N
N
N
N
N
N
N
N
N
N
N
N
N
N
N
N
N
N
N
N
N
N
N
Cairo
Egypt
Cape Town
South Africa
Rabat
Morocco
Tunis
Tunisia
Windhoek
Namibia
AUSTRALIA AND OCEANIA
30°
34°
34°
37°
23°
City
State/Country
Latitude
Adelaide
Brisbane
Canberra
Alice Springs
Hobart
Perth
Sydney
Melbourne
Auckland
South Australia
Queensland
New South Wales
Northern Territory
Tasmania
Western Australia
New South Wales
Victoria
New Zealand
35°
27°
35°
24°
43°
32°
34°
38°
37°
Looking at or near the Sun will cause irreversible damage to your eye. Do not point this telescope at or near the
Sun. Do not look through the telescope as it is moving.
N
S
N
N
S
S
S
S
S
S
S
S
S
S
APPENDIX B: THE MOON
The Moon option of the Object menu allows you to observe the moon in a way never
possible before. You will be able locate many specific features of the lunar surface,
including hundreds of craters, mare, valleys, and mountains. One special feature
allows you to view all six Apollo landing sites. While you won't be able to see details
such as any of the lunar landers or lunar excursion modules left behind by the astronauts (the best earth-based telescopes can only resolve features of about a half-mile
across), you'll be able pinpoint the landing sites and study the terrain surrounding
these sites.
When Autostar II syncs to a lunar feature, the telescope switches to Selenographic
coordinates, i.e., lunar latitude and longitude.
To observe the Apollo 15 landing site using the Moon option:
1. Initialize and align the telescope system as previously described.
2. Press "5" on the Autostar II keypad. "Solar System: Mercury" displays.
3. Press a Scroll key until "Solar System: Moon" displays. Press ENTER.
4. "Moon: Overview" displays. Press GO TO. The telescope slews to the Moon.
5. With "Moon: Overview" on Autostar II's display, use the Scroll keys to browse
through the menus options. Five categories of features are available: Landing
Sites, Craters, Mountains, Mare and Lakes, and Valleys and Rills.
6. Select a distinct lunar crater with which you are familiar, such as Copernicus or
Kepler, from the Craters option and press ENTER.
7. Then press GO TO to slew to that feature. Center the feature in the eyepiece
and hold down ENTER for more than two seconds to ENTER TO SYNC. The
telescope is now synced to Selenographic coordinates.
8. Press MODE twice to return to the features list. Press a Scroll key until "Moon:
Landing Sites" displays.
9. Press ENTER. "Landing Sites: Apollo 11" displays.
10. Press a Scroll key until "Landing Sites: Apollo 15" displays.
11. Press GO TO. The telescope slews to the Apollo 15 site.
12. Press MODE to return to the previous menu option. Continue to press MODE to
exit this menu.
Use this method to find other lunar features and points of interest. When you have
selected a feature, press the "?" key or use the Scroll keys to display detailed information about the feature. Press MODE to return to the menu options.
Kepler
Copernicus
Tycho
Figure 56: Some easily recognized lunar craters.
Looking at or near the Sun will cause irreversible damage to your eye. Do not point this telescope at or near the
Sun. Do not look through the telescope as it is moving.
55
APPENDIX C: Smart Mount
Introduction
Smart Mount improves the pointing accuracy of your MAX-ACF telescope's "Go to"
system. Despite careful efforts to calibrate and align telescopes, they may fail to
precisely center objects. Smart Mount allows your telescope to learn about, and then
correct for, any systematic pointing errors, regardless of the cause.
Because training your mount takes some time, we recommend that it be primarily
used on permanently mounted instruments or when imaging requires very accurate
pointing. Once Smart Mount training has been performed, the scope will benefit from
it so long as you carefully park the telescope at the end of each session and do not
modify the mounting.
For portable instruments, we recommend training Smart Mount each time you set up
your telescope to insure best results.
We recommend that you use an illuminated reticle during the training procedure. An
illuminated reticle allows you to precisely center celestial objects in a telescope’s
eyepiece. The more precisely you center objects during Smart Mount training, the
more pointing precision your telescope will be able to achieve.
Operation
The Smart Mount feature is located in the Autostar II Setup menu.
In order to use Smart Mount, create a model that allows Smart Mount to improve your
telescope's accuracy. This is normally done by training Smart Mount. Once training
has been completed, you will save your model. Autostar II allows you to save
several models under different names. This allows you to, for example, save one
model for a heavy imaging camera configuration on a permanently aligned scope, and
another when you have a lighter load on the mount.
Training
In order to obtain solid, repeatable results, perform the following procedures before
you create a model:
•
Auto align
•
Drift align
•
Collimate
•
Align OTA
•
Calibrate Home
•
Then train both the RA and Dec training calibration
Once you have calibrated and aligned your telescope, if you wish to start a new
model, go to the Smart Mount main menu. Locate and select "Erase" to clear the
current model. Next, proceed with the steps below:
Note: If you do not erase the current model, the training session will refine
the current model.
•
Locate “Train” in the Smart Mount Configuration menu and press enter.
•
The telescope will select and slew to several (over 40) stars.
•
When requested to do so, carefully center each star and then press ENTER.
If you find that you cannot see a star because there is an obstruction blocking your
view:
•
Press MODE briefly to skip this star. Another star will be chosen.
To exit the training sequence before it is completed:
•
Press and hold MODE for about two seconds and then release it.
When you have completed training:
56
Looking at or near the Sun will cause irreversible damage to your eye. Do not point this telescope at or near the
Sun. Do not look through the telescope as it is moving.
•
Save your model, using a good, descriptive name, using the “Save As” menu.
Upon completion of the training, Smart Mount is enabled and remains on until
you choose “Off” from the Smart Mount Configuration menu.
Permanently Mounted Scopes
For permanently mounted telescopes, it is not necessary to have more than one
model unless the weight and balance of auxiliary equipment introduces balance or
flexure changes that significantly affect pointing. The best practice is to train the Smart
Mount and then run a couple of sessions with Update enabled. Thereafter, simply
leave Smart Mount On as the installation default.
Other Menus Options
Save As and Load
The Smart Mount system allows you to save several models you have created (see
TRAINING on the previous page) using the Save As command. Choose which model
will be the "Current Model” using the Load command.
Update
The Update mode allows you to update training for the current model you have
enabled. You will sync on several stars as previously described, which will further
refine the pointing of your telescope. Save your model after running in update mode,
otherwise the update will be lost when the telescope is powered off.
On
Load a model from memory (see SAVE AS AND LOAD above) and then Select Smart
On. When Smart Mount is "On," the telescope will use the currently loaded model to
refine your telescope's pointing, but will not update the model (see SMART MOUNT
UPDATE above). If Smart Mount was "On" when you last powered off your telescope, it
will be "On" when you start the next session.
Off
When Smart Mount is "Off," the telescope will not use any model you have created to
refine pointing accuracy.
Erase
The Erase command clears the Current Smart Mount table values to allow a new
model to be created.
Delete
The Delete command allows you to delete any model from memory. To delete a
model, just scroll through the names and select the model to you wish to delete and
press ENTER.You will be asked to confirm your choice. Press ENTER again and it will
be removed from memory.
Looking at or near the Sun will cause irreversible damage to your eye. Do not point this telescope at or near the
Sun. Do not look through the telescope as it is moving.
57
APPENDIX D: How to
Read the Latitude Scale
Introduction
As Max needs to be polar aligned, you will need to set the latitude scale for you latitude range. The Latitude scale has three sets of measurements, one for each latitude
range: 0 to 30°, 30° to 60° and 60 to 90°. Note that there are five extra degrees beyond
both 0 and 90°. This allows you to add for latitudes just slightly below 0 and just slightly above 90 degrees. For instructions as to how to set up the pedestal (or wedge) for
you latitude range, see step 8, page 15.
A short tick marks on the scale represents one-half degree, a long tick marks represents one degree. Line up your latitude with the indicator line at the edge of scale.
Count the longer
tick marks down to
the indicator
Line up your
latitude with
the indicator
In the example above, lets say you have chosen the latitude range of 30 to 60
degrees. This is the middle set of numbers (30, 40, 50 and 60). Count the number of
longer tick marks from 40 down to the indicator. Always count from the set of numbers closest to the indicator. As there are four longer ticks down to the indicator, the
scale reads 44 degrees. If you had chosen the 0 to 30 degree range, the scale
reads 14 degrees. Additionally, if you chosen the 60 to 90 degree range, the scale
reads 74 degrees.
58
Looking at or near the Sun will cause irreversible damage to your eye. Do not point this telescope at or near the
Sun. Do not look through the telescope as it is moving.
MEADE LIMITED WARRANTY
Every Meade telescope, spotting scope, and telescope accessory is warranted by Meade Instruments Corporation (“Meade”)
to be free of defects in materials and workmanship for a period of ONE YEAR from the date of original purchase in the U.S.A.
and Canada. Meade will repair or replace a product, or part thereof, found by Meade to be defective, provided the defective
part is returned to Meade, freight-prepaid, with proof of purchase. This warranty applies to the original purchaser only and is
non-transferable. Meade products purchased outside North America are not included in this warranty, but are covered under
separate warranties issued by Meade international distributors.
RGA Number Required: Prior to the return of any product or part, a Return Goods Authorization (RGA) number must be
obtained from Meade by writing, or calling (800) 626-3233. Each returned part or product must include a written statement
detailing the nature of the claimed defect, as well as the owner’s name, address, and phone number.
This warranty is not valid in cases where the product has been abused or mishandled, where unauthorized repairs have been
attempted or performed, or where depreciation of the product is due to normal wear-and-tear. Meade specifically disclaims
special, indirect, or consequential damages or lost profit which may result from a breach of this warranty. Any implied warranties
which cannot be disclaimed are hereby limited to a term of one year from the date of original retail purchase.
This warranty gives you specific rights. You may have other rights which vary from state to state.
Meade reserves the right to change product specifications or to discontinue products without notice.
This warranty supercedes all previous Meade product warranties.
27 Hubble, Irvine, California 92618
(800) 626-3233 www.meade.com
14-7753-00 8/06 REVB