1
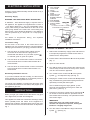
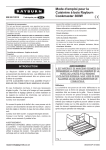
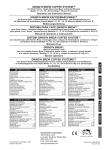
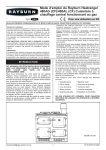
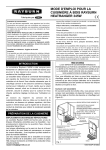
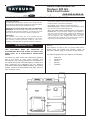
Users Instructions for
Rayburn 200 G/L
Gas-Fired Cooker
FOR USE IN GB & IE
PLEASE READ THESE INSTRUCTIONS BEFORE USING THIS APPLIANCE
Consumer Protection
As responsible manufacturers we take care to make sure that
our products are designed and constructed to meet the required
safety standards when properly installed and used.
of the listed materials could be interpreted as being injurious to
health and safety, see below for information.
Fire cement – when handling use disposable gloves.
Glues and Sealants – exercise caution - if these are still in liquid
form use face mask and disposable gloves.
IMPORTANT NOTICE: PLEASE READ THE ACCOMPANYING
WARRANTY. Any alteration that is not approved by AGA, could
invalidate the approval of the appliance, the warranty and could
also infringe the current issue of the statutory requirements.
Glass Yarn, Mineral Wool, Insulation Pads, Ceramic Fibre,
Kerosene Oil – may be harmful if inhaled, may be irritating to
skin, eyes, nose and throat. When handling avoid inhaling and
contact with skin or eyes. Use disposable gloves, face masks
and eye protection. After handling wash hands and other
exposed parts. When disposing of the product reduce dust with
water spray, ensure that parts are securely wrapped.
IMPORTANT:
This appliance could contain any of the materials that are
indicated. It is the Users/Installers responsibility to ensure that
the necessary personal protective clothing is worn when
handling, where applicable, the pertinent parts that contain any
An optional programmer can be set to operate your
Rayburn.
Your Rayburn is easy to use. To get the best from it,
please read this leaflet and carefully follow the
instructions before using your Rayburn for the first time.
INTRODUCTION
THIS APPLIANCE MUST BE INSTALLED IN
ACCORDANCE WITH THE RULES IN FORCE AND
USED ONLY IN A SUFFICIENTLY VENTILATED
SPACE.
You will find supplied with your Rayburn the following:-
The cooker you have chosen has a well known pedigree
and is the result of many years evolution and
development. The cooking performance and features of
the popular and proven solid fuel Rayburn cookers have
been preserved and integrated into the Rayburn
Cookmaster 200 G/L GAS FIRED COOKER. The cooking
facilities consist of a heat-graduated hot plate, cast iron
main and lower ovens.
[email protected]
1
2
1
1
1
1
solid shelf
grid shelves
meat tin
grill rack
cookbook
01/10 EOPI 510975
A
B
ELECTRICAL INSTALLATION
C
D
Checks to ensure electrical safety should carried out by a
competent person.
E
F
Electricity Supply
WARNING: THIS APPLIANCE MUST BE EARTHED.
G
H
J
A 220/240V ~ 50Hz electrical supply is required near to
the appliance. The appliance is supplied with a 0.75m2 3
- core 85ÞC rated PVC x 3m long replaceable power
supply cable having a label attached to the end of the
cable giving details of the cable core colour-coding and
their function, which should be adhered to. The appliance
must be protected by a 3 amp fuse if a 13 amp plug is
used.
OUTER DOOR
GAS CONTROL
VALVE KNOB
PIEZO
THERMOSTAT
KNOB
SERVICE COCK
SIGHT GLASS
BURNER VIEWING
WINDOW
MAIN BURNER
PILOT BURNER
MANUAL RESET
BUTTON
B - HOLD IN TO LIGHT - TURN
CLOCKWISE TO EXTINGUISH
GAS
CONTROL
VALVE
For details of Programmer Wiring, see separate
Installation Instructions.
To connect a Plug
As the colour of the wires in the mains lead of this
appliance may not correspond with the coloured markings
identifying the terminals in your plug, proceed as follows:-
Fig. 1
LIGHTING THE BURNER - SEE FIG. 1
1. The wire which is coloured green-yellow must be
connected to the terminal in the plug which is
marked with the letter E or by the earth symbol
or coloured green or green and yellow.
1. Switch OFF the electricity supply at the wall socket or
if the optional programmer is fitted ensure that it is
switched to the OFF position.
2. Ensure that the thermostat knob D is at the O position
(Fig. 1).
2. The wire which is coloured blue must be connected
to the terminal which is marked with the letter N or
coloured black.
3. Open the outer door A.
3. The wire which is coloured brown must be connected
to the terminal which is marked with the letter L or
coloured red.
4. Turn ON the service cock E (below the cooker burner
control valve) so that the line of the top of the service
cock E is in line with the pipework.
Gas Safety Installation and Use
5. Turn cooker burner control knob B to the ignition
symbol
and depress it fully (see Fig. 2).
In your own interests and that of safety, it is the law that
all gas appliances are installed by a competent person in
accordance with the Regulations in force.
6. Keeping the cooker burner control knob B depressed
fully, simultaneously press Piezo spark generator C
repeatedly until the pilot flame lights.
The whole gas installation, including the gas meter shall
be inspected and tested for soundness, and purged up to
the appliance gas cock.
This is visible through the sight glass F. (A few
seconds must be allowed for the gas to reach the
pilot burner). (See Fig. 1).
INSTRUCTIONS
7. Continue to hold down cooker burner control knob B
for at least 15 seconds after the pilot flame has lit,
then release the knob slowly. The pilot flame should
then remain alight.
When you light your cooker for the first time it may give
out a slight odour, this will soon disappear.
This appliance is fitted with combustion discharge safety
device (CDSD) which will switch off the appliance in
adverse flue conditions, therefore before turning the main
burners ensure that the manual reset button is depressed.
Fig. 1.
IMPORTANT
If the flame does not remain alight, wait 3
minutes and repeat the sequence, holding the
knobs for a slightly longer time.
8. Turn the cooker control B to the large main flame
symbol
(See Fig. 2).
2
9. Turn on electricity supply and if the optional
programmer is fitted set it to ‘Continuous’.
If the programmer is not in use turn the thermostat knob
D to number 9 setting in the morning to increase the
hotplate temperature and minimise the time to boil a
kettle. Then turn to the setting required.
10. Turn the thermostat knob D to MAX (9) and check that
the main burner flame has lit.
THE OVENS
Both the ovens are made of thick cast iron and are
indirectly heated.
11. Close the outer door A.
12. Select the setting of thermostat D to suit your needs.
Main Oven
This oven is thermostatically controlled by the thermostat
knob D (see Fig. 1). When the oven reaches the desired
temperature this is maintained by the thermostat.
13. Ensure both hotplate insulating covers are closed
down to conserve heat in the hotplate.
TO TURN OFF COOKER BURNER
As a guide, the numbered settings give the following
approximate oven temperatures and an indication of heatup-time.
LONG PERIODS: SWITCH THE ELECTRICITY OFF AT
THE WALL SOCKET, AND TURN THE COOKER
BURNER CONTROL KNOB B CLOCKWISE UNTIL THE
KNOB SYMBOL O IS IN THE “GAS OFF” POSITION
(See Fig. 2) AND THIS WILL EXTINGUISH THE PILOT
LIGHT. TO RE-LIGHT, FOLLOW THE PROCEDURE
GIVEN UNDER ‘LIGHTING THE BURNER’.
The thermodial temperature on the oven door is the
approximate temperature in the centre of the oven.
NOTE: Due to the varying operating demands on the
cooker the thermostat temperature relative to the
thermostat knob is given as a guide only.
TO USE THE HOT PLATE AND
OVENS
SETTING APPROXIMATE
MAIN OVEN
TEMPERATURE
DO NOT LEAVE THE ROASTING OVEN DOOR OPEN If left open for any length of time over-heating may cause
damage to some components within the appliance.
LOW
To increase the temperature of the hotplate and ovens
turn the thermostat knob D (See Fig. 1) to the required
setting.
2
4
6
8
9
THE HOTPLATE
The single hotplate of your Rayburn is graduated in
temperature, the hottest side is on the left hand side and
cooler over the ovens. Just slide pans to a hotter or cooler
area depending on whether boiling or simmering is
required. The hotplate temperature is also variable,
depending upon the setting used; the higher the setting
the hotter the hotplate.
IDLING
(284-320°F)
(338-374°F)
(383-419°F)
(428-464°F)
(455-491°F)
18 MINS
30 MINS
40 MINS
53 MINS
60 MINS
When the ovens are not required during the day and
overnight, then turn to the LOW (idling) setting to give the
lowest burning rate.
NOTE: When the main oven is at LOW, slow cooking and
meringues can be cooked here.
Made of thick cast iron, the hotplate is ground flat. In order
to ensure perfect contact and even heat distribution it is
recommended that all pans and utensils used have thick
ground bases. Pans should also have tight fitting lids for
greater efficiency.
Lower Oven
The temperature of the cast iron lower oven is dependent
upon the temperature of the main oven. As a guide, it is
around half the temperature of the main oven. This means
it can be used as a cooking oven when the main oven is
at higher temperature i.e. over (200°C) for meringues,
casseroles, milk puddings, etc.
NOTE: Hotplate cooking is quicker when the gas burner
is on high fire. So increase the setting on the thermostat
knob D (see Fig. 1) to increase the temperature of the
hotplate. (This hotplate gains in heat quicker than the
oven).
Best results are obtained if food is brought up to heat
Keep the insulated hotplate covers down when the
hotplate is not being used to conserve heat.
GAS OFF
140-160°C
170-190°C
195-215°C
220-240°C
234-255°C
APPROXIMATE
HEAT UP TIME
FROM LOW
IGNITION
BURNER ON
PRESS DOWN & RETURN
OPERATING POSITIONS FOR GAS CONTROL KNOB ‘B’
3
(either on the hotplate or the main oven) first, then
transferred to the lower oven. (The exception being
meringues).
MAINTENANCE
It is important to have the appliance serviced once a year
by a competent maintenance engineer.
Some examples of items that are suitable for lower oven
temperatures are given below for these times the
thermostat knob D (see Fig. 1) is above setting 6:-
WARNING: IF A GAS LEAK OR FAULT IS SUSPECTED,
TURN OFF THE APPLIANCE AND CONSULT YOUR
LOCAL INSTALLER.
Casseroles:- Bring to boiling point, place on floor of lower
oven for about 21/2 to 3 hours.
Rayburns are designed to be continuous burning
appliances. if left unlit for any amount of time, leave the
doors slightly open to allow circulation.
Rice Pudding:- Bring to boiling point, place in middle of
lower oven for about 2 to 3 hours.
CLEANING
Lemon Meringue Pie:- To cook meringue topping place
completed pie in lower oven for about 13/4 hours.
REMEMBER: BE CAREFUL OF THE HOT APPLIANCE.
Meringues:- Place on baking parchment on the solid
sheet. middle of the lower oven, for about 11/2 to 2 hours.
DO NOT USE A STEAM CLEANER TO CLEAN THIS
COOKER,
When the main oven is at a cooler temperature the lower
oven can be used for warming plates and other dishes
and for keeping food warm.
To keep the vitreous enamelled surface bright and clean,
wipe over daily with a soapy damp cloth, followed by a
polish with a clean dry duster. If milk, fruit juice or anything
containing acid is spilt on the top plate or down the
cooker, be sure to wipe it immediately or the vitreous
enamel may be permanently discoloured. Keep a damp
cloth handy, while cooking to wipe up spills as they occur,
so they do not harden and become more difficult to
remove later. If spills do become baked on, a cream
cleanser can be used. For stubborn deposits a soap
impregnated pad can be carefully used on the vitreous
enamel.
PROGRAMMER (OPTIONAL)
This control is available giving three individual time
settings and an override control. It may be used for the
following:
1. Pre-set morning program to turn cooker to desired
temperature, so that cooker is available for
immediate use on rising.
In the main oven, spills and fat splashes are carbonised
at high temperatures, occasionally brush out with a stiff
brush. The oven door can be removed by cleaning DO
NOT immerse in water. Shelves can be soaked and
cleaned with a cream cleanser.
2. Mid-day or evening timing to suit meal times.
3. Alternative third program setting if needed.
The lower oven can be wiped out with a damp cloth.
Please refer to the separate manual provided for the
programmer for the method of setting up the programmer.
Both insulating covers should be raised and allowed to
cool before cleaning with a soapy damp cloth.
The programmer can be set to give the desired cooking
temperature when you want it, without having to wait for
the warming up period. For example, if you wish to cook
breakfast at 7:30 am, the programmer can be set to give
the required heat up time prior to this. Thus, if it takes 60
minutes to come to the temperature you require, the
programmer will be set to operate at 6:30 am and the
thermostat knob D (see Fig. 1) set to the position you
require the night before. The programmer switches on at
6:30 am and the cooker will commence to warm up. The
‘Time Off’ will need to be set to allow sufficient time for
your cooking period.
Use a wire brush to keep the cast iron hotplate clean.
General cleaning is best carried out when the Rayburn is
cool.
DO NOT USE OVEN CLEANERS, CONTAINING CITRIC
ACID ON ENAMELLED SURFACES.
NOTE: SMOKE/SMELL EMITTED DURING INITIAL
USAGE
Some parts of the cooker have been coated with a light
covering of protective oil. During initial operation of the
cooker, this may cause smoke/smell to be emitted and is
not a fault with the appliance, it is therefore advisable to
open doors and or windows to allow for ventilation. Lift the
lids to prevent staining the linings.
The recommendations for the best use of the appliance
are guidelines only and the respective setting of the
cooker thermostat knob which suits your requirements will
be apparent with experience.
IMPORTANT NOTE: AGA recommend Vitreous Enamel
Association Approved Cleaners for cleaning vitreous
enamelled surfaces of this product.
But they are unsuitable for use on: chrome and stainless
steel components, hand-rails and their brackets.
4
COOKING HINTS
The oven is indirectly heated from outside by hot gases
from the heat source so that no flame or elements within
the oven means full use can be made of the whole
cooking space.
The main oven is slightly hotter towards the top than the
bottom. At a low idling heat the main oven can be used for
long slow cooking such as casseroles, stock, soup,
ratatouille, curries, meringues, crème caramel’s, rice
puddings etc., all of which benefit from the gentle slow
heat, and as the oven is vented into the flue, cooking
smells disappear to the outside.
Alternatively, the lower oven can be used for slow cooking
when the main oven is being used at a high temperature.
One of the many benefits of the cast iron main oven is that
the floor of the oven is hotter than that of a conventional
cooker. No need to bake quiche pastry “blind”, just place
the flan dish on the oven floor for “soggy-free” pastry.
When the oven is hot, the floor of the oven can be used
for shallow frying (a cast iron dish is recommended) with
the added advantage that fat splashes are carbonised, so
cleaning is minimised and frying smells are taken away
through the flue.
For perfect baking results, turn food during cooking.
The top of a hot oven is where grilling takes place. Place
the grill rack in the meat tin arrange food to be grilled on
the grill rack and slide onto the top set of runners of the
main oven.
The thermodial temperature gauge on the main oven door
is a guide to the internal oven temperature. Remember
though. on opening the door the temperature will appear
to drop, do not worry, close the door and after a few
minutes the oven temperature can be read again. Heat is
not lost as quickly from a cast iron oven, as a pressed
metal boxed type, so you can peep at a cake to see how
it is cooking without it sinking.
As you have probably realised, the meat tin supplied with
your Rayburn fits the oven size, hanging directly from the
runners, so leaving the grid shelves free for other dishes.
The oven grid shelves are designed to be non-tilt and
should be fitted with the upstand to the top at the back, so
when pulled forward the shelf cannot come right out.
The solid shelf can be used as a baking sheet or as a heat
deflector. If the oven is too hot or food already in the oven
is beginning to over-brown, slide the solid shelf above the
food. To be effective, this shelf should be stored out of the
oven so that it is used from cold.
NOTE: IT IS NOT ADVISABLE TO PUT VERY WET
CLOTHES ONTO THE HAND RAIL AS THIS MAY
CRAZE THE ENAMEL.
Further accessories (extra meat tins, shelves, solid
shelves are available from your stockist).
5
6
7
For further advice or information contact
your local distributor/stockist
With AGA’s policy of continuous product
improvement, the Company reserves the right to
change specifications and make modifications to
the appliance described at any time.
Manufactured by
AGA
Station Road
Ketley Telford
Shropshire TF1 5AQ
England
www.rayburn-web.co.uk
www.agacookshop.co.uk
www.agalinks.com
8