1
Operator's Manual
I £RRFTSMRWI
Electric
_
Hedge Trimmer
Model
No. 172.79443
CAUTION:
Read, understand
and follow
all Safety Rules and Operating
Instructions
in this manual before using this product.
,WARRANTY
• SAFETY
• ASSEMBLY
• OPERATION
Sears, Roebuck end Co., Hoffmen Estates, IL 60179 U.S.A.
Visit our Craftsman _ website: www.sears.com/craftsman
MAINTENANCE
• PARTS
LIST
i I±1:1II:::l[o]_PIe] _i d:::1_
i_
Warranty ............................................................................................
Page
2
Safety Symbols ...................................................................................
Page
3
Safety Instructions ................................................................................
Page
Unpacking .......................................................................................
Page
11
Description .........................................................................................
Page
12 - 13
Assembly
Page
14
Operation ..............................................................................................
Page
17 * 19
Maintenance .........................................................................................
Page
20 - 21
Accessories ..............................................................................................
Page 22
Parts List ...........................................................................................
Page
]3NO
and Adjustments
YEAR
FULL
..................................................................
WARRANTY
ON
CRAFTSMAN®
HEDGE
does not include
bonnets
or strings.
t{ this Craftsman
applies
for only
product
90 days
expendable
Roebuck
and
such as lamps,
is used far commercial
aT rental
from the date of purchase.
This warranty
gives you specific
which vary from state to state.
Soars,
parts
Co.,
Hoflman
lega_ rights,
and you
Estates,
may
4 ÷ 11
Z_ WARNING:
BE SURE
manual,
including
all safety
"CAUTION",
BEFORE
using
below may result
in electric
17
SYMBOL
MEANING
I _[
CAUTION.
SAFETY
to read and understand
all safety
Instrueflons
in this
alert symbols
such as "DANGER",
"WARNING"
and
this tool. Failure
to follow
art instructions
listed
shock,
fire end/or
serious
personal
injury.
23 - 26
May
be used
in conjunction
with DANGER,
other symbols
or plctographs,
ALERT
SYMBOL:
ladlcefes
WARNING,
OR
STORE
serious
in ury to yourself
or
safety precautions
to reduce
and personal
injury.
to others.
Always
follow
the risk of fire, electric
the
shock
serious
Injury
to yourself
or to others.
Always
follow
safety precautions
to reduce
the risk of fire, electric
and parsons|
injury.
the
shock
batteries,
purposes,
this warranty
also have
other
rights,
IL
injury to yourself
or others
follow
the safety
precautions
electric shock
end personal
or property
to reduce
injury,
damage.
Always
the
fire,
.... risk
It inofpersonal
I1 CAD.,ON
i Eo,,uro.
obey
th,ssafety
warn,ng..Y
1
contains
chemicals
known
I Z_WARNING:
dust
defects
or other Some
reproductive
SAVE
THESE
READ
ALL
i
TRIMMER
tf this Crattsmanproducl
fails due to s defect
in material
or workmanship
within
two years from
the date of purchase,
RETURN
IT TO ANY SEARS
OR OTHER
CRAFTSMAN
OUTLET
tN THE UNITED
STATES
FOR FREE
REPLACEMENT.
This warranty
bits, blades,
The purpose
of safely
symbols
is to attract your attention
to possible
dangers.
The safety
symbols,
end the explanations
with them, desaP/e
your careful
attention
sod
understanding.
The symbol
warnings
DO NOT by themselves
eliminate
any danger.
The instructions
and warnings
they gwe are no subslitutes
for proper accident
prevention
measures
to the State
of California
to cause
created
lawn
and garden
harm. by using
cancer
power
and
tools
birth
]
|
DAMAGE
PREVENTiON
AND
INFORMATION
These inform user of import._nt
information
or other properly
damage
if no! followed
as in the examP4e beLOw:
MESSAGES
and/or instructions
that could lead to equipment
Each message
is preceded
by the word "NOTE:"
INSTRUCTIONS!
NOTE:
are
not followed.
Equipment
INSTRUCTIONS!
and/or
property
damage
may
result
if these
Instructions
,_WARNING:
The operation
of any power tool can result
in foreign
objects
being thrown
into your eyes, which can
result In severe
eye damage.
Before beginning
power tool
operation,
ALWAYS
wear safety
goggles
or safety
glasses
with side shield
and a full-face
shield
when needed. We
recommend
a Wide Vision Safety Mask for use over
eyeglasses
or standard
safety
glasses
with side shield,
available
st Sears Stores or other Craftsman
Outlets,
2
I
PERSONAL
I
cont.
TRIMMER.
before using this power fooL Failure ta follow
all instructions
may result in electric
_ WARNING:
BE SUREpersooa[
to read injury.
and understand
all instructions
In this manual
shock,
fire and/or
serious
If Ihe hedge trimmer
blades jam or get caught on an electrical
cord or wires, DO NOT
TOUCHTHE
BLADE OR ELECTRICAL
CORD OR WIRES FOR ANY REASONI
THE
BLADE COULD
BE ELECTRICALLY
"LIVE"
AND CAUSE
SERIOUS OR FATAL
PERSONAL
INJURY.
I _n
th WARNING:
s too unt
the To
tel avoid
owing mistakes
Instructions
that could
have been
cause read
serious
and understood.
in ury, DO
WORK
AREA
ALWAYS
2.
SAFETY
handle end efficient
too!; if used improperly
or without the due precautioos
it could
become
e dangerous if correctly
tool. For pleasant
safe work,
strictly
comply
L_ WARNING:
used, thisand
electric
hedge ALWAYS
trimmer
is a quick,
easy with
to
the safety rules that are contained
in this manual.
conditions.
DO NOT use in wet or d_mp
DO NOT operate in the presence
of liammsble
creals sparks which may ignite du_t or fumes.
NEVER
bystanders
allow children
4. Children
MUST
6. DO
near the tool.
your toots
use. This trimmer
SAF
L_ WARNING:
L_ DANGER:
BLADE
when
gases,
al a safe distance
Flying
objeels
or dust.
or expose
and master
switches.
at night,
make sure you have
in the area.
2.
STAY ALERT,
3.
DO NOT
Lock tools away when not in
adequate
A moment
lighting.
operation
result
Laceration
Hazard.
power is on.
of any
trimmer
in personal
Keep
hands
can result
injury
in FOREIGN
or property
away from
blades.
damage.
Keep
DRESS
use
watch
tool
warning
what you are
while
will cause
ol inaltengon
properly.
Wear
doing
tired
or under
while
operaling
rubber
Tdmmers
can pick up objects
DO NOT wear loose clothing
moving
pads. Loose
clothing
OBJECTS
ALWAYS
sadhus
personal
in!u_
m'_l
gloves
and
use common
the influence
this tool may
and
sense
of drugs,
result
substantial
when operating
alcohol
in serious
rubber
soled
this toot.
or medication,
personal
footwear
injury.
when
both
such as rocks and send them flying at fasl speeds.
or jewelry. Keep your hair, clothing,
and gloves away from
or long hair can be caught in moving pads.
5. USE SAFETY
EQUIPMENT.
Always wear salary goggles or safety glasses wlth side
shields or full face shield, proper work shoes with rubber non-slip soles, heavy_uly
r, oo-slip rubber gloves and desl mask or respirator and hearing protection.
Hard hal
hands
should
be used for appropriate
conditions.
6. DO NOT overreach.
Keep proper footing
arid balance
balance enables
better cnnlrnI Of the too! in unexpected
WARNINGS
TO AVOID PERSONAL
iNJURY:
• Handle blade _=with cRm
TOOL
• Always keep nne hand on the rear handle and the other hand on the auxiliary
handle to prevent your hands from louchi_} the cuttirg blades.
I
• DO NOT place your fingers or hand between Ihe dual culling blades
position on the blade bar where Ihey could get pinched or old.
HEDGE
working outdoors.
DO NOT operate lawn and garden tools when barefoot
or weadng
open sandals.
Wear long panls and tong sleeves to protect your legs and arms.
E'I"_'
The
YOUR
KNOW your tool. Read Ihe operator's
manual carefully. Learn the electdc trimmer's
applications
and limitations, as well as the specific potantial
hazards related Io this tool.
a trimmer,
4.
ALWAYS
OPERATING
Electric tools
while operating
can iniure anyone
CARE WHEN
te rain.
this tool.
with padk_cks
BEING THROWN,
which can
use proper safe_y equipment.
on handles
liquids,
areas
is not a toy.
NOT ese thmmer
PERSONAL
end visitors
NOT operate
5. CHILDPROOF
USE EXTREME
Fallur_ to heed this DANGER
possible
death.
dangerous
keep
ALWAYS
Release, drop, set-down
the hedge tdmmer in the safest way possible, disconnect
the damaged
electrical cord or wires from the power source if possible. If that is not
possible,
ceil an electrician,
electrical
contractor,
or the power company
for assistance.
NOT plug
SAFETY
avoid
3. ALWAYS
/_ DANGER:
or in any
• NEVER touch, inspecl or service, the blades or hedge trimmer unless the
pigtail power cord is disconnected
from the extension cord and power supply.
USE AND
CARE
at all times.
situations.
Proper
footing
and
SAFETY
operating
this tool. Failure to follow all instructions
L_ WARNING:
BE SURE to read and understand
electric shock, fire end/or serious personal
Injury.
1. DO NOT use the tool if switch does
controlled
with the switch is dangerous
listed below may result
all instructions
before
not turn it "On" or "Off".
and mus! be repaired,
II
in
Any tool thai cannot be
• ALWAYS wear heavy-duty
rubber gloves when you are using the hedge trimmer
and when inspecting the blades for damage or cleaning or lubricating Ihem.
2. DISCONNECT
the plug from the power source before making any adlustments,
changing
accessories
or storing
the tool.
Such preventive safety measures
reduce
risk of slading
Ibe tool accidentally.
• DO NOT use the hedge Irimmer g the cutting bar or blade assembly
or berll. Have the hedge lrimmer serviced at Sears Pads and Repair
3. STORE
idle tools out of the reach of children
and other untrained
persons.
Children
MUST NOT operate
the tool. Tools are dangerous
in the hands of entrained
users.
fs damaged
Service Center.
the
I .......................................................................
,_'I-Id=1i'l
TOOL
4.
USE AND
CARE SAFETY
ELECTRICAL
cont,
6. ALWAYS
iNSPECT
the hedges
bushes,
plantings
wires, pipe, landscape
boards
or ether obstructions
the cuffing
bar oi blades.
4. DO NOT
locations.
and any
serviced
stole tbe hedge trimmer on or adjacent
fo tedilizers
or garden
and garden
chemicals
contain
agents which greatly accelerate
such as the hedge trimmer's
blades
and cuffing
bar.
i
NOTE:
lubrication
IMPORTANT
will shortenLubricate
blade
ELECTRICAL
the and
life
bladesaffectbefore
cullingand operation.
after each
USe.
chemicals.
the corrosion
I
Z_ WARNING:
1
I
f
When
"W-A"
operating
a power tool outside,
ALWA_/S
or <_/V-. lhese cords are rated for outdoor
use an outdoor
use and reduce
ALWAYS
ALWAYS
USE a
WEAR
exlension cord marked
the risk of eleefdc
shock.
fool cords repaired
of Ihe cord location
al a Re_r_
and k_,ep itwe!!
8. DO NOT abuse the cord. NEVER
use the cord to carry the tool by or to pull
the plug from
the outlet. Keep cord away from heat, oil, sharp edges or moving
pads.
Replace
damaged
cords immedialely.
Damaged
cords increase the risk of electric
shock.
rio
not
permit
of plug
when
the outlet.
fingers
installing
to touch
or
i
J
removing
Cubie eta dot
rect_ngulo
puesto
[_ _7_
6
NOT
take
this fool
of fool.
an AWO
(American
Wire
Gauge)
size of a least
a smaller
wire
gauge
size
has
greater
capacity
(14-gauge
wire has more capacity
than 16-gauge
wire;
capacity
than 14-gauge).
When in doubt use the smaller
When
operating
a power
tool outdoors,
marked "W-A"
or "W'.These
cords
are
of electric
hedge
trimmer cord
has (see
a 12-in.
aThis
proper
extension
page Pigtail
7).
Double
operating insulation
this tool. DOES
overhealing
For
Remember,
Dr)!!ble in,_,lJlalio'_ [',] elimii_a!_._ ihe need for ihe three wire grnunded
power
grounded
power
supply svsfeir_.
Applicable
only to C!_,es !_ (dr_',_hte-ineu!afed}
This tool is a double
Insulated
tool.
Z'_ WARNING: when
precautions
and
the
Laboratories
in a loss of powe_
14-gauge
is recommended
for an extension
cord of 25- If. or less in length.
Use 12-gauge
for an extension
of 5O-fl. Extension
cords lOg-it,
or longer are not recommended.
Double Insulated
tools are equipped
with a polarized
plug (one blade is wider than the other).Thls
plug
will fit hl a polarized
outkzt only one way. I! the plug
_ plugged
CAUTION:
be
into
CORDS
Use a proper
extension
cord. ONLY use cords listed by Underwrilers
(UL).
Other extension
cords can cause
a drop in line voltage, resulting
does not fil fLiIly in file rill!air
reverse
lhe plug, If it still does
nol lif. contacf
a q_lified
electrician
to insfal! a polarized
outlet, go net change or alter Ihe plug in any way.
2.
6.
EXTENSION
I
lermlnals
plug from
If operating
an electric
tool in damp locations
Is unavoidable,
Ground
Fault Cimuit Interrupter
to supplv
power to your tool.
electrician's
rubber
gloves and footwear
in damp conditions.
SAFETY
Z_ WARNING:
Ground
Fault Circuit
Interrupter
(GFCI)
protection
should be provided
On the
circuit(s)
or outlet(s)
to be used for hedge
trimmer.
the
the
expose
tools to rain or wet conditions
or use electric tools in wet or damp
Waler entering
an electric fool will increase the risk el electric shock.
7. INSPECT
tool cords for damage.
Have damaqed
Service
Center. 81_ SURE to slay constantly
aware
away from the blades.
1
Ignoring
cont.
5.
that yoc are going fo fdm for Mdden
that could gel caught
in, or damage
i
DO NOT
Fedilizers
of metals,
SAFETY
3. BEFORE
plugging in the tool, BE SURE thai the outlet voltage supplied
is within the
voltage
marked on the tool's data plate. DO NOT use "AC only" rated tools with a DO
power supply.
MAINTAIN
hedge
trimmer
with care. Keep cutting
blades
sharp and clean for best
performance
and to reduce
the risk el (njtlry, leepecf
extension
cord pmiedicatly
and
replace
if damaged.
Keep handles dry, clean and free from oil and grease.
5. CHECK
for misalignment
or binding
of moving
parts,
breakage
of parts,
other condition
lhaf may atlect the Iool's operalion,
If damaged,
have Ihe loci
before using. Many
accidents
are caused
by poody
maintained
too)s.
7.
I1_11:lllll | [I] 1_'ll,]lil
Power
place
Cord
a larger
wire has
usa only with an outdoor
rated for outdoor
use and
number
more
extension
cord
reduce
the risk
shock.
cnrd and
Iools.
that
of normal
than
12-gauge
number,
cord
must
safety
I
}
l
cord so that It will not get caught
on bushes,
hedges,
tree trunks,
Z_ other
Dr
CAUTION:
obstructionsKeep while
the extension
you are working
cord clear
with of the
the trimmer.
work area.
lawnmowere
Position
the
immediately.
Never
use tool with a damaged
cord since touching
the
area WARNING:
Z_
could
cause electrical
Check extension
shock,
resulting
cords
before
in serious
each use.
Injury.If damaged
damaged
replace
_.'f:1_i |'|| _{,,"]J_IIIIJj [t]_'f;Z/I
EXTENSION
The
label
CORDS
on your
tool
!
R.'f,_1=1=ilIt'| I_k"]lll1,1
I[I,]l I [I] __:I_.] =|m_
cont.
may
SAFETY
include
the
following
4.
symbols.
Volts
A ......................................................................
HZ ....................................................................
W .....................................................................
rain ..................................................................
Amps
Hertz
Walls
Minutes
,%.....................................................................
..................................................................
no ....................................................................
Alternating currenl
Direcl currenl
No-load speed
__] ....................................................................
RPM ...................................................
SPM ................................................
Class II conslruclion,
Double
Revolutions
par miaule
Stmk_s
per mir_ute
OPf_
......................................................
/_ ...................................................................
Orbils per minule
Indicales danger, warning
or caution.
It means attenlion!
Your safety is involved.
5,
of this hedge
any electrical
power
switch and
missing,
damaged
remove
the trimmer
plug from the power
source _nd have
or failed parts replacP, d BEFORE
resuming
operation.
3.
When
servicing
a tool, use only identical
replacement
parts. Follow
instructions
in the maintenance
section
of this manual.
Uee of unauthorized
parts nr failure
Io renew maintenance
iestruclions
may create e risk of electric
shor.k or injury.
RULES
DANGER;
Risk
FOR
ELECTRIC
of cut.
Keep
HEDGE
hands
away
Parts end Repair
Center.
Service
could result in n risk of injury,
blades.
Keep
both
2.
3.
CAUTION:
Blades
coast
material
when
after
from blades.
picking
up or
hedge
trimmer
hands
DO NOT grasp
the exposed
holding
the hedge
trimmer.
is turned
this rule will
reduce
lbe
risk of electric
shock,
ALWAYS
fire or serious
or
Keep both Hazard,
hands
Laceration
on
handles
Keep
hands when
sway power
from
8
is on.
blades,
cont.
quickly.
Your
9.
where
trimmer
was
without
and
adequate
lighting.
ALWAYS
make
sure
when
vegelation
is dry.
trimmer
by both
the main
the cord
it can
Ihat
you can
see
edging,
handle
and the
auxiliary
behind
the
trimmer
be cut by the
when
in use.
DO
handle
NEVER,
NOT
place
for
greater
for any
reason,
the cord
over
blade,
I
I
il from the
bower
11,
if hedge trimmer
starts
can cause
injury.
12,
DO NOT OVERREACH,
Keep proper
fooling when taking steps while using
13,
STAY ALERT.
trimmel whorl
14,
ALWAYS
cleaning
15.
MAINTAIN
the trimmer
with care. Follow
instructions
for lubricating
blades.
ALWAYS
inspect
lho hedge trimmer cord and if damaged
have repaired,
and also inspect
extension
cord before each use and replace
if damaged.
16.
KEEP the handle
dry, c_een and free of nil and grease.
Use a dean cloth when cleaning.
DO NOT use solvents,
brake fluids, gasoline,
or other petroleum
products
to clean the
Irimmer.
They can damage
plastic pads.
17,
KEEP guard in place and in good working order,
in place. Keep hands away from culling
blades.
!8.
NEVER
Failure
cutting
injury,
DO NOT carry the lrimmer
by the cord or pull the cord to disconnect
receptacle,
Keep cord away from heat, oil and sharp edges.
DO NOT FORCE
the trimmer.
Do not try to cut more than wha_ the trimmer
is designed
for. DO NOT force the unit through
thick, dense
growth, ff the b_ades slow down,
reduce
your pace.
Trimmer
will do a better job with less chance
of injury when used at Ihe rate
for which il is designed
on
Learn the
related to this tool
Handle
keep
hedge
10.
I
blades
with care.
I _
DANGER:
ONLY
ho_d the
blade
cut when
blades
are moving.
ALWAYS
make sure the trimmer
switch
Is OFF and
trimmer
is UNPLUGGED
when clearing
jammed
material
from blades.
DO NOT
cutting
blades
or
when
picking
or holding
Do
not attempt
to cutting
remove edges
cut material
or hold up
material
to be
the hedge
trimmer.
off.
KNOW
your electric
trimmer.
Read operator's
manes!
carefully.
applications
and limitations,
as well as the specific
potential
haTards
Following
Use trimmer
HEDGE TRIMMERS
how to slop the
hold the exposed
I Z_.WARNING:
handles
when power
is connected
to hedge
trimmer.
DO NOT ATTEMPT
to remove
cut material
or hold material
to be cut when blades
are moving.
Make sure the
trimmer
switch
is off, and the trimmer
is disconnected
from the power
supply
when clearing
jammed
blades
or e=_dting edges
use trimmer
7.
know
in mind. DLJal Safety Trigger
Switches
located
on the rear handle
handle help prevent
accidental
starting.
BOTH tdgger switches
to turn the hedge trimmer On. ONLY one has to be released
to
you are trimming
lhe hedge
TRIMMERS
from
NOT
6, ALWAYS
the
Tool service
maintenance
!
and
centre! and balance.
NEVER
reach in front of lhe safety
guard.
touch thn r:!rt!ing b!ades or any moving
p_rte dudng use.
2.
SAFETY
FOR ELECTRIC
controls
6.
Insulated
trimmer
is missing or should break, bend, or fail in any way;
component
fail to perform
properly:
SHUT
OFF the
should
be performed
at a Sears
performed
by unqualified
persormel
DO
whet
SAFETY
1. If any part
or should
the
designed
with safety
and Ihe front auxiliary
have to be depressed
turn the trimmer
Off.
V .......................................................................
SERVICE
RULES
Know
to vibrate
abnormally,
Watch what you are tloing.
you are tired.
disconnect
or servicing
the Idmmer
it.
from
CHECK
footing
trimmer.
immediately.
Use commor_
power
Excessive
vibration
and balance
at all limes, Be aware el
NEVER
run when using your hedge trimmer,
source
use the guard as a handle. NEVER
hold
to heed Ihis warning
can result in serious
_nee.
when
NEVER
not
DO NOT
in use,
operale
the hedge trimmer
personal
injury.
e_erate
or when you
trimmer
without
by the guard.
the
are
guard
l..'_;_d :li'|l_
SAFETY
l._11;| I{q / [I}_ _.'l_l,}ltl
RULES
FOR
from
ELECTRIC
power
source
HEDGE
20.
ALWAYS
store Ihe trimmer indoors when not in use. It should
high up or locked in a place lhat is out of the reach el children.
21.
ALWAYS
use only the accessories
provided
by or sold by Sears.
accessories
may create a hazardous
siIualion,
22.
ALWAYS
keep
23.
BEFORE
as cords,
using
lights,
24.
If you hi! an object
operating
condition
openings
passing
clear
the
cent.
Disconnect
ver, tilatio,n
BEFORE
TRIMMERS
19.
hedge
trimmer
to another
be slored
person.
in a dry place,
Use of any other
of debris.
this hedge Irimmer,
clear the area to be cuL
wire, or string, which can become
entangled
with the hedge trimmer. CHECK
BEFORE
continuing
to use.
Remove
all objects
such
in the cutting blade.
to be sllre
trimmer
7. ALWAYS
check the tool
olher part that is damaged
properly and perform its
pads, breakage
of parts,
A guard or other pad that
Service
center.
for damaged
parts.
Before further use of the tool, a guard or
should be carefully
checked
Io determine if it will operale
intended funelion.
Check for misalignment
or binding
of moving
and any other condition that may affect the tool's operation.
is damaged
should
be properly
repaired
or replaced at a Sears
8. Keep
hands
blades.
9. Keep
both
COAST
11. DO
use in wel conditions,
in fertilizers,
chromium
herbicides,
pesticides,
from
chemically
treated
Your risk from these exposures
varies,
type of work.To
reduce
your exposure
• Work
• Work
that
ADDITIONAL
in e well-ventilated
RULES
FOR
SAFE
NOT store
trimmer
don'l
overreach.
Oft.
blade bar, cutting
blades,
guard, handles,
power
repaired
at your nearest Sears Service
Center.
plugged
to lnslmet
others who
have these inslrucIions
iiilo power
may use Ihis tool.
also.
cord
or
supply.
RefertothemIrequenlly
andusethem
If someone
borrows
this loci, make
sure
they
and insecticides.
lumber.
depending
upon how
to these chemicals:
often
you do this
equipment,
such as those
to filter
out microscopic
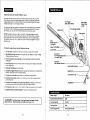
1. The hedge trimmer comes fully assembled
except
for the blade
front auxiliary
handle,
which must both be attached,
dust masks
particles.
2.
Remove the trimmer,
Ior damage.
3.
Do not discard
box
front auxiliary
or packing
malerial
handle
until
and guard
all parts
are
from
guard
the carton
and the
and inspect
them
examined.
OPERATION
I
I
turn
14.SAVE THESE INSTRUCTIONS,
area
with approved
safety
ere specially
designed
NOT
after
12. DO NOT use with damaged
exlension
cord. Have them
is in safe
Some dust particles
created
by lawn and garden
chemicals
krlown
to caos_
cancer, birth
defects
or other
harm. Some
examples
of these chemicals
are:
• Compounds
Arsenic
and
from
on handles;
10. BLADES
13. DO
../_ WARNING:
tecta cor_ta|n
reproductive
away
hands
to follow
all instructions
listed
below may result
in electric
shock,
z_
WARNING:
BE SURE to read and understand
a!l instructions.
serious
personal
iniury.
fire and/or
Failure
I
I
not
in the
Z'_ plug
WARNING:
Fig.
1
trimmer
If any
until
damaged
pert the
of the
hedge
part is repaired
trimmer
is mtssingor replaced.
or damaged,
do
1. Had=
1. Know your power tool. Rend operator's
manual
carefully ..... earn h_ app ..........
ra nn= and
llml a ions, as well as he specific
pe en at hazards; re e ed to hi_ o_. _o owir_g
this rule wii! red!lap ]h# d_k of electric
shock,
fife ar serious
injuq/. I_end Ihis eperaie{'s
manual to any user who borrows
Ihis hedge trimmer.
2. ALWAYS
wear safety
eyeglasses
have only
3. PROTECT
your
lungs.
glasses
or eye shields
impact-resistant
lenses;
Wear
a face mask
when using
this tool. Everyday
they are NOT safety glasses.
o_ dust
mask
it the ope_atior_
4. PROTECT
your hearing.
Wear appropriate
personal
hearing
Under some conditions
noise from this prodIlet
may contribute
5. ALL VISITORS
AND BYSTANDERS
operator
of the Iooi wears.
MUST
wear
the same
6. INSPECT
the tool cords periodically
and If damaged
nearest
Sears Service
Center.
ALWAYS
BE AWARE
salary
2. Front
is dusty.
protection
during
to hearing loss.
equipmenl
have them repaired
of the cord location.
Auxiliary
Handle
use.
that the
at your
4. Blade
10
(
5. Operator's
11
Manual
I
I
...........................................................................................
KNOW
YOUR
ELECTRIC
HEDGE
TRIMMER
(Fig.
2)
Your hedge trimmer has mae, v built-i_
convenience
teatures
for test, efficient
cutting
These features
include
a full length trigger swilch
under the front auxiliary
handle and
a trigger safety switch under the rear handle to prevent
accidenta{
starts.
8oth triggers
must be depressed
t_ turn the hedge trimmer
on.
Your hedge trimmer
has a precision
to a 120-roll,
60 Hz AC ONLYpower
should
always
be used with a GFC!
Front Trigger
Safety Power
Fig. 2
bui)t electric
motor and it should
only be connected
supply
normal
household
curren?
. The trimmer
(Ground
Fault Circuit interrupter)
outlet.
Blade
Front
Guard
RearTrigger
Sefet
Switch
Auxiliary
Handle
DO NOT operate
fftts trimmer
on direct current
(DO). The large voltage
drop wot.dd
caus9 a _oss c4 power and the motor would overheat.
If the trimmer
does not operate
when plugged
into correct
120 volt, 60 ttz AC ONLY outlet,
check the power
supply.
]he trimmer
comes
with a 12-1n pigtail power
cord and must be plugged
into a proper
extension
cord
Blade
Cutting
This
Electric
Amp
HedgeTrimmer
Motor
Has
provides
the
the
t.
4.0
2.
3200 SPM-Strokes
per minute
trimming jobs around
the yard.
3
22-inch
long
cutting
reach.
4.
Dual Cutting
8. fast cutting
5.
Hardened
6
Dual Safety
Trigger
Switches
auxiliary
handle
harp prevent
7
4-Position
Front
8
3-Position
your cutting
Rear
Handle
reach
9.
4-Position
FroP, t Hec_dle
provide
maximum
control
f0.
Cord
11.
Lightweight
Aluminum
Action
act_oe,
Steel
Reteetion
Handle
Features:
to cut branches
(no-load
speed)
up Io 3/d-inch
for fast outliog
Bar
Upper
Cutting
Lower
Blade
Blade
in diameter.
on a variety
Buttons
of hedge
for
Front Handle
Adjustment
(1 on each side)
Bar
minimize
provides
lightweight
vibration
Io reduce
durability
operator
and
extended
fatigue
and
Button for
Rear Handle Extension
provides
Rear
stay
sharp
adjusts
extends
and
and
on 3-position
starting.
on t2-inr:h
Designed
rear handle
to a comforlable
up ta 4-inches
3-Position
np_ra!ing
Z_ DANGER:
blades
with care. Laceration
Keep both Hazard.
hands
Handle
Extension
longer
fecated
accidental
easily
Clip Iterated
Ergonomically
power
Cutting
helps
Blades
Following
Su
Rear
comfort
pigtail
out
oF tt_e motor
and
helps
use and
keep
housing
extension
handling
on
Keep
handles
hands when
away power
from
on 4-position
front
Pigtail
posilion,
Handle
with Moldedqn
with reduced
vibration
cord
for easy
working
Retainer
P!ug
Blades
to extend
Comfort
Grfp
cord conneded,
cornlod
blades,
is on.
Handle
Blade
Length
Speed
(Strokes
22-inches
per Mfoute)
3200
Cutting
Capacity
3/4.taeh
Cutting
Action
Dual
Power
12
Cord
Cord
Requirement
12g-volt,
13
G0 Hertz
AC
Clip
--
z'_
WARNING:
Your hedge
trimmer
should
NEVER
power
source
when you are assembling
parts,
making
blades,
cleaning
or when it is not in use. Disconnecting
prevent
accidental
starting,
which coold
cause
serious
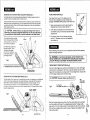
ATTACHING
be connected
to the
adjuslments_
oiling
the trimmer
will
personal
iniury.
The Front
1. Disconnect
WARNING:
To avoid
outlet
injury,
BEFORE
ALWAYS
turn
installing
parts
,.._:,
off and
cleaning
disconnect
the
the
trimm_r-pr
:i,
2.
trimmer
(Fig.
3_ 3a and
The Blade Safety
mu_I be altacl/ed
t, Dist;,onnect
the power
i_
Fig.
3
Fig,3. i!dh
Idmmer
from
FRONT
must
the
AUXILIARY
be attached
power
HANDLE
before
(Fig, 4, 4a and 4b)
use,
supply.
Insert the left side of the handle containing
making
sure both plug blades are properly
(see Fig, 4)
the plug
connected
the trimmer
or
disconnect
the trimmer
I
blades into the motor housing,
into notches {receptaclas)
|
Rotate each lock nut as sbown
in Fig. 4b 1o lock handle
in position.
Check
lock nuts are locked
Ohio the main housing
and that handle
is secure.
CAUTION:
connected,
3b)
Handle
3, Pull handle (bend sSghlly), and iaserl the right side of the handle into the right side
of meier housing
as shown in Fiq, 4a.
n_aking
';_
4.
ATTACHING
THE
BLADE
SAFETY
GUARD
4-POSI33ON
from the power
outlet
BEFORE
installing
parts,
cleaning
I L_
WARNING:
To avoid injury. ALWAYS
turn off and
making
any adjustments.
.'/_-_.CAUTION:
ALWAY5
make
sure you support
the weight
of the hedge
trimmer
by setting
it down on a flat, dry surface
before you assemble
parts,
adjust
handles
or pertorm
maintensnce
on the hedge
trimmer.
from the power
any adjustments.
THE
Auxiliary
the
If the
2 Safety
plug
blades
on the auxiliary
Trigger
Switches
WILL NOT
handle
operate
to ensure
are not properly
as designed.
Guald
before
l[immar
Item
supply.
2, In_ert the blade safety
guard into the slol as
shown
in Fig. 3. m_king
sure it is securely
attached,
Conneel
3. Itse the two screws
inch_ded to altar!t_
the _uard
securely.
NOTE: Before completely
lightening
the
"lock
nuts" down, connect
the hedge
trimmer
to power
supply
to make
sure the safety
trigger
swttch
on th_
auxiliary
handle
is operating
properly
(See
Z_ CAUTION:
17 Fig. B)
Z_WARNING:
When
turning
hedge
trimmer
on make sure blade support
bar and blades
are clear of any
obstructions,
and trimmer
is
securely
held in place.
aotate lock nut
14
Page
Blades
coast
after
turn
off.
I
15
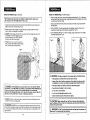
ADJUSTING
THE
Your hedge
plovtde
the
4-POSITION
FRONT
AUXILIARY
HANDLE
tFig.
trimmer's
front auxiliary
handle wil! adjust to 4 different
most con',lo'rtab_e
position
in which to work.
PIGTAIL
5)
preset
positions
to
Press and hold Ihe two buttons on either side of the unit (see Fig 5) and rolate the fronl
hand{e tO the most comfortable
angle.
The front handle wilt click end lock into piece after
you release
the buttons.
Make sure the handle is locked
inlo one the 4 pro-set
positions
before
L=sing the tdmrner
Z_
CAUTION:
power source,
you assemble
ALWAYS
and support
paris,
adjust
make sure you disconnect
hedge
trimmer
from
the
its weighl by setting
if down on a flat, dry surface
before
handles
or perform
maintenance
on hedge
trimmer.
For normal
hePzonlal
or eertlca!
(_de'l c\_ting,
operate
the trimmer
w h he a J_ _l _ R _ p n the
[2} most Iolwald
positions
Use the (2) rea! positions
exlended
reaches.
] hose
4 positions
will provide
you with morn balanced
corltrol when opereling
your hedge trirnr'ne£
For2
r_l
R3nr
/':'-'-_
I
I
elongated
3.
7)
f
place through
clip (Fig. 7).
Fig. 7
_--_.]
Clip,
the
hole.
Plug trimmer's
power
(see Fig. 7). Exleneion
cor(,i r_taioer
CiJp.
cord into extension
cord is now lirmly
cord plug
attached
to
)
for
Before
attempting
to uee any !col,
features
and safety instructions.
HEDGE
TRIMMER
TRIGGER
SAFETY
be sure
to familiarize
yourself
with all the operating
UNTIL
THE MISSING
PARTS
ARE REPLACED.
FAILURE
ANY
ARE INMISSING,
NOT OPERATE
YOUR
COULDPARTS
RESULT
SERIOUS DOPERSONAL
INJURY.
I z_
WARNING:
FOLLOW
THIS RULEIF
one
THE
3-POSITION
REAR
HANDLE
(Fig.
SWITCHES
(Fig.
8)
of the trigger
switches
and the
trimmer
will stop.
6}
Tile rear handle of the trimmer
can he e×tended
out from 1he i'nnk)r housing
inches to extend your cutling
reach. To operate
this feature,
press end hold
button with your thumb and pul! _he rear handle
away from the motor housing
cheese
from 3 preset positi_)ns
the ilandie
wiii click when it is in one of the
{see Fig 6) ,Make s_re handle
is £;,_l:llred and ciinked tn orle o! the 3 preset
using the hedge
[rimmec
eo_lSort
6
POWER
Hp to 4 additional
the extension
You can
positions
positions
before
J
[
z'_
CAUTION:
R ....
ber bled ......
tatter
t ....
ff.]
J
--
Fig,
8
s.fm'y
Rear
Safety Trlgg_"
Fewer Swllel_
I
Po_llion_
t
_'
Note that the ldgger
safety power
switch on the front auxiliary
handle
an e!l three sides under the lop of the u-shaped
auxilim¥
handle.
The
power ewitch on the rear handle
is under the aRt!re
Both switches
ere designed
for convenience,
ease
in all cuttim;J positions,
116
TO
There arc 2 safety tdgger power
swilches
on the handles of your trimmer.
Both tri#ge_swilches
need to be depressed
for the trimmer
to operate.
Depress
and hold the froot
trigger switch and depress
tire rear trigger switch.
To stop hedge trkt',me£
re_ease either
Adjustment Buttons
(Ohm On each Side /
Fig.
(Fig,
2. Fasten
this loop of extension
cord onto the hook oa the
cord retainer
clip (Fig. 7), Pull excess
cord back lhrough
I
Fig. 5
ADJUSTING
CORD
Make a loop of extension
cord and
elongated
hole on the cord retainer
_1
Rear
r,
rotv_rcl
POWER
Your hedge trimmer
has a 12-inch pigtsil poweT eo_d,
This cord must be attached
to a proper extension
cord
(see, page 7, EXTENSION
CORDS),
using the Cord Retainer
Adjustment Button
can be activated
trigger safely
length of the top of the rear handle
of operalion
and handling
comfort
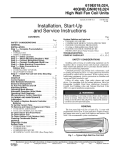
UStNG
I
THETRIMMER
DoOTE:
not place
Always if keep
over
f
Always
balance
(Figs.
the
9,10
power
hedge
and
11)
USING
cord behind
where
it may the
be cut.
hedge
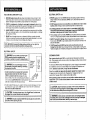
I;old the hedge trimmer firmly with both
and do not overreach
(see Fig. 9)..
hands.
2. Before
cutting
an area, inspect
if first and remove
become
thrown or entangled
in the blades.
3. ALWAYS
hold the hedge trimmer
with one
rear handle and with 1he blade away from
you before lurning it on. NEVER
hold the
trimmer
by the blade safety
guard.
4
hand
trimmer
Maintain
any foreign
on the front
DO NOT try to [tim ior_ much at one l+me
fhis can cal_se the blades
to hind and slow
down,
reducing
the cutting
efficiency.
when
proper
objects
handle
footing
lhat
and
]
in use.
on the
TRIMMER
(Figs,
g, 10 and
11) coot.
new growth, use a wide sweeping
motion (see Fig. !1),
into the culting
blade. A slighl downward
tilt of the blade
the best cutting.
7.
Older growth will
sawing
motion.
8,
LEVEL
HEDGES
- To obtain
exceptionally
level hedges,
stretched
along the edge el the hedges
as a guide
(see
9.
SIDE TRIMMING
HEDGES
- To side4rim
and sweep
upward
(see Fig. 9).
and
could
one
THE
6. When
trimming
are fed directly
of motioa gives
have
thicker
slams
and should
be trimmed
hedges,
begin
using
so the stems
in the direction
a back
a piece el string
Fig. 10).
at the bottom
and forth
can be
of the hedge
/_-
Fig. 9
Z_ WARNING:
•
Read
To help guard
operator's
manuel
against
before
• Always
Check
Front Auxiliary
are adjusted
and Ior¢ked _nto
DANGER:
If the blade
jams on any electrical
cord or line, DO NOT]OUCH
THE BLADE,
IT CAN BECOME
ELECTRICALLY
LiVE AND BE VERY
DANGEROUS.
Continue
to hold your trimmer
by the insulated
handles
and immedialely
disconnecl
the damaged
electrical
cord or line from the power
source,
Failure to
heed this wareing
will result
in serious
or fatal personal
injury.
•
Keep
hands
away
•
Keep
bends
on handles.
• Do not use
in wet
• Do not use
with
• Never
5,
ALWAYS
wear heavy-duty
rubber gloves
hands from thorny or prickly growth
when
trimming;
they will help pretecl
your
from
Immerse
Z_ CAUTION:
Do not
!B
Z_ WARNING:
attachment.
Such
observe
Save
and Rear
securely
behind
the
the following
rules.
manual.
Handle
to make sure they
bt_tore using the trimmer.
blade
safety
guard.
overreach.
conditions.
any
part
extension
cords.
of the
tool
into
after
turn
off,
coasts
near the blades
until they come
trimmer
from power
soume.
Ihick or those ohvieusly
too large to feed into tb_ cutti_g
blade.
U_e the hedge trimmer
non'hal
hedges
Use a
pruning3/4-in
saw (19mm)
to trim
I for
Z_ cutting
CAUTION:
oO NOT and
try shnJhbery
In cut branchonly stems
thathand
are saw
largeror Ihan
large branches
use.
Handle
position
blades,
damaged
Blade
injury, always
each
to e complete
a liquid.
Do not
stop
DO NOT use this hedge
trimmer
usage
might
be hazardous.
19
put your
hands
and
you
have disconnected
anywhere
with any
type of accessory
or
Z_
WARNING:
Your hedge
trimmer
should
NEVER
be connected
power
soured
when you are assembling
parts, making
adjustments,
blades,
cleaning
or when it is not in use. Disconnecting
the trimmer
accidental
starling,
which could
cause serious
personal
injury,
Periodic
maintenance
allows
lot long life and
maintenance
schedule
should
be maintained.
praclice,
follow ttlese recommended
steps:
1. When work has
tile tool !o allow
of obetrucllene.
Clean
3
Keep the me!or _ir np_nings
and s!ore tool in a dry" place.
the tool
with a small
brush.
free
Wipe
Item
|
trouble-free
operation.
A cleaning
and
AS a common
preven'=ive
mainlenance
been completed,
etwe¥_
clean and
smooth
functioning
of the tool over
2.
to the
oiling
will prevent
elf any
oi_ the cutting
b_ades, and clean
time. Also keep the air vents free
moisture
oi1, gru_t._e,
l
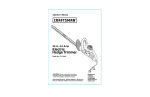
SHARPENING
AND
5. Repeat
the above
nick and sharpened
AND
REMOVING
FROM
THE
BLADES
stems
the tdmmer
from
Ihe power
from
12
trimmer
by setting
it down
in ALWAYS
a vise.
Blade
cont.
(Fig.
12)
and moving
lhe blade
teeth
until you have
removed
the
BLADE
the
power
To avoid
outlet
(Fig_
13)
injury,
BEFORE
ALWAYS
installing
turn
parts,
off and
cleaning
disconnect
the
trimmer
the
trimmer
or making
ad ustments.
I
I
clean and lubricate
the hedge trimmer
be sure tbe unit is turned OFF and
light machine
oil along lhe top edge
____
_.,%,t_
supply,
|
]
I
I
I
some types
of grease
to break
down.To
prevent
damage
to the unit, only use
CAUTION:
lubricants
contain solvents
and wfl| cause
a,4',
premium
machine Some
oil spray-on
on a flat, dry surface
when you are clamping
the
make sure you support
the weight
of the hedge
20
BLADES
_
3. Clamp
the blade supped
cutting
bar assembly
in a vise
and make sure you supper1 the weight of the motor hmlsing
and rear handle
on a flel surface.
File the exposed
cutting
surface
of the damaged
blade tooth wilh an B-inch fine
round file having
a 1/4 or 7/32-lech
diameler.
Be sore to
retain the tooth's original
angle when filing to sharpen
or
to remove nicks.
I Z'_
blade CAUTION:
assembly
process of filing
the tooth.
For efficient
operation
and k_nger blade life, alwaye
b ades be ore and af er eac 1 use. Before lubricating,
unplugged
from lhe power
supply. Apply a premium
of the blade supped
bar (see Fig. 13).
Lower
Cutting'_
wilh the upper
as shown
and disconnec!
the trimmer
from the power
outlet
BEFORE
installing
parts,
cleaning
the trimmer
or
/_
WARNING:
To avoid
injury, ALWAYS
turn off
making
_ny adjustments,
12)
cuain
in Fig, !2, This will allow clearance
for the file between
lhe upper cutting
leelh and the lower teeth,
2. Diseonneel
(Fig.
Fig,
as long as it does eel interfere
wilh lhe movement
el the
blade's
dual action.
Tn remove
nicks or sharpen
the blades,
{OUOW these recomme_ded
steps:
!n come
to a stop
blades
positioned
THE
Or woodchip,_,
any
The culling
blades
are made from high quality,
hardened
sleel and with normal usage. Ihey will not require
re-sharpening.
However,
il you accidentally
hit a wire lence,
siena or brick wall or some other hard objects,
you may put
a nick in the blade.
There is no need to remove
Ihe nick
t. Allow the hedge trimmer
cutting
blades
and lower
FROM
with a soft cloth.
leaves,
LUBRICATINGTHE
NICKS
NICKS
from Ihe vise, connect
to power, restad trimmer
to expose
blade you need to file, stop trimmer,
and disconnect
Irimmer
products,
penetrating
oils, etc,, come in contact
with plastic
parts.
Chemicals
can damage,
weaken
or destroy
plastic
which may result
ia serious
Z_
WARNING:
De net at any time let brake fluids,
gasoline,
petroleum-based
personal
injury.
Z_ WARNING:
SHARPENING
REMOVING
4. Remove
the hedge Irimmer
any other pad of the cutting
from the power
supply.
21
I
I
I L_ CAUTION: Thereare
NO
designed
accessories
WARNING:
your
local
Sears
store
or other
Craftsmen
ouflets
NEED MORE HELP?
- rind
tiffs
and at[ your
Get answers
lroln
, Get a personalized
• Find
use
The use of attachments
or accessories
for this tool might
be dangerous
and could
recommended
Visit
for
in=orrnation
our
other
product
manuals
team
of home
experts,
rnaintenance
and
tnols
tn
plan
help
for
with
your
home
rnanage_home
22
online,
home.
projects.
on your
hedge
that are not
result in serious
or shop
trimmer
I
I
injury.
sears.corn/craftsman.
I
[,_-,]lail_',kl ["_N
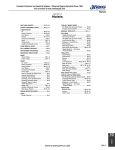
22-in. 4.0 Amp
Electric Hedge Trimmer
Model
22-in. 4.0 Amp
Electric Hedge Trimmer
No. 172.7944.3
Model No. 172.79443
The model number will be found on the eameptate ofthe Hedge Trimmer.
Always mention the model number when requesting pads and service for your too!.
The mode! number wi)}be found on the nameplate of the Hedge Trimmer.
Always menlion the model number when requesting parts and sewice for your tool.
Jlern No.
ftelN°'-
t
3
'_
_
i
GHre0ou2-2GHTSOOU2-1PArls
No.
_t _£ver
L°Jt_
_Part Lobe{
Descriplion
GHT500U2-3
GHTSOOU2
i
_
Left/Right HousingScrew ST3 3x8
4
,_
j
36
37
f
!8
38
39
f03
47
---8-
.....
12
GHT500U2
8
GFITSOOU2-12
13
GHT5OOU2-r3
Sc[ev_ S]3.9xle
2-2
14
15
GHTS00U2-14
GHT500U2-15
Left Lock Gear
Pin4×r8
1
2
....Le.....
" Right Lock Gear
--/
Pala Labor
PortableCord
Tube Sleeve
1
2
Fronl Coverof RearHand_
1
Screw ST2.2x6.5
Brush Holder Ass'y
4
2"
6O
61
65
33
_
29
I
--2-- 2
Fiele
2
4
1
GHTeOOU2-31
_/ Sea-dnoRl,'hl_r¢.nverleX22Xt05
GHTSOOIJ2-33
i
Motor Plastic SupJ_o_
....ion -_--- c;_g65-u_:ion- )=%To;_s_ _
24
--
10
9
I
1
1
62
63
64
L_HTS00U2
NuIM5
ProtectPlele 46011
ProtectCord 5heath
LeftFIex_e Tub_
1
29
2
6
GHT50OU2-60
GHTS00U2-61
GHT500U2-62
Motor Plastic Cover
28
Screw ,M,
SX35
BOHMSX16
FletWasher
1
GHTS0OU2-23
_
t
1
1
4
Steel Plato510
59
20
22
2-
Brash Holder 5X_)t
g!_de SetAss'y
Gear C_e Cover
£_m_ tLS)q 2
GHT50OU2-58
GHT500U2-59
2
2
CarbonGrushSXBX!SFP43S2P
termin_ 48
1
1
1
_
GH] 500U2-56
GHTSOOU2-57
Sr_EEqg
1.0X9 3X21.5
Washer 4.3X/2X1.5
S_:tew M4X12
eaia
GHTS00U2-47
9_11_adr_ 628Z
Gearbox....
Fie1Washe{ &4)_24
56
57
Lock Gear Plate
Revolve Button
GHTSOOU2 27
GH t 500U2=2e
_
-[
GHTS00U2*52
GHT500U2-55
GHTS00U2-19
GHTSOOU2-20
GHT500U2_21
.....
GHTS00U2-25
OHTSuoU2-37
GHT500U2-38
GH] 500U2-39
GHTSOOU2-103
5O
52
55
GHTSOOU2-17
(_H TSOOU2-1 S
26
27
Cry.
_-TT_C
GHTS00U2-48
GHTSOOU2 -49
17
re
24
101
Parl Description
48
49
__..
GHT5OOU2
G HT500U2
No,
GHT5O0U2-35
G,_oou_
_5 ___
]
1
GH]SOO_U2
16 _... Le.C!_p£Jate ...............
21
23
Paris
35
QlY.tl
GH] 500U2-63
GH7500U2-64
GHTS00U2-65
_aJ:L_t,Z_
_66
_7
GHT500U2-67
Al_l_mimJm
Bar 510
i
I
]
_ __
_
Cove_of Rear Hsad_
0_er Steel T_be
2
PushButtOn
1
68
I
69
70
GHTSOOUa-6e
6
71
GHTS00U2-71
1
72
GHT500U2-72
["
Slide BlockFrame
73
GHTSOOU2-73
i
Rod3.2X14
74
GHT500U2-74
__
1
elide Block
G_Oou2-7o.is_,,_o7x_x,_.s
t
Slaotleg Block
25
1
1
/
2
i
2"
FJ,.t;_(,-'3
rll_
22-in. 4.0 Amp
Electric Hedge Trimmer
Model
No. 172.79443
The model number will be found on the nameplate of the Hedge Trimmer.
A_waysmentbr, the model number when requesfin9 pads and service lot your |col.
75
_GH]
Z8
{ (_HTSOOU2-7R
_2-75
PressPlale
84
83
GHTSOOU2-B
GIITS00U2-83
86
GHTS00U2-86
87
GHTSOOU2-87
j
1
Ir_ferna_Ibrown
_----_
_Sfrain
GHT5O0U2-89
90
91
GH_500U2-90
GH] 500U2-91
92
93
94
GH3r 50OU2-a2
GHT50OU2-93
GHTS00U2-94
95
96
GHT500U2-95
GHr5O0U2-g6
97
98
GH75O0U2-97
GHT50OU2-gB
123
424
125
Relief "--
1
1
Ha,Hook
4
Kr_b
--
Snpn_ng
Pin3x16
Push Button el Fronl Handle
.
Connec_,____
2
1-
U_j)e { Front Handle
1
_
1
-- --
Rod
2"" --
--T---
Rel_i_
R,.j_
__. GjI]S0(?U2_lO0
I
-{
Spdng 0,axgxe0
Ba
___ 424
_-
P-_i---_ut_non
ef RearHandle
......88=_OHT_50O_U2_-B88
_
__.100
_90
_"
Prolec{Guard UL
1
ScrewST3.9X13
2
_ S_t:LT59_G.L_
GHT 5P0U2_T 123
___
[ GHT500U2-124
GHTSQOUe-425
Se__appin9 _¢mw_ 9_!3
Tut,.psup_a,_
126
GHT5OOU2
127
GH r500U2-121
128
GHT500U2-129
130
GHTSOOU2
131
GI4T5eou2-131
Connector plu_
132
GHTSOOU2-I32
Slpring0.8XBX_9.5
130
-.
__
4
1;'6
P_,_su]epudcuver
i
Selflappj
s_iew 3.3x8
_
£e_l lapping
_le_ 2_9x13
2
Con_eclirlg W_ring
1
26
1
-
Your
For expert troubleshooting
Home
and home solutions advice:
manage[_
iii i iiii'ii' ,
For repair - in your
home - of all major brand appliances,
lawn and garden equipment,
no matter who made
_ii!iii!ii
For the r_r_l_cRm_n_
owner's
home
www,man_gemyhome,com
manuals
For Sears professional
iiiiiiiU_iiiiiii_and items like garage
or heating and cooling systems,
it, no matter who sold It!
nnrl¢
_PP_QQ_rie_ _nd
that you need
to do-it-yourself.
installation of home appliances
door openers arid water heaters.
1-800-4-MY-HOME ® ca,anytime,
dayornight
(1-S0(]-469-4663)
www.sears.com
(U.S.A. aP,
d Canada)
www.sears.ca
Our Home
For repair of carry-in items like vacuums, lawn equipment,
and electronics, call anytime for the location of the nearest
Sears Parts & Repair Service Center
1-B00-488-1222
(U.S.A.)
www.sears,com
1-800-469-4663
www.sears.ca
To purQ'iase a prr,,iec{ion agreement on a product
1_800-827-6655
(U.SA.)
Para pedir s_rvir',inde rep_
a domicilio, y pare ordenar piezas:
1-888_UJ-IOGAR_
(Canada)
serviced by Sears:
1-800-361-6665
(Canada)
Au C an.ada po.Jr se.,'vice en ._"an,?.ais:
1-800_E-FO_tI_R Mc
(1-80o-533_g37)
© se.a_ Brands.tL¢
® Registered Trademark ! T,_Trademark / _ Service Mark of Sears Brands. LLC
® Marca RegJstrad_ ! TM Marca de F_bric_ ! _ Marca de Se_cio de Sears Brar_s. LLC
_c t_arque de commerce ! MDMarque (_pos_e de Se_rs Srand_. LLC