1
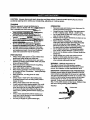
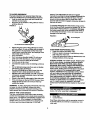
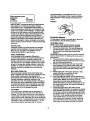
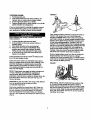
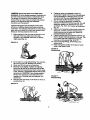
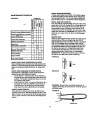
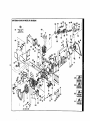
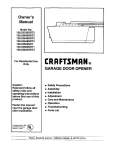
Operator's
Manual
iPROFESSIONAL
i
4.1 HP/2-Cycle
51 ccJ3.15 cu. in.
CHAIN SAW
Model No. 360.352001 - 20-inch Bar
CAUTION:
Before using this product, read this
manual and follow all its Safety
Rules and Operating Instructions.
•
•
•
•
•
•
Safety
Operation
Maintenance
Service & Adjustments
Parts
Espa_ol
Sears, Roebuck and Co., Hoffman Estates, IL 60179 U.S.A.
Visit our Craftsman website: www.sears,com/craftsman
CAUTION: Always disconnect spark plug wire and place where it cannot contact spark piug to prevent
accidental starting when setting up, transporting, adjusting or making repairs.
TRAINING
Read the operator'smanual carefullypriorto
operation.Become familiar with the conll_._a_d I_now
how to operate yourchain sew pmpe_
i"--
,
OPERATION
•
,rt tVi .
•
i
Keep the area of operationclear of_!_ons
•
•
manual.
DOnot atlowcTran
•
•
proper ins_ns,
k,,,.__,,,,O_3Mnt:.._
Do not operate the chain saw ifit hlF._p_
,;
_R
.,,.--..-to operate )_bl_
Z!]
_saw.
•
u,_v_=J.. J=.,.=_o-..,=..y,,.=,n_.'J_v_shave
damage repairedbefore using your chainsaw.
Use only recommendedCraftsman accessories
and replacementparts. Use of non-Craftsman
parts and accessoriesmay be hazardous.
•
•
PREPARATION
,j
• Always wear safety glasses or eye shieldswhen
starting and while using your chainsaw.
•
Dress properly.Do not operate chain saw when
barefoot or wearing open sandals. Wear onlysolid
shoes with good traction.
• Wear long-sleevedclothesthat are snugfitUng.
' Avoid weadng loose clothing.
• Wear either tightlycuffed or cufflesspants.
• Wear headng protectioneven when workingfor a
short pedod of time. Remember - haadng damage
is cumulative.
• Wear protective,non-slipglovesfor safer
operation.
• Always wear a =hardhat" in the workingarea.
Overhead hazards such as falling limbspresent
danger of injury.
•
Alwayswear safety bootswith steel toes.
•
Check fuel tank before starting engine. Do not fill
fuel tank indoors,when the engine is runningor
when the engine is hot. Allow the engine to cool
for several minutesbefore filling the fuel tank.
Clean offany spilledgasoline beforestartingthe
engine.
•
Always make adjustmentsbefore startingyour
chain saw. Never attemptto make adjustments
while the engine is running.
• Use only in daylightor good artificiallight.
•
•
Keep your eyes and mind on your chain saw. Do
not let yourself be distracted.
Always be sure of your footing. Use extra caution
in wet or slipperygrass. WALK - DON'T RUN.
Do not put handsor feet near rotatingparts.Keep
clear of chain at ell times.
Always stop the engine whenever you leave or are
not usingyour chain saw.
Before cleaning, inspecting,or repairingyour
chain saw, stop the engine and make absolutely
sure ell movingparts have stopped. Then
disconnectspark plug wire and keep it away from
the spark plug to prevent accidental starting.
Do not adjustcarburetor. Ovarspeeding engine
may result in engine damage or personal injury.
Do not run the engine indoors.Exhaust fumes are
dangerous.
Never operate your chain sew without proper
guards or other safety devices in place.
Never remove hands from chain saw handles
when activelycutting with the saw.
WARNING: CaliforniaProposition65
The engine exhaust from this productcontains
chemicalsknown to the State of Californiato cause
cancer, birthdefects, or other |:eproductive harm.
KICKBACK CONDITIONS AND PREVENTION
Kickbackoccurswhen the upper quadrant of the bar
nose contacts a solid object in the wood or is pinched,
This type of contact stops the chain for an instant.The
resultis a lightningfast reverse reaction of the chain;
causing the bar to "kick"up end back toward the
operator. Under some circumstancesthe operator
(Fig. I) may suffer severe or fatal injury.Kickbackmay
also occurdudng limbing (See LIMBING).
RGURE 1
Kickback path
3
second. The chain brake can also be engaged
manually by pushingthe lever-handguardtowards the
frontof the saw untila loud click is heard. The saw
shouldnot be run above idle for more than a few
secondswith the brake engaged; otherwise damage to
the saw will occur.
TO AVOID KICKBACK
The best protectionfrom personal injurythat may
resultfrom Kickback is to avoid Kickbacksituations.
•
Hold the chain saw firmlywith beth handsand
maintain a secure grip,
•
Be aware of the location of the guide bar nose at
all times (Fig, 2).
RGURE 2
To properlydisengage the chain brake; firmly pull the
[ever-handguard back towardsthe hand[e (Fig. 3) until
a loud click is heard. Failure to completely disengage
the brake properlywill cause excessive heat build-up
on the brake band which, in turn, can cause severe
damage to the saw body.
Oor_ lettheI_r ¢o_=t _ gmurtd
•
•
•
•
•
•
•
•
•
•
•
Never bdng the nose of the guide bar in contact
with any ob|ect. Do not cut timbswith the nose of
the guide bar. Be especiaUycarefulwith small,
tough limbs, small-size brush, and saplingswhich
may easily catch the chain.
Don't overreach.
Don't cut above shoulder height. Do not use a
chain saw while standingon a tree or [edded
Begin and continuecutting at full throttle.
Cut only one lot at a time.
Use extreme caution when re-entering a previous
,cut.
Do not attempt plunge cuts if you are not familiar
with these_utting techniques.
Be alert of shiftinglog or other forces that may
cause the cut to dose end pinch the chain.
Maintain saw chain properly°Cut with a correctly
sharpened, properly tensioned chain at all times
(Use a 4.5-ram file).
Stand to the side of cuttingpath of the chain saw.
tf the cut ctoses on the bar, STOP the saw. Use a
wedge to free the saw. Do not try to free it by
pullingthe handle.
CUSTOMER
•
•
RESPONSIBILITIES
Read and observethe safety rules.
Followa regular schedule in maintaining, cadng
and using your chain saw.
Followthe instructionsunder the Maintenance and
Storage sectionsof this manual.
•
SPECIAL NOTICE: For users on U.S. Forest Land
end in some states, including California (Public
Resources Code 4442 end 4443), Idaho, Maine,
Minnesota, New Jersey, Oregon and Washington:
Certain intern!!(combustionengines opere.tedon
forest, brush,and/or gress-covered lend in the above
areas are required to be equipped with a spark
arrestor, m_dnt_nedfor the prevention of fire. Check
with your state or localauthoritiesfor regulations
pertaining to these requirements.Failure to follow
these requirementsis a rio|orion of the taw.Thi s unit
Is not faotory-equipped with a spark arrestor;,
however, • spark arrestor is available as an optional
part. If a spark arrestor is required in your area,
contactyour Authorized Service Center for the correct
kit.
WARNING: A dull or improperlysharpened chain may
increase the risk of Kickback.Always cut with a
properly Sharpened saw. improper loweringof the
depth gauges also increases the chance of kickback.
:_.$"1=l_rJl:!ll"
Your new chain saw has been assamb',edat the
factory.No further assembly is necessary.
ABOUT THE CHAIN BRAKE
The main components of the chain brake assembly
are the [ever-handguard and a brake band aroundthe
clutchdrum. The brake is automaticallyengaged when
kickback occurs. When engaged, the brake band
clamps down around the clutch drum, stoppingboth
the drum and the chain in less than 1/10 of one
•
•
o(o]_1 / :1_I I-lo] :uof:1-1 I[O]_
Chain Saw
Combi-Wrench
Read these instructionsand the operating manual in
its entiretybeforeyou attempt to operate your new
chain saw.
4
The followingitems for the operation of your chain saw are available at your nearest Sears store..
• Safety goggles
•
Airfilter
• Hearing protection
,
Fuel Stabilizer
•
Gloves
•
Spark plug
•
2-Cycle air cooled engine oil
• Gas can
KNOW YOUR CHAIN SAW
Read this Operator's Manual and Safety Instructionsbefore operating yourchain saw. Compare the illustrationbelow
(Figure4) with your chain saw to familiarize yourself with the locationof various controlsand adjustments.Save this
manualfor future reference.
14. Half Throttle Pin (Pg. 6)
15. Side Cover
16. Top Cover
17. Lever- Handguard (Pg. 4)
18. BuckingSpike
19. Chain Tensioning Screw
20. Chain Tensioning Lug
21. Clutch Drum
22. Chain Brake Sand
23. Oil AdjustmentScrew
24. Sprocket
25. Serial Number
1. Spark Plug
2. Air Filter
3. Primer
4. Choke Lever
5. On-Off Switch
.6. Safety Lever
7. ThrottleLever
8. Fuel-OilMix Cap
g. Cover Over Pra-FUter
10. Bar-Chain Oil Cal)
11. Bar
12. Chain
13. Bar Nuts
FIGURE 4
GASOUNE
bearingsand other moving parts. The correct fuel- oil
mixtureis 40:1 (see Fuel Mixture Chart). Too littleoil
or the incorrectoil type will cause poor performance
and may cause the engine to overheat and seize.
AND OIL MIXTURE
Important! Do not use automotive or boat oils in your
chain saw. These oils do not have proper additives for
2-cycle, air-cooled engines and can cause engine
damage.
Gasoline and oil mustbe pramixed in a clean
approvedfuel container.Always use fresh regular
unleadedgasoline.This engine is certifiedto operate
on unleaded gasoline.
The 2-cycle engine on this productrequiresa fuel
mixture of regular unleaded gasolineand a high quality
2-cycle air-cooled engine oil for lubricationof the
5
FUEL MIXTURECHART
GASOUNE
OIL
1 Gallon
3.2 Ounces
2.5 Gallons
counterclockwise(+) increases the amount of oil,
clockwise(-) decreases the flow. Never cut without
chain lubrication.Check proper level before each
cutting.
I
I
FIGURE 5
8.0 Ounces
IMPORTANTI Alcohol blendedfuels called gasohol
(using ethanol or methanol) can attract moisture,
which leads to fuel - oil separation'andformationof
acids dudng storage. Acidic gas can damage the fuel
system of an engine while in storage. To avoid engine
problems, the fuel system shouldbe emptiedbefore
storage of 30 days or longer. Drain the gas tank, then
run the fuel out of the carburetorand fuel linesby
startingthe engine and letting it run untilit stops. Use
fresh fuel next season. See storage instructions for
additional information.Never use engine or carburetor
cleaner products in the fuel tank or permanentdamage
may occur.
STOPPING ENGINE
•To stop engine, release the throttle lever. Move the
On-Off switch to the off (STOP) position.
STARTING
COLD
NOTE: Check ©haln tension before starting!
1. Tum the on-off switch to the on "1"position.
2. Pull out the choke knob. The fast idle stays set
until the throttle is depressed, at which time the
red pin inside the choke lever retracts (idle
position).
CAUTION: Retain a secure gdp on the saw using the
foot and hand positionfor startingthe chain saw in a
safe manner.
3. Pump fuel pdmer until it is approximately ½ full
with fuel and increased resistance is felt. Proceed
with coldstarting instructions.
4. Slowly pull on starter gdp until rope encounters
some resistancefrom starter pulley. Next, pull
ropefirmly and rapidly in an upward motion. Guide
rope back into starter rather than lettingit snap
back.
5. Repeat rope pulls until engine attemptsto start,
usually2-3 pulls, no more than 5; then
immediatelypush in choke knob.
6. Once the engine is steadily running depress and
release the throttle lever to allow engine to operate ,
at idle speed. NOTE: Depressing (and then
releasing)the throttle lever releases the halfthrottleautomatic lock and the red indicatorpin on
the choke knob retracts.The engine continuesto
runat idle speed.
7. Shouldthe engine fail to start after several
repeated starting attempts, the engine has already
been "flooded"(too much fuel mixture in cylinder).
in this case, remove the spark plug and dry it. Set
the ignitionswitch to "stop"and the throttlelever to
fullthrottle.Crank engine by pullingthe starter
ropeseveral times to vent fuel mix and vapors
from cylinderand crankcase. Check spark plug
gap (.015-.020"); correct if necessary. Reinstall
spark plug;connect spark plug cap. Set ignition
2-CYCLE O|L
Craftsman 2-cycle, air-cooled engine oil is specially
blended with fuel stabilizers.If you do not use this
Sears oil, you can add a fuel stabilizer,such as
Craftsman No. 33500, to yourfuel mix.
FUEL STABILIZER
A fuel stabilizer is an acceptable a_f'emativein
minimizing the formation of fuel gum depositsdudng
storage. Add stabilizer to gasoline mixture in fuel
storagecontainer and mix well. Always followthe fuel
mix ratio found on the stabilizer container.Run engine
at least 5 minutes after adding stabilizerto allowthe
stabilizerto reach the carburetor. You do not have to
drain the fuel tank for storage if you are usingfuel
stabilizer. _
BAR AND CI_IAIN OIL
We recommend e special chain oil (low sling, high
tack) to lubricateyour bar and chain; consult your local
Sears retailer. Dudng chain saw operationsat
temperatures below freezing (00C/32*F), the chain oil
viscosityincreases creating an ovedcad to the
automatic oil pump. Overloadingresultsin damage to
the driver gear, pump mechanism, and bar and chain.
A specialcold-climate chain oil shouldbe used. Refill
chain oil each time you refuel. CAUTION: Never use
waste engine oil; it will damage the pump.
OIL PUMP
Your chain saw is equipped with an automaticoil
pump that pumps oil to the chain when the chain is
rotating. You may adjust the amountof oil pumped to
compensate for long bars and chainsor for extremely
hard or frozen wood. Adjust the flow rate by turningthe
adjustmentscrew. The adjustmentscrewis locatedon
the bottomof the saw below the markings+ - on the
same side as the bar and chain (Fig. 5). Turning
6
STARTING WARM
1. Pullchoke knob out.
2. Pushchoke knobback into open position,red
indicator pin on choke button remains visible.
3. Crank engine and allow to run briefly.
4. Depress throttle lever to allow engine to run at idle
speed (indicatorpin disappears).
RGURE 6
If you are unsuccessful[in starting the engine, consult
the Troubleshootingguide in your Craftsman chain
saw handbookor contact a Bears Service Center.
Beforefelling a tree, survey it carefully and answer
these questions:
1. In which directiondoes the tree lean?
2. Is the condition of the trunk sound, hollowor
partiallyrotten?
3. From which directionis the wind blowing?
4: What is the wind velocity? CAUTION: Wind
directionand velocitymay change. Be alert!
Fellingshould not be attempted in high winds.
5. Isthe crown (top) of the tree more dense and
heavieron one side?
These are factors and forces which will influencethe
line of fall and escape routes.
Survey the area; make sure that felled trees cannot
strikeany objectssuch as power lines, buildings,cars
and blockroadways or railroad tracks. Insure that
neither persons nor animals are within the danger
zone (measured distance away from tree that is 21,_
timesthe tree height).
Clear escape route by removingundergrowthlikelyto
intedere with es_c_....Be sure to warn othersby
shouting"TIMBER when e tree is about to fall. Bdef
each team member on properescape proceduresand
signals. Have visualcontactwith team members prior
to and during fellingoperation.Practice a "dryrun"
escape! Prior to fellingprepare the immediatesite and
the base of the tree by clearingaway undergrowthwith
an axe, not the saw. Undergrowthcan tangle up or
snag the saw chainresultingin serious injuryor saw
damage. Clean the trunkof brush and remove small
branches from the lower trunkwith a small axe.
Remove large buttressrootsfirst.Start by cuttingthe
largest buttressrooL Remove each by cuttingit
verticallyfirst,then horizontally(Fig. 7). Sina!! buttress
rootscan be removedwhen fellingis complete unless
they hamper the fellingprocess.
RGURE 7
NOTE: These basic rules apply to felting a single tree
or many. However, end additional organizingis
requiredwhen felling several trees. Preliminary
preparationmust be done outside the danger zone. Be
sure othersknow where you are and what you are
doingat all times.
CAUTION: Do not try to fell a tree along a line different
from its natural line of fail unlessyou have
considerableexperience.
Determinecarefully the correct line of fall. Clear two
safe exitpaths to the rear (clear away escape routes
for each member of the felling team). Do not place
toolsand equipmentin the path. Make your escape
routeat a 45 ° angle back and away from the line of fail
(Fig. S).
When felling, assume a balanced bodyposition(Fig.
8). Positionthe feet paralleland apart to obtain a
steady stance and stand at the side of the tree. Lower
the point of gravityby bendingthe knees (comfortably
arch your back). Keep the saw near the body, hold it
firmly with both hands,and lockthe thumbs under the
handlebar at all times.
FIGURE 8
CAUTION: Maintain good footing, body balance and
insurea safe escape path has been established.
Never fell a tree without making a proper felling notch
(undercut).
The next cut (Fig. 11) is called the felling cut (back
cut). Make itat least 2" higherthan the lower cut of the
fellingnotch by cutting horizontallyand parallelto the
fellingnotch. Do not cut throughto the felling notch.
Leave a "hinge"of uncutwood approximately 1/10 of
the tree diameter (Fig. 11).
WARNING: To avoid personal injury, do not cut
throughthe hinge! A properhinge prevents the tree
from possibly"sittingback"or "butt kicking"the back of
the stump,twistingoff the stump, or fa_tingprematurely
end uncontrolled.
CUI"I'ING FELLING NOTCH
Start felling by making a careful fellingnotch
(undercut) first (Fig. 9). This notch determines the line
of fall. Positionit at a dght angle. Cut the fellingnotch
to a depth of about '/_of the trunk diameter. It must be
wide enough and shouldnever be higherthan its
depth.
When fellinga large tree, drive wedges intothe felling
cut. Use only wooden or plasticwedges. Never use
steel or iron wedges whichcan cause kickbackand
damage to the chain. Wedges prevent the tree from
settlingback on the bar and help controlthe direction
of the fall towardthe fellingnotch (fig. 12).
RGURE 9
RGURE 12
Fellin
To make the felling notch, startwitITthe upper cut
facing the line of fail This is a directionalcut
downwards at an angle (Fig. 10, 1). Next, make the
lower felling notch cut. Cut horizontallyand straight
intothe tree until it meets the upper cut forminga
wedge (Fig. 10, 2).
SMALL TREES
If the trunkdiameter is smaller than the guide bar
cuttinglength, be carefulmaking the fellingcut and
formingthe hinge. Once the felling cut has been made,
place the buckingspike at the base line dghtbehind
the hinge, and do a fan cut (Fig. 13).
RGURE 10
RGURE 13
Directionof fa_=_
The exception is when the tree is on a slope;then the
lower cut should be on an upward angle to cut a
larger, more open wedge and to gain greater control
durirtgthe fall of the tree (Fig. 11).
The buckingspike is the toothed metal piece attached
to the front of the saw body and found to the left of the
bar. With the buckingspike teeth against the log firm
contactbetweenthe saw body and the log are
maintained.A fan cut is accomplishedby first
contactingthe teeth of the buckingspike to the log and
then, usingthe buckingspike as the pivot point,
rotatingthe bar through the log in a counterclockwise
direction.
FIGURE 11
8
LIMBING(Removing
limbsfromfelledtrees)
WARNING:
Ofall the cutting operations,limbingis the
6.
Craftsman saws are designedto allowthe
powerheed to glide over the trunkduring limblng.
Cut the branches in a swingingbeck and forth
movement with the saw remainingon the tree.
This is knownas the =pendulum method."
7. Pdor to cuttingthe branches,considerthe
directionin whichthe branches may fall. Thiswill
determine whether you cut from the top down
(overbuck, Fig. 16) or from below up (underbuck,
Fig. 17).
8. Watch out for branches under tensionwhichcan
snap back. Tension mustbe removed before
these branches can be safely cut. Beware of
potentialkickbacksituations.
9. If large branches are to be used for firewood, cut
them to length while stillattached to the tree. This
is an easier and safer method than bucking
branches on the ground (Fig. 16 & 17).
10. If you tire during limbing, STOP! Rest, then
resume work.
11. Never change the positionof the feet or hands
while in the midstof a cut.
one that holdsthe mostchance of unforeseen injury.
The danger of kickbackis most prevalent during
limbingif the bar nose comes in contact with another
branch or the side of the tree (see "Kickback
Conditionsand Prevention'),
Professionalloggershave developed various safe,
efficientand effectivelimbingtechniqueswhich you
must follow.The followinginstructionsare a few of the
basic safe work habitsfor a chainsaw operatorwhile
limbingor removingbranchesfrom a tree.
1. Before startingto limb, be sure the branch is on a
safe side of the log, uphill,and on the side
oppositeof any potentialmotion the cut branch
mightmake (Fig. 14).
FIGURE 14
RGURE 16
Overbucklng
2.
Do not stand on a log while limbing.You may slip,
fall or the log may roll. Maintainsure footing.
3; Never use the bar nose to cut branches.
4. Bendthe knees slightly.Positionthe rightleg
behindthe leftside of the chain saw and the left
leg forward and outward away from contact range
of bar. Assume a comfortable stance with the feet
spreadapart. CAUTION: If you change position,
the bar must always be on the side of the tree
oppositeyou. Keep the tree trunk between you
and the bar.
5. Rest the chainsaw bodyon the trunk as much as
possible(Fig. 15).
RGURE 17
Underbucldng
FIGURE 15
9
FIGURE 20
BUCKING (The cutting of • log Into sections):
1. Be alert to the stress and motionof logs. Always
positionyourself to prevent the rollingof a cut log
section or the stress forces withina log from
actingagainst you.
2. Never stand directlybehind the chain saw when
cutting.Stand to the left side of the cutting path of
the chain saw to reduce the chances of injuryfrom
kickback or a broken chain shootingbackwards
towards you (Fig. 18, 1).
3. Bend the knees slightly,Assume a comfortable
stance with the feet spread apart (Fig. 18, 2).
4. Keep the left elbow straightwhile cuffing (Fig. 18,
3).
5. Lock the thumb under the handlebar (Fig. 18, 4).
WARNING: Logsand branches may be under stress
or tension.Before cutting check to see if stress exists.
If stressdoes exists, start to cut on the right side of the
logor branch to prevent pinchingand possible
kickbacksituationsso that the branch does not whip
backand strike you.
9.
RGURE 18
If the chain bar is pinchedwhile bucking, shut off
the engine immediately.
IMPORTANT! If the bar and chain become pinched,
do not try to wrench or twistthe bar free. Move the |og
intoanother position or lift up with a rod or lever (Fig.
21).
RGURE 21
6. Set the bucking spikes firmlyagainstthe log.
7., When cutting firewood, place the log on a suitable
supportsuch as a saw buck (Fig. 19).
RGURE 19
GENERAL RECOMMENDATIONS
The warrantyon this chain saw does not cover items
that have been subjected to operator abuse or
negligence.To receive full value from the warranty,
operator mustmaintain chain saw as instructedin this
manual.
All items in the Maintenance section of this manual
shouldbe checked at least once each season.
8.
1. SerVice more often when operating in dusty or
dirtyconditions.
2. Once a year you should replace the spark plug
and clean or replace the air filter. A new spark
plug and e clean air filter assure proper air-fuel
n_xtureand help your engine run better and |ast
longer.
Free hanging ends can be cut off without riskof
bar pinching. But ifthe wood is not to splitor tear,
make an undercut(underbucking,Fig. 20, 1) of
about 1/3 the depth of the logdiameter, then apply
the finishingcut (overbucking,Fig. 20, 2).
10
MAINTENANCE
CHECK CHAIN SHARPNESS
A sharp chain makes wood chips.A dull chain makes
a sawdust powderand cuts slowly.Chain sharpening
requiresspecial tools.You can purchase sharpening
tools at Sear or go to a professionalchain sharpener.
SCHEDULE
FIGURE 22
REFILL BAR AND CHAIN OIL
Your saw will use approximatelyone tank of bar oil for
every tank of fuel mix. Always fillbar oil tank when you
fill the fuel tank, For maximum bar and chain life,we
recommend you use Craftsmanchainsaw bar oil. If
Craftsman bar oilis not available,you may use a high
quality bar and chain oil. CAUTION: Only use bar and
chain oil; do not use motoroil. Motor oil willdamage
the saw.
uJ
m
3hack for Io_;e fasteners & parts
3hack for_d.amagedor worn pads
3beck chaJ_tansion
3heck chain sharpness
X
X
X
X
Flefillbar and chain o_1
inspectbar
_lean engine cooling fins
<c
EX !
X
X
X
"lean air filler & I_re-filter
Replace spark plug
X
Clean fuel filter
inspect muffler
Clean spark arrestor
INSPECT BAR
Keep bar rails squareand fiat. Check for inside groove
wear as follows.Place a straightedge (Fig. 23, A)
against side of bar and one cutter. If there is clearance
(Fig. 23, B) between bar and straightedge, the bar
railsare good. If the chain leans (Fig. 24) and there is
no clearance between bar and straightedge (Fig. 24,
B), the bar rails are worn. Straighteningworn bars,
under certain circumstances,can only be done by
service technicians.Replace bar if un-repairable.
IMPORTANT: To preventone-sidedwear of the bar,
flipthe bar over after each chain sharpening.
X
',_
X
RGURE 23
X
ii
-,-.-I...-
CHECK FOR LOOSE FASTENERS & PARTS
Check all fasteneR, includingnuts, bolts, screwsand
Clamps, to insure that they are tight and secure. If not,
make all necessary adjustments priorto using chain
saw.
U
Good
I
Worn
RGURE 24
CHECK FOR DAMAGED OR WORN PARTS
Replacement of damaged or wom parts shouldbe
refen"edto your Sear Service Center
•
On-Off Switch - Check functionof the switch by
runningthe saw then tuming the switchto the "off"
position.The engine should stop; then turnto the
"on" positionand restad.
•
Fuel Tank & Oil Tank - Do not usa the saw if oil or
fuel leaks from the unit. NOTE: It is normalfor a
small amount of oil to ddp from the bar and the
side where the chain adjustment pin is located.
WARNING: Be sure chain is properlytensioned. A
saggingchain (F'_. 25) can jump out of the bar groove
and even break,
CHECK CHAIN TENSION
If the chain is too loose it can come off the bar and
possiblycause injury. DO NOT operate the saw if the
chain is loose. To set your chain to the proper tension
refer to Chain Tension in the Service and Adjustment
section.
RGURE25
Sagging chain
11
Clean the oil inlet hole (Fig. 26, A) and the bar groove
priorto placingthe chain in the bar groove.
FIGURE 28
Retaining clip
FIGURE26
pre-filtet
Cleaningtool
Airfilter
REPLACE SPARK PLUG
Change your spark plug each year to make your
engine start easy and run batter. Set spark plug gap at
.020".
With sprockethose bars (Fig. 27), grease the bearings
of the sprocket with a grease gun containingbearing
grease. Pump the grease into the cisan._ out holes
while rotatingthe sprocket.WARNING: Wear gloves
when handling chain to prevent injury.
CLEAN FUEL RLTER
The fuel filter is located inside the fuel tank and is
attached to the fuel line. To clean, scrubwith a small
brush. Replace if deteriorated.
INSPECT MUFFLER
Inspectmufflerevery 25 hours of use and replace if
corroded.
FIGURE 27
CLEAN sPARK ARRESTOR SCREEN (if installed)
After every 25 hours of use the spark arrestor screen
must be cleaned. Replace screen if deteriorating (part
no. 2048391).
To clean:
1. Remove screen.
2. Clean using a wire brush.
3. Reinstall
IMPORTANTI The bar is designedspecificallyto be a
track for the cha'tn.Never use bar to pry, lift or twist.
CLEAN ENGINE COOLING FINS
For bast performance, keep dirt from accumulating
arodnd the engine cooling fins. Cloggedcoolingfins
cause the engine to run hotter and shorteneng'_nelife.
Cooling fins may be cleaned using a toothbrushor stiff
bdstie brush.
CHAIN TENSION
Correct chain tension is very importantto insure a long
service life for the chain. Check the chain tension each
time the saw is stopped and the bar and chain have
cooled off. Check the tension and the chain and 10ar
lubricationfrequentlyduring prolonged periods of
cutting. If the chain is loose, lubricateit well and let it
cool off before readjustingthe tension.
CLEAN AIR FILTER & PRE-RLTER
Your engine wi, not run pmpedy and may be damaged
by usinga dirty air filter and/or pre-filter.Replace if
deteriorationoccurs. Service more often ifyou use
your chain saw in very dusty or dirtyconditions.
WARNING: Be sure the chain is pmperly tensioned. A"
saggingchain can jump out ol the bar groove, break,
and cause serious injury.
To Clean Air Fitter & Pre-F|lter:
1. Remove airfiifercover.
2. Remove pre-fiiter and air fitter (Fig. 28). To
remove air filter, slide retainingclip off and pull up
on air filter.
3. Clean air filterwith soft brush or tap lightly.If
heavily soiled, rinse in a mildsoap and water
solution.The pre-filtermust be blownclean with
compressed air.
4. Dry air fitter completely. Reassemblethe pre-tilter
and air filter;,ensure that they are correctlyseated
before reinstalling.
5. Replace filters if deteriorating.
The chaintension needs adjusting if the chain is
saggingaway from the underside of the bar when the
saw is he_dupright(Fig. 29).
FIGURE 29
Sagging chain
12
RGURE33
WARNING: Shut off engine before attemptingto adjust
the chain tension. Additionally,disconnect the spark
plug wire, Wear gloves when handlingchainsto
prevent injury.
To adjustthe tension:
1. Loosen the bar nuts using the Combi-wrsnch.
2. Tum the tension screw clockwise(Rg. 30, 1) until
the chain touches and no longer sags at the
underside of the bar.
2.
RGURE 30
Clean the suflace between the bar and the guide
plate (Fig. 34, A); and the oilieropening (Rg 34,
B).
3.
4.
Tum the chaintensioningscrew (Fig. 34, C)
counterclockwiseto positionthe tension lug (Fig.
34, D) to the far left.
Slide the bar over the tension lug and fd securely
into lughole.Failureto fdthe lug into the hole may
resultin the tensionscrew being bent when the
side cover is tighteneddown.
RGURE34
3. The saw chain is correctlytensioned when the
chain fitssnuggly against the underside of the bar,
but can still be easily rotated on the bar by hand.
Be sure the chain fits correctlyon the sprocketand
the bar (Fig. 30), NOTE: The chain will not rotate it
the chain brake is engaged_
4. Hold up the bar tip. Tighten the bar nuts securely
with the Combi-wrenchprovided. Only use the
providedCombi-wrench to tighten the bar nuts
(Fig. 31). CAUTION: Excessive force will stdp the
bar studs out of the saw case.
/
Feed the chainaround the chain sprocketintothe
bar groove (Fig. 35). Cutters (the sharp edge on
top) mustpointforward toward bar nose. Insure
the chaindrive I'tnksengage the cha'msprocket
and the sprocket nose on the bar.
5.
', RGURE 31
RGURE35
INSTALLING NEW CHAIN
CAUTION: |nju_Jhazarot Wear safety gloves when
handlingsaw chain at any time.
1. Be sure chain brake is disengaged first (Fig. 32),
Pull backwards on hand guard until it clicks
audibly. Remove the two bar nuts (Fig, 33) and
side cover.
6.
Attach the side cover and bar nuts by hand
tighteningonly. Liftingthe bar nose slightly;tum
the chainclockwiseand tighten the chain with the
tension screwuntilthe chain touchesthe bar
withoutsagging.The chain tension is correctif the
chain is snugagainstthe undersideof the bar but
can stillbe easily rotated by hand. NOTE: The
(_hainwillnot rotate if the chain brake is engeged!
7. Hold bar tip up; tighten bar nuts securelywith
Combi wrenchsupplied.CAUTION: Excess force
will stripthe bar studs out of the case,
RGURE 32
]3
NOTE: Check chain tension frequently. Chain tension
willbe affected by such conditionsas durationof work,
outsidetemperature, hardness of wood, lubdcation,
etc. If the chain becomes loose, shut off saw, loosen
retaining nuts and readjust chain accordingto previous
instructions.
6.
7.
8.
Pour a few drops of oil intothe cylinder.
Pull the starter handle slowlyto distributethe oil.
Replace with new spark plug.
STORAGE TIPS
if possible, store your unit indoors and cover it to give
it protectionfrom dust and dirt. Do not use plastic.
Plastic cannot breath, which willallow condensationto
form and willcause your unitto rust. IMPORTANT!
Never cover chain saw while engine and mufflerare
stillwarm.
CARBURETOR ADJUSTMENT
To comply with emission regulations,the carburetor
mixtureis pre-set at the factory and can not be
adjusted without the proper tools. Any mixture
adjustment must be performedby a service center.
The idle speed can be adjusted.The idle speed set
screw is located on the top of the unit and to the left of
the spark plug. It is indicatedby the letter "T." To
adjust the idle speed, turn clockwiseto increaseand
counterclo<;kwiseto decrease idle speed. Idle speed is
2500 ± 100 RPM.
Prepare your chain saw for storageat the end of the
season or if the unit will not be used for 30 days or
more.
BEFORE STORING
1. Use soap and water to wipe d_qwnunit.
2. Be sure that all nuts, bolts,screws, and fasteners
are securely fastened. Inspectfor damaged or
worn pads. Replace if necessary.
ENGINE
It is important to prevent gum depositsfrom formingin
essential
fuel system parts such as the carburetor, fuel
J
fiter, fuel hose, or tank dunng storage. Alcohol
blendedfuels, such as gasohol, ethanol,or methanol,
can attract n_isture, which leads to separationand
formationof acids during storage. Acidic gas can
damage the fuel system of an engine while in storage.
Do not store gasoline from one season to the next.
Two-cycle mix ages quicklyand can cause engine
damage. Replace your gasoline containerif it startsto
rust. Rust or dirt in your gasolinewill cause engine
problems.
To avoid engine problems, the fuel system shouldbe
emptied before storage of 30 days or more.
Followthese instructions:
1. Drain the fuel tank
2. Start engine and let it rununtil the fuel lines and
carburetor are empty (The engine will stop.)
3. Use fresh gas next season.
4. If you use a fuel stabilizer,the gasolinecan be left
in the tank. CAUTION: Never store chainsaw
inside a buildingwith fuel in the tank! Fumes can
concentrate and possiblyreach a sourceof
ignition.Allow engine to cool before storage.
5. Remove spark plug.
]4
CAUSE
PROBLEM
Engine does not start.
SOLU_ON
1. Refuelwith fresh fuel,
2. Drainand flush the fuel
tank. Refuel with fresh fuel mix.
See "Fuel MixtureChart" in
Operations.
3. Set switchto "I ."
4. Cleanor replace plug.
1. Fuel tank is empty.
2. Stale fuel mix.
3. Ignitionswitch off.
4. Spark plug fouled.
Chain rotates in idle mode.
1. Idle speed too fast.
1. Turn idlespeed set screw
counterclockwiseuntil
chainstops whilethe
engine idles.
1. Idle speed mixturetoo rich.
2. Too much oil in fuel mixture.
Exhaust is smokey.
3. Air filter clogged.
4. Choke only partially/open.
Chain cuts poody,
%J
1. Bluntchain or incorrectly
sharpened.
2. Carburetor adjusted
incorrectly.
3. Air filter clogged.
The Caiitomia Air Resources Board and Sears are pleased
to explainthe emission controlsystem warranty on your
1996 end later lawn and garden equipment engine. In
California, new lawn and garden equipment engines must be
designed, built, and equipped to meet the state's stringent
anti-smogstandards.Sears must warrant the ern_ton
control system on your lawn and garden equipmant engine
for the periodof time listed below provided there has been
no abuse, neglect,or improper maintenance of your lawn
and garden equipment engine.
1. ContactSears Service Center.
2. Adjustthe fuel-oil mixture
ratio.
3. Clean or replace air filter.
4. Open choke all the way.
1. Sharpenchain.
2. Contact Sears Service Center.
3. Clean or replace air filter.
you retain all receipts coveringmaintenance on your lawn
and garden equipmentengine. Sears cannotdeny warranty
solely for the lack of receiptsor for your failureto ensurethe
performance of all scbedu_edmaintenance.
As the lawn and garden equipmentengine owner, you
shouldhowever be aware that Sears may deny you warranty
coverage if your lawn and garden equipmentengine or a
part has failed due to abuse, noglact, improper maintenance
or unepproved modifications.
You are responalblefor presentingyour lawn and garden
equipment engine to a Sears repaircenter as soon as a
problem exists. The warranty repairs shouldhe completed in
a reasonable amount of lime, cot to exceed 30 days.
Your emissioncontrolsystem includes parts such as the
carburetoror fuelinjected system, the ignition system, and
connectorsand other ernLssion-relatudassemblies.
Where a warrantable concliben exists, Sears will repair your
lawn andgarden equipment engine at no cost to you
includingdiagnosis,parts, and labor.
If you have any quos_onsregardingyour warrantyri_
and
responsibilities,youshouldcontactSears at 1-800-4737247.
MANUFACTURER'S WARRANTY COVERAGE:
A.
WARRANTY COMMENCEMENT DATE
The wananty periodbegins on the date the equipment
is purchased by a retail customer.
Bo
LENGTH OF WARRANTY COVERAGE
Sears warrants to the initialowner and each
subsequent purchaserthat the engine is free from
defects in materials and workmanshipfor a period of
two years fromdate of odginalpurchase from Sears.
The 1996 and later lawn and garden equipment engines are
warranted for two years. If any emission-related part on your
engine is defective, the pad will he repaired or replaced by
Sears.
OWNER'S WARRANTY RESPONSIBILITIES:
As the lawn and garden equipment engine owner, you are
responsiblefor the performance of the required maintenance
listed in your Operetofs Manual. Sears recommends that
15
C.
6. Any failure b'_atresultsfrom an scddent, customer
abuse, normal wear, neglect or failure to operate
the product In accordance with the instructions
provided In the Operators Manual or provided with
the product.
7. Pm-deliveq/eet-up time.
8. Operation of an engine with an incorrectfual:oil
ratio, air filter removed or speeds tn excess of
Sears' recommendations (if applicable).
9. Transportationcosts associated with delivering and
return of productto a Sears warranty station.
WHAT IS COVERED
REPAIR OR REPLACEMENT OF PARTS
Repair or replacement of any warranted part will
be performed al no charge to the owner at a
warranty station. To locate a warrantystaUen, you
may call Sears at 1-800-473-7247, (24 hours, 7
days a week).
WARRANTY PERIOD
Any warranted part which is not scheduled for
replacement as required maintenance, or which is
scheduled only for regular inspectionto the effect
of "repair or replace as nsce_',ari' shall be
warranted for the warranty pedod. Any warranted
part which is scheduled for replacement as
required
maintenance shall be warranted for the
pedod of time up to the first scheduled
replacement point for that pert.
lw
.
=
E.
Sears Warranty Claim Request
Outdoor Power Equipment Institute
Universal Warranty Claim Report
Engine Service Association Claim
DIAGNOSIS
The'owner shall not be charged fbr diegno_tic
labor, which leads to the determinationthat a
warranted part is detective, it the diagnosticwork
is performed at Sears.
Warranty claims must be received at Sears within 60
days of the date of repair noted on the claim.
Fo
4. CONSEQUENTIAL DAMAGES
The engine manufacturer is liable for damages to
the engine components caused by the failure of a
warranted part still under waq_nty.
D°
HOW TO FILE A CLAIM
Warranty claims may be submitted on several different
forms:
G.
WHAT IS NOT COVERED
1. Failures caused by abuse, neglect, or improper
maintenance.
2. Add-on or modified parts. The use of add-on or
modified parts can be grounds for disallowinga
warranty claim. The engine manufacturer is not
liable to cover failures of warranted parts caused
by the use of add-on or modifiedpads.
3. Any indirect or consequential damages that may
insult"fromthe failure or maifuoctlon of the Sears
product. Some states do notallow the exclusionor
limitationof consequential damages so these
limitations may not apply to you.
4. Normal service requirements arisingduring the
warranty pedod such as carburetor or ignition
adjustment, cleaning, normal wear, lubrication,
spark plugs, filters, starter ropes, etc.
5. Normal service work over and above the repair or
replacement of defective parts.
H,
WHERE TO GET WARRANTY SERVICE
Warranty service or repairs shall be provided at Sears
Service Centers. For the address of a Service Canter
near you call Seers at 1-800-473-7247, (24 hours, 7
daysa week).
MAINTENANCE, REPLACEMENT AND REPAIR OF
EMISSION RELATED PARTS
Sears replacement pads must be ased in the
performance of any warranty maintenance or repairs
on emission-related pads end will be provided without
charge dudng the warranty peded.
EMISSION CONTROL WARRANTY PARTS LIST
Sears' warranty includesthe following parts (unless
said part was scheduled for replacement as required
maintenance):Air Filter, Fuel Filter, Carburetor and
internal parts, Choke Mechanism, Intake Manifold,
Spark Plug, Flywheel, Ignition Module.
MAINTENANCE STATEMENTS
Follownormal maintenance service, recommended fuel
mixture (where applicable), lubdcatlon,operation end
storage of the product as explained in the Operator's
Manual. The owner shall not be charged for diagnostic
labor, which leads to the determination that a
warranted part is defective, if the diagnostic work is performedat Soars.
16
CRAFTSMAN CHAIN SAW MODEL NO: 360.352001
132
130
131
9O
165
/
I 116
"111
I
29
28
14 l
212
214
210
CRA_'SMAN
CHAIN
SAWMODEL
NO.360.352001
Pos.
Number
Part
1
2
l_lumber 0ascrlpUon
6073641 Nr golde
0020145 Nut
3
5
6
0072145 Tensionspdng.
240O280 R_
0010158 Screw
7
10
11
0034201 Cbdip
21QO6240GNCnmkcase,complete
0054252 O_as_d
12
13
14
15
0050187 Groovedball beadng
0018267 Screw
0018336 Saew
20744160GNPm-fiitercover
16
17
18
19
21
22
2500582
0021232
2300469
2061473
0040190
2700_82
23
24
2800285
207_DGN
25
6074401
26
ooe22s0
27
28
29
6400183
60744o9
0018280
Pin
Stop plate
Screw
30
31
2042726
0018267
Stopplate
Screw
32
33
34
35
36
0073381
0050188
0054265
6063329
6400209
Torsionspdng
Bai bearing
O=1seal
Oilhose
Pumphousing
_
Pre-lgterassembly
Nut
Sh_t circuitswitch
Crankcasegasket
Pin
Check valve
Tlvo_e link_Qe
Consola
Plug
37
00622"/6
38
39
4O
41
42
45
46
48
49
5O
51
52
60
0018280
6700124
6_03299
0044271
6074447
0031529
0070265
603133O
6400_07
OO55136
0031209
6074976
6042817
Screw
Oilstmlner
Hose
Rivet
Co_r
_
washer
Pm_surespring
Pumppiston
Oil pump.complete
Q_
Washer
Dd,_ngworm
Washer
61
62
63
64
70
0071172
3500405
3500372
0052257
6200131
Clutch$pdng
Qutch. complete
Clutchdrum
Needlebearing
Brake
71
72
75
76
80
81
85
86
90
91
92
110
111
112
115
116
120
OO7O254 Spring
6300208 Adjuster
6300175 Pressureplate
0070253 Spdng
0031534 Washer
0055104 Washer
6074999 Brakebandcover
0018280 Screw
6100371DGNC_ain Guard
6074696 Guideshoe
00202147 Nut
2200238 Crankshaft
0075100 Disc spdng
0052255 Needle beanng
0055267 Pistonpin drcfip
2031249 Pistonpin
2200265 Piston
18
POS.
Number
121
122
125
126
127
128
129
130
131
132
135
136
137
140
141
142
143
144
150
151
152
153
154
155
156
160
161
162
163
164
165
166
168
170
171
172
175
176
177
178
179
180
187
188
189
190
191
192
193
194
105
196
199
200
201
210
211
212
213
214
215
22O
222
235
236
240
241
Part
Number
Description
2048357
2061478
2011756
(_G4201
0010541
0094252
2300730
0015286
Pistonring
Cylinderfoot gasket
O/fader
Cin:lip
Screw
Spacer
Sparkplug
Studastew
2061441
2500604
0072144
0028137
0018336
2061430
2300732
0034201
0010112
Mufflergasket
Muffler
Was_er
Locknut
Screw
Manifoldgasket
Manifold
CIrclip
Screw
2061443
2300709
6074916
2074441
6043247
0018267
Cad_uretorgasket
Carbureto_
Lever
Guide nozzle
Support
Screw
oo34_47 Spr_ ring
0015279
Screw
2500641
0062246
0011282
2074946
Air filter assembly
O-dng
Screw
Profile
2074423
0018230
6032640
RIter housing
Tensionscrew
Chain tensionbo_t
6900814
0018398
Repair klt
Screw
6043329 Guide plate
0010478 Screw
6900221N Guide bar
6043323
0034201
0010559
Bud,Jngspike
Clrdip
Screw
6O71248
6_00220N Chain
0030101 Washer
0072148
0018327
2300752
0084600
0073385
0064292
2_63333
0084702
0066335
0066314
Tension spring
Screw
Ignll_n oou
Spad(plug cap
Contact spdng
Hose
Grommet
Short circuitcable
Grommet
Grommet
2700345
0C62288
6300155
0030115
0018280
0018274
Oil tank cap
O-dng
Rubber metal connection
Washer
Screw
Screw
0033318
0018257
Spacer tube
Screw
6074422DGN Pmteclive cap
6043352 Chain proteclJonplate
0510952 Carburetorgasket kit
0510951 Carburetcrregair kit
0510953 Throttle axle kit
0510965 Choke axid kit
CRAFTSMAN CHAIN SAW MODEL NO. 360.352001
PoS. Number
P_'L
Number De_.rlptlo n
610041_N
M_n housing
0073392 Thm_e control_dng
2074z_9 Gas lever
0073339 Spring
6074292 Stoplever
6074443 Safety lever
2036381 Throale linkage
0010531 Sorew
6073681 Gdp cup, left
0010512 Screw
0010531 Sinew
6073681OGNGdp cup, k_
0070147 Spdng
6074381 Lever
6031247 Pin
0061356 Gasket
2700353 Tank lid
0098140 Safety catch
0018274 Screw
680_41
Handlebat
0094288 Rubbermetal connection
00301102 Washer
0098141 Safety catch
gQ_.8130 Nut "
0016274 Screw
0018274 Screw
0010157 Screw
003010_ Washer
1
3
4
5
6
7
8
g
15
16
17
20
21
22
23
25
26
28
29
30
33
34
35
37
38
42
43
44
45
47
50
52
53
54
_
0098142
0098143
6800235
0044280
0034152
0010188
Safety catch
Safety catch
Hand prote_on
Rivet
C_rcfip
Screw
Fos,
Number
57
58
60
61
62
63
64
65
66
67
68
69
70
71
72
73
75
76
79
80
82
83
85
86
87
88
89
SO
100
104
105
106
110
111
112
Pitt
Number Description
0072140 Spring we.sher
6O32639 Bolt
0028118 Nut
6O32669 Bo;t
6063328 Fuel hose
0013214 Screw
25OO744 Ventilationhose
0O67124 Nipple
6O63304 Vent hose
60633O2 Fuel hose
0073351 Hose loop
606330_ Hose g_lde
2700321 Hose
0063191 Sealingcord
2074469 Plug
2074470 Frame
6O73683 Cover. Black
680O334 Screw
OO18336 Screw
0018337 Screw
6074,993 Choke leve_
6074992 Pin
270O322 Primer
O0644O7 Hose
OO64432 Hcue
6074958 Primer support
6O42753 Ilokltlng foil
0094252 Rubber spacer
6O73566 Hub o_Ner,black
6074426 Chokelever
0011258 Screw
OO3O1O8 Washer
27OO354 Fual plck-up.corr_ete
27O0327 P._ p_k-up
270O335 Fuel pick-up,Ind in 61004Q_
50
"
68
58
111
_ 67
i
°
I
112
I
19
CRAFTSMAN
CHAINSAWMODEL
NO.360,352001
Pos. Number
1
3
4
5
6
7
10
11
12
13
14
Part
DescripUon
2600282OGN Sta_er, complete
0018336
Screw
2100578
Staller housing
0063186 Sbuter rope
2074206 Starter handle
260_J3
2074419
0031260
2074209
2074408
0073365
Sp_ingcassette
Starter puney
Washer
Starterpaw1
Template
Pin
I
20
For in-home major brand repair service:
Call 24 hours a day, 7 days a week
1-800-4-MY-HOME"
(1-800-469-4663)
Para pedir servicio de reparaci6n a domicilio - 1-800-676-5811
In Canada for all your service and parts needs call
Au Canada pour tout le service ou les pi_ces
--1-800-665-4455
For the repair or replacement parts you need:
Call 6 a.m. - 11 p.m. CST, 7 days a week
PartsDirect"
1-800-366-PART
(1-800-366-7278)
Para ordenar piezas con entrega a domicilio - 1-800-659-7084
For the location of a Sears Service Center in your area:
Call 24 hours a day, 7 days a week
1-800-488-1222
To purchase or inquire about a Sears Maintenance Agreement:
Call 7 a.m. - 5 p.m. CST, Monday - Saturday
1-800-488-6655
SE/U $
HomeCentrar