1
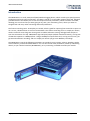
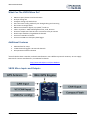
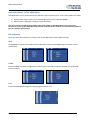
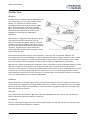
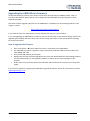
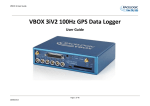
VBOX Micro User Guide Issue 1 06 August 2014 VBOX MICRO MANUAL This page is intentionally left blank Page | 2 06 August 2014 VBOX MICRO MANUAL Contents Introduction........................................................................................................................................... 4 What Can The VBOX Micro Do? .............................................................................................................. 5 Additional Features ................................................................................................................................ 5 VBOX Micro Inputs and Outputs ............................................................................................................. 5 Parts Supplied with RLVBMIC01C............................................................................................................ 6 Optional Accessories .............................................................................................................................. 6 Cables.............................................................................................................................................................................. 6 Input Modules ................................................................................................................................................................ 6 Antennas ......................................................................................................................................................................... 6 Getting Started ...................................................................................................................................... 7 Connecting Power To The VBOX Micro .......................................................................................................................... 8 LED Indicators ................................................................................................................................................................. 8 Logging .................................................................................................................................................. 9 Logging Control ............................................................................................................................................................... 9 Logging Modes ................................................................................................................................................................ 9 Logging Rates .................................................................................................................................................................. 9 File Management ............................................................................................................................................................ 9 Memory Cards ................................................................................................................................................................ 9 Configuring the VBOX Micro ................................................................................................................. 10 General ......................................................................................................................................................................... 10 Log settings ................................................................................................................................................................... 11 Time/Date ..................................................................................................................................................................... 11 Connecting an Input Module to the VBOX Micro ................................................................................... 12 Configuring the Input Modules ..................................................................................................................................... 12 Connecting a Display to the VBOX Micro ............................................................................................... 12 Configuring and using the VCI input (VBMIC01C only) ........................................................................... 13 Cables required ............................................................................................................................................................. 13 Enabling VCI Mode........................................................................................................................................................ 13 Baud Rate...................................................................................................................................................................... 14 Configuring a VCI channel ............................................................................................................................................. 14 Loading a CAN database file ......................................................................................................................................... 15 DATA Base format types ............................................................................................................................................... 15 Memory Cards ..................................................................................................................................... 15 Satellite lock ........................................................................................................................................ 16 Antenna ........................................................................................................................................................................ 16 Coldstart ....................................................................................................................................................................... 16 Manually .......................................................................................................................................................................................16 Via Software .................................................................................................................................................................................16 Upgrading the VBOX Micro’s Firmware ................................................................................................. 17 How to Upgrade the Firmware ..................................................................................................................................... 17 Connectors Assignments ...................................................................................................................... 18 Specification ........................................................................................................................................ 19 Module Dimensions ............................................................................................................................. 20 Contact details ..................................................................................................................................... 20 Page | 3 06 August 2014 VBOX MICRO MANUAL Introduction The VBOX Micro is a small, waterproof (IP66) GPS data-logging device, which records your speed, position, acceleration and many other parameters. This data is stored on a removable compact flash card. Software provided with the unit allows you to view and analyse all of the parameters, which have been recorded, allowing you to see how fast you were going at any time, your maximum g-force, where you went on Google Earth and many other interesting and useful parameters. The fastest recording rate is 10 samples per second, which is good for capturing fast events like a sports car on a circuit, a downhill skier or even a mountain biker. The slowest recording rate is 1 sample per minute, which is useful for more long term testing such as vehicle endurance testing, mileage/route analysis or even the movement of a ship. VBOX Micro logs 116 bytes/sample (default standard channels), at a log rate of 10Hz this equates to 4.2Mbytes/hour. Using a 512Mbyte compact flash card, at a log rate of 10 Hz, you get around 120 hours recording, and at 1 sample per minute you get over 3000 days recording! The VBOX Micro records the following parameters as standard: Time, Position, Velocity, Heading, Height, Vertical Velocity, and Accumulated Distance. You can also record other parameters, either by connecting directly to your vehicle’s CAN bus (RLVBMIC01C), or by connecting a suitable external input module. Page | 4 06 August 2014 VBOX MICRO MANUAL What Can The VBOX Micro Do? Measure speed, distance and acceleration Analyse driving line Compare driving style with others See if the most is being made of tyres during braking and cornering Plot routes on Google Earth Measure acceleration figures, top speed, ¼ mile etc. Take it anywhere – IP66 sealed against water, mud, dust etc. Choose a sample rate from 10 times a second to once per minute Attach input modules to log additional channels Connect to CAN bus of vehicle Connect via CAN to a third party data-logger Additional Features USB interface for setup 13 GPS channels logged + 16 external channels LED operational status indication *Not all vehicles have a CAN bus, and each manufacturer uses a different protocol. However, we can supply CAN sets for various manufacturers, see website for details: http://www.velocitybox.co.uk/can-database VBOX Micro Inputs and Outputs Page | 5 06 August 2014 VBOX MICRO MANUAL Parts Supplied with RLVBMIC01C Description Product Code 10Hz Data logger VBMIC01C GPS Magnetic Antenna RLVBACS018 4GB Compact Flash Card RLACS098 Power Cable – 2W Fischer – Cigar Plug (VBOX MICRO power lead) RLCAB010F VBOX Carry Case RLACS106 USB A - USB Mini B – 2m RLCAB066-2 Optional Accessories Cables Description Product Code 5-way Fischer to 9 way ‘D’ connector (female) – 1m (CAN cable) RLCAB19F 9-way ‘D’ connector (male) to OBDII connector – 1.2m (VCI products) RLCAB020 VBOX Micro to VBOX module cable RLCAB063 VBOX Micro to IMU04/YAW03 cable RLCAB065-C Input Modules Description Product Code VBOX Mini Input Module RLVBMIM01 4 channel Frequency and Pulse Counter Input Module RLVBFIM03 8 Channel Thermocouple Interface RLVBTC8 8 Channel (16bit) Analogue Interface RLVBADC03 Yaw Rate sensor +2 Axis G sensor (IP65) RLVBYAW03 RLVBIMU04 Inertial Measurement Unit (IP65) Antennas Description Product Code Low Profile ‘Ground Plane’ Antenna RLACS103 Mushroom type ‘Ground Plane’ Antenna RLVBACS065 Page | 6 06 August 2014 VBOX MICRO MANUAL Getting Started The VBOX Micro can be used to log data once the following simple steps have been followed. 1. Insert a suitable CF card and close the door. 2. Connect the GPS antenna; ensure it is mounted in a suitable position. 3. Connect a power supply to the VBOX Micro. Page | 7 06 August 2014 VBOX MICRO MANUAL Connecting Power To The VBOX Micro The VBOX Micro can be powered from two different types of power source, via the 2way PWR input socket. 1) Vehicle power outlet socket (via a supplied cigar lighter power cable RLCAB060) 2) Battery power, (Racelogic 2Ah Battery pack RLACS110) You must connect the GPS antenna before connecting power to the VBOX Micro. This is necessary because on power-up the VBOX Micro will look for a connected GPS antenna and automatically adjust its gain for optimum performance. LED Indicators There are three LED indicators on the top panel of the VBOX Micro: SATS, COMS and LOG. SATS Flashing RED to indicate that satellite lock has NOT been attained, Solid GREEN light to indicate a valid satellite lock. COMS Illuminates RED to indicate configuration communications via USB, Illuminates YELLOW to indicate CAN communications. LOG Illuminates GREEN indicating data is being logged to the CF card. Page | 8 06 August 2014 VBOX MICRO MANUAL Logging Logging Control Logging of data to the CF card can be controlled in two ways: Opening the CF card door; this triggers a micro switch that stops the logging and closes the file. Closing the door will restart the logging to a new file. Pressing the ’■’’ button, this will stop the logging and close the current file. Pressing the ’■’’ button again will then re-start the logging to a new file. Logging Modes The VBOX Micro supports two logging modes that are set using the VBOX Micro Setup software: Log continuously. Log only when moving (speed >0.5km/h) Logging Rates The VBOX Micro has an adjustable log rate set within Racelogic Config. This allows the log rate to be set in the range between 1 sample per minute and 10 samples per second (10Hz). File Management VBOX Micro data files are stored in Month folders on the CF card, i.e. Jan14. Each logged file will have a name based on date with the following format: Mon04Dec07_XXXX.VBO. A new file name is created for each new day, if a file is being logged when the time crosses midnight a new file is not created. If the system is switched off and then on again in the same day then it will append new data to the existing file for that day. If one file is closed and another created on the same day they can be distinguished by an increment to the file number, i.e. Mon04Dec07_0001.VBO, Mon04Dec07_0002.VBO. When a module is connected the unit must be power cycled, once the unit is recognised this will then cause the VBOX Micro to open a new file as above. Memory Cards The VBOX Micro stores logged data on Compact Flash (CF) cards. The supplied CF cards are already optimised for use on the VBOX Micro and as such do not need formatting before use. Should the CF Card need formatting due to card errors it can be done through Windows, as the VBOX Micro supports the following format type: FAT (up to 2GB) FAT32 (up to 128GB) Racelogic strongly recommends the following media card brands: Page | 9 SanDisk Kingston Lexar Ultra 06 August 2014 VBOX MICRO MANUAL Configuring the VBOX Micro Configuration of the VBOX Micro is performed using Racelogic Config software. With the supplied USB cable, connect the USB port on the VBOX Micro to one of the computers USB ports. When connecting to Racelogic config use the drop down list to select the COM port assigned to the VBOX Micro. Once this is selected Racelogic Config will connect to the unit automatically. General 1. Connection - Selected COM port, refresh and disconnect buttons. 2. Units - specify the distance, acceleration & velocity units. 3. VBOX Information - Serial number and installed firmware version of connected unit. 4. Load/Save Configuration - Load/Save settings from/into a Racelogic setting file (.RSF). 5. Language - Select an operating language. 6. Diagnostics - Live preview of satellites, latitude, longitude, velocity & accumulative distance. 7. GPS Information - reports the internal GPS engine type and allows user to coldstart the unit. 8. Write to unit - After making changes to setup, the write to unit button must be selected to upload settings. Page | 10 06 August 2014 VBOX MICRO MANUAL Log settings To adjust the logging mode and the log rate of the VBOX Micro, open the ‘Logging’ tab in Racelogic Config. Once the logging mode and rate have been set, click the ‘Write Settings’ button to program the new configuration into the VBOX Micro. The log rate is shown as a frequency (in Hz) and also as a time period (in ms). Both options are linked so if one is altered the other setting will automatically reflect the change. Time/Date The VBOX Micro uses time and date information available from GPS satellites. This time is based around UTC (approximately equal to GMT) so if the VBOX Micro is used in a different time zone the local time should be set inside the VBOX Micro for ease of use. As the time and date are critical to the creation of file names in the VBOX Micro, it is recommended that the local time is correctly set. Adding or subtracting an offset on the GPS page of Racelogic Config adjusts the local time. Once the offset has been set click the ‘Write Settings’ button to program the new time and date into the VBOX Micro. NOTE: In order to obtain UTC time, the VBOX Micro must have attained satellite lock. Page | 11 06 August 2014 VBOX MICRO MANUAL Connecting an Input Module to the VBOX Micro The VBOX Micro can connect to any one of the following Racelogic input modules and then include the data from each channel in the logged VBO file. The VBOX Micro will automatically log all channels from a connected Input Module providing that the module is connected before the power is switched on. Part Numbers Descriptions RLVBTC8 RLVBADC02 RLVBADC03 RLVBFIM03 RLVBMIM01 RLVBYAW03 RLVBIMU04 8 Channel Thermocouple Interface 8 Channel (10bit) Analogue Interface 8 Channel (16bit) Analogue Interface 4 Channel Frequency and Pulse Counter Input Module Mini Input Module Yaw Rate Sensor + 2-Axis G Sensor Inertial Measurement Unit Connection Cable RLCAB063 RLCAB065 Configuring the Input Modules To configure an input module you must connect the module directly to the computer via a serial cable, the channels cannot be setup via the USB port on the VBOX Micro. The software required will be Stand Alone Module Setup software or Racelogic Config depending on the module being configured. The module can take power from the VBOX Micro both during operation and during configuration. Connecting a Display to the VBOX Micro A Multi-Function Display (MFD, part number RLVBDSP03) can be connected to the CAN output of the VBOX Micro using an RLCAB063 cable. This then provides the user with a live display of the VBOX Micro data parameters, plus the ability to show live results of acceleration and deceleration runs and also display Lap times. For details of full functionality please refer to the Multi-Function Display user manual. Whilst connected to the VBOX Micro, the MFD will have full functionality except for the ability to display trigger-activated brake test results. Page | 12 06 August 2014 VBOX MICRO MANUAL Configuring and using the VCI input (VBMIC01C only) The VBMIC01C version of the VBOX Micro has the ability for its CAN port to be used as a 16 channel vehicle CAN interface. NOTE: When the VBOX Micro is configured in VCI mode it is not possible to connect and log data from Racelogic input modules. Cables required Description Product Code 5-way Fischer to 9 way ‘D’ connector (female) – 1m (CAN cable) RLCAB019F 9-way ‘D’ connector (male) to OBDII connector – 1.2m RLVBCAB20 Enabling VCI Mode Connect the VBOX Micro to the computer via the USB cable Run Racelogic Config. Select the appropriate COM port. Click on the CAN tab to display the CAN page. Select the ‘Enable VCI’ option. The screen shot below displays the CAN page when the VCI is enabled. Displayed are the 16 CAN channels, which in this case have all been configured to read CAN data from other Racelogic products. For a VCI channel to be included in the logged file it must be ‘Ticked’ as shown on all the channels in the screen shot, below. Page | 13 06 August 2014 VBOX MICRO MANUAL Baud Rate The VCI CAN bus’ baud rate is configured by selecting the desired baud rate from the right hand side of the Racelogic Config CAN tab. Configuring a VCI channel To configure a VCI channel click on the channel box that needs to be setup, this will open a new configuration window. All CAN attributes for channel configuration can be manually configured from within this window, shown below. Page | 14 06 August 2014 VBOX MICRO MANUAL Loading a CAN database file Each of the 16 CAN channels can be configured from a CAN database file. From each channels setup window a CAN database file can be loaded by clicking the ‘Database’ button. Clicking the ‘Database’ button allows a CAN database file to be opened and then a signal from the Database can be selected. This will then automatically configure the channel with the correct CAN settings. DATA Base format types .VCI - Racelogic CAN database file .REF - Racelogic Encrypted database file .DBC - Database file Memory Cards The VBOX Micro stores logged data on Compact Flash (CF) cards. The supplied CF cards are already optimised for use on the VBOX Micro and as such do not need formatting before use. Should the CF Card need formatting due to card errors it can be done through Windows, as the VBOX Micro supports the following format type: FAT (up to 2Gb) FAT16 (up to 2Gb) FAT32 (up to 128Gb) Racelogic strongly recommends the following media card brands: SanDisk Kingston Lexar Ultra PQi Page | 15 06 August 2014 VBOX MICRO MANUAL Satellite lock Antenna The GPS antenna supplied with the VBOX Micro is a 3.5V active antenna. For the best possible signal quality, it is important to maintain a clean connection between the antenna and the VBOX Micro. Before fixing the antenna to the VBOX Micro, ensure that there are no dust particles in either connector. Replacement antennae are available by contacting your VBOX Micro distributor. The antenna is a magnetic mounting type for quick and simple mounting to the vehicle roof. For optimum GPS signal reception, make sure that the antenna is fitted to the highest point of the vehicle away from any obstructions that may block satellite reception. The GPS antenna works best with a metal ground plane underneath (a metallic vehicle roof is perfect for this). Please also note that when using any GPS equipment, a clear sky view is important. Objects in the surrounding area such as tall buildings or trees can block the GPS signal causing a reduction in the number of satellites being tracked, or introducing reflected signals that can decrease the accuracy of the system. Note that clouds and other atmospheric conditions do not affect the VBOX Micro’s performance. GPS antennas require a ground plane to operate correctly. This helps to reduce unwanted reflections of the GPS signal caused by nearby objects, and usually the metal roof of a vehicle performs this function. However, if a test requires an antenna to be placed either off the vehicle, or on a vehicle that does not have a metallic roof, a special ground plane antenna must be used. This has an internal ground plane and can operate perfectly without the need for mounting on a metal surface. Ground plane antennas are available from your VBOX distributor (part number RLVBACS065). Coldstart A GPS coldstart forces the GPS engine to reset its downloaded almanac of current satellite positions. This can be useful if the VBOX Micro is having trouble locking onto satellites, which typically occurs if the VBOX Micro has not been used for several weeks or if it was last used a long distance (over one thousand miles) away from the current location. Manually Press and hold the square button ’■’ on the side of the VBOX Micro for five seconds. The unit will then beep to indicate that the GPS coldstart is underway. Via Software Connect to Racelogic Config, select the ‘Coldstart’ option within the ‘General’ tab. The unit will then beep to indicate that the GPS coldstart is underway. Page | 16 06 August 2014 VBOX MICRO MANUAL Upgrading the VBOX Micro’s Firmware Occasionally Racelogic releases new versions of firmware (internal code) for VBOX products, often to introduce new features. New firmware can be loaded into the VBOX Micro using a computer and the supplied USB cable. The latest firmware upgrade (.RUF) file for the VBOX Micro is available from the Racelogic website in the ‘Support’ section. http://www.velocitybox.co.uk/firmware If you need the latest file, download it from the website and copy it to your computer. If you are upgrading the VBOX Micro for the first time (or the first time on the computer being used for the upgrade), please follow the instructions in the section ‘Using USB’ earlier in this manual before following the instructions below. How to Upgrade the Firmware Press and hold the ‘◄’ button whilst the power is connected to the VBOX Micro. The VBOX Micro will enter ‘Upgrader’ mode, indicated by solid RED ‘COM’ and ‘LOG’ LEDs and a solid GREEN ‘SAT’ LED. Connect the USB cable to the computer. Double-click the .RUF firmware upgrade file that you have downloaded from the Racelogic website. This will automatically run the Upgrader software, in which you can see the progress of the upgrade. At the end of the process disconnect the USB cable and then disconnect and reconnect the power supply. If you have any questions regarding the VBOX Micro upgrade procedure, please do not hesitate to contact [email protected] . Page | 17 06 August 2014 VBOX MICRO MANUAL Connectors Assignments 2 PIN LEMO socket 5 PIN LEMO socket POWER - 2 PIN LEMO socket PIN In/Out Description 1 I Power + 2 I Ground Range 6V to 30V 0V COMS – 5 PIN LEMO socket PIN In/Out Description 1 I/O Power 2 O RS232 Tx 3 I RS232 Rx 4 I/O CAN H 5 I/O CAN L ANTENNA - SMA connector PIN In/Out Description Centre RF Signal / Power for active antenna Chassis Ground Page | 18 06 August 2014 VBOX MICRO MANUAL Specification Velocity Accuracy Units Maximum update rate Maximum velocity/ Minimum velocity Resolution Latency 0.2 Km/h (averaged over 4 samples) Km/h or Mph 10 Hz 1000 Mph/0.1 Km/h 0.01 Km/h >160ms Distance Accuracy Units Maximum update rate Resolution 0.05% (<50cm per Km) Metres / Feet 10 Hz 1cm Absolute Positioning Accuracy Height accuracy Maximum update rate Resolution 5m 95% CEP** 10 Metres 95% CEP** 10 Hz 1 cm Heading Resolution Accuracy 0.01° 0.2° Time Resolution Accuracy 0.01 s 0.1 s (0.01s for results scanned in VBOXTools) Acceleration Accuracy Maximum Resolution Maximum update rate 1% 4G 0.01 G 10 Hz Inputs CAN Bus – RLVBMIC01 VCI CAN Input – RLVBMIC01C CAN connection for Racelogic modules only Allows the user to log incoming CAN data from other systems CAN Bus Outputs Bit rate Identifier type Data available 125, 250, 500kbit/s & 1Mbit/s selectable baud rate Standard 11bit and Extended 29bit 2.0A Satellites, UTC time, Latitude, Longitude, Speed, Heading, Altitude, Vertical velocity, Longitudinal & Lateral acceleration, Distance since reset Power Input Voltage range Current 6-30V DC Typically 70mA Environmental and physical Weight Size Operating temperature Storage temperature Approx 275 grams 105mm x 85 x 30mm -10˚C to +60˚C -40˚C to +85˚C ** CEP = Circle of Error Probable 95% CEP (Circle Error Probable) means 95% of the time the position readings will fall within a circle of the stated radius. Page | 19 06 August 2014 VBOX MICRO MANUAL Module Dimensions Contact details Racelogic Unit 10 Swan Business Centre Osier Way Buckingham Bucks MK18 1TB United Kingdom Email: [email protected] Web: www.racelogic.co.uk Page | 20 06 August 2014