1
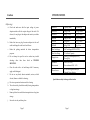
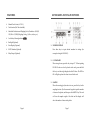
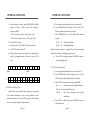
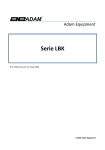
CONTENT SEK SERIES ELECTRONIC PIECE COUNTING / CHECK WEIGHING SCALE OPERATION MANUAL 1 2 3 4 5 6 7 8 CAUTION SPECIFICATIONS FEATURES KEYBOARD LAYOUT & FUNCTIONS DISPLAY INDICATORS INTERNAL FUNCTIONS TROUBLESHOOTING CALIBRATION READ THIS MANUAL BEFORE OPERATING THE SCALE *Specifications and functions subject to change without prior notice X0SEK030000 Revision: April 2008 Page: 1 2 3 4 5 7 8 14 15 Caution SPECIFICATIONS Before usage: a. Check and make sure that the input voltage of power b. c. Model No. Capacity (Max) Division (e) adaptor matches with the output voltage of the outlet. If it SEK-3000 3000g / 6.6lb 0.05g / 0.01oz does not, do not plug in the adaptor and contact your dealer SEK-6000 6000g / 13.2lb 0.1g / 0.01oz immediately. SEK-12K 12kg / 26.45lb 0.2g / 0.01oz Before first time use, plug the main adaptor into the wall SEK-30K 30kg / 66lb 0.5g / 0.02oz outlet and charge the scale for at least 8 hours. SEK-60K 60kg / 132lb 1g / 0.1oz Retain the packing materials for future transportation Max. Tare Range Full Tare Range(SUBTRACTIVE) purposes. Max. Zero Range 2% of Rated Capacity Weight Units Metric(g), Avoirdupois(lb or oz), Pieces (pcs) d. Do not attempt to open this unit or conduct any trouble shootings other than those listed on TROUBLE SHOOTING. e. Clean the scale with a soft and damp cloth. If necessary, apply a mild detergent. f. Power Source 0~40℃ (32~104℉) Non-condensed. R.H.≦85% 6V 4Ah Rechargeable Battery or External Power Adaptor Do not use any harsh, abrasive material, acetone, volatile solvent, thinner or alcohol for cleaning. g. Operation Environment Specifications subject to change without notice Do not use pressurized water nozzle for cleaning. h. The scale must be placed horizontally during transportation or long time storage. i. Remove platter from scale before transportation or long time storage. j. Store scale in a dry and clean place. Page: 2 Page: 3 FEATURES KEYBOARD LAYOUT & FUNCTIONS Manual Zero Fuction (± 2% F.S.) Tare Function (Full Tare Available) Selectable Resolution and Weighing Units ( Resolution: 1/60,000, 1/30,000 or 1/15,000) (Weighing Units: g, lb, lb-oz, tael, or pcs) Low Battery Warning Indicator ( ) Backlight (Optional) Rear Display (Optional) RS-232 Interface (Optional) Press these keys to input desired numbers for settings (for Relay Output (Optional) example, setting the HI-OK-LO). 1- NUMERIC KEYPAD 2- 0 / STANDARD When in regular use, press this key to input “ 0”. When inputting HI-OK-LO value or a load is placed on the scale, press and hold this key to set the weight displayed as the OK value. The LED for OK will light up when the value is stored in the scale. 3- SAMPLE When the counting (pcs) function is in use, press this key for the sampling function. (Use the numeric keypad to input the number of items on the platter, and then press the SAMPLE key. The scale will store the sample weight of the load and the display will show the number of items on the platter. Page: 4 Page: 5 KEYBOARD LAYOUT & FUNCTIONS 4- TARE KEYBOARD LAYOUT & FUNCTIONS When inputting HI-OK-LO value or a load is placed on the scale, Press this key to tare off the weight of the load on the platter (full press and hold MODE/RANGE to set the displayed value as the tare available). range for HI and LO values from the OK value. The LED for HI and LO will light when the value is stored in the scale. 5- ON/ZERO Press this key to turn on the scale or to manually set the display Remark: The weighing units can be turned on/off in the Function 3. to zero (can be used up to 2% of full capacity). Press and hold If the weighting unit is turned off, it will not be displayed by this key to turn the backlight on / off. pressing the MODE key. 6- MODE/RANGE 7- MR Press this key to change the weighing units/resolution and the Press this key to recall the accumulated total weight or total range of the HI-OK-LO. (When selecting weighing units or pieces. resolution, press and hold this key until the desired weighing unit and resolution is displayed). 8- M+ Press this key to accumulate the weight or pieces displayed into Example for a 6kg SEK scale: the memory. By pressing and holding the MODE key, it will shift between the following weighing units and division: 9- LOW LIMIT 6000.1 g 6000.2 g 6000.5 g 0.0000 lb 0’ 0.00 lb (lb-oz) When inputting the number using the numeric keypad or 0.0.0.0 Tael placing a load on the scale, press this key to set the LO limit for PCS 6000.1 g … HI-OK-LO.(the LED for LO will light when the value is stored in the scale) Page: 6 Page: 7 KEYBOARD LAYOUT & FUNCTIONS DISPLAY INDICATORS 10- HIGH LIMIT 13- CHARGE STATUS LIGHT When inputting the number using the numeric keypad or This LED light displays the charging status. When charging placing a load on the scale, press this key to set the HI limit for using the adaptor, the LED will turn red. The LED will turn HI-OK-LO (the LED for HI will light when the value is stored in green once the rechargeable battery is fully charged. the scale). 14- LED for LO 11- CLEAR This LED lights up when the weight or pcs on the scale is lower Press this key to clear the previous settings for HI-OK-LO (high than the LO value set for HI-OK-LO. limit, low limit, standard, and range settings). 15- LED for OK 12- OFF This LED lights up when the weight or pcs on the scale is within Press this key to turn the scale off. the range of the OK value set for HI-OK-LO. 16- LED for HI *Backlight can be turned on/off by pressing and holding the This LED lights up when the weight or pcs on the scale is higher ON/ZERO than the HI value set for HI-OK-LO. key. At zero weight status, the backlight will automatically turn off after 20 seconds and will turn back on when weight is placed on the scale. 17- ZERO INDICATOR An arrow on this sign indicates a zero weight status. ** Auto Zero Function when turned on works within 20% of the rated capacity. To maintain normal operation, please remove all weight from the platter before turning on the scale. 18- TARE INDICATOR An arrow on this sign indicates TARE function is in operation and weight displayed is the NET weight. Page: 8 Page: 9 DISPLAY INDICATORS 19- LOW-BATTERY INDICATOR ***This sign appears when the battery is low. INTERNAL FUNCTIONS To access the internal functions: <1> Press and hold TARE, then press <ON/ZERO> <2> Display will show “F0” 20- M+ INDICATOR <3> Press TARE until the desired Function is displayed An arrow on this sign indicates the accumulation function is in <4> Press MODE/RANGE to enter function use. <5> Press MODE/RANGE to make selection <6> Press TARE to confirm selection 21- MR INDICATOR <7> Press ON/ZERO key to return to weighing mode An arrow on this sign indicates that the accumulation data is currently shown on the display. F0 Set the Auto Zero Tracking range (Zero_X, can select how many divisions of e to Auto Zero) 22- WEIGHING UNITS INDICATOR This indicator shows the current weighing unit employed. Within the setting range, the weight is forced to be zero. F1 Span Value display F2 Software version display and full display test F3 Displays default weighing units used and disable/enable ***Charge the scale immediately when the LOW-BATTERY sign different weighing units shown when pressing MODE in appears. Failure to do so can shorten the life of the rechargeable normal weighing mode battery. Page: 10 F4 Enable/disable Auto Power Off F5 RS-232 Interface Setting (Baud Rate, Parity Setting) F6 Enable/disable Digital Filter (FiLt_0 ~ FiLt_5) F7 RS-232 transmission mode (P-Out, Conti, Auto) F8 Tare mode (n_tArE, S_tArE) Page: 11 INTERNAL FUNCTIONS F9 INTERNAL FUNCTIONS Sound Alarm for HI-OK-LO (nobEEP, gobEEP, HLbEEP, HbEEP, LbEEP). (F4) Auto Power off Function a) Use the procedure described above to reach Function F4 F10 Relay Output Mode Selection (Act L – open / close, Act H open / close) b) Press MODE/RANGE. The display will show “XX_oFF” c) Press MODE/RANGE to select the Auto Power off time. 0_oFF no auto power off (F3) Weighing Unit Selection 30 oFF auto power off if not used in 30 minutes d) Press TARE to confirm, then press ON/ZERO to return to a) Use the procedure described above to reach Function F3 b) Press MODE/RANGE to enter Function F3. The display will show “on 0.X g” or “OFF 0.X g” (X value is the normal weighing mode. (F5) Using RS-232 to connect to PC division) c) Press MODE/RANGE to enable/disable the selection of this weighing unit by pressing MODE during normal operation. d) Press SAMPLE to shift between the different weighing units available. e) Repeat c) to d) for all the other weighing units. a) Enter function F5. f) In order to set the default weighing unit shown when the b) Select Baud Rate by pressing SAMPLE. scale is first turned on, press SAMPLE until the desired weighing unit is shown then press ON/ZERO. The display will show “InIt 0.X g” “F4”. Turn off and then turn on the scale to complete this process. Page: 12 br48 br 48 br 86 br 192 br96 br192 4800 bps 9600 bps 19200 bps Page: 13 INTERNAL FUNCTIONS c) INTERNAL FUNCTIONS After Baud rate is selected, press MODE/RANGE, and the a) Use the procedure described above to reach Function F6. display will show “P=XXX”. Select Parity Setting by b) Press MODE/RANGE and display will show “FiLt_X” (X pressing SAMPLE. being the number selected from previously) P=n81 no Parity bit, data = 8 bit, stop bit = 1 bit c) P=E71 Even Parity bit, data = 7 bit, stop bit = 1 bit Press MODE/RANGE to select the Digital Filter number required. d) Press TARE to confirm. FiLt_0 Disable Digital Filter e) Enter function F7 to select RS-232 transmission mode FiLt_1~5 Enable Digital Filter. f) Start RS-232 software on the PC. (Higher number represents a stronger filter with more weighing g) When placing an item on the platter, after weight becomes stable, the computer display will show a line of RS-232 stability but with slower weighing response speed) d) data. S Press TARE to confirm, then press ON/ZERO to return to normal weighing mode. W W W . W W Blank U U CR LF Blank (F7) RS-232 Transmission Mode a) Use the procedure described above to reach Function F7. b) Press MODE/RANGE, and the display will show “XXXX” eg. - 3 0 6 0 1 0 3 . . 1 5 1 g b CR CR LF LF (XXXX being the setting from the previous selection) c) Select RS-232 Transmission mode by pressing MODE. Auto (F6) Enable/Disable Digital Filter Digital Filter can be enabled when weighing in environment with external interferences, such as wind, vibration or other unknown interference. The scale will have a more stable reading; however, the speed response will be decreased. Page: 14 Send data once after weight stabilization P-Out Printer Output (**Reserved) Conti Send data continuously after weight stabilization d) Press TARE to confirm, then press ON/ZERO to return to normal operation. Page: 15 INTERNAL FUNCTIONS (F8) Tare Mode Selection INTERNAL FUNCTIONS d) Press TARE to confirm, then press ON/ZERO to return to a) Use the procedure described above to reach Function F8. normal weighing mode. b) Press MODE/RANGE to enter, and display will show “X-tArE” (X being the previous selected mode) n_tArE S_tArE c) (F10) Relay Output Mode Selection Tare function can be used when weight is not a) Use the procedure described above to reach Function F10. stable b) Press MODE/RANGE to enter function. Tare function can be used only when weight c) is stable d) Press TARE to confirm, then press ON/ZERO to return to Press MODE/RANGE to select the desired setting. Use MODE/RANGE to choose either Act L or Act H. normal weighing mode. d) Press TARE to confirm, then press ON/ZERO to return to normal weighing mode. Act L (F9) Sound Alarm for HI-OK-LO a) Use the procedure described above to reach Function F9. Act H Normal Relay output status is open Relay output status is closed b) Press MODE/RANGE and the display will show XXbEEP (XX being the setting from the last selection) nobEEP disable sound alarm gobEEP sound alarm when OK value is reached HLbEEP sound alarm when HI/LO value is reached c) HbEEP sound alarm when HI value is reached LbEEP sound alarm when LO value is reached Press MODE/RANGE to select the desired setting. Page: 16 Page: 17 Action Relay output status is closed Relay output status is open TROUBLESHOOTING Syndrome Scale cannot be turned on Scale turns off automatically after a period of time. Scale display shows symbol. Weight is not accurate. Possible Cause 1. Adaptor not plugged correctly. 2. Rechargeable battery has low battery. 3. Adaptor voltage incompatible with electrical outlet. Auto Power Off function is in operation. CALIBRATION Solution 1. Re-plug the adaptor to the scale. 2. Recharge the battery. 3. Replace the adaptor with the correct voltage. Enter function F4 and change the setting. Low battery warning. Recharge the battery. 1. 1. 1- Press ON/ZERO to turn on the scale. Before the countdown finish from 9 to 0 press and hold MODE/RANGE key. 2- The display will show “CAL.?_1” 3- Press MODE/RANGE. 4- The display will show “YES”. The platter should be free from any loads to calibrate the zero point. 5- After zero point is calibrated, the display will show “LOAD” “XXXX.X” “or” “XXXX.X” 6- Place the weight marker with the corresponding weight shown on the display. After calibration is finished, the display will show “CAL.?_2” 7- Press ON/ZERO to exit calibration and return to normal weighing mode. If there is a need to calibrate the second 2. Is there any object stuck on the scale? Is there any outside interference such as wind or RF interference? Page: 18 2. Remove the object and try again. Go to an environment free of interference and try again. point, repeat instructions from number 3 to 6. 8- After the second point is calibrated, the scale will automatically return to weighing mode. Page: 19