1
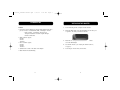
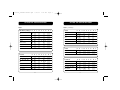
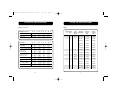
P72551-A_F3H1381-manual.qxd
3/10/03
3:56 PM
Page 2
Belkin Corporation
501 West Walnut Street
Compton • CA • 90220 • USA
Tel: 310.898.1100
Fax: 310.898.1111
VGA Adapter
for Macintosh®
computers
Belkin Components, Ltd.
Express Business Park
Shipton Way • Rushden • NN10 6GL
United Kingdom
Tel: +44 (0) 1933 35 2000
Fax: +44 (0) 1933 31 2000
Belkin Components B.V.
Starparc Building • Boeing Avenue 333
1119 PH Schiphol-Rijk • The Netherlands
Tel: +31 (0) 20 654 7300
Fax: +31 (0) 20 654 7349
Belkin, Ltd.
7 Bowen Crescent • West Gosford
NSW 2250 • Australia
Tel: +61 (0) 2 4372 8600
Fax: +61 (0) 2 4372 8603
Belkin Tech Support
US: 310.898.1100 ext. 2263
800.223.5546 ext. 2263
Europe: 00 800 223 55 460
Australia: 1800 666 040
© 2003 Belkin Corporation. All rights reserved.
All trade names are registered trademarks of respective manufacturers listed.Macintosh, Mac, Mac OS, and Apple
are trademarks of Apple Computer, Inc., registered in the U.S. and other countries.
P72551-A
User Manual
F3H1381
P72551-A_F3H1381-manual.qxd
3/10/03
3:56 PM
Page 4
TABLE OF CONTENTS
Introduction
Product Diagram . . . . . . . . . . . . . . . . . . . . . . . . . . . . . . . . . . .1
Features . . . . . . . . . . . . . . . . . . . . . . . . . . . . . . . . . . . . . . . .2
Installing the Adapter . . . . . . . . . . . . . . . . . . . . . . . . . . . . . . . . . .3
DIP Switches . . . . . . . . . . . . . . . . . . . . . . . . . . . . . . . . . . . . . . . .4
Setting the Switch Positions . . . . . . . . . . . . . . . . . . . . . . . . . . . . . .5
Reference . . . . . . . . . . . . . . . . . . . . . . . . . . . . . . . . . . . . . . . . . .10
Troubleshooting . . . . . . . . . . . . . . . . . . . . . . . . . . . . . . . . . . . . .11
Information . . . . . . . . . . . . . . . . . . . . . . . . . . . . . . . . . . . . . . . .12
P72551-A_F3H1381-manual.qxd
3/10/03
3:56 PM
Page 6
INTRODUCTION
Congratulations and thank you for buying this high-quality Belkin
product. We trust you will get years of use and satisfaction from your
new VGA Adapter.
Note: So that you are sure to use it correctly and to get the most out
of your connections, please READ THIS MANUAL CAREFULLY, BEFORE
ATTEMPTING TO USE THIS PRODUCT.
The Belkin VGA Adapter allows Macintosh computers to use PC-type
VGA/SVGA monitors. It features simple-to-use controls—DIP switch
and rotary knob settings—that let you easily select the appropriate
resolution for your computer and monitor.
Product Diagram
1
P72551-A_F3H1381-manual.qxd
3/10/03
3:56 PM
Page 2
INTRODUCTION
Features
INSTALLING THE ADAPTER
1. Power OFF both your Mac computer and the monitor.
• Connector to allow a Macintosh computer with a DB15 female video
port to connect to a standard VGA, SVGA, or MultiSync® monitor
2. Attach the DB15 male end of the VGA Adapter to the video port
of your Mac. The video port will look like this:
- Fixed resolution, or multimode, which lets you
change the multimode resolution anytime through
the Mac Control Panel
• VESA resolution support:
640x480
800x600
1024x768
3. Attach the cable of your monitor to the HDDB15 female
end of the VGA Adapter.
• Mac® resolution support:
512x384
832x624
1132x870
4. Set the DIP switches. (See “Setting the Switch Positions”,
on page 5.)
• Quick Reference chart on the back of the Adapter
5. Power ON your monitor first, then the Mac.
• Belkin Lifetime Product Warranty
2
3
P72551-A_F3H1381-manual.qxd
3/10/03
3:56 PM
Page 4
DIP SWITCHES
Switch Descriptions
1. The rotary knob and DIP switches 1, 3, 4, and 8 set the
resolution of the monitor and computer.
SETTING THE SWITCH POSITIONS
Table 1 on the next page lists the various Macintosh models and the
possible switch settings. If your Mac is not listed here, please select
the model closest to it.
2. DIP switches 5 and 6 set external sync. For Mac IIci, IIsi,
IIvi, IIvx, or any computer that uses “sync on green”, these
are to be turned OFF. For all other computers, they are to be
turned ON.
Select a column that has an ”X” in it, and refer to Table 2 to check if
your monitor supports the resolution(s) listed. Then, select a switch
setting that both your monitor and your Mac can support.
3. DIP switch 7 is composite sync and it is rarely used. Try
turning it on and observe if it improves results.
Settings B, H, and I in Table 1 and 2 are multimode settings, the
others are fixed mode. This means that you can change resolutions
in the Macintosh Apple® Menu under “Control Panel/Monitors”
without having to restart the computer. In “Control Panel/Monitors”,
more selections are available on many Mac models by pressing the
“Option” key on the keyboard while clicking on the “OPTIONS” button
on the screen.
Note: Restart the computer each time the rotary and switch
settings are changed.
The ON position in the DIP switches is the “up” position.
The first setting, “3 / All off”, is a fixed-mode setting. It is the only
setting that will work with the Mac IIci and IIsi. Older non-SVGA
monitors cannot support the resolution this setting produces.
4
5
P72551-A_F3H1381-manual.qxd
3/10/03
3:56 PM
Page 6
SETTING THE SWITCH POSITIONS
SETTING THE SWITCH POSITIONS
Table 1 (continued)
Table 1
MAC Model /Setting #
A
B
LC
X
LC II
X
X
LC III
X
X
LC 475
X
X
C
D
E
F
X
X
X
X
X
LC 630
X
X
X
LC 6300 series
X
X
X
A
B
400, 405, 410, 430
X
X
450, 460, 466, 467
X
X
475
X
X
600, 600CD
X
X
630 series
X
X
6200 series
X
X
H
II
X
LC 500 series
Performa
G
C
D
E
F
X
G
X
X
6
X
X
H
Quadra
A
B
700, 900
X
X
605
X
X
630
X
X
C
X
D
E
F
X
X
X
X
G
H
II
G
H
II
G
H
II
X
610, 650, 700, 800, 950
X
X
X
X
X
660AV, 840AV
X
X
X
X
X
Centris
A
B
C
D
610,650
X
X
X
X
X
660AV
X
X
X
X
X
PowerBook®
A
B
C
D
E
F
II
E
F
160, 180 series
X
X
X
500, 5300 series
X
X
X
X
Duo Dock, Mini Dock
X
X
X
X
Duo Dock II
X
X
X
7
X
X
P72551-A_F3H1381-manual.qxd
3/10/03
3:56 PM
Page 8
SETTING THE SWITCH POSITIONS
SETTING THE SWITCH POSITIONS
Table 1 (continued)
Table 2
Workgroup Servers
A
B
C
D
60, 80, 95, 9150
X
X
X
X
6150, 8150
X
X
E
F
G
H
II
X
X
Power Mac®
A
B
6100, 7100,
8100 DRAM
X
X
7100, 8100 with VRAM
X
X
C
D
E
F
G
H
X
X
X
X
X
X
X
X
X
X
X
X
4.8, 8.24, 8.24GC
X
Mac “Clones”
X
X
X
X
X
X
X
X
All Off
640x480
35kHz
67kHz
B
0
8
640x480
31kHz
60kHz
800x600
35kHz
56kHz
800x600
37kHz
60kHz
800x600
48kHz
72kHz
1024x768
48.3kHz
60kHz
C
0
1,3
1024x768
60kHz
75kHz
D
0
1,4
1152x870
68.7kHz
75kHz
E
1
All Off
1024x768
60kHz
75kHz
F
2
All Off
832x624
50kHz
75kHz
G
4
All Off
1152x870
68.7kHz
75kHz
H
3
4
800x600
37kHz
60kHz
800x600
48kHz
72kHz
800x600
37kHz
60kHz
800x600
48kHz
72kHz
X
I
8
VerticalI
Refresh
Rate
3
II
Video Boards
Horizontal
Refresh
Rate
A
X
7200, 7500, 8500,
9500, 400, G3
X
DIP
Supported
Switches Resolutions
Set ON
X
6100, 7100,
8100 with AV
24AC
Setting Rotary
#
Knob
3
3
9
P72551-A_F3H1381-manual.qxd
3/10/03
3:56 PM
Page 10
REFERENCE
Your Belkin VGA Adapter is capable of either “multimode” or
“fixed-mode” settings.
Multimode settings allow you to change resolutions anytime
through the Control Panel/Monitors in the Mac OS®, without having
to restart your computer. A MultiSync monitor may be required for
some settings, depending on which Mac OS and Mac computer you
are using.
Fixed-mode settings, unlike multimode, keep your monitor on one
resolution. In order to change resolutions once fixed-mode is in
effect, you must change the settings on your VGA Adapter, and
then restart your computer.
TROUBLESHOOTING
There is no image, or the image has no vertical hold.
1. The monitor and the computer are not synchronized correctly.
Try changing the settings of both DIP switches 5 and 6, or just
DIP switch 7.
2. The monitor does not support the resolution selected.
Try changing to a different switch setting, and then restart
the computer.
There is no color in the image.
Finding Other Multimode Settings
This is most likely caused by changing switch settings while the
computer boots up. Go into the “Control Panel/Monitors” in the
Macintosh Apple menu. Select the color depth you prefer, and
click “OK”.
To find other settings supported by your Mac, review Table 1.
Note: For example, the Mac LC II has an “X” in columns A and B.
The image is too small on the screen.
Look in Table 2 for rows A and B. There, you pick your preferred
setting. Setting B is more desirable than A because it is a
multimode setting, and allows you more flexibility in choosing
resolution settings. Be sure your monitor supports the settings you
wish to use before proceeding.
Set your VGA Adapter’s rotary knob on 0 and all the DIP switches
OFF, except 8, as described on setting# B in Table 2.
Restart your computer. You will have the multimode selections in
your Mac Control Panel.
10
1. Adjust the screen size by using the controls on your monitor.
2. If the monitor cannot expand the image to fit the entire screen
using its controls, the monitor simply cannot support that
resolution. Try switching to a lower resolution.
If your question was not answered here, please e-mail your
question to [email protected] or call Belkin Technical Support
at 310-898-1100 ext. 2263.
Before calling, please ensure that you have all of your
equipment connected and powered ON, and that you are
at the computer.
11
P72551-A_F3H1381-manual.qxd
3/10/03
3:56 PM
Page 12
INFORMATION
FCC Statement
DECLARATION OF CONFORMITY WITH FCC RULES FOR
ELECTROMAGNETIC COMPATIBILITY
We, Belkin Corporation, of 501 West Walnut Street, Compton, CA 90220, declare under our
sole responsibility that the product:
F3H1381
to which this declaration relates:
Complies with Part 15 of the FCC Rules. Operation is subject to the following two
conditions: (1) this device may not cause harmful interference, and (2) this device
must accept any interference received, including interference that may cause
undesired operation.
Belkin Corporation Limited Lifetime Product Warranty
Belkin Corporation warrants this product against defects in materials and workmanship for its lifetime.
If a defect is discovered, Belkin will, at its option, repair or replace the product at no charge provided
it is returned during the warranty period, with transportation charges prepaid, to the authorized
Belkin dealer from whom you purchased the product. Proof of purchase may be required.
This warranty does not apply if the product has been damaged by accident, abuse, misuse, or
misapplication; if the product has been modified without the written permission of Belkin; or if any
Belkin serial number has been removed or defaced.
THE WARRANTY AND REMEDIES SET FORTH ABOVE ARE EXCLUSIVE IN LIEU OF ALL OTHERS, WHETHER ORAL
OR WRITTEN, EXPRESSED OR IMPLIED. BELKIN SPECIFICALLY DISCLAIMS ANY AND ALL IMPLIED WARRANTIES,
INCLUDING, WITHOUT LIMITATION, WARRANTIES OF MERCHANTABILITY AND FITNESS FOR A PARTICULAR
PURPOSE.
No Belkin dealer, agent, or employee is authorized to make any modification, extension, or addition
to this warranty.
BELKIN IS NOT RESPONSIBLE FOR SPECIAL, INCIDENTAL, OR CONSEQUENTIAL DAMAGES RESULTING
FROM ANY BREACH OF WARRANTY, OR UNDER ANY OTHER LEGAL THEORY, INCLUDING BUT NOT LIMITED
TO LOST PROFITS, DOWNTIME, GOODWILL, DAMAGE TO OR REPROGRAMMING OR REPRODUCING ANY
PROGRAM OR DATA STORED IN OR USED WITH BELKIN PRODUCTS.
12