1
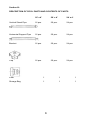
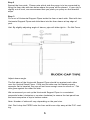
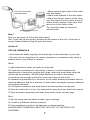
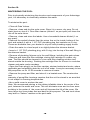
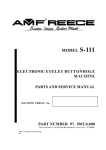
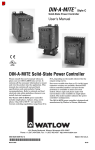
Owners Manual
OWNER’S MANUAL
INDEX
Important Considerations
1
Preface
2
Pool Parts Description
3
Pool Assembly
4
Unpacking
Horizontal Pipes
Brackets
Vertical Stand Pipes
Throughwall Fitting
4
5
6
6
6
Tips on Chemicals
7
Problem Guide
8
Disassembly
Folding Diagram
8
9
Water Start Up/General Water Info
Start Up Procedures
Exchange Rates
Water Test Kits
Water Balance
Water Hardness
Alkalinity
pH
Acids
Sodium Bisulfate
Water Maintenance
Heating
Sanitizer Levels
Sanitizers
Cartridge Filter Maintenance
10
10
10
11
11
11
12
12
13
14
14
14
15
15
15
Winterizing
16
Warranty
inside back cover
Section II:
PREFACE
Thanks for choosing an Advantage Portable Pool. Proper care and maintenance of your pool will result in years of enjoyment. Please register your pool
to receive free customer service and warranty support.
Think of your pool as a large bathtub shared by members of your family and
friends, all using the same water. The need to keep the water clean and safe is
obvious. Contaminants from swimmers feet, wind and rain only add to the need
to water to be properly started up, balanced and sanitized and filtered on a regular basis.
There are many different types of chemicals available. Your authorized
Advantage Pool dealer is an excellent source for advice and product. Some
cheap consumer type chemicals have actually stained the liner. Buying commercial chemicals from your dealer will save you time and extend the life of
your pool. Purchase start up and balancing chemicals from your dealer to be
sure you have the right stuff in your pool.
Once started and balanced, maintaining chlorine, DPD level of 3 parts per millions will eliminate most common problems. Testing and adjusting chemicals for
balance and sanitizer levels, will require the use of a water testing kit. Testing
every other day for sanitizer levels and balancing once a week should maintain
a clean pool. Again, the best source for these products is your Advantage Pool
dealer.
The Advantage pump and filter should be operated for a minimum of three
water exchanges per day to keep the water free of debris and contamination. A
water exchange is measured by the amount of time it takes for the pump/filter
system to filter out all the water in the pool (total gallons of pool/gallons per
minute flow of the pump filter system). A separate manual on the powerful
Advantage Pump is also included.
Cartridge filters can be replaced or cleaned. Please contact your distributor for
cartridge replacements.
Hint: The optimal way to run your filter is off a timer. An optional timer is available for use with the pool pump and filter system. See your dealer for more
details.
2
Section III:
DESCRIPTION OF POOL PARTS AND CONTENTS OF PARTS
16' x 4'
20’ x 4'
24’ x 4’
Vertical Stand Pipe
16 pcs.
20 pcs.
24 pcs.
Horizontal Support Pipe
16 pcs.
20 pcs.
24 pcs.
Bracket
16 pcs.
20 pcs.
24 pcs.
Cap
16 pcs.
20 pcs.
24 pcs.
Liner
1
1
1
Storage Bag
1
1
1
3
Section IV:
ASSEMBLY
Assembly Tips:
DO NOT PLACE CHLORINE TABLETS OR SANITIZERS IN THE ADVANTAGE
SKIMMER
The vertical ribs may bow and will remain bowed after assembly. This is normal
and does not impact the structural strength of the pool. When putting up the
pool, make sure the bow points outward.
The Advantage liner will "weep" water along some of the seams for one season.
This is not a leak and is normal for liner material. When placing an Advantage
Pool on a non-absorbing surface such as concrete or asphalt a small puddle
may appear. This "weeping" will stop on its own.
Hint: IT IS BEST TO MEASURE OUT AN EXTRA FOOT FOR YOUR POOL
SITE
Measurements for Site Placement:
Pool Size
Circumference
Total Gallons
Surface Area
16' x 4'
6,500
201 sq. ft.
50 feet
20' x 4'
9,500
314 sq. ft.
14,500
452 sq. ft.
63 feet
24’ x 4’
75 feet
How to Assemble the Pool
Step I
Take liner bag out of the box and place it at the center of where you plan to
place the pool. Be careful not to damage the liner when using a knife to open
the box, and clear the area of sharp objects.
DO NOT DRAG THE POOL LINER - across asphalt, concrete or any other
abrasive surface.
4
Step 2
Spread the liner wide. Please note which side the pump is to be connected by
lining the liner side with two holes where the pump will be placed. If your site is
slightly out of level, we reccommend that you place you pump on the downhill
slope.
Step 3
Put a set of Horizontal Support Pipes inside the liner at each side. Start with two
Horizontal Support Pipes and slide them into the liner sleeve at top edge of
pool.
Hint: By slightly adjusting angle of sleeve, pipe will slide right in - Do Not Force.
Adjust sleeve angle.
The flat sides of the Horizontal Support Pipes should lay against each other
over the Vertical Stand Pipes. If the two flat sides are not mated properly,
example: flat to beveled, the cap will not have enough room to screw on. Flat
side goes against the other flat side.
We recommend you set up the Horizontal Support Pipes in a consistent
sequential order (clockwise or counter clockwise) to ensure the last panel has
the same sequence of top to bottom mates.
Note: Number of sides will vary depending on the pool size.
Hint: Don't drop the PIPES onto the liner as this can chip away at the PVC coating.
5
Step 4
Put the Bracket over the mated Horizontal Support
Pipes and Screw the Caps on over the Vertical
Stand Pipes by pressing down and twisting.
Hint: This should not require much force. If it does,
you need to adjust the angle of the Horizontal
Support Pipes and the sleeve.
Step 5
Slide the bottom of the
Vertical Stand Pipe to fit
into the flap (tongue) circle
hole at the bottom of each
side.
Step 6
Put pump/filter valve fittings to the holes on liner wall. Connect the skimmer to
the top hole valve fitting from the inside.
Pool Wall
Through Wall
Compression
Fitting
Gasket
Gasket
Hint: Use
Teflon Tape on
all plumbing
threads.
(Compression
fittings use
gaskets or OSkimmer
Rings and
teflon tape should not be used for these.)
• 2 Flex Hoses
• 4 Clamps (one for each end of hose)
• 2 Through wall fittings
• (Air bleeder valve uses O-ring)
• (Pressure gauge uses teflon tape on its threads)
6
Optional Gate
Valve - see
your dealer for
this option.
Compression
Nut
• Attach optional gate valve to the motor
inlet and tighten.
• Attach hose adapter to the filter outlet.
• Attach the loonger section of flex hose
from the skimmer to the motor inlet and
attach shorter section of flex hose from
return line to the fiolter outlet.
Tip: Use teflon tape on threads to
prevent leaks.
SUCTION LINE FROM
POOLSKIMMER
RETURN LINE TO POOL
Step 7
Now you are ready to fill the pool with water!!!
Hint: It will help to prevent any wrinkles at the bottom of the pool, if the pool is
evenly flattened before filling the pool with water.
Section V:
TIPS ON CHEMICALS
• Small amounts added regularly is the best way to add chemicals to your pool.
• Too much of one chemical or too many chemicals in combination may cause a
problem that is very difficult to reverse.
Rules:
1) Add chemcials to water, not water to chemicals
2) Follow the manufacturer's instructions. If there is a conflict between the
manufacturer's instructions and the pool guide, follow the guide when using the
chlorine as the sanitizer. NEVER place sanitizers or acids in the basket.
3) Introduce only enough chemical to reach the minimum test levels.
4) Operate the pump/filter for a minimum of one water exchange between start-up
chemical additions and for a minimum of three water exchanges between additions
of sanitizers and acids.
5) Pre-dissolve sanitizers and acids before introducing them into the pool.
6) Store all chemicals in a cool, dry area and far away from any direct heat source.
7) Store sanitizers separately and away from acids, paints, oils and rags.
Don't:
1) Re-use empty chlorine pails for trash, toys or storage.
2) Combine all different chlorine products.
3) Place sanitizers or acids in the skimmer or strainer baskets.
ALWAYS KEEP CHEMICALS AND TEST KITS OUT OF THE REACH OF
CHILDREN
7
Section VI:
PROBLEM GUIDE
The plumbing fitting are leaking:
Fittings expand and contract differently in the sun and cold. Adding pipe or
Teflon tape to the threads will reduce leakage.
My ladder keeps floating:
You may need to fill the inner portion of the ladder with water.
My ladder is wobbly:
The ground under the ladder may not be flat. Flatten the ground if possible. If
not, lay a thin piece of wood under the base.
My motor will not work or works intermittently (on/off):
We recommend you do not use an extension cord longer than 10'. Check your
power source. Longer cords should be 10 guage wire (contractors grade) to
ensure proper power. Motors supplied with insufficient power will overheat and
trip the automatic overload cicuit in the motor.
My motor works but has no suction:
Make sure the level of your water is covering the skimmer opening by at least
halfway.
I can't find a hole but there is a puddle of water, I think I have a leak:
You do not have a leak, you are experiencing the natural phenomenon of weep ing. Don't worry, it will go away.
My pool skimmer is not skimming:
Lower the water level a little so the suction pulls from the top.
The pool is leaning:
A leaning pool is the result of your ground being too far out of level.
The water is clean but the pool wall is green:
If you did not remove the minerals from your pool water then the green is actu ally a
mixture of yellow (rusted minerals) and the blue Advantage wall.
Section VII:
DISASSEMBLY
Pool Disassembly Tips:
• Don't leave the pool up without water - it will fly away and possibly cause damage to others.
• Don't drain the pool from the return liner - it might seem like a good idea but it
will leave up to 8" of water that is difficult to remove.
• Be sure to thoroughly dry the liner before storing it. Trapped moisture can create mildew and leave stains.
8
Disassembling the pool:
Drain the pool.
Take down the liner the same way you put it up. This is easiest with two people. One can hold up the wall while the other removes the parts.
It is important to remove all plumbing parts from the liner prior to folding up the
pool. Apply a little petroleum jelly to the "O" rings to prevent them from drying
out.
Before you begin folding the liner, let it dry out in the sun, wipe it down and
sprinkle some baking soda or baby powder. The powder will absorb some of
the moisture reducing molds and smells.
Storage Folding Diagram
Before folding up the liner, create a square shape. This will
make folding the liner easier.
Starting at one side, fold the
Do this twice
from opposite sides.
2 liner in on itself.
With the end fold
4 completed walk the
full length of the liner on
top of the liner. This will
help compact the liner more.
Then tightly roll for insertion into storage bag.
Once you have created two
opposing folded sides, simply
fold one over the other like
closing a book.
9
Section VIII:
GUIDE TO WATER START UP AND GENERAL WATER INFORMATION
Proper water treatment will reduce the maintenance time and costs of your pool.
It can also reduce or eliminate liner staining and simplify water balancing. All
water contains some impurities: dissolved minerals, metals, bacteria, algae and
organic contaminants. Swimmers, wind, rain, debris and trees continually add
new contaminants that require future treatment with start-up chemicals. Startup chemicals remove mineral and other contaminants. Contaminants too small
to be filtered and a clarifier is used to combine the small particles into larger
units that can be filtered.
Algaecides and enzymes are added to the water to control algae and reduce
sanitizer requirements. Do not use copper based green liquid algaecides since
overuse will stain the liner. While there isn't a requirement to test and balance
the water, before adding start up chemicals, we suggest balancing if you are
using start up chemicals supplied through you local retailer. When starting up
either new or winterized water, the process should not be interrupted by swimming activity.
When water is started and balanced start up chemicals may be added for maintenance at any time. Always operate the pump/filter for at least one water
exchange after introducing any chemicals and prior to swimming.
1) Start up procedures:
Start with a clean pool and clean filter media.
Remove all covers, pool and solar.
If water is being re-started: make sure the water level is halfway up the skimmer. Remove all debris from the skimmer and strainer basket.
Operate the pump/filter for 1 water exchange, making sure everything is working
properly with no leaks. NEVER add more than one chemical at a time.
ALWAYS
operate the pump/filter for a minimum of 1 water exchange between additions of
the same or different chemicals. Hose off the cartridge filter after the first three
exchanges have taken place.
Exchange Rates:
16 x 4 (1.0HP) 8hr. 27,500 Gallons
20 x 4 (1.5HP) 8hr.
46,000 Gallons
24 x 4 (2.0 HP) 8hr. 58,000 Gallons
10
If Chlorine is your primary sanitizer:
• Turn on the pump/filter and add a metal remover, pre-stain or stain preventer
(note: all these chemicals are identical and perform the same function)
• After one water exchange, add an anti-scalant or mineral remover (these are
formulations that combine both metal and mineral removal).
• After one water exchange, test and balance the water - refer to test kits and
balancing section
• After the water is balanced, shock treat the water - refer to the shock treatment
section. After three exchanges of water and a free chlorine level of 5 PPM or
less
• Add a clarifier, after one water exchange, turn off the pump and filter and let
the contaminants settle to the bottom of the pool. This will take about 4 to 6
hours. At this point, we highly recommend you vacuum the bottom of the pool.
• Remove the cartridge filter and hose it off and re-install it. Prime and turn on
the pump filter again.
• Add an algaecide or an enzyme.
• After one water exchange, test and adjust the chlorine level to 3 PPM
• After one water exchange, start normal maintenance.
Water Test Kits:
A test kit is needed to test and balance the water. It can also be used to monitor the waters balance and the sanitizer level. It should also measure alkalinity,
pH and free chlorine (DPD) levels. We suggest a kit that also includes measurements for hardness and total chlorine (OTO). Your Advantage Dealer is an
excellent source for a test kit and sound advice.
During the initial 10 to 14 days of operation, test the water every day until you
become comfortable with the testing and adjustment process and your pool's
requirements. Test and adjust the water each evening and test the water again
in the morning to verify that you've made the right adjustments. Once you are
comfortable with the process, test and adjust every three to four days. Test
every two days when swimming activities or temperatures are higher than normal and within 24 hours of a large swim party, rain or wind storm.
REMEMBER: WE ASSUME CHLORINE IS THE PRIMARY AND ONLY SANITIZER IN THESE INSTRUCTIONS
1. Water Balance:
Balancing the water means adjusting the alkalinity and pH to levels that optimize the sanitization of the water. In other words, if the water is not balanced
correctly the sanitizer won't kill the germs, bacteria and algae which may create
water problems and health risks. This is just a guide, always follow the manufacturers directions and contact your Advantage dealer for advice.
2. Hardness:
Hardness is required in pool water and similar to chemicals too little or too
much will effect the balance.
11
To raise hardness levels, add calcium chloride. 2 ounces of calcium chloride/1000
gallons will raise hardness 10PPM.
To lower hardness levels, add softer water. We don't know how much soft
water you need to add since all water is different. If you do not have a soft
water source, treat the water with a professional anti-scalant or mineral
remover, at least once a month and maintain your alkalinity levels in the 80-100
PPM range.
3. Alkalinity
This is the foundation of the balancing process. It measures the waters ability
to resist changes in pH. If the alkalinity level is not in range, both the pH and
sanitizer reading may be inaccurate. It is very important to maintain the proper
alkalinity
levels for an Advantage Pool in the 80-120 PPM. Adjust to 120 PPM when using
stabilized chlorine; 100 when using non-stabilized chlorine with or without a
stabilizer and 80 PPM if hardness levels exceed 500 PPM.
To raise alkalinity add 2.5 ounces of sodium bicarbonate/1000 gallons to
increase by 10 PPM
To lower alkalinity use either sodium bisulfate or muratic acid: Always make
certain that the pump/filter is turned on and operating properly. Always predilute acids in water prior to introduction into the pool, NEVER make an adjustment at one time of more than 30 PPM. ALWAYS, operate the pump/filter for a
minimum of 3 water exchanges after the introduction of an acid and prior to
adding any chemical including more acid. 3.5 ounces of Muractic Acid per 1000
gallons will lower alkalinity by 10 PPM and will also lower pH. To lower alkalinity more than pH, pour the pre-diluted Muratic acid mixture slowly into the pool,
close to the return line and as far away from the pool walls as possible.
4. pH
pH measure acidity created by hydrogen atoms. PH is measured on a logarithmic scale of 1 to 14 with a reading of 7 considered neutral. Below 7 the water
is basic and above 7 acidic. Each .1 change in the reading means the pH level
has undergone a 10 times change. This is why it is important to maintain the
proper balance of pH levels.
Remember, alkalinity controls the pH reading. If alkalinity is not balanced, pH
reading will be inaccurate. Ideal pH levels for an Advantage pool are 7.2 to 7.8.
The pH of the human eye is 7.5. The pH level controls the effectiveness or the
sanitizer. A change of .4 in the pH level will reduce the sanitizing power by a
factor of 15. IF you can smell chlorine it isn't working effectively and therefore
the pH level is not within its ideal range. Out of range alkalinity levels and sanitizer levels or 10 PPM or greater will cause an inaccurate pH reading. A pH
level of 7.4 to 7.6 will provide the greatest level of swimming comfort.
12
To raise pH 1/4 ounces of sodium carbonate or soda ash/1000 gallons will raise
pH by .1. To lower pH 1.5 ounces of Muratic Acid per 1000 gallons will lower
pH .2. When the pH level is at 8 or above a larger amount of Muratic acid will
be required to lower the pH.
To lower pH review the section on acids prior to use. One ounce of pre-diluted
muratic acid/1000 gallons will lower pH by .1. Muractic acid also lowers alkalinity. In order to maximize the lowering of pH and minimize the effect of alkalinity
the prediluted muratic acid mixture should be broadcast or spread evenly over
the surface of the pool. 2.5 ounces of sodium bisulfate/1000 gallons will lower
pH by .2.
Always be sure the pump/filter is turned on and operating properly.
Always pre-dilute acids prior to introduction into the pool. NEVER make an
adjustment at one time of more than 30PPM. ALWAYS operate the pump/filter
for a minimum of 3 water exchanges after the introduction of acid and prior to
adding any chemical including more acid.
5. Acids
Acids, used to lower alkalinity and pH will eat through the liner of the pool if
applied in full strength. Extreme caution should be exercised when using these
products. For best results wear hand and eye protection, pre-dilute all acids in
water, and make certain the pump/filter is on and working properly prior to introducing an acid into the pool. ALWAYS operate the pump/filter for a minimum of
three water exchanges between additions of acids or any other chemical.
NEVER resume swimming until the minimum of three water exchanges have
occurred since the last introduction of an acid. NEVER make a single acid
adjustment of more than 30 PPM in alkalinity or 04 in pH.
Muratic Acid:
Muratic or Hydrochloric acid is the most effective and least expensive method to
lower alkalinity & pH. Muractic acid formulations for pool use are 20
Baume/31.45 HCL. When spread evenly over the water pre-diluted muratic acid
will lower pH more than alkalinity. When poured slowly in a column it will lower
alkalinity more than pH.
To Lower alkalinity 2 ounces of Muratic acid per 1000/gallons will lower alkalinity
by 10 PPMIt is simple to correct water that has too little hardness and difficult to
adjust water that has too much. If you aren't heating your pool water you
shouldn't be concerned about too much hardness, unless your reading is in
excess of 500 PPM. Once hardness levels are either placed in range or
accepted as being with tolerable levels, they will remain fairly stable over an
average swimming season. Heavy rains, make-up water and granular chlorine
will have the greatest effect on hardness levels. Ideal hardness levels for an
unheated or solar heated Advantage pool are 200-400 PPM. If you are heating
with fossil fuels, adjust hardness levels to thoserecommended by the heater
manufacturer.
13
Sodium Bisulfate
Sodium bisulfate is a dry acid ad is most effective in lowering pH. The use of
an acid however will lower both alkalinity and pH. Alkalinity should b adjusted
prior to adding sodium, bisulfate to lower pH.
To lower pH 2.5 ounces of sodium bisulfate/1000 gallons will lower pH .2 when
pH level is at 8 or more a larger amount of sodium bisulfate will be needed to
lower pH.
To lower alkalinity add 3.5 ounces of sodium bisulfate /1000 will lower alkalinity
10 PPM
6. Water Maintenance
In order to sanitize the water and mix chemicals the pump/filter needs to be
operated for three water exchanges per day, during average weather conditions
and regular usage. More during periods of hot weather or heavy use and less
during periods of inactivity. We highly recommend using a timer and operating
your pump/filter for one water exchange at each of the following times;
* in the evening after most swimming activities have ended (8-9 PM). This is
also a good time to test the water.
* In the morning 3 hours prior to the resumption of swimming (7-8 AM). Test the
water to make sure chlorine levels are 3 PPM. Adjust as necessary before the
peak of the day.
* Mid-afternoon after the hottest part of the day around 2-3 PM.
The sanitizer levels should be tested and adjusted two to three times weekly
and should never be permitted to fall below a 1 PPM level, unless using a low
chlorine filter. We recommend a Monday/Thursday schedule as a minimum.
The balance of the water should be tested and adjusted on a weekly basis. The
balance should always be tested and adjusted after periods of heavy use.
7. Heating the water
If you are heating your water it is best to operate the pump/filter with the solar
cover on the pool between the 11 AM and 2 PM time frame with the sun is present. This same schedule holds true for heating the water with a solar hearer.
Cycling the pump/filter on /off for 30 minutes during this period will provide for
optimumwarming of the water when using only the solar cover.
14
If you are using a fossil fuel heater follow the manufacturers directions for proper water balancing requirements paying particular attention to the hardness levels. Keeping the solar cover on the pool when heating or in periods of non-use
will add to the hear retention.
8. Sanitizer Levels
Once properly balanced maintaining a free chlorine level of 1 to 5 PPM; 3 PPM
is considered ideal, will eliminate and or reduce water problems that contribute
to algae and organic contaminants. Permitting the sanitizer lever to drop below
1 PPM will normally result in problem water. If you are using a low chlorine filter
or a chlorine alternative follow the instruction provided by the manufacturer.
NEVER put sanitizer directly into the Advantage pool, the skimmer or the
pump/filter housing. Doing so will void your warranty.
9. Sanitizers
A sanitizer kills or inactivates microorganisms to levels established as safe by
federal and state authorities. Sanitizers can be categorized as follows; chlorine,
chlorine based alternatives and non-chlorine.
Filter Maintenance
The cartridges should be washed weekly by spraying them with a standard garden hose, flushing particles from the inside out. As the interior of the cartridge
begins to darken, the media should be soaked overnight in a non-acidic
degreaser cleaner. We recommend a complete cleaning of 50 sq. ft or smaller
cartridges each 30 days; however, your individual swimming habits, the size of
the pool, the cartridge and weather conditions may require more or less frequent cleaning.
CARTRIDGE REPLACEMENT FILTERS
Your dealer can supply you with Advantage replacement filters for all the cartridge pump filter systems (50, 75, 100, 150 square foot order by height and
diameter). The cartridge filters are made of polyester and will last for approximately 3 years. We recommend two filters for optimum life. Use one while
cleaning the other.
Cartridge Filter Maintenance:
Hint: Before cleaning cartridge filters disconnect both hoses a pump filter and
quickly place in pool, leaving the poolside connections intact. This will prevent
water loss during filter maintenance. If optional gate valves have been installed,
close both the suction and return side to prevent loss of water. Be sure to open
both valves after maintenance is complete.
15
Section IX:
WINTERIZING THE POOL
Prior to physically winterizing the structure and components of your Advantage
pool, it is necessary to chemically winterize the water.
To winterize the pool:
• Close all Gate Valves.
• Remove, clean and dry the solar cover. Store it in a warm, dry area. Do not
stack items on top of it. Orca filter cleaner (diluted 1 oz per quart) will clean the
oils off the solar cover.
• Remove, clean and store the ladder. Use a household cleaner diluted (1 oz
per quart).
• Remove the eyeball diverter from the return line on the inside, bottom of the
pool and replace it with a 1 1/2" PVC plumbing plug that contains an O ring.
These are available from your dealer or at your local plumbing supply house.
• Drain the water to a level equal to or slightly below the skimmer basket.
• Insert a 1 1/2" PVC plumbing plug, with O ring, into the top of the wall fitting in
the skimmer basket.
• Remove all plumbing fixtures up to the wall fittings, including the gate valves.
• Remove and clean the filter cartridge, storing the cartridge in a warm, dry
area. The filter should be cleaned in a non-acid filter cleaning solution and
stored outside the housing. Soaking the cartridge filter for 8 hours in a solution
cleaner and water works wonders.
• Open the Drain plug(s) on the filter canister, strainer basket and motor, where
applicable and completely drain the unit of all water. It may be necessary to turn
the pump/filter on for 15-30 seconds to remove all water.
• Remove the pump and filter, and store it in a heated area. The construction
and
warranty of pump/filter housings requires that the unit be stored in an area that
is not subject to freezing temperatures.
•Use a solid cover to enclose the pool.
Note: We recommend placing a non-rubber inflatable tube in the center of the
pool, between the water and cover. This will eliminate snow and ice from accumulating in the center of the cover and will increase the life of the cover. We
have large vinyl inner tubes that are ideal for this purpose. Tire and truck tubes
may leave a "carbon" residue on the pool walls.
16
ADVANTAGE POOL LIMITED WARRANTY
This Warranty covers the components supplied by Advantage, Inc., including the
polyester reinforced liner, metal superstructure, as well as inlet and outlet fittings. To validate this limited warranty, the pool must be registered with Advantage, Inc. Please return within fifteen days of purchase with a copy of the sales receipt to:
Advantage Manufacturing, Inc.
624B South B Street
Tustin, CA92780
Phone: 800-636-8866 Fax: 714-505-1160
TERMS AND CONDITIONS
1. This warranty is provided for the original purchaser (end consumer) only.
2. This limited warranty covers only components supplied by Advantage, Inc.
3. This limited liner warranty provides lifetime warranty against workmanship defects in seams such as
ripping and tearing. It also provides warranty against defect in the metal superstructure of the pool. All
other parts such as; pump, motor, filter (excluding filter element), hoses, clamps, etc. are covered for
two years from date of purchase.
4. Advantage will replace defective parts upon inspection by factory. Customer is responsible for return
freight to Advantage Mfg.
5. Failure or refusal to allow Advantage or it's dealer to inspect the product claimed to be defective (at
dealer or Advantage's location) shall render this warranty null and void. Advantage, Inc. cannot be
responsible for damage to the part(s) caused by the consumer or installer.
6. This warranty is null and void if the design of the product is altered in any way.
7. Incidental, consequential, or other damages will not be paid by Advantage, Inc., including, but not
limited to the cost of labor and or water or chemical loss or any damages that occur.
8. Ground must be level within three inches.
9. All objects (rocks, sticks, etc.) must be cleared from the area the pool is to be installed on.
10. Advantage is not responsible for damage to pool due to improper use of
chemicals.
11. To validate the warranty purchaser must return warranty form.
COMPLETE AND RETURN
THIS CARD
✂
Name And Address of Purchaser
Dealer Name And Phone Number
_______________________________
______________________________
_______________________________
______________________________
_______________________________
______________________________
_______________________________
______________________________
Date Purchased______________________ Price$__________________
Pool Size__________________________