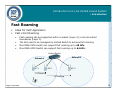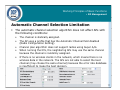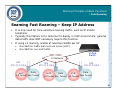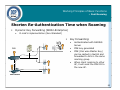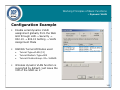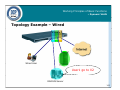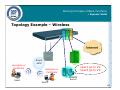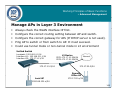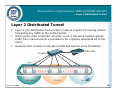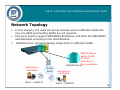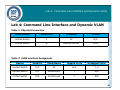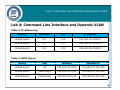
1
[DWS-4026] Version 1.0 Course Outline Introduction to D-Link Unified Access System Unified System Deployment Unified System Usage Lab 1: Unified Switch Redundancy Working Principles of Basic Functions Lab 2: Advance Management New Functions Implementation (DWS-4026/DWL-8600AP) Lab 3: Cluster Controller Command Line Interface System Maintenance and Troubleshooting Lab 4: CLI and Dynamic VLAN Assignment 2 Introduction to D-Link Unified Access System Session 1 Introduction to Unified Access System 3 Introduction to D-Link Unified Access System Session 1: Introduction to Unified Access System Introduction Hardware Basis Working Concept 4 Introduction to D-Link Unified Access System Introduction Introduction D-Link Unified Access System is an integrated wired/wireless solution which provides: • • • • • • Centralized management S Secure wireless i l connectivity ti it Seamless layer 2 and layer 3 wireless roaming Automatic RF adjustment Comprehensive statistics and report Visualization management tool Users can easily y deploy p y and manage g their wireless network with this solution. 5 Introduction to D-Link Unified Access System Introduction Centralized Management Central Policy Control • Profile configuration is applied to a managed AP when an AP is in managed mode, or when an AP is reset. Users hence can enjoy the convenience of one-time configuration. L2 or L3 Network Firmware dispatch Profile dispatch - RADIUS server settings - Security settings - Radio configuration - SSIDs, VLAN & Tunnel setting - QOS configuration Page is Animated 6 Introduction to D-Link Unified Access System Introduction Centralized Management – Switch Clustering DWS-4026 only Peer Switches can form a Cluster Group • • • All wireless configuration & management can be done from one switch One Master gathers statistics and status from all APs and Clients in the group Provides single point of management Similar to D-Link Single IP Management (SIM) Wireless Management & Configuration Ad i Admin Master Controller Peer Switches Unified Switch Page is Animated Unified Switch 7 Introduction to D-Link Unified Access System Introduction Secure Wireless Connectivity Complete Security Features Support tradition wireless security • • • • • Managed AP MAC list Wireless Client MAC list WEP (Static/Dynamic) WPA Enterprise/Personal E t i /P l WPA2 Enterprise/Personal Also support D-Link D Link proprietary security • • • Captive Portal Wireless Intrusion Detection System (WIDS) y (WIPS)/Threat ( )/ Mitigation g – DWSWireless Intrusion Prevention System 4026 only 8 Introduction to D-Link Unified Access System Introduction Secure Wireless Connectivity – Captive Portal A Web-based Authentication which provides intuitive, user friendly authentication An authentication web page is prompted to the HTTP client on the wireless network before surfing the Internet Authentication Web page could be customized No configurations needed for wireless clients 9 Introduction to D-Link Unified Access System Introduction Secure Wireless Connectivity – WIDS DWS-4026 supports advanced Wireless Intrusion Detection and Mitigation: • Detect and classify AP : – • Managed, Standalone, Unknown, Rogue (fake managed AP, fake SSID, illegal channel, etc…) Detect and Classify y Wireless Client – Authenticated, Black-listed, Rogue (probe attack, flooding network, etc…) Detect & Classify Managed Standalone Unknown Wireless AP Rogue Unified Switch Authenticated ut e t cated Black-Listed Wireless Client Rogue -Fake managed AP -Fake managed SSID -AP using illegal channel -AP using invalid channel -Incorrect security config -Invalid SSID -Unexpected U t d WDS device d i -Etc… -Not in client database -Probe attack -Flooding network -Too many failed auth -Authenticated with Unknown AP -Etc… 10 Introduction to D-Link Unified Access System Introduction Secure Wireless Connectivity – WIPS/Threat Mitigation g DWS-4026 supports advanced Wireless Intrusion Detection and Mitigation: • Detect and classify AP : – • Managed, Standalone, Unknown, Rogue (fake managed AP, fake SSID, illegal channel, etc…) Detect and Classify y Wireless Client – Authenticated, Black-listed, Rogue (probe attack, flooding network, etc…) Detect & Classify Mitigate Rogue Mitigate attacks from Rogue AP - Disable Rogue AP once detected Managed Mitigate attacks from Rogue Clients (AP must operate in Sentry Mode) Standalone - Disable Rogue Client once detected Unknown Wireless AP Rogue Unified Switch Authenticated ut e t cated Black-Listed Page is Animated Wireless Client Rogue -Fake managed AP -Fake managed SSID -AP using illegal channel -AP using invalid channel -Incorrect security config -Invalid SSID -Unexpected U t d WDS device d i -Etc… -Not in client database -Probe attack -Flooding network -Too many failed auth -Authenticated with Unknown AP -Etc… 11 Introduction to D-Link Unified Access System Introduction Fast Roaming Ideal for VoIP Application Fast L2/L3 Roaming • • • • Fast roaming can be supported within a subnet (Layer 2) or across subnet boundaries (Layer 3). The APs need to be managed by Unified Switch to achieve fast roaming One DWS-3000 switch can support fast roaming up to 48 APs. One DWS-4000 Switch can support fast roaming up to 64 APs. Unified Switch Subnet B Subnet A AP-1 AP-3 AP-2 L2 Roaming L3 Roaming Page is Animated 12 Introduction to D-Link Unified Access System Introduction Fast Roaming (Cont.) Inter-Switch Roaming • • • • • DWS Series not only can support fast roaming between APs which are managed by the same switch, it can also support roaming between switches g group g p For DWS-3000,, 4 Peer Switches in the same Roaming DWS-3000 supports up to 192 APs For DWS-4000, 8 Peer Switches in the same Roaming group DWS-4000 supports up to 256 APs Switch1 Switch2 Switch3 Switch4 L2 or L3 Inter-Switch Roaming Page is Animated 13 Introduction to D-Link Unified Access System Introduction Automatic RF Adjustment – Auto Channel Channels will automatically be adjusted on any new event in the system such as an AP being added or removed, or the switch can be programmed to automatically readjust channels at certain times (i.e. 2:00am each day) of the day a certain interval (i.e. every y or upon p ( y 6 hours)) Channel 36 Channel 52 3. Changes to Channel 149 2. Rogue AP or Radio interference Channel 52 Channel 44 Channel 60 1. When first time implementing APs, the System selects different channels for Page is Animated APs at random to avoid interference 14 Introduction to D-Link Unified Access System Introduction Automatic RF Adjustment – Auto Power Automatic power uses a proprietary algorithm to automatically adjust the RF signal to broadcast far enough to reach wireless clients, but not so far that it interferes with RF signals broadcast by other APs. 15 Introduction to D-Link Unified Access System Introduction Automatic RF Adjustment - Self-Healing Network Fail-Safe • • When a Managed AP is powered down, the power of its neighboring AP(s) managed by the same switch is immediately increased by 20%. power level will adjust j again g every yp pre-configured g Interval by y sensing g The p neighboring AP power status. Failure detected Increase 20% of power! Page is Animated Failed il d 16 Introduction to D-Link Unified Access System Introduction Comprehensive Statistics/Alerts Logging for Dynamic RF Status • The administrator can benefit by the rich logging/trap function provided by DWS4026. Information such as AP status, RF scan, and client status makes DWS-4026 a powerful RF monitor. Statistics on Web GUI 17 Introduction to D-Link Unified Access System Introduction Comprehensive Statistics/Alerts (Cont.) Associated Client Status on Web GUI 18 Introduction to D-Link Unified Access System Introduction Easy-to-Use Visualized Management Tool The diagram below shows an example of a floor plan and network with a DLink Unified Switch that manages two APs. The graph also shows a peer switch and a rogue AP in the network. 19 Introduction to D-Link Unified Access System Hardware Basis Hardware Basis D-Link Unified System consists of two components: • Unified Switch and Unified Access Point D-Link has four Unified Switch models Unified Switch = L2+ Switch + Wireless Controller Switch DWS-3024L / 3024 Description 24-Port Gigabit L2+ PoE Unified Switch Access Point No. of APs Note DWS-3026 24-Port Gigabit L2+ PoE Unified Switch with Two 10GE Open Slots DWL-3500AP / DWL-8500AP DWL-8600AP * 24 / 48 DWS-4026 48 DWL-8600AP 64 PoE Capable * Release 3.0 20 Introduction to D-Link Unified Access System Hardware Basis Hardware Basis DWL-8600AP • • • • • Support 802.11n Wireless LAN Up to 300Mbps wireless throughput, 5 times of 802.11g Four-antenna Four antenna design using MIMO Technology Support up to 32 SSIDs Support 802.3af Power over Ethernet DWL-3500AP • • • • Support 802.11g Wi l Wireless LAN Two 5dbi antennas Support 8 SSIDs Support 802.3af PoE DWL-8500AP • • • • Support 802.11 a/g d lb dual band d Wireless Wi l LAN Two 5dbi a/g dual band antennas Support 16 SSIDs Support 802.3af PoE 21 Introduction to D-Link Unified Access System Working Concept Working Concept In D-Link Unified System, the Unified Switch works as wireless controller and centralized controls and manages all the APs. The switch provides the configurations, including SSIDs, radio settings, QoS, security, and more, to the Unified APs and Thin APs. D-Link Unified Access System works only when the APs are managed by DLink Unified Switch. D-Link Unified Switch only can work with specific Unified APs, not all the APs b Unified Switches. S itches can be managed by DWS-3000 series (Release 3.0) can work with DWL-8600AP DWS-4026 doesn't work with (can't manage) DWL-3500/8500AP Manage APs and provide config files Unified APs L2 or L3 Network k Unified Switch Consider as Unknown/Rogue and mitigate if needed Non Unified APs 22 Unified System Deployment Session 2 Unified System y Deployment p y 23 Unified System Deployment Session 2: Unified System Deployment Protocol Basics Overlay and Unified Solution Tunnel and Non-Tunnel Modes AP Management and Client Data Network Switch Redundancy 24 Unified System Deployment Protocol Basics D-Link Wireless AP Protocol (DWAPP) CAPWAP like protocol Can cross L2 or L3 network Switch AP • TCP/Port 57777, SSL encryption – • UDP/Port 57775, 57776 – Report and Statistics Switch Switch • • TCP/port 57777, SSL encryption UDP/port 57775 – Firmware/Profile delivery/Heartbeat/Client session key sharing etc. Client data/AP data/RF status sharing within peer switches Note: Make sure there is no NAT device between AP and switch Unified Switch (Peer Switch) Control packets TCP/SSL L2 or L3 Network k Unified Switch Statistics UDP 25 Unified System Deployment Overlay and Unified Solution Overlay Solution In overlay solution deployment, unified switch is introduced to existing network infrastructure to protect current investment in network infrastructure with all the benefits of WLAN switching. The Unified Switch works as wireless controller here. Unified Switch Layer 2 switch Page is Animated Server Farm Layer 3 Switch Layer 2 switch 26 Unified System Deployment Overlay and Unified Solution Unified Solution Deploy at the network edge for greatest scalability Full Gigabit Ethernet speed is ready for 802.11n Unified Switch works as L2 edge switch and wireless controller at the same time Layer 3 Switch Server Farm All layer 2 switches are replaced with unified switch Unified f d Switch h Page is Animated Layer 2 switch Layer 2 switch U Unified ifi d S Switch it h 27 Unified System Deployment Overlay and Unified Solution Overlay + Edge Deployment Typical deployment topology – Mixture of Overlay and Edge deployments The unified switch to APs is reachable by routing Example: A campus network •Manage remote APs across L2 or L3 network C Computer C Center Building A Overlay Deployment •Replace existing old L2 switch •Provide wired & wireless connections DWS-4026 DGS-3600 DGS-3400 Edge Deployment Page is Animated 28 Unified System Deployment Tunnel and Non-Tunnel Modes Tunnel Mode Wireless client’s data will go through IP-IP tunnel and back to the Unified Switch. IP-IP Tunnel Unified Switch L2 or L3 Network Unified Switch IP Packet IP Packet AP’s IP SW’s IP Src IP Dst IP SW’s IP Src IP IP Packet AP’s IP IP Packet Dst IP 29 Unified System Deployment Tunnel and Non-Tunnel Modes Non-Tunnel Mode Wireless client’s data can be tagged with a VLAN but not necessarily goes back to the Unified Switch (depending on the network design). Unified Switch VLAN Data Data Data’s flow direction depends on the network’s VLAN configuration Internet 30 Unified System Deployment Tunnel and Non-Tunnel Modes Flexible Deployment – Adaptable Wireless Wireless traffic can be local-switched at the AP or Central-switched at the Unified Switch depending on users’ needs No need to purchase additional license or upgrade firmware Unified Internet Switch Server Farm Page is Animated Local-Switched (Non-Tunnel Mode) Central-Switched (Tunnel Mode) • Better performance • Better centralized security control 31 Unified System Deployment Tunnel and Non-Tunnel Modes Tunnel & Non-Tunnel Modes Advantages and Disadvantages VLAN Forwarding L3 Tunneling Advantage • Easier Unified Switch configuration • Save more bandwidth in Overlay topology • Better centralized policy with ACL, QoS, DHCP Server, etc • Transparent to customer network (no ‘VLAN explosion’ issue explosion Disadvantage • May not use advanced • More complicated Unified features, such as ACL, QoS, Switch configuration DHCP Server, etc on the • May consume more U ifi d Switch Unified S it h iin Overlay O l b d idth iin O bandwidth Overlay l topology topology • ‘VLAN explosion’ issue – setting up VLAN membership across large l network t k requires huge effort 32 Unified System Deployment AP Management and Client Data Network AP Management and Client Data Network AP and client data can be segregated into different networks to provide better security. Unified Switch • Unified Switch manages APs by IP therefore the routing must be properly set up AP Management Network 10.91.0.0/16 Wireless PC Network 192.168.1.0/24 L2 or L3 Network VoIP Network 192.168.2.0/24 • Setting up ACL on Unified S i h or edge Switch d switches i h to prevent wireless clients to access AP Management Network AP Management g Network 10.92.0.0/16 Wireless PC Network VoIP Network 192.168.1.0/24 192.168.2.0/24 33 Unified System Deployment Switch Redundancy Switch Redundancy Design – N + 1 One extra switch works only as backup Allow each switch manages its maximum number of APs Primary: Unified Switch 1 Secondary: Unified Switch BKP Unified Switch 1 L2 or L3 Network Unified Switch BKP Primary: Unified Switch 2 Secondary: Unified Switch BKP Unified Switch 2 34 Unified System Deployment Switch Redundancy Switch Redundancy Design – N + N Each switch backup its peer switches In order to backup peer switches, the switch needs to reserve some space for peer switch managed APs. Therefore, it cannot manage its maximum number of APs. Do not require an extra switch Primary: Unified Switch 1 Secondary: Unified Switch 2 Unified Switch 1 L2 or L3 Network Primary: Unified Switch 2 Unified Switch 2 Secondary: Unified Switch 1 35 Unified System Usage Session 3 Unified System y Usage g 36 Unified System Usage Session 3: Unified System Usage User Interface AP Profile AP Discovery AP Validation Peer Switch 37 Unified System Usage User Interface User Interface – Unified Switch D-Link Unified Switch supports 3 kinds of user interface • • • Web GUI CLI (te C (telnet et a and d co console so e port) po t) SNMP v1/v2c/v3 Default IP of the Unified Switch is 10 90 90 90 10.90.90.90 Default account is “admin” and blank for the password Provide MIB file for SNMP protocol • Baud rate: 115,200 bps • Data bits: 8 • Parity: none • Stop bit: 1 • Flow control: none 38 Unified System Usage User Interface User Interface – Unified Access Point D-Link Unified APs support three types of user interfaces: • • • Web GUI C CLI SNMP v1/v2c/v3 In Managed Mode, Web GUI and SNMP are disabled DHCP client is enabled by default If there is no DHCP server in the network, the AP will use its default IP as 10.90.90.91 Default username and password are both “admin” DWL-8600AP DWL 8600AP supports external console port (Baud rate 115,200 bps) 39 Unified System Usage User Interface AP Configuration Example Unified Switch 10.90.90.90/8 # # # # # # Unified Switch 10.90.90.92/8 # factory-reset (set AP to factory default) # reboot (re-start AP) set management dhcp-status down set management static-ip i i 10.90.90.92 10 90 90 92 (Telnet (T l again i with i h new IP) set management static-mask 255.255.255.0 set static-ip-route gateway 10.90.90.90 save-running save running get management (Check the new configuration) 40 Unified System Usage User Interface Save Changes After changing the configuration of the Switch or AP, it is necessary to save changes. If it is not saved, the Switch and AP will loose its configuration after the power cycle Save changes can be done through WEB UI or CLI Command: • • “write memory” for Switch “save-running” for AP WEB UI of the Switch CLI of the Switch CLI of the AP 41 Unified System Usage AP Profile AP Profile D-Link Unified Solution centralized manage all APs by using AP Profiles With AP Profiles, users can pre-configure the wireless parameters such as SSID, Security, QoS, and push configurations to all managed APs There is a default profile in switch, switch users may use it if their APs have the same settings 42 Unified System Usage AP Profile AP Profile If the users need to divide the APs into different groups, they can create several new profiles. Support up to 16 profiles on each Switch Next, apply different profiles to different APs 43 Unified System Usage AP Profile Apply Settings to AP After configuring the profiles, the settings are saved in switch and not the APs. Remember to push the configurations to APs using the following two ways: 1. Reset the APs 2. By clicking “Apply” button 44 Unified System Usage AP Discovery AP Discovery To implement D-Link Unified Solution, the switch must manage the APs. To manage the APs, the switch needs to find out where are the APs. D-Link Unified Solution implements some mechanisms for switch and AP to discover each other: • • • • L2 discovery L3 discovery L3 discovery DHCP option – Switch discovers AP – Switch discovers AP – AP discovers switch 43 With Default setting, the switch only discovers VLAN 1 (no default setting on APs). The users need to manually locate the AP if the AP is not in the default VLAN of the switch. 45 Unified System Usage AP Discovery AP Discovery – L2 Discovery APs need to in the same L2 broadcast domain with switch. Switch sends a broadcast packet containing the discovery message every 30 seconds. Users need to input the AP’s AP s VLAN VLAN 1 is the default VLAN in the L2 discovery list 46 Unified System Usage AP Discovery AP Discovery – L3 Discovery If the AP and switch are in a L3 environment, the switch can discover the APs with their IP addresses. The switch and AP must be able to ping each other. Switch sends UDP message to AP. AP initiates an SSL TCP connection to the switch. List of AP IPs AP 1 IP AP 2 IP UDP Discovery Message 172.17.5.x 172.17.6.x 47 Unified System Usage AP Discovery AP Discovery – L3 Discovery It is possible to ask the AP to discover the switch. The users need to use CLI to achieve this. Login to the CLI of the AP and configure 1-4 Switch IP addresses using command “set set managed-ap switch-address-1 switch-address-1” Next, the AP will try to discover the switches in sequence with the IP address The switch and AP must be able to ping each other. List of Switch IPs Switch 1 IP Switch 2 IP UDP Discovery Message 48 Unified System Usage AP Discovery DHCP Option 43 It is a heavy loading to configure the switch’s IP address on all APs, especially when there are many APs. D-Link Unified Solution provides an easy way to complete these settings automatically with DHCP option 43 Format for DHCP option 43 values are defined by RFC 2132 as follows: • Data type code (01) + address length (04) + IP address in hexadecimal format DHCP Option 43 entry for 192.168.1.10 looks like 01 04 C0 A8 01 0A. DHCP Option 43 is not required if switch IP is statically configured in APs. DHCP Request DHCP Response DHCP Server 49 Unified System Usage AP Discovery AP Discovery Limitation Routing between switch and APs is necessary. The correct L2 or L3 discovery setup is needed if the switch and APs are not in the same VLAN/network segment. AP discovery is NOT allowed when passing through NAT. NAT Firmware versions of both Switch and APs must the same. 50 Unified System Usage AP Validation AP Validation Valid AP database Add the MAC address of the AP manually here Before applying configuration to the AP, the AP must be managed by the Unified Switch. To manage an AP, the MAC Address of the AP must be in “Valid AP” database. Valid AP database can be local or on a RADIUS server. There are two ways to add the MAC address of the AP to local Valid AP database, the first way is to add it manually. 51 Unified System Usage AP Validation AP Validation Another way is to place a “tick” to the required AP from WLAN Monitoring Access points All Access Points , and click “Manage” After completing the setup, remember to check the AP status from WLAN Monitoring Access points Managed AP Status 52 Unified System Usage AP Validation Debug Mode The APs managed by the unified switch are not accessible via Telnet. The users must enable “Debug Mode” if they want to access the AP. When the “Debug Mode” on the AP is enabled, it can be accessed via Telnet again. again 53 Unified System Usage Peer Switch Peer Switch D-Link Unified Solution allows users to group up to 4/8 Unified Switches to: • • • • Share the information about the AP they managed Share the information about wireless clients associated with the APs Set Switches in a peer group can handle up to 8000 clients Form an inter-switch roaming group (Need the same security setting) WS3 WS2 WS1 WS4 L2/L3 Network APs managed by WS4 APs managed by WS1 APs managed APs managed d by WS2 by WS3 54 Unified System Usage Peer Switch Inter-switch Roaming Inter-Switch roaming (formed by Peer Switch) can support fast roaming and pre-authentication across Switch. WS2 WS1 L2/L3 Network AP1 managed by WS1 AP2 managed b WS2 by 55 Unified System Usage Peer Switch How to Set Up Peer Switch? Peer unified switches discover each other using similar method as unified switch discovering APs. In L2 network, they are able to find each other easily. In different VLANs or L3 network network, the users need to set VLAN Discovery or L3 Discovery 56 Unified System Usage Peer Switch Check the Peer Switch Status Check Peer Switch Status Check Peer Switch’s Managed AP Information The color indicates the AP type • Green: Managed AP • Red: Rogue AP • Amber: Peer Switch managed AP 57 Lab 1: Switch Redundancy Lab 1 Switch Redundancy y 58 Lab 1: Switch Redundancy Equipment Requirement It is recommended to have four members in each group Equipment 1. 2. 3. 4 4. 5. 6. 7. DWS-4026 x 3 DWL-8600AP x 3 (with power adapter and console cable) DGS-3627 x 1 Wi l Wireless Cli Clientt with ith IEEE 802 802.11n 11 and d supportt WPA2-Enterprise WPA2 E t i x2 Windows XP desktop computer or laptop x 1 (as RADIUS Server) RS-232 console cable x 1 (USB to RS-232 if required) Network cable x 10 59 Lab 1: Switch Redundancy Lab 1: Switch Redundancy This scenario shows how to setup fail over solution for DWS-4026 and how to use the AP Discovery with DHCP option 43 Objectives: • • • • Knowing how unified switches discover APs or how APs discover unified switches Knowing the communication between Peer Switches Understanding the configuration of DHCP option 43 Designing a correct redundancy solution for customer 60 Lab 1: Switch Redundancy Network Topology Unified Switch 1 is in VLAN10, works as DHCP server and provides IPs for VLAN10, 20, 30. Unified Switch 2 is in VLAN20 while Unified Switch 3 is in VLAN30. g L3 Switch creates three L3 Interfaces for VLAN10,, 20 and 30,, and handing the routing. To begin, the AP Group 1 is managed by Switch 1, AP Group 2 is managed by Switch 2, AP Group 3 is managed by Switch 3. If one of the Unified Switches crashes, its managed APs will automatically be managed by other S it h Switches. Unified Switch 1 DHCP sever Unified Switch 2 AP Group 1 L3 Switch AP Group 2 Unified Switch 3 AP Group 3 61 Lab 1: Switch Redundancy Lab 1: Switch Redundancy Table 1: Physical Connection From Device From Port Unified Switch 1 1 Unified Switch 2 7 Unified Switch 3 13 L3 Switch 4 L3 Switch 10 L3 Switch 16 Table 2: VLAN and Port Assignment Device VLAN ID VLAN Name Unified Switch 1 10 VLAN10 Unified Switch 1 20 VLAN20 Unified Switch 1 30 VLAN30 L3 Switch 10 VLAN10 L3 Switch S it h 20 VLAN20 L3 Switch 30 VLAN30 To Device L3 Switch L3 Switch L3 Switch AP Group 1 AP Group 2 AP Group 3 Tagged Ports N/A 1 1 N/A 1 1 To Port 1 7 13 N/A N/A N/A Untagged Ports 1 N/A N/A 1-6 7 12 7-12 13-18 62 Lab 1: Switch Redundancy Lab 1: Switch Redundancy Table 3: IP Addressing Device Unified Switch 1 Unified Switch 1 Unified Switch 1 Unified Switch 2 Unified Switch 3 L3 Switch L3 Switch L3 Switch Interface 4/1 4/2 4/3 Management Management ipif10 ipif20 ipif30 VID 10 20 30 1 1 10 20 30 IP Address 192.168.10.1/24 192.168.20.2/24 192.168.30.2/24 192.168.20.1/24 192.168.30.1/24 192.168.10.254/24 192.168.20.254/24 192.168.30.254/24 Table 4: DHCP Server Device Pool Unified Switch 1 VLAN10 Network 192.168.10.0/24 Excluded IP 192.168.10.1-100 192.168.10.200-255 Unified Switch 1 VLAN20 192.168.20.0/24 192.168.20.1-100 192 168 20 200 255 192.168.20.200-255 Unified Switch 1 VLAN30 192.168.30.0/24 192.168.30.1-100 192.168.30.200-255 Option 43 0104.c0a8.0a01 0104.c0a8.1401 0104.c0a8.1e01 0104.c0a8.1401 0104 c0a8 1e01 0104.c0a8.1e01 0104.c0a8.0a01 0104.c0a8.1e01 0104.c0a8.0a01 0104.c0a8.1401 63 Lab 1: Switch Redundancy Lab Scenario Discussion Is DHCP option 43 necessary in this scenario? Why need 3 VLANs? Why I need to create 3 VLANs on Unified Switch 1? Is that a necessary step? Wh configuring Why fi i ttagged d ports t b between t U Unified ifi d S Switch it h 1 and d L3 switch? it h? Why disable L2 discovery but enable L3 discovery? 64 Working Principles of Basic Functions Session 4 Working g Principles p of Basic Functions 65 Working Principles of Basic Functions Session 4: Working Principles of Basic Functions Standalone Mode and Managed Mode Virtual Access Point AP Channel and Power Management L3 Tunnel Fast Roaming Wi-Fi Multimedia Dynamic VLAN Assignment Advanced Management 66 Working Principles of Basic Functions Standalone Mode and Managed Mode Standalone Mode and Managed Mode D-Link Unified AP supports Standalone and Managed Modes. When the AP works as Managed Mode (often does), it works as a Thin AP. It is managed by Unified Switch and received configuration from the switch. When the AP be configured as Standalone Mode, Mode it works as a Fat AP. AP It works alone, does not require a wireless controller. Standalone Mode supports WEB GUI but Managed Mode does not. Internet Internet Unified switch L2/L3 switch Standalone Mode Work alone without the need of wireless controller Managed M d Mode Wireless controller is needed, managed and received configuration from controller 67 Working Principles of Basic Functions Standalone Mode and Managed Mode Standalone Mode and Managed Mode (Cont.) When the Unified AP boots up, it will try to enter managed mode first. If there is no unified switch inside the network,, it will turn to standalone mode. Once the managed AP loses the management from the switch, it will tune to standalone mode and keep the current configuration until it reboots. The current AP status can be checked by • • Boot User Reboot AP Unified Switch inside network? Yes Keep Discovering No Managed Mode Standalone Mode No Lose Management? Yes Command “get managed-ap”, up is managed mode and down is standalone mode WEB UI Tune to Standalone Mode but keep config from switch N No Yes Unified Switch back to network? 68 Working Principles of Basic Functions Standalone Mode and Managed Mode Standalone Mode and Managed Mode (Cont.) For DWS-4026 R1 (currently), when the AP loses management from switch, the AP turn back to standalone mode and disable the radios. For DWS-4026 R2 (future release), when the AP loses management from switch, users will have a pre-option to disable the radio or not. If the radio is not disable, it will behave like DWS DWS-3000 3000 series. Boot User Reboot AP Unified Switch inside network? Yes Keep Discovering No Managed Mode Standalone Mode No Lose Management? Yes Turn radio on or off? On Tune to Standalone Mode but keep config from switch off Tune to Standalone Mode and disable the radio No No Yes Unified Switch back to network? 69 Working Principles of Basic Functions Virtual Access Point Virtual Access Point (VAP) It is also called SSID. A physical AP can provide multiple SSIDs. To the wireless clients, it appears to have many APs inside the network. C t Customer can classify l if users into i t different diff t groups with ith VAP. VAP It can isolate users by different SSIDs and security methods. SSID SSID_1 1 WEP SSID_2 WPA Site Survey SSID_3 WPA2 70 Working Principles of Basic Functions Virtual Access Point Combine with VLAN Function An VID can be assigned SSID, wired and wireless users with the same VID form a VLAN group. When combining with VLAN function, the AP forwards wireless packets with user-assigned the user assigned tagged VID to wired network The AP must be connected to a switch which supports VLAN function with correct VLAN settings. V1 V2 V3 SSID_1 SSID 1 V1 SSID_2 V2 SSID_3 V3 71 Working Principles of Basic Functions Virtual Access Point VAP Features DWL-3500AP supports 8 SSIDs on 2.4GHz DWL-8500AP supports 8 SSIDs on both 2.4/5GHz, total 16 SSIDs DWL-8600AP supports 16 SSIDs on both 2.4/5GHz, total 32 SSIDs VAP function procedure: • • • Create and configure a new SSID Assign this SSID to specific AP Profile Apply the profile to APs DWS-3000 DWS 3000 series i create t 8 SSID SSIDs (VAP (VAPs)) by b default d f lt and d DWS-4026 DWS 4026 create 16 SSIDs. Users can choose to use the default VAP settings. Note: Same SSID can be assigned to different profiles or same profile with different radio 72 Working Principles of Basic Functions Virtual Access Point Create New SSID (Wireless Networks) Configure up to 64 unique SSIDs (wireless networks) Apply different SSIDs for new AP profile manually (Apply to AP) 73 Working Principles of Basic Functions RF Management AP Channel Assignment Two methods of Channel Assignment: • Static assign – – • Through valid AP database (fix the channel) Managed AP Advanced (run-time only) Automatic (two methods) – – Initial Channel Selection (ICS) Auto Channel Adjustment (ACA) 74 Working Principles of Basic Functions RF Management AP Channel Assignment Initial Channel Selection (ICS) • • • Each time the AP reboot or managed by switch, the mechanism runs to select the initial operating channel. g channels which In DWS-4026,, the AP chooses one channel at random from eligible could be configured by customer and makes this channel the operational channel. For DWS-3000 series, only channels 1, 6, 11 are available. 75 Working Principles of Basic Functions RF Management AP Channel Assignment Auto Channel Adjustment (ACA) • Switch decide which channel to use by: • • The Unified Switch periodically evaluates the operational channel and changes the channel if the current channel is noisy RSSI readings from managed APs Comparing the transmission/reception error rates Three ways to configure ACA • • • Fixed Time (Plan is calculated once every 24 hours at the specified time) Manual (Users initiate the calculation of the channel plan) Interval (Switch periodically calculates the channel plan, 6-24 hours) 76 Working Principles of Basic Functions RF Management Automatic Channel Selection Limitation The automatic channel selection algorithm does not affect APs with the following conditions: • • • • • The channel is statically assigned. Th AP uses a profile The fil th thatt h has th the A Automatic t ti Channel Ch l field fi ld disabled di bl d (Radio Configuration Setting). Channel plan algorithm does not support radios using Super A/G. When running g the ICS,, the neighboring g g APs may y use the same channel because the channel is randomly assigned. If there is no wireless clients in the network, which means there is no wireless data in the network. The APs are not able to select the best channel (may choose the same channel) because the error rate database is insufficient to make the best decision. 77 Working Principles of Basic Functions RF Management AP Power Assignment Two methods to assign the power of AP • • Static Automatic Static Assignment • • Web GUI has only four options to fix the power through valid AP database (same as static channel) Command line can support more options – – • (Config wireless)#ap database 00:17:9a:d2:8d:70 (Config-wireless)#ap (Config-ap)#radio 2 power 70 Managed AP Advanced (run-time only) 78 Working Principles of Basic Functions RF Management AP Power Assignment Automatic Power Assignment • • • • The Unified Switch monitors the AP’s statistics to adjust the power when necessary, if the AP’s power level is not manually setup. Power level is a percentage of maximum power. power The switch sets the initial power of the AP to the value specified in the profile. The algorithm increases or reduces the power level in 10% increments. The Unified Switch uses the following statistics to make the power adjustment decision: • • Increase in duplicate packets from client (ACKs cannot reach clients) Increase in re-transmissions (ACKs cannot reach AP) 79 Working Principles of Basic Functions RF Management AP Power Assignment Two way to configure Auto Power Adjustment • • Interval (15-1440 minutes) Manual Note: The algorithm never reduces the AP power below the initial power setting g in the p profile ((Default is 100%). ) Therefore if the initial p power setting g is 100% in the profile then the auto power adjustment algorithm has no effect on the AP. 80 Working Principles of Basic Functions Layer 3 Tunnel Layer 3 Tunnel Layer 3 (L3) Tunnel, also called IP-IP tunnel, is supported by D-Link Unified Solution to build a bridge between switch and APs regardless the number of L3 network subnets they pass through. Within this tunnel, the mobile stations can maintain the same IP connections while roaming from one AP to another AP even when these APs are attached to different IP subnets. This feature is especially useful for environments that use wireless Voice over IP (VoIP) on the 802 802.11 11 networks with multiple subnets. subnets Tunnel subnet 192.168.20.0/24 172.17.5.0/24 Tunnel bridge 172.17.6.0/24 Tunnel bridge Tunnel bridge Tunnel bridge 192.168.5.0/24 192.168.6.0/24 AP1 AP2 Always get IP address in 192.168.20.0/24, ega d ess which c is s regardless the connected AP 81 Working Principles of Basic Functions Layer 3 Tunnel Layer 3 Tunnel When configuring L3 tunnel mode, the switch establishes an IP-IP tunnel to the APs that are configured for tunneling mode. The tunnel will encapsulate IPv4 packets inside an extra IPv4 packets. Both the switch and the AP perform tunnel encapsulation and decapsulation. • • The AP uses the Unified Switch IP address as the destination IP in the outer IP header and itself as the source IP. The Unified Switch uses the AP IP address as the destination IP in the outer IP header and itself as the source IP. Tunnel bridge IP Data De-capsulate Extra IP IP header Tunnel bridge Data Encapsulate IP Data 82 Working Principles of Basic Functions Layer 3 Tunnel Layer 3 Tunnel WS1 loopback interface: WS1 192.168.10.254 172.17.5.0/24 L3 SW 172.17.6.0/24 AP2 172.17.5.254 172.17.6.254172.17.6.1 L3 Tunnel AP1 STA 192 168 250 3 192.168.20.2 192.168.250.3 172.17.5.253 192.168.20.254 STA ping interface 172.17.5.253 AP1 / WS1 STA / Interface 83 Working Principles of Basic Functions Layer 3 Tunnel L3 Tunnel Configuration To create an individual VLAN and IP subnet, the wired equipment and roaming wireless clients have to be in the same L3 tunnel subnet. Routing is enabled on each switch. L3 tunnel is enabled based on SSID (go through Basic Setup SSID ) NOTE: When L3 tunneling is enabled the VLAN ID is not used. 84 Working Principles of Basic Functions Layer 3 Tunnel Layer 3 Tunnel Limitation Tunneled packets have extra 20 bytes in header for all devices. It does TCP MSS Reduction to avoid the frame over-sizing issue. IPv6 clients are not supported on tunneled interfaces. Only unicast IPv4 traffic is tunneled in hardware. Multicast traffic and Non-IP traffic are tunneled in software. • • Slower C Cause network t k congestion ti All devices that use the L3 tunnel network are stored in the ARP cache because the wireless subnet is local to the switch (ARP cache fills up faster than expected). 85 Working Principles of Basic Functions Fast Roaming What is Roaming? A wireless client connects to an AP first. Next, this client moves to another location which is too far from the original AP to keep connected, so this client disconnects from the original AP and tries to connect to a new AP. To allow wireless client to roam, all the APs need to have the same SSID and security. Roaming behavior is controlled by wireless client, D-Link Access Points provide solutions to speed up this behavior. AP2 with the same SSID and security with AP1 AP1 Client is originally connected to AP1 Roaming Client moves here and d connects t to t AP2 86 Working Principles of Basic Functions Fast Roaming Seamless Fast Roaming To speed up the hand over time of the roaming behavior, D-Link unified solution implements seamless roaming solution with the following. • Keep the client’s IP address while it roams (L3 Tunnel Mode) – • Re authentication can be avoided or shorten re-authentication Re-authentication re authentication time – – – The wireless client can keep its IP address after roaming to another AP, regardless it is a L2 or L3 roaming. Even these two APs are in the different subnets, the client can continue keep the same IP address. WPA2 Pre-Authentication (WPA2-PSK & Enterprise) WPA2 Key Caching (WPA2-PSK & Enterprise) Dynamic Key Forwarding (WPA2-Enterprise) Note: Dynamic WEP / WPA Enterprise does not supported by fast roaming function 87 Working Principles of Basic Functions Fast Roaming Seaming Fast Roaming – Keep IP Address With the tunnel function on D-Link Unified solution, the wireless clients can roam to different APs in different network subnets without renewing the IP address. This will save lots of updating time. Client IP 10.5.5.75 AP1 IP 10 5 20 1 10.5.20.1 Client IP 10.5.5.75 Tunnel Subnet 10.5.5.0/24 L3 Network AP2 IP 10.5.40.1 AP3 IP 10.5.60.1 Client IP 10.5.5.75 As clients move from one AP to another AP, the switch updates its ARP table to reflect the new location of the client. 88 Working Principles of Basic Functions Fast Roaming Seaming Fast Roaming – Keep IP Address It supports seamless roaming across peer switch too. Switch 1 Interfaces: VLAN Routing: 10.5.5.1 Network: 192.168.10.1 Call Server 10.5.5.8 AP 1 192.168.10.10 Client IP 10.5.5.75 L3 Network Unified Switch 2 Switch 2 Interfaces: VLAN Routing: 10.5.5.2 Network: 192.168.20.1 AP 2 192.168.20.10 Client IP 055 5 10.5.5.75 Client IP 10.5.5.75 89 Working Principles of Basic Functions Fast Roaming Seaming Fast Roaming – Keep IP Address It is only used for time-sensitive roaming traffic, such as IP mobile telephone. Typically this feature is for customer to deploy in VoIP environment, general data traffic does NOT necessary require this function. If using L3 roaming, enable at least two SSIDs per AP • • One SSID for traffic that must use tunnel (VoIP) One SSID for non-VoIP traffic Unified Switch L3 Network AP1 172.17.1.1/24 AP2 172.17.2.1/24 Data VoIP L3 Tunnel Non Tunnel Data VoIP L3 Tunnel Non Tunnel AP3 172.17.3.1/24 Data VoIP L3 Tunnel Non Tunnel 90 Working Principles of Basic Functions Fast Roaming Shorten Re-Authentication Time when Roaming WPA2 Pre-authentication (WPA2-PSK & Enterprise) • • The client can attempt to authenticate to other APs within range. D-Link’s implementation – Pre-Auth request will be forwarded by the Unified Switch to the neighboring g g AP. AP Unified Switch Pre-Auth request Neighboring AP WPA2 Key Caching (WPA2-PSK & Enterprise) • • The AP & Clients will retain the PMK key generated for each session. When the client roams to another AP and then roams back, re-authentication is not necessary 91 Working Principles of Basic Functions Fast Roaming Shorten Re-Authentication Time when Roaming Dynamic Key Forwarding (WPA2-Enterprise) • D-Link’s implementation (Non-Standard) Key Forwarding: • PMK • • • Authenticated with RADIUS Server PMK key generated PMK (Pair wise Master Key) can be cached in Switch and forwarded to APs in the same roaming group When client roaming to other AP, it will send the PMK ID to the new AP. Peer Switch 92 Working Principles of Basic Functions Wi-Fi Multimedia Wi-Fi Multimedia Wi-Fi Multimedia (WMM) is an optional Wi-Fi Alliance interoperability certification, based on Enhanced Distributed Channel Access (EDCA) of the IEEE 802.11e standard. WMM provides basic Quality of service (QoS) features to IEEE 802.11 networks, multimedia applications including voice, video data could get higher priority. Devices which pass the Wi-Fi WMM certification are guaranteed to work with each other. other To make WMM works, both AP and client have to support it. Normal data gets lower priority and is transmitted after voice data Support WMM Support WMM Voice data gets higher priority and is transmitted firstly Support WMM 93 Working Principles of Basic Functions Wi-Fi Multimedia WMM Operating For legacy 802.11 network, CSMA/CA-based Distributed Coordination Function (DCF) is used for transmit data which avoids the collision condition. Each client has to wait for a random backoff time. If there is no other clients transmitting, g, the client will get g the permission p and start to deliver the data With DCF, all the clients get the same priority WMM defines 4 Access Categories, Voice, Video, Best Effort, and Background. The categories are mapped to different priories which are defined in IEEE 802.1p. 802 1p The default priority is Best Effort Access Category g y Description p IEEE 802.1p priority Voice Highest priority 7, 6 Video Prioritize video traffic above other data traffic 5, 4 Traffic from legacy devices, or traffic from applications or devices that lack QoS capabilities 0 3 0, Low priority traffic (file downloads, print jobs) that does not have strict latency and throughput requirements 2, 1 B t Effort Best Eff t Background 94 Working Principles of Basic Functions Wi-Fi Multimedia WMM Operating WMM is an extension to the legacy CSMA/CA-based DCF mechanism Each time when AP transmits a packet, it wait for a specific period of time, defined by AIFS (Arbitration Interframe Space ) and listen for contention. After the waiting time of AIFS, AIFS AP starts to count down a random backoff wait time from 0 to the value defined by the Minimum Contention Window (cwMin). If the random backoff time ends and a collision is detected, the AP select a random andom time again and retry, et but b t doubles do bles the time range. ange The retry et and doubling behavior continues (if collisions remain there) until reach the value specified in the Maximum Contention Window (cwMax) or packet has been sent/discarded. Initial transmission AIFS 1st retransmission AIFS 2nd retransmission AIFS Xth retransmission AIFS 0 – cwMin = AIFS 0 – 2x cwMin 0 – 4x cwMin 0 – cwMax = Random Backoff Wait Time 95 Working Principles of Basic Functions Wi-Fi Multimedia WMM Operating If the random backoff time ends and no collision is detected, AP starts to transmit this packet WMM enabled devices create four queues for different categories, data packets will be assigned to different queues according to its access category and priority. Each queue follows the described mechanism and is configured with different AIFS, AIFS cwMin, cwMin cwMax parameters. Queues with higher priority are configured with lower AIFS/cwMin/cwMax S/ / (lower (l waiting time) to make sure the packet has higher chances to be transmitted. 96 Working Principles of Basic Functions Wi-Fi Multimedia WMM Setup WMM setup is base on AP Profile and enabled by default. Customer can setup AP EDCA Parameters which affect the traffics from AP to client or Station EDCA Parameters which affect the traffics from client to AP. TXOP: The Transmission Opportunity is the time period that a client who has won the control of the shared medium can retain it. Max. Burst: This value is the maximum burst time length allowed for packet bursts on the wireless network. A packet burst is a collection of multiple f ames ttransmitted frames ansmitted without itho t heade header information. info mation 97 Working Principles of Basic Functions Wi-Fi Multimedia WMM Limitation Both AP and clients have to be certified by Wi-Fi for WMM and has WMM enabled. The source application on clients (for instance VoIP) must supports WMM. APs with WMM can accept IEEE802 IEEE802.1p 1p priorities from wired network and could map its priorities to IEEE802.1p, too. But it doesn’t take effect if WMM is disabled. IEEE802.1p has priorities from 0 to 7, higher number has higher priority, and same does WMM WMM, b butt an e exception ception e existed isted that 0 is higher highe than 1&2. 1&2 98 Working Principles of Basic Functions Dynamic VLAN Dynamic VLAN Assignment The clients get assigned to the appropriate VLAN that is configured in the RADIUS server regardless which port or SSID they connect to. Flexibility for the clients to move around the network without much configuration required by the administrator. Users have to pass the 802.1X authentication before they can access the network. Based on the username, the RADIUS server will dynamically assign the clients to different VLANs. It forces the specific user be assigned to specific VLAN. It can authenticate both wired and wireless clients. It does d not support fast f roaming. i 99 Working Principles of Basic Functions Dynamic VLAN Configuration Example Enable wired dynamic VLAN assignment globally from the Web GUI through LAN Security 802.1X 802.1X Setting g VLAN Assignment Mode RADIUS Tunnel Attributes used • • • Tunnel-Type=VLAN Tunnel Type=VLAN (13) Tunnel-Medium-Type=802 Tunnel-Private-Group- ID= VLANID Wireless dynamic VLAN function is supported by default, just leave the VID of the SSID as 1. 100 Working Principles of Basic Functions Dynamic VLAN Topology Example – Wired V1V2 V3 Wired User User1 go to V2 RADIUS Server 101 Working Principles of Basic Functions Dynamic VLAN Topology Example – Wireless V1V2 V3 Username or Certificate User1 Single SSID User1 go to V2 User2 go to V3 Username or Certificate RADIUS Server User2 102 Working Principles of Basic Functions Advanced Management Advanced Management There are three main types of interfaces that assign IP addresses in Unified Switch • • • VLAN routing interface N t Network k interface i t f (network ( t k managementt IP address) dd ) WLAN function interface VLAN routing interface routes data from different VLANs. VLANs • • • • An interface that binds a VID, usually stands for a network subnet Need to create VLAN first, then enable VLAN routing to create VLAN routing interface DWS-4026 can show the VID of the interface using CLI but DWS-3026 series cannot Command: show running-config – – – vlan database vlan 10,20 vlan routing 10 10 The 1st “10” is the VID, the 2nd “10” is the interface 103 Working Principles of Basic Functions Advanced Management Network Interface and Management Network Network interface is the IP Address • • Entered into browser address bar, or For telnet client to configure switch The default network management interface is 10 10.90.90.90/8 90 90 90/8 Management network is a subnet only for managing the switch. Operational network is the network where the box is responsible for routing/switching the traffic In D-Link’s design, operational network traffic is not allowed to flow to the management network Default VLAN V10 V20 AP20 PC_A Not allowed PC_B 104 Working Principles of Basic Functions Advanced Management WLAN Function Interface It is the IP Address to communicate with AP. It is very important to make sure that the communication between AP and WLAN interface is routable. The IP address of WLAN function interface is chosen automatically. automatically • • • IP address of the loopback interface has the first priority. If user does not setup Loopback interface, the lowest VLAN routing interface will be selected, for example interface 4/1 has higher priority than 4/2. 4/2 If the switch works as L2 devices, which means there is no VLAN routing in this switch, the network management interface will be the WLAN function interface. A loopback interface is a permanent logical interface which must be always up. As such, it provides a mean to configure a stable IP address on the device that may be referred to by other switches. It is typically used by routing protocols. Make sure what is the IP address of WLAN interface before implementing APs. 105 Working Principles of Basic Functions Advanced Management WLAN Function Interface Configuration Create Loopback interface Verify the WLAN interface status before implementing APs 106 Working Principles of Basic Functions Advanced Management Manage APs in VLAN Environment When using Unified Solution in a multiple VLAN environment, it is recommended to create a new VLAN for AP management network to separate the AP management network and client data. In this example, V5 is newly created and only for managing APs. The port connecting to the AP has tagged V1, V2 V3 and untagged V5 (Using untagged port to managed AP) V1 V2 V3 V5 SSID_1 V1 SSID_2 V2 SSID_3 V3 107 Working Principles of Basic Functions Advanced Management Manage APs in VLAN Environment If the topology does not allow creation of a new VLAN, an existing VLAN can be used to manage the AP. An additional configuration is needed on the managed AP. Commands: • “set management vlan-id 10”, where the 10 equal to the vlan ID Disadvantage: Mixing the AP management network and client data network In this example, the port that connects the AP has to be tagged with V10, V20, V30 (Using tagged port to manage AP) V10V20 V30 SSID_1 V10 SSID_2 V20 SSID_3 V30 108 Working Principles of Basic Functions Advanced Management Manage APs in Layer 3 Environment Always check the WLAN interface IP first. Configure the correct routing setting between AP and switch. Configure the correct gateway for APs (If DHCP server is not used). Ping AP to switch or from switch to AP. It must succeed. Could use tunnel mode or non-tunnel mode in L3 environment Unified Switch Loopback: 192.168.10.1/24 Interface 4/1: 192.168.101.1/24 Interface 4/2: 172.17.10.1/24 172.17.10.0/24 L3 Device Internet IPIF1:172.17.10.254/24 IPIF2:172.17.20.254/24 172.17.20.0/24 Remote Offi Office AP Local AP 192.168.101.x/24 172.17.20.x/24 109 Working Principles of Basic Functions Advanced Management Manage AP through VPN Able to manage AP through VPN. The AP management data are “don’t fragment” packets, make sure the VPN devices do not drop “don’t fragment ” packets. Loopback Interface 192.168.10.254 Unified Switch AP1 192.168.20.1 192.168.20.254 WAN: 192.168.192.1 WAN: 192.168.192.2 VPN DFL-800 172.17.5.253 LAN:172.17.5.254 DFL-800 AP2 172.17.6.1 LAN:172.17.6.254 110 Lab 2: Advanced Management Lab 2 Advanced Management g 111 Lab 2: Advanced Management Lab 2: Advanced Management This scenario shows how to manage AP in L2 and L3 environment, setup tunnel and non-tunnel modes, design management data and client data flow. Objectives: • • • • Understand management network and client data network Understand tunnel and non tunnel mode Understand WLAN function interface Design typical L2 + L3 wireless network 112 Lab 2: Advanced Management Network Topology Wireless network in local office works in L2 environment, remote office is implemented with L3 network. All employees connect to SSID S2-Group1-Employee and assign to the same subnet regardless where they are. Guests connect to SSID S2-Group1-Guest and assign to different subnet according to their locations. Base on the design, remote office requires a L3 tunnel SSID and a nontunnel SSID. Local office needs to mix the management network and client d t network data t k tto minimize i i i th the needed d d VLAN. VLAN Internet Unified Switch 172.17.10.0/24 L3 Switch 172.17.20.0/24 Internet Local AP 192.168.101.x/24 SSIDs: S2-Group1-Employee 192.168.101.x/24 S2-Group1-Guest 192.168.102.x/24 Remote Office AP 172.17.20.x/24 SSIDs: S2 Group1 Employee S2-Group1-Employee 192.168.101.x/24 S2-Group1-Guest 172.17.20.x/24 113 Lab 2: Advanced Management Lab 2: Advanced Management Table 1: Physical Connection From Device From Port To Device To Port Unified Switch 24 L3 Switch 1 Unified Switch 1 Local AP N/A L3 Switch 24 Remote AP N/A Table 2: VLAN and Port Assignment Device VLAN ID VLAN Name Tagged Ports Untagged Ports Unified Switch 10 Core10 N/A / 24 Unified Switch 101 Tunnel101 1 N/A Unified Switch 102 Client102 1 N/A L3 Switch 10 Core10 / N/A 1 L3 Switch 20 Client20 N/A 24 114 Lab 2: Advanced Management Lab 2: Advanced Management Table 3: IP Addressing Device Interface VID IP Address Unified Switch 4/1 10 172.17.10.254/24 Unified Switch 4/2 101 192.168.101.254/24 Unified Switch 4/3 102 192.168.102.254/24 Unified Switch Management 1 10.90.90.90/8 Unified Switch Loopback N/A 192.168.100.254/32 L3 Switch ipif10 10 172.17.10.1/24 L3 Switch ipif20 20 172.17.20.1/24 Table 4: DHCP Server Device Pool Network Excluded IP Unified Switch Tunnel101 192.168.101.0/24 / 192.168.101.200-255 Unified Switch Client102 192.168.102.0/24 192.168.102.200-255 L3 Switch Client20 172.17.20.0/24 172.17.20.1-100 115 Lab 2: Advanced Management Lab Scenario Discussion The reason to create loopback interface on Unified Switch? Why employees need a tunnel, can I create a tunnel for guests? Why need to configure local AP? Is that necessary? Wh need Why d a static t ti route t on L3 switch? it h? 116 New Functions Implementation (DWS-4026/DWL-8600AP) Session 5 New Functions Implementation (DWS-4026/DWL-8600AP) 117 New Functions Implementation (DWS-4026/DWL-8600AP) Session 5: New Function Implementation ( (DWS-4026/DWL-8600AP) / ) Switch Clustering Layer 2 Distributed Tunnel RF Scan and Rogue Management Wireless Intrusion Detection System Wireless Intrusion Prevention System IEEE 802.11n AP Clustering Wireless Distribution System Centralized IEEE 802.1x Authentication Other Features 118 New Functions Implementation (DWS-4026/DWL-8600AP) Switch Clustering Switch Clustering Peer Switches can form a Cluster Group. Within this group, users can push the configurations from one switch to other peer switches. • In a Cluster Group, Group a Cluster Controller will be selected selected. This Controller will gather all the AP and clients statistics in this group. • It is not necessary to configure the same settings one by one. Single point of management is possible. Switch clustering is only supported by DWS-4026. Apply configurations Apply configurations L2 or L3 Network L2 or L3 Network Cluster Controller Report Information P Peer S i h Switches Report Information Managed M d APs AP 119 New Functions Implementation (DWS-4026/DWL-8600AP) Switch Clustering Cluster Controller Selection The switches select the Cluster Controller by two ways: • • Compare Cluster Priority. The switch with the highest priority becomes the Cluster Controller. priority y is the same,, the switch with lower IP address becomes the Cluster If the p Controller. The Cluster Priority can be 0 to 255. Setting 0 disables the Cluster function, the IP of the Controller will show 0.0.0.0. 120 New Functions Implementation (DWS-4026/DWL-8600AP) Switch Clustering Cluster Controller Selection (Cont.) A switch performs the election process when • • • • It boots up. It loses connection to the current Cluster Controller. A new peer switch joins. Cluster Priority changes in any of the peer switches. Each switch makes an independent decision about the Cluster Controller. If there is no peer switch, it will appoint itself as the Cluster Controller. Check status stat s 121 New Functions Implementation (DWS-4026/DWL-8600AP) Switch Clustering Cluster Controller Capabilities It can push the configurations to other peer switches. It can control the APs that managed by peer switch, for example to run auto channel/power adjustment, WIDS. It can display information of whole peer group. group • The switches which are not Cluster Controllers can only show its locally attached devices. (Different with DWS-3000 series) The Cluster Controller is also responsible for assuring that there is not more than 256 APs in the unified system. system 122 New Functions Implementation (DWS-4026/DWL-8600AP) Switch Clustering Configuration Pushing Configurations are pushed manually by the admin, and it is not automatic. Configurations can be pushed from any peer switch to other peer switches in a cluster. It is not necessary from the cluster controller only. 123 New Functions Implementation (DWS-4026/DWL-8600AP) Switch Clustering Configuration Pushing Users can choose up to ten configuration items to push. 124 New Functions Implementation (DWS-4026/DWL-8600AP) Layer 2 Distributed Tunnel Layer 2 Distributed Tunnel Layer 2 (L2) Distributed Tunnel mode is used to support L3 roaming without forwarding any traffic to the Unified Switch. When clients roam to another AP which is not in the same network subnet, traffic from roamed clients is tunneled to the originally associated AP of the client. Roamed client remains on the same VLAN and has the same IP address. DWS-4026 S 0 6 L3 Switch 192.168.1.0 Page is Animated 172.17.3.0 10.10.10.0 125 New Functions Implementation (DWS-4026/DWL-8600AP) Layer 2 Distributed Tunnel Layer 2 Distributed Tunnel Operation The initial associated AP of the client is called the “Home AP”. The AP which the client roams to is called the “Association AP”. When a client roams to another AP in a different subnet, the Association AP tunnels all traffic from the client to the Home AP using L2 UDP tunnel. The Home AP injects the traffic received over the tunnel into the wired network. Internet 172.17.6.0/24 3 AP1 10.90.90.0/24 4 Home AP 2 192.168.1.0/24 1 Roaming AP2 A Association i i AP 126 New Functions Implementation (DWS-4026/DWL-8600AP) Layer 2 Distributed Tunnel Layer 2 Distributed Tunnel Operation (Cont.) It uses CAPWAP tunnel encapsulation to forward L2 frames, no extra IP header is needed. Association AP encapsulates the packets into tunnel and Home AP decapsulate the packets. Note: If a client roams to another AP in the same subnet, the tunnel is not created, and the new AP will become the Home AP. L 3 Switch L2 Tunnel Home AP IP Data D t De-capsulate the packets Association AP IP IP Data Encapsulate the original packet to the frame body IP Data 127 New Functions Implementation (DWS-4026/DWL-8600AP) Layer 2 Distributed Tunnel Layer 2 Distributed Tunnel Setup It is based on Virtual Access Point, VAP (SSID). Two APs form a roaming group. APs need to be in different VLAN and network subnet (AP's IP subnet and not client client's s IP subnet) APs attaching to different peer switches can establish a tunnel. 128 New Functions Implementation (DWS-4026/DWL-8600AP) Layer 2 Distributed Tunnel Layer 2 Distributed Tunnel Some more parameters Advantages of Layer 2 distributed tunneling • • • Support fast roaming Reduce network resources because traffic is forwarded locally Reduce Unified Switch loading Disadvantages of Layer 2 distributed tunneling • • Reduce AP performance due to the extra load on the APs for handling roamed clients. clients If the Home AP fails, the L3 roaming does not work because the traffic is not tunneled to the Home AP. 129 New Functions Implementation (DWS-4026/DWL-8600AP) Wireless Intrusion Detection System Wireless Intrusion Detection/Prevention System DWS-4026 supports Wireless Intrusion Detection/Prevention System (WIDS/WIPS). • • Steps to use WIDS/WIPS • • • It detects intrusion of rogue AP and clients automatically. It mitigates iti t attacks tt k from f rogue AP and d clients. li t RF scan with active mode or sentry mode Manually assign rogue devices or automatically defined rogue AP/clients by Unified System Mitigate rogue devices if needed For intrusion mitigation, Unified System only mitigates the interference from rogue AP/clients • • Automatically A t ti ll mitigate iti t rogues. AP/clients which are not classified as rogue are not influenced. 130 New Functions Implementation (DWS-4026/DWL-8600AP) Wireless Intrusion Detection System Radio Frequency Scan Unified APs can scan the entire wireless network and list all the APs in the network. Two scanning modes: • • Active mode: The AP primarily services wireless clients clients, performs RF scan periodically and reports the results to the Unified Switch. Sentry mode: The AP performs only continuous RF scans and does not service Wireless Clients. Unified AP performs only passive RF scans by listening to the wireless traffic. APs do not perform active scans, which send probe requests. Listen to network Receive Rogue’s packets and report to the switch Rogue AP sends wireless packets i l k 131 New Functions Implementation (DWS-4026/DWL-8600AP) Wireless Intrusion Detection System Sentry Mode Operation The AP is dedicated to perform RF scan and does not service any wireless clients. AP in sentry mode scans from the first to the last channel and repeat continuously. AP in sentry mode spends one second on each channel for RF scan. Radios that are configured in sentry mode scan all 802.11 channels, and not just the channels valid for the specific country Sentry mode is configured based on radio (profile). 132 New Functions Implementation (DWS-4026/DWL-8600AP) Wireless Intrusion Detection System Active Mode Operation It is enabled by default. It has three options: • • • RF Scan Other Channels: It scans other channels and AP only listens to its operational channel when the option disabled RF Scan Interval: The interval that AP scan all the channels, in seconds. The default is 60. RF Scan Duration: The duration that the AP stays in each channels, in millisecond. The default is 10. The AP scans only the supported channels in its country. 133 New Functions Implementation (DWS-4026/DWL-8600AP) Wireless Intrusion Detection System Clients Detection The wireless clients are detected by the wireless system because the clients either attempt to interact with the system, or because the system detects traffic from the clients. The wireless clients are detected by following methods: • • • • • Clients attempt to associate with the Unified System. Clients attempt to authenticate with the Unified System, but fail. Clients pre-authenticate with the wireless system. Clients send 802 802.11 11 management frames to the system. system Data traffic from/to clients is detected by Unified AP. 134 New Functions Implementation (DWS-4026/DWL-8600AP) Wireless Intrusion Detection System Manual Detected AP Classification The detected APs are classified into the following categories: • • • • • Managed: AP is managed by the wireless system. Standalone: Administrator classifies it as standalone AP in valid AP database. Rogue: The AP is classified as a threat by threat detection algorithms. Unknown: The AP is detected but not classified. By default, detected AP is classified to unknown AP. Users can manually define the AP category. 135 New Functions Implementation (DWS-4026/DWL-8600AP) Wireless Intrusion Detection System Known Client Database Detected clients can be classified as known clients in Known Clients Database. • • • It is used to compare detected clients with known valid clients and generate traps when unknown clients are detected It is used for MAC Authentication for associated clients. It is used for Wireless Intrusion Detection System. It can reside on the switch or on the RADIUS server. It supports up to maximum 1024 entries. entries 136 New Functions Implementation (DWS-4026/DWL-8600AP) Wireless Intrusion Detection System Automatic Intrusion Detection – AP The threat classification algorithm allows Unified System classifies APs as rogue automatically. 11 types of threats are supported. The two threats “Unmanaged Unmanaged AP detected on wired network” network and “AP AP is operating on an illegal channel” are only detected with sentry-mode AP. Other threats can be detected by either sentry mode or active mode. 137 New Functions Implementation (DWS-4026/DWL-8600AP) Wireless Intrusion Detection System Automatic Intrusion Detection – Clients Wireless clients can be classified automatically by Unified System, too. The wireless clients are classified into the following categories: • • • • Authenticated – The wireless client is authenticated with the wireless system. Detected – The wireless client is detected by the wireless system, system but is not a security threat. Black-Listed – The client with this MAC address is specifically denied access via MAC Authentication. Rogue – The client is classified as a threat by one of the threat detection algorithms. 138 New Functions Implementation (DWS-4026/DWL-8600AP) Wireless Intrusion Prevention System WIPS/Threat Mitigation The function is disabled by default, system will automatically mitigate all rouge devices including rogue APs and rouge clients once you enable it. The basic technique of intrusion mitigation is to send de-authentication packets to rogue devices. • • • It sends de-auth packets to clients on behalf of the rogue AP. It sends de-auth packets to the rogue AP on behalf of the clients associated with that AP. It sends de de-auth auth packets to known clients that associate with Unknown APs 139 New Functions Implementation (DWS-4026/DWL-8600AP) Wireless Intrusion Prevention System WIPS/Threat Mitigation APs in sentry mode send de-auth packets every seconds to mitigate the intrusion from both rouge AP and client APs in active mode send de-auth packets every ten seconds for intrusion mitigation and only for rouge AP in its operation channel. Rouge client and rouge AP in other channels won’t be affected. Max 16 APs, 128 clients are attacked concurrently. Users could view AP De-Authentication Attack Status to check which rogue is attacked. attacked 140 New Functions Implementation (DWS-4026/DWL-8600AP) Wireless Intrusion Prevention System WIDS/WIPS Limitation Users must make sure that there is no legitimate APs which are classified as rogues before enabling the attack feature. • De-auth messages are sent every ten seconds (active mode) or every second(sentry mode) for performance concern. • System shows the classified result and reason on WIDS AP Rogue Classification. The function is to mitigate, not to block the rogues If the detected rogue is spoofing the BSSID of the valid managed AP then the wireless system doesn’t attempt to use the attack. The de-authentication attack is not effective against Ad hoc networks. The APs operating on channels outside of the country domain are not attacked due to the law. 141 New Functions Implementation (DWS-4026/DWL-8600AP) IEEE 802.11n IEEE 802.11n IEEE 802.11n has ratified on Sep. 2009 DWL-8600AP supports IEEE 802.11n. It has higher performance and more coverage. It can supportt maximum i 300Mb 300Mbps on b both th 5GH 5GHz/2.4GHz /2 4GH concurrently. tl Primary 802.11n feature implemented in DWL-8600AP. • • • 2X2 MIMO Channel Binding Guard Interval 142 New Functions Implementation (DWS-4026/DWL-8600AP) IEEE 802.11n Antenna Technology Revolution Single Input, Single-Output channel suffers from fading Single-Input, Multiple-Output channel: Rx Diversity Multiple-Input, Single-Output channel: Tx Diversity 143 New Functions Implementation (DWS-4026/DWL-8600AP) IEEE 802.11n Multiple-Input, Multiple-Output (MIMO) It is the use of multiple transmitters and receivers (multiple antennas) on wireless devices to improve performance. When two transmitters and two or more receivers are used, two simultaneous data streams can be sent, which double the data rate. Multiple p receivers alone allow g greater distances between devices. DWL-8600 implemented two by two MIMO on both 2.4/5GHz. Data Stream TX Radio RX Channel Combiner 144 New Functions Implementation (DWS-4026/DWL-8600AP) IEEE 802.11n IEEE 802.11n Channel Bandwidth 802.11a/g uses 20MHz frequency bandwidth per channel. 802.11n can use 40MHz channel (optional) which is consist of two 20-MHz channels that are contiguous in the frequency domain. With doubling channel bandwidth bandwidth, the data transmitting/receiving speed is doubled. Due to the double channel bandwidth, there are lesser available channels (without interference) compared with 802.11a/g. Doubling channel bandwidth enables higher data rates 145 New Functions Implementation (DWS-4026/DWL-8600AP) IEEE 802.11n Guard Interval Guard Interval is a time period between two transmitted symbols. The purpose is to prevent interference in multipath environments. When two symbols arrive over two different paths, the beginning of a new symbol may arrive at the receiver before the last symbol is completely received. The default setting of 802.11a/g/n is 800 nanoseconds. 802.11n supports short guard interval which shorten the time to 400ns It can improve around 10% of performance. Time line Earlier Symbol y 2 Later Symbol Earlier Symbol y 1 Guard Interval Interference 146 New Functions Implementation (DWS-4026/DWL-8600AP) IEEE 802.11n IEEE 802.11n Parameters Go to WLAN Administration Advanced Configuration AP Profile to configure 802.11n parameters (these parameters are not displayed in Basic Setup option). 20 or 40MHz Channel Bandwidth could be configured here. Note, the default setting of 5GHz is 40MHz and 2.4GHz is 20MHz. Short Guard Interval is enabled by default. Primary Channel is used for 802.11n clients that supports only a 20-MHz channel band bandwidth idth and for fo legacy legac clients. clients 147 New Functions Implementation (DWS-4026/DWL-8600AP) AP Clustering AP Clustering Admin can treat a group of 8600APs in the same subnet as one single device. Previously, admin needs to configure every AP individually. AP Clustering • • • Same concept as Switch Clustering. APs share configuration information with each other It provides single point of management for the AP Cluster Configuration Configuration Admin AP Cluster Page is Animated 148 New Functions Implementation (DWS-4026/DWL-8600AP) AP Clustering AP Clustering APs have to be connected on the same network subnet. APs that join the cluster need to have the same Cluster Name. Maximum 8 APs in a cluster. Cl t i Clustering mode d iis enabled bl d on all ll the th APs AP (default (d f lt disabled). di bl d) Users can create multiple clusters in a network subnet. 149 New Functions Implementation (DWS-4026/DWL-8600AP) AP Clustering AP Clustering Operation When multiple APs form cluster, the following arbitration rules determine the AP which control the cluster: • • • • • • Clusters are formed when APs configure the cluster name and enable their clustering mode. mode Clusters are formed between APs that have same cluster name and are joined by a wired network. When APs start the cluster formation, the first AP that declares itself a member of the cluster wins the arbitration. The AP that wins the arbitration pushes the configuration to the rest of the APs in the cluster. When administrator configures one of the APs in the cluster, that AP will then push the configuration to the rest of the cluster and have control of the cluster. When two disjoint clusters are joined, the first cluster that is created wins the arbitration for cluster control. control The configuration on the newer cluster is overwritten by the larger cluster controller. 150 New Functions Implementation (DWS-4026/DWL-8600AP) AP Clustering AP Clustering Operation (Cont.) • • • • A single AP can be called as a cluster with one AP and the above rule of arbitration applies. APs can be dropped out of cluster if they lose the connectivity to other APs in the cluster. That means if they do not receive discovery packets for 60 seconds. The discovery packets are transmitted every ten seconds. If an AP loses connectivity and joins the cluster again before it is dropped from the cluster cluster, any configuration changes to that AP during the lost connectivity will be propagated when connectivity resumes. If there is any changes in configuration in the disconnected AP, it will be propagated once the AP joins the cluster again. If there is change in configuration in two disconnected APs, APs the latest change will be selected and will be propagated across the cluster. 151 New Functions Implementation (DWS-4026/DWL-8600AP) AP Clustering AP Clustering – Channel Management With AP Clustering, the APs automatically assigns radio channels used by clustered access points to reduce interference. Administrator can configure the detecting interval and specify the minimum percentage of interference reduction. The proposed plan must be achieved in order to apply Channel Management. This mechanism takes the following parameters into consideration: • • Signal strengths Channel of the detected APs 152 New Functions Implementation (DWS-4026/DWL-8600AP) Wireless Distribution System Wireless Distribution System (WDS) WDS allows standalone DWL-8600AP to act as wireless bridge and connect two networks wirelessly. • • Data is encrypted when it is sent between two networks. There is no need to run cables across two sites. Multiple WDS links can be enabled for redundancy • It supports 802.1d STP to prevent loops. Network 1 Page is Animated Network 2 153 New Functions Implementation (DWS-4026/DWL-8600AP) Wireless Distribution System Wireless Distribution System (WDS) WDS is only supported by Standalone Mode. WDS works in Layer 2 network and connects two or more physical network segments. However, these segments have to be in the same network subnet. To build the WDS link between two APs, it is needed to enter the correct MAC address of the opposite AP, and the channel, security of both APs must be the same. SSID on both sides m must st be the same when hen using sing WPA/WPA2-PSK. WPA/WPA2 PSK 154 New Functions Implementation (DWS-4026/DWL-8600AP) Centralized IEEE 802.1x Authentication Centralized IEEE 802.1x Authentication On DWS-3000’s 802.1x process, each AP works as the 802.1x authenticator and authenticates clients individually. • All AP’s IP have to be configured in RADIUS database. New software architecture on DWS DWS-4026 4026 enables Switch to act as 802.1x 802 1x authenticator. • • DWS-3000 Authenticator: AP1’s IP AP2’s IP ... architecture Switch will interface with RADIUS server instead of AP. Only Switch’s IP will need to be entered in RADIUS database. RADIUS Server DWS-4026 DWS 4026 architecture APs communicate with RADIUS server directly Authenticator Supplicant Authenticator: Switch’s IP RADIUS Server APs forward authentication requests to switch, switch works as authenticator Supplicant 155 New Functions Implementation (DWS-4026/DWL-8600AP) Centralized IEEE 802.1x Authentication Centralized IEEE 802.1x Authentication DWS-3000 system has 1 RADIUS server for wireless authentication, 3 RADIUS servers for wired clients authentication. DWS-4026 has up to 32 RADIUS server support, for both wired and wireless authentication. DWS-4026 support group of RADIUS servers. • Customer configures a RADIUS Server Name first, then assign IP addresses to this RADIUS Server Name as an IP group, when using 802.1x authentication, designate this RADIUS Server Name as the RADIUS server. 156 New Functions Implementation (DWS-4026/DWL-8600AP) Other Features Other Features OUI database • • DWS-4026 contains a build-in database of registered Organizationally Unique Identifiers (OUIs) which can be used to identify the manufactures of the detected APs and clients. If the detected devices are not in the database, customer can add a new one from the Local OUI Database Summary page, up to 64 user-defined OUIs can be added. The local database is searched first. 157 New Functions Implementation (DWS-4026/DWL-8600AP) Other Features Other Features Default SSL Certificate • A self-signed SSL certificate is generated by default on the switch. IPv6 management of the switch • Customer can manage switch with IPv6 IP address. 158 New Functions Implementation (DWS-4026/DWL-8600AP) Other Features Other Features NetBIOS Name Snooping • The managed AP snoops the clients’ NetBIOS name and send it to the switch. Captive Portal • • Allow user to log out of the CP with a pop-up logout button. Support per-user bandwidth control. 159 New Functions Implementation (DWS-4026/DWL-8600AP) Other Features Other Features Client QoS • • The Client QoS feature allows users to apply the wired QoS features including access control lists (ACLs) and differentiated service (DiffServ) of the Unified Switch to the wireless clients associated to the AP. Enable AP Client QoS first • Apply ACL or Differentiated Service for wireless networks based on SSIDs 160 Lab 3: Switch Clustering Lab 3 Switch Clustering g 161 Lab 3: Switch Clustering Lab 3: Switch Clustering This scenario is an example to designing switch clustering and Layer 2 distributed tunnel environment. Objectives: • • • Understand how to design and setup a cluster environment. Understand how to select the cluster controller and push configuration between the Unified Switches. Switches Understand the configuration of the Layer 2 distributed tunnel and when to use it. 162 Lab 3: Switch Clustering Network Topology With this topology, users can set up a cluster controller and push configurations to other switches in the same peer group. Instead of Layer 3 tunnel, wireless clients can get the same fast roaming result with Layer 2 distributed tunnel. Across L3 Network Unified Switch1 L3 Device 172.17.6.0/24 Unified Switch2 Network IP: 10.90.90.91 Loopback: 192.168.20.254 Network IP: 10.90.90.90 Loopback: 192.168.10.254 172.17.5.0/24 192.168.102.x/24 AP2 Seamless Roaming AP1 192.168.101.x/24 Client SSID : S3-Group1 163 Lab 3: Switch Clustering Lab 3: Switch Clustering Table 1: Physical Connection From Device From Port To Device To Port Unified Switch 1 1 AP1 N/A Unified Switch 1 24 L3 Switch 1 Unified Switch 2 1 AP1 N/A Unified Switch 2 24 L3 Switch 24 Table 2: VLAN and Port Assignment Device VLAN ID VLAN Name Tagged Ports Untagged Ports Unified Switch 1 5 Core5 N/A 24 Unified Switch 1 101 AP1 N/A 1 Unified Switch 1 201 Client1 1 N/A Unified Switch 2 6 Core6 N/A 24 Unified Switch 2 102 AP2 N/A 1 U ifi d Switch Unified S it h 2 202 Cli t2 Client2 1 N/A L3 Switch 5 Core5 N/A 1 L3 Switch 6 Core6 N/A 24 164 Lab 3: Switch Clustering Lab 3: Switch Clustering Table 3: IP Addressing Device Unified Switch Unified Switch Unified Switch Unified Switch Unified Switch Unified Switch Unified Switch Unified Switch Unified Switch Unified Switch L3 Switch L3 Switch 1 1 1 1 1 2 2 2 2 2 Table 4: DHCP Server Device Unified Switch 1 Unified Switch 1 Unified Switch 2 Unified Switch 2 Interface Management Loopback 4/1 4/2 4/3 Management Loopback 4/1 4/2 4/3 ipif5 ipif6 Pool 101 201 102 202 VID 1 N/A 5 101 201 1 N/A 6 102 202 5 6 Network 192.168.101.0/24 192.168.201.0/24 192.168.102.0/24 192.168.202.0/24 IP Address 10.90.90.90/8 192.168.10.254/32 172 17 5 254/24 172.17.5.254/24 192.168.101.254/24 192.168.201.254/24 10.90.90.91/8 192.168.20.254/32 172.17.6.254/24 192.168.102.254/24 192.168.202.254/24 172.17.5.1/24 172 17 6 1/24 172.17.6.1/24 Excluded IP 192.168.101.200-255 192.168.201.200-255 192.168.201.200-255 192.168.202.200-255 165 Lab 3: Switch Clustering Lab Scenario Discussion Can I push configurations from Unified Switch 2 (Non cluster controller) to Unified Switch 1? Can I see peer switch managed AP or run auto channel/power for peer switch managed AP on Unified Switch 2? Why need a static route on Unified Switch 1 and 2? AP1 and AP2 are in different IP subnets, what if they are in the same subnet? How to confirm L2 Tunnel is working? 166 Command Line Interface Session 6 Command Line Interface 167 Command Line Interface Session 6: Command Line Interface Command Line Interface 168 Command Line Interface Command Line Interface Use the following settings to make a console connection: • • • • Select the appropriate serial port (COM port 1 or COM port 2). Set the data rate to 115200 baud. Set the data format to 8 data bits, 1 stop bit, and no parity. Set flow control to none. In command line interface, enter a question mark (?) at the command prompt to display the commands available a a ab e in the t e current cu e t mode. ode The full command keyword appears when sufficient unique characters are typed. Once you have entered sufficient letters, letters press the SPACEBAR or TAB key to complete the keyword. 169 Command Line Interface CLI and Scenario There are three basic levels of Command Mode for users to classify user privilege. Different modes can run different level of commands. User EXEC mode is the first level that contains a limited set of commands to view basic system information, enter enable to get into Privileged EXEC mode. d The Privileged EXEC mode allows you to enter any EXEC command or enter the Global Configuration mode with the command configure Global Config mode groups general setup commands and permits making modifications difi ti to t the th running i configuration. fi ti Command Mode Prompt Access Method Exit or Access Previous Mode User EXEC (DWS-4026)> ( ) This is the first level of access. To exit,, enter logout g Privileged EXEC (DWS-4026)# From the User EXEC mode, enter enable To exit to User EXEC mode, enter exit or press Ctrl-z Global Config (DWS-4026) (Config)# From the Privileged EXEC mode , enter configure To exit to Privileged EXEC mode, enter exit or press Ctrl-z 170 Command Line Interface CLI Example The user wants to have two SSIDs to classify the wireless users, one with VLAN 101 for employees, the other one with VLAN 102 for g guest. Different SSIDs have different security, the expected configurations are as follows: Employee v101 Guest v102 VLAN ID VLAN Name Tagged Port Untagged Port Interface/IP 10 AP1 N/A 1 192.168.10.254/24 20 AP2 N/A 13 192.168.20.254/24 101 employee 1 13 1, N/A 192 168 101 254/24 192.168.101.254/24 102 guest 1, 13 N/A 192.168.102.254/24 SSID VLAN ID Security Key employee 101 WPA-PSK 12345678 guest 102 WEP 12345 171 Command Line Interface CLI Example 1. Assign Switch IP Address (DWS-4026) >enable Password: (DWS-4026) #network parms 192.168.1.241 255.255.255.0 2. Create VLANs (DWS-4026) (DWS-4026) (DWS-4026) (DWS-4026) (DWS 4026) (DWS-4026) (DWS-4026) (DWS-4026) (DWS-4026) (DWS-4026) #vlan database (Vlan)#vlan 10 (Vlan)#vlan 20 (Vlan)#vlan 101 (Vlan)#vlan (Vl )# l 102 (Vlan)#vlan name (Vlan)#vlan name (Vlan)#vlan name (Vlan)#vlan name 10 AP1 20 AP2 101 employee 102 guest 3. Create IP Interface by VLANs (DWS-4026) (DWS-4026) (DWS-4026) (DWS-4026) (DWS 4026) (DWS-4026) (Vlan)#vlan (Vlan)#vlan (Vlan)#vlan (Vlan)#vlan (Vlan)#exit routing routing routing routing 10 20 101 102 172 Command Line Interface CLI Example 4. Assign VLANS settings to the ports (DWS-4026) (DWS-4026) (DWS-4026) (DWS-4026) (DWS 4026) (DWS-4026) (DWS-4026) (DWS-4026) (DWS-4026) (DWS-4026) (DWS-4026) (DWS 4026) (DWS-4026) (DWS-4026) (DWS-4026) (DWS-4026) (DWS-4026) (DWS-4026) (DWS-4026) #configure (Config)#interface 0/1 (Interface 0/1)#vlan participation include 10 (Interface 0/1)#vlan participation include 101 (I t f (Interface 0/1)#vlan 0/1)# l participation ti i ti include i l d 102 (Interface 0/1)#vlan pvid 10 (Interface 0/1)#vlan tagging 101 (Interface 0/1)#vlan tagging 102 (Interface 0/1)#exit (Config)#interface 0/13 (Interface 0/13)#vlan participation include 20 (Interface 0/13)#vlan participation include 101 (Interface 0/13)#vlan participation include 102 (Interface 0/13)#vlan pvid 20 (Interface 0/13)#vlan tagging 101 (Interface 0/13)#vlan tagging 102 (Interface 0/13)#exit 5. Setup the IP Routing Interface (DWS-4026) (Config)#interface loopback 0 173 Command Line Interface CLI Example (DWS-4026) (DWS-4026) (DWS-4026) (DWS-4026) (DWS-4026) (DWS 4026) (DWS-4026) (DWS-4026) (DWS-4026) (DWS-4026) (DWS-4026) (DWS-4026) (DWS 4026) (DWS-4026) (DWS-4026) (DWS-4026) (DWS-4026) (Interface loopback 0)#ip address 192.168.0.254 255.255.255.0 (Interface loopback 0)#exit (Config)#interface 4/1 (Interface 4/1)#ip address 192.168.10.254 255.255.255.0 (Interface 4/1)#exit (Config)#interface 4/2 (Interface 4/2)#ip address 192.168.20.254 255.255.255.0 (Interface 4/2)#exit (Config)#interface 4/3 (Interface 4/3)#ip address 192.168.101.254 255.255.255.0 (Interface 4/3)#exit (Config)#interface 4/4 (Interface 4/4)#ip address 192.168.102.254 255.255.255.0 (Interface 4/4)#exit (Config)#ip routing 6. Setup DHCP (DWS-4026) (DWS-4026) (DWS-4026) (DWS-4026) (DWS-4026) (Config)#service dhcp (Config)#ip dhcp pool AP1 (Config-dhcp-pool)#network 192.168.10.0 255.255.255.0 (Config-dhcp-pool)#default-router 192.168.10.254 (Config-dhcp-pool)#ex f 174 Command Line Interface CLI Example (DWS-4026) (DWS-4026) (DWS-4026) (DWS-4026) (DWS-4026) (DWS 4026) (DWS-4026) (DWS-4026) (DWS-4026) (DWS-4026) (DWS-4026) (DWS-4026) (DWS 4026) (DWS-4026) (DWS-4026) (DWS-4026) (DWS-4026) (DWS-4026) (Config)#ip dhcp pool AP2 (Config-dhcp-pool)#network 192.168.20.0 255.255.255.0 (Config-dhcp-pool)#default-router 192.168.20.254 (Config-dhcp-pool)#exit (Config)#ip dhcp pool employee (Config dhcp pool)#network 192 (Config-dhcp-pool)#network 192.168.101.0 168 101 0 255 255.255.255.0 255 255 0 (Config-dhcp-pool)#default-router 192.168.101.254 (Config-dhcp-pool)#exit (Config)#ip dhcp pool guest (Config-dhcp-pool)#network 192.168.102.0 255.255.255.0 (Config-dhcp-pool)#default-router (Config dhcp pool)#default router 192.168.102.254 (Config-dhcp-pool)#exit (Config)#ip dhcp excluded-address 192.168.10.100 192.168.10.255 (Config)#ip dhcp excluded-address 192.168.20.100 192.168.20.255 (Config)#ip dhcp excluded-address 192.168.101.100 192.168.101.255 (Config)#ip dhcp excluded-address 192.168.102.100 192.168.102.255 7.1 Configure wireless setting (DWS-4026) (Config)#wireless (DWS-4026) (Config-wireless)#country-code us Are you sure you want to change the country code? (y/n) y 175 Command Line Interface CLI Example 7.2 Configure AP Discovery (DWS-4026) (Config-wireless)#discovery vlan-list 10 (DWS-4026) (Config-wireless)#discovery vlan-list 20 7 3 Add the APs the valid AP database 7.3 (DWS-4026) (DWS-4026) (DWS-4026) (DWS-4026) (DWS-4026) (DWS-4026) (DWS-4026) (DWS-4026) (Config-wireless)#ap database 00:22:B0:3D:95:80 (Config-ap)#profile 1 (Config-ap)#location AP1 (Config-ap)#exit (Config-wireless)#ap database 00:22:B0:3D:95:90 (Config-ap)#profile 1 (Config-ap)#location AP2 (Config-ap)#exit 7.4 Configure SSID (DWS-4026) (DWS-4026) (DWS-4026) (DWS-4026) (DWS-4026) (DWS-4026) (Config-wireless)#network 1 (Config-network)#vlan 101 (Config-network)#ssid employee (Config-network)#security mode wpa-personal (Config-network)#wpa key 12345678 (Config-network)#exit 176 Command Line Interface CLI Example (DWS-4026) (DWS-4026) (DWS-4026) (DWS-4026) (DWS-4026) (DWS 4026) (DWS-4026) (DWS-4026) (DWS-4026) (Config-wireless)#network 2 (Config-network)#vlan 102 (Config-network)#ssid guest (Config-network)#security mode static-wep (Config-network)#wep key type ascii (Config network)#wep key length 64 (Config-network)#wep (Config-network)#wep key 1 12345 (Config-network)#exit 7.5 Assign SSID to the correct profile and radio (DWS-4026) (DWS 4026) (DWS-4026) (DWS-4026) (DWS-4026) (DWS-4026) ((DWS-4026) 0 6) (DWS-4026) (DWS-4026) (DWS-4026) (DWS-4026) (DWS-4026) (DWS-4026) (Config wireless)#ap profile 1 (Config-wireless)#ap (Config-ap-profile)#name Test (Config-ap-profile)#radio 1 (Config-ap-radio)#vap 0 (Config-ap-profile-vap)#network 1 (Config-ap-profile-vap)#enable ( o g ap p o ap) ab (Config-ap-profile-vap)#exit (Config-ap-radio)#vap 1 (Config-ap-profile-vap)#network 2 (Config-ap-profile-vap)#enable (Config-ap-profile-vap)#exit (Config-ap-radio)#exit f 177 Command Line Interface CLI Example (DWS-4026) (DWS-4026) (DWS-4026) (DWS-4026) (DWS-4026) (DWS 4026) (DWS-4026) (DWS-4026) (DWS-4026) (DWS-4026) (DWS-4026) (DWS-4026) (DWS 4026) (DWS-4026) (DWS-4026) 8. (Config-ap-profile)#radio 2 (Config-ap-radio)#vap 0 (Config-ap-profile-vap)#network 1 (Config-ap-profile-vap)#enable (Config-ap-profile-vap)#exit (Config ap radio)#vap 1 (Config-ap-radio)#vap (Config-ap-profile-vap)#network 2 (Config-ap-profile-vap)#enable (Config-ap-profile-vap)#exit (Config-ap-radio)#exit (Config-ap-profile)#exit (Config ap profile)#exit (Config-wireless)#exit (Config)#exit Save Configuration ((DWS-4026) 0 6) #write memory o y 178 System Maintenance and Troubleshooting Session 7 System y Maintenance and Troubleshooting 179 System Maintenance and Troubleshooting Session 7: System Maintenance and Troubleshooting g Firmware Upgrade Backup Configuration File Factory Reset and Image Problem Logs 180 System Maintenance and Troubleshooting Firmware Upgrade Firmware Upgrade – Unified Switch Upgrade firmware from Tool Download File of the Web UI Upgrade firmware from CLI • copy tftp://10.90.90.90/helio_switch_1006.opr image1 D-Link Unified Switch supports dual image, users can select one of them as the operation image and the other as the backup image. Ch k and Check d active ti iimages ffrom Tool T l Multiple M lti l IImage S Service i 181 System Maintenance and Troubleshooting Firmware Upgrade Firmware Upgrade – Unified AP Upgrade firmware from Unified Switch when the AP is in Managed Mode WLAN Administration AP Management Software Download Able select the number of APs to be upgraded concurrently from group size The firmware could be upgraded from CLI • firmware-upgrade tftp://10.90.90.100/ap_21012.tar In Standalone Mode, firmware is upgraded from Tool Upgrade of the Web UI Note: It needs approximately 12 minutes to complete the process. Do not power off the AP in this time, or firmware may be corrupted. 182 System Maintenance and Troubleshooting Backup Configuration File Backup Configuration File Backup or recover the configuration file from Tool Upload/Download of the WebUI. Backup configuration from CLI. • • copy nvram:startup-config tftp://10.90.90.100/ConfigFile.txt copy tftp://10.90.90.100/ConfigFile.txt nvram:startup-config Note: DWS-3000 only y supports pp binary y config g file and DWS-4026 supports pp text-based file. 183 System Maintenance and Troubleshooting Backup Configuration File Backup Configuration File – Script Files D-Link Unified Switch provides another type of text based configuration file called Script file. For DWS-3000 series, this is the only way to edit the configuration without ith t using i switch. it h Commands: • • show running-config config.scr (config.scr is the name assigned for this config file) copy nvram: script config.scr tftp://10.90.90.111/config.scr (config.scr is the config file to download to the PC, 10.90.90.111 is the PC's IP) The config.scr file can be edited with notepad or MS word. Upload the configuration back to switch. • • copy tftp://10.90.90.111/config.scr nvram:script config.scr script apply config.scr 184 System Maintenance and Troubleshooting Backup Configuration File Firmware and Configuration between DWS-3000/DWS-4000 / Series There is no upgrade path from DWS-3000 switch to DWS-4000 switch There is no conversion path from DWS-4000 switch to DWS-3000 switch it h The configurations for DWS-3000 and DWS-4000 are different in format and content • • • They do not inter-operate. inter-operate The binary configuration of DWS-3000 cannot be transferred to DWS4000. Similarly, the text/binary configuration of DWS-4000 cannot be transferred to DWS-3000. 185 System Maintenance and Troubleshooting Factory Reset and Image Problem Switch Boot Menu and Reset Password There is no reset button, backdoor password or password recovery for Unified Switches. If the users forget the password, the configuration of the switch needs to be reset to factory default through console. When the switch is powered on, select option 2 to enter the Boot Menu through console. Select 16 to reset password d to d default f l For DWS-3000 series, option 16 is supported, the only way you can do is to reset all the configurations. Select 10 - Restore g to factory y configuration defaults (delete config files) 186 System Maintenance and Troubleshooting Factory Reset and Image Problem AP Reset If the password of the AP is forgotten, there is no backdoor password, press the reset button to reset the configuration to factory default. Remember the password of the AP but forget the IP address. • • • Need to reset on DWL DWL-3500/8500AP 3500/8500AP For DWL-8600AP, go through console to check the IP Command: get management – – “static-ip” is the manually configured IP “ip” ip is the current using IP which may be from DHCP server 187 System Maintenance and Troubleshooting Factory Reset and Image Problem Damage Image - Switch Enter the Boot Menu through console. Select 11 – Activate Backup Image. If there is no backup image or the backup image does not work, select “4 Load new operational code using XMODEM” XMODEM to upload a new firmware firmware. Send the firmware file through the Hyper Terminal. 188 System Maintenance and Troubleshooting Log Files Logs – Unified Switches There are several types of switch logs. System log • • Contain error messages for catastrophic events Not understandable to users, only for R&D troubleshooting 189 System Maintenance and Troubleshooting Log Files Buffered Log This log stores messages in memory based upon the settings for message component and severity. It is enabled by default. It disappears after rebooting. rebooting Only the latest 128 entries are displayed on webpage. 190 System Maintenance and Troubleshooting Log Files Persistent Log The persistent log is stored in persistent storage, which means that the log messages are retained even if the switch reboots. The first log type is the system startup log. The system startup log stores the first 32 messages received after system reboot. The log full operation attribute is always set to “stop on full”. This log can store up to 32 messages. The second log type is the system operation log. The system operation log stores the last 1000 messages received during system operation. The log full operation attribute is always set to “overwrite”. This log can store up to 1000 messages. 191 System Maintenance and Troubleshooting Log Files Send to Log Server Enable System Log Configuration • Configure the IP address of the log server • LAN Administration Log System Log Configuration LAN Administration Log Host Configuration Debug (7) will include all log message 192 System Maintenance and Troubleshooting Log Files SNMP Trap Log SNMP Traps is defined to inform administrator of events such as entry addition, deletion and database full events. The administrator can choose the types of traps to receive. 193 System Maintenance and Troubleshooting Log Files Logs – Unified AP From command line: • get log-entry - show logs on AP Using the syslog server: • • • set log relay-enabled 1 set log relay-host xx.yy.zz.aa, where xx.yy.zz.aa is the syslog server set log severity 7 194 Lab 4: Command Line Interface and Dynamic VLAN Lab 4 Command Line Interface and Dynamic VLAN 195 Lab 4: Command Line Interface and Dynamic VLAN Lab 4: Command Line Interface and Dynamic VLAN This scenario shows when and how to use the Dynamic VLAN Assignment function. Objectives: • • • Understand how to use dynamic VLAN function. Understand how to set up the RADIUS server for Dynamic VLAN environment. environment Different users are assigned to different VLAN. 196 Lab 4: Command Line Interface and Dynamic VLAN Network Topology In this scenario, the users can group wireless users to different VLAN with only one SSID and multiply SSIDs are not required. End users need to support WPA/WPA2-Enterprise, and enter the WPA/WPA2 authentication according to the identifications. RADIUS server will automatically assign them to different VLANs. 100101 102 Username or Certificate User1 – VLAN101 RADIUS Server assign VLANs for users according to thei usernames their se names RADIUS Server Single SSID Username or Certificate User2 – VLAN102 197 Lab 4: Command Line Interface and Dynamic VLAN Lab 4: Command Line Interface and Dynamic VLAN Table 1: Physical Connection From Device From Port To Device To Port Unified Switch 1 AP N/A / Unified Switch 9 RADIUS Server N/A Table 2: VLAN and Port Assignment Device VLAN ID VLAN Name Tagged Ports Untagged Ports Unified Switch 100 AP N/A 1, 9 Unified Switch 101 UserGroup1 1 N/A Unified Switch 102 UserGroup2 1 N/A 198 Lab 4: Command Line Interface and Dynamic VLAN Lab 4: Command Line Interface and Dynamic VLAN Table 3: IP Addressing Device Interface VID IP Address Unified Switch 4/1 / 100 192.168.100.254/24 / Unified Switch 4/2 101 192.168.101.254/24 Unified Switch 4/3 102 192.168.102.254/24 Table 4: DHCP Server Device Pool Network Excluded IP Unified Switch AP 192.168.100.0/24 192.168.100.200-255 Unified Switch UserGroup1 192.168.101.0/24 192.168.101.200-255 Unified Switch UserGroup2 192.168.102.0/24 192.168.102.200-255 199 Lab 4: Command Line Interface and Dynamic VLAN Lab Scenario Discussion Must I use WPA-Enterprise for Dynamic VLAN? Are radius settings on DWS-4026 and DWS-3000 the same? 200