1
OpenMobility
SIP-DECT 4.0 Solution
Installation & Administration
Compendium
Compendium: OM SIP – DECT Solution
Welcome to Aastra
Thank you for choosing this Aastra product. Our product meets the strictest
requirements with regard to quality and design.
The following compendium will assist you in installing and configuring your
SIP-DECT 4.0 solution and provide answers to all your most important questions.
If you should require further technical support or information about other
Aastra products, please contact the person responsible for your system or get in
touch with your local dealer.
You can also find information about this device and other products on our website
at http://www.aastra.de or http://www.aastra.com.
Contents
Aastra SIP-DECT 4.0 Solution . . . . . . . . . . . . . . . . . . . . . . . . . . . . . . . . . . . . . . . . . . . . 1
About this Compendium. . . . . . . . . . . . . . . . . . . . . . . . . . . . . . . . . . . . . . . . . . . . . . . . . . . . 1
Related Documentation. . . . . . . . . . . . . . . . . . . . . . . . . . . . . . . . . . . . . . . . . . . . . . . . . . . . . 1
Abbreviations . . . . . . . . . . . . . . . . . . . . . . . . . . . . . . . . . . . . . . . . . . . . . . . . . . . . . . . . . . . . . . 2
Trademarks. . . . . . . . . . . . . . . . . . . . . . . . . . . . . . . . . . . . . . . . . . . . . . . . . . . . . . . . . . . . . . . . . 2
Scope of Delivery and Licenses . . . . . . . . . . . . . . . . . . . . . . . . . . . . . . . . . . . . . . . . . . 2
About RFP Types. . . . . . . . . . . . . . . . . . . . . . . . . . . . . . . . . . . . . . . . . . . . . . . . . . . . . . . . . . . . 3
Infrastructure . . . . . . . . . . . . . . . . . . . . . . . . . . . . . . . . . . . . . . . . . . . . . . . . . . . . . . . . . . . . . . . 3
About G.729 Licenses . . . . . . . . . . . . . . . . . . . . . . . . . . . . . . . . . . . . . . . . . . . . . . . . . . . . . . . 4
Small SIP-DECT System. . . . . . . . . . . . . . . . . . . . . . . . . . . . . . . . . . . . . . . . . . . . . . . . . . 5
Configure RFPs using the OM Configurator . . . . . . . . . . . . . . . . . . . . . . . . . . . . . . . . . . 5
Set up RFPs and Basic Telephony . . . . . . . . . . . . . . . . . . . . . . . . . . . . . . . . . . . . . . . . . . . . 7
Large SIP-DECT System. . . . . . . . . . . . . . . . . . . . . . . . . . . . . . . . . . . . . . . . . . . . . . . . . 10
Install OMM on a Linux PC server system . . . . . . . . . . . . . . . . . . . . . . . . . . . . . . . . . . .10
Set up RFPs . . . . . . . . . . . . . . . . . . . . . . . . . . . . . . . . . . . . . . . . . . . . . . . . . . . . . . . . . . . . . . . .11
Enable Hi-Q audio (CAT-iq) . . . . . . . . . . . . . . . . . . . . . . . . . . . . . . . . . . . . . . . . . . . . . . . . .12
Set up WLAN . . . . . . . . . . . . . . . . . . . . . . . . . . . . . . . . . . . . . . . . . . . . . . . . . . . . . . . . . . . . . .13
Subscribe DECT Handsets . . . . . . . . . . . . . . . . . . . . . . . . . . . . . . . . . . . . . . . . . . . . . . . . . .13
OM IMA Application . . . . . . . . . . . . . . . . . . . . . . . . . . . . . . . . . . . . . . . . . . . . . . . . . . . 15
Activate the OM IMA Service . . . . . . . . . . . . . . . . . . . . . . . . . . . . . . . . . . . . . . . . . . . . . . .15
Further Information. . . . . . . . . . . . . . . . . . . . . . . . . . . . . . . . . . . . . . . . . . . . . . . . . . . . . . . .15
OM Locating Application . . . . . . . . . . . . . . . . . . . . . . . . . . . . . . . . . . . . . . . . . . . . . . . 16
Install the OM Locating Application . . . . . . . . . . . . . . . . . . . . . . . . . . . . . . . . . . . . . . . .16
Add Site / Location Pictures . . . . . . . . . . . . . . . . . . . . . . . . . . . . . . . . . . . . . . . . . . . . . . . .16
Start the OM Locating Application. . . . . . . . . . . . . . . . . . . . . . . . . . . . . . . . . . . . . . . . . .17
Configure the OMM Connection. . . . . . . . . . . . . . . . . . . . . . . . . . . . . . . . . . . . . . . . . . . .17
Configure the OML Users. . . . . . . . . . . . . . . . . . . . . . . . . . . . . . . . . . . . . . . . . . . . . . . . . . .17
Configure the Users’ Portable Parts . . . . . . . . . . . . . . . . . . . . . . . . . . . . . . . . . . . . . . . . .17
OM AXI Specification. . . . . . . . . . . . . . . . . . . . . . . . . . . . . . . . . . . . . . . . . . . . . . . . . . . 18
i
Welcome to Aastra
Aastra SIP-DECT 4.0 Solution
Compendium: OM SIP – DECT Solution
Aastra SIP-DECT 4.0 Solution
The Aastra SIP-DECT 4.0 solution provides a professional DECT system that
extends an existing SIP communications system (PABX), thus operating DECT
handsets as SIP clients. The SIP-DECT 4.0 solution includes up to 2,048 DECT base
stations (RFP, “Radio Fixed Parts”) that form a DECT radio system. The RFPs and the
SIP communications system are interconnected via an Ethernet/IP network that is
used to transport the SIP/VoIP data streams as well as management data.
Within the DECT radio system, a single entity exists that controls all RFPs and
manages communication streams: the OMM (OpenMobility Manager). For smaller
DECT systems (1 – 256 RFPs), the OMM can be hosted on an RFP. A larger DECT
system (256 – 2,048 RFPs) requires to host the OMM on a Linux PC server system.
About this Compendium
This compendium focuses on system planers and system administrators who
install, configure, and administer the Aastra SIP-DECT 4.0 solution.
The necessary steps to set up the SIP-DECT 4.0 solution differ substantially with
the number of RFPs as well as the number of added services. For this reason, this
compendium offers separate parts:
■
The first part concentrates on the basic steps to set up a small system with an
RFP-hosted OMM that uses a SIP PABX located in your LAN.
■
The second part illustrates how to set up a large system that also taps the full
potential of additional features.
■
The third part describes how to configure additional services: Locating and
Messaging.
■
A further chapter describes how to interact with the OMM by using the
OM Application XML Interface.
The respective configuration steps are listed in short. Links to further and detailed
information in the step-relevant documentation part (see next section) are quoted
in the right column: Manual, Guide: Chapter.
> Example
OM System Manual:
Licensing Mode
Related Documentation
The SIP-DECT 4.0 solution is described in a variety of documents:
■
■
■
■
■
■
■
SIP-DECT: OM System Manual
Describes installation, administration, and maintenance of a SIP-DECT system.
> Denoted as
SIP-DECT: OM Locating Application
Describes installing and using the DECT handset locating application.
> Denoted as
SIP-DECT: OM Integrated Messaging & Alerting Application
Describes messaging features and the integrated messaging solution.
> Denoted as
SIP-DECT: OM Handset Sharing & Provisioning
Describes the enhanced user and handset management features and the OM
handset provisioning concept.
> Denoted as
SIP-DECT: OM User Monitoring
Describes how to use the OM monitoring capabilities on DECT handsets
> Denoted as
SIP-DECT: Aastra 600 c/d Messaging & Alerting Applications
Describes the messaging features specific to the Aastra 600 c/d DECT handsets.
> Denoted as
“OM System Manual”
“OM Locating Application”
“OM IMA Application”
“OM Handset Provisioning”
“OM User Monitoring”
“Aastra 600 c/d IMA”
Aastra 600 c/d series SIP-DECT® User's Guide
Describes using the Aastra 600 c/d DECT handsets on the SIP-DECT system.
1
Compendium: OM SIP – DECT Solution
Scope of Delivery and Licenses
Abbreviations
The following specific abbreviations are used in this compendium:
API
Application Programming Interface
DECT
Digital Enhanced Cordless Telecommunication
GAP
Generic Access Profile
OM AXI
OM Application XML Interface
OM IMA
OM Integrated Messaging & Alerting service
OML
OM Locating application
OMM
OpenMobility Manager
OMP
OM Management Portal
PABX
Private Branch Exchange (i. e. communications system)
PP
Portable Part, handset
RFP
Radio Fixed Part, base station
SIP
Session Initiation Protocol
VoIP
Voice over IP
Trademarks
Apache TomcatTM is a trademark of the Apache Software Foundation.
Bluetooth® is a registered trademark of Bluetooth SIG
Linux® is a registered trademark of Linus Torvalds.
OracleTM and JavaTM are a registered trademarks of Oracle Corporation.
Red Hat® is a registered trademark of Red Hat, Inc.
All other product and brand names are trademarks, registered trademarks, or
service marks of their respective holders.
Scope of Delivery and Licenses
The SIP-DECT 4.0 product delivery varies with your purchase. You typically receive
the following components:
■
RFPs, software, services, and licenses according to the planned installation size
(see Infrastructure starting on page 3)
■
DECT handsets Aastra 610d / 620d / 630d (denoted as “Aastra 6x0d”),
Aastra 612d / 622d / 632d (“Aastra 6x2d”), Aastra 650c, or Aastra 142d
■
SIP-DECT 4.0 installation medium (“CD-ROM”) containing
– Manuals in PDF format
– RFP software files (“iprfp3G.dnld”, “iprfp2G.tftp”)
– Aastra 6x0d, Aastra 6x2d, Aastra 650c firmware file (“aafon6xxd.dnld”)
– PC OMM installation file (“SIP-DECT_4.0.bin”)
– OM Configurator (Java tool, “OM_Configurator.jar”)
– OM Management Portal (OMP Java tool, “OMP.jar”)
– OM Locating application (TomCat web application archive, “OML.war”)
2
> OM System Manual:
About the Portable Parts
Scope of Delivery and Licenses
Compendium: OM SIP – DECT Solution
About RFP Types
With SIP-DECT version 3.0, a new series of radio fixed parts is introduced:
RFP (L)35 IP, RFP (L)36 IP, RFP (L)37 IP, and RFP (L)43 WLAN. The following table
summarizes the major differences to the older RFP devices RFP (L)32 IP,
RFP (L)34 IP, and RFP (L)42 WLAN.
> OM System Manual:
About the Radio Fixed Parts
Current and Older RFP feature comparison
Feature
Current RFPs
Older RFPs
Available Model Numbers
35 / 36 / 37 / 43
32 / 34 / 42
Runs SIP-DECT 4.0 OMM
Yes
No
Stores Software on Flash
Yes
No
Hi-Q Audio (CAT-iq)
Yes
No
USB 2.0 Interface
Yes
No
Max. Ethernet Speed
1 GBit
100 MBit
Requested DHCP Vendor Class
OpenMobility3G
OpenMobility
While mixed operation of both current and older RFPs is supported, the
SIP-DECT 4.0 OMM only runs on a current RFP or on a Linux PC server system.
Also, the Bluetooth locating feature as well as monitoring with USB video devices
is only supported with current RFPs.
Infrastructure
SIP-DECT is sold in small, medium and large installations. In order to properly
address these, it is split into different categories:
> OM System Manual:
Licensing Model
Small un-activated – up to 2 standard RFPs
1. Any mixture of RFP 35 IP, RFP 36 IP, RFP 37 IP, RFP 43 WLAN
2. Telephony only; no licences required
3. Free software upgrade
Small un-activated – up to 2 L-RFPs
1. Any mixture of RFP L35 IP, RFP L36 IP, RFP L37 IP, RFP L43 WLAN
2. Advanced features built-in, no licences required
3. Free software upgrade
Note
The PARK code from a OM System CD is required to operate (unactivated) small
systems.
Small activated – up to 20 L-RFPs
1. Any mixture of RFP L35 IP, RFP L36 IP, RFP L37 IP, RFP L43 WLAN
2. Advanced features built-in
3. Requires an activation
3
Compendium: OM SIP – DECT Solution
Medium – up to 256 RFPs
1. Any mixture of RFP (L)35 IP, RFP (L)36 IP, RFP (L)37 IP, RFP (L)43 WLAN
2. Licences required for
– Installation (number of RFPs)
– Messaging and alerting services
– Locating service
– Software upgrade
Large – up to 2,048 RFPs
1. Any mixture of RFP (L)35 IP, RFP (L)36 IP, RFP (L)37 IP, RFP (L)43 WLAN
2. OpenMobility Manager (core software) resides on one or two Linux-based PCs
3. Licences required for
– Installation (number of RFPs)
– Messaging and alerting services
– Locating service
– Software upgrade
Additionally the OMM can operate in a demonstration mode. Note that G.729 is
not available if the OMM operates in a demonstration mode.
About G.729 Licenses
Starting with SIP-DECT® release 3.0, the G.729 codec is a licensed feature. If G.729
shall be used, an appropriate license is required. This applies to all types of
SIP-DECT 4.0 installations independent from the RFP type.
Note
The number of G.729 licenses is part of the activation or license file. You can view
the current number of G.729 licenses on the Licenses page of the OM Web
service or on the License page of the OMP Java tool after uploading the
activation or license file.
The G.729 license contains the number of G.729 channels licensed. A SIP-DECT 4.0
installation does not maintain more G.729 channels than licensed. As soon the
number of licensed G.729 connections has been reached, the OMM does not offer
this codec in further SIP codec negotiations. In addition, syslog and health state
warnings occur.
About G.729 Licenses for un-activated small systems
For the un-activated license categories “Small - up to 2 standard RFPs” and “Small up to 2 L-RFPs” as well as for the demonstration mode, the number of G.729
licenses is zero, thus G.729 cannot be used.
If you need to use G.729 on a small system, you can do this by either
■
by activating up to 2 L-RFPs, this will make ten G.729 licenses available, or
■
by licensing up to two standard RFPs ("OM G.729 Mini License" needs to be
applied), this will make 4 G.729 licenses available.
Note
In both cases your system will be bound to the current release and normal
update mechanisms (update license, re-activation will apply). For this reason, you
loose the free software upgrade possible with un-activated small systems.
4
Scope of Delivery and Licenses
Small SIP-DECT System
Compendium: OM SIP – DECT Solution
Small SIP-DECT System
This chapter describes how to set up a SIP-DECT 4.0 system with a smaller number
of RFPs (1 – 256). This includes configuring an RFP-based OMM, a static IP configuration using the OM Configurator Java tool, and setting up basic DECT telephony
service.
Prerequisites
You need the RFP devices as well as a number of DECT handsets – preferably
Aastra 6x0d, Aastra 6x2d or Aastra 650c. For more than two L-RFPs, you should
have obtained an activation file from the Aastra license server. For more than
20 RFPs, you should have obtained a license file from the Aastra license server.
■
If you plan to operate only current RFPs (see About RFP Types starting on
page 3), you optionally need a HTTP, FTP, or TFTP server in your LAN to deploy
updates of the RFP software (“iprfp3G.dnld”) and the DECT handset firmware
(“aafon6xxd.dnld”).
■
If you plan to operate current RFPs and older RFPs concurrently, a TFTP server
in your LAN is required to host the older RFP’s software files (“iprfp2G.tftp”).
> OM System Manual:
Licensing Model
The HTTP, FTP, or TFTP server is not part of the SIP-DECT 4.0 solution, hence you
need to set up your own.
You also need a PC with a web browser to open the OMM web console. The Sun/
Oracle Java runtime environment should be installed on the PC in order to run the
Java-based OpenMobility Configurator tool. Visit the Java website on the
Internet ( http://www.java.com/ ) for downloading and installation instructions.
Your company LAN should allow connections from the mounted RFPs to your SIP
PABX and to your PC.
Note
This chapter explains how to configure RFPs using static addresses for a quick
start. However, you may consider using DHCP to dynamically configure addresses
as it is explained in the next chapter (see Large SIP-DECT System starting on
page 10).
Configure RFPs using the OM Configurator
The SIP-DECT 4.0 installation medium includes the “OM_Configurator.jar” Java
tool. To run this tool, you need a PC with the Sun/Oracle Java runtime environment
installed. You configure the RFPs with the following basic steps.
> OM System Manual:
Static Local Configuration of
an RFP
1. Connect the RFPs to power and LAN. Note, that you can only operate the OMM
on a current RFP (see About RFP Types starting on page 3). On your PC, double
click the “OM_Configurator.jar” file to start the OpenMobility Configurator
Java tool.
2. Click the Scan button to find connected RFPs. Select one of the entries in the
RFP configuration list. Activate the Login option and enter User and
Password (“omm” / “omm” by factory default).
The Scan function only works for RFPs in the same Ethernet segment.
Alternatively, enter the MAC address that is printed on the RFP’s backside label.
Note, that older RFPs in factory default configuration do respond to the scan.
3. Click the List configuration button. You should see a blue status message at
the bottom of the OpenMobility Configurator window.
5
Compendium: OM SIP – DECT Solution
Small SIP-DECT System
4. Change the configuration to match your LAN configuration. Change the Use
local configuration option to “yes” and configure IP address, Net mask, TFTP
server address, and TFTP file name.
– For a current RFP and when you want to use a HTTP, HTTPS, FTP, or FTPS
server for software updates, you do not need the optional TFTP server settings.
Enter “0.0.0.0” in the TFTP server address and “none” in the TFTP file name
input fields to disable this function.
– For a current RFP and when you want to deploy software updates via TFTP,
enter the TFTP server address and change the TFTP file name to
“iprfp3G.dnld”. Also upload the RFP software file (“iprfp3G.dnld”) and the DECT
handset firmware file (“aafon6xxd.dnld”) to the TFTP server.
– For an older RFP, you are required to configure these settings to match your
TFTP server. Enter the TFTP server address and change the TFTP file name to
“iprfp2G.tftp”. Also upload the RFP software file (“iprfp2G.tftp”) to the TFTP
server.
5. One of the RFPs needs to operate as OMM (“Open Mobility Manager”). Enter
the IP address of the RFP you selected as OMM in the OMM IP address setting.
Note, that you can only use a current RFP for this. When configuring the RFP
that operates as primary OMM, the IP address and OMM IP address settings
should match.
6. Optional: if you operate two or more RFPs, configure a second RFP as standby
OMM. Click the Add parameter button, select the 2nd OMM IP address entry,
then click the Add button. Configure the 2nd OMM IP address input field.
7. Optional: if you want to deploy software updates via HTTP, HTTPS, FTP, or FTPS,
add a configuration file server option for the RFPs that should operate as OMM.
Click the Add parameter button, select the Configuration file server entry,
then click the Add button. Configure the Configuration file server input field,
e.g. “http://192.168.1.1/omm”. Also upload the RFP software file
(“iprfp3G.dnld”), the DECT handset firmware file (“aafon6xxd.dnld”), and a
configuration file (“ipdect.cfg”) to the file server. You can create the “ipdect.cfg”
in a text editor, e.g. the following two lines will work in the above context:
OM_SwImageUrl=http://192.168.1.1/omm/iprfp3G.dnld
OM_ManagerDownloadOverAirUrl=http://192.168.1.1/omm
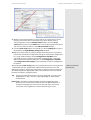
Verify the file server, e.g. by browsing to “http://192.168.1.1/omm/ipdect.cfg”.
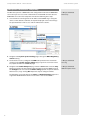
The following screenshot illustrates an example that uses a HTTP server to
configure updates for a single RFP L43 WLAN that is also used as OMM. After
sending the configuration, the RFP operation was verified on the command
line of the HTTP server.
6
> OM System Manual:
OMM Standby
Small SIP-DECT System
Compendium: OM SIP – DECT Solution
8. Optional: if you want the RFP to access IP addresses in other LANs or on the
Internet, you need to add a router option (also called: default router or
standard gateway). Click the Add parameter button, select the Route
addresses entry, then click the Add button. Click the plus button below the list
and enter the router IP address in the Add list element dialogue.
9. Click the Send config. button. You should see a black sending ok message at
the bottom of the OpenMobility Configurator window.
10.Repeat the above steps to configure all RFPs. Alternatively, you can prepare a
text file that includes the configuration settings to automate the configuration
for a larger number of RFPs. Use the Configuration: Safe RFPs menu
command to create a template. Change the resulting text file – refer to the
OM System Manual for details. After this, use the Configuration: Safe RFPs
and Configuration: Run Config’s menu commands to send the configuration
to the RFPs.
After clicking the Send config. button, the respective RFP restarts. During startup,
a current RFP loads the “iprfp3G.dnld” software file from your file server and
updates the software stored in the internal flash if a software change is detected.
An older RFP loads the “iprfp2G.tftp” software file from your TFTP server. Watch
the LEDs to verify the startup procedure.
Tip:
> OM System Manual:
RFP LED Status
You may verify the TFTP function, e.g. by entering “tftp -i 192.168.1.1 get
iprfp3G.dnld” or “tftp -i 192.168.1.1 get iprfp2G.tftp” on the Windows
command line.
Please note: If the RFP was operated within another SIP-DECT 4.0 system
previously, the user/password combination for the OM Configurator is
changed accordingly. If you do not know the login data, you need to
contact the Aastra support for an unlock token to regain access.
7
Compendium: OM SIP – DECT Solution
Small SIP-DECT System
Set up RFPs and Basic Telephony
The RFP that operates as OMM offers two configuration methods: the OMM Web
service that you can access with a web browser and the OMP Java tool. Use the
OMM Web service for initial setup that includes the following basic steps.
> OM System Manual:
Initial Setup
1. Start a browser and navigate to the IP address of the OMM. Log in using the
“omm / omm” default credentials. Accept the displayed license text. Change
the password for the “Full access” and the “Root/SSH” accounts.
2. Navigate to the System: System settings page. Change the DECT: Regulatory
domain setting.
3. For the built-in license, configure the PARK code printed on the installation
medium on the System: System settings page. If you have received a license
file, import the file on the Licenses page.
> OM System Manual:
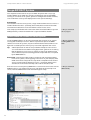
4. Navigate to the Radio fixed parts page. Click the Scan button. Click the Stop
button to view the list that should include the RFP running the OMM. Click on
the Configure icon and activate the DECT settings option. Accept the default
DECT cluster (“1”) by clicking OK. Repeat this step to configure all RFPs.
> OM System Manual:
The following screenshot depicts the Status and Radio fixed parts pages for a
single RFP L43 WLAN with a built-in license that is also used as OMM.
8
Licensing
“Radio fixed parts” Menu
Small SIP-DECT System
Compendium: OM SIP – DECT Solution
5. Navigate to the System: SIP page. Change the Proxy server and Registrar
server settings to match your PABX.
6. On the Portable parts page, create new portable parts with Name, Number,
DECT authentication code, and SIP authentication settings.
> OM System Manual:
“SIP” Menu;
“Portable parts” Menu
Click on the Start button under Wildcard subscription. Start the subscription
procedure on the DECT handset using the configured authentication code.
Tip:
Even with a smaller SIP-DECT 4.0 system, you can use more features, such as
DECT XQ, Hi-Q audio (CAT-iq), or SNMP. You may read on with the next
chapter “Large SIP-DECT System” or read the OM System Manual.
> OM System Manual:
Enhanced Feature Overview
9
Compendium: OM SIP – DECT Solution
Large SIP-DECT System
Large SIP-DECT System
This chapter describes how to set up a SIP-DECT 4.0 system with a very large
number of RFPs (up to 2,048). This includes configuration of up to two OMMs
running on a Linux PC server system, dynamic IP configuration of RFPs via DHCP,
and a multi DECT cluster system deployed to several separate buildings.
Prerequisites
You need two Linux PC server systems, a larger number of RFP devices as well as a
number of DECT handsets – preferably Aastra 6x0d, Aastra 6x2d or Aastra 650c.
You should have obtained a license file from the Aastra license server.
Your company LAN should allow connections from the mounted RFPs to your SIP
PABX, preferably a switched network with a separate VLAN for SIP/VoIP.
> OM System Manual:
802.1Q Support
Install OMM on a Linux PC server system
Install the OMM software on up to two dedicated i386 32-bit PC server systems
running Red Hat Enterprise Linux 6. While it is possible to operate the OMM
software on various PC systems, only the recommended hardware/software configuration is tested by Aastra and may only receive full support for this reason.
Tip:
> OM System Manual:
Installing OMM in Host
Mode
A brief explanation on how to set up ”Red Hat Enterprise Linux Server 6“
can also be found in the “OM Locating Application” guide in the “Installing
Red Hat Enterprise Linux Server 6” chapter. Do not install additional web
server software to prevent blocking port 80 and port 443 that are required
by the OMM software.
Please note: Choosing the right hardware, setting up and managing multiple
Linux server systems, and integrating Linux servers in your company LAN/
VLAN environment is beyond the scope of this compendium. You should
at least read the “Red Hat Enterprise Linux 6 – Installation Guide” that is
available on the Internet under http://docs.redhat.com/does/ URL.
One Linux server runs the primary OMM while a second Linux server takes over the
OMM function in case of failure. On the main and optionally the backup Linux
server, install the OMM software with the following basic steps.
10
> OM System Manual:
OMM Standby
Large SIP-DECT System
Compendium: OM SIP – DECT Solution
1. Open the System menu and select the Administration: Firewall command.
Disable the firewall function.
2. Copy the necessary “SIP-DECT_4.0.bin” file to the Linux server, either via the
SIP-DECT 4.0 product installation medium or via download.
3. Open the Applications menu and select the System Tools: Terminal
command. Enter the “su” command to elevate your system access rights.
4. Enter “sh SIP-DECT_4.0.bin” to extract the installation files and to start the
installation automatically.
> OM System Manual:
5. Enter “nano /etc/sysconfig/SIP-DECT” to adapt the OMM configuration file.
Remove the hash character and change the “OMM_RESILIENCY=” setting to
the IP addresses of the primary and secondary OMM instances. If the OMM
should bind to a specific Ethernet interface, remove the hash character and
change the “OMM_IF=” setting accordingly. Leave the editor with the [Ctrl-X]
keyboard combination and save your changes. Start the OMM with “/etc/init.d/
sip-dect-omm start” or reboot the PC.
> OM System Manual:
6. Start a browser and navigate to the IP address of the server that runs the OMM.
Log in using the “omm / omm” default credentials. Accept the displayed
license text. Change the password for the “Full access” and the “Root/SSH”
accounts. Import the license file. Navigate to the System: System settings
page. Change the DECT: Regulatory domain setting.
> OM System Manual:
Installing the OMM Software
Configuring the Start
Parameters
Initial Setup
Set up RFPs
For a larger number of RFPs, a DHCP service that automatically configures RFPs is
important. The DHCP service sends the IP configuration, where to download the
software files (“iprfp3G.dnld” and “iprfp2G.tftp”) via TFTP and the IP addresses of
the OMMs to the starting RFPs.
> OM System Manual:
DHCP Client
The TFTP and DHCP services are not part of the SIP-DECT 4.0 solution, hence you
need to set up your own.
Tip:
The “OM System Manual” provides an example in the “Setting up DHCP /
TFTP” chapter.
Your DHCP server configuration should include at least:
■
a static MAC/IP address mapping for the RFPs / PC system running the OMM;
■
an IP address range large enough to assign a separate IP address to all RFPs;
■
a rule to separate DHCP queries by vendor ID “OpenMobility3G” for current
RFPs (see About RFP Types starting on page 3);
■
a rule to separate DHCP queries by vendor ID “OpenMobility” for older RFPs;
■
DHCP answers containing IP, net mask, gateway, TFTP server IP, and boot file
name;
■
option 224 with “OpenMobility” or “OpenMobilitySIP-DECT” in DHCP answers;
■
option 43 with vendor option 10 (OMM IP) and – if using a backup server –
vendor option 19 (2nd OMM IP).
After setting up the DHCP and TFTP service, connect at least all RFPs referenced in
the license file to power and LAN. Navigate to the Radio Fixed Parts page of the
OMM Web service. Verify the RFPs Connected status.
> OM System Manual:
Tip:
> OM System Manual:
For a first test, click on the configuration icon of a connected RFP. Activate
the DECT settings option. Accept the default DECT cluster number “1”.
Confirm with OK to activate the RFP. Watch the RFP’s LEDs for a status
indication.
The DECT cluster number groups RFPs that can be synchronized over the air. With
synchronization, seamless handover of DECT handsets is possible. Use a different
Creating and Changing RFPs
RFP LED Status
> OM System Manual:
RFP Synchronization
11
Compendium: OM SIP – DECT Solution
Large SIP-DECT System
DECT cluster number for RFPs that are deployed e.g. to a different building where
the distance prevents overlapping radio coverage. Also configure one RFP per
DECT cluster as the Preferred synchronization source, preferably an RFP that is
located in the middle of the radio domain.
For a larger RFP deployment, you should prepare a list of RFPs, their names
together with their MAC addresses. Also, a map or building plan that indicates the
RFP mounting positions may be helpful. The list of RFPs in CSV format can be
imported via OMP or on the Radio Fixed Parts page of the OMM Web service.
Exporting this list is only supported in the OMP Java tool.
> OM System Manual:
You can use a de-centralized configuration method that utilizes configuration files
directly queried by the RFPs during startup. You can use this method e.g. with
script generated configuration files.
> OM System Manual:
For a large SIP-DECT 4.0 system, consider to define paging areas to keep the signalling traffic separated in the different areas.
> OM System Manual:
Enable Hi-Q audio (CAT-iq)
The current RFPs support Hi-Q audio (via wideband speech according to CAT-iq)
for use with Aastra 650c DECT handsets. To manage this feature, RFPs can be
assigned to different sites. You can enable or disable the Hi-Q Audio Technology
switch per site. When assigning RFPs to sites, please consider the following rules:
■
Only current RFPs should be assigned to a Hi-Q-enabled site.
■
You should assign all RFPs with the same cluster number to the same site.
■
You also can assign RFPs with different cluster numbers to the same site, but
you should refrain from assigning different sites to RFPs of the same cluster.
Basically, this means that a handover between a Hi-Q-enabled (current) RFP and an
(older) Hi-Q-disabled RFP is not possible. If you operate one older RFP in a cluster,
you should therefore assign all RFPs of that cluster to a site with the Hi-Q feature
disabled.
To configure the Hi-Q feature, you need to add a site configuration with the following steps:
1. Navigate to Sites page of the OMM Web service or OMP Java tool.
2. If you plan to use Hi-Q audio throughout all RFPs, change the “default” site
entry and enable the Hi-Q Audio Technology option. You may also change
the name of the site entry, e.g. to “Hi-Q enabled site”.
If you plan to use a mixed configuration of older and current RFPs, add at least
one site entry, e.g. a site entry named “Hi-Q disabled site”. Disable the Hi-Q
Audio Technology option for this site entry.
3. Navigate to the Radio fixed parts page. Change the Site assignment for all
RFPs with the same cluster number either to “Hi-Q enabled site” or to “Hi-Q
disabled site”.
Note
You cannot combine a Hi-Q audio with DECT XQ audio within the same
connection. Depending on the Aastra 650c operation mode, either Hi-Q audio or
DECT XP audio is used (refer to the OM System Manual for details). Also note, that
Hi-Q audio doubles the required DECT air capacity, thus only 4 Hi-Q audio
connections per RFP are possible. For connections to external SIP devices, the
G.722 (wideband) audio codec is supported for Hi-Q audio.
12
RFP Export File Format
RFP Configuration Files
“Paging areas” Menu
Large SIP-DECT System
Compendium: OM SIP – DECT Solution
Set up WLAN
Your SIP-DECT 4.0 system may include a number of current RFP (L)43 WLAN
devices or older RFP (L)42 WLAN devices that offer also WLAN connectivity. To set
up the WLAN function proceed as follows:
> OM System Manual:
Creating and Changing
WLAN Profiles
1. Navigate to the System: System settings page of the OMM Web service.
Under WLAN settings configure the Regulatory domain.
2. On the WLAN page, create at least one WLAN profile.
3. On the Radio fixed parts page, assign the WLAN profile to the desired RFPs.
Note
The RFP (L)43 WLAN offers additional WLAN capabilities, such as 802.11abg
(5 Ghz and 2.4 Ghz radio channels) and 802.11n (MiMo operation) that are not
available with the older RFP (L)42 WLAN. Either use different WLAN profiles for
different RFP models or use a WLAN profile with WLAN features available with
both RFP models.
Subscribe DECT Handsets
To use the DECT telephony service, you need to subscribe a number of DECT
handsets to the SIP-DECT 4.0 system. Also, a number of user accounts needs to be
created in order to login to the SIP accounts provided by the PABX system. Note,
that you need to set the IP of the PABX system on the System: SIP page of the
OMM Web service (Proxy server and Registrar server settings).
> OM System Manual:
Creating and Changing PPs
Different subscription methods exist as well as two different models to link DECT
handset subscriptions to SIP user accounts:
■
Static subscription with wildcards: On the Portable parts page of the OMM
Web service, create a new portable part with Name, Number, DECT
authentication code, and SIP authentication settings.
> OM System Manual:
Subscribing PPs
Click on the Start button under Wildcard subscription. Start the subscription
procedure on the DECT handset using the authentication code within
2 minutes. This will create a static subscription, i. e. a DECT handset that is
statically linked to number and SIP account.
■
Static subscription with IPEI: when creating the portable parts entry, also enter
the IPEI number of the DECT handset.
Click on the Start button under Subscription with configured IPEIs. Start the
subscription procedure on the DECT handset using the authentication code
within 24 hours. This will also create a static subscription.
■
Dynamic subscription: Start the OMP Java tool and navigate to the Portable
parts: Users page. Create a new user entry with Name, Number, and SIP
settings. Navigate to the System: System settings page. Enable the Autocreate on subscription option and enter a DECT authentication code.
> OM Handset Provisioning
On the Portable parts: Overview page, enable the Subscription mode. Start
the subscription procedure on the DECT handset using the authentication
code. This will create a new DECT device entry, i. e. a DECT handset that can be
dynamically linked to number and SIP account by means of a login/logout
procedure.
■
Dynamic subscription with External User Data Provisioning: while you need to
manually subscribe the DECT handsets, the process of creating new user
accounts can be automated by integrating external user data.
You can also enrol DECT handsets semi-automatically by importing a configuration file via the OMM Web service or the OMP Java tool.
> OM Handset Provisioning:
External User Data
Provisioning
> OM System Manual:
Importing PP Configuration
Files
13
Compendium: OM SIP – DECT Solution
The firmware for the Aastra 6x0d, Aastra 6x2d and Aastra 650c DECT handsets can
be deployed automatically and over the air. On the System: System settings page
of the OMM Web service, enable the Downloading new firmware to portable
parts option for this.
Large SIP-DECT System
> OM System Manual:
Download Over Air
Note
With an RFP-based OMM, you need to configure a download URL for the
Aastra 600 c/d firmware file (“aafon6xxd.dnld”). With an OMM running on a Linux
PC server system, this firmware file is installed by the installation file on the PC’s
file system.
Tip:
14
With a large SIP-DECT 4.0 system, you will typically use more features, such
as DECT XQ, Hi-Q audio (CAT-iq), SNMP, the OM IMA Application, or the
OM Locating Application. Also, the monitoring capabilities of the OMP Java
tool help you to manage the radio network, e.g. the Sync. view or Statistics
functions available below the Monitoring: Radio fixed parts menu.
> OM System Manual:
Enhanced Feature Overview;
OM Management Portal
(OMP)
OM IMA Application
Compendium: OM SIP – DECT Solution
OM IMA Application
This chapter describes how to configure the OpenMobility Integrated
Messaging & Alerting Application service (in short “OM IMA” service). The
OM IMA service supports the delivery of messages to or from DECT portable parts.
> OM IMA Application:
Integrated Messaging &
Alerting Application
This includes:
■
delivery of text messages to or from DECT handsets;
■
delivery of special messages for vcards, jobs, and paging;
■
handling of message confirmations;
■
automatic generation of messages;
■
alarm scenarios that define reactions on alarm triggers;
■
escalating unanswered / unconfirmed alarm scenarios.
> OM IMA Application:
OM IMA Service Features
With these features, the OM IMA service forms a professional and comprehensive
DECT messaging solution. The OM IMA service also provides an networked API
(“Application Programming Interface”) that can be used to control messaging
functions from an external messaging server. For example, the OM Locating application utilizes the API to send or receive messages.
Prerequisites
To activate the OM IMA service, you need the appropriate licenses. The application
can also be started with the automatically applied demo license, which is valid for
72 hours.
> OM IMA Application:
Notes on Licences
To configure the OM IMA service, you need a TFTP, FTP(S), or HTTP(S) server that
provides a configuration file that is downloaded by the OMM. This server is not
part of the SIP-DECT 4.0 solution.
Activate the OM IMA Service
Activate the OM IMA service with the following steps:
> OM IMA Application:
1. Start a web browser and navigate to the OMM address.
Activating the OM IMA
Service
2. Log in (User name and Password are “omm” / “omm” by factory default) and
browse to the System: System settings page.
3. Below the OM Integrated Messaging & Alerting service heading, activate
the Active option.
4. Activating the OM IMA service without any configuration file is sufficient for
basic text messages and for the OM Locating application. To configure
extended functions, you need to provide a configuration file. Enter the URL of
the configuration file in the URL input field.
> OM IMA Application:
Configuration File Reference
Further Information
Most features of the OM IMA service require that you create and deploy an XMLbased configuration file. For some features, you need additional services in your
LAN such as a POP3 e-mail server to provide an e-mail account that can be polled
in order to send messages to DECT handsets.
To debug your custom configuration, and to start or stop the OM IMA service the
OMM provides a console application.
Tip:
> OM IMA Application:
OMM Console Login
The messaging API accepts XML (“OM AXI”) that is transported via TCP on
two ports: either encrypted or unencrypted (see OM AXI Specification
starting on page 18). If required, contact Aastra A2P2 support for the XML
specification.
15
Compendium: OM SIP – DECT Solution
OM Locating Application
OM Locating Application
This chapter describes how to install and configure the Web-based OpenMobility
Locating application (in short: “OM Locating application”). The OM Locating application is designed to manage customer designed events, SOS / ManDown calls, to
locate the handset which triggered such a call, and to track the handset user’s
movements. The application is equipped with messaging and alerting functions.
These functions utilize the “OM Integrated Messaging & Alerting (OM IMA)”
service, see also OM IMA Application on page 15.
Prerequisites
To use the OM Locating application, you need the appropriate licenses. The application can also be started with the automatically applied demo license, which is
valid for 72 hours.
> OM Locating Application:
OpenMobility Locating
Application
> OM Locating Application:
Notes on Licences
To operate the OM Locating application, you need the following components:
■
OM Locating server to record all locating information provided by the
OpenMobility Manager (OMM) and present them to the OM Locating clients.
■
OM Locating clients (up to 10) provided with a Web browser to manage the
locating information.
■
For the Bluetooth locating feature, you need a number of Linux compatible
USB Bluetooth beacons (“dongles”). If you want to monitor with USB video
devices, a number of Video4Linux-compatible USB web cams are required. If
you want to attach more than one USB device per RFP, you also need standard
USB hubs.
Additionally, you should configure the OMM settings for messaging, locating and
event handling to ensure that the OM Locating application features work.
> OM Locating Application:
Technical Data; Configuring
the Workstation Computers
> OM Locating Application:
OMM Configuration
Prerequisites
Install the OM Locating Application
To install and run the OM Locating application on the OM Locating server, you
need to setup a Sun/Oracle Java 1.6 runtime environment and the Apache
Tomcat 6 server on a PC running “Red Hat Enterprise Linux Server 6”.
1. Install the “Red Hat Enterprise Linux Server 6” operating system on the
dedicated OM Locating server. During installation of the operating system, you
can also install the required “tomcat6” packages.
> OM Locating Application:
2. Install the Sun/Oracle Java Runtime Environment. You can download it from
the Web address “http://java.com”. Ensure to download the Linux version
(RPM) of the “Java SE Runtime Environment (JRE)” either for 32 bit or 64 bit
CPUs. If you have not installed the Tomcat software within installation of the
Red Hat operating system, you can make it up now.
> OM Locating Application:
Installing Red Hat Enterprise
Linux Server 6
Installing the OM Locating
Application
3. Install the OM Locating application’s servlet. Copy the “OML.war” file from the
OM Locating installation media to the “webapps” folder below the Apache
Tomcat working directory.
Add Site / Location Pictures
The OM Locating application’s user interface provides graphic views of the RFPs
where a portable part is located. You can save pictures of the RFP installation sites
to the “webapps/OML/images/locations/” directory of the Tomcat server running
the OM Locating application. These pictures can e.g. base on the plant layout.
16
> OM Locating Application:
Adding Site / Location
Pictures
OM Locating Application
Compendium: OM SIP – DECT Solution
Start the OM Locating Application
1. On an OM Locating client call up a web browser and enter the OML address:
http://localhost:8080/OML/
(when the browser runs on the PC which also runs the OML), or
http://192.168.1.1:8080/OML resp. http://dns-name-of-pc:8080/OML
(when browser and OML run on different PCs in the LAN).
2. Enter the OML User name and Password. Initial login data is: admin (default
user) and OpenMob (default password).
Note
Cookies must be enabled in the web browser for a successful login.
Configure the OMM Connection
1. Switch to the Administration: OMM Configuration menu (after initial login
this menu is displayed automatically).
> OM Locating Application:
2. Enter the User name and the Password for the OMM “Full access” account
type (“omm” / “omm” by factory default). In the Address field, enter the OMM
IP address or OMM DNS name.
> OM System Manual:
Configuring the OMM
Connection
Account Types
Configure the OML Users
1. Switch to the Administration: Users menu.
2. Create the OML accounts for new users or edit/change existing accounts.
> OM Locating Application:
Managing Users
Note
Two different user groups can be assigned to the OML users: users for operators,
administrators for users who are allowed to administer the OML configuration
and the OML users (operators).
Configure the Users’ Portable Parts
1. Start the OMP. To do so, browse the OpenMobility installation media for a file
named “OMP.jar”. Right click the file and select the Open with Sun Java 6
Runtime menu item from the context menu.
> OM Locating Application:
Configuring the Portable
Parts
2. Enter the User name and the Password for the OMM “Full access” account
type. In the Address field, enter the OMM IP address or OMM DNS name.
3. Call up the Portable Parts: Overview page to enable the OM Locating features
for the appropriate portable parts.
4. Select the desired portable part in the Overview table. In the portable part’s
details view switch to the Locating tab. Enable the Tracking, Locatable, and
Locating permission options (locating properties).
5. Repeat the previous step for all portable parts that should be monitored with
the OM Locating application.
Notes
■
Aastra provides Aastra 6x0d, Aastra 6x2d or Aastra 650c handsets for use with
the OM Location application. These handsets support all application features.
> Aastra 600 c/d IMA
■
Aastra 142d and GAP handsets can also be used, but offer a limited feature set.
> OM Locating Application:
Notes on GAP / Aastra 142d
17
Compendium: OM SIP – DECT Solution
OM AXI Specification
This chapter describes an alternative approach to interact with the OMM: the
“OM Application XML Interface”, or short “OM AXI”. OM AXI is an application programming interface (API) that allows external software to configure the OMM and
to use the OMM’s various interfaces, e.g. to realize interactive applications. Here
are some examples:
■
a GUI application programmed in Java with dialogues and menus to configure
some of the OMM’s features similar to the OMP.jar application;
■
a web application programmed in PHP that offers a form-based user interface,
e.g. to send and receive text messages;
■
an XML key on an Aastra 675xi or Aastra 673xi SIP system telephone that calls a
PHP page on a web server that in turn triggers some functions on the OMM.
Because of the nature of OM AXI, a complete programming example is beyond the
scope of this compendium. However, the following basic concepts apply:
■
OM AXI features an XML-based message exchange.
■
Your application sends an XML snippet, e.g. “<Open seq="1" username="omm"
password="x" />” terminated by a null character (0x00). The OMM responds
with an XML snippet “<OpenResp seq="1" ommStbState="None"
protocolVersion="35" />”.
■
The OMM offers two TCP ports for OM AXI communication by default:
– Port 12621 for unencrypted communication for debugging,
– Port 12622 for SSL encrypted communication (preferred).
■
For performance reasons, you do not need to open or close single sessions for
subsequent XML commands. You can just re-use the already opened command
stream for this.
Details are available in the “OM Application XML Interface specification (OM AXI) ”.
SIP–DECT XML terminal interface
The SIP-DECT 4.0 solution also supports the SIP–DECT XML terminal interface.
With this, external applications provide interactive content displayed on the
Aastra 600 c/d DECT handsets:
■
In the OMP Java tool, you configure XML application hooks for the DECT
handsets on the System features: XML applications menu page. With this,
e.g. the redial list or an entry in the OMM system menu is linked to an URI that
triggers a query on an external server.
■
The queried server pushes the content back to the DECT handset by means of a
SIP notify message.
Details are available in the “SIP-DECT XML terminal interface specification”.
Note
If required, contact Aastra A2P2 support for the XML specification documents.
There are also examples available that implement some of the mentioned
programming techniques.
18
OM AXI Specification
Notes
Compendium: OM SIP – DECT Solution
Notes
19
Copyright 2012 www.aastra.com
All rights reserved
As of 09.12.2012 • Subject to changes