1
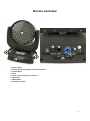
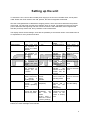
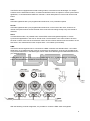
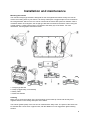
RGBW LED beam movinghead
User manual
1
Safety precautions
WARNING: This unit may cause serious injury to the eyes when used incorrectly. It is therefore
strongly advised to read this user manual carefully, to get familiance yourself with the functions of this
device.
WARNING: This unit must be operated by, or under the supervision of an adult. This device is not
suitable for children.
WARNING: Do not look directly into the beam from a short distance. This may cause serious injury to
the eyes. Ayra is not responsible for any injuries caused by incorrect use of this device.
Installation requirements:
- Always check the power supply to which you want to connect the device. If the voltage requirements
do not meet, do not connect the device as this may cause serious damage.
- This device must be installed by a professional technician, in a standing or hanging position. Only
use the included mounting bracket if you want to position the unit against a ceiling or truss system.
- When installed in a hanging position above your audience, this unit MUST be secured by using a
safety cable, capable of holding 10x the weight of this device.
- The unit is designed to be installed with a halfcoupler or G-clamp, by using the included mounting
bracket. Direct installation with proper bolts is also possible.
- Make sure there are no flammable objects in the direct environment of the device.
- Do not block the beam-exit and fan.
- Keep a minimum distance of 0.25 meter from any walls to provide sufficient cooling.
- Make sure the beam-exit and fan are not blocked by any objects in the near environment.
- Always use the included power supply. Contact your local dealer for a replacement unit if necessary.
Maintenance and protection
- Keep the unit away from dusty environments, as this may have negative effects on the fan-cooling
system and optics. Clean the optics and fan with a small, soft brush and vacuum cleaner when
needed. Clean the housing of the unit with a damp cloth. WARNING: Always disconnect the unit from
the power supply when cleaning the unit. Reconnect the unit only when any moist on the fixture has
evaporated completely.
- Do not switch the power on and off frequently, as this may cause serious damage to the unit.
- Avoid heavy shocks and collision during transport and use, as this may cause damage to the LED
light source, electronic circuit, optics and housing.
- Keep the device away from moisture, rain, water or any liquids as this may cause a short circuit
and/or electric shocks. If any liquid enters the unit, power supply or housing of the unit, disconnect the
unit immediately and do not reconnect the power supply. Contact your local dealer or technician to
inspect the unit for any damage.
2
Box contents
Box contents
1x ERO 3108 movinghead
1x power cable
1x XLR-XLR signal cable
1x installing bracket
1x safety cable
Unit and accessory inspection
- Always use the supplied power cable to connect the unit to a power supply. If the cable appears
broken or has visible damage, do not use it.
- If the unit is not going to be used for a longer period of time, disconnect it from the power supply and
store it in a dust-free environment.
- Always check the unit for possible damage before use. If you suspect that something is wrong with
the unit, do not connect it to a power source! When you suspect that your unit is broken or damaged,
contact your local dealer or a certified technician to inspect the unit.
- When your device does not generate any light, do not look directly into the lens. When the fixture
suddenly produces a beam, it may cause injury to your eyes.
3
Device overview
1. Beam output
2. Control panel with display and menu-functions
3. On/off switch
4. Fuse
5. Power input (Twist-lock connector)
6. DMX input
7. DMX output
8. Transport handles
4
Setting up the unit
To activate the unit, connect the included power supply to the unit and a suitable 230V, 50 Hz power
outlet. Switch the on/off switch to the ‘ON’ position, the LED movinghead will activate.
Give the movinghead time to calibrate the stepping motors, which are used to determine the position
of the head. You may hear and see some shaking, which is normal. The stepping motors use an end
point to determine the beginning and end of their movement. After calibration, the movinghead will
start the previously used mode, but by default it is set to DMX mode.
The display shows several settings, each with the possibility to set several values. In the table below is
an explanation for every feature and value.
Menu item
Description
Values/options
DMX ADDRE
Press enter and
use up/down to
change the DMX
address
Press enter and
use up/down to
change the pan
inversion
1 – 512
Press enter and
use up/down to
change the pan
angle
Press enter and
use up/down to
change the tilt
inversion
540 / 630
Use the up/down
buttons and enter
to
choose
a
working mode
Press enter to
access
the
manual operating
mode
DMX
SLAVE
AUTO
SOUND
CH:XX
Date(XXX)
PAN INVERT
PAN ANGLE
TILT INVERT
MODE
MANUAL
RESTORE
Press enter to
access the Motor
and Factory reset
Yes / no
Yes / no
512
‘Enter’ triggers
action
Set DMX address
Followed by
When ‘yes’ is
selected,
the
behavior of the
pan function will
be inverted
Choose between
a pan angle of
maximum 540 or
630 degrees
When ‘yes’ is
selected,
the
behavior of the tilt
function will be
inverted
Scroll and press
enter to select an
operating mode
Press Menu to
return to the main
menu
Select a channel
(CH:XX) and a
value
for
the
channel
(Date(XXX)).
Press enter to
activate the reset
function for the
motors or factory
reset.
Press Enter to
save the setting.
Press Menu to
return to the main
menu
Press Menu to
return to the main
menu
Press Menu to
return to the main
menu
Press Menu to
return to the main
menu
Motor reset =
recalibrate
the
pan
and
tilt
motors
Factory reset =
Reset the fixture
to factory settings
The display will automatically shut down after 30 seconds of inactivity. When pressing one of the menu
buttons, the menu backlight will re-activate.
5
The ERO 3108 is equipped with several working modes, each with its own advantages. For simple
events there are stand-alone modes, for advanced situations there are options to create synchronized
lightshows, or controlled with a DMX-512 controller. A short description for each mode can be found
below:
Auto:
Automatic lightshow with a pre-programmed internal show, on a pre-defined speed.
Sound:
Automatic lightshow with a pre-programmed internal show, on the beat of the music, thanks to an
internal microphone which senses the beat of the music and will change a step every time a beat is
detected.
Slave:
In master/slave mode, it is possible to link several ERO 3108 movingheads together, to create
synchronized lightshows in the Auto or Sound mode. The first fixture in the chain needs to be set in
the Auto or Music mode. All the next fixtures need to be set to Slave and will mimic the behavior of the
first fixture. The master/slave function requires XLR – XLR cables (not included).
DMX:
The ERO 3108 movinghead can be connected to a DMX-controller with standard XLR – XLR cable.
While doing so, a DMX-terminator must be connected to the last fixture, at the end of the DMX-chain.
This prevents reflections in the DMX-signal, which could cause flickering and unwanted behavior from
your intelligent fixtures.
A DMX terminator is a XLR connector with a resistor of 120 Ohm, placed between pin 2 and 3 as a
bridge. See the illustrations below for more information.
With the following channel assignment, it is possible to control the ERO 3108 movinghead:
6
Channel
1
2
3
4
Function
Pan
Tilt
Dimmer
Strobe
5
6
7
8
9
10
Red
Green
Blue
White
Motor speed
RGB macro function
11
Auto
12
Reset
Value
0-255
0-255
0-255
0-6
7-65
66-69
70-128
129-132
133-191
192-195
296-255
0-255
0-255
0-255
0-255
0-255
0-4
5-44
45-49
50-94
95-99
100-149
150-154
155-166
167-178
179-190
191-202
203-214
215-226
227-238
239-250
251-255
0-127
128-255
0-250
251-255
Description
Pan movement 8-bit
Tilt movement 8-bit
Dimmer function 0-100%
No function
Strobe function Slow – Fast
No function
Pulse strobe (Slow – Fast)
No function
Strobe fade in (Slow – Fast)
No function
Strobe fade out (Slow – Fast)
Red 0-100% dimmer
Green 0-100% dimmer
Blue 0-100% dimmer
White 0-100% dimmer
Fast – Slow movement speed
No function
Eight fixed colors
No function
Eight jumping colors (9 speeds)
No function
8 fading colors (5 speeds)
No function
Red + Green, 0-100%
Green + Red, 100-0%
Green + Blue, 0-100%
Blue + Green, 100-0%
Blue + Red, 0-100%
Red + Blue, 100-0%
RGB, 0-100%
Blue + Red 0-100%, green 100-0%
Master RGBW output 100%
No function
Auto
No function
Reset (after 3 seconds on the same
value)
7
Installation and maintenance
Mounting the bracket
The included omega-type bracket is designed for this movinghead and makes it easy to mount en
remove a mounting hook to your fixture. A G-clamp, halfcoupler or triggercoupler can be mounted to
the omega bracket, which on his turn can be mounted to the fixture with quick-lock fastners. With a
clockwise rotation of 90 degrees, the omega-type bracket is mounted to the fixture. When using the
omega bracket, a safety cable must be connected to the safety eye of the fixture. For more
information, see the graphic instructions below.
1. Omega-type bracket
2. Clamp (Triggerclamp, not included)
3. Safety cable
4. Quick-lock fastners
Cleaning
Make sure to clean the exterior of the unit frequently, as the build-up of dust and dirt may have
negative effects on the cooling and optics of the fixture.
The exterior (plastic parts) of the unit can be cleaned with a damp cloth. The optics of the fixture can
be cleaned with a clean cloth or paper towel, with the addition of a non-aggressive glass cleaning
solution.
8
Clean the fan outlet and the cooling vents with a small brush, while using vacuum cleaner suction to
remove any loose dust and/or dirt.
Clean the exterior of this fixture once a month. When using this fixture intensively, the frequency of
maintenance needs to be increased.
Transport
When using this fixture in mobile setups, provide sufficient protection during transport. Use the original
packaging of this unit, or use a professional flightcase with proper foam inlay. This way the electronics,
optics and housing are protected against severe shocks, exterior damage and failing electronics.
Make sure the moving parts of the movinghead (pan and tilt motors) are secured during transport.
Shocks and fierce movement of the pan and tilt stepping motors may cause permanent damage.
After use, let the unit cool down for at least 10 minutes. When using DMX, use the ‘black out’ option on
your DMX controller. This way the unit is positioned in a static stand-by mode and the internal fan is
able to cool down the internal electronics, which decreases the chance of damage during transport.
Replacing the internal fuse
First check whether a failing power supply may be the cause of malfunction. When you suspect that
the internal fuse is broken, the fuse can be replaced by removing the fuse cover, located directly below
the power inlet.
WARNING: Before changing the fuse, always disconnect the fixture from your wall outlet or any other
power supply to prevent electric shocks.
Always replace a broken fuse with a fuse that has the same type and rating. After the fuse has been
replaced, always close the fuse-cover. Reconnect the fixture to your power supply and check whether
the problem is solved. When this does not solve your problem, contact your local dealer for help.
IMPORTANT: A spare fuse is located inside a special compartiment of the fuse holder.
Spare parts
This unit has no user serviceable parts inside. When any damage to internal components occurs,
contact your local dealer or a specialized technician in order to repair the fixture.
Checkup
To prevent dangerous situations, make sure your fixture is in optimal condition before using it. Check
your fixture frequently by using the following checklist:
- All screws must be mounted tightly.
- Check all screws and metal parts for corrosion. No visible corrosion may be present.
- The exterior of your fixture must be in optimal condition. Check your fixture for dents, cracks or
missing parts.
- Your installation spot must be in optimal condition. Check your installation spot for corrosion, cracks,
dents and strength.
- Electrical components (connectors and cables) must be in optimal condition. Any form of damage
(cuts, exposed wire cores or any other visual deformities should not be present.
If any visual or mechanical damage is detected, contact your local dealer or a specialized technician.
Do not use a damaged or failing fixture.
Connectors and wiring schematics:
DMX-connections:
Electrical wiring:
9
Technical specifications
- RGBW LED beam movinghead
- 108x 3 Watt high power Edison LEDs, spread over red (24), green (28), blue (28) and white (28)
- expected lifespan LEDs: 50.000h
- low power consumption
- 8-bit smooth and precise pan and tilt movement
- 540 or 630 degrees pan, 270 degrees tilt
- scan position memory function with autocorrect
- RGBW color mix system
- LED shutter (electronic)
- LED dimmer (0-100% variable)
- LED rainbow effect
- LED macro effect
- LED strobe effect (0-18 Hz) with pulse
- master dimmer + dimmer for each color
- 12 DMX channels
- 2x16 character LCD display with blue backlight
- display auto dim function when not used for 30 seconds
- power requirements: 90-240V AC, 50/60 Hz
- power consumption: 120W (stand-by), 344W (max.)
- dimensions: 350 x 260 x 350 mm
- packing dimensions: 425 x 295 x 400 mm
- net weight: 9 kg
- gross weight: 11 kg
Connectors:
- DMX: 3p XLR male and female
- Power: Twist-lock connector (power cable to Schuko included)
Included accessories:
- Mounting bracket
- XLR-XLR signal cable
- Twist-lock to Schuko power cable
- Safety cable
10