1
Owner’s Manual
Deva Mix-12
Digital Mixing Console
Rev: 12.002
March 2007
230 West Parkway, Unit 9, Pompton Plains, NJ 07444 USA
Tel: 973.835.5000
Fax: 973.835.6633
Change History
2006-10-30
❑
First revision.
2007-03-05 (12.002)
❑
Updated to reflect currently shipping firmware.
Table of Contents
Deva Mix-12 Owner’s Manual
Table of Contents
What s in the Box . . . . . . . . . . . . . . . . . . . . . . . . . . . . . . . . . . . . . . . . . . . . . . . . . . . . . . . . . . . . . . 1
Introduction . . . . . . . . . . . . . . . . . . . . . . . . . . . . . . . . . . . . . . . . . . . . . . . . . . . . . . . . . . . . . . . . . . 1
Features . . . . . . . . . . . . . . . . . . . . . . . . . . . . . . . . . . . . . . . . . . . . . . . . . . . . . . . . . . . . . . . . . . . . 1
Getting to Know your Deva Mix-12 . . . . . . . . . . . . . . . . . . . . . . . . . . . . . . . . . . . . . . . . . . . . . . . . 2
Installation . . . . . . . . . . . . . . . . . . . . . . . . . . . . . . . . . . . . . . . . . . . . . . . . . . . . . . . . . . . . . . . . . . . 5
Typical Setup Sequence . . . . . . . . . . . . . . . . . . . . . . . . . . . . . . . . . . . . . . . . . . . . . . . . . . 5
DC Power . . . . . . . . . . . . . . . . . . . . . . . . . . . . . . . . . . . . . . . . . . . . . . . . . . . . . . . . . . . . . . . . . . . 5
Operation . . . . . . . . . . . . . . . . . . . . . . . . . . . . . . . . . . . . . . . . . . . . . . . . . . . . . . . . . . . . . . . . . . . . 5
Playback Output Switching . . . . . . . . . . . . . . . . . . . . . . . . . . . . . . . . . . . . . . . . . . . . . . . . 5
Faders . . . . . . . . . . . . . . . . . . . . . . . . . . . . . . . . . . . . . . . . . . . . . . . . . . . . . . . . . . . . . . . 6
Faders 9 through 12 . . . . . . . . . . . . . . . . . . . . . . . . . . . . . . . . . . . . . . . . . . . . . . . . 6
Channel Trims . . . . . . . . . . . . . . . . . . . . . . . . . . . . . . . . . . . . . . . . . . . . . . . . . . . . . . . . . 7
Attenuating Pre-fader Audio . . . . . . . . . . . . . . . . . . . . . . . . . . . . . . . . . . . . . . . . . . 7
Amplifying the Pre-fader Audio . . . . . . . . . . . . . . . . . . . . . . . . . . . . . . . . . . . . . . . . 7
Fader Input Meters . . . . . . . . . . . . . . . . . . . . . . . . . . . . . . . . . . . . . . . . . . . . . . . . . . . . . . 7
Adjusting the Meter Brightness . . . . . . . . . . . . . . . . . . . . . . . . . . . . . . . . . . . . . . . . 7
Record and Stop Buttons . . . . . . . . . . . . . . . . . . . . . . . . . . . . . . . . . . . . . . . . . . . . . . . . . 7
Channel Button (CH) . . . . . . . . . . . . . . . . . . . . . . . . . . . . . . . . . . . . . . . . . . . . . . . . . . . . 7
Channel Button Shortcuts . . . . . . . . . . . . . . . . . . . . . . . . . . . . . . . . . . . . . . . . . . . . 8
Bus Button . . . . . . . . . . . . . . . . . . . . . . . . . . . . . . . . . . . . . . . . . . . . . . . . . . . . . . . . . . . . 8
PFL Button . . . . . . . . . . . . . . . . . . . . . . . . . . . . . . . . . . . . . . . . . . . . . . . . . . . . . . . . . . . . 8
TALK1, TALK2 and SLATE . . . . . . . . . . . . . . . . . . . . . . . . . . . . . . . . . . . . . . . . . . . . . . . 9
TONE KEY . . . . . . . . . . . . . . . . . . . . . . . . . . . . . . . . . . . . . . . . . . . . . . . . . . . . . . . . . . . . 9
Reassigning the Tone Key . . . . . . . . . . . . . . . . . . . . . . . . . . . . . . . . . . . . . . . . . . . 9
Output Level POTS . . . . . . . . . . . . . . . . . . . . . . . . . . . . . . . . . . . . . . . . . . . . . . . . . . . . . 9
Keyboard . . . . . . . . . . . . . . . . . . . . . . . . . . . . . . . . . . . . . . . . . . . . . . . . . . . . . . . . . . . . 10
Additional keyboard functions . . . . . . . . . . . . . . . . . . . . . . . . . . . . . . . . . . . . . . . . 10
DEVA EQ . . . . . . . . . . . . . . . . . . . . . . . . . . . . . . . . . . . . . . . . . . . . . . . . . . . . . . . . . . . . . . . . . . . 11
Channels 1 and 2 . . . . . . . . . . . . . . . . . . . . . . . . . . . . . . . . . . . . . . . . . . . . . . . . . . . . . . 11
EQ buttons . . . . . . . . . . . . . . . . . . . . . . . . . . . . . . . . . . . . . . . . . . . . . . . . . . . . . . . . . . . 11
EQ knobs . . . . . . . . . . . . . . . . . . . . . . . . . . . . . . . . . . . . . . . . . . . . . . . . . . . . . . . . . . . . 11
Jog Wheel . . . . . . . . . . . . . . . . . . . . . . . . . . . . . . . . . . . . . . . . . . . . . . . . . . . . . . . . . . . . 11
Using a USB Keyboard . . . . . . . . . . . . . . . . . . . . . . . . . . . . . . . . . . . . . . . . . . . . . . . . . . 12
Deva Mix-12 Key shortcuts . . . . . . . . . . . . . . . . . . . . . . . . . . . . . . . . . . . . . . . . . . . . . . . 12
Using the Deva Keypad . . . . . . . . . . . . . . . . . . . . . . . . . . . . . . . . . . . . . . . . . . . . . . . . . 13
Deva Compressor . . . . . . . . . . . . . . . . . . . . . . . . . . . . . . . . . . . . . . . . . . . . . . . . . . . . . . . . . . . . 13
Zaxcom Warranty Policy and Limitations . . . . . . . . . . . . . . . . . . . . . . . . . . . . . . . . . . . . . . . . . . 15
iii
Deva Mix-12 Owner’s Manual
Table of Contents
iv
Deva MIX-12 Owner’s Manual
Chapter 1
Chapter 1 - Introduction
What’s in the Box
The following items are included in the Zaxcom Mix-12
❏
Deva Mix-12 on-location mixing board
❏
RS-422 cable
❏
Power Supply
❏
Owner’s Manual
Introduction
The Zaxcom Deva Mix-12 is a control surface for the embedded digital audio mixer of either the
Deva IV or Deva V location recorders.
The Mix-12 is fully digital, only the microphone pre-amps, A-D and D-A converters are used for
analog connections to the outside world. All mixing is performed in the digital domain using a
floating point DSP ensuring the highest quality audio.
Features
The Mix 12 provides all of the mixing functionality required for Film and Television audio
production and contains the following features:
❏
True digital mixing console
❏
Three band shelving EQ with two notch filters and high pass per channel
❏
Soft knee compressor with makeup gain
❏
All cross points are cross faded (never any clicks or pops)
❏
Zero time offset design for no phase distortion channel-to-channel
❏
No audio cabling from mixer to recorder
❏
Floating point DSP (no internal clipping or quantization issues)
❏
Unlimited routing
❏
Penny & Gilles faders
❏
No sample rate issues between mixer and recorder
❏
Integrated Deva record and stop buttons
❏
QWERTY keyboard for metadata input
❏
Cross points can be pre or post fader with phase inversion
1
Chapter 1
Deva MIX-12 Owner’s Manual
Getting to Know your Deva Mix-12
1
2
4
3
5
6
7
8
9
10
11
12
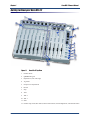
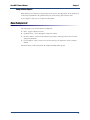
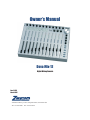
Figure 1-1
Deva Mix-12 Top View
1.
Channel Trims
2.
QWERTY Keypad
3.
Equalization (low, mid, high)
4.
Jog wheel
5.
Output Level Adjustments
6.
Record
7.
Stop
8.
Tone
9.
Talk 2
10. Talk 1
11. Slate
12. Channel strip: Fader, Bus button, PFL monitor button, Channel EQ button, and Channel button
2
Deva MIX-12 Owner’s Manual
Chapter 1
13
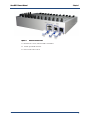
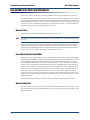
Figure 1-1
14
15
Deva Mix-12 Back View
13. RS-422 Ports 1 and 2; labeled COM 1 and COM 2
14. 12VDC 4-pin XLR connector
15. Power on/off rocker switch
3
Chapter 1
4
Deva MIX-12 Owner’s Manual
Deva MIX-12 Owner’s Manual
Chapter 2
Chapter 2 - Installation and Use
Installation
Before the Mix-12 can operate with the Deva, you must install the proper firmware on your Deva.
This firmware is supplied by Zaxcom when you purchase the Mix-12.
Typical Setup Sequence
NOTE:
1.
Connect the RS-422 cable from the Deva Serial connector to the Com1 connector on the
Mix-12 using Com 1.
The Com2 port is reserved for future use (displaying the meters on a computer screen).
2.
Set the Deva serial port mode to RS-422 from the Deva Operating Mode screen.
Main Menu > Deva Setup > Operating Mode
3.
Enable Mix-12 support on the Deva from the Mix-12 screen.
Main Menu > Deva Setup > Mix-12
The Deva will retain the Operating Mode settings when not powered on. However, if a factory
restore is performed, these settings must be re-enabled since they are not the default settings.
4.
Connect the 12 VDC power input.
The input power must be between 8 and 16 VDC.
DC Power
The supplied AC-to-DC power convertor provides the proper voltage to the Mix-12. However, if a
DC power source is used, it must supply a DC input voltage of 8 to 16 Volts. When planning your
power usage with a DC power source, be aware that the Mix-12 draws approximately.25 amps of
current.
Operation
This section describes the operation of the Mix-12.
Playback Output Switching
This function can be controlled from the Operating Mode Menu. The Master Output mode
button selects if the playback switch of the output busses is enabled or disabled. This has been done
so that the output busses can be used for feeding Comteks and other devices. Playback only affects
the headphone output bus.
5
Chapter 2
Deva MIX-12 Owner’s Manual
Faders
The channels the faders are assigned to are permanently assigned and cannot be changed. They are
assigned as follows:
Fader
1
2
3
4
5
6
7
8
Channel
Analog Input 1
Analog Input 2
Analog Input 3
Analog Input 4
Analog Input 5
Analog Input 6
Analog Input 7
Analog Input 8
Fader
9
10
11
12
Channel
Digital Input 1
Digital Input 2
Digital Input 3
Digital Input 4
You can assign digital inputs 5 through 8 to the 4 rotary faders on the Deva.
Important:
You must ensure all channels controlled by the Mix-12 are not assigned to the rotary faders on the
Deva.
Faders are assigned in Faders menu.
To use the faders on the Mix-12, you must setup the audio to be routed to the output busses post
fader. The Mix-12 faders cannot be used when the Deva audio is routed using the pre-fader option.
Each fader has an input meter. The meter is a pre fader indication of the input level feeding that
channel. Adjustments to the input level are performed using the channel trims located along the top
of the Mix-12.
Faders 9 through 12
The Deva IV and V have only eight microphone inputs. However faders 9 through 12 allow you to
use the four AES digital inputs on the Deva for additional inputs. On the Deva, you can assign these
digital inputs to any track or place them on any output pre- or post-fader.
If you would like to use these for additional microphone inputs, you need to use an external A/D
converter. When using an external A/D, the word clock on the Deva feeds the external A/D, so it is
in sync with the Deva clock. You always want the Deva clock to be the master when using external
A/D devices.
6
Deva MIX-12 Owner’s Manual
Chapter 2
Channel Trims
Each channel has a separate channel trim. Each channel can be attenuated or amplified using the
trim. The limit of the attenuation and gain is limited by the Deva itself. The input signal can be
attenuated by up to -20 dB and amplified up to +30 dB.
Attenuating Pre-fader Audio
Rotating the knob on the Mix-12 counter-clockwise attenuates the prefader audio.
Amplifying the Pre-fader Audio
Rotating the knob on the Mix-12 clockwise increases the pre-fader audio.
The actual amount of gain or attenuation can be seen on the input audio screen on the Deva.
Fader Input Meters
Each channel on the Mix-12 has a fader input meter, this meter is displayed using 18 LEDs. These
are all pre-fader input level indications. All inputs should read between 0dB and +6dB for best
performance.
In the Deva Home screen and Cue screen, pressing M toggles the Mix-12 metering between
prefader analog input, bus metering, and the disk mix metering.
NOTE:
The PFL LEDs are inverted whenever the Mix-12 is not metering the prefader analog input bus.
The Mix-12 metering mode is not saved when powered down. The Mix-12 default setting of
metering the prefader analog is always used when first powered on.
Adjusting the Meter Brightness
You can adjust the meter brightness on the Mix-12. There are eight brightness levels that the meter
can be adjusted to. The brightest setting allows the meters to be seen in direct sunlight.
To adjust the meter brightness, use the meter brightness button located in the Deva Setup menu. All
meter brightness changes are saved when the Deva is powered down.
Record and Stop Buttons
The record and stop buttons on the Mix-12 are identical to those on the Deva and reflect the current
transport status of the Deva itself.
Channel Button (CH)
On each channel strip, the CH key allows direct access to that channel s effect and characteristics.
The CH key illuminates indicating the channels selected. When the Slate, Talk 1, or Talk 2 button
are pressed, the channels they are being mixed to illuminate.
Pressing the CH key opens the control menu for that channel, allowing easy access to setting input
type, phantom power options, EQ, channel assignments, channel delay, and more. Pressing the CH
key again, takes you back to the screen you were previously on.
7
Chapter 2
Deva MIX-12 Owner’s Manual
Channel Button Shortcuts
❏
EQ menu - When in the EQ menu, pressing CH changes the which of the five filters is being
controlled by the jog wheel. Pressing CH moves the control knob to the next filter.
❏
Bus menu - When in the Bus menu, pressing CH toggles the cross point.
Bus Button
An individual bus routing menu allows the routing for a single channel on the internal Deva mix
busses and to the external output busses. The number keypad on the mix-12 can be used to make
channel assignments on the DEVA and assign the outputs.
The Bus LED indicates channel, output, or disk that is in the mix when in the Stop mode. When in
Record, the Bus LED indicates the channels in the disk mix.
When bus is pressed once, the input bus routing menu appears on the Deva. Pressing the a keypad
number toggles between analog post-fader, analog post-fader inverted, analog pre-fader, and analog
pre-fader inverted.
NOTE:
If using fader strips 9 through 12, you control the digital signal, not the analog.
If bus is pressed a second time, the output routing for that channels appears on the Deva. The talk
and slate keys are selected in the output bus menu. When bus is pressed a third time, it exits.
The list below contains the keys that perform special functions.
Bus Screen
❏
CH button - Toggles the cross point.
Input Screen
❏
Left Arrow and Right Arrow - Switches between Disk Channel and Output Channel.
Output Screen
❏
Up Arrow and Down Arrow - Switches between Disk Channel and Output Channel.
❏
Slate, Talk 1, Talk 2 - Toggles cross points in the output mix.
PFL Button
The PFL keys select an input channel directly to the headphone bus in a pre fader mode. When the
PFL is active the current headphone selection will be suspended while the PFL is active. Pressing
the PFL keys activate and de-activate the PFL function. Only the headphone us is effected by the
PFL function. Multiple inputs can be selected when using the PFL function.
When the metering is changed the LED lighting is inverted.
8
Deva MIX-12 Owner’s Manual
Chapter 2
TALK1, TALK2 and SLATE
To route the Talk keys press BUS on the fader associated with the output bus number to route.
For example, press BUS twice on fader 3 to route the Talk keys to MIX bus or output bus 3. The
menu displays a Xpoint selection for the Slate and Talk keys.
Hint:
The Slate and Talk keys can be pressed at the same time to talk to each destination at the same time.
The Slate key on the Mix 12 is a duplication of the Slate key on the Deva itself.
TONE KEY
The Tone key toggles tone on and off. The button lights when tone is active.
Reassigning the Tone Key
The Tone Key can be reassigned in the Mix 12 screen on the Deva. The Tone key can be reassigned
to perform the following functions:
❏
Tone
❏
Home Screen key
❏
Escape
❏
Play
❏
Unassigned - This essentially disables the Tone key.
Output Level POTS
The analog output levels of busses 1 through 4 are controlled by the output level pots. The output
level is adjustable from 0 dBu to infinity. The AES digital outputs are also affected by the output
level pots. Outputs 1 through 4 should be used to feed returns to Comteks or any device where an
output level adjustment is necessary.
You cannot adjust the output level of outputs 5 and 6 from the MIX12.
9
Chapter 2
Deva MIX-12 Owner’s Manual
Keyboard
A built-in Qwerty keyboard on the Mix-12 is used to enter metadata. The function keys F1 though
F6 are a identical to those keys on the front panel of the Deva.
Additional keyboard functions
Many of the keyboards functions are the same as the External USB keyboard.
Key
F7
F8
F9
F10
Esc
M
Arrows
10
Description
Shortcut to Meter Labels menu
irect entry of Note information.
Direct entry of Scene information.
Direct entry of Take
T
number.
Functions as Stop button or back.
Toggles PFL metering monitoring.
T
Used to navigate in screens.
Deva MIX-12 Owner’s Manual
Chapter 3
Chapter 3 - Deva Equalization
DEVA EQ
The Deva EQ is very powerful. It is the same EQ that is in the Cameo mixing console. The EQ
consists of five filters. A three band parametric and two notch filters are available on each channel.
The EQ is present in both pre and post fader and cannot be separated. When EQ is changed, all
audio on that channel is affected. However, adding EQ does not change the timing of the audio as it
passes through a channel, any delay remains constant.
Channels 1 and 2
Channels 1 and 2 on the Deva have equalization and compression enabled. All other channels
require the Mix-12 or can be added. Contact Zaxcom for details on enabling additional channels on
the Deva.
EQ buttons
Pressing EQ enables or disables the EQ on the channel. If a channel is already under EQ control,
pressing EQ bypasses the EQ for that channel. However, the EQ settings are retained when in the
bypass mode. Pressing EQ again allows you to enable the EQ again.
Hint:
If you press and hold the EQ button, when you release the button you exit out of the EQ screen.
EQ knobs
The three EQ knobs, Low, Mid, and High always control the levels of the first three bands of the
currently selected channel. The selected channel is indicated by the illuminated CH key. When a
channel is selected, you can adjust the EQ at any point since the EQ knobs are always active.
However, the results of the adjusting the EQ can only be seen on the Deva s EQ screen.
There are five filters per channel. BAND 1,2,3 are selectable as Low shelf, High shelf and peak
filter. Bands 4 and 5 are notch filters. Each channel has its own filter set. If a filter is not in use
leave the EQ for that channel disabled. The saves processing power. It may be important if a
number of the effects need to be on at the same time. The CH key may be used to change the filter
being adjusted if the Deva is in the EQ screen.
Jog Wheel
The function of the jog wheel is to adjust the other EQ parameters as selected in the Deva EQ
menu. The filter selected and the current parameter to adjust determines the function of the jog
wheel. Filter Q and Frequency are adjusted with the Jog wheel.
By using the CH key on the channel, you determine the Filter to adjust. The selection of controlled
parameter is selected on the touch screen in the lower right corner of the EQ display.
11
Chapter 3
Deva MIX-12 Owner’s Manual
Using a USB Keyboard
A standard USB keyboard can be used to help get to the EQ and compression screen without the
Mix-12. The following are keys that enable quick access to the EQ and compression screen.
Channel Screen
When in the Channel Screen, the following keys on the USB keyboard have special functions:
❏
E - Goes to the EQ of the current channel. This functions as the EQ button on the Mix-12.
❏
B - Goes to the Bus of the current channel. This functions as the Bus button on the Mix-12.
When in the EQ Screen, the following keys on the USB keyboard have special functions:
❏
E - Functions as the EQ button on the Mix-12.
Deva Mix-12 Key shortcuts
When in the EQ screen of the Deva, the following keys on the Mix-12 perform the described
function.
❏
EQ Knobs (Low, Mid, High) - Always control the levels of the first three bands of the
currently selected channel.
❏
Jog Wheel - Controls the frequency or Q of the EQ.
❏
Enter - Toggles the EQ bypass.
❏
U - Resets the EQ to the default ‘unity’ settings.
❏
CH - Selects the next band of the EQ.
❏
Up Arrow - Changes the current band’s filter type.
❏
EQ - Pressing EQ once places you into the EQ screen. Pressing EQ a second time places you
into the EQ Memory Screen. Pressing EQ a third time, exits out of the EQ Screen.
❏
F - Sets the entry mode to Frequency.
❏
Q - Sets the entry mode to Q
❏
L - Sets the entry mode to Level.
The current bands entry mode is indicated on screen by a yellow highlight indicating level,
Frequency, or Q. Using the Jog Wheel in the entry mode, automatically sets the entry mode to
Frequency.
In the EQ Memory Screen, the following keys are used:
NOTE:
12
❏
CH - toggles memory through load mode/save mode.
❏
1 through 5 - Pressing numbers 1 through 5 on the keyboard loads or saves the respective
memory.
❏
EQ - exits out of the EQ Screen.
Press the EQ button of another channels causes the EQ to change to the channel.
Deva MIX-12 Owner’s Manual
Chapter 3
Using the Deva Keypad
When in the EQ screen, the Deva keypad may also be used to enter EQ values. To use the keypad,
set the entry mode button to the parameter that you want to change, then enter the value.
To set a negative value, use a zero (0) before the number.
Deva Compressor
The following keys are used in the Deva Compressor.
❏
Enter - toggles compressor on/off
❏
Up/Down arrow - cycles through the compressor buttons.
❏
Inc./Dec. buttons - used to set the compressor parameters. The keyboard can also be used to
change the parameters.
❏
Copy Compress - This is used to save you time and copy all compressor values to another
channel.
The meter shows you the total gain on the channel including make-up gain.
13
Chapter 3
14
Deva MIX-12 Owner’s Manual
Zaxcom Warranty Policy and Limitations
Mix-12 Owner’s Manual
Zaxcom Warranty Policy and Limitations
Zaxcom Inc. values your business and always attempts to provide you with the very best service.
No limited warranty is provided by Zaxcom unless your Zaxcom Deva (“Product”) was purchased
from an authorized distributor or authorized reseller. Distributors may sell Products to resellers who
then sell Products to end users. Please see below for warranty information or obtaining service. No
warranty service is provided unless the Product is returned to Zaxcom Inc. or a Zaxcom dealer in
the region where the Product was first shipped by Zaxcom.
Warranty Policy
Zaxcom Mix-12 carries a Standard Warranty Period of one (1) year.
NOTE:
The warranty period commences from the date of delivery from the Zaxcom dealer or reseller to the
end user.
There are no warranties which extend beyond the face of the Zaxcom limited warranty. Zaxcom
disclaims all other warranties, express or implied, regarding the Products, including any implied
warranties of merchantability, fitness for a particular purpose or non-infringement. In the United
States, some laws do not allow the exclusion of the implied warranties.
Return Material Authorization (RMA)
No Product may be returned directly to Zaxcom without first contacting Zaxcom for a Return Material Authorization ("RMA") number. If it is determined that the Deva may be defective, you will be
given an RMA number and instructions for Product return. An unauthorized return, i.e. one for
which an RMA number has not been issued, will be returned to you at your expense. Authorized
returns are to be shipped prepaid and insured to the address on the RMA in an approved shipping
container. Your original box and packaging materials should be kept for storing or shipping your
Product. To request an RMA, please contact Zaxcom by telephone. There is an RMA form on the
Zaxcom web site www.zaxcom.com. Please fill out the form and return it with the product for
repair. Zaxcom will return the warranty repair via 2nd day UPS or FedEx at their discretion. If overnight service is required a FedEx or UPS account number must be provided to Zaxcom to cover the
shipping expenses.
All Devas returned for warranty service must be returned with a Zaxcom disk drive carrier.
Warranty Limitations
Zaxcom's limited warranty provides that, subject to the following limitations, each Product will be
free from defects in material and workmanship and will conform to Zaxcom's specification for the
particular Product.
15
Mix-12 Owner’s Manual
Zaxcom Warranty Policy and Limitations
Limitation of Remedies
Your exclusive remedy for any defective Product is limited to the repair or replacement of the
defective Product.
Zaxcom may elect which remedy or combination of remedies to provide in its sole discretion. Zaxcom shall have a reasonable time after determining that a defective Product exists to repair or
replace a defective Product. Zaxcom's replacement Product under its limited warranty will be manufactured from new and serviceable used parts. Zaxcom's warranty applies to repaired or replaced
Products for the balance of the applicable period of the original warranty or thirty days from the
date of shipment of a repaired or replaced Product, whichever is longer.
Limitation of Damages
Zaxcom's entire liability for any defective Product shall in no event exceed the purchase price for
the defective Product. This limitation applies even if Zaxcom cannot or does not repair or replace
any defective Product and your exclusive remedy fails of its essential purpose.
No Consequential or Other Damages
Zaxcom has no liability for general, consequential, incidental or special damages. These include
loss of recorded data, the cost of recovery of lost data, lost profits and the cost of the installation or
removal of any Products, the installation of replacement Products, and any inspection, testing, or
redesign caused by any defect or by the repair or replacement of Products arising from a defect in
any Product.
In the United States, some states do not allow exclusion or limitation of incidental or consequential
damages, so the limitations above may not apply to you. This warranty gives you specific legal
rights, and you may also have other rights which vary from state to state.
Your Use of the Product
Zaxcom will have no liability for any Product returned if Zaxcom determines that:
❑
The product was stolen from Zaxcom
❑
The asserted defect:
1.
is not present,
2.
cannot reasonably be fixed because of damage occurring when the Product is in the possession
of someone other than Zaxcom, or
3.
is attributable to misuse, improper installation, alteration (including removing or obliterating
labels and opening or removing external covers (unless authorized to do so by Zaxcom or an
authorized Service Center)), accident or mishandling while in the possession of someone other
than Zaxcom.
❑
The Product was not sold to you as new.
Additional Limitations on Warranty
Zaxcom’s warranty does not cover products which have been received improperly packaged,
altered, or physically abused.
16