1
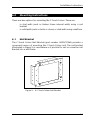
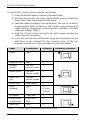
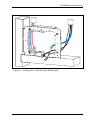
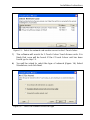
C-Touch Colour Touch Screen
Installation Instructions
50xxCTC Series
© Copyright Clipsal Integrated Systems Pty Ltd 2005. All rights Reserved. This
material is copyright under Australian and international laws. Except as permitted
under the relevant law, no part of this work may be reproduced by any process
without prior written permission of and acknowledgement to Clipsal Integrated
Systems Pty Ltd.
Clipsal and C-Bus are registered trademarks of Clipsal Australia Pty Ltd.
The information in this manual is provided in good faith. Whilst Clipsal Integrated
Systems (CIS) has endeavoured to ensure the relevance and accuracy of the
information, it assumes no responsibility for any loss incurred as a result of its use.
CIS does not warrant that the information is fit for any particular purpose, nor does
it endorse its use in applications which are critical to the health or life of any
human being. CIS reserves the right to update the information at any time without
notice.
V1.0a Mar 2005
Contents
1.0
2.0
3.0
4.0
5.0
6.0
7.0
8.0
9.0
10.0
11.0
12.0
13.0
14.0
15.0
16.0
17.0
Product Range
Important Notes
Description
3.1
Packing List
3.2
Features
3.3
Infrared Remote Control
Definitions
Installation Procedure
5.1
Location
5.2
Multiple C-Touch Units
Mounting Instructions
6.1
Nail Bracket
6.2
Wall Box
6.3
The Power Supply Unit
6.4
Attaching the Facia
Wiring Details
7.1
C-Bus Network Connection
7.2
Programming Lead
7.3
Audio and IR Connections
7.4
Video Connection
7.5
RS-232 Connection
C-Bus System Clock
C-Bus Power Requirements
Power Surges and Short Circuit Conditions
Megger Testing
Programming Requirements
Using the C-Touch Colour Transfer Utility
Electrical Specifications
Mechanical Specifications
Standards Complied
Warranty
5
5
6
6
7
8
8
9
9
10
11
11
14
15
16
17
17
19
19
20
21
21
22
22
22
23
23
32
34
36
37
C-Touch Colour Touch Screen
4
Installation Instructions
1.0
Product
Facia Style
Catalogue Number
C-Touch Colour
Touch Screen
Stainless Steel
BS5000CTC
Brass
BB5000CTC
Neo
5050CTC
Glass, Cream
5080CTC-3
Glass, Black
5080CTC-6
Glass, Mid-Brown
5080CTC-7
Glass, White
5080CTC,GF
Infrared Remote Control
—
5035TX
Nail Bracket
—
5000CTCNA
Wall Box
—
5000CTCWB
Power Supply
—
5000CTCPS
2.0
•
•
•
•
•
Product Range
Important Notes
Do not replace, extend or shorten the Power Supply’s DC output cable.
Doing so may result in damage to the C-Touch Colour or Power Supply
unit, and void your warranty.
Do not connect mains directly to C-Touch Colour units.
Ensure you connect the pink C-Bus cable to one of the two C-Bus RJ45
connectors on the left side of the C-Touch Colour (looking from the
front). Do not connect the C-Bus cable to a C-Touch Colour’s Ethernet
RJ45 connector!
Using any non-C-Bus software with C-Bus hardware without the written
consent of Clipsal Integrated Systems may void any hardware
warranties.
To comply with EMC regulations the included ferrite filters must be
fitted to any audio, video and IR cables connected to the C-Touch
Colour unit. Refer to sections 7.3 and 7.4 on pages 19 and 20.
5
C-Touch Colour Touch Screen
•
Cabling for this product should be performed by a suitably qualified
person, in accordance with the laws and requirements of the state or
country of installation.
Do not over tighten the screws when securing the C-Touch Colour unit
to the wall. Doing so may distort the casing, making attachment of the
facia more difficult.
•
3.0
Description
The C-Touch Colour Touch Screen (C-Touch Colour) allows sophisticated
control of an entire C-Bus system from one location.
Using appropriate software, the unit can be configured to look and
operate in a manner convenient to the user. Refer to page 23 for further
details.
3.1
Packing List
The items* included with the C-Touch Colour package are shown in
Figure 1. They are:
• C-Touch Colour Touch Screen (LCD covered by protection sheet)
• C-Touch Universal Power Supply with 4 metre mains cable and
4 metre DC cable
• programming lead (2 metre red crossover network cable)
• RJ45 Cable Joiner
• 2 × ferrite filters
• cleaning cloth
• Installation Instructions (this booklet)
• User’s Guide
• Warranty and Registration card
• 4 × mounting screws (finish to suit touch screen style).
• 5035TX Infrared Remote Control.
*
Subject to change without notice
6
Installation Instructions
Figure 1 – Typical components packed with the5080CTC, GF C-Touch Colour
3.2
Features
The C-Touch Colour’s features include:
•
•
•
•
•
•
•
•
•
a touch sensitive 6.4 inch (16.3 cm) LCD screen
real time clock for automatic scheduling of events
10/100 Ethernet interface
in-built infrared (IR) receiver with an external IR input
2 × USB and 1 × RS-232 serial ports
an RCA composite video output
2 × C-Bus connections (in parallel)
audio line in and line out connections
inbuilt speaker.
7
C-Touch Colour Touch Screen
3.3
Infrared Remote Control
The C-Touch Colour is equipped with an Infrared Remote Control, used to
select scenes and switch loads on, off, or adjust their level. The remote
control functionality is incorporated into a software project. The available
functions depend on how the C-Touch Colour is programmed. If multiple
C-Touch Colour units are installed, the same remote control can talk to
each of them.
Figure 2 – The Infrared Remote Control
4.0
Definitions
Term
Definition
Load
An electrical device (such as a light) connected to a
C-Bus output unit (such as a dimmer).
scene
A series of actions across multiple outputs, triggered by
a single button. For example, on arrival home you could
use a scene to switch on lights in the hallway, kitchen
and lounge, and switch on a heater.
schedule
A sequence of events to occur at particular instances in
the future.
Backlight
The light behind the LCD screen providing visibility in
varying lighting conditions.
8
Installation Instructions
5.0
Installation Procedure
5.1
Location
It is important to select the right location to install the C-Touch Colour.
Some considerations:
• The unit has a typical viewing angle of 70° to the left, right and
down, and 40° up (illustrated in Figure 3). Take this into account
when choosing the mounting height.
• Provide easy access to the unit for switching lights and selecting
scenes.
• Keep the C-Touch Colour clear of places subject to water,
humidity, direct sunlight and heavy dust.
• Allow adequate ventilation.
• Do not cover the unit.
• Avoid obstructions to the reception of infrared signals by the
Infrared Remote Control.
• The C-Touch Colour is designed for indoor use only.
• Do not mount opposite windows or other sources of bright light,
as the reflections make viewing difficult.
• The unit must be mounted vertically (to maximise heat
dissipation).
A warm airflow radiates from the vents at the top of the unit. This
may cause discolouration of some surfaces over time.
no wet
hands
no cleaner
spray
no
coverage
no direct
sunshine
no
dust
9
C-Touch Colour Touch Screen
40° up
70° left
70° down
70° right
Figure 3 – Consider the C-Touch Colour's viewing angle when mounting the unit
5.2
Multiple C-Touch Units
Multiple C-Touch units can be installed on a C-Bus network. These units
may be programmed to operate cooperatively or independently of each
other. Take care not to mount units where a single IR remote control
transmission can be received by multiple units (illustrated in Figure 4).
Otherwise, multiple units may trigger a scene, with unpredictable results.
5000CT
5000CT
remote
Good placement
5000CT
5000CT
remote
Poor placement
Figure 4 – Take care not to overlap IR transmission/reception zones
10
Installation Instructions
6.0
Mounting Instructions
There are two options for mounting the C-Touch Colour. These are:
•
•
6.1
in stud walls (such as timber frame internal walls) using a nail
bracket
in solid walls (such as brick or stone) or stud walls using a wall box.
Nail Bracket
The C-Touch Colour Nail Bracket (part number 5000CTCNA) provides a
convenient means of mounting the C-Touch Colour unit. The nail bracket
(illustrated in Figure 5) is used where is it practical to nail or screw the nail
bracket into a wall frame.
Figure 5 – A C-Touch Colour Nail Bracket
11
C-Touch Colour Touch Screen
To mount the C-Touch Colour using the nail bracket:
1) Place the bracket against a beam of the wall frame.
2) Nail the bracket into the frame. Alternatively mark and drill the
holes, then screw the bracket into the frame.
3) Feed the cables through to the nail bracket. The use of conduit is
recommended. Refer to Figure 6. The number and positioning of
cables will vary depending on the particular installation. Possible
cables are listed in Table 1.
4) Hold the C-Touch Colour unit up to the nail bracket and plug the
cables into the connectors.
5) Insert the unit into the nail bracket, lining the mounting holes up
with those in the bracket. Fix the C-Touch Colour to the nail
bracket using the four screws provided. Do not over tighten.
Cable
Connection
Quantity
C-Bus
RJ45
2
Serial RS-232
DB9
1
Infrared
(input)
3.5 mm
mono socket
1
Audio line in
3.5 mm
stereo socket
1
Audio line
out
3.5 mm
stereo socket
1
Serial USB
USB Type A
2
Cat-5
network
RJ45
2
(1 front,
1 back)
DC power
4 pin DIN
1
PS/2 mouse
or keyboard
6 pin mini
DIN
1
Video out
RCA
1
Connector Location
Table 1 – C-Touch Colour cable connections and location
12
Installation Instructions
Figure 6 – Installing the C-Touch Colour Nail Bracket
13
C-Touch Colour Touch Screen
6.2
Wall Box
The C-Touch Colour Wall Box (part number 5000CTCWB) allows the
C-Touch Colour unit to be mounted within a solid wall construction such as
brick or stone. It provides increased RF shielding compared to the Nail
Bracket. The wall box (illustrated in Figure 7) may also be used to mount a
C-Touch Colour unit in timber or metal framed stud walls.
Figure 7 – A C-Touch Colour Wall Box
To mount the C-Touch Colour using the wall box:
1) Prepare a hole in the wall or place the wall box against a beam of
the wall frame (in stud walls).
2) Fix the wall box into the frame, in an appropriate manner.
3) Feed the cables through to the wall box. It is recommended that
conduit be used. Refer to Figure 8. The number and positioning of
cables will vary depending on the particular installation. Possible
cables are listed in Table 1.
4) Hold the C-Touch Colour unit up to the wall box and plug the
cables into the connectors.
5) Insert the unit into the wall box, lining the mounting holes up with
those in the wall box. Fix the C-Touch Colour to the wall box using
the four screws provided. Do not over tighten. Ensure cables are
clear of mounting screws.
14
Installation Instructions
Figure 8 – Installing the C-Touch Colour Wall Box
6.3
The Power Supply Unit
It is recommended that the 5000CTCPS Power Supply be mounted above
the C-Touch Colour unit in the ceiling space. Note the following important
points:
•
•
•
•
Do not cover the power supply unit or sandwich it between
cavities or insulation.
Feed the DC output cable down to the C-Touch Colour unit
through conduit. This simplifies the process of replacing the power
supply unit, should this ever be necessary.
A mains power outlet is required for the power supply unit to plug
into.
Do not replace, extend or shorten the Power Supply’s DC output
cable. Doing so may result in damage to the C-Touch Colour or
Power Supply unit, and void the warranty.
15
C-Touch Colour Touch Screen
6.4
Attaching the Facia
The following steps are illustrated in Figure 9. To attach the facia:
1) Position the facia over the touch screen, with the IR and indicator
windows on the right hand side. Ensure that the clips on the left
underside of the facia are positioned just left of the matching clips
on the C-Touch Colour unit.
2) While applying forward pressure on the left side of the facia
(toward the touch screen), push the left side to the right. You
should feel the clips slotting into each other.
3) Push the right side of the facia forward and to the right until the
clip on the right underside snaps into place.
Position the facia
1
Clips
Forward pressure
Push to the right
2
Push forward and to the right
3
Figure 9 – Ataching the facia
16
Installation Instructions
To remove the facia:
1) Grasp the right side of the facia with your left hand.
2) Push the release lock in with your right thumb. At the same time
lift the right side of the facia plate off and to the right with your
left hand (to disengage the clip.
3) Swing the facia off towards the left. Refer to Figure 10.
Push the
release lock
Lift off and to the right to disengage
the clip, then swing to the left
Figure 10 – Removing the facia
7.0
Wiring Details
7.1
C-Bus Network Connection
Connection to the C-Bus network is made via one of the RJ45 sockets. Use
Cat-5 Unshielded Twisted Pair (UTP) C-Bus cable, and an appropriately
wired RJ45 plug. Pinouts and cable conductor assignments are provided in
Figure 11 and Table 2. The C-Bus RJ45 sockets are internally connected
together. The Clipsal catalogue number for the C-Bus Cat-5 UTP cable is
5005C305B.
17
C-Touch Colour Touch Screen
C-Bus Positive:
blue + orange
C-Bus Negative: blue & white + orange & white
Remote OFF:
brown + brown & white
Remote ON:
green + green & white
Figure 11 – C-Bus cable conductor assignments
Pin
C-Bus Connection
Colour
1
Remote ON
green & white
2
Remote ON
green
3
C-Bus Negative (-)
orange & white
4
C-Bus Positive (+)
blue
5
C-Bus Negative (-)
blue & white
6
C-Bus Positive (+)
orange
7
Remote OFF
brown & white
8
Remote OFF
brown
87654321
87654321
Table 2 – RJ45 sockets and C-Bus pinouts
Ensure you connect the pink C-Bus cable to one of the two C-Bus
RJ45 connectors on the left side of the C-Touch Colour (looking
from the front). Do not connect the C-Bus cable to a C-Touch
RJ45 connector!
Colour’s Ethernet
18
Installation Instructions
7.2
Programming Lead
A programming lead is provided with the C-Touch Colour unit. It consists
of a Cat-5 crossover Ethernet patch cable. Use the crossover programming
lead when connecting directly from a PC (e.g. laptop) to the C-Touch
Colour. If connecting through a network hub or switch, you will need to
use a standard Ethernet cable. Cable conductor assignments for a
crossover Ethernet cable are shown in Table 3.
12345678
Connection A
Connection B
Colour
1
3
Green/White
2
6
Green
3
1
Orange/White
4
4
Blue
5
5
Blue/White
6
2
Orange
7
7
Brown/White
8
8
Brown
Table 3 – Wiring assignments for a crossover Ethernet patch cable
7.3
Audio and IR Connections
Audio line in and line out connections are provided on the bottom left side
of the C-Touch Colour (3.5 mm stereo sockets). An infrared input is also
provided in this location (3.5 mm mono socket).
If any of these connections are utilised, it is important that the cables are
looped through the large ferrite filter provided. This applies an additional
level of filtering in order to comply with EMC regulations. Refer to
Figure 12.
19
C-Touch Colour Touch Screen
Figure 12 – Audio and IR cables must be looped through the large ferrite filter
7.4
Video Connection
An RCA video out connection is provided on the bottom right side of the
C-Touch Colour. This allows the unit’s display to be viewed on a TV or
monitor which has a composite video input.
If the video out connection is utilised, it is important that the smaller
ferrite filter (provided) is fitted over the video cable. This applies an
additional level of filtering in order to comply with EMC regulations. Refer
to Figure 13.
Figure 13 – The smaller ferrite filter is fitted over the video cable
20
Installation Instructions
7.5
RS-232 Connection
The RS-232 serial port connection uses standard EIA 574 pinouts
(provided in Table 4). The RS-232 port allows you to connect external
devices to the C-Touch Colour, such as security and control equipment.
If using the RS-232 port to connect to external devices, ensure
you use a suitable shielded data cable. Cable length should be
limited to 15 metres for communication at up to 19,200 bps, or
7.5 metres at 38,400 bps.
12345
6789
Pin
Name
Description
1
DCD
Data Carrier Detect
2
RD
Receive Data
3
TD
Transmit Data
4
DTR
Data Terminal Ready
5
GND
Ground
6
DSR
Data Set Ready
7
RTS
Request To Send
8
CTS
Clear To Send
9
RI
Ring Indicator
Table 4 – RS-232 pinouts
8.0
C-Bus System Clock
The C-Touch Colour incorporates a software selectable C-Bus System Clock
used for synchronising data communication on a C-Bus network. Since a
maximum of three enabled System Clock units should exist on a network,
the System Clock on the C-Touch Colour is disabled by default.
21
C-Touch Colour Touch Screen
9.0
C-Bus Power Requirements
The C-Touch Colour draws 20 mA from the C-Bus network. Adequate
C-Bus power supply units must be installed to support connected devices.
If in doubt, refer to the C-Bus Training Manual. The C-Bus Calculator
software is useful in determining power supply requirements. Note that
factors such as even power supply distribution and cable length have an
impact on the actual power requirements.
10.0 Power Surges and Short Circuit Conditions
The mains voltage to the Power Supply must be limited to the range
specified. The Power Supply unit incorporates transient protection
circuitry, however external power surge protection devices should be used
to enhance system immunity to power surges. It is strongly recommended
that over voltage equipment such as the Clipsal 970 is installed at the
switchboard
11.0 Megger Testing
Megger testing of a mains electrical installation that has C-Bus units
connected, will not damage the units. Since C-Bus units contain electronic
components, this should be taken into account when interpreting megger
readings.
Never perform megger testing on the pink C-Bus data cabling or terminals,
as this may degrade the performance of the network.
22
Installation Instructions
12.0 Programming Requirements
Unit Address
The C-Touch Colour must be programmed with a unique identification
address (Unit Address). This is accomplished using the C-Bus Toolkit
software, available from the downloads section of the Clipsal Integrated
Systems (CIS) web site (http://www.clipsal.com/cis). The C-Bus Toolkit is
also used to enable the C-Bus System Clock and burden if required.
C-Touch Colour Project
The C-Touch Colour must be configured with a software project which has
been customised for a particular C-Bus installation. Such a project is
produced using the Programming Interface for C-Bus Embedded Devices
(PICED) software. The PICED software is available from the downloads
section of the CIS web site (http://www.clipsal.com/cis). Documentation
and help files are included with the software.
Both the C-Touch Colour and C-Bus Toolkit project files should be saved to
disk and kept in an archive at your premises. It is also recommended to
give a copy to the customer.
The PICED software can be used to transfer the project to the C-Touch
Colour. Alternatively, you can use the C-Touch Colour Transfer Utility
software to transfer an archived project and perform various configuration
functions. Section 13.0 which follows, explains how to use the Transfer
Utility software to configure the C-Touch Colour with a customised project.
13.0 Using the C-Touch Colour Transfer Utility
The C-Touch Colour Transfer Utility software is available from the
downloads section of the CIS web site (http://www.clipsal.com/cis). The
Transfer Utility is used to transfer a software project to the C-Touch Colour.
This section takes you through the process of installing a project onto the
C-Touch Colour, using a direct Ethernet connection. It is also possible to
install projects to multiple C-Touch Colour units via a common DHCP
network, or a network where each C-Touch Colour has been configured
with an appropriate static IP Address.
23
C-Touch Colour Touch Screen
1)
Once the C-Touch Colour has been installed and switched on, you
should see the default screen in Figure 14. You must configure the
unit with an IP address and customised project file, before it is ready
for use.
Figure 14 – The initial screen of an unconfigured C-Touch Colour Touch Screen
2)
Remove the facia if it has been fitted to the unit (refer to page 17).
3)
Plug the supplied programming lead (red crossover cable) into the
RJ45 Ethernet socket on the front right side of the unit.
4)
Plug the other end of the patch cable into the Ethernet socket on
your PC.
5)
Start the C-Touch Colour Transfer Utility software. (This can be started
by clicking on the Transfer icon of the PICED software).
6)
You will be presented with a list of network cards present in your PC
(Figure 15). Select the network card to which you have connected the
patch cable and click Next (most PCs only have one network card).
24
Installation Instructions
Figure 15 – Select the network card used to connect to the C-Touch Colour
7)
The software will search for C-Touch Colour Touch Screen units. It is
likely that none will be found. If the C-Touch Colour unit has been
found, go to step 12.
8)
You will be asked to select the type of network (Figure 16). Select
Standalone, and click Next.
Figure 16 – Select the network connection type
25
C-Touch Colour Touch Screen
9)
The Transfer Utility software will suggest an IP Address to be
programmed into the C-Touch Colour unit (Figure 17). This address is
chosen to be compatible with the PC you are using. It is sent to the
C-Touch Colour which will ask you to confirm the new IP Address
(Figure 18). Press Yes on the C-Touch Colour unit.
Figure 17 – An IP Address will be suggested for the C-Touch Colour
Figure 18 – Press Yes on the C-Touch Colour to confirm the IP Address
10) The C-Touch Colour will advise you that the Address Type has been
set (Figure 19). Press OK on the C-Touch Colour to clear this message.
26
Installation Instructions
Figure 19 – The Address Type has been set
11) Click Next on your PC. The Transfer Utility software will again search
for the C-Touch Colour unit.
12) You will be presented with a list containing the found unit (Figure 20).
Ensure the unit is selected (click on its name to highlight it), and click
Finish.
Figure 20 – Select the unit you want to program and click Finish
27
C-Touch Colour Touch Screen
13) The Transfer Utility software will display the Information page for the
connected C-Touch Colour unit (Figure 21). Two other pages, Control
and Transfer, can be selected by clicking the appropriate tab.
Figure 21 – The Information page in the Transfer Utility software
14) Click the Transfer tab to select the Transfer page shown in Figure 22.
From here you can transfer a project to the C-Touch Colour Touch
Screen. You can also transfer a project or log file from the C-Touch
Colour to your PC, or update the C-Touch Colour with new system
software (if provided).
28
Installation Instructions
Figure 22 – The Transfer page in the Transfer Utility software
15) Select the ‘…’ button adjacent to the Project File Location field (Figure
23), and choose the project archive to be transferred.
Figure 23 – Choose a project to be transferred to the C-Touch Colour
29
C-Touch Colour Touch Screen
16) Click the “Transfer Project To C-Touch Colour” button (Figure 24).
Figure 24 – Transfer the project to the C-Touch Colour
17) Depending on its size, the project may take from one to many
seconds to transfer. Once the project has been successfully
transferred, you will be advised that the project has been uploaded
(Figure 25).
Figure 25 – The project has been successfully transferred to the C-Touch Colour
18) Click the Control tab to select the Control page shown in Figure 26.
From here you can stop and start the C-Touch Colour’s project (in
HomeGate), enable logging, set the time and change the name that
identifies the C-Touch Colour over an Ethernet connection.
30
Installation Instructions
Figure 26 – The Control page in the Transfer Utility software
19) Ensure that the time on your PC is set correctly. If not, change the
time. This can be accomplished by double clicking the clock on the
bottom right of the screen (if present).
20) Click the “Set Time” button in the Transfer Utility software. This will set
the time on the C-Touch Colour to the time set on your PC. No
feedback is given to indicate the time on the C-Touch Colour has been
set.
21) Type a name in the field that will identify the C-Touch Colour when
controlled via Ethernet. Click the “Rename C-Touch Colour” button.
Click Yes when asked to confirm the change (Figure 27). Renaming
the unit is especially useful if multiple C-Touch Colour Touch Screens
are to be connected to a common Ethernet network.
Figure 27 – Confirming a name change
Using the C-Touch Colour on a network follows the same
principles. You may need assistance from the network
administrator.
31
C-Touch Colour Touch Screen
14.0 Electrical Specifications
C-Touch Colour Touch Screen
Parameter
Description
Supply voltage
5 V DC, 30 W maximum via power pack*
Display type
6.4 inch TFT Colour Active Matrix LCD
Display resolution
640 × 480 pixels
Display luminance
300 cd/m²
Display contrast ratio
better than 100:1
Viewing angle
left, right, down: 70°; up: 40°
Backlight lifetime (typical)
50,000 hours, factory exchangeable
Touch surface durability
35 million touches in any one location,
1 million touch slides
C-Bus supply voltage
15 to 36 V DC @ 20 mA required for
normal operation. Does not provide
current to the C-Bus Network
C-Bus control functions
Load switching and dimming, scene
control, scheduling
C-Bus connection
2 × C-Bus RJ45 (parallel)
C-Bus System Clock
Software selectable
Video connection
1 × Composite Video Out (75 Ω RCA)
PAL or NTSC selectable
Other connections
2 × USB type A, 2 × Ethernet RJ45,
RS-232 DB9, Audio Line In (3.5 mm
stereo), Audio Line Out (3.5 mm stereo),
Infrared In (3.5 mm mono), PS2 keyboard, 4 pin Power
Processor
VIA Eden Chipset, 300 MHz
Warm up time
2 minutes
Operating temperature range
10 to 30 °C
Operating humidity range
10 to 90% RH (non-condensing)
32
Installation Instructions
Infrared Remote Control
Parameter
Description
Supply voltage
3 V DC required for normal operation.
Transmission range reduces with
decreasing battery voltage
Battery
Lithium “coin” battery CR2025 (or
equivalent)
Battery shelf life
Approximately ten years
Infrared transmission range
up to 8 metres at 90° to C-Touch
Colour
Control functions
8 membrane buttons comprising 5
general purpose buttons,1 master off
button, up/down buttons
Power Supply*
Parameter
Description
Supply voltage
90 to 264 V AC, 50/60 Hz
Supply cables
4 m mains input (IEC plug),
4 m DC output (fixed)
Operating temperature range
0 to 60 °C
*The provided C-Touch Colour Power Supply must be used. Failure to do so will void the
warranty
33
C-Touch Colour Touch Screen
15.0 Mechanical Specifications
C-Touch Colour Touch Screen
Parameter
Description
Dimensions (W×H×D)
246 x 173 x 72.5 mm (excluding facia)
Protrusion from wall
23.5 mm (including glass facia)
Mounting depth (into wall)
54 mm
Mounting centres (H×V)
212.5 × 112 mm
Weight
1375 g (excluding facia)
246 mm
202 mm
18.5 mm
54 mm
158
mm
173
mm
234 mm
34
Installation Instructions
Infrared Remote Control
Parameter
Description
Dimensions (W×H×D)
86 × 54 × 8 mm
Weight
28 g
Colour
black
Nail Bracket
Parameter
Description
External dimensions (W×H×D)
287 × 215 × 47 mm
Cut-out dimensions (W×H)
205 × 162 mm
Weight
530 g
Wall Box
Parameter
Description
External dimensions (W×H×D)
224 × 167 × 68 mm
Internal dimensions (W×H×D)
219 × 162 × 66.8 mm
Weight
667 g
35
C-Touch Colour Touch Screen
16.0 Standards Complied
DECLARATIONS OF CONFORMITY
Australian/New Zealand EMC & Electrical Safety Frameworks and Standards
The C-Touch Colour Touch Screen complies with the following:
Regulations
EMC (C-Tick)
Safety
Standard
AS/NZS CISPR 22
(Class A)
Title
IT Equipment Emissions Standard
AS/NZS CISPR 24
IT Equipment Immunity Standard
AS/NZS 60950.1
IT Equipment Safety Standard
European Directives and Standards
The C-Touch Colour Touch Screen complies with the following:
European
Council Directive
EMC Directive
89/336/EEC
Standard
Title
EN 55022
IT Equipment Emissions Standard
EN 55024
IT Equipment Immunity Standard
Safety
EN60950-1
IT Equipment Safety Standard
US FCC Regulations
The C-Touch Colour Touch Screen complies with the following:
Regulation
EMC
36
Standard
FCC Part 15.101
Installation Instructions
17.0 Warranty
The C-Touch Colour product carries a two year warranty against
manufacturing defects (refer to the Warranty Statement), with the
exception of the 5035TX Infrared Remote Control’s battery which is
limited to 30 days.
37
C-Touch Colour Touch Screen
38
Technical Support and Troubleshooting
For further assistance in using this product, consult your nearest
Clipsal Integrated Systems Sales Representative or Technical
Support Officer.
Technical Support Hotline: 1300 722 247 (Australia)
0800 888 219 (New Zealand)
Technical Support Email:
[email protected]
Sales Support Email:
[email protected]
A list of worldwide contacts, additional product information and
technical resources is provided at http://www.clipsal.com/cis/
Product of Clipsal Integrated Systems Pty Ltd
ABN 15 089 444 931
Head Office
12 Park Terrace, Bowden, SA 5007, Australia
Telephone: (+61) 8 8440 0500
Facsimile: (+61) 8 8346 0845
Email: [email protected]
Web: http://www.clipsal.com/cis/
1036259