1
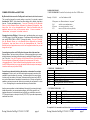
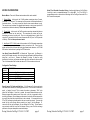
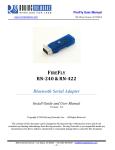
Version 4.16
FirePlug Install Guide
OPERATING MODES
0-Slave Mode - The default mode, whereby other devices can discover and connect to the FirePlug.
1 - Master Mode (SM,1<CR>) Enables outbound connections. To connect, use the “C” command.
2-Trigger Mode (SM,2<CR>) Automatically connects to stored address, when data is received on
local serial port of master.
3-Auto Master Mode (SM,3<CR>) Automatically connects to stored address on power up. If no
address is stored, inquiry is performed until a device is found.
4-DTR Master Mode (SM,4<CR>) Automatically connects to stored address based on the
enabled (active) state of the DTR output signal from PC com port. Automatically disconnects
when DTR is taken away (disabled).
5-ANY Master Mode (SM,5<CR>) Automatically does continuous discovery until it finds a device
to connect to. Does not store any addresses, always picks the first device found (based on
matching the COD set using the SC and SD commands). Uses the DTR signal to initiate discovery,
connect, and disconnect.
NOTE: In all master modes the device will not be discoverable or remote configurable.
LEDs
MODE
GREEN LED BLINK
Configuring
Boot up, Remote Configurable
Discoverable/Idle
Connected
Fast, 10 x per second
2 times per second
1 time per second
On Solid
The YELLOW Led blinks when data is TRANSMITTED or RECEIVED.
Initial Setup
Just plug the FirePlug into any USB port, on Windows, Apple MAC, or Linux PC. Fireplug uses the
FTDI 232RL chip, drivers for this are built in on MAC OS and Linux, and some Windows XP
machines. If not, the PC can automatically search and install the required drivers. Once the driver
installs, you can check what COM port was installed by Using the Device Manager under
Windows. Look under the Ports( COM & LPT) section and you should find a COM port with the
name “USB Serial Port”.
Baudrate
The FirePlug defaults to 115200, no parity, 8 bits, 1 stop. Because data is actually flowing back
and forth over a VIRTUAL COM via the USB port, there generally is no need to change this.
However, some older programs require other baudrates or parity settings. If required, the FirePlug
can be changed to these settings, then rebooted and the new settings will take effect.
OTHER PRODUCTS AVAILABLE FROM ROVING NETWORKS
Making a Connection
FirePlug shows up under Service discovery as “FirePlug-zpdq” where the zpdq is the
last 2 bytes of the Bluetooth address. To connect to FirePlug, browse for services, you
should see: “SPP on FirePlug-zpdq”. FirePlug uses Bluetooth Serial Port Profile and
can be connected to as a Virtual COM port on PCs, Palms, PocketPCs, MACs, Smart
Phones, Serial Adapters, Access Points, and other clients.
NOTE: Only one client can connect to FirePlug at a time, and there is a limit of 7 total
devices in a Bluetooth Piconet network.
If authentication is not required, generally you can simply connect to the FirePlug by
clicking on the service shown by your client. If authentication is required, the default
passkey of “1234”, or the passkey that has been configured should be entered.
RN-700
Bluetooth Terminal Server & Serial Gateway
RN-240M
FireFly Bluetooth Serial Adapter
RN-220XP
Bluetooth Battery powered Serial Adapter
RN-422M
Bluetooth Serial RS-422 Adapter
RN-USB
Bluetooth Class I (long range) USB Adapter
RN-800S-AD
Bluetooth Sensor AtoD 16bit, 8 channel
RN-30S
Bluetooth embedded serial module, class I
RN-24S
Bluetooth embedded serial module class II
Connection Status
Status can be viewed by the GREEN LED (solid), and also can be shown by reading the
values of the CD and DSR lines on the port. If connected, both CD and DSR lines will
be Active, otherwise they will be inactive. You can also get an indication string sent over
the receive line by using the “SO,<string>” command. For example, if you store the
“%” char using, “SO,%”, then each time a connection is made, you will receive
“%CONNECT”, and “%DISCONNECT” status strings.
(4-24Vdc input, 8 GPIO, high power switches)
Changing Configuration
FROM LOCAL SERIAL PORTRun your favorite terminal emulator, Hyperterminal*** or other program. Open the COM
port corresponding to the FirePlug.
Type $$$ on your screen (3 dollar signs). You
should see CMD returned to you. This will verify that your COM port and settings are
correct. Valid commands return AOK. Errors in format will return ERR, and
unrecognized commands will return a ?.
Type “h”<cr> to see a list of commands,
and “d”<cr> to see a summary of current settings.
REMOTE VIA BLUETOOTH- Make a connection via Bluetooth, then follow the
directions above for local configuration. To return to data mode, type a final “---“ ( 3
minus signs) <cr>, or reset the device and connect again.
NOTE: remote configuration can only occur if the bootup configuration timer (default 60
seconds) has not expired. This timer is set to 0 ( remote config disabled) for master
mode, and auto-connect slave mode, so that data can immediately flow between the 2
devices in cable replacement fashion.
***Roving Networks recommends downloading our free teraterm terminal
emulator, as Hyperterminal has a number of “features” in WinXP (such as autobaud detection which does not work) which render it effectively inoperable for a
local serial port connection. Teraterm can be downloaded at:
For more information and support:
Contact Roving Networks: phone 408-395-6539
fax 603-843-7550
431 Monterey Avenue, Suite 5
Los Gatos, California, 95030 USA
Email :
[email protected]
http://www.rovingnetworks.com
http://www.rovingnetworks.com/support/teraterm.zip
Roving Networks FirePlug-II V 4.00 1/31/2007
page 2
Roving Networks FirePlug-II V 4.00 1/31/2007
page 7
COMMAND SUMMARY
COMMON PROBLEMS and QUESTIONS:
***SET COMMANDS***stored in flash, and only take effect AFTER reboot
My Bluetooth client can see the FirePlug and its serial service, but I can’t connect:
This is most likely caused by a security setting on your client. If a pincode is required,
the default is “1234”. Some clients have these settings off by default, others have
them on. To check and disable security: From your PC desktop, click My Bluetooth
Places, go to the Bluetooth Device configuration (or Advanced Configuration) drop
down menu, click on the client applications tab, Select the Bluetooth serial port
application name, and click on the properties button, if “secure connection”, or
“authentication”, or “encryption” is checked, un check it.
Example: SU,9600
SN,myname
SA,1
SP,secret
SF,1
CMD
Changing the clients COM port: Widcomm stack, (and others) allows you to connect
to FirePlug using a “Virtual COM” port mapper. The software installs with a default COM
port, usually COM3, COM4, or COM5. To change this setting: From your PC desktop,
click My Bluetooth Places, go to the Bluetooth Device configuration (or Advanced
Configuration) drop down menu, click on the client applications tab, Select the
Bluetooth serial port application name, and click on the properties button, then you can
change the com port.
Connecting to more than one FirePlug from the same client at the same time:
Bluetooth allows 7 devices at a time in a piconet. Widcomm stack allows you to create
multiple instances of serial port profile and connect to multiple FirePlugs at the same
time. To do this: From your PC desktop, click My Bluetooth Places, goto the Bluetooth
Device configuration (or Advanced Configuration) drop down menu, click on the
client applications tab, Select the Bluetooth serial port application name, and click on
the ADD COM port button, then you can add another Bluetooth serial port and assign it
to another virtual com port (such as COM9).
Connections can be made but during data transfer, no characters flow, or bytes
are dropped. Check to see if your flow control signals are properly connected, and
enabled in the serial software you are using. A common mistake is to connect during
the boot config timer window, in this case, all characters will be ignored until a $$$ is
seen, and no characters are forwarded to the remote device. If remote configuration is
enabled, a good way to ensure that the device is not waiting for configuration is to issue
“---“<cr> at the beginning of a connection and before any user data is sent.
Another common problem is related to hardware flow control,it is not enough to simply
disable flow control in your communications software, the FirePlug expects to use
hardware flow control, so do disable this on the FirePlug you must either remove the
CTS flow control jumper, or short pins 7 and 8 (RTS,CTS) of your cable to permanently
enable the flow control.
sets Uart Baudrate to 9600
sets Bluetooth name to “myname”
enables secure authentication
sets security pincode to “secret”
restores all values to factory defaults
VALUE
TYPE
DEFAULT DESCRIPTION
SA
SE
SF
SL
SM
0,1
0,1
1
E,O,N
0,1,2,3,4,5
dec
dec
dec
char
dec
0
0
SN
SO
SP
SR
ST
SU
string
string
string
string
word
string
SX
0,1
Enable Authentication
Enable encryption
Reset to Factory Defaults
N
Parity, Even, Odd, or None
0
Mode (0-slav, 1=mstr, 2=trigr,3=auto,
4=DTR, 5=ANY)
1-16 chr FirePlug-x Bluetooth Name
1-8 chr NOT SET Status string or break character(s)
1-16 chr 1234
Security Pin Code
12 chrs NOT SET Remote Address (123456789ABCDEF)
seconds 60
Config Timer(0=no config, 255=always on)
2-4 char 115K
Baudrate:1200,2400,4800,9600,384k,576k
115k,230k,460k)
dec
0x1F00
Bonding (locks to a single remote address)
*** DISPLAY COMMANDS ***
CMD
DESCRIPTION
D
E
G<X>
GB
&
V
Basic Settings
Extended Settings
A single setting matching the commands above
Bluetooth Address of this device
I/O Ports (shows the value of the switches)
Firmware Revision
*** OTHER COMMANDS
CMD
C
H
I
R
U
VAL1
VAL2
<addr>
<time> <COD>
1
<rate> <E,O,N>
***
DESCRIPTION
Connect to Remote Address( in Master Mode only)
Help, Show list of commands
Inquiry Scan, time= xx seconds ,optional COD filter
Reboot device immediate
Temporary UART Change, immediate, not stored
A complete list of commands can be found at www.rovingnetworks.com/support
Roving Networks FirePlug-II V 4.00 1/31/2007
page 6
Roving Networks FirePlug-II V 4.00 1/31/2007
page 3
NOTES ON OPERATION:
Master Modes: There are 5 different master modes which can be enabled:
Wake PC on Bluetooth Connection Feature: Another useful feature of the FirePlug is
the ability to wake a suspended/sleeping PC or Apple MAC. If a PC or MAC is in
suspend/sleep mode, a remote device connecting into the FirePlug will cause the PC or
MAC to wake from suspend.
1. Manual Mode. In this mode, the FirePlug makes connections when a Connect
Command “C”, is received. This command can also contain the Bluetooth address of
the remote device. If no device is specified, then the store remote address is used.
The connection can be broken if the special break character or string is sent (use the SO
command to set the break character) This is a low speed connect mode.
2. Trigger Mode. In this mode, the FirePlug makes connections automatically when a
character is received on the serial port. The connection will continue as long as
characters are received on either end. There is a configurable timeout (which is set
using the ST command) which will cause a disconnect after XX (from 1 to 254) seconds
of inactivity. This is a low speed connect mode.
3. Auto Mode, 4 DTR, 5 ANY modes. In these modes, the FirePlug makes connections
automatically on powerup, and re-connects when connection is lost. This is the high
speed connect mode, and cannot be broken by software break characters. In DTR and
ANY modes it can be broken by setting the DTR line inactive.
Low Speed Connect Mode NOTE: in Manual and Trigger mode, the Blueport is
making a LOW speed connection, that is, data is being processed by the Blueport before
being sent over the air. Because the Blueport is looking for break or config
character(s), the latency will increase and data rate will be decreased in these modes.
Thus it is recommended that for data rates above 57.6K these modes not be used.
Configuration Timer Settings
VALUE
DESCRIPTION
(decimal)
0
No remote config, No local config when connected
1-252
Time in seconds from powerup to allow config
253
Continous config LOCAL only
254
Contiuous config, REMOTE only
255
Continous config, both LOCAL and REMOTE
Security Issues, Pin Codes and Link Keys: If A> Blueport, or B> the remote device
has authentication enabled, the following process occurs: The first time a connection is
made, a “passkey” is used. This is a series of numbers or characters, “1234” is the
default for the Blueport. Once this is entered, the remote Bluetooth device and the
Blueport compare their passkeys and if they match, a link key is generated, which is
stored by the Blueport. Upon subsequent connections, the devices will first compare link
keys and if they match no pin code will have to be re-entered. If the remote device is a
PC or PDA, a prompt is generally made to the user to enter this pincode. To remove the
stored link key on the remote device, generally you “unpair” with the Blueport. To
remove the link key on the Blueport, you can change the Pin Code. This will remove
any previously stored link keys from the blueport, forcing a new Pin Code exchange
process to occur upon subsequent connection attempts.
Roving Networks FirePlug-II V 4.00 1/31/2007
page 4
Roving Networks FirePlug-II V 4.00 1/31/2007
page 5