1
Owner's Manual
Manuel del Propietario
®
DEHUMIDIFIER
DESHUMIDIFICADOR
Model, Modelo 580.54501, 580.54701
Sears, Roebuck and Co., Hoffman Estates, IL 60179 U.S.A.
www.sears.com
Safety Precautions ...................................... 3
Installation .................................................
13
Prior to Operation .......................................
7
Maintenance ..............................................
14
Instruction ...................................................
8
ESPANOL ...................................................
16
Electrical Safety ..........................................
9
MASTER PROTECTION AGREEMENTS .....31
Operating Instructions ............................. 11
SERVICE NUMBERS ................... Back cover
Inside
you will find
many
helpful
hints on how to use and maintain
your dehumidifier
properly. Just a little preventive care on your part can save you a great deal of time and
money over the life of your dehumidifier,
You'll find many answers to common problems in the table of troubleshooting
tips. If you
review our table of Troubleshooting
Tips first, you may not need to call for service at all.
• The dehumidifier is not intended for use by young children without supervision.
• Young children should be supervised to ensure that they do not play with the dehumidifier.
• When the power cord is to be replaced, replacement work shall be performed by authorized
personnel only using only genuine replacement parts.
FULL ONE YEAR WARRANTY
ON DEHUMIDIFIER
For one year from the date of purchase, if this Dehumidifier is operated and maintained
according to the owner's instructions furnished with the product, Sears will repair this
Dehumidifier free of charge, if defective in materials or workmanship.
FULL FIVE YEAR WARRANTY ON SEALED
REFRIGERATION SYSTEM
For five years from the date of purchase, when this Dehumidifier is operated and
maintained according to owner's instructions furnished with the product, Sears will repair
the sealed refrigeration system (consisting of refrigerant, connecting tubing, and
compressor motor) free of charge, if defective in material or workmanship.
WARRANTY SERVICE IS AVAILABLE BY RETURNING UNIT TO THE NEAREST
SEARS SERVICE CENTER IN THE UNITED STATES. CALL 1-800-4-MY-HOME ®FOR
THE NEAREST SERVICE CENTER TO YOU.
This warranty applies only while this Dehumidifier is used in the United States.
This warranty gives you specific legal rights, and you may also have other rights which vary
from state to state.
Sears, Roebuck and Co., D/817WA, Hoffman Estates, IL 60179 U.S.A.
2
Dehumidifier
Safety Precautions
READ ALL INSTRUCTION
BEFORE USING
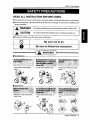
• To prevent injuryto the user or other people and property damage, thefollowing instructionsmust be followed.
• Incorrect operation due to ignoring instructionswill cause harm or damage; the seriousnessis classified by the
following indications.
I
_
L_i,
WARNING
This
symbol
indicates
there
may
bethe
possibility
ofdeath
orserious
injury.
_
CAUTION
Ths eymbo nd cates the possibility of injury or damage to property only.
_
• Meanings of symbols used in this manual are as shown below.
®
O
Be sure not to do.
/
Be sure to follow the instruction.
C&w...,..
• Installation
• It may cause fire and electdc
shock.
• It may cause explosion or fire.
• It may cause electric shock and
failure.
®
•
Operation
pro_y.
.....................................
• Otherwise,it may cause electric
shock or fire.
:::::::::::::::::::::::::::::::::_
..........
............. ...............................................................................................................
• It may cause electric shock or
fire.
• It may cause electric shock or
fire.
Owner's
Manual
3
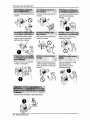
Safety Precautions
• It may cause electric shock or fire.
• It may cause electric shock or fire•
• Not grounding unit may cause
electric shock.
• Unpluggingthe unit may avoid
electric shock or fire hazard•
• It may cause fire and electdc
shock•
• It may cause electric shock•
• It may cause explosion,fire, and
burn.
• Water may enter the unit and
degrade the insulation•It may
cause an electric shock.
• Since the fan rotates at high
speed during operation, it may
• It will cause machine failure or electdc shock•
4
Dehumidifier
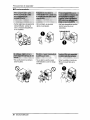
Safety Precautions
•
Installation
iiiii@ii i!
• Itmay causefailureof applianceor
performancedeterioration.
• Otherwise, it may cause electric
shock and damage.
iiiiiiiiiiiiiiiiiiiiiiiiiiiiiiiiiiiii
• Turningoff the unitwill save on
energycosts,
i
_i_i_i_i_i_!
.....................................................
_ii_!
_ _i_iiiiiiiiiiiiiiiiiiiiiiiiiii_!!ii%_ii_i_i_ii%_%_i_i_i_i_i_i_i_iii!_i%%i_iiiiiiiiiiiiiii
iii_ii_i_i_i_i_i_i_i_i_i_i_i_i_i_i_i_i_i_i_i_i_i_i_i_i_i_i
• It is not designed to dehumidify
the entire house,
° For proper operation, your
dehumidifier should be installed
only on a floor,
• The dehumidifier must be
operated in an enclosed area to
be most effective.
• Sharp edges may cause injury.
Owner's
Manual
5
Safety Precautions
• Operation
• The appearanceof the dehumidifier • Otherwise, it willcause property
may deteriorate,changecolor,or
damage.
developsurfaceflaws,
®
iii,.vl',e_ii_i_U_ii_!_i_iiiiiiiiiiiiiiiii
• This could injure the pet or plant.
®
6
Dehumidifier
• Lowtemperaturescould cause
coils to frost,
0
iiiii_iiiiiiiiiiiiiiiiiiiiiiiiiiiiiiiiiiiii_iii_H_i!!i_i_iiiiiiiiiiiiiiiiiiiiiiiiiiiiiiiiiiiiiiiiiiiiiiiiii
i_iiii_iiiiiiii!!!_!!_ii!iiiiiiiiiiiiiiiiiiiiiiiiiiii!iiiiiiiiii
• It is not sanitary and could cause
illness or personal injury,
• Operationwithout filters will cause
unit failure.
0
Priorto Operation
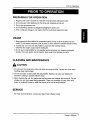
PREPARING FOR OPERATION
1. Plug the power cord in properly to a standard 3-slot grounding wall power outlet.
2. Do not plug any other appliance into the same wall receptacle as this unit.
3. Do not use an extension cord.
4. Do not start/stop operation by plugging/unplugging
the power cord.
5. If the cord/plug is damaged, only replace it with an authorized replacement part.
USAGE
1. Being exposed to direct airflow for an extended period of time could be hazardous to your
health. Do not expose occupants, pets, or plants to direct airflow for extended periods of time.
2. Ventilate the room when the dehumidifier is used with other heating devices.
Otherwise the oxygen supply may be inadequate.
3. Do not use this dehumidifier for non-specified special purposes (e.g. preserving precision
devices, food, pets, plants, and art objects). Such usage could damage the items.
CLEANING AND MAINTENANCE
CAUTION:
1. Do not touch the metal parts of the unit when removing the filter. Injuries can occur when
handling sharp metal edges.
2. Do not use water to clean inside the dehumidifier.
insulation, leading to possible electric shock.
Exposure to water can destroy the
3. When cleaning the unit, first make sure that the power and breaker are turned off. The fan
rotates at a very high speed during operation. There is a possibility of injury if the unit's
power is accidently turned on while the interior of the unit is being cleaned.
SERVICE
For repair and maintenance, contact your Sears Parts & Repair Center.
Owner's
Manual
7
Instruction
SYMBOLS USED IN THIS MANUAL
This symbol
alerts you to the risk of electric
This symbol alerts you to the possibility
property damage.
shock.
of personal
injury or
FEATURES
d_k
wiring
regulations,
This guide
acts be
as installed
a guide to
to explain
WARNING:
This appliance
should
in help
accordance
withproduct
national
features.
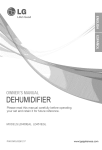
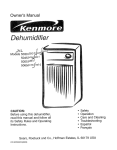
Control
Front Grille
Cabinet
Air Filter
Powei" cord
Water bucket
8
Dehumidifier
Rear Grille
ElectricalSafety
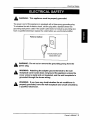
WARNING:
This appliance
must be properly
grounded.
The power cord of this appliance is equipped with a three-prong grounding plug.
To minimize the risk of electric shock, use the plug with a standard three-slot
grounding wall power outlet. If the power outlet does not include a grounding slot,
have a qualified electrician replace the outlet before you use the dehumidifier.
Preferred method
-nsure proper ground
exists before use
WARNING:
power
plug. Do not cut or remove
&
the grounding
prong from the
WARNING:
Attaching the adapter ground terminal to the wall
receptacle cover screw does not ground the appliance unless the
cover screw is metal and not insulated, and the wall receptacle is
grounded through the house wiring.
WARNING:
If you have
whether the
conditioner
properly grounded,
haveany
the doubt
wall receptacle
andaircircuit
checkedis by
a qualified electrician.
Owner's
Manual
9
Electrical
Safety
TEMPORARY
USE OF AN ADAPTER
We strongly discourage the use of an adapter due to potential safety hazards.
For temporary connections, use only a UL-listed adapter, available from most local
hardware stores. To disconnect the power cord from the adapter, use one hand on
each to avoid damaging the ground terminal. Avoid frequently unplugging the power
cord as this can lead to eventual ground terminal damage.
Temporary method
,_
WARNING:
TEMPORARY
Never use the appliance with a broken adapter.
USE OF AN EXTENSION
CORD
We strongly discourage the use of an extension cord due to potentialsafety
hazards.
10
Dehumidifier
OperatingInstructions
6
5
CONTROL
4
7
3
PANEL
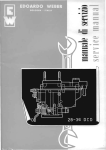
1. POWER key --- Pressing this key once turns the dehumidifier "ON" and pressing again turns the
dehumidifier "OFF".
2. HUMIDITY CONTROL keys -- Are used to select the desired humidity setting.
•/k : Used to raise the desired humidity setting.
• V : Used to lower the desired humidity setting.
• The desired humidity can be selected within a range of 35% to 70% RH in increments of 5%.
• If you press the V key once again at 35%RH, continuous "On" mode is selected. In "On" mode the unit
operates confinuously, regardless of humidity conditions.
3. HUMIDITY SETTING display --- Displays the selected humidity setting.
4. FAN SPEED key --- Is used to set the fan speed as "High" or "Low".
• Pressing this key changes the fan speed from High , Low • High.
• The selected fan speed is indicated by indicator lights marked "High" and "Low".
5. ENERGY TIMER key --- It is used to select the type of operation.
• Select either 3 or 6 hr. On/Off for cycled operation.
In this case the unit will run for 3 or 6 hours, and then shut off completely for 3 or 6 hours. The cycle will
repeat until you change the setting.
• When ENERGY TIMER key is pressed, the Timer indicator lights shift from 3hr.On/Off to 6hr.On/Off.
6. BUCKET FULL Indicator -- This light glows when the bucket is full and needs to be emptied. It also
glows when the bucket is not properly positioned. When bucket full indicator light glows, the compressor
and fan will turn "OFF".
7. AUTO RESTART -- Once the power is restored after a power outage, the unit begins to operate at its
previousoperationsetting.The fan will run by defaultfor 2 minutes,After 2 minutes both fan and
compressorwill be ON or OFF depending on the humidity conditions.
TO OPERATE THE DEHUMIDIFIER:
1. Plug the powercord into the electrical outlet. Press the POWER key.
2. Set the Humidity control anywhere between 35% to 70% for normal operation.
• For less humidity, press the V HUMIDITY CONTROL key.
• For higher humidity, press the/% HUMIDITY CONTROL key.
3. Press the ENERGY TIMER key, to set the amount of time for which you want the unit to cycle On and Off.
The time can be set for 3 hours or 6 hours.
4. If you want to change the fan speed, press the FAN SPEED key. Each time the FAN SPEED key is
pressed the fan speed changes from High Low * High.
5. Press the POWER key to stop the unit manually.
Water bucket must be properly installed,
• The dehumidifier will not run if the bucket is not properly installed.
• The dehumidifier shuts offwhen the desired humidity setting is reached.
Owner's
Manual
11
Operating
Instructions
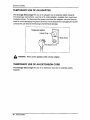
AUTOMATIC SHUT OFF
The dehumidifierhas a waterlevel control switch that willturnthe unit off
when the bucket is full, or when the bucket is removed or not replaced in the
proper position.
The bucket must be replaced in the proper position for the dehumidifier
to work. The light will be on and the dehumidifier will not run if the
bucket is not in the proper position.
Water level
controlswitch
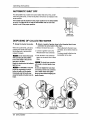
DISPOSING OF COLLECTED
1. Empty the bucket manually.
When the bucket is full, pull out by
grasping the handle and empty it
into a large sink or tub and then
replace it properly.
WATER
2. Attach
a length of garden hose to the threaded drain hose
connector to carry water to the drain.
1. Remove the drain hole cover.
Whenattachedto the drain hose
connector, do not bend or kink the
2. Connecta garden hose to the
hose.
threadeddrain hose connector.
The hose should lie flat from the
dehumidifier to the drain.
3. Push the drain hose connector
Do notremovethebucket
tightly intothe drain hole on Rear
whileoperatingthedehumidifier.
Gdlle.
It can causewaterto dropon the
basepanor thefloor.
Thedrainhoseconnector
Emptythebucketwhentheindicator
will accepta standardgardenhose
lighttums on.
fitting.
It is advisableto carrythe Donot overtightenthehosewhen
bucketby supportingitfrom the
connectingit to thehoseconnector;
bottomas well as bythe handle.
usea rubberwasherand tighten
Carryingby onlythe handlemay
firmlybyhandwithoutstrippingthe
causethehandleor bucketcoverto plasticthreads.
break.
DRAIN HOSE
CONNECTOR
12
Dehumidifier
Installation
CHOOSING THE PROPER LOCATION FOR YOUR DEHUMIDIFIER
• Usethe dehumidifier in a
basement to help prevent
moisture damage.
• Use the dehumidifier in laundry
drying, bathing, and dishwashing
areas which have excessive
moisture.
• Use the dehumidifier to prevent
moisture damagewhere books
are stored.
INSTALLING THE DEHUMIDIFIER PROPERLY
1. Allow at least 12 inches of space on all sides of the unit for good air circulation.
2. Install your dehumidifier on a floor only.
3. Lift the bucket and place it in the dehumidifier, making sure the slots
on the bottom side of the bucket are positionedcorrectly.
4. Swivel casters allow you to movethe dehumidifier easily.
THE CLEANING OF BUCKET
1,Pullout the bucketcover.
2. Brushoffthe residuein the
bucket.
Cleanthe bucketby
wipingwitha brushor a cloth
__
_;Imut_;_ed
deterge_
in a mild
nt
3. Closethe cover,
I_1
Push thetabs on thetop
of the bucketcoverwhen installing
the bucketcover,
_
Owner's
Manual
13
Maintenance
Your dehumidifier is designed to serve you yearround. It needs pracficaflyno attention. However,
you should check your dehumidifier and inspect the
coils annually.
You may want Sears Parts& RepairCenter to
perform this annual checkup. (Cost of the inspection
is the owner's responsibility.)
OR
If you are familiar withelectrical appliances and their
functions, listed below are instructionswhich would
allow you to perform the inspection and
maintenance for yourself.
Cleaning
the
and cabinet
front
case,
bucket
Clean the front case and the cabinet with a soft
cloth, warm water, and a mild detergent.
Clean the grille with a vacuum attachmentor brush.
Do not use bleach or abrasives.
Cleaning
the air filter
1. Removewaterbucket from the cabinet.
Pull out the air filter as shown above.
2, Wash air filter with warm water and a mild
detergent. Rinse and dry it.
Replace it in the unit.
Cleaning
the coil
1, Remove Front Grille from the cabinet as shown.
2. Use a small brush to gently clean the coils as
shown.
If necessary use warm water and a mild
detergent. Rinse and dry thoroughly.
with
CAUTION
a water: Do
hose.
not spray the coil
Be careful!
14
Dehumidifier
Sharp edges!
Electrical Shock Hazard
• Disconnect power supply cord from receptacle
before performing any maintenance.
• Be careful when cleaning the coils.
Fins are sharp.
Failure to follow the above precautionscould result
in electrical shock or personal injury.
Maintenance
TROUBLESHOOTING
_The
dehumidifier
may
Dehumidifier
does not start
be
operating abnormally
when:
• Make sure the dehumidifier plug is pushed
completely into the outlet.
• Check the house fuse or circuit breaker box
and replace the fuse or reset the breaker.
• The dehumidifier automatically turns off
when this occurs. Empty the bucket.
• Make sure the bucket is in the right place.
• Press the _ humidity control button to
lower the humidity.
Dehumidifier
does not dry the
• When first installed, allow at least 3 or 4
days to maintain the desired dryness.
air as it should
• Make sure there are no curtains, blinds or
furniture blocking the front or back of the
dehumidifier.
............................................
_'[_i_may_i
o Press the _)aumidity Control button to
lower the humidity.
• Check that all doors, windows and other
openings are securely closed.
• Install the dehumidifier away from the dryer.
The dryer should be vented to the outside.
•The 50 pint model(54501)may notoperateefficiently
if the roomtemperatureisbelow65°F(18°C).
•The 70 pint LowTemperaturemodel(54701)will
continuouslycycleup to the temperature42°F(6°C)+
Dehumidifier runs
too much
• Check with your dealer to see if the capacity
is adequate.
• Close all doors and windows to the outside.
Frost appears on
the coils
• This is normal. Frost will usually disappear
within 60 minutes.
Fan noise
• This is normal.
Water on floor
• Check the hose if one is attached.
• See Removing and Emptying The Water
Bucket.
Dehumidifier
operates
continuously
• Change the humidity setting, to 35% or
above.
• Change the humidity to lower setting.
Owner's
Manual
15
de seguridad ..................... 17
Instalacibn .................................................
27
Antes de la utilizacibn .............................. 21
Mantenimiento ...........................................
28
Instruccibn .................................................
ACUERDOS DE PROTECCIC)N
Precauciones
22
Seguridad el_ctrica ................................... 23
ESPECIALIZADA ....................................... 31
Instrucciones
PARA PEDIR SERVIClO.._.Cubierta Trasera
de funcionamiento ............ 25
En su interior encontrar_ muchos consejos Otiles sobre la utilizaci6n y el mantenimiento
adecuado de su deshumidificador.
Una simple atenci6n preventiva por su parte puede
ahorrarle mucho tiempo y dinero a Io largo de la vida de su deshumidificador.
Encontrar_ muchas respuestas a los problemas m_s comunes en el cuadro de consejos para
la soluci6n de problemas. Si en primer lugar revisa nuestro cuadro de consejos para la
soluci6n de problemas, es posible que no tenga necesidad de Ilamar al servicio t6cnico.
• Este deshumidificador
supervisi6n.
no estd dise_ado
para ser utilizado por ni_os de corta edad sin
• Debe vigilarse a los nifios para asegurarse de que no juegan con el deshumidificador.
• Cuando haya que sustituir el cable de alimentacibn, debe realizar el trabajo de
sustitucibn personal autorizado utilizando dnicamente piezas de recambio originales.
UN ANO DE GARANT[AEN TODASLAS PARTESDEL DESHUMIDIFICADOR
Durante un afio a partir de la compra, si el deshumidificador es usado y mantenido de acuerdo con
las instrucciones del usuario adjuntas o suministradas con el aparato, Sears reparar_ el
deshumidificador sin costo alguno si _ste muestra defectos en los materiales o mano de obra.
ClNCOANOS DE GARANTJACOMPLETAEN EL SISTEMADE
REFRIGERACION
Durante cinco afios a partir de la compra, si el deshumidificador es usado y mantenido de acuerdo
con las instrucciones del usuarioadjuntas o suministradas con el aparato, Sears reparar_ el sistema
de refrigeraci6n sellado (el cual consta de refrigerante, los tubos conectores y el motor compresor) si
_ste muestra defectos en los materiales o mano de obra.
SE OFRECE SERVIClO DE GARANTIA AL REGRESAR LA UNIDAD AL CENTRO DE SERVICIO
SEARS MAS CERCANO EN TODOS LOS ESTADOS UNIDOS. LLAME 1-800-4-MY-HOME ® PARA
A M/t.S CERCANO CENTRO DEL SERVICIO A USTED.
Esta garantia s61otiene validez mientras el deshumidificador se este usando en los Estados Unidos.
Esta garantfa le confiere derechos legales especificos, pero usted podria gozar de otros derechos
que pueden variar de Estado a Estado.
Sears, Roebuck and Co., D/817WA, Hoffman Estates, IL 60179 U.S.A.
16
Deshumidificador
Precaucionesde seguridad
LEA ESTAS INSTRUCCIONES
ANTES DE USAR
• Para evitar lesiones al usuario o a otras personas y daSos materiales, debe seguir las siguientes instrucciones.
• El useincorrecto ocasionado al ignorarlas instrucciones
puede causar lesiones o daSos. La gravedad se
clasifica mediante las siguientes indicaciones.
A
A
ADVERTENCIAEstasimboleindicaque puedeha_
E"sste
_
de lesiones o da!os s61ornateiia!es.
II
• A continuaci6n se muestran los significados de los simbolos utilizadosen este manual•
®
0
No Io haga.
i_
siga, !as instrucci°nes"
&
J
ADVERT£NCIA>
• Instalacibn
• Podria producirse un incendio y
una descargael_ctdca.
• Podria producirseuna explosi6n o
incendio.
m
m
• Puede causar una descarga
el_ctrica
®
• Funcionamiento
_
• De Io contrado, puede ocasionar
un incendio o una descarga
electdca.
• Causar_ una descarga el_ctrica
o incendio
,,,,,,__
..............
• Podriaproducirse unadescarga
el_ctrica o incendio.
Manual
de usuario
17
Precauciones
de segufidad
• Causar_ una descarga el6ctrica o
incendio.
• Causar_ una descarga el6ctrica o
incendio.
|
:::
::::
:::::::::::
• Si no hay toma de tierra, podrfa
producirse una descarga
electrica.
::::::.... :::::::::
::::: ::::::
• Desenchufar la unidad puede
evitar el riesgo de descargas
el6ctricas o de incendios.
• Podria producirse una descarga
el6ctrica o incendio.
• Puede causar una descarga
el6ctricao incendio.
• Podria producirse una explosi6n,
incendioy quemaduras.
• El agua podria introducirseen la
unidad y degradar el aislamiento.
Podria producirse una descarga
el6ctrica.
• Como el ventilador gira a alta
velocidad durante el
funcionamiento,podrian
producirse lesiones.
'
O
®
• Causara fallo de la maquina o descarga electrica.
18
Deshumidificador
0
' @,
Precaucionesde seguridad
===_&
ATENClON)
• Instalacibn
• Puede causar fallas de apUcaci6n
o deterioro en su rendimiento.
• De Io contrario, podria ocurriruna
descarga el_ctricay da5os.
• No est_ diseSadopara enfriarla
casa entera
• Para un funcionamiento
adecuado, su deshumidiflcador
se deberia instalar enicamente en
el suelo.
• Para una mayor eficacia, el
deshumidificador debe utilizarse
en una zona cerrada.
O
O
I
/
• Los bordes afilados pueden
provocar lesiones.
Manual
de usuario
19
Precauciones de seguridad
• Funcionamiento
• Podriadetedorarse el aspecto del
deshumidiflcador,cambiarel
color o producirse desperfectos
en su superficie.
• De Io contrario, se causaran
danos a ]a propiedad.
• Las bajas temperaturas podr[an
producir escarcha en los
serpentines.
• Esto podria lesionar al animal o
danar la planta.
• No es salubre y podr/acausar
enfermedades o poner en riesgo
su salud.
• Ponerla unidad en marcha sin
filtros provocar_,fanos en la
unidad.
20
Deshumidificador
Antesde la utilizaci6n
Preparacibn
para la utilizacibn
1. Enchufe el cable de alimentaci6n adecuadamente
clavijas y toma a tierra.
2. No enchufe ningen otro electrodom_stico
a una toma de pared est_,ndar con tres
en el mismo recept_culo que esta unidad.
3. No utilice una alargadera.
4. No inicie/detenga el funcionamiento enchufando/desenchufando
el cable de alimentaci6n.
5. Si el cable/clavija se dafia, sustitL_yalo Qnicamente por una pieza de recambio autorizada.
UTILIZACION
1. La exposici6n a flujo de aire directo durante un largo periodo de tiempo puede ser perjudicial
para su salud. No exponga a personas, animales o plantas al flujo de aire directo durante
largos periodos de tiempo.
2. Ventile la sala cuando el deshumidificador se use con otros aparatos de calefaccion.
De Io contrario, el suministro de oxigeno puede ser inadecuado.
3. No utilice este deshumidificador para finalidades no especificadas (p.ej., preservar dispositivos
de precision, alimentos, animales, plantas y objetos de arte). Tal uso podria daSar estos
elementos.
LIMPIEZA Y MANTENIMIENTO
ATENCI6N:
1. No toquelas partes met&licasde la unidadcuando retire el filtro. Podrfan producirse lesiones con los bordes
met_licos afilados.
2. No utilice agua para limpiar el interior del deshumidificador.La exposici6nal agua puede destruir el
aislamiento y ocasionar una posible descarga electdca.
3. Cuando limpie la unidad, primero asegOresede que la alimentaci6ny el interrupter est_n apagados. El
ventilador gira a una velocidad muy alta durante el funcionamiento. Existe la posibilidadde lesion si se
enciende accidentalmentela alimentaciona la unidad mientras se esta limpiando su interior.
SERVICIO TC:CNICO
Para reparaci6n y mantenimiento,
Recambios Sears.
p6ngase en contacto con su Centro de Reparaci6n y de
Manual
de usuario
21
/
Instruccion
S[MBOLOS UTILIZADOS
Este simbolo
EN ESTE MANUAL
le avisa del riesgo de descarga
Este simbolo le alerta de la posibilidad
dahos a la propiedad.
el6ctrica.
de lesiones
personales
o
Caracteristicas
_lb
nacional
para instalaciones
Este manual
sirve con
comola guia
para
DVERTENCIA:
este aparato eldctricas.
debe instalarse
de acuerdo
normativa
ayudar a explicar las caracteristicas
del producto.
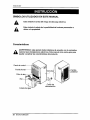
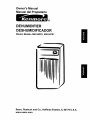
Panel de control
Parrilla frontal-
a
posterior
Filtro de aire --
Cable de
alimentaci6n
Cubeta de agua
22
Deshumidificador
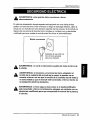
Seguridadelectrica
ADVERTENCIA:
adecuadamente.
este aparato
debe conectarse
a tierra
El cable de alimentaci6n de este aparato esta equipado con una clavija de tres
patillas con toma de tierra. Para minimizar el riesgo de descarga el6ctrica, utilice la
clavija con un enchufe con toma de tierra estandar de tres ranuras. Si el enchufe no
dispone de una ranura de toma de tierra, p6ngase en contacto con un electricista
cualificado para que cambie el enchufe antes de utilizar el deshumidificador.
M_todo recomendado
toma
de tierra
_seg_rese
de apropiada
que existe una
antes de la utilizaci6n.
&
&
&
ADVERTENCIA:
la clavija.
no corte ni desmonte
la patilla de toma de tierra de
ADVERTENCIA:
si incorpora un terminal de tierra adaptador al
tornillo de la cubierta del enchufe de la pared, el aparato no se
conecta a tierra a no ser que el tornillo de la cubierta sea de metal y
no estd aislado y que el enchufe estd conectado a tierra a travds de
la instalacibn electrica dom_stica.
ADVERTENCIA:
est_ conectado
electricista
el circuito.
si tiene alguna duda sobre si el deshumidificador
a tierra correctamente,
pbngase en contacto con un
cualificado
para que compruebe
el enchufe
Manual
de la pared y
de usuario
23
Seguridad
el6ctrica
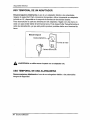
USO TEMPORAL
DE UN ADAPTADOR
Desaconsejamos
totalmente el uso de un adaptador debido a los potenciales
riesgos de seguridad. Para conexiones temporales, utilice _nicamente un adaptador
incluido en UL, disponible en la mayoria de tiendas de electricidad locales.
Para desenchufar el cable de alimentaci6n del adaptador, h&galo con una mano en
cada uno para evitar daSar el terminal de tierra. Evite desenchufar frecuentemente el
cable de alimentaci6n, ya que esto podrfa producir posibles daSos en el terminal de
tierra.
Clavija adaptadora--..._
-Torni]lo de metal
M6todo temporal
Cubierta del enchuf_
_,
ADVERTENClA:
USO TEMPORAL
no utilice nunca el aparato con un adaptador roto.
DE UNA ALARGADERA
Desaconsejamos
totalmente
riesgos de seguridad.
24
Deshumidificador
el uso de una alargadera debido a los potenciales
Instruccionesde funcionamiento
6
5
4
7
3
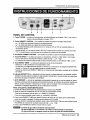
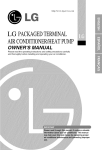
PANEL DE CONTROL
1. Tecla POWER --- si pulsa una vez esta tecla, el deshumidificador se enciende, "ON", y si la vuelve a
pulsar el deshumidificador se apaga, "OFF".
2. Teclas HUMIDITY CONTROL --- Se visualiza en pantalla el ajuste de humedad seleccionado.
• A : se utiliza para aumentar el ajuste de humedad deseado.
• V : se utiliza para disminuir el ajuste de humedad deseado.
• La humedad deseada puede seleccionarse en un rango del 35% a170% de humedad relativa, en
incrementos del 5%.
• Si pulsa la tecla V una vez de nuevo a 35% HR, se seleccionara el modo "On" continuo. En modo
"On", la unidad funciona continuamente sin considerar las condiciones de humedad.
3. Visualizador HUMIDITY SETTING -- Se visualiza en pantalla el ajuste de humedad seleccionado.
4. Tecla FAN SPEED --- se utiliza para ajustar la velocidad del ventilador a "High" (alta) o "Low" (baja).
• Si pulsa esta tecla la velocidad del ventilador cambia de High , Low., High.
• La velocidad del ventilador seleccionada se indica mediante pilotos con la indicaci6n "High" y "Low".
5, Tecla ENERGY TIMER --- se utiliza para seleccionar el tipo de funcionamiento.
• Seleccione 3 6 6hr.OniOff para un funcionamiento ciclico.
En este caso, la unidad funcionara durante 3 o 6 horas y, a continuaci6n, se apagar_ completamente
durante 3 6 6 horas. El ciclo se repetir_ hasta que cambie el ajuste.
• Cuando se pulsa la tecla ENERGY TIMER, la luz indicadora del temporizador cambiar_ de 3hr ON/Off a
6h On/Off.
6. Indicador BUCKET FULL m este pilotose ilumina cuando la cubeta estd Ilena y es necesario vaciarla.
Tambi_n se iluminacuando la cubeta no est_ colocadacorrectamenta.Cuando el piloto de cubeta Ilena
ae ilumina, se apaga el compresory el ventilador.
7, AUTO RESTART -- una vez se reestablecela alimentacibn despu6s de un corte de energia, la unidad
comienzaa funcionar con los ajustesde funcionamiento previos.El ventiladorse pondr_en marcha, por
defecto,durante2 minutos. Transcurfidos2 minutos, tanto el ventiladorcomoel compresorestar_n
encendidoso apagadosdependiendode las condicionesde humedad.
PARA UTILIZAR EL DESHUMIDIFICADOR:
1. Enchufe el cable de alimentaci6n en la toma el_ctrica. Pulse latecla POWER.
2. Ajuste el controlde humedadde135% a170% para un funcionamiento normal.
• Para menos humedad,pulsela tecla (V) HUMIDITY CONTROL.
• Para una mayorhumedad,pulsela tecla ( A ) HUMIDITY CONTROL.
3. Pulse la tecla ENERGY TIMER para ajustarel periodode tiempoen que desea que la unidadrealice
cicIos de encendidoy apagado.El tiempopuede ajustarse a 3 o 6 horas
4. Si desea cambiar la velocidaddel ventilador,pulsela tecla FAN SPEED. Cada vez que se pulsala tecla
FAN SPEED, la velocidaddel ventiladorcambia de High * Low _ High.
5. Pulse la tecla POWER para detener manualmanta la unidad.
La cubeta de agua deberb instalarse adecuadamente.
• El deshumidificador no funcionar_ si la cubeta no estb instalada correctamente.
• El deshumidiflcador se apagarb cuando se alcance el ajuste de humedad deseado.
Manual
de usuario
25
I
Instrucciones
de funcionamiento
APAGUE AUTOMATICO
El deshumidiflcadortiene un detector de nivel de agua que apaga la unidad
cuando la cubeta est& Ilena, o cuando se quita de su lugar y no se vuelve a
poner en ]a posici0n adecuada.
La cubeta debe co]ocarseen la posicibn correcta para que el
deshumidificadorfuncione. El deshumidificador no funcionar_ y se
encenderd el piloto si la cubeta no est_ en la posicibn correcta.
ELIMINACION
interrupter de control
del nivel de agua
DEL AGUA RECOGIDA
1. Vacie la cubeta manualmente.
Cuando fa cubeta este ]lena, tire de
ella asiendoel asa y vaciela en un
fregadero grande o en una baSera.
Col0quela de nuevo en su lugar
debidamente.
2. Acople una manguerade jardinal conectorroscadode drenajepara
Ilevaral aguaal drenaje.
1. Quite]a tapa del orificiode
drenaje,
AI acoplarseal conectorde ]a
manguera de drenaje,no dobleni
2. Conecte la manguera de jardinal pliegue la manguera.
conectorroscadode drenaje.
La mangueradeberiair planadesde
3. Empujeconfuerza el conectorde el deshumidificador
al punto de
No quitelacubetacon el
la manguerade drenajeal orificio drenaje.
deshumidificador
enmarcha.EIIo
de drenaje de la parrilla posterior.
hardqueel aguacaigaenel colector
I_
Elconectorde la manguera
baseo en el suelo.
de drenajeaceptar:_
un acoplamiento
Vacielacubetacuandola luz
de mangueradejardinnormal.
indicadorase encienda.
No aprietedemasiado]a mangueraal
I_
Se aconsejaIlevarla
conectadaal conectordela
cubetasosteniendole
desdela parte manguere.Useuna arandelade
de abajoedemasde hacedocon el
cauchoy aprieteflrmementecon la
asa.Transportarla
sblocon el asa
manosin cortarlasroscasde
puedeprovocarque se rompael asa pl=tstico.
o la cubiertade la cubeta.
CONECTOR DE LJ
MANGUERA DE DRENAJE
26
Deshumidificador
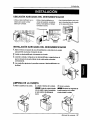
Instalaci6n
UBICACI6N ADECUADA DEL DESHUMIDIFICADOR
• Utiliceel deshumidificador en un
sbtano para ayudar a evitar
dafios por humedad.
• UtiUceel deshumidificador en
zonas de lavaderos,secadoras,
bai_osy lavavajillasque tengan
humedadexcesiva.
• Use el deshumificador para evitar
que la humedaddane los lugares
en los que guarda libros.
INSTALACION ADECUADA DEL DESHUMIDIFICADOR
1.Deje al menos un espacio de unos 30 centimetros a cada lado de la unidad
para permitir una buena circulacibn de aire.
2. tnstale su deshumidificadort_nicamenteen el suelo.
3. Levante la cubeta y col6queta en el deshumidificador,asegur_ndosede
que las ranuras de la parte inferior de ta cubeta estz_ncolocadas
correctamente.
4. Las ruedecillas giratorias le permiten moverse el deshumidificadorcon
facilidad.
LIMPIEZA DE LA CUBETA
1. Retirela cubiertade la cubeta.
2. Limpieel residuode la cubeta.
3. Cierrela cubierta
I_
Limpiela cubetafrotando
I_
Presionelas leng(ietasde
con un cepilloo panohumedecido la parts superiorde la cubeta
en una solucionde detergents
cuandoinstalela cubeta.
Manual
de usuario
27
Mantenimiento
Este deshumidificador est_ diseSadopara funcionar
en cualquier _poca del aSo. Pr_cticamente no
necesita cuidados. No obstante, debe revisar el
deshumidificadore inspeccionarlos serpentines
anualmente.
Posiblementeprefiera que sea el Centro de
Reparacionesy Recambios de Sears quien lleve a
cabo este chequeo anuaL (El coste de la inspecci6n
es responsabilidad del usuario).
O
Siesta familiarizadocon los aparatos electricos y
sus funciones, a continuaci6n se muestranalgunas
instrucciones que le permitir_n realizar a usted
mismo la revisi6n y el mantenimiento.
Limpieza del panel frontal, cubeta y
carcasa
Limpie el panel frontal y ]a carcasa con un patio
suave, agua tibia y detergente suave,
Limpie la parrilla con un aspirador o cepillo.
No utilice blanqueadores ni abrasivos.
Limpieza
del filtro de aire
1, Saque la cubeta de agua de la carcasa.
Retireel flltrode aire como se muestra arriba.
2. Limpie el filtro de airs con agua tibia y un
detergente suave. Enjuagueloy s_quelo.
Vuelva a colocarlo en su sitio.
Limpieza
del serpentin
1. Retire la parrilla frontal de la carcasa came se
muestraamba.
2, UtUiceun cepillo de pequefio tamafio para lirnpiar
suavementelas bobinas como se muestraen la
ilustraci6n. Si es necesario utilice agua tibia y un
detergente suave. Enju_guelo y s6quelo
completamente.
,_
28
ATENCI(_N: sobre
No tire
agua de la
manguera
la bobina.
iCuidado!
iBordes afiladosT
Deshumi_ficador
Riesgo de descarga el_ctrica
• Desconecte el cable de alimentaciSndel enchufe
antesde realizarccalquiermantenimiento.
• Tengacuidadoeuandolimpie los serpentines.
Lasaletasestdnafiladas.
Si nosiguelas precauciones
antefiorespodria
producirse
unadescargaelectriceo dafios personales.
Mantenimiento
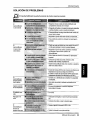
SOLUCION
DE PROBLEMAS
El deshumidificador
El
deshurnidiflcader
no seenciende
puede funcionar de mode anormal cuando:
• AsegQrese
dequela clavijadeldeshumidificador
esta
oompletamente
insertadaenel enchufe.
• Cornpruebe
losfusibleso elcuadrodelinterrupter
autom&tico
y cambieelfusibleo vuelvaa conectar
el interrupter.
• El deshumidificador
seapagaautomaticarnente
cuandoesto
ocurre.
Vaelelacubeta.
• Aseg0rese
de quela cubetaest_colocada
correctamente.
• Pulseel bot6nde controldele humedad
_ parabajarla
humedad.
El
lt_
deshumidificador
no secaelaire
corno
debiera
_ _
• Cuandoseinstalaperprirnera
vez,debeesperaral menos3
6 4 diesparemantener
el nivelde hurnedad
deseado.
-A-s-eg_J
re_ de-queno-haicoffin'spers;a-nas
o-m;b-i,i-a-r
o--queblequean
tapertefrontalo posterior
del
deshurnidil'icador,
• Pulseel bot6nde controldelahurnedad
_) parabajarla
hurnedad,
• Cornpruebe
quetodaslaspuertas,ventanas
y otras
aberturas
est_ncerredas
cornpletamente,
• Instaleeldeshumidificador
lejosde lasecadora.
La secadora
debetenersalidaalexterior.
1/
, Elmodelo
de50pintas
(54501)
telveznofuncione
coneficiencia
sila
temperature
delasaleest_perdebajo
delos65°F(18_C),
•ELmodelo
de70pintas
debajatemperatura
(54701)
realizar_
dales
continuarnente
hasta
alcanzar
unatemperatura
de42°F(6°C),
I/
El
deshumidificador
funcionadurante
muchotJempo
• Consulte
consudistdbuidor
paracornprobar
si lacapacidad
esadecuada.
Apareceescarcha
enlosserpentines
• Esnormal.Norrnalmente,
la escarcha
desaparece
transcurridos
60 minutes.
El ventiladorhace
ruido
• Esnormal.
Hayagueen el
suelo
• Compruebe
la rnanguera,
encasede quehayaincorporado
uNa,
• Cierretodaslaspuertasy ventanas
comunicadas
conel
exterior,
• Consuite
c6rnoretirary vaciarlaeubeta
deague,
El
deshurnidificador
funeionade
rnaneracontinuada
• Carnbieelajustede humedad
e 35%o m_s.
• Cambiela humedada unajustemasbajo.
Manual
de usuario
29
Nota
30
Deshumidificador
Master Protection Agreements
Acuerdos
Congratulations
on making a smart purchase.
Your new Kenmore ® product is designed and
manufactured for years of dependable operation.
But like all products, it may require preventive
maintenance or repair from time to time.
That's when having a Master Protection Agreement
can save you money and aggravation.
iEnhorabuena! Ha realizado una compra inteligente.
Su nuevo aparato Kenmore® esta disefiado y fabricado
para ofrecerle arias de buen funcionamiento.
Sin embargo, al igual qoe todos los productos,puede
precisar un mantenimiento preventivo o incluso alguna
reparaci6n de vez en cuando. En esas ocasiones, un
Master Protection Agreement puede ayudarle a ahorrar
dinero e inconvenientes.
Purchase a Master Protection Agreement now and
protect yourself from unexpected hassle and
expense.
Adquiera un Master Protection Agreement ahora, y
protejase a sf mismo de mo/estias y gastos inesperados,
The Master Protection Agreement also helps extend
the life of your new product. Here's what's included
in the Agreement:
Unlimited service and no charge for parts and
labor on all covered repairs
[]
"No-lemon" guarantee - replacement of your
covered product if four or more product failures
occur within twelve months
[]
Product replacement
can't be fixed
[]
Annual Preventive Maintenance
request - no extra charge
[]
Servicio experto per parte de cuatquiera de
nuestros 12.000 t6cnicos profesionales especialistas
de Sears.
[]
Prestacibn de servicios sin limitaciones y sin
cargarte las piezaso la mano de obra en todas las
reparaciones eubiertaspor el acuerdo.
Garantia seria de sustitucibn de las piezas del
productoeubiertopor el acuerdo,si coatro o mas
piezas se mostrasen defectoosasen un periodode
doce meses.
[]
Fast help by phone - phone support from a
Sears technician on products requiring in-home
repair, plus convenient repair scheduling
[]
Power surge protection against electrical
damage due to power fluctuations
[]
Rental reimbursement if repair of your covered
product takes longer than promised
Once you purchase the Agreement, a simple phone
call is all that it takes for you to schedule service.
You can call anytime day or night, or schedule a
service appointment online.
Sears has over 12,000 professional repair
specialists, who have access to over 4.5 million
quality parts and accessories. That's the kind of
professionalism you can count on to help prolong
the life of your new purchase for years to come.
Purchase your Master Protection Agreement today!
Some
limitations
and exclusions
apply.
information
call
For prices and additional
1-800-827-6655.
Sears
Installation
[]
if your covered product
Check at your
Service
For Sears professional installation of home
appliances, garage door openers, water
heaters, and other major home items, in the
U.S.A, call 1-800-4-MY-HOME ®
Especializada
El Master Protection Agreement le ayudara tambien a
prolongar la vida de su nuevo aparato. Los siguientes
servicios est_e inciuidos:
F-v[Expert service by our 12,000 professional
repair specialists
[]
de Protecci6n
[]
[]
[]
[]
Sustitucibn del producto por otro nuevo, si el
defeotuosono pudiese repararse.
Control de mantenimiento anual preventivo,
sJempreque Io desee y sin gastoadicionalalguno.
Asisteneia telefbnica inmediata de un tecnico
especialistaen productosque han de ser reparadosa
domicilio, ademas de una programaci6n adecuada de
la reparacion.
Proteccibn contra subidas de tensibn que
provoquendafios electricos debidos alas
fluctuaciones en el suministro.
Reintegre del alquiler si la reparacion del producto
Ileva mas tiempodel promtetido
Uea vez que haya adquirido el Agreement, no necesitar_
m_s que una simple Ilamada para solicitar el servicio de
su aparato. Ademas, podr_ hacerlo en coalquier momento
del dia o de la noche, o solicitar una cita para prestaci6n
de servicios online.
Sears cuenta con m_s de 12.000 tecnicosprofesionales
especialistas en reparaciones, con acceso a mas de 4,5
millones de piezas de sustituci6n y accesodos de calidad.
I_stesera el tipo de profesionalidad y servicio con el que
podr_contar para prolongar la vida de su euevo producto
pot muchos afios, iAdquiera hoy mismo su Master
Protection Agreement#
Se aplicar_n algunas limitaciones y
restricciones.
Si desea hacer alguna consulta sobre los
precios u otra informaci6n adicional, le rogamos
Ilame al tel_fono 1-800-827-6655.
Servicios
de Instalacibn
Sears
Pera so/iciter servicios de instalaciSn profesionales
de Sears de electrodom_,sticos, mandos de apertura
de puertas de garajes, calentadores de agua y otros
aparatos en los Estados Unidoe, puede Ilamar a
1-800-4-MY-HOME
®
Manual
de usuario
31
I
I
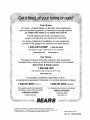
Your Home
For repair - in your home-of all major brand appliances,
lawn and garden equipment, or heating and cooling systems,
no matter who made it, no matter who sold it!
::::::::::::::::::i
::::::::::::::::,,
For the replacement parts, accessories and
owner's manuals that you need to do-it-yourself.
For Sears professional installation of home appliances
and items like garage door openers and water heaters.
1-800-4-MY-HOME
...............
_
Call anytime,
::::::::
::::::::
_ (1-800-469-4663)
day or night (U.S.A.
and Canada)
iiiiiiiiiiiiiiiiiiii
::::::::::::::
:::::::::::::
i{il i
www.sears.com
iiiiiiiiiiiiiiiiiiii
www.sears.ca
ii_i_i_iiiii_
I
OurHome
iiiiiiiiiiiiiiiiiiii
For repair of carry-in items like vacuums, lawn equipment,
%_i_i_i_ and electronics, call or go on-line for the location of your nearest
iiiiiiiii!i!iiii
iii_
ii:;i;;;:i;i:
iiliii!
Sears Parts & Repair Center.
!i!i!i!i!i!i:_!_!_:_
3;_!ili!ii!iiiiii
1-800-488-1222
Call anytime,
day or night (U.S,A.
@iii
iiiiiiiiiiiiiiiiiiiiiii!ii
only)
To purchase a protection agreement (U.S.A.)
or maintenance agreement (Canada) on a product serviced
ii_!:!i!i!:!i!:!:
!
1-800-827-6655
(U.S.A.)
1-800-361-6665
by Sears:
(Canada)
i_!i_iiiiiiiii
;3;331
]_i,iiii]_iii
£C3
:;:::;:;c;
............
Para pedir servicio
a domicilio,
_:_:_:_:_;i_i"_
de reparacion
y para ordenar piezas:
1.888.SU.HOGARSM
Au Canada
pour service
en fran_;ais:
1-8O0.LE.FOYER Mc
(1-800-533-6937)
"@i
_:_
ii!iiiiiiiiiiiiii
i_i_i;;;;;_
1-888-784-6427)
® Registered Trademark / TMTrademark / SMService Mark of Sears, Roebuck and Co.
® Marca Registrada / TM Marca de F_brica ! sM Marca de Servicio de Sears. Roebuck and Co.
Mc Marque de commerce / MDMarque deposee de Sears, Roebuck and Co.
© Sears. Roeb=_ckand Co.
Part No.: 3828A2.0399E