1
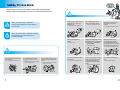
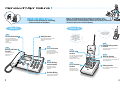
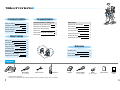
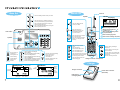
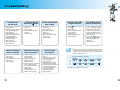
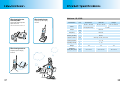
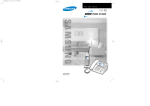
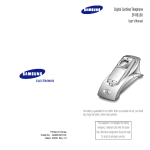
900 MHz Phone SP-C700R GG68-00405E 03/10. Rev.1.0 English Manual Safety Precautions The following is to ensure the user's safety and to minimize potential damages. Carefully read the following guidelines and use in accordance with the instructions. Note Warning Note Never pull out the power plug by pulling the line or when your hands are wet. When you see this sign, it indicates a warning that something can cause death or serious injury. Do not fold the power line or leave it under heavy objects. ● It can cause electric shock or fire. ● It can cause electric shock or fire. This product is for 220V only. Do not use for any other voltages. ● It can cause electric shock or fire. When you see this sign, it indicates a warning that something can cause minor injury or product damage. Use only the designated adapter. ● It can cause fire. Always disconnect the Phone Jack first before disconnecting the DC Power Jack of the adapter from the phone. ● It can electric shock. Always disconnect from the power supply when cleaning. Do not spray water and do not use benzene, thinner or any other alcohol while cleaning the phone. ● It can cause electric shock or fire. Warning Do not use damaged power lines or loose plugs. ● It can cause electric shock or fire. Do not disassemble or repair. ● It can cause electric shock, fire or injury. ● If it needs repairing, please contact our local service center. If there is dust or water on the power plug, wipe it off with a dry cloth. ● Do not use water, as it can cause electric shock or fire. Do not pour water or any liquid on the phone. ● It can cause electric shock or fire. If you hear any weird or unusual noises or smell anything weird, immediately disconnect the power line and call the service center. Do not dispose batteries into a fire. ● It can cause an explosion. ● It can cause electric shock or fire. 1 2 Overview of Major Features WIDE 900 MHz Phone ● Here are some instructions concerning various functions of the phone. Base Set Remote Set page 28 Recent call function Setting function You can easily search and redial the most recent numbers you called without dialing them up again. (Up to 10 calls) You can set and manage your own settings for various phone functions. page 22 Morning call/alarm function This button will set an alarm to sound at a certain time. Base set : Phone directory (20 phone numbers), recent calls (10 calls). Remote set : Phone directory (10 phone numbers), recent calls (10 calls). The phone directory is saved separately from the recent call function and the base set and the remote set are controlled separately. An illuminated dial pad adds to your convenience. It allows you to dial phone numbers even in dark places. You can easily carry the remote set when moving around. page 23~26 Phone directory search function page 17, 19 Intercom function You can easily switch between an internal call (intercom) with the base set and an external call. page 28 Recent call function You can easily search and redial the recent numbers you called without dialing them up again. (Up to 10 calls) page 23~26 Phone directory search function This helps you store or search up to 20 phone numbers. This helps you store or search up to 10 phone numbers. page 17~19 Intercom function You can easily switch between an internal call (intercom) with the base set and an external call. page 31 Noise reduction function It will detect a clear channel when the call has a bad connection Setting function You can manage settings for various phone functions. On Hook Dialing You can make a call without picking up the remote set. 3 4 Convenient features Safety precautions 1 Overview of major features 3 Help functions Convenient features for making calls 28 Selecting Pulse / Tone Dial Type 30 5 Deleting the recently dialed number 28 Noise reduction 31 Product information 7 Out of range warning 31 29 Phone installation 9 Blocking a user from making long distance calls Low voltage warning 31 Dialing another number after a call (Flash) 29 Adjusting the Flash Time 31 Pause function 30 Initializing the phone 32 Registering the remote set 33 Basic Features 13 Answering calls 14 Date / Time setting 15 Using the intercom function 17 Transferring calls 18 Changing the ringing melody and adjusting the voice volume 20 Morning call / alarm setting 22 Using the phone directory 23 Reference Troubleshooting 35 How to Clean 37 Product Specifications 38 Reference Making calls Convenient features Redialing the recently dialed number Basic features Preparation & Installation Table of contents / Components Preparation & Installation Table of Contents Components Base set Base adapter Phone line cord Remote set (DC 12V 500mA) Charger Charger Adapter Battery (DC 12V 500mA) (DC 3.6V 450mAh) User's manual Warranty card ● Please check the components. ● In case there is a problem with the components, please contact a retail shop where you made your purchase. 5 6 Product Introduction Remote Set � Use it for redialing the last number you called. Antenna Speaker Preparation & Installation Base Set ●Screen Displaying � Use it for searching or registering numbers in your own phone directory ( up to 20 numbers ). � Use it for redialing the last number you called. � Use it to navigate upward when moving and searching through the menu. � Use it to navigate downward when moving and searching through the menu. Battery status When out of range from the base set � Use it for searching or registering numbers in your personal phone directory ( up to 10 numbers ). Hook switch When the line is busy with a call ( ) or an extension call ( ) When searching or registering numbers in your phone directory Volume of receiving ring (2 levels) � Use it for searching the order of the most recent calls � Use it for changing the function setting ( e.g. bell type, device number ). Speaker Volume of one's voice during a call (3 levels) � Use it for turning on/off the power. � Use it for reducing misconnected calls or noise. � Use it for setting or canceling the phone's features. � Use it for confirming the function setting. Use it for setting or canceling the morning alarm call. � Use it for canceling functions. � Use if for adjusting the volume of the ring tone or speakerphone. � Use it for deleting certain phone numbers from the directory, recent calls or saved numbers in searching phone numbers. Use it for dialing numbers without picking up the handset. � Use it for calling, answering or hanging up. � Use it for setting or canceling the phone's features. � Use it for adjusting the ring tone or the voice volume. � Use it for either communicating with the remote set or transferring a call to the remote set. � Use it for making another call without hanging up. � Use it for either communicating with the base set or transferring a call to the base set. � Use it for canceling a function. � Use it for deleting the most recently called numbers or saved numbers in searching phone numbers. � Use it for making another call without hanging up. Charger connector Microphone Charger Standby Screen Call Restriction Ring Volume Bell Off Tone Dial (indicator) Morning call 7 Call Screen Hour Minute Speaker phone Volume Call indicator Dial (Phone Number) This shows you the duration of the call. Charger connector Power cable connector (back side) LED lamp for recharging status 8 Installing the Base Set Loading the battery to the remote set Connect the phone line. Open the Place the Rearrange the picture. shown in the picture. Close the as by setting 4 battery cover. 3 line 1 battery cover. 2 battery shown in the the battery as DC 12V 500mA Connect the power plug to 220V. � When you have finished installing the base set, press“On Hook ”button and check for a dial tone. � If you cannot hear a dial tone, then check both the power and phone line connections. � This product works for 220V. How to use the battery ● Charge the battery for approximately 24 Installing the Remote Set hours before using. ● Always remove the battery from the remote DC 12V 500mA Connect the power plug to 220V. set, when you are not using it for an extended period. ● It is best to charge the battery until you see the ( ) sign on the screen. Battery life ÀÀ ;; @@ ;; @@ ÀÀ ;; @@ ÀÀ ● The battery life has a 6-month warranty after purchase. ● As time goes by, there will be a reduction in the � Place the remote set on the charger and check if the lamplight is on. � Press the call button and check for a dial tone. � If you cannot hear the tone, check the installation. battery's power. When battery's power capacity is reduced by half, purchase a new battery and replace it. ● Please contact your local Samsung Electronics Service Center on how to purchase and replace the battery. To turn on / off the power 9 � To turn on the power: Press button (hold for more than 2 seconds) until you begin to hear the beeping sound. � If it does not turn on when you press button, then you probably need to recharge the remote set. It should then automatically turn on. Please recharge the battery for 24 hours before using it. � If you do not charge the battery for at least 6 hours, then in order to protect it, the battery must be fully charged or it will stop operating. � To turn off the power: Press buttons (hold for more than 3 seconds) until you hear the beeping sound. 10 Preparation & Installation Phone Installation Basic Features ■ Making calls 13 ■ Answering calls 14 ■ Date / Time setting 15 ■ Using the intercom function 17 ■ Transferring calls 18 ■ Changing the ringing melody and 11 adjusting the voice volume 20 ■ Morning call / alarm setting 22 ■ Using the phone directory 23 12 Making Calls Answering Calls Answering a Call with the Base Set Making a Call with the Base Set When using the base-handset When using the On Hook � When hanging up the phone � Basic features Press button and dial the number you want to call. When calling in standby mode Pick up the base-handset and dial the number you want to call. � You can get a dial tone in 3 seconds. � ● You can switch from pulse to tone mode by pressing Place the handset down on its position. When the Phone Rings Pick up the handset to answer the call. button during dialing. ● If you have incorrectly dialed the number in standby mode, you can delete a digit by pressing button and then pick up the handset or press 'On Hook' button. What is "On Hook Dialing"? � It is a very convenient feature. With it, you can first dial the number you want to call and then pick up the handset to talk to the caller after identifying his/her voice through the speaker. (NB. If you don't pick up the handset, the other side can't hear you.) Making a Call with the Remote Set When the remote set is placed on the Charger When the remote set is not placed on the Charger Answering a Call with the Remote Set When hanging up the phone Pull out the remote set from the charger, press button and dial the number you want to call. Press button and dial the number you want to call. ● You can switch from pulse to tone mode by pressing Place the remote set on the charger or pressing button. When the Phone Rings Pull out the remote set from the charger and press button to answer the call. press the call. button to answer button during dialing. ● You can dial the number before pressing button. ● If you have incorrectly dialed the number in standby mode, you can delete a digit by pressing 13 When the remote set is not placed on the charger � � and then press When the remote set is placed on the charger button button. 14 Date/Time Setting ● You need to setup the Date/Time feature in order to see the current time and to use the Morning Call/Alarm function. ● Only the hour and minute setting is available on the base set. Setting up the Base Set 1 2 3 4 5 You will hear a beep confirming the completion of the setting. �Press 4 digits in the order of hour, and minute. Setting up with the Remote Set 1 2 3 4 5 Displaying You will hear a beep confirming the completion of the setting. �Press 8 digits in the order of day, month, hour, and minute. In the case of a power failure or if you have deliberately disconnected the power, the date and time will be erased. Therefore you will have to set it up once again. 15 16 Basic features Displaying Using the Intercom Function Transferring Calls ● Separating from external calls, you can use intercom function between the base set ● While talking you can transfer the call either to the base set or to the remote set. and the remote set. In this particular case the calls are not charged. Calling from 1 to 2 How to transfer from 3 to 4 Remote set Basic features Base Set 1 Base Set or When the internal call is connected, pick up the handset to talk. Base Set While talking When you hear it ringing ● In order to cancel the intercom during any call, simply press � button, or lift up the handset and place it back on the hook. Calling from to 1 2 3 Remote set Displaying of the Internal call Base Set 2 3 4 Place the handset on the hook to hang up the call. When you hear it ringing Pick up the remote set and press button to talk on the phone. When you are connected through to the person, talk on the phone. �When you hear it ringing, pick up the handset. ● In order to cancel the intercom during any call, simply press the charger. 17 te No or button, or place the remote set on ● To cancel the transferring, simply pick up the handset. ● When an external call comes during an intercom talk, button on the remote set to hang up the call To answer by the base set → Press To answer by the remote set → simply place the handset of the base set on its cradle to transfer the call. 18 Transferring Calls Changing the Ringing Melody and Adjusting the Voice Volume (continued) ● You can adjust the type and volume of ring tone melodies as you please. Base Set to 1 2 Remote set ●Transferring from the Selecting the Ringing Melody 1 3 2 remote set to the base set Remote Set While talking �The current melody will ring and the number of the melody will be displayed. ● 4 5 5 Displaying � 3 4 You will hear a beep confirming the completion of the setting. �(Up to 10 available) -- Silence. Adjusting the Ring Volume Adjusting Speaker/ Voice Volume ●You can adjust the volume to 3 levels (High/Medium/Low). ●The default setting is medium. ●The volume can be adjusted by 2 levels, Low and High. ●The original seting is Low. or Speaker Volume After pressing the button Place the remote set on the charger or press button to hang up. Stand by When the phone rings ● To cancel the transferring, simply press 19 Press Pick up the handset. ● button. button one after another. In doing so, you can switch the volume to high, medium or low. Press Voice Volume ● While talking into the handset. button one after another. In doing so, you can switch the volume to high, or low. 20 Basic features Transferring from Changing the Ringing Melody and Adjusting the Voice Volume (continued) Morning Call/Alarm Setting ● First, set the current time (see page 15 for more details) ● You can only setup the morning call/alarm on the base set. ● When you set the morning call/alarm, it will give you a wakeup call at a certain time. Remote Set Selecting the Ringing Melody 3 2 4 1 5 Displaying 3 4 Displaying Time Setting 2 You will hear a beep confirming the completion of the setting. You will hear a beep confirming the completion of the setting. �Press the search button and select the ringing melodies that you want (Up to 10 available) �You can select by pressing button one after another. �Press four digits in the order to set up hours and minutes. ● When you set the Morning call/alarm, it will automatically be enabled. -- Silence. ● Adjusting the Ring Volume ●The volume can be adjusted by 2 levels, Low and High. ●The original seting is High. 5 Adjusting the Voice Volume ●You can adjust the volume to 3 levels (High/Medium/Low). ●The original seting is Medium. Setting or Canceling the Morning Call /Alarm ● When you cancel and reset the morning call/alarm, Wait! the time that was last set beforehand will be effective. ● When you set up your wakeup time, the morning call/alarm is enabled. It will ring for up to 10 minutes. ● When the morning call/alarm is ringing, Stand by Press ● 21 button one after another. In doing so, you can switch the volume to high, or low. During a call After pressing button Press ● button one after another. In doing so, you can switch the volume to high, medium or low. if you want to turn it off, simply press any button on the base set or lift up and then put down the handset back on to the cradle. Or press the call button on the remote set. In standby mode, you can toggle between setting and canceling using button. When it is active, the screen of the phone displays an icon. When the Morning call/alarm is enabled 22 Basic features 1 Setting the Time on the Base Set Using the Phone Directory ● You can register up to 20 phone numbers on the base set. Registering a Phone Number (Using the Base Set ) 1 2 3 Making a Call from the Phone Directory (Using the Base Set ) 2 1 4 3 You will hear a beep confirming the completion of the setting. �Press button. �Press button. (You can use up to 20 digits) �Press button and select the phone number you want Press button or pick up the handset. Deleting Each of the Numbers in the Phone Directory (Using the Base Set ) 2 1 Using a phone directory with an installed switchboard or an internal phone line. 3 In case of an installed switchboard or an internal phone, you can usually make external calls by using an external switch number (mostly 9). When registering the phone number, enter a pause between the external switch number and the phone number. Example : To register � The selected phone number has been erased. 012-345-6789 � �Press button. Searching the Phone Directory (Using the Base Set ) 1 2 �Press button and select the phone number you want Deleting All of the Numbers in the Phone Directory (Using the Base Set ) 1 3 2 3 4 Displaying All of the saved phone numbers have been erased. �Press button. �Press button to look up any of the numbers that have been previously saved. ● When the searching phone number has more than 12 digits, you can use �Press button to identify button. �Press button and hold for at least 3 seconds ● To cancel the deleting, simply press button. the rest of the number that is not displayed. 23 24 Basic features Enter the phone number. Using the Phone Directory (continued) ● You can register up to 10 phone numbers in the remote set. Making a Call from the Phone Directory (Using the Remote Set ) Registering a Phone Number (Using the Remote Set ) 1 2 1 5 4 3 2 3 You will hear a beep confirming the completion of the setting. �Press button. �Press button and select the phone number you want �Press (You can use up to 20 digits) button. Basic features Enter the phone number. �Press button and select the phone number you want Deleting Each of the Numbers in the Phone Directory (Using the Remote Set ) 1 2 3 Searching the Phone Directory (Using the Remote Set ) 1 2 The selected phone number has been erased. 3 Displaying �Press �Press button. �Press button and select the phone number you want Deleting All of the Numbers in the Phone Directory (Using the Remote Set ) �Press button to look up any of the numbers that have been saved. ● When the searching phone number has more than 12 digits, you can use button. 1 button to identify 2 3 4 the rest of the number that is not displayed. All of the saved phone numbers have been erased. �Press button. �Press button and hold for at least 3 seconds ● To cancel the deleting, simply press 25 button. 26 Convenient Features for Making Calls You can call the recently dialed numbers without redialing by yourself. To Redial a Number 1 Convenient Features Base Set in standby mode � Press button Press Blocking a user from making long distance calls Dialing another number after a call (Flash) Pause function button � Pick up the handset. (You can press button and then pick up the handset.) Press button to search for the recently dialed numbers. � � Remote Set in standby mode Deleting the recently dialed number ■ Help functions � 28 Redialing the recently dialed number 3 � Press button to search for the recently dialed numbers. ● The most recent numbers are stored in the memory (up to 10 numbers). 30 ● Press button of the base set in stand-by mode and pick up the handset to call the last dialed number. ● Press button of the remote set in stand-by mode and press button to call the last dialed number. Selecting Pulse / Tone Dial Type Noise reduction Out of range warning To Delete the Recently Dialed Number 1 Low voltage warning 2 3 4 Adjusting the flash time Initializing the phone Registering the remote set Base Set in standby mode � Press � Press 27 button � The selected phone number will be erased. � � The selected phone number will be erased. Press button to search for the recently dialed number to delete. button Remote Set in standby mode � Press button to search for the recently dialed number to delete. 28 Convenient features ■ Convenient features for making calls 2 Convenient Features for Making Calls Convenient Features for Making Calls / Help Functions To Block Long Distance Calls (Using the Base Set ) 1 2 3 Dial Pause (Using the Base Set /Remote Set ) 4 5 Displaying � Base Set in standby mode � � � 1 This function is used for making external calls within the internal switchboard. Base Set in standby mode 3 � ~ 4 � � (External switch number) � : Impossible to button make long-distance calls �Press : Enable to and select the phone make a long-distance call number you want 2 ~ Select from Press the button. Press the number to dial. Pick up the handset. � When you pick up the handset When you press the button Remote Set in standby mode ~ Select from Base Set � ~ � � (External switch number) Press the button. Press the number to dial. Press button. by using an external switch number (mainly 9). ● When the restriction function is enabled, you can make a long distance call with the base set. And you will also see icon on top of the screen. Selecting Pulse / Tone Dial Type (Using the Base Set) ● When the restriction function is enabled, you can make a (long distance) call with the base set. However, when you dial eight first on the remote set, it will return to standby mode instead of sending a call. Remote Set You can select from pulse and tone dial type. 1 Base Set in standby mode 2 � 3 � Dialing Another Number after a Call (Using the Base Set/Remote Set) (Flash) You can make another call without hanging up after a call. Convenient features ● In case of an installed switchboard or internal phone line, you can make external calls Do not hang up after finishing a call. Press the number to dial. Press for more than 2 seconds. Do not hang up after finishing a call. 4 : Pulse Dial : Tone Dial 5 � You will hear a beep confirming the completion of the setting. Press the number to dial. Press for more than 2 seconds. ● See page 31 for selecting the flash time. � � �Press button and select the phone number you want ● The pulse dial is originally set. ▼:Pulse Dial, ▲:Tone Dial ● You can change the dial type only from the base set. 29 30 Help Functions Help Functions This is to initialize the phone to its original condition. Noise Reduction (Using a Remote Set ) Initializing the Phone (Base Set / Remote Set ) 1 2 � When there is a lot of noise 1 Press 2 3 ∙If the noise is not reduced, press the button several times. Base Set in standby mode � � � � Out of Range warning with the Remote Set 1 4 Displaying button � : Initialization set : Initialization cancelled 5 � Press All functions will be initialized with a completion sound. button on the top. 2 This prevents a remote set from being disconnected from the base set. � When the remote set gets too far from the Base set Remote Set in standby mode You will see a on the top of the screen with a warning sound. When this occurs, move closer toward the base set. Press the three buttons at the same time and hold for at least 3 seconds. All functions will be initialized with a completion sound. Convenient features When there is a lot of noise, or when the call has a bad connection, you can use this function to reduce irrelevant noise by changing channels. Low Voltage Warning in Remote Set 1 When the battery voltage of the remote set falls below a certain level, a warning is given. Default or Initial State of the Phone 2 When a battery needs recharging � You will hear a warning sound with these Base Set marks blinking. Adjusting the Flash Time You can adjust the flash time. Remote Set When this occurs, immediately recharge your remote set. 1 2 3 4 5 Displaying � � � � �Press button to select the flash time you want. You will hear a beep confirming the completion of the setting. ● Ring type : 1 ● Ring type : 1 ● Call Restriction : Cancel ● Ring volume : High ● Morning call / alarm time : 06:00 ● Phone volume : Medium ● Ring volume : Medium ● Recently number : None ● Phone volume : Low ● Phone directory : None ● Recently number : None ● Date / Time : 01/ 01 24:00 ● Phone directory : None ● Current time : 24:00 ● Dial mode : Pulse ● Flash time : 100ms ● You can select the range of the flash time from 0.1 to 1.0 seconds. 31 32 Help Functions Registering the Remote Set (Using Base Set / Remote Set) 2 Base Set in standby mode � 3 � 4 Displaying � 5 � ~ 1 6 � � Reference Press the two digits you want. Remote Set in standby mode 8 � 9 � Displaying 10 � 11 � ~ 7 12 � Enter the same two digits as you did in the base set. Wait a few seconds and you will hear a beep confirming the completion of the registration. ■ Troubleshooting 35 ■ How to Clean 37 ■ Product Specifications 38 When registering the remote set, the number of the base set and the remote set must be identical. In addition, it is recommended that you register the remote set right after registering the base set. ÀÀ ;; @@ ;; @@ ÀÀ ;; @@ ÀÀ 33 34 Troubleshooting ●Is the phone correctly installed? (Refer to page 9) ●Is the power correctly connected to the appropriate voltage? (Refer to page 9) ●Check if the batteries are correctly inserted to the remote set. (Refer to page 10) ●Check if the batteries are adequately charged. (Refer to page 10) ●Check if the power is on. (Refer to page 9) I cannot hear the tone when I press button. ●Check if the phone is correctly connected. (Refer to page 9) ●Check if the power is correctly connected. (Refer to page 9) The morning call/alarm does not work. ●Check if the current time is accurately set. (Refer to page 15) ●Check if the morning call time is set. (Refer to page 22) ●Check if the morning call/alarm function is set. (Refer to page 22) Internal or transferring calls are not working. The phone does not ring in the base set or the remote set. I cannot recharge the remote set. ●Check if you have installed the phone correctly. (Refer to page 9) ●Try re-registering the remote set to the base set. (Refer to page 33) ●Check if the batteries are correctly inserted. (Refer to page 10) ●Check if the batteries are adequately charged. (Refer to page 10) ●Check if the power of the remote set is on. (Refer to page 9) ●Try re-registering the remote set to the base set. (Refer to page 33) ●Check if the BELL OFF is selected. (Refer to page 21) ●Check if the charging connector is clean. ●If the charging connector is not clean, use a cotton tip or an eraser to wipe it clean. (Refer to page 37) ●Check if the power voltage is appropriate. (Refer to page 9) ●If you have cleaned the charging connector but it still does not work, then please contact your local service center and purchase new batteries. (Refer to page 10) 35 I hear many noises while using the remote set. ●Press button to reduce the noise. (Refer to page 31) ●Check if the distance is too far from the base set. (Refer to page 31) ●Try installing the base set at a different location. I hear beeping warning sounds in the remote set. ●Check if the base set is currently in use. Try again after the call in the base set has been hung up. ●Check to see if you are too far away from the base set. If yes, move closer toward the base set. (Refer to page 31) ●If you see the mark on the screen, hang up the phone and adequately charge your remote set. (Refer to page 31) ● When there is a problem with radio communication between the base set and the remote set, do the following, and if it still will not work, then please contact your local Samsung Electronics Service Center. ● Follow instructions in the order. Base Set � � � � Remote Set � � � � Reference The phone does not work at all. ;; @@ ÀÀ ;; @@ ÀÀ ;; @@ ÀÀ ※ See page 33 for registering a remote set 36 How to Clean When cleaning the outer side of the phone. Apply neutral washer liquid and wipe it with a cloth. ●Do not use benzene, thinner, etc. Product Specifications When cleaning charger Frequently wipe the charging connector. Model name : SP- C700R Classification Unit Power V Remote Set Base Set Charger DC 3.6 V, 450 mAh DC 12 V, 500 mA DC 12 V, 500 mA for 220V Rechargeable battery When cleaning remote set mW Below 10 Frequency kHz Below 16 Receiving sensitivity ㎶ Below 2 Usage time for remote set Hours Stand by: over 20, Call: over 3 Operating temperature ℃ -10 ~ +40 Operating humidity % 5 ~ 90 Weight g 138 513 122 Dimension (length*width*height) mm 214×46×23 233×130×57 130×76×75 Reference Frequently wipe the charging connector. Output 37 38 MEMO MEMO MEMO