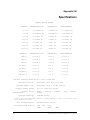
1
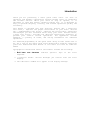
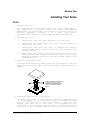
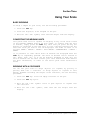
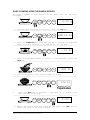
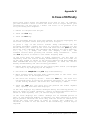
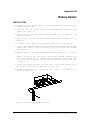
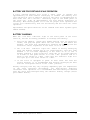
Table of Contents
Introduction...........................................................1
Section One............................................................3
Installing Your Scale................................................3
SETUP..............................................................3
EXPERIMENTATION....................................................5
Section Two............................................................6
Understanding Your Scale.............................................6
KEYBOARD FUNCTIONS.................................................6
DISPLAY SYMBOLS....................................................6
MESSAGES...........................................................6
LED................................................................7
Section Three..........................................................8
Using Your Scale.....................................................8
BASIC WEIGHING.....................................................8
CONVERTING THE WEIGHING UNITS......................................8
WEIGHING WITH A CONTAINER..........................................8
BASIC COUNTING USING THE SAMPLE SIZE KEY...........................9
USING THE MINIMUM SAMPLE SIZE AND MINIMUM ACCURACY FEATURE........10
COUNTING WITH ACCURACY ENHANCEMENT................................10
REVERSE COUNTING OR KITTING.......................................12
PRINTING OUT INFORMATION..........................................13
INTERFACING WITH A COMPUTER.......................................13
Appendix I............................................................14
Set-Up Functions....................................................14
Appendix II...........................................................15
Calibration.........................................................15
Appendix III..........................................................16
Glossary of Terms...................................................16
Appendix IV...........................................................17
RS-232 Serial Data Communications...................................17
The RS-232 Interface Hardware.....................................17
Appendix V............................................................19
Accessories and Options.............................................19
Appendix VI...........................................................20
In Case of Difficulty...............................................20
Appendix VII..........................................................22
Battery Option......................................................22
INSTALLATION......................................................22
BATTERY USE FOR PORTABLE SCALE OPERATION..........................23
BATTERY CHARGING..................................................23
Appendix VIII.........................................................24
Specifications......................................................24
Appendix IX...........................................................26
Limited Two-Year Scale Warranty.....................................26
Index.................................................................27
Introduction
Thank you for purchasing a Setra Quick Count scale. Its ease of
operation and durable construction should provide years of convenient
and reliable service. While your scale is easy to operate, it is
advisable to read this manual carefully before use. It is designed to
help you perform weighing, counting, and related operations quickly and
accurately.
This manual is divided into four sections. Section One, “ Installing
Your Scale,” explains the proper installation of your scale. Section
Two, “ Understanding Your Scale,” explains the various keys, operations
and messages you will encounter while using your scale. Section Three,
“ Using Your Scale,” provides the detailed instructions necessary to
perform your scale's various operations. The Appendices include
examples, a glossary of terms, and set-up information for advanced
operations.
For advanced programming of the Quick Count using an Auto Count™ 200 or
PC, get a copy of the Setra Quick Count Technician's Guide by contacting
your local authorized Setra dealer or call Setra toll free at 1-800-25SETRA.
Typographical Conventions used in this manual include the following:
1. Bold lower case characters
keyboard.
2. “ Quotation marks”
display.
indicate
specific
keys
on
the
scale
enclose messages you receive from the scale
3. nnn indicates a number will appear in the display message.
Weighing Platform
Display
Round weighing platform shown is
used on scales of 5000 gram
capacity or less.
Keypad
Adjustable Foot
Level Bubble
Weighing Platform
Rectangular weighing platform shown is
used on scales of 27 pound capacity
or more.
Display
Keypad
Adjustable Foot
Level Bubble
FIGURE 1. Components and features of the Setra Quick Count.
2
Setra Quick Count™ Operator's Manual
Section One
Installing Your Scale
SETUP
1. Locating your scale
The rugged design of your Setra Quick Count scale ensures that it
will operate well in typical factory or office environments.
Nonetheless, you should treat your scale as you would any piece of
precision equipment, locating it on a clean, dry surface;
protected, where possible, from extremes of draft and vibration.
2. Leveling your scale
a.
Retract the right rear foot completely into the scale.
b.
Adjust the two front feet
centered in the circle.
c.
Extend the right rear foot until it contacts the mounting
surface. Make certain that all four feet are contacting the
mounting surface.
d.
Make certain the scale is stable by placing both hands on the
scale platform and attempt to rock the scale. If it moves,
adjust the leveling feet until the scale stands firmly on the
mounting surface.
until
the
leveling
bubble
is
3. Installing the weighing pan
Using the Allen wrench provided, secure the pan support to the four
posts over the sensor. Next, place the weighing pan over the pan
support.
An Allen wrench and four socket head cap
screws are provided to assist in the
installation of the load frame support for
sclaes using a rectangular weighing
platform.
4. Connecting your scale to an AC outlet
To connect your scale to an AC outlet, insert the appropriate end
of the AC adaptor into an electrical outlet. Now connect the other
end into the back of the scale (see FIGURE 1). Once you have
plugged your scale into a live outlet, it is automatically on,
unless the scale is equipped with a battery, in which case the onoff switch on the rear panel should be put in the 'on' position to
Setra Quick Count™ Operator's Manual
3
power up the scale. The scale draws very little current from an
outlet and may be left connected. This keeps your scale ready to
use with no “ warm-up” time.
4
Setra Quick Count™ Operator's Manual
EXPERIMENTATION
1. Display test
When your scale is first powered on, it automatically runs through
a display test; lasting about six seconds. The scale next displays
“ C nnn g” where nnn equals the full scale capacity in grams),
performs self-diagnostics to ensure proper operation and then sets
itself to zero. A wake up message is always transmitted upon power
up. (If a printer is connected to the scale, the scale model,
capacity and software version will be printed. If the scale is
connected to a computer the wake up message may be disregarded.)
The scale is then ready for use. For best accuracy, allow the scale
to warm up for 5 minutes.
2. Using your scale for the first time
It is important that you read this operator's manual thoroughly to
ensure proper use of your scale. Nonetheless, experimenting with
your scale and its keyboard prior to reading this manual in its
entirety will not harm your scale (provided it is not overloaded),
and may actually give you a better understanding of the
instructions in this manual. If you instruct the scale to do
something it is not capable of doing, the scale will respond by
displaying the message “ UnAbLE” . To continue experimenting, simply
press the clear key.
Setra Quick Count™ Operator's Manual
5
Section Two
Understanding Your Scale
KEYBOARD FUNCTIONS
zero
sample
size
Assigns the pan and whatever is currently being weighed a
value of zero. While the scale is determining a stable zero
reading, the display will indicate “ bUSY” .
Displays
pieces).
preprogrammed
sample
sizes
(10,
25,
50
or
100
count
Instructs the scale to begin or resume counting. This key
may also be used to “ update” the average piece weight for
increased counting accuracy.
print
Scale sends any displayed and stored information to
printer, computer (or other RS-232 peripheral device).
units
Converts the weighing units of measure (e.g. changes from
grams to ounces).
clear
Clears the last number entered or operation requested, and
displays weight.
a
DISPLAY SYMBOLS
OK
Reading shown
performed.
is
stable.
Further
operations
PC
Reading shown is given in number of pieces.
g
Reading shown is given in grams.
oz
Reading shown is given in ounces.
lb
Reading shown is given in pounds.
t oz
Reading shown is given in troy ounces.
dwt
Reading shown is given in pennyweights.
c
Reading shown is given in carats.
may
be
MESSAGES
C nnn g
Displayed when the scale is powered on. “ nnn”
the scale's full capacity in grams.
bUSY
The scale is waiting for a stable reading.
UnAbLE
The scale
operation.
operation.
equals
is unable to complete your requested
Press the clear key and select another
FLASHING
6
Setra Quick Count™ Operator's Manual
DISPLAY
The weight on the pan exceeds the capacity of the
scale; the pan is not properly seated or the scale is
under loaded.
OFLO
The displayed count exceeds six digits (999,999).
UPdAtE
The scale is recalculating the average piece weight to
enhance counting accuracy.
Add nnn.PC
The scale is requesting an additional number of pieces
(nnn)
to
satisfy
any
minimum
accuracy
setup
requirements.
Sub nnn.PC
When kitting, the scale is requesting an additional
number of pieces (nnn) be removed to satisfy any
minimum accuracy setup requirements.
rEF n.n
The scale is displaying the current software version
number (n.n).
low bat
If lit, battery needs to be recharged. (Battery option
only)
LED
Setra Quick Count™ Operator's Manual
7
Section Three
Using Your Scale
BASIC WEIGHING
To weigh a sample on your scale, use the following procedure:
1. Press the zero key.
2. Place the object(s) to be weighed on the pan.
3. Wait for the “ OK”
symbol, then read the weight from the display.
CONVERTING THE WEIGHING UNITS
Your Quick Count scale is capable of weighing in any of the units listed
in the DISPLAY SYMBOLS portion of this guide. To convert from one unit
to another, simply press the units key. Each time you press the key the
display is converted to the next unit in line. Continue pressing the key
until the units you wish to use are displayed. The order of units is as
follows: GRAMS - OUNCES - POUNDS - TROY OUNCES - PENNYWEIGHTS - CARATS GRAMS.
It is possible to limit which units of measure are displayed when the
units key is repeatedly pressed. The units of measure can be limited to
two, three, four, etc. or it can be entirely disabled so that only one
unit of measure can be used. Contact your local Authorized Setra dealer
for more information, or refer to the Setra Quick Count Technician's
Guide.
WEIGHING WITH A CONTAINER
You can use your scale to weigh objects (or liquids) by placing or
pouring them into a container. To weigh objects or liquids in this
manner, WITHOUT including the weight of the container, use the following
procedure:
1. Press the zero key. Place the empty container on the pan.
2. Press the zero key again.
3. Wait for the “ OK”
the container.
4. Wait for the “ OK”
display.
8
symbol. Place or pour objects or liquids into
symbol, then read the net weight from the
Setra Quick Count™ Operator's Manual
BASIC COUNTING USING THE SAMPLE SIZE KEY
To count a number of like objects on the scale, use the following
procedure:
zero
sample count
size
print
clear
0.00 g
1. Place an empty container on the scale. Press the zero key.
-----------------------------------------------------------------------zero
sample count
size
print
clear
Add 10 Pc
2. Press the sample size key. Each time the key is pressed the requested
sample size will increase (i.e., Add 10, 25, 50, 100 PCs).
-----------------------------------------------------------------------zero
sample count
size
print
clear
10 Pc
3. Place the requested number of pieces in the container. Press the
count key.
------------------------------------------------------------------------
zero
sample
size
count
print
clear
202 Pc
4. Fill the container to the desired number of pieces.
------------------------------------------------------------------------
zero
sample
size
count
print
clear
278 Pc
Tape/Label
Press the print key to generate a tape/label or to transmit the
data from the RS-232 port.
-----------------------------------------------------------------------5.
zero
sample count
size
print
clear
0.00 g
6. Remove the pieces from the container and press the clear key to
return the scale to the weight display.
Setra Quick Count™ Operator's Manual
9
USING THE MINIMUM SAMPLE SIZE AND MINIMUM ACCURACY FEATURE
Counting errors can be caused by non-uniformity in the parts being
counted or by insufficient sample weight. To reduce these errors your
scale has been designed with two special features. The minimum sample
size feature ensures that the scale will calculate an average piece
weight from a large enough sample which is nearly equal to the average
piece weight of the entire lot. This feature prevents an operator from
using a sample size which is too small and could be “ biased” , i.e.,
not truly representative of the distribution of unequal parts in the lot
to be counted. Setting the scale to require a larger minimum sample will
reduce the error which is introduced by non-uniformity.
The minimum accuracy feature ensures that the total sample weight is
heavy enough to keep counting errors very small. The higher the degree
of accuracy desired, the larger the total sample weight that will be
required. This means that even if the sample satisfies the minimum
sample size requirement it may still be too light to achieve the
accuracy level selected and therefore the scale will request more
pieces.
Your scale has been preprogrammed at the factory with a minimum sample
requirement of 10 pieces and a minimum accuracy requirement of 95%. If
you wish to change these settings contact your local authorized Setra
dealer or refer to the Setra Quick Count Technician's Guide.
COUNTING WITH ACCURACY ENHANCEMENT
When counting parts that are not uniform in weight, you can periodically
update the average piece weight (APW) and thereby increase the accuracy.
Each time the count key is pressed, the scale will update the APW as
long as the additional weight is less than or equal to the previous
sample weight. If the added weight is more than 100% of the previous
sample, the APW will not be updated. For example, if you start with a
sample size of 10 pieces then add 10 more and press the count key, the
APW will be recalculated based on a 20 piece sample. The next time you
wanted to update the APW you could add up to 20 pieces. If you added 11
or more to the original 10 piece sample, the APW would not be updated
and would continue to represent the original 10 pieces. To count using
this accuracy enhancement feature, follow the procedure below.
1. Place an empty container on the scale and press the zero key.
2. Press the sample size key. The scale display will say “ Add 10. PC” .
(The sample size requirement can be increased by pressing the
sample size key repeatedly. The predetermined sample sizes are: 10,
25, 50 and 100 pcs. A custom sample size may be preset using the
minimum sample size setup feature. If preset, the scale will never
request a sample size less than the preset minimum sample size.)
3. When you reach the desired sample size, place the requested number
of pieces in the container.
4. Press the count key. Wait for the “ OK” symbol then slowly add
pieces until the displayed count is increased by 100% or less.
5. Press the count key. The scale displays “ UPdAtE” and automatically
calculates a new average piece weight based on the larger number of
pieces. If “ UPdAtE” is not displayed, the additional pieces have
exceeded 100% of the previous sample weight and the APW will not be
updated.
10
Setra Quick Count™ Operator's Manual
NOTE: The accuracy enhancement feature is disabled if the average piece
weight has been scanned in from a bar code or entered via a
computer.
Setra Quick Count™ Operator's Manual
11
REVERSE COUNTING OR KITTING
Using this feature, you can place a container full of pieces on your
scale and count the number of pieces removed. This is especially helpful
when kitting (counting out a certain number of pieces to be packed
together). To perform reverse counting or kitting, use the following
procedure:
1. Place a container full of pieces you wish to count on the pan.
2. Press the zero key.
3. Press the sample size key.
4. The scale display will say “ Add 10. PC” .
(The sample size requirement can be increased by pressing the
sample size key repeatedly. The predetermined sample sizes are: 10,
25, 50 and 100 pcs. This sequence of predetermined sample sizes
will repeat itself as the sample size key is pressed. A custom sample
size may be preset by using the minimum sample size setup feature.
If this is the case, the scale will never request a sample size
less than the preset minimum sample size.)
5. When you reach the desired sample size, REMOVE the requested number
of pieces from the container.
6. Press the count key. If the sample size is not large enough to
satisfy the minimum accuracy requirement the display will read
“ Sub nnn” . Remove the specified number of pieces (i.e., nnn) from
the container and press the count key again.
7. Remove pieces until the display reads the number of pieces you wish
to count out or kit.
8. Press the zero key.
9. Repeat Steps 7 and 8 as many times as needed.
12
Setra Quick Count™ Operator's Manual
PRINTING OUT INFORMATION
Your Setra Quick Count scale is designed to print out requested or
stored information regarding a given batch when connected to an optional
serial printer (see Appendix I). To print out information using the
Setra Model 240P or 340P dot matrix printer, use the following
procedure:
1. Connect the printer’s AC adaptor to a 110-volt outlet.
2. Connect the other end of the adaptor to the printer.
3. Connect the appropriate end of the printer connection cord to the
printer.
4. Connect the other end of the connection cord to the scale's RS-232
port.
5. Perform the necessary counting or weighing procedures on the scale.
6. Make sure the printer is turned on (as indicated by the printer’s
green light). If the printer is not on, press the black button on
the side of the printer.
7. Press the print key on the scale.
8. Repeat Steps
information.
5
through
7
any
time
you
wish
to
print
out
NOTE: a. When using a printer other than the Setra 240P or 340P, set the
baud rate and parity of your scale to match the printer (see
Appendix I).
b. It is possible to customize the information to be printed to
either a dot matrix printer or thermal printer for bar codes
with ScriptCoder™. Contact your local authorized Setra dealer
for more information.
INTERFACING WITH A COMPUTER
Your Setra Quick Count scale is designed to interface with a wide
variety of computers. For information on how to connect your scale to a
computer and transmit data ask your local authorized Setra dealer for
the Setra Quick Count Technician's Guide, or request a copy from the
factory.
Setra Quick Count™ Operator's Manual
13
Appendix I
Set-Up Functions
Your Setra Quick Count scale was programmed at the factory to operate in
a prescribed manner. Many of the factory settings can be altered by an
authorized Setra dealer to optimize scale performance for your counting
or weighing operation. For example, the scale is factory preset to
request a minimum of 10 pieces to initiate the counting process. Your
dealer can alter the minimum to a smaller or larger sample, such as 5 or
25 pieces. Your dealer can also alter the minimum counting accuracy, the
baud rate used for data communications, display hysteresis and print
formatting.
Factory settings can also be changed by a scale operator using a Setra
Auto Count™ 200, or by using a computer connected to the scale through
the bi-directional RS-232 serial data port. For information on how to
use a PC to alter factory settings ask your dealer for the Setra Quick
Count Technician's Guide, or request a copy from the factory.
The following scale settings are available in addition to the factory
default settings. Your dealer may change these settings to fit your
particular application and so the factory defaults may not apply.
Minimum Sample Size(pieces):
25, 50 or 100
0-999
Minimum Counting Accuracy: 95-99.99%, none
Baud Rate:
Default: 10,
Default: 95%
300, 600, 1200, 2400, 4800, 9600 Default:
2400
Parity:
even/odd/none
no
parity
Display Hysteresis:
on or off
Default: on
Display hysteresis when enabled provides a
more stable, easier to read number. Display
hysteresis can be set to prevent the last
digit from changing if weight changes are
less than 1 displayed increment.
Printer Settings:
Default:
Weight/Count, Average Piece
Weight,
English
Format,
240P 340P
Print Device Type:
240P
340P with 6 line feeds for 1” length labels
Auto Count 200 - English/Bar Code
ScriptCoder - custom English/Bar Code designs
To print a copy of the scale's current setup information use the
following procedure. Connect the scale to a printer via the RS-232
serial port. Power up the scale and then hold the print key down while
the scale completes the countdown and displays the scale capacity, i.e.,
-2-, -1-, C nnnng. The scale will display “ rEF n.n” , the software
version while printing the current setup information. Press the clear key
twice to return to the normal weighing mode.
14
Setra Quick Count™ Operator's Manual
Appendix II
Calibration
Your Setra Quick Count scale is highly stable, and requires infrequent
calibration. While it may be span calibrated as often as desired, the
factory calibration is adequate for most counting applications. For
precise weighing applications more periodic calibrations may be
desirable. To perform a span calibration on Quick Count scales with
operating program version 1.3 or higher, use the following procedure:
1. Remove all objects from the pan.
2. Make certain the scale is level.
3. Press the units key to place the scale in either the GRAMS or POUNDS
weighing mode. (If either of these units of measure are disabled,
refer to “ Units Enable/Disable Selection” in the Setra Quick Count
Technician's Guide.)
4. Press the zero key and while the scale is displaying “ bUSY” *, press
the units key.
The scale will flash “ CAL” and return to displaying “ bUSY” .
5. The scale will then display “ L xxxxx” , where xxxxx is the scale's
first calibration point. Press the sample size key repeatedly, the
scale will display each calibration point available.
To ensure maximum accuracy the calibration point selected should be
as close as possible to the scale's full capacity.
6. When the desired calibration point is displayed, load the displayed
weight on the pan, and press the units key.
7. The scale will
weighing mode.
display
“ bUSY” ,
and
then
return
to
the
normal
8. Remove the weights from the pan, press zero to zero the display.
*
If you are having difficulty entering the calibration mode, gently
touch the edge of the weighing pan to prolong the “ bUSY” display
message in step 4.
Setra Quick Count™ Operator's Manual
15
Appendix III
Glossary of Terms
ACCURACY
The degree of conformity of a measured value to the true value.
AVERAGE PIECE WEIGHT
The average weight in a sample of like pieces.
BAUD RATE
The rate at which your scale transmits or receives information to or
from a computer or peripheral device.
DISPLAY HYSTERESIS
The tendency of a scale with a fluctuating reading to stabilize on
the higher value.
KITTING
Repeatedly removing a given number of pieces for inclusion in a kit;
e.g., removing the number of like transistors necessary to
manufacture a radio.
PARITY
A bit used to check the validity of the data word.
PRECISION
The degree of reproducibility which can be placed on an average value
derived from multiple measurements usually expressed as one standard
deviation (or one sigma).
REPRODUCIBILITY
See PRECISION.
16
Setra Quick Count™ Operator's Manual
Appendix IV
RS-232 Serial Data Communications
Your Setra Quick Count comes equipped with a bidirectional RS-232
interface using a default baud rate of 2400 and no parity. Users who
have purchased a Setra 240P or 340P printer may simply follow the
directions under “ Printing Out Information” to connect it to the
scale. Users who are interfacing a scale to the Auto Count 200 or to
another printer for a custom label design using ScriptCoder should
follow the installation instructions in the operator’s guides for those
products.
The RS-232 Interface Hardware
Although Setra scales can communicate with almost any RS-232 device, the
built-in interface does not include the complete protocol; only the
transmit and receive lines of the standard interface are used.
The data format is:
1 start bit
8 data bits including parity
1 stop bit
10 bits per frame (framing errors ignored)
NOTE: The scale will transmit using the parity selected; however it does
not check the parity it receives.
Use an RS-232 cable to connect the external device to the scale, or
construct one following these instructions. The serial port uses an
eight pin modular connector. The pinout is as follows:
1
2
3
4
5
6
7
8
ground
transmit out
receive in
no connection
no connection
+5V @ 250 mA* (optional)
ground
ground
8
1
Modular Jack
Connector
(in back of scale)
* If the fuse (Setra p/n 404722) is installed, power is provided for the
Auto Count 200 bar code option or an intelligent bar code wand (p/n
403676), CCD or laser scanner on pin 6.
NOTE: The “ handshake” signals, such as “ Clear To Send” (CTS), are not
implemented. This requires that the peripheral have a minimal
buffer (15 characters).
In addition, some computers which require handshaking will need a
connection between two pins on the computer's connector named DTR and
DSR (Data Terminal Ready and Data Set Ready) in order to communicate
with the scale. CTS (Clear to Send) may also need to be jumpered to RTS
(Request to Send) at your computer interface.
The maximum recommended cable length is 15 meters. The cable may be
longer if it has less than 2,500 pF capacitance. The load impedance of
the device connected should be between 3,000 and 7,000 ohms with not
more than 2,500 pF shunt capacitance.
Setra Quick Count™ Operator's Manual
17
For further information, obtain a copy of the Setra Quick Count
Technician's Guide by contacting your local authorized Setra dealer.
18
Setra Quick Count™ Operator's Manual
Appendix V
Accessories and Options
The following accessories are available for the Setra Quick Count. Ask
your dealer for current price information and/or a demonstration.
Part
Number
Description
401150
240P PRINTER - 40 column dot matrix tape printer comes preinterfaced to Setra scales and balances. Printer has an RS232 serial asynchronous interface with 1.5 kilobyte data
buffer
and
user
selectable
baud
rate.
Printing
is
bidirectional at 2 lines per second, and baud rate is
selectable. Dimensions: 8” x 8” x 4” (200 x 200 x 100
mm).
401151
340P LABEL PRINTER - same as the 240P above, but includes
sprocket mechanism for label advance. Designed for standard
3-1/2” x 15/16” adhesive backed labels. (Avery #4145 or
equivalent.)
404530
BATTERY CONNECTOR ASSEMBLY - designed for portability, this
option permits battery operation of the Quick Count scale.
Included is an “ on-off” switch, external battery charger
and a DC. power clip. A battery is not included.
404719
EXTERNAL BATTERY CHARGER - used to charge camcorder style
lead-acid battery.
404620
BATTERY - this camcorder style lead-acid battery will
provide up to twenty-four hours of scale operation on a full
charge. (See Battery Use For Portable Scale Operation,
Appendix VII.) Battery is 12 VDC, 2.3 ampere-hours. Use of
this battery is limited to scales equipped with the BATTERY
CONNECTOR ASSEMBLY (Setra part number 404530.)
404150
AUTO COUNT 200 - scale bar code option allows use of the
Setra scale for reading and printing bar code labels.
404910
SCRIPTCODER LABEL DESIGN & CABLE KIT - this programming
option allows customization of labels to include any
alphanumeric information, scale data fields or ASCII control
characters to print any label format including bar codes on
thermal printers.
Setra Quick Count™ Operator's Manual
19
Appendix VI
In Case of Difficulty
Setra Quick Count scales are designed to be easy to use. If, however,
you have reached a state in which the scale will no longer follow your
instructions, you may wish to “ reset” the scale. It is possible to do
so by following this sequence.
1. Remove all weights from the pan.
2. Press the clear key.
3. Press the zero key.
If this procedure does not solve the problem, try briefly unplugging the
unit from its power source then plug the unit in again.
To print a copy of the scale's current setup information use the
following procedure. Connect the scale to a printer or computer via the
RS-232 serial port. Power up the scale and then hold the print key down
while the scale completes the countdown and displays the scale capacity,
i.e., -2-, -1-, C xxxxg. The scale will display “ rEF n.n” , the
software version while printing the current setup information.
Press
the clear key twice to return to the normal weighing mode.
If the scale does not return to normal operation, you may want to
completely reset the scale's battery backed memory. This will cause all
of the user setups to return to the factory defaults and WILL ERASE ANY
SPAN CALIBRATION that may have been performed. To reset the scale's
battery backed memory use the following procedure:
1. Remove power from the scale via the scale's power switch (if equipped
with one) or by unplugging the AC adaptor.
2. Hold down the sample size and print keys simultaneously.
3. While holding these two keys down, restore power to the scale. This
puts the scale in the diagnostic mode.
4. The scale will display “ d-noS” . Press the clear key. The scale will
now perform tests to verify its operation and reset all of the setups
to the factory defaults. The scale will then display “ PASS” .
5. Press the clear key. The scale will now perform the normal segment
test, capacity and count down displays.
If the unit displays any unusual messages during the warm-up period, or
does not return to normal operation, contact an Authorized Setra Service
Center or Setra Systems, Inc., as service may be required.
If the scale displays the “ bUSY” message for an extended period of
time, or the displayed reading is unstable, too much vibration or draft
may be present. Relocate the scale away from the source of vibration or
shield the scale from draft in order to correct this condition. If
vibration or draft is not the cause of the instability, service may be
required.
20
Setra Quick Count™ Operator's Manual
If the scale displays “ d-noS” , it may have been subjected to an
extreme discharge of static electricity or power line fluctuations. The
scale can be easily restored to operation by following the procedures
outlined in steps #4 and #5 above. Note, the user setups will be
restored to the original factory defaults.
If the RS-232 interface does not function correctly, first make certain
that you are using the correct RS-232 cable, and that it is securely
fastened to both the scale and the peripheral device. If data
transmission or reception is still not possible, be certain that both
the scale and peripheral device serial ports are set up correctly (baud
rate, parity, handshaking, etc.). See Appendix IV.
When communicating with certain types of devices, especially computers,
it may be necessary to “ cross” the receive and transmit lines of the
interface. That is, the receive line of the scale must connect to the
transmit line of the external device. Likewise, the transmit line of the
scale must connect to the receive line of the external device. Special
cables can be purchased for this purpose from a computer dealer.
If the problem still persists, contact your local authorized Setra
dealer, refer to the Setra Quick Count Technician's Guide or consult
Appendix IX, “ Limited Two-Year Scale Warranty,” for more information.
To obtain a copy of the Setra Quick Count Technician's Guide contact
your local authorized Setra dealer.
Setra Quick Count™ Operator's Manual
21
Appendix VII
Battery Option
INSTALLATION
Disassembly of the entire scale is not required when installing the
battery option kit.
1. Position the back of the scale so it overhangs the rear of a work
bench (see Figure 2).
2. Remove the (2) Phillips head screws (marked “ A”
the rear panel.
in Figure 2) and
3. Next remove the (2) hex head screws and washers marked “ D”
Figure 2.
in
4. Disconnect the ribbon cable and remove the power circuit board.
5. Install the battery option circuit board and reconnect the ribbon
cable. Make sure to loop the battery clip out through the battery
door opening.
6. Replace the (2) hex head screws and washers marked “ D”
2.
in Figure
7. Before replacing the rear panel, remove the pre-cut knockout for
the power switch with a hammer and screwdriver. Mount the rear
panel onto the scale with the (2) Phillips head screws (marked “ A”
in Figure 2).
8. Slide the battery halfway into the scale, attach the battery clip,
then insert the battery completely into the scale.
9. Slide the battery door closed and the scale is now powered for
portable operation.
Figure 2. Installing the Battery Option.
22
Setra Quick Count™ Operator's Manual
BATTERY USE FOR PORTABLE SCALE OPERATION
A fully charged battery will allow a Setra scale to operate for
approximately 24 hours before recharging is needed. The battery will
last one-half as long or about 12 hours if the scale is equipped with an
Auto Count 200. The “ low bat” indicating light on the front panel of
the scale will light up approximately one hour before recharging is
necessary. When battery power is too low for proper scale operation the
circuit will automatically shut off the battery and the scale will cease
operation.
Replacement and spare batteries can be ordered from Setra Systems (part
number 404620).
BATTERY CHARGING
When the “ low bat” indicator light on the front panel of the scale
turns on, use the following procedure to recharge the battery:
1. Plug the AC adaptor, (Setra part number 404712) into an electrical
outlet, and plug the power cable into the scale. Do not remove the
battery. The scale will automatically recharge the battery from the
electrical outlet regardless if the scale is on or off.
2. The “ low bat” indicator light will remain on during recharging
until the battery reaches 40% of its rated capacity. This will take
between 2 to 2.5 hours depending if the scale is on or off. A
battery powering a scale alone will reach 95% of its rated capacity
in 8 hours if the power switch is in the “ ON” position and in 7
hours if the switch is “ OFF” . Note that the indicator light will
not light up if the scale switch is “ OFF” .
3. If the scale is equipped to power an Auto Count 200 from the
scale's battery, it is recommended that battery recharging be done
with the scale power switch in the “ OFF” position.
Battery charging time may vary slightly depending upon the temperature
in the scale operating environment. For applications requiring
continuous scale operation it is recommended that the battery be removed
from the scale and recharged using the external battery charger (Setra
part number 404719).
Setra Quick Count™ Operator's Manual
23
Appendix VIII
Specifications
Setra Quick Count
CAPACITY
REPRODUCIBILITY
READABILITY
NON-LINEARITY
2.2 lb
+/-0.00002 lb
0.00002 lb
+/-0.00002 lb
5.5 lb
+/-0.00005 lb
0.00005 lb
+/-0.00005 lb
11.0 lb
+/-0.0001 lb
0.0001 lb
+/-0.0001 lb
27.0 lb
+/-0.0005 lb
0.0005 lb
+/-0.0005 lb
55.0 lb
+/-0.001 lb
0.001 lb
+/-0.001 lb
75.0 lb
+/-0.002 lb
0.002 lb
+/-0.002 lb
110.0 lb
+/-0.002 lb
0.002 lb
+/-0.002 lb
REPRODUCIBILITY
READABILITY
NON-LINEARITY
CAPACITY
1000 g
+/-0.01 g
0.01 g
+/-0.01 g
2500 g
+/-0.02 g
0.02 g
+/-0.02 g
5000 g
+/-0.05 g
0.05 g
+/-0.05 g
12,500 g
+/-0.2 g
0.2 g
+/-0.2 g
25,000 g
+/-0.5 g
0.5 g
+/-0.5 g
34,000 g
+/-1.0 g
1.0 g
+/-1.0 g
50,000 g
+/-1.0 g
1.0 g
+/-1.0 g
Internal Counting Resolution: 1 Part in 500,000
Counting Accuracy:
Minimum Sample Size:
Display Update Speed:
Display Units:
pennyweights,
Counting Capacity:
Selectable from 95% to 99.99%*
Selectable from 1 to 999 pieces*
Up to 5 times per second
grams,
carats
ounces,
pounds,
troy
ounces,
999,999 pieces
* Contact your authorized Setra dealer to change settings or refer to the Setra Quick
Count Technician's Guide.
Data Communications:
Selectable Baud Rates*:
24
Bi-directional RS-232
300, 600,
2400,
1200,
4800,
9600
Setra Quick Count™ Operator's Manual
Selectable Parity*:
Display:
Pan:
Operating Temperature:
even/odd/none
6-digit LCD
Stainless Steel
40• to 110•F (5• to 43•C)
Power Supplied by AC Adaptor: Input - 110 VAC / 60 Hz
Output - 16.5 VDC @ 500 ma
Platform/Pan Dimensions:
1000 g (2.2 lb.)
2500 g (5.5 lb.)
5”
5”
diameter 130 mm
diameter 130 mm
5000 g (11 lb.)
6.25”
12,500 g (27 lb.)
11”
x 14”
280 mm x 355
25,000 g (55 lb.)
11”
x 14”
280 mm x 355
34,000 g (75 lb.)
11”
x 14”
280 mm x 355
50,000 g (110 lb.)
11”
x 14”
280 mm x 355
diameter
160 mm
mm
mm
mm
mm
Overall Dimensions:
retracted)
All models:
360
14” w x 15.5” l x 6” h (feet
mm
x
395
mm
x
145mm
(feet
retracted)
Shipping Weight:
Quick Count - 1000g - 5000g: 26 lb. (12.0 Kg)
Quick Count - 12,500g - 50,000g: 32 lb. (13.5
Kg)
Specifications subject to change without notice.
* Contact your authorized Setra dealer to change settings or refer to the Setra Quick
Count Technician's Guide.
Setra Quick Count™ Operator's Manual
25
Appendix IX
Setra Systems, Inc.
Limited Two-Year Scale Warranty
Setra Systems, Inc. warrants the scales it manufactures to be free from
defects in material and workmanship. Upon return, transportation charges
prepaid, to Setra’s factory within two (2) years of the date of
purchase, Setra will repair or replace, at its option, any scale which
it determines to contain defective material or workmanship and will
return said scale to purchaser, transportation prepaid, at any point in
the United States. Setra shall not be obligated, however, to repair or
replace scales which have been repaired by unauthorized parties, abused,
improperly installed, altered, or otherwise misused or damaged, even if
by accident, in any way. Setra will not be responsible for any
dismantling, reassembly or reinstallation charges.
Nothing in this warranty shall be construed as a warranty for
merchantability or fitness for any specific use or purpose, and this
warranty is in lieu of all other warranties, express or implied. Setra
shall not be held liable under the terms of this warranty for any
special, indirect, incidental or consequential damages claimed in
connection with the scales’ performance or availability.
Setra Systems, Inc.
Weighing Systems Division
159 Swanson Road • Boxborough, MA 01720 • (508) 263-1400
26
Setra Quick Count™ Operator's Manual
Index
AC adaptor, 3, 11, 17, 20, 22
accessories, 16
accuracy, 4, 5, 6, 9, 10, 12, 13, 14, 21
enhancement, 5, 9
Add nnn, 6
Auto Count 200, 12, 15, 16, 20
average piece weight, 5, 6, 9, 12, 14
update, 9
bar code, 9, 12, 15, 16
wand, 15
battery, 3, 6, 16
charging, 20
external charger, 20
installation, 19
portable operation, 20
replacement, 20
baud rate, 11, 12, 14, 15, 16, 22
bUSY, 5, 13, 17
C nnn g, 4, 5
cable, 15
calibration, 13, 17
factory, 13
point, 13
span, 13
capacity, 4, 5, 17, 21
carats, 5, 7, 21
clear, 4, 5, 8, 12, 17
Clear To Send, 15
computer, 4, 9, 11, 12, 14, 15, 18
count, 5, 8, 9, 10
default, 12, 15, 17, 18
display, 1, 5, 7, 8, 22
flashing, 5
hysteresis, 14
hysteresis, 12
messages, 5
symbols, 5, 7
test, 4
update, 21
d-noS, 17, 18
draft, 3, 17
full scale, 4
grams, 4, 5, 7, 21
handshaking, 15
installation, 1, 15
interface, 11, 15, 18
keyboard, 1, 4, 5
kitting, 6, 10, 14
L xxxxx, 13
labels, 8
LED, 6
leveling, 3
low bat, 6, 20
memory, 17
battery backed, 17
messages, 1, 17
minimum accuracy, 6, 9, 10, 12
minimum sample size, 9, 10, 12, 21
model, 4, 22
non-linearity, 21
OFLO, 6
OK, 5, 7, 9
ounces, 5, 7, 21
Setra Quick Count™ Operator's Manual
27
pan, 3, 5, 22
parity, 11, 12, 14, 15, 22
PASS, 17
PC, 5
pennyweights, 5, 7, 21
peripheral device, 5, 14, 18
pounds, 5, 7, 21
precision, 14
print, 5, 8, 11
print, 11, 12, 17
printer, 4, 5, 11
240P, 11, 12, 15, 16
340P, 11, 12, 15, 16
readability, 21
rEF n.n, 6, 12, 17
reproducibility, 14, 21
Request to Send, 15
reset, 17
resolution
internal counting, 21
reverse counting, 10
RS-232, 1, 5, 8, 11, 12, 15, 16, 17, 18, 22
sample, 7, 9, 12, 14
sample size, 5, 8, 9, 10, 17
custom, 9
ScriptCoder, 11, 12, 15, 16
self-diagnostics, 4
serial port, 15
service, 17
Setra Quick Count Technician's Guide, 1, 7, 9, 11, 12, 13, 15, 18, 21,
22
settings, 9, 12, 21
Printer, 12
setup information, 12, 17
software version number, 4, 6
specifications, 21
Sub nnn, 6, 10
troubleshooting, 17
troy ounces, 5, 7, 21
typographical conventions, 1
UnAbLE, 4, 5
units, 5, 7, 21
disabling, 7
UPdAtE, 6, 9
vibration, 3, 17
wake up message, 4
warm up, 4, 12, 17
warranty, 18, 23
weighing, 7, 11, 12
zero, 4, 5, 7, 8, 9, 10, 17
zero, 10
28
Setra Quick Count™ Operator's Manual
FCC WARNING
This equipment has been tested and found to comply with the limits for a
Class A digital device, pursuant to Part 15 of the FCC Rules. These
limits are designed to provide reasonable protection against harmful
interference when the equipment is operated in a commercial environment.
This equipment generates, uses, and can radiate radio frequency energy
and, if not installed and used in accordance with the instruction
manual, may cause harmful interference to radio communications.
Operation of this equipment in a residential area may cause harmful
interference in which case the user will be required to correct the
interference at their own expense.
Setra Quick Count™ Operator's Manual
29