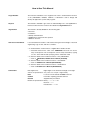
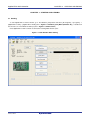
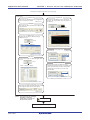
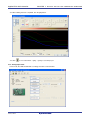
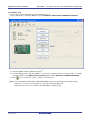
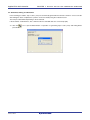
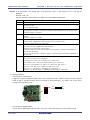
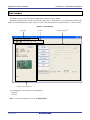
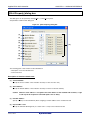
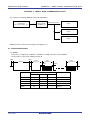
1
User’s Manual AppliletTM EZ for HCD Controller For Ver. 8.30 User’s Manual All information contained in these materials, including products and product specifications, represents information on the product at the time of publication and is subject to change by Renesas Electronics Corp. without notice. Please review the latest information published by Renesas Electronics Corp. through various means, including the Renesas Electronics Corp. website (http://www.renesas.com). www.renesas.com Rev.12.00 Jul, 2014 Notice 1. Descriptions of circuits, software and other related information in this document are provided only to illustrate the operation of semiconductor products and application examples. You are fully responsible for the incorporation of these circuits, software, and information in the design of your equipment. Renesas Electronics assumes no responsibility for any losses incurred by you or third parties arising from the use of these circuits, software, or information. 2. Renesas Electronics has used reasonable care in preparing the information included in this document, but Renesas Electronics does not warrant that such information is error free. Renesas Electronics assumes no liability whatsoever for any damages incurred by you resulting from errors in or omissions from the information included herein. 3. Renesas Electronics does not assume any liability for infringement of patents, copyrights, or other intellectual property rights of third parties by or arising from the use of Renesas Electronics products or technical information described in this document. No license, express, implied or otherwise, is granted hereby under any patents, copyrights or other intellectual property rights of Renesas Electronics or others. 4. You should not alter, modify, copy, or otherwise misappropriate any Renesas Electronics product, whether in whole or in part. Renesas Electronics assumes no responsibility for any losses incurred by you or third parties arising from such alteration, modification, copy or otherwise misappropriation of Renesas Electronics product. 5. Renesas Electronics products are classified according to the following two quality grades: “Standard” and “High Quality”. The recommended applications for each Renesas Electronics product depends on the product’s quality grade, as indicated below. “Standard”: Computers; office equipment; communications equipment; test and measurement equipment; audio and visual equipment; home electronic appliances; machine tools; personal electronic equipment; and industrial robots etc. “High Quality”: Transportation equipment (automobiles, trains, ships, etc.); traffic control systems; anti-disaster systems; anticrime systems; and safety equipment etc. Renesas Electronics products are neither intended nor authorized for use in products or systems that may pose a direct threat to human life or bodily injury (artificial life support devices or systems, surgical implantations etc.), or may cause serious property damages (nuclear reactor control systems, military equipment etc.). You must check the quality grade of each Renesas Electronics product before using it in a particular application. You may not use any Renesas Electronics product for any application for which it is not intended. Renesas Electronics shall not be in any way liable for any damages or losses incurred by you or third parties arising from the use of any Renesas Electronics product for which the product is not intended by Renesas Electronics. 6. You should use the Renesas Electronics products described in this document within the range specified by Renesas Electronics, especially with respect to the maximum rating, operating supply voltage range, movement power voltage range, heat radiation characteristics, installation and other product characteristics. Renesas Electronics shall have no liability for malfunctions or damages arising out of the use of Renesas Electronics products beyond such specified ranges. 7. Although Renesas Electronics endeavors to improve the quality and reliability of its products, semiconductor products have specific characteristics such as the occurrence of failure at a certain rate and malfunctions under certain use conditions. Further, Renesas Electronics products are not subject to radiation resistance design. Please be sure to implement safety measures to guard them against the possibility of physical injury, and injury or damage caused by fire in the event of the failure of a Renesas Electronics product, such as safety design for hardware and software including but not limited to redundancy, fire control and malfunction prevention, appropriate treatment for aging degradation or any other appropriate measures. Because the evaluation of microcomputer software alone is very difficult, please evaluate the safety of the final products or systems manufactured by you. 8. Please contact a Renesas Electronics sales office for details as to environmental matters such as the environmental compatibility of each Renesas Electronics product. Please use Renesas Electronics products in compliance with all applicable laws and regulations that regulate the inclusion or use of controlled substances, including without limitation, the EU RoHS Directive. Renesas Electronics assumes no liability for damages or losses occurring as a result of your noncompliance with applicable laws and regulations. 9. Renesas Electronics products and technology may not be used for or incorporated into any products or systems whose manufacture, use, or sale is prohibited under any applicable domestic or foreign laws or regulations. You should not use Renesas Electronics products or technology described in this document for any purpose relating to military applications or use by the military, including but not limited to the development of weapons of mass destruction. When exporting the Renesas Electronics products or technology described in this document, you should comply with the applicable export control laws and regulations and follow the procedures required by such laws and regulations. 10. It is the responsibility of the buyer or distributor of Renesas Electronics products, who distributes, disposes of, or otherwise places the product with a third party, to notify such third party in advance of the contents and conditions set forth in this document, Renesas Electronics assumes no responsibility for any losses incurred by you or third parties as a result of unauthorized use of Renesas Electronics products. 11. This document may not be reproduced or duplicated in any form, in whole or in part, without prior written consent of Renesas Electronics. 12. Please contact a Renesas Electronics sales office if you have any questions regarding the information contained in this document or Renesas Electronics products, or if you have any other inquiries. (Note 1) “Renesas Electronics” as used in this document means Renesas Electronics Corporation and also includes its majorityowned subsidiaries. (Note 2) “Renesas Electronics product(s)” means any product developed or manufactured by or for Renesas Electronics. (2012.4) How to Use This Manual Target Readers This manual is intended for user engineers who wish to understand the functions of the PD78F8024, 78F8025, 78F0754, or 78F0756 in order to design and develop its application systems and programs. Purpose This manual is intended to give users an understanding how to use Applilet EZ for HCD Controller and of the functions described in the Organization below. Organization This manual is broadly divided into the following parts. Overview Installation Startup and termination Applilet EZ for HCD Controller operation Windows reference How to Use This Manual It is assumed that the readers of this manual have general knowledge of electrical engineering, logic circuits, and microcontrollers. To understand the overall functions of Applilet EZ for HCD Controller Read this manual in the order of the CONTENTS. The mark <R> shows major revised points. The revised points can be easily searched by copying an “<R>” in the PDF file and specifying it in the “Find what:” field. To learn the details of the hardware functions of the PD78F8024 Refer to PD78F8024, 78F8025 User’s Manual (U18976E). To learn the details of the hardware functions of the78K0/Ix2 Refer to 78K0/Ix2 User’s Manual (R01UH0010E). To learn the details of the hardware functions of theRL78/I1A Refer to RL78/I1A User’s Manual (R01UH0169E). Conventions Data significance: Higher digits on the left and lower digits on the right Active low representation: (overscore over pin or signal name) Note: Footnote for item marked with Note in the text Caution: Information requiring particular attention Remark: Supplementary information Numerical representation: Binary ... or B Decimal ... Hexadecimal ... H Related Documents The related documents indicated in this publication may include preliminary versions. However, preliminary versions are not marked as such. Documents Related to Devices Document Name Document No. PD78F8024, 78F8025 User’s Manual U18976E 78K0/Ix2 User’s Manual R01UH0010E RL78/I1A User’s Manual R01UH0169E Documents Related to Development Hardware Tools Document Name Document No. PG-FP5 Flash Memory Programmer User’s Manual R20UT0008E 78K0/IA2 PWM Evaluation Board (EZ-0006) User’s Manual ZBB-CE-09-0009-E 78K0/IB2 HBLED Evaluation Board (EZ-0005) User’s Manual ZBB-CE-09-0010-E RL78/I1A DC/DC LED Control Evaluation Board User’s Manual R01UH0363E Caution The related documents listed above are subject to change without notice. Be sure to use the latest version of each document for designing. Documents Related to Development Software Tools Document Name RA78K0 Ver.3.80 Assembler Package User’s Manual Note 1 Document No. Operation U17199E Language U17198E Structured Assembly Language Note 1 78K0 Assembler Package RA78K0 Ver.4.01 Operating Precautions (Notification Document) CC78K0 Ver.3.70 C Compiler User’s Manual Note 2 U17197E ZUD-CD-07-0181-E U17201E Operation U17200E Language Note 2 78K0 C Compiler CC78K0 Ver. 4.00 Operating Precautions (Notification Document) ZUD-CD-07-0103-E SM+Note 3 System Simulator User’s Manual Operation U18601E User Open Interface U18212E ID78K0-QB Ver.2.94 Integrated Debugger User’s Manual Operation U18330E ID78K0-QB Ver.3.00 Integrated Debugger User’s Manual Operation U18492E PM plus Ver.5.20 Note 4 Note 5 PM+ Ver.6.30 U18416E User’s Manual CubeSuite+ V. 2.02.00 User’s Manual Notes 1. U16934E User’s Manual Start R20UT2865E Analysis R20UT2868E Message R20UT2871E RL78 Design R20UT2684E 78K0 Design R20UT2138E RL78, 78K0R Coding R20UT2774E 78K0 Coding R20UT2141E RL78, 78K0R Build R20UT2623E 78K0 Build R20UT0783E RL78 Debug R20UT2867E 78K0 Debug R20UT0731E This document is installed into the PC together with the tool when installing RA78K0 Ver. 4.01. For descriptions not included in “78K0 Assembler Package RA78K0 Ver. 4.01 Operating Precautions”, refer to the user’s manual of RA78K0 Ver. 3.80. 2. This document is installed into the PC together with the tool when installing CC78K0 Ver. 4.00. For descriptions not included in “78K0 C Compiler CC78K0 Ver. 4.00 Operating Precautions”, refer to the user’s manual of CC78K0 Ver. 3.70. 3. The current SM+ version supports only instruction simulation. 4. PM+ Ver. 5.20 is the integrated development environment included with RA78K0 Ver. 3.80. 5. PM+ Ver. 6.30 is the integrated development environment included with RA78K0 Ver. 4.01. Software tool (assembler, C compiler, debugger, and simulator) products of different versions can be managed. Caution The related documents listed above are subject to change without notice. Be sure to use the latest version of each document for designing. Applilet, CubeSuite are a registered trademark of Renesas Electronics Corporation. Windows, Windows Vista, Internet Explorer, and Excel are either registered trademarks or trademarks of Microsoft Corporation in the United States and/or other countries. Pentium is a trademark of Intel Corporation. CONTENTS CHAPTER 1 OVERVIEW........................................................................................................................... 1 1.1 Overview.......................................................................................................................................... 1 1.2 Host Machine, Software, and Hardware Configurations ............................................................ 2 CHAPTER 2 INSTALLATION ................................................................................................................... 4 2.1 Installing Application ..................................................................................................................... 4 2.1.1 Installing Applilit EZ for HCD Controller............................................................................................... 5 2.1.2 Installing compiler, assembler, or integrated development environment and device file ..................... 5 2.1.3 Folder configuration ............................................................................................................................ 6 2.1.4 Windows [start] menu and shortcut icon ............................................................................................. 7 2.2 Installing USB Driver...................................................................................................................... 7 2.3 Uninstall .......................................................................................................................................... 7 CHAPTER 3 STARTING AND ENDING.................................................................................................. 8 3.1 Starting ............................................................................................................................................ 8 3.1.1 Setting up at the first startup ............................................................................................................... 9 3.2 Ending............................................................................................................................................ 10 CHAPTER 4 APPLILET EZ FOR HCD CONTROLLER OPERATION.............................................. 11 4.1 4.2 4.2 4.3 Operation Flow ............................................................................................................................. 11 Setting Up the Evaluation Board ................................................................................................ 12 Setting Up the Evaluation Board ................................................................................................ 13 Mode Setting ................................................................................................................................. 14 4.3.1 Fix mode ........................................................................................................................................... 14 4.3.2 Variable mode ................................................................................................................................... 15 4.3.3 Analog Input mode ............................................................................................................................ 17 4.3.4 Serial Command mode...................................................................................................................... 19 4.3.5 DMX512 mode .................................................................................................................................. 21 4.3.6 DALI mode ........................................................................................................................................ 22 4.3.7 Switch mode...................................................................................................................................... 23 4.3.8 IR Remote controller control mode.................................................................................................... 24 4.4 Generation, Writing, and Evaluation..................................................................................................... 25 CHAPTER 5 WINDOW REFERENCE.................................................................................................... 29 5.1 Overview of Windows and Dialog Boxes................................................................................... 29 5.2 Description of Windows and Dialog Boxes ............................................................................... 30 APPENDIX A SAMPLE FILE.................................................................................................................. 40 A.1 [Reference] Measurement Environment for the Color Temperature...................................... 41 APPENDIX B SERIAL COMMAND MODE COMMUNICATION COMMANDS ................................. 42 Index-1 B.1 Overview of Binary Type............................................................................................................. 42 B.1.1 Details of basic format 1 (host target)........................................................................................... 43 B.1.2 Details of basic format 2 (target host)........................................................................................... 44 B.1.3 Binary type execution example (EV-K0-HCD) .................................................................................. 45 B.2 Overview of ASCII Type .............................................................................................................. 45 B.2.1 Details of basic format 3 (host target)........................................................................................... 46 B.2.2 Details of basic format 4 (target host)........................................................................................... 47 B.2.3 ASCII type execution example.......................................................................................................... 47 B.3 Transmission/Reception Timing According to Communication Method .............................. 48 APPENDIX C DMX512 MODE COMMUNICATION DATA.................................................................. 50 C.1 Protocol Specifications ............................................................................................................... 50 C.2 Communication Data Specification ........................................................................................... 51 APPENDIX D DALI MODE COMMUNICATION DATA ....................................................................... 52 D.1 Protocol Specifications ............................................................................................................... 52 D.2 Transmission/Reception Timing Rules ..................................................................................... 54 APPENDIX E RESERVED AREAS USED IN ON-CHIP DEBUGGING............................................. 55 APPENDIX F 16-BIT TIMER/EVENT COUNTER 00 FUNCTIONS (FOR PD78F8024/78F8025 AND 78K0/Ix2 ONLY) ....................................................... 57 Index-2 R20UT0435EJ1200 Rev. 12.00 Jul 31, 2014 Applilet EZ for HCD Controller Ver. 8.10 CHAPTER 1 OVERVIEW 1.1 Overview Applilet EZ for HCD Controller is a tool used to automatically generate software for microcontrollers for LED lamps and illumination and to write programs. By specifying dimming and the communication mode on the GUI, Applilet EZ for HCD Controller can be used to easily generate the programs that control the software for microcontrollers that control LEDs at a constant current. It can also be used to automatically write the generated software to the flash memory in microcontrollers via a USB cable and to check operation by using an evaluation board. By using Applilet EZ for HCD Controller, the labor hours for controlling LEDs, developing communication software, and checking operation can be significantly reduced. In addition, application systems for LED lamps and illumination that use microcontrollers can be evaluated without microcontroller expertise. <Configuration example> USB cable Evaluation board (EV-K0-HCD, etc.) PC (GUI) R20UT0435EJ1200 Rev. 12.00 Jul 31, 2014 1 Applilet EZ for HCD Controller CHAPTER 1 OVERVIEW 1.2 Host Machine, Software, and Hardware Configurations The host machine, software, and hardware configurations for using Applilet EZ for HCD Controller are shown below. (1) Host machine OS: Windows XPTM (32-bit mode), Windows VistaTM (32-bit mode), Windows 7 (32-/64-bit mode) CPU: Must satisfy the recommended requirements for each OS Memory: Must satisfy the recommended requirements for each OS USB: USB 1.1 interface or later (2) Software Applilet EZ for HCD Controller (this software) Browser: Internet ExplorerTM 6.0 or later Software that can edit CSV files, such as Microsoft ExcelTM Assembler/compiler/integrated development environment/device fileNote 1 <Renesas ElectronicsNote 2> CompilerNote 6: Assembler CC78K0 (Ver. 3.80 or Ver. 4.00) Note 6 RA78K0 (Ver. 3.70 or Ver. 4.01)Note 3 : DF788025 or DF780756 (only when developing a system in PM+)Note 4 Device file: Or Integrated Development Environment: CubeSuite+ CA78K0, CA78K0R <IAR Systems> Integrated development environment: IAR Embedded Workbench CompilerNote 6: IAR C/C++ Compiler for Renesas 78K0 IAR C/C++ Compiler for Renesas RL78 Note 6 Assembler : IAR Assembler for Renesas 78K0 IAR Assembler for Renesas RL78 Note 6 Device file DF-78K0-788025-EE_xxxxxNote 5 : DF-78K0-Ix2-EE_xxxxxNote 5 Note 5 DF-RL78I1A-EE_xxxxx <KPIT (GCC)> GNURL78Note 7 Tool package: Parameter file PRM78F8025········· Parameter file for the PD78F8024, 78F8025 including information of flash memory programming PRM78F0756········· Parameter file for the PD78F0754, 78F0756 including information of flash memory programming Renesas Flash Programmer or WriteEZ5 ········ Software for flash memory programming Board driver ············· Driver used to make the host PC recognize the evaluation board (EV-K0-HCD, etc.) (3) Hardware Evaluation board EV-K0-HCD ············· This is an evaluation board for high-brightness LEDs that uses the PD78F8024. (Shine it) Red, green, blue, and white LEDs are mounted on the board. The LEDs can be controlled in 8-bit resolution by using the constant-current driver IC mounted on the PD78F8024. EV-K0-HCD2 ··········· This evaluation board is the same as the EV-K0-HCD—a board for evaluating highbrightness LEDs—except that it uses the PD78F8025 as the microcontroller unit. R20UT0435EJ1200 Rev. 12.00 Jul 31, 2014 2 Applilet EZ for HCD Controller CHAPTER 1 OVERVIEW EZ-0005··················· This is an evaluation board for high-brightness LEDs that uses the PD78F0756 (78K0/IB2). (78K0/Ix2LED) Red, green, and blue LEDs are mounted on the board. The LEDs can be controlled by using the internal features of the PD78F0756 and an FET without the constant-current driver IC. EZ-0006··················· This is an evaluation board for high-brightness LEDs that uses the PD78F0754 (78K0/IA2). Red, green, blue, and white LEDs can be controlled in up to 16-bit resolution, by using this board with the EZ-0007 (a PD168804 voltage reduction HBLED evaluation board). EZ-0009··················· This is a development kit for the PD78F8024 and 78F8025. This kit consists of a simple on-chip debug emulator and a target board. Up to four LEDs can be controlled by adding circuits to the PD78F8025 mounted on the target board. EZ-0011··················· This is an AC/DC evaluation board that uses the PD78F0756. It can control PFC and up to 3ch of LED. It writes in the microcontroller. MINICUBE2 is used to debug. EZ-0012··················· This is an evaluation board for LEDs that uses the RL78K/I1A. Red, green, and blue LEDs are mounted on the board. The LEDs can be controlled by using the internal features of the L78/I1A and an FET without the constant-current driver IC. RL78/I1A AC/DC······ This is an evaluation unit for the LED power source with the RL78/I1A implemented. It can full digital 3-ch control the power factor correction circuit (PFC) and up to three channels of LED. Writing to LED control unit the microcomputer and debugging are handled by using the on-board USB interface or E1. Notes 1. The supported development environment differs depending on the OS used. 2. When using a software tool made by Renesas Electronics, software can be automatically generated using Applilet EZ for HCD Controller without installing a device file. However, to develop a system in the integrated development environment PM+ by using the generated source file, a device file must be installed. Device file for PD78F8024, 78F8025: DF788025 Device file for PD78F0754, 78F0756: DF780756 3. This includes the integrated development environment PM+. 4. The device file for PM+ is necessary to re-edit or re-compile a source file that was generated by Applilet EZ for HCD Controller in PM+. The device file is not required when using the source file only in Applilet EZ for HCD Controller. 5. “xxxx” indicates the version. 6. Applilet EZ for HCD may not operate depending on the versions of the complier, assembler, and device file. 7. Use e2studio from Renesas as the integrated development environment for GNURL78. Cautions 1. 2. It is recommended that the latest service pack be installed for any OS. Applilet EZ for HCD Controller requires the compiler, assembler, or integrated development environment and device file of an Renesas Electronics or IAR Systems product. Remarks 1. For details about how to obtain compilers, assemblers, integrated development environments, and device files, contact your local Renesas Electronics sales representative. 2. For details of the evaluation boards, refer to each user’s manual. R20UT0435EJ1200 Rev. 12.00 Jul 31, 2014 3 Applilet EZ for HCD Controller CHAPTER 2 INSTALLATION CHAPTER 2 INSTALLATION 2.1 Installing Application The following applications must be installed to use Applilet EZ for HCD Controller. Applilit EZ for HCD Controller Compiler, assembler, or integrated development environment and device fileNote 1 Notes 1. Install one of the following as the compiler, assembler, integrated development environment and device file. Install the device file according to the chip mounted on the evaluation board. <Renesas Electronics> Compiler: CC78K0 (Ver. 3.80 or Ver. 4.00) Assembler: RA78K0 (Ver. 3.70 or Ver. 4.01) Device file: DF788025 or DF780756 (only when developing a system in PM+)Note 2 Or Integrated development environment: CubeSuite CA78K0/Ix2LED <IAR Systems> Integrated development environment: IAR Embedded Workbench Compiler: IAR C/C++ Compiler for Renesas 78K0 IAR C/C++ Compiler for Renesas RL78 Assembler: IAR Assembler for Renesas 78K0 IAR Assembler for Renesas RL78 Device file: DF-78K0-788025-EE_xxxxx DF-78K0-Ix2-EE_xxxxx DF-RL78I1A-EE_xxxxx <KPIT (GCC)> Tool package: GNURL78 2. The device file for PM+ is necessary to re-edit or re-compile a source file that was generated by Applilet EZ for HCD Controller in PM+. The device file is not required when using the source file only in Applilet EZ for HCD Controller. Remark For details about how to obtain compilers, assemblers, integrated development environments, and device files, contact your local Renesas Electronics sales representative. R20UT0435EJ1200 Rev. 12.00 Jul 31, 2014 4 Applilet EZ for HCD Controller CHAPTER 2 INSTALLATION 2.1.1 Installing Applilit EZ for HCD Controller Double-click the AppEZHCD.msi file to start the installation wizard of Applilet EZ for HCD Controller. Click the [Next] button and proceed with the installation by following the instructions that will be displayed in the wizard window. 2.1.2 Installing compiler, assembler, or integrated development environment and device file Install the compiler, assembler, or integrated development environment and device file according to each product manual. Caution After installation, the compiler to be used must be selected. For details, refer to 3.1.1 Setting up at the first startup Compiler setting. R20UT0435EJ1200 Rev. 12.00 Jul 31, 2014 5 Applilet EZ for HCD Controller CHAPTER 2 INSTALLATION 2.1.3 Folder configuration Once the application has been successfully installed, the following folders are copied to the specified installation folder. Figure 2-1. Folder Configuration Installation folder (default: C:\Program Files\Renesas\Applilet EZ for HCD) BaseProject EV-K0-HCD INCLUDE ····· Include file folder OBJ ············· Object file folder SRC ············· Source file folder EZ-0005 INCLUDE OBJ SRC Sample EV-K0-HCD EV-K0-HCD2 xxxx.xml ······· Sample file for board (refer to APPENDIX A SAMPLE FILE for details xxxx.xml of sample files) Tools DEV ········································· Device file folder PRM ········································ Parameter file folder AppEzHCD.exe ··················································· Applilet EZ for HCD Controller executable file board.xml ····························································· Information file of evaluation board (Evaluation board name).bmp ····························· Bitmap data of evaluation board NIConverter.exe ·················································· File internally used by Applilet EZ for HCD Controller R20UT0435EJxxxx_APPLILETEZ.pdf ················· PDF file of user’s manual wez5ctl.dll ···························································· File for flash memory programming Caution The files under BaseProject are internally used by the system. Do not change the folders and files under BaseProject. R20UT0435EJ1200 Rev. 12.00 Jul 31, 2014 6 Applilet EZ for HCD Controller CHAPTER 2 INSTALLATION 2.1.4 Windows [start] menu and shortcut icon When installing of the application has been completed normally, the following folder will be copied into the specified installation folder. Figure 2-2. Windows [start] Menu (Windows XP) The following shortcut icon is displayed on the Windows desktop. Figure 2-3. Shortcut Icon 2.2 Installing USB Driver USB driver is required when using an evaluation board. The USB driver for evaluation board is stated in the disk media provided or in an e-mail message. The first time that the host machine is connected to the evaluation board via the bundled USB cable, Windows’ [Found New Hardware Wizard] appears, prompting for installation of the USB driver. Proceed with the installation by following the windows that will be displayed. 2.3 Uninstall To uninstall Applilet EZ for HCD Controller, C compiler, and assembler, go to the Windows Control Panel and select [Add or remove programs] (in Windows XP). R20UT0435EJ1200 Rev. 12.00 Jul 31, 2014 7 Applilet EZ for HCD Controller CHAPTER 3 STARTING AND ENDING CHAPTER 3 STARTING AND ENDING 3.1 Starting To start Applilet EZ for HCD Controller, go to the Windows [start] Menu and select [All Programs] [Programs] [Applilet EZ for HCD] [Applilet EZ for HCD] (refer to Figure 2-2 Windows [start] Menu (Windows XP)), or double click the shortcut icon on the Windows Desktop (refer to Figure 2-3 Shortcut Icon). Once Applilet EZ for HCD Controller is started, the following Main window opens. Figure 3-1. Main Window When Starting R20UT0435EJ1200 Rev. 12.00 Jul 31, 2014 8 Applilet EZ for HCD Controller CHAPTER 3 STARTING AND ENDING 3.1.1 Setting up at the first startup Compiler setting On [Setting] menu, select [Select Compiler], and then select the compiler name to be used. Compiler folder setting (a) On the [Setting] menu, select [Compiler Folder] to specify the folder in which the compiler to be used is installed. Inputting the path is not usually required because the path is automatically retrieved. If the path is not automatically entered, enter it manually. R20UT0435EJ1200 Rev. 12.00 Jul 31, 2014 9 Applilet EZ for HCD Controller CHAPTER 3 STARTING AND ENDING (b) Specifying the folder in which to save the generated configuration file (*.xml) and the source and project files (*.prj). On the [Setting] menu, select [Project Folder] . The following dialog box will then be displayed. Folder in which to save the generated configuration file (*.xml) . Folder in which to save the source and project files (*.prj) . Change the location where the *.xml and *.prj files are saved as required. (c) Flash programming setting The COM Port connected to the flash memory programmer or the board is specified here. The location for setting will vary depending on the board used. On the [Setting] menu, select [Flash Program…] .The following dialog box will be displayed when menu. If the evaluation board (EZ-0011, etc.) is using MINICUBE2, specify the place where the programming GUI QBProgrammer is installed in “for EZ-0011”. If an evaluation board which has a USB interface (EV-K0-HCD, EV-K0-HCD2, or EZ-00xx) is used, select the connected COM Port in “Other Board” and press the [OK] button. Remark If an evaluation board which has a USB interface is used, leave the setting of step (b) as AUTO, because the COM port will be automatically detected. However, if multiple boards are connected or boards cannot be properly connected, select the COM port to which the boards are connected. 3.2 Ending To exit from Applilet EZ for HCD Controller, go to the Main window’s [File] menu and select [Exit]. R20UT0435EJ1200 Rev. 12.00 Jul 31, 2014 10 Applilet EZ for HCD Controller CHAPTER 4 APPLILET EZ FOR HCD CONTROLLER OPERATION CHAPTER 4 APPLILET EZ FOR HCD CONTROLLER OPERATION This chapter describes the operation flow, from automatically generating object codes (*.hex) by using Applilet EZ for HCD Controller and writing to the flash memory, up to checking operation by using the evaluation board. 4.1 Operation Flow Start Applilet EZ for HCD Controller Setting up at the first startup (refer to 3.1.1) · Compiler · Setting file (*.xml) folder · Project file (*.prj) folder · Flash programming Setting up the evaluation board Menu -> [Project] -> [CPU] Refer to 4.2 Mode setting (to the next page) R20UT0435EJ1200 Rev. 12.00 Jul 31, 2014 11 Applilet EZ for HCD Controller CHAPTER 4 APPLILET EZ FOR HCD CONTROLLER OPERATION Setting up the evaluation board (from the previous page) Mode setting Switch mode Variable mode In this mode, the dimming levels are changed by the switch connected to the board. Refer to 4.3.7 In this mode, LED dimming can be continuously changed. The output pattern can be specified as in art software. Fix mode In this mode, the LEDs are dimmed according to the input fixed values. Select Click the [Edit] button Refer to 4.3.1 DMX512 mode In this mode, the LEDs are dimmed using the DMX512 protocol. Select Menu -> [Project] -> [DMX512] Refer to 4.3.2 Analog Input mode In this mode, the LEDs are dimmed according to the A/D converted values. Refer to 4.3.5, Chapter 5 DALI mode In this mode, the LEDs are dimmed using the DALI protocol. Refer to 4.3.3 Select Serial Command mode In this mode, the LEDs are dimmed by using commands depending on the type of communication. Specify the communication format, communication command type, and channels to use for serial communication. Menu -> [Project] -> [DALI] Refer to 4.3.4 Motion Sensor/Light Sensor mode Refer to 4.3.6, Chapter 5 In these modes, the LEDs are dimmed by using the motion sensor and light sensor connected to the board, respectively. IR remote control mode In this mode, the LEDs are dimmed using the remote control signal reception function on the board. Refer to 4.3.8 Refer to 4.3.9 for Motion Sensor mode Refer to 4.3.10 for Light Sensor mode Refer to 4.3 Caution Some modes may be unavailable, depending on the board specifications. For details, see , the each board s manual. Save the project Generation, writing, and evaluation (refer to 4.4) R20UT0435EJ1200 Rev. 12.00 Jul 31, 2014 12 Applilet EZ for HCD Controller CHAPTER 4 APPLILET EZ FOR HCD CONTROLLER OPERATION 4.2 Setting Up the Evaluation Board In the menu, select [Project] and then [CPU] to set up the evaluation board in the dialog box below. Performing this setup updates the specified mode displayed in the main window. (1) (2) (6) (3) (4) (7) (8) (5) (1) Target: Select the evaluation board to use. (2) Device: If an evaluation board is selected, the mounted microcontroller is displayed. (This setting cannot be changed.) (3) Clock Source: Select the clock to use. This setting might be fixed depending on the setting of (1). (4) Frequency (MHz): Select the frequency. This setting might be fixed depending on the setting of (1) and (3). (5) Channel X: Specify the channels to enable by selecting their [Enable] checkboxes. Specify the color of the lighting of each channel by using the [Color] buttons. These settings might not be selectable or changeable depending on the setting of (1). Enter the max current level of each channel in [Limit]. * This setting may be unavailable, depending on the board. (6) Enable ‘On Chip Debug’.: If this checkbox is selected, a program that enables on-chip debugging is generated. If this setting is specified for the EV-K0-HCD, EV-K0-HCD2, and EZ-0009, UART6 cannot be selected in serial command mode. R20UT0435EJ1200 Rev. 12.00 Jul 31, 2014 13 Applilet EZ for HCD Controller CHAPTER 4 APPLILET EZ FOR HCD CONTROLLER OPERATION (7) All Channel Synchronized.: If this checkbox is selected, the brightness of all selected channels will be the same. If only one channel is selected, this checkbox is disabled. (8) Logarithmic dimming control.: Select this checkbox to logarithmically change the dimming of the LEDs. If this checkbox is not selected, values such as duty factors are handled as direct values. If the checkbox is selected, the specified value is converted to logarithmic value. 4.3 Mode Setting Select a mode to use from Dimmer Program on the main window and set the details. 4.3.1 Fix mode In this mode, the LEDs are dimmed according to the input fixed values. If multiple channels are set to synchronization mode (refer to 4.2 (7)), the duty value can be specified only for channels that have lower numbers. (The duty value cannot be entered for the other channels, but the same duty value applies.) The corresponding [Chx duty] (where x is the channel number) turns black for the other channels to synchronize. <1> Select the [Fixed Duty] button in Dimmer Program (This button is selected by default.). Note <2> Enter a value into the [Ch1] to [Ch4] boxes <3> Click or select a color from the [Select Color] drop-down list. icon or select Menu [File] [Save] to save the project. Note The values that can be entered vary depending on the evaluation board. R20UT0435EJ1200 Rev. 12.00 Jul 31, 2014 14 Applilet EZ for HCD Controller CHAPTER 4 APPLILET EZ FOR HCD CONTROLLER OPERATION 4.3.2 Variable mode In this mode, LED dimming can be continuously changed. The output pattern can be specified as in art software. <1> Select the [Variable] button in Dimmer Program. <2> Click the [Edit] button to open a separate window, shown below. Edit the output pattern in this window. (a) Selecting the channel to operate (b) Selecting the operation mode (c) Editing tools The cursor position and specified values are displayed. Specify the number of data units and speed. R20UT0435EJ1200 Rev. 12.00 Jul 31, 2014 Specify repetition. Field for editing and displaying the brightness curve 15 Applilet EZ for HCD Controller CHAPTER 4 APPLILET EZ FOR HCD CONTROLLER OPERATION (a) Selecting the channel to operate Select the channel to edit. Only channels that can be edited can be selected. Select all channels or individual channels. The brightness curve of a selected channel is displayed as a bold line. (b) Selecting the operation mode Range selection A range can be selected by left-clicking and then dragging the mouse in the brightness mode curve editing field. Editing tools are used for the selected range. Freehand line mode A freehand line can be drawn by left-clicking and then dragging the mouse in the brightness curve editing field. This mode is enabled only if one operation channel is selected. All data of the selected channel is cleared. Clear mode CSV editing mode The brightness values are output to a CSV file and an editing application (the application associated with the extension .csv) starts. Control does not return to Applilet EZ for HCD Controller until the application is closed. (c) Editing tools Turns changes in the values of a selected channel or selected range into a straight Straight line line. The straight line connects the values of the start and end positions in the selected range. Sets the values in the selected range to their maximum specifiable values. Maximization Sets the values in the selected range to their minimum value (0). Minimization Color specification Specifies the color of a value in the selected range from the color specification window. This tool is enabled only if all operation channels and a range are selected. Shifts the values in the selected range to the left, right, up, or down by one point. If Shifting these buttons are clicked while holding down the [Ctrl] key, the values shift in 10point units. Cuts the values in the selected range and temporarily retains them in a buffer. The Cutting cut values can be pasted to any position by using the paste button. This tool is enabled only if one operation channel is selected. Temporarily copies the values in the selected range to a buffer. The copied values Copying can be pasted to any position by using the paste button. This tool is enabled only if one operation channel is selected. Pastes the data temporarily retained in a buffer. The position to which to paste the Pasting data must be selected as a range. Multiple channels can be selected for pasting. Values that were cut or copied when one channel was selected are applied to the values of the selected channels. Undoes the previous operation. This can be used to undo only the most recent Undo R20UT0435EJ1200 Rev. 12.00 Jul 31, 2014 operation. 16 Applilet EZ for HCD Controller CHAPTER 4 APPLILET EZ FOR HCD CONTROLLER OPERATION <3> When editing has been completed, click the [OK] button. <4> Click icon or select Menu [File] [Save] to save the project. 4.3.3 Analog Input mode In this mode, the LEDs are dimmed according to the A/D converted values. R20UT0435EJ1200 Rev. 12.00 Jul 31, 2014 17 Applilet EZ for HCD Controller CHAPTER 4 APPLILET EZ FOR HCD CONTROLLER OPERATION <1> Select the [Analog Input] button in Dimmer Program and specify from the [use] drop-down list the A/D conversion value to be used for the duty. (For the EV-K0-HCD) [each channel] The conversion value of each A/D conversion port is applied to the duty of the corresponding effective channel. <Example> When Channels 1 and 2 are effective ANI0 Channel 1 ANI1 Channel 2 [ANIx only] The conversion value of the selected A/D conversion port is applied to the duty of all effective channels. <Example> When ANI3 is selected and Channels 1 and 2 are effective ANI3 Channels 1, 2 Caution ANIx varies depending on the evaluation board. <2> Set the number of samples to be used in moving average processing. Caution When the number of samples is set to 1, the moving average processing is not performed. icon or select Menu [File] [Save] to save the project. <3> Click Remarks 1. To use this mode, an analog signal source must be connected to the analog input port (ANI) of the microcontroller. For details, refer to the user’s manuals of the microcontroller and evaluation board. 2. The moving average interval is 5 ms. R20UT0435EJ1200 Rev. 12.00 Jul 31, 2014 18 Applilet EZ for HCD Controller CHAPTER 4 APPLILET EZ FOR HCD CONTROLLER OPERATION 4.3.4 Serial Command mode In this mode, the LEDs are dimmed by using commands depending on the type of communication. Specify the communication format, communication command type, and channels to use for serial communication. To use this mode, a host controller for serial communication must be connected to the serial communication port of the evaluation board. For details, refer to the user’s manuals of the microcontroller and evaluation board. For the command of Serial Command mode, refer to APPENDIX B SERIAL COMMAND MODE COMMUNICATION COMMANDS. <1> Select the [Serial Command] button in Dimmer Program and specify from the [by] and [type] drop-down lists the communication mode and communication command system to be used, respectively. [by] Note 1 Select from UART6 UART6 , UART0, SPI, and IIC. Serial communication is performed in this mode by using UART (universal asynchronous receiver transmitter) with the TxD6 or RxD6 pin of the device. UART1 Serial communication is performed in this mode by using UART (universal asynchronous receiver transmitter) with the TxD1 or RxD1 pin of the device. UART0 Serial communication is performed in this mode by using UART with the TxD0 or RxD0 pin of the device. SPI 3-wire serial communication is performed in this mode by using the SI1n, SO1n, or SCK1n pin of the device. The following pins can be used as enabling pins when using the device of the evaluation board as the slave. (For details, see the [CSI Property] dialog box described in CHAPTER 5 WINDOW REFERENCE.) The INTP0, INTP2, or INTP3 pin: EV-K0-HCD, EV-K0-HCD2, and EZ-0009 The SSI11 pin: EZ-0005 and EZ-0006 Remark n = 0: EV-K0-HCD, EV-K0-HCD2, and EZ-0009 n = 1: EZ-0005 and EZ-0006 IIC 2 Serial communication is performed in this mode via the I C (inter-integrated circuit) bus by using the SCLn and SDAn pins of the device. Remark n = 0: EV-K0-HCD, EV-K0-HCD2, and EZ-0009 n = A0: EZ-0005 and EZ-0006 R20UT0435EJ1200 Rev. 12.00 Jul 31, 2014 19 Applilet EZ for HCD Controller [type] CHAPTER 4 APPLILET EZ FOR HCD CONTROLLER OPERATION Note 2 Select from ASCII and BINARY. ASCII Communication by using ASCII codes is performed. BINARY Communication by using binary data is performed. <2> Click Notes 1. icon or select Menu [File] [Save] to save the project. For the EV-K0-HCD, EV-K0-HCD2, and EZ-0009, UART6 cannot be selected when [Enable ‘On Chip Debug’] is checked in the [Board Property] dialog box. 2. Remark [type] can be set only if UART is selected. A program that corrects errors in the internal high-speed oscillation clock frequency is generated when the EV-K0-HCD, EV-K0-HCD2, and EZ-0009 are selected and the CPU clock and communication mode to be used are set as follows. CPU clock: Internal high-speed oscillation clock (Set to “Internal osc.” via the [Board Property] dialog box.) Communication mode: UART0 or UART1 or UART6 (Select the [Serial Command] option button for the Dimmer Program, select “UART0” or “UART1” or “UART6” via [by], and select “ASCII” or “BINARY” via [type].) This correction program calibrates one frame of receive data in the following format immediately after a reset (about 100 ms) when the CPU operates with the internal high-speed oscillation clock and serial communication is to be performed with UART0 or UART6. Accordingly, data for calibration must be transmitted first from the host controller. [Format of data for calibration] 1 data frame Start bit D0 D1 Baud rate: Selected clock Parity bit: None D2 D3 D4 D5 D6 D7 Stop bit Data length: 8 bits (LSB) Stop bit: 1 bit To perform calibration with UART0, connect P00/TI000 and P11/RxD0. UART reception operation can be started after calibration has ended normally. When calibration succeeds in ASCII mode, the welcome message is displayed. R20UT0435EJ1200 Rev. 12.00 Jul 31, 2014 20 Applilet EZ for HCD Controller CHAPTER 4 APPLILET EZ FOR HCD CONTROLLER OPERATION 4.3.5 DMX512 mode In this mode, the LEDs are dimmed by using the DMX512 protocol. For the communication command of DMX512, refer to APPENDIX C DMX512 MODE COMMUNICATION DATA. Note <1> Select the [DMX512] button in Dimmer Program . <2> Push the [Setting] button and then [DMX512…] in the menu, and then specify the channel number. For details about this setting, see the [DMX512 Property] dialog box described in CHAPTER 5 WINDOW REFERENCE. <3> Click icon or select Menu [File] [Save] to save the project. Note For the EV-K0-HCD, EV-K0-HCD2, and EZ-0009, DMX512 cannot be selected with the following settings. When the clock source is set to [Internal osc.] in the [Board Property] dialog box When the CPU clock is set to 4 MHz by selecting UART0 or UART6 via [by] R20UT0435EJ1200 Rev. 12.00 Jul 31, 2014 21 Applilet EZ for HCD Controller CHAPTER 4 APPLILET EZ FOR HCD CONTROLLER OPERATION 4.3.6 DALI mode In this mode, the LEDs are dimmed by using the DALI protocol. DALI (Digital Addressable Lighting Interface) is an international open standard lighting control communication protocol, mainly used for light control of multiple fluorescent lamps or LED lights. For the communication command of DALI, refer to APPENDIX D DALI MODE COMMUNICATION DATA. <1> Select the [DALI] button in Dimmer Program. <2> Open the [DALI Property] dialog box by selecting [Project] and then [DALI…] in the menu, and then specify the channel number. For details about this setting, see the [DALI Property] dialog box described in CHAPTER 5 WINDOW REFERENCE. <3> Click icon or select Menu [File] [Save] to save the project. Caution: When using the GNU GCC compiler in RL78/I1A AC/DC full digital 3-ch LED control unit, values specified for the Factory Burn in parameter in the Memory Bank section defined by IEC62386-102 and values specified for all parameters in the Declaration of variables section except the ROM parameter are not retained when the power to the microcontroller is turned off or the microcontroller is reset. R20UT0435EJ1200 Rev. 12.00 Jul 31, 2014 22 Applilet EZ for HCD Controller CHAPTER 4 APPLILET EZ FOR HCD CONTROLLER OPERATION 4.3.7 Switch mode In this mode, light is controlled depending on the switches connected to the board. Only EZ-0011 can be selected. Each switch number corresponds to an LED channel in EZ-0011. Switch mode has 2 modes. Mode1: Fade mode You can press and hold the switch to gradually raise or lower (fade) the dimming level. Press and release the switch to turn the light ON or OFF. Press and hold to raise/lower the dimming level to the degree to which it is pressed. Mode 2 level dimming mode Go to 1520305010050302015 [%] by pressing down the switch to change the dimming level in steps. R20UT0435EJ1200 Rev. 12.00 Jul 31, 2014 23 Applilet EZ for HCD Controller CHAPTER 4 APPLILET EZ FOR HCD CONTROLLER OPERATION 4.3.8 IR Remote controller control mode In this mode, lights are dimmed by using the on-board function for receiving remote control signals. Remote control signals in the Renesas format can be received. This mode can be selected only for EZ-0012. In this mode, the custom code and data code can be specified as a four-digit and a two-digit hexadecimal respectively. The dimming level is changed as OFF --> 100% --> 50% --> 10% --> OFF every time the remote control code is received. When an evaluation is performed using the infrared remote control function of the lighting communication master evaluation board (EZ-0008), which is optionally available, set the following values based on the channel settings on the master evaluation board. CH01: Custom code = 0x0000. Data code = 0x5AA5 CH02: Custom code = 0x0000. Data code = 0xDA25 R20UT0435EJ1200 Rev. 12.00 Jul 31, 2014 24 Applilet EZ for HCD Controller CHAPTER 4 APPLILET EZ FOR HCD CONTROLLER OPERATION 4.4 Generation, Writing, and Evaluation In the following procedures, object codes (*.hex) are automatically generated and software is written to a microcontroller. After writing has been completed, the operation can be checked by using the evaluation board. The write procedure differs depending on the board used. If the board has a USB interface, first confirm that the PC and USB cable are connected properly. <1> Click the icon to open the Build window. Preparation for generating object codes (*.hex) and writing will be performed. R20UT0435EJ1200 Rev. 12.00 Jul 31, 2014 25 Applilet EZ for HCD Controller CHAPTER 4 APPLILET EZ FOR HCD CONTROLLER OPERATION Remark If an abnormality occurs during object code generation (*.hex) or flash writing, an error code may be displayed. Example: “code = xx” Take the following countermeasures according to the code number (xx) displayed. Code No. Countermeasures 2 Applilet EZ for HCD Controller may not be correctly installed. Reinstall it. 3 Data cannot be written because the folder that should be set via the [Folders...] setting on the [Setting] menu does not exist. Re-set an appropriate folder. 4 The compiler or assembler selected via the [Compiler] setting on the [Setting] menu cannot be found. Check whether the compiler or assembler is correctly selected and installed. If it still cannot be found, reinstall the compiler or assembler. 5 The compiler or assembler selected via the [Compiler] setting on the [Setting] menu is not correctly installed. Reinstall the compiler or assembler. 9 The folder set via the [Folders...] setting on the [Setting] menu or the BASEPROJECT folder in the installation folder of Applilet EZ for HCD Controller is set as a read-only folder. Cancel the read-only setting for the whole folder. 23 This is a system error of the compiler or assembler selected via the [Compiler] setting on the [Setting] menu or the main body of Applilet EZ for HCD Controller. Handle this error by checking the following points. If a read-only folder or file exists under the folder set via the [Folders...] setting on the [Setting] menu, cancel all read-only settings. If the error still cannot be fixed, reinstall the compiler or assembler and the main body of Applilet EZ for HCD Controller. 26 Illegal value of DALI propaty. Details of the error are displayed by text as below. If two or more errors exist, only the first detected error is displayed. "Power-On Level" < "Min. Level“, "Power-On Level" > "Max. Level”, "System Failure Level" < "Min. Level“, "System Failure Level" > "Max. Level" "Min. Level" < "Physical Min. Level“, "Min. Level" > "Max. Level“, "Min. Level" < 1 "Min. Level" > 254, "Max. Level" < "Min. Level“, "Max. Level" > 254, "Max. Level" < 1, "Fade Rate" < 1, "Fade Rate" > 15, "Fade Time" < 1 "Fade Time" >15, "Random Address" < 0x000000, "Random Address" > 0xFFFFFF <2> Writing preparation • If the board has a USB interface Toggle the Program (PROG)/Run (RUN) switch on the evaluation board to “PROG” and then turn the evaluation board off and on (The picture below shows an example of the EV-K0-HCD.). For details, refer to each user’s manual of the evaluation boards. OFF (PROG) ON (RUN) SW1 EV-K0-HCD • If the board is using MINICUBE2 Connect the PC, MINICUBE2 and the board to each other, and turn ON the power of the evaluation board. R20UT0435EJ1200 Rev. 12.00 Jul 31, 2014 26 Applilet EZ for HCD Controller CHAPTER 4 APPLILET EZ FOR HCD CONTROLLER OPERATION <3> Writing • If the board has a USB interface Click OK button and flash programming is started. • If the board is using MINICUBE2 Press the OK button. The flash programmer GUI will start. Follow the flash programmer GUI operation procedure to write in the board. R20UT0435EJ1200 Rev. 12.00 Jul 31, 2014 27 Applilet EZ for HCD Controller CHAPTER 4 APPLILET EZ FOR HCD CONTROLLER OPERATION <4> Operating preparation • If the board has a USB interface When the program has been written normally, toggle the Program (PROG)/Run (RUN) switch to “RUN” and then turn the evaluation board off and on. • If the board is using MINICUBE2 Switch OFF the power of the board, remove the connection of MINICUBE2, and turn ON the power of the evaluation board once again. <5> Operating • For EZ-0011 or RL78/I1A AC/DC Full digital 3ch LED control unit Perform the auto tuning operation (lights all the LEDs of the connected channels) first to check the characteristics of the connected LEDs. To start the auto tuning, push the switch 1 (SW1) after power ON. The operation of auto selected program starts after the auto tuning. If an illegal condition (such as internal overvoltage) occurs, the LEDs are automatically turned off and the operation backs before auto tuning. In that case, push the switch 1 (SW1) again to start again from the auto tuning.Note • For boards other than the above The operation will start immediately when the power is turned ON. Note When protection against the circuit by the comparator is actuated in the RL78/I1A full digital LED control unit, the status lamp will be turned on and off. In such cases, push a reset switch to start an auto tuning again. Caution Since the Write/Execute procedure differs depending on the board used, see the board’s manual for details. Remark When only generating object codes (*.hex), click R20UT0435EJ1200 Rev. 12.00 Jul 31, 2014 icon. 28 Applilet EZ for HCD Controller CHAPTER 5 WINDOW REFERENCE CHAPTER 5 WINDOW REFERENCE 5.1 Overview of Windows and Dialog Boxes The following windows and dialog boxes are provided with Applilet EZ for HCD Controller. Table 5-1. List of Windows and Dialog Boxes in Applilet EZ for HCD Controller Window/Dialog Box Name Main window Description This window is opened automatically when Applilet EZ for HCD Controller is started. This window is used to select and set all functions to be included in the automatically generated object codes. [UART6 Settings] dialog box This dialog box is used to set UART6. [UART1 Settings] dialog box This dialog box is used to set UART1. [UART0 Settings] dialog box This dialog box is used to set UART0. [IIC Property] dialog box This dialog box is used to set IIC. This setting operates only in slave mode. [CSI Property] dialog box This dialog box is used to set SS pin of CSI10. This setting operates only in slave mode. [DALI Property] dialog box This dialog box is used to set DALI. [DMX512 Property] dialog box This dialog box is used to set DMX512. [Board Property] dialog box This dialog box is used to set the evaluation board. For details, refer to 4.2. [Compiler] Select the compiler to be used. For details, refer to 3.1.1. [FLASH Programming Settings] This dialog box is used to set flash programming. dialog box For details, refer to 3.1.1. [Folder Settings] dialog box This dialog box is used to set a folder into which the generated file is to be saved. For details, refer to 3.1.1. R20UT0435EJ1200 Rev. 12.00 Jul 31, 2014 29 Applilet EZ for HCD Controller CHAPTER 5 WINDOW REFERENCE 5.2 Description of Windows and Dialog Boxes The following format is mainly used to describe Applilet EZ for HCD Controller’s windows and dialog boxes. Window/dialog box name The name of the window or dialog box is indicated in this text frame. Next, the window or dialog box’s functions are described briefly and an illustration of the window or dialog box is shown. Menu bar The options that appear in pull-down menus under each item in the window’s menu bar are enumerated and described briefly. Tool bar The functions corresponding to the buttons in the window’s tool bar are described. Description of function-related areas The areas corresponding to functions set via the dialog box are described below. Function buttons The various function buttons in the dialog box are described. Other Operation methods, functions, and other noteworthy items or caution points are described. R20UT0435EJ1200 Rev. 12.00 Jul 31, 2014 30 Applilet EZ for HCD Controller CHAPTER 5 WINDOW REFERENCE Main window This window is opened automatically when Applilet EZ for HCD Controller is started. Setting items (Setting up the evaluation board, mode setting (refer to 4.2 and 4.3), etc.) are sequentially selected in this window to automatically generate object codes (*.hex) that can be directly written to the flash memory of a microcontroller. Figure 5-1. Main Window Menu bar Tool bar Mode setting area Note Setting content display area The following parts of this window are described below. Menu bar Tool bar Note For the mode setting area, refer to 4.3 Mode Setting. R20UT0435EJ1200 Rev. 12.00 Jul 31, 2014 31 Applilet EZ for HCD Controller CHAPTER 5 WINDOW REFERENCE Menu bar (1) [File] menu [Create New] This option is used to create a new setting. Clicking the [Open...] button selects the same function. This option is used to open an existing setting file. Use the dialog box that opens for this option to select the existing setting file (*.xml). Clicking the [Save] button selects the same function. This option is used to save the current settings. Clicking the button selects the same function. [Save as...] This option is used to save the current settings with a newly named. [Exit] This option is used to close Applilet EZ for HCD Controller. (2) [Project] menu [Board...] This option is used to open the [Board Property] dialog box. [UART6...] This option is used to open the [UART6 Settings] dialog box. [UART0...] This option is used to open the [UART0 Settings] dialog box. [IIC..] This option is used to open the [IIC Property] dialog box. [CSI...] This option is used to open the [CSI Property] dialog box. [DALI...] This option is used to open the [DALI Property] dialog box. [DMX512...] This option is used to open the [DMX512 Property] dialog box. [Motion sensor.] This option is used to open the [Motion sensor mode] dialog box. [Light sensor.] This option is used to open the [LightSensor mode] dialog box. (3) [Build] menu [Generate and Build] Executes automatic generation of object codes (*.hex). Clicking the [FLASH Programming] Writes an already generated object codes (*.hex). Clicking the [All procedure] button selects the same function. button selects the same function. Executes automatic generation and writing of object codes (*.hex). For the procedures from generation to writing, refer to 4.4 Generation, Writing, and Evaluation. Clicking the button selects the same function. (4) [Setting] menu [Compiler] Select the compiler to be used. [FLASH Program...] This option is used to open the [FLASH Programming Settings] dialog box. [Folders...] This option is used to open the [Folder Settings] dialog box. R20UT0435EJ1200 Rev. 12.00 Jul 31, 2014 32 Applilet EZ for HCD Controller CHAPTER 5 WINDOW REFERENCE (5) [View] menu [Toolbar] Displays or hides the tool bar and status bar every time this is selected. [Statusbar] (default: display) (6) [Help] menu [Version...] This option is used to display version information about Applilet EZ for HCD Controller. Tool bar The icons on the Tool bar are provided to enable one-click selection of frequently used menu items. This selects the same function as when [Create New] is selected in the [File] menu. This selects the same function as when [Open...] is selected in the [File] menu. This selects the same function as when [Save] is selected in the [File] menu. This selects the same function as when [Generate and Build] is selected in the [Build] menu. This selects the same function as when [FLASH Programming] is selected in the [Build] menu. This selects the same function as when [All procedure] is selected in the [Build] menu. R20UT0435EJ1200 Rev. 12.00 Jul 31, 2014 33 Applilet EZ for HCD Controller CHAPTER 5 WINDOW REFERENCE [UARTx Settings] dialog box This dialog box can be opened by clicking [UARTx...] in the [Project] menu. Set UARTx in this dialog box. The setting items are identical in both dialog boxes. The [UARTx Settings] dialog box is used below as an example. Figure 5-2. [UARTx Settings] dialog box (1) (2) (3) (4) The following parts of this window are described below. Description of function-related areas Function buttons Description of function-related areas (1) Speed: This can be selected from 9,600, 19,200, and 115,200 bps. (2) Data bits: This is fixed to 8 bits and cannot be changed. (3) Parity: This can be selected from None, Odd, and Even. (4) Start bit:, Stop bit: These are fixed to LSB and 1 bit respectively, and cannot be changed. Function buttons Button Description Click this button to save the current settings and close the open dialog box. Click this button to close the open dialog box without saving the current settings. R20UT0435EJ1200 Rev. 12.00 Jul 31, 2014 34 Applilet EZ for HCD Controller Remark CHAPTER 5 WINDOW REFERENCE When the EV-K0-HCD, EV-K0-HCD2, and EZ-0009 are selected and the CPU clock is set to the internal high-speed oscillation clock (fRH), the data received first is used as data for calibration (refer to Remark in 4.3.4 Serial Command mode). The settings made via the [UART6 Settings] or [UART0 Settings] dialog box result in the communication data format after calibration. [IIC Property] dialog box This dialog box can be opened by clicking [IIC...] in the [Project] menu. Set IIC in this dialog box. This setting operates only in slave mode. Figure 5-3. [IIC Property] dialog box (1) (2) The following parts of this window are described below. Description of function-related areas Function buttons Description of function-related areas (1) Operation Mode: This is fixed to Standard (100 kb/s) and cannot be changed. (2) Slave Address: A numeral of 8 to 119 can be entered. 24 is entered by default. Function buttons Button Description Click this button to save the current settings and close the open dialog box. Click this button to close the open dialog box without saving the current settings. Note A half of the value set in the field becomes IIC bus slave address. For example, when 9 is set in the field, the address becomes 7-bit slave address as "0001001." R20UT0435EJ1200 Rev. 12.00 Jul 31, 2014 35 Applilet EZ for HCD Controller CHAPTER 5 WINDOW REFERENCE [CSI Property] dialog box This dialog box can be opened by clicking [CSI...] in the [Project] menu. Set SS pin of CSI10 in this dialog box. This setting operates only in slave mode. Figure 5-4. [CSI Property] dialog box <For the EV-K0-HCD, EV-K0-HCD2, and EZ-0009> < For the EZ-0005> (1) (1) (2) (2) (3) (3) The following parts of this window are described below. Description of function-related areas Function buttons Description of function-related areas (1) SlaveSelect Enable Select this checkbox when using the SS pin function. Items (2) and (3) cannot be set when this checkbox is not selected. (2) Pin Assign For the EV-K0-HCD, EV-K0-HCD2, and EZ-0009, any of INTP0, INTP2, and INTP3 can be selected. For the EZ-0005, this setting is fixed to SSI11. (3) Active Level For the EV-K0-HCD, EV-K0-HCD2, and EZ-0009, either LOW or HIGH can be selected. For the EZ-0005, this setting is fixed to LOW. Function buttons Button Description Click this button to save the current settings and close the open dialog box. Click this button to close the open dialog box without saving the current settings. R20UT0435EJ1200 Rev. 12.00 Jul 31, 2014 36 Applilet EZ for HCD Controller CHAPTER 5 WINDOW REFERENCE [DALI Property] dialog box This dialog box can be opened by clicking [DALI...] in the [Project] menu. Set parameter of DALI in this dialog box. Figure 5-5. [DALI Property] dialog box (1) (2) (3) (4) (5) (11) (6) (7) (8) (9) (10) The following parts of this window are described below. Description of function-related areas Function buttons Description of function-related areas (1) Version Number: Specify the version number of the evaluation board (as a value from 0 to 255). (2) Short Address: Specify the default address of the evaluation board (as a value from 0 to 63 and 255). Caution When the short address is assigned to the same address of the mounted LED channels, a right result may not be acquired in command replies such as Query. (3) Random Address: Specify a value (from 0 to 0xFFFFFF) when assigning a random address to the evaluation board. (4) Physical Min. Level: Specify the minimum dimming level (as a value from 1 to 254) for the evaluation board. R20UT0435EJ1200 Rev. 12.00 Jul 31, 2014 37 Applilet EZ for HCD Controller CHAPTER 5 WINDOW REFERENCE (5) Power-On Level: Specify the dimming level for when turning on power (as a value from 1 to 255). (6) System Failure Level: Specify the dimming level for when a failure occurs (as a value from 0 to 255). (7) Max. Level: Specify the maximum dimming level (as a value from the minimum level to 254). (8) Min. Level: Specify the minimum dimming level (as a value from the physical minimum level to the maximum level). (9) Fade Rate: Specify the amount by which the dimming level is changed by fading (as a value from 1 to 15). (10) Fade Time: Specify the time required for the dimming level to be changed by fading (as a value from 0 to 15). (11) Group Specify the group the evaluation board belongs to. Multiple groups can be specified. Function buttons Button Description Click this button to save the current settings and close the open dialog box. Click this button to close the open dialog box without saving the current settings. R20UT0435EJ1200 Rev. 12.00 Jul 31, 2014 38 Applilet EZ for HCD Controller CHAPTER 5 WINDOW REFERENCE [DMX512 Property] dialog box This dialog box can be opened by clicking [DMX512...] in the [Project] menu. Set channel numbers of DMX512 in this dialog box. Figure 5-6. [DMX512 Property] dialog box (1) (2) The following parts of this window are described below. Description of function-related areas Function buttons Description of function-related areas (1) Channel X Enter a number from 1 to 512 in order to assign each channel to a slot (channel) of the DMX512 protocol. If an existing configuration file is open, the value in that file is displayed. (2) Enable DMX Status Slot. Input the slot (channel) to which to assign the DMX status as a value from 1 to 512. Do not select this checkbox if not using the DMX status slot. The status is valid only for EV-K0-HCD, EV-K0-HCD2, EZ-0009, or EZ-0006. The following operations are performed according to the data of the slot (channel) to which the status is assigned. 0x80 (128): Sets the constant-current driver IC enable signal to low level (the shutdown status). 0x00 (0): Sets the constant-current driver IC enable signal to high level (the enabled status). No operation is performed for other values. Remark The channel 4 and DMX status slot cannot be used for EZ-0005, EZ-0011. Function buttons Button Description Click this button to save the current settings and close the open dialog box. Click this button to close the open dialog box without saving the current settings. R20UT0435EJ1200 Rev. 12.00 Jul 31, 2014 39 Applilet EZ for HCD Controller APPENDIX A SAMPLE FILE APPENDIX A SAMPLE FILE This chapter introduces sample files for specific colors. These sample files are stored in the following folder. C:\Program Files\Renesas\Applilet EZ for HCD\Sample\Board name\ Sample File Name Description Candle_xxxxx.xml Candle light color_temperature_3000K_xxxxx.xml Color temperature 3,000 K color_temperature_3500K_xxxxx.xml Color temperature 3,500 K color_temperature_4200K_xxxxx.xml Color temperature 4,200 K color_temperature_5000K_xxxxx.xml Color temperature 5,000 K color_temperature_6500K_xxxxx.xml Color temperature 6,500 K Flame_of_candle_xxxxx.xml Candle flame Flash_xxxxx.xml Flash Flame_of_Gas_xxxxx.xml Flame of gas Rainbow_xxxxx.xml Rainbow Random_xxxxx.xml Random color Remarks 1. 2. Operation Mode Fix mode Variable mode In the sample file names, “xxxxx” represents the name of an evaluation board. Refer to A.1 [Reference] Measurement Environment for the Color Temperature for measurement environment for the color temperature. 3. Depending on the board, these files may not exist. 4. If the LED being beforehand mounted on a board is changed, the color may be changed. 5. In the condition of ch1 = Red, ch2 = Green, and ch3 = Blue for EZ-0011. R20UT0435EJ1200 Rev. 12.00 Jul 31, 2014 40 Applilet EZ for HCD Controller APPENDIX A SAMPLE FILE A.1 [Reference] Measurement Environment for the Color Temperature Data that was measured in the following environment is used for the color temperature sample file (color_temperature_xxxxxK_) included with Applilet EZ for HCD Controller. < Measurement environment > The whole measurement equipment is set up in a dark room where all outside light is cut off. A color sensor and lighting board are installed perpendicularly. A diffusion board is installed at the intersecting point, tilted at 45. The distance L2 is set up so that the colors of the three LEDs are sufficiently mixed. The status of the mixed colors that is projected on the diffusion board is acquired by the color sensor. The lighting board is installed at a height so that the center of the LEDs and diffusion board are at the same height. Diffusion board L1 15.5 mm Dark room 14.5 mm Color sensor 45° L2 Distance L1 = fixed at 10 mm EZ-0005(78K0/Ix2LED):L2 = 20 mm EV-K0-HCD(Shain it):L2 = 20 mm EZ-0007:L2 = 30 mm Lighting board Caution The above measurement environment is intended for acquiring data to create a sample file and does not guarantee the accuracy or reproducibility of colors. Remark In the above measurement environment, the following multimedia display tester, made by Yokogawa Electric Corporation, is used as the measuring equipment: Multimedia display tester: 3298F (3298 02 (the main unit) + 3298 21 (the color sensor)) R20UT0435EJ1200 Rev. 12.00 Jul 31, 2014 41 Applilet EZ for HCD Controller APPENDIX B SERIAL COMMAND MODE COMMUNICATION COMMANDS APPENDIX B SERIAL COMMAND MODE COMMUNICATION COMMANDS This chapter describes the communication commands used between a host device (such as a PC or a microcontroller) and a target device (the EV-K0-HCD, EV-K0-HCD2, or EZ-00xx evaluation board). An application software that uses the communication commands can be generated by selecting [Serial Command] in the Applilet EZ for HCD Controller and determining the communication method. Refer to 4.3.4 for operation details. Host Machine (PC, microcontroller, etc.) Various communications interfaces Target (EV-K0-HCD, EV-K0-HCD2, EZ-0005, EZ-0006, or EZ-0012 evaluation board) The communication methods that can be selected with the Serial Command mode are UART6, UART0, IIC, and SPI (CSI). With UART, binary types and ASCII types of these communication methods can be selected. With IIC and SPI (CSI), only binary types are supported. Refer to B.1 Overview of Binary Type, B.2 Overview of ASCII Type for details of each type. Refer to B.3 for the timings of each communication method. B.1 Overview of Binary Type Basic format 1 (host target) startcode block command block parameter block startcode startcode R/W startcode ch parameter 8 bits 8 bits 1 bit 5 bits 2 bits 8 bits Basic format 2 (target host) parameter block parameter 8 bits Basic formats 1 and 2 are binary type communication formats. Basic format 1 is used to transmit data from a host device to a target device and consists of a startcode block, a command block, and a parameter block. Basic format 2 is used to transmit data from a target device to a host device and consists of only a parameter block. Details of each block are described below. R20UT0435EJ1200 Rev. 12.00 Jul 31, 2014 42 Applilet EZ for HCD Controller APPENDIX B SERIAL COMMAND MODE COMMUNICATION COMMANDS B.1.1 Details of basic format 1 (host target) startcode block 2 [byte] data, each byte consisting of 8 bits fixed to 0. It is required when transmitting data from a host device to a target device. command block 1 [byte] data consisting of 8 bits. The meaning of each bit is as follows. R/W (1 bit): This bit specifies the flow of information. Whether status acquisition is requested to the target device or an operation status is set to the target device changes, depending on this bit. 1 (READ): This specifies status acquisition (during reception). 0 (WRITE): This specifies setting (during transmission). Command (5 bit): These bits specify the items whose status is to be acquired (during reception) or that is to be set (during transmission). The following two item types exist and their meanings vary, depending on whether they are set to status acquisition (during reception) or setting (during transmission). 01000 (Duty): This item represents the duty. Status acquisition (during reception) = When this command is selected, the target device returns as 1 [byte] data the duty setting value of the channel instructed with “Ch”. Refer to B.1.2 for details. Setting (during transmission) = When this command is selected, the duty of the channel instructed with “Ch” is set by using the value specified by “parameter”. Note 10000 (Status): This item represents the status . Status acquisition (during reception) = Status acquisition (during reception) = When this command is selected, the target device returns as 1 [byte] data the current status. Refer to B.1.2 for details. Setting (during transmission) = When this command is selected, the value specified by “parameter” is used to set the status of the target device. 1000 0000 (0x80): Shutdown (sets the EN pin to low level) 0000 0000 (0x00): Enable status (sets the EN pin to high level) Ch (2 bit): These bits specify the target channel. 00 Channel 1 01 Channel 2 10 Channel 3 11 Channel 4 Note Do not use the status command for EZ-0005, which does not use a constant-current driver IC, because no status acquisition or status specification command is provided in EZ-0005. R20UT0435EJ1200 Rev. 12.00 Jul 31, 2014 43 Applilet EZ for HCD Controller APPENDIX B SERIAL COMMAND MODE COMMUNICATION COMMANDS parameter block 1 [byte] data consisting of 8 bits. This block has no meaning when set to status acquisition (during reception: R/W = 1)Note 1. Specify 0x00 for status acquisition (during reception). When it is set to setting (during transmission: R/W = 0), it has the following meaning according to “Command (5 bits)” of the command block. 01000 (Duty): During duty setting This specifies the duty of the channel instructed with “Ch”. A value within the range of 0 to 0xFF (255) can be specified. 10000 (Status): During status settingNote 2 This specifies the current status of the target device. 1000 0000 (0x80): Shutdown status (sets the EN pin to low level) 0000 0000 (0x00): Enable status (sets the EN pin to high level) Notes 1. 2. This has no meaning but it cannot be omitted. Do not use the status command for EZ-0005, which does not use a constant-current driver IC, because no status acquisition or status specification command is provided in EZ-0005. B.1.2 Details of basic format 2 (target host) parameter block 1 [byte] data consisting of 8 bits. It is not transmitted when the host device has selected setting (during transmission: R/W = 0). When status acquisition (during reception: R/W = 1) has been selected, it has the following meaning according to “Command (5 bits)”. 01000 (Duty): During duty setting This returns as 1 [byte] data the duty setting value of the channel instructed with “Ch”. The duty value holds a value within the range of 0 to 0xFF (255). 10000 (Status): During status settingNote 1 This returns as 1 [byte] data the current status of the target device. The status of the target device is one of the following. 1000 0000 (0x80): Shutdown status (EN pin: low level)Note 2 0000 0000 (0x00): Enable status (EN pin: high level) Notes 1. Do not use the status command for EZ-0005, which does not use a constant-current driver IC, because no status acquisition or status specification command is provided in EZ-0005. 2. Shutdown status during status acquisition occurs due to the following causes. When overheat protection alarm output (SH) of the constant-current driver IC enters an alert state (high level) When Shutdown status has been set by a communication command In both cases, operation or standby input (EN pin) of the constant-current driver IC becomes low level in Shutdown status. R20UT0435EJ1200 Rev. 12.00 Jul 31, 2014 44 Applilet EZ for HCD Controller APPENDIX B SERIAL COMMAND MODE COMMUNICATION COMMANDS B.1.3 Binary type execution example (EV-K0-HCD) 1. Target device status acquisition Transmission from the host device Hexadecimal: Binary: 00 00 C0 00 0000 0000 0000 0000 1100 0000 0000 0000 Reception from the target device (Enable status) Hexadecimal: Binary: 00 0000 0000 2. Setting the duty of channel 1 of the target device to 10 Transmission from the host device Hexadecimal: Binary: 00 00 20 0A 0000 0000 0000 0000 0010 0000 0000 1010 Reception from the target device None 3. Acquiring the duty value of channel 3 of the target device Transmission from the host device Hexadecimal: Binary: 00 00 A3 00 0000 0000 0000 0000 1010 0011 0000 0000 Reception from the target device (duty value = 255) Hexadecimal: Binary: FF 1111 1111 4. Setting the status of the target device to Shutdown Transmission from the host device Hexadecimal: Binary: 00 00 40 80 0000 0000 0000 0000 0100 0000 1000 0000 B.2 Overview of ASCII Type Basic format 3 (host target) ch Comma (0x2C) cmd Comma (0x2C) data LineFeed (0x0D) CarriageReturn (0x0A) 1 byte 1 byte 2 bytes 1 byte 3 bytes 1 byte 1 byte Basic format 4 (target host) data LineFeed (0x0D) CarriageReturn (0x0A) 3 bytes 1 byte 1 byte The ASCII-type communication format uses ASCII characters for transmission and reception, and can be selected only if UART6 or UART0 has been selected as the communication method. Similarly with the binary type, there are two communication formats of the ASCII type. Basic format 3 is used to transmit data from a host device to a target device, consists of a ch block, a cmd block, and a data block, and is delimited by commas. Basic format 4 is used to transmit data from a target device to a host device and consists of only a data block. Furthermore, LineFeed (0x0D) and CarriageReturn (0x0A) are added to each format. R20UT0435EJ1200 Rev. 12.00 Jul 31, 2014 45 Applilet EZ for HCD Controller APPENDIX B SERIAL COMMAND MODE COMMUNICATION COMMANDS B.2.1 Details of basic format 3 (host target) ch block 1 [byte] data. It specifies the channel to be controlledNote 1. Specifiable values: “1”, “2”, “3”, “4” cmd block 2 [byte] data. It can be used to specify for the duty and status of each channel of the target device, status acquisition (during reception) or setting (during transmission). The following four items can be specified. Specifiable items: “wd” Set DutyNote 2 ···········This sets the duty of the channel specified with the “ch” block. “rd” Read DutyNote 2 ········This requests the setting of duty of the channel specified with the “ch” block. “ws” Set Status “rs” Notes 2, 3 Read Status ·····This sets the status of the target deviceNote 1. Notes 2, 3 ··This requests the status of the target deviceNote 1. When requesting to the target device has been specified, the target device returns the current status. Refer to B.2.2 for details. Notes 1. When “status” has been selected for an item of the cmd block, specification of the ch block has no meaning, but it cannot be omitted. Specify fixing to “1”. 2. All items of the cmd block must be expressed by using lowercase characters. Uppercase characters cannot be specified. 3. Do not use the status command for EZ-0005, which does not use a constant-current driver IC, because no status acquisition or status specification command is provided in EZ-0005. data block 3 [byte] data. It has the following meanings according to the items specified with the cmd block. cmd = “wd”Note 1: This specifies as 3 digits in decimal format the value of the duty to be set. (“000” to “255”) cmd = “ws”: This specifies as 3 digits in decimal format the value of the status to be set. Two values can be specified. “128”: Shutdown status (sets the EN pin to low level) “000”: Enable status (sets the EN pin to high level) cmd = “rd” and “rs”Note 1: This specifies “000” with a duty or status request to the target deviceNote 2. Notes 1. Do not use the status command for EZ-0005, which does not use a constant-current driver IC, because no status acquisition or status specification command is provided in EZ-0005. 2. When cmd is “rd” and “rs”, the data block has no meaning, but it cannot be omitted. R20UT0435EJ1200 Rev. 12.00 Jul 31, 2014 46 Applilet EZ for HCD Controller APPENDIX B SERIAL COMMAND MODE COMMUNICATION COMMANDS B.2.2 Details of basic format 4 (target host) data block 3 [byte] data. The data is transmitted from the target device only when cmd is “rd” and “rs”, among the items specified for basic format 3. cmd = “rd”: cmd = “rs” This returns as 3 digits in decimal format the duty value of the specified channel. (“000” to “255”) Note 1 : This returns as 3 digits in decimal format the status state. “128”: Shutdown status (EN pin: low level)Note 2 “000”: Enable status (EN pin: high level) Notes 1. Do not use the status command for EZ-0005, which does not use a constant-current driver IC, because no status acquisition or status specification command is provided in EZ-0005. 2. Shutdown status during status acquisition occurs due to the following causes. When overheat protection alarm output (SH) of the constant-current driver IC enters an alert state (high level) When Shutdown status has been set by a communication command In both cases, operation or standby input (EN pin) of the constant-current driver IC becomes low level in Shutdown status. B.2.3 ASCII type execution example Remark LineFeed (0x0D) and CarriageReturn (0x0A) are expressed as \r and \n, respectively, in this section. 1. Target device status acquisition Transmission from the host device “1,rs,000\r\n” Reception from the target device (Enable status) “000\r\n” 2. Setting the duty of channel 1 of the target device to 10 Transmission from the host device “1,wd,010\r\n” Reception from the target device None 3. Acquiring the duty value of channel 3 of the target device Transmission from the host device “3,rd,000\r\n” Reception from the target device (duty value = 255) “255\r\n” 4. Setting the status of the target device to Shutdown Transmission from the host device “1,ws,128\r\n” Reception from the target device None R20UT0435EJ1200 Rev. 12.00 Jul 31, 2014 47 Applilet EZ for HCD Controller APPENDIX B SERIAL COMMAND MODE COMMUNICATION COMMANDS B.3 Transmission/Reception Timing According to Communication Method The method and timing of transmission and reception differ according to the communication method. The differences of each communication method are as follows. <UARTx (ASCII/BINARY)> In communication using a UART, transmission and reception are performed completely asynchronously. A transmission operation of the target device uses basic format 1 or 3, and occurs only when the host device has requested information acquisition (during reception) to the target device. UART communication example Host transmission pin (TxDNote 1) Target reception 00H STbit D6 D0 D7 SPbit Basic format 1 or 3Note 2 Calibration data Host reception pin (RxDNote 1) Target transmission STbit D6 D0 D7 SPbit Basic format 2 or 4Note 2 100 [ms] CalibrationNotes 3, 4 Host device transmission Target device transmission Notes 1. Name of the signal line on the host side 2. This is a waveform of when parity has been set to “None”. 3. Calibration will be required when using the internal high-speed oscillation for the EV-K0-HCD board. Transmit 00H data after 100 [ms] have elapsed since having started the target device. 4. To perform calibration with UART0, short the RxD0 and P00/TI000 pins. <SPI/CSI> During transmission and reception with the SPI or CSI, the host device is the master device. acquisition (during reception) of the target device, dummy data is transmitted. For information SPI communication example Slave select pin (SSNotes 1, 2) Host clock pin (SCK10Note 3) Host transmission pin (SI10Note 3) Target reception D7 D6 D5 Undefined Undefined Undefined D3 D2 D1 D0 D7 D6 Undefined Undefined D7 D6 Undefined Undefined Maximum 52 [clocks] Host device transmission D4 D3 D2 D1 D0 D1 D0 Dummy data (1 byte)Note 4 Basic format 1 (4 bytes) Host reception pin (SO10 Note 3) Target transmission D5 D5 D4 D3 D2 Basic format 2 (1 byte) Target device transmissionNote 5 Notes 1. Select whether to use an SS pin and which pin to use for the SS pin in [CSI Property] dialog box. Because, for the EV-K0-HCD board, the SS pin is controlled using software, up to 52 cycles of the target system CPU clock are required for the signal status of the SS pin to be recognized and transfer to be enabled. 2. This waveform is an example of when the SS pin is set to LowActive. 3. Name of the signal line on the host side 4. To acquire information by using basic format 2, transmit dummy data of one byte from the host device. 5. In target device transmission, only information acquisition (during reception) occurs for transmission from the host device. R20UT0435EJ1200 Rev. 12.00 Jul 31, 2014 48 Applilet EZ for HCD Controller APPENDIX B SERIAL COMMAND MODE COMMUNICATION COMMANDS <IIC> In communication using an IIC, the host device is the master device. A communication operation such as that shown below is performed for information acquisition (during reception) of the target device. IIC communication example Stop condition Start condition SCL0 SDA0 1 2 7 8 W Address 1 9 D7 ACK 2 D6 Address specificationNote 1 7 D1 8 D0 9 ~ NACK Basic format 1 (4 bytes) Host device transmission Stop condition Start condition 1 ~ 2 7 8 R Address Address specificationNote 1 1 9 ACK D7 2 D6 7 D1 8 D0 9 NACK Basic format 2 (1 byte) Target device transmissionNote 2 Notes 1. Specify the address of the subject target device. 2. When the host device has transmitted a command whose status must be received with basic format 1, communication must be performed by issuing a start condition from the host side, such as shown above for “Target device transmission”. R20UT0435EJ1200 Rev. 12.00 Jul 31, 2014 49 Applilet EZ for HCD Controller APPENDIX C DMX512 MODE COMMUNICATION DATA APPENDIX C DMX512 MODE COMMUNICATION DATA The communication data by DMX512 mode is described below. Host Machine (PC, microcontroller, etc.) Master board (EZ-0008, etc.) DMX communication Target Target Target DMX512 performs communication using the following protocol. C.1 Protocol Specifications <1> Packet One packet is configured of one MTBP, one BREAK, one MAB, 513 frames, and 512 MTBFs. The first frame is a start code and data is fixed to 0. MTBP MAB BREAK Frame (Start code) Frame (Channel 1) Frame (Channel 512) MTBF MTBF Name Data width Level MIN. TYP. MAX. BREAK 88 s 88 s 176 s Low-level MAB 8 s 8 s 1s High-level FRAME 44 s 44 s 44 s MTBF 0 s – 1s High-level MTBP 0 s – 1s High-level R20UT0435EJ1200 Rev. 12.00 Jul 31, 2014 Low-level/High-level 50 Applilet EZ for HCD Controller APPENDIX C DMX512 MODE COMMUNICATION DATA <2> Frame One frame is configured of one start bit, eight data bits, and two stop bits. One frame is equivalent to one UART communication data byte with a baud rate of 250 kbps, no parity, and two stop bits. MTBF 1 data frame Start bit D D D D Name D D D Data width D Stop bits Level Start bit 4 s Data bits 4 s 8 bits Low-level/High-level Stop bits 4 s 2 bits High-level Low-level C.2 Communication Data Specification The frame data bits are LSB first. The start code is fixed to 0x00. Packets with a start code other than 0x00 are invalid. Brightness data corresponding to channels 1 to 4 on the board are set to each frame (0 brightness data 255). If the DMX status is assigned to a channel in the PD78F8024 that has a constant-current driver IC or an evaluation board that uses a constant-current driver IC (EV-K0-HCD or EZ-0006), the following operations are performed depending on the channel data. If 0x80 is received when DMX communication is enabled, DMX communication is shut down. If 0x00 is received when DMX communication is shut down, DMX communication is enabled. Example of communication data (when the DMX status is assigned to channel 5) BREAK Start code MAB (fixed to 0x00H) Channel 1 (brightness level of CH1: 0x00H to 0xFFH) MTBP R20UT0435EJ1200 Rev. 12.00 Jul 31, 2014 Channel 2 (brightness level of CH2: 0x00H to 0xFFH) MTBP MTBP Channel 5 (Enable/ Shutdown: 0x00H/0x80H) Channel 512 MTBP 51 Applilet EZ for HCD Controller APPENDIX D DALI MODE COMMUNICATION DATA APPENDIX D DALI MODE COMMUNICATION DATA The communication data by DALI (Digital Addressable Lighting Interface) mode is described below. Master board (EZ-0008, etc.) Host Machine (PC, microcontroller, etc.) DALI communication Target Target Target Remark The EV-K0-HCD is not supported DALI communication. DALI performs communication using the following protocol. D.1 Protocol Specifications DALI is a network consisting of up to 64 short addresses and 16 group addresses, and performs half-duplex command communication between one master and one slave or multiple slaves. DALI commands are used for purposes such as setting the dimming level with 8-bit accuracy and saving or switching among up to 16 arbitrary dimming levels. The communication speed is 1,200 Hz 10%. <1> Bit definition A falling edge is bit-defined as “0” and a rising edge as “1”, because DALI communication uses Manchester code. If no communication is performed, DALI communication is fixed to the high level. Figure D-1. Bit Definition 1 R20UT0435EJ1200 Rev. 12.00 Jul 31, 2014 1 0 0 1 52 Applilet EZ for HCD Controller APPENDIX D DALI MODE COMMUNICATION DATA <2> Frame Forward frame This is a frame used when transmitting from the master to a slave. A frame consists of 19 bits. Figure D-2. Forward-Frame Structure 1 bit 1 bit a 6 bits 1 bit 8 bits 2 bits c d e f b 8 bits a: Start bit This indicates the start of the frame. It is always the same waveform as “1”. b-d: Address byte This specifies the transmission destination of the frame. e: Data byte f: Stop bits This specifies a command. These indicate the end of the frame. These are fixed to the high level. Backward frame This is a frame used when transmitting from the slave to a master. A frame consists of 11 bits. Figure D-3. Backward-Frame Structure a: Start bit b: Data byte c: Stop bits 1 bit 8 bits 2 bits a b c This indicates the start of the frame. It is always the same waveform as “1”. This replies to the master. These indicate the end of the frame. These are fixed to the high level. R20UT0435EJ1200 Rev. 12.00 Jul 31, 2014 53 Applilet EZ for HCD Controller APPENDIX D DALI MODE COMMUNICATION DATA D.2 Transmission/Reception Timing Rules <1> Timing in the frame 1 bit width in DALI is 833.3 s 10% for both Forward and Backward frames. Figure D-4. Timing in the Frame Start bit Data bit Data bit 833.3 μs 833.3 μs 833.3 μs Data bit 833.3 μs Stop bitsNote 1666.67 μs Note Because there are two stop bits, their timing is 1666.67 s. <2> Timing among frames With DALI, the following timing must be controlled in frame units. Forward frame width: 15.83 ms 10% Backward frame width: 9.17 ms 10% Communication interval between one Forward frame and the Backward frame: 2.92 to 9.17 ms Communication interval between one Forward frame and the next Forward frame: 9.17 ms min. Communication interval between one Backward frame and the next Forward frame: 9.17 ms min. Figure D-5. Timing among frames 9.17 ms 15.83 ms min. Forward frame 2.92 to 9.17 ms Forward frame 9.17 ms Backward frame 9.17 ms min. Forward frame Forward start - Backward start R20UT0435EJ1200 Rev. 12.00 Jul 31, 2014 54 Applilet EZ for HCD Controller APPENDIX E RESERVED AREA USED IN ON-CHIP DEBUGGING APPENDIX E RESERVED AREAS USED IN ON-CHIP DEBUGGING The reserved areas shaded in gray in Figures F-1 and F-2 are used during on-chip debugging. Figure F-1. Reserved Areas Used in On-chip Debugging (PD78F8024) Internal ROM space Internal RAM space 0x03FFH Debug monitor area (381 bytes) Stack area for debugging (16 bytes) 0x0085H 0x0084H Option byte area (5 bytes) 0x0080H 0x007FH Software break area (2 bytes) 0x007EH 0 x 0 0 1 5 H UART6 reception interrupt vector (2 bytes) 0x0014H 0x0003H Debug monitor area (2 bytes) 0x0002H 0x0000H Figure F-2. Reserved Areas Used in On-chip Debugging (78K0/Ix2) Internal ROM space 0x028FH 0x018FH 0x018EH Internal RAM space Pseudo PRM area (128 bytes (MAX.)) Debug monitor area (256 bytes (MIN.)) 0x008FH 0x008EH 0x0085H 0x0084H Security ID setting area (10 bytes) 0x007FH 0x007EH Software break area (2 bytes) 0x0003H 0x0002H Debug monitor area (2 bytes) Stack area for debugging (9 bytes (MAX.)) Option byte area (1 byte) 0x0000H R20UT0435EJ1200 Rev. 12.00 Jul 31, 2014 55 Applilet EZ for HCD Controller APPENDIX E RESERVED AREA USED IN ON-CHIP DEBUGGING Figure F-3. Reserved Areas Used in On-chip Debugging (RL78K/I1A) Code flash memory Internal RAM Use prohibited SFR area Note 1 (512 bytes or 256 bytes Note 2) Stack area for debugging Internal RAM (4 bytes) Note 4 area Mirror area Code flash area : Area used for on-chip debugging 01000H 000D8H 000CEH Debug monitor area (10 bytes) 000C4H Security ID area (10 bytes) On-chip debug option byte area (1 byte) 000C3H 00002H 00000H Debug monitor area (2 bytes) Note 3 Notes 1. Address differs depending on products as follows. Products Address of Note 1 R5F1076C, R5F107AC, R5F107BC 07FFFH R5F107AE, R5F107DE 0FFFFH 2. When real-time RAM monitor (RRM) function and dynamic memory modification (DMM) function are not used, it is 256 bytes. 3. In debugging, reset vector is rewritten to address allocated to a monitor program. 4. Since this area is allocated immediately before the stack area, the address of this area varies depending on the stack increase and decrease. That is, 4 extra bytes are consumed for the stack area used. When using self-programming, 12 extra bytes are consumed for the stack area used. R20UT0435EJ1200 Rev. 12.00 Jul 31, 2014 56 Applilet EZ for HCD Controller APPENDIX F 16-BIT TIMER/EVENT COUNTER 00 FUNCTIONS APPENDIX F 16-BIT TIMER/EVENT COUNTER 00 FUNCTIONS (FOR PD78F8024/78F8025 AND 78K0/Ix2 ONLY) Driver functions are provided for using 16-bit timer/event counter 00 as an interval timer or for pulse width measurement. When using the functions, they must be added to a PM+ (integrated development environment) or SubeSuite+ project. Add TM00Int.c and TM00Int_user.c to the project when using 16-bit timer/event counter 00 as an interval timer, and add TM00PIs.c and TM00PIs_user.c to the project when using 16-bit timer/event counter 00 for pulse width measurement. Cautions 1. 16-bit timer/event counter 00 functions is not support with RL78/I1A. 2. TM00 cannot be used in variable mode or when using UART0 or UART6 for internal high-speed oscillation. 3. 16-bit timer/event counter 00 functions cannot be used while DALI or the EZ-0011 board is used. (1) TM00Int.c void IntervalTimer_init(void) [Processing overview] This function initializes TM00 as an interval timer. After TM00 is initialized, it is stopped, and IntervalTimer_Start() must be called to start it. [Return value] None [Parameter] None [Prototype definition source] TM00Int.h void IntervalTimer_Start(void) [Processing overview] This function starts a count operation of TM00 that has been initialized. Interval interrupts are set to be unmasked and the interrupt handler is set to be called. [Return value] None [Parameter] None [Prototype definition source] TM00Int.h void IntervalTimer_Stop(void) [Processing overview] This function stops the count operation of TM00. Interval interrupts are set to be masked and the interrupt handler is set not to be called. [Return value] None [Parameter] None [Prototype definition source] TM00Int.h unsigned char IntervalTimer_SetInterval( unsigned char ucUnit, unsigned long ulValue ) [Processing overview] This function reflects the interval specified by a parameter to the interval setting-related registers (CR000, PRM00) of TM00. R20UT0435EJ1200 Rev. 12.00 Jul 31, 2014 57 Applilet EZ for HCD Controller APPENDIX F 16-BIT TIMER/EVENT COUNTER 00 FUNCTIONS [Return value] Processing result Successful Failed ... TRUE (1) ... FALSE (0) [Parameter] unsigned char ucUnit ..... Unit of interval setting value UNIT_SEC............1 s UNIT_MILLISEC.......1 ms UNIT_MICROSEC.......1 s UNIT_NANOSEC........1 ns UNIT_FALLING_EDGE...Number of times the falling edge of the TI000 pin is detected UNIT_RISING_EDGE....Number of times the rising edge of the TI000 pin is detected UNIT_BOTH_EDGE...Number of times the rising or falling edge of the TI000 pin is detected unsigned long ulValue ..... Interval setting value [Prototype definition source] TM00Int.h [Remark] A failure will be returned if this function is called while starting TM00. (2) TM00Int_user.c __interrupt void Interval_interrupt( void ) [Processing overview] This is the interval interrupt handler. The processing content is to be described by the user. [Return value] None [Parameter] None [Prototype definition source] TM00Int_user.c (3) TM00Pls.c void PulseMeasure_init(void) [Processing overview] This function initializes TM00 as the pulse width measurement function. After TM00 is initialized, it is stopped, and PulseMeasure_Start() must be called to start it. [Return value] None [Parameter] None [Prototype definition source] TM00Pls.h R20UT0435EJ1200 Rev. 12.00 Jul 31, 2014 58 Applilet EZ for HCD Controller APPENDIX F 16-BIT TIMER/EVENT COUNTER 00 FUNCTIONS void PulseMeasure_Start() [Processing overview] This function starts a count operation of TM00, which has been initialized, in clear & start mode set by inputting the valid edge of the TI000 pin. Interrupts are set to be unmasked by detecting the valid edge of the TI000 pin and the interrupt handler is set to be called. [Return value] None [Parameter] None [Prototype definition source] TM00Pls.h void PulseMeasure_Stop() [Processing overview] This function stops the count operation of TM00. Interrupts are set to be masked by detecting the valid edge of the TI000 pin and the interrupt handler is set not to be called. [Return value] None [Parameter] None [Prototype definition source] TM00Pls.h void PulseMeasure_GetPulseWidth( unsigned long* ulPulseCycle, unsigned long* ulHighWidth, unsigned long* ulLowWidth ) [Processing overview] This function acquires the measured pulse cycle and positive and negative pulse widths. [Return value] None [Parameter] unsigned long* ulPulseCycle ..... Pointer of the area in which the pulse cycle is to be stored unsigned long* ulHighWidth ..... Pointer of the area in which the positive pulse width is to be stored unsigned long* ulLowWidth ..... Pointer of the area in which the negative pulse width is to be stored [Prototype definition source] TM00Pls.h [Remark] The pulse cycle and positive and negative pulse widths are stored in the form of a count value of TM00. Their values must be converted to time values, based on the time of one count of each setting. Time of one count of each setting MEASURE_RANGE_FPRS_1 4 MHz 8 MHz 16 MHz 0.25 s 0.125 s 0.0625 s MEASURE_RANGE_FPRS_2_2 1 s 0.5 s 0.25 s MEASURE_RANGE_FPRS_2_8 64 s 32 s 16 s R20UT0435EJ1200 Rev. 12.00 Jul 31, 2014 59 Applilet EZ for HCD Controller APPENDIX F 16-BIT TIMER/EVENT COUNTER 00 FUNCTIONS (4) TM00Pls_user.c __interrupt void TI000_Capture_Interrupt( void ) [Processing overview] This function calculates the pulse cycle and positive and negative pulse widths, based on the TM00 count values stored in CR000 and CR010. [Return value] None [Parameter] None [Prototype definition source] TM00Pls_user.c R20UT0435EJ1200 Rev. 12.00 Jul 31, 2014 60 Applilet EZ for HCD Controller User’s Manual Ver. 8.30 Publication Date: Rev.1.00 May 1, 2008 Rev.12.00 Jul 31, 2014 Published by: Renesas Electronics Corporation http://www.renesas.com SALES OFFICES Refer to "http://www.renesas.com/" for the latest and detailed information. Renesas Electronics America Inc. 2801 Scott Boulevard Santa Clara, CA 95050-2549, U.S.A. Tel: +1-408-588-6000, Fax: +1-408-588-6130 Renesas Electronics Canada Limited 1101 Nicholson Road, Newmarket, Ontario L3Y 9C3, Canada Tel: +1-905-898-5441, Fax: +1-905-898-3220 Renesas Electronics Europe Limited Dukes Meadow, Millboard Road, Bourne End, Buckinghamshire, SL8 5FH, U.K Tel: +44-1628-585-100, Fax: +44-1628-585-900 Renesas Electronics Europe GmbH Arcadiastrasse 10, 40472 Düsseldorf, Germany Tel: +49-211-6503-0, Fax: +49-211-6503-1327 Renesas Electronics (China) Co., Ltd. Room 1709, Quantum Plaza, No.27 ZhiChunLu Haidian District, Beijing 100191, P.R.China Tel: +86-10-8235-1155, Fax: +86-10-8235-7679 Renesas Electronics (Shanghai) Co., Ltd. Unit 301, Tower A, Central Towers, 555 Langao Road, Putuo District, Shanghai, P. R. China 200333 Tel: +86-21-2226-0888, Fax: +86-21-2226-0999 Renesas Electronics Hong Kong Limited Unit 1601-1613, 16/F., Tower 2, Grand Century Place, 193 Prince Edward Road West, Mongkok, Kowloon, Hong Kong Tel: +852-2265-6688, Fax: +852 2886-9022/9044 Renesas Electronics Taiwan Co., Ltd. 13F, No. 363, Fu Shing North Road, Taipei 10543, Taiwan Tel: +886-2-8175-9600, Fax: +886 2-8175-9670 Renesas Electronics Singapore Pte. Ltd. 80 Bendemeer Road, Unit #06-02 Hyflux Innovation Centre, Singapore 339949 Tel: +65-6213-0200, Fax: +65-6213-0300 Renesas Electronics Malaysia Sdn.Bhd. Unit 906, Block B, Menara Amcorp, Amcorp Trade Centre, No. 18, Jln Persiaran Barat, 46050 Petaling Jaya, Selangor Darul Ehsan, Malaysia Tel: +60-3-7955-9390, Fax: +60-3-7955-9510 Renesas Electronics Korea Co., Ltd. 12F., 234 Teheran-ro, Gangnam-Ku, Seoul, 135-920, Korea Tel: +82-2-558-3737, Fax: +82-2-558-5141 © 2014 Renesas Electronics Corporation. All rights reserved. Colophon 3.0 Applilet EZ for HCD Controller Ver. 8.30 R20UT0435EJ1200