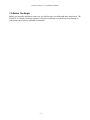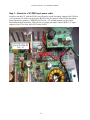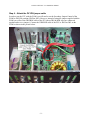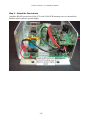
1
CarNetix CNX-P5V V1.2 Installation Manual
CarNetix CNX-P5V DC-DC Regulator
(applies to Version 1.0+ hardware)
Installation and Operation Manual
Version 1.2
2/16/07
-1-
CarNetix CNX-P5V V1.2 Installation Manual
Table of Contents
1.0 CNX-P5V Introduction................................................................................................................... 3
1.1 Overview..................................................................................................................................... 3
1.3 Before You Begin ....................................................................................................................... 5
2.0 Installing Your CNX-P5V .............................................................................................................. 6
2.1 Installing the CNX-P5V in a CNX-P1900.................................................................................. 6
Step 1 – Remove the P1900 Lid ................................................................................................... 6
Step 2 – Bolt the P5V to the P1900 Chassis ................................................................................. 6
Step 3 – Attach the +12V RED input power cable ....................................................................... 8
Step 4 – Attach the DLYON jumper cable ................................................................................... 9
Step 5 – Attach the Ground wire................................................................................................. 10
Step 6 – Attach the +5V output wires......................................................................................... 11
Step 7 – Replace the Lid ............................................................................................................. 11
2.2 Installing the P5V in a CNX-P2140.......................................................................................... 12
Step 1 – Remove the P2140 Lid ................................................................................................. 12
Step 2 – Bolt the P5V to the P2140 Chassis ............................................................................... 12
Step 3 – Attach the +12V RED input power cable ..................................................................... 14
Step 4 – Attach the DLYON jumper cable ................................................................................. 15
Step 5 – Attach the Ground wire................................................................................................. 16
Step 6 – Attach the +5V output wires......................................................................................... 17
Step 7 – Replace the Lid ............................................................................................................. 18
Alternate Mounting Locations .................................................................................................... 18
2.3 Installing the P5V in a Stand-Alone POL Application............................................................. 19
2.3.1 Heat Dissipation of the Regulator IC................................................................................. 19
2.3.2 Wiring the P5V as a Stand-Alone POL Regulator............................................................. 20
2.4 Installing the P5V in a CarNetix P1280 or P1290 .................................................................... 22
Step 1 – Remove the Lid............................................................................................................. 22
Step 2 – Bolt the P5V to the Chassis .......................................................................................... 22
Step 3 – Attach the +12V RED input jumper cable.................................................................... 22
Step 4 – Attach the DLYON jumper cable ................................................................................. 23
Step 5 – Attach the Ground wire................................................................................................. 23
Step 6 – Attach the +5V output wires......................................................................................... 23
Step 7 – Replace the Lid ............................................................................................................. 23
-2-
CarNetix CNX-P5V V1.2 Installation Manual
1.0 CNX-P5V Introduction
1.1 Overview
The P5V can provide 3+ amps for power hungry USB devices like Audigy 2NX sound card, WiFi,
and GPS devices. The P5V is a "bolt-on" upgrade that requires no soldering when installed in the
P1900 or the P2140. It is also controlled by the DLYON control of the P1900/P2140 so that you can
safely power down your USB devices when you ignition is off. Alternatively, the P5V can be used
as a stand-alone Point-Of-Load (POL) regulator in non-P1900/P2140 applications, or in conjunction
with the CNX-P1290 to add an additional +5V/3A output.
Features
•
•
•
•
•
15 Watt Regulator (+5V @ 3+ Amps)
Installs inside P1900 or P2140 using just a Phillips screwdriver
Can be used in non-P1900/P2140 applications as a stand-alone POL regulator.
Output is controlled by the DLYON signal from the P1900/P2140 so that USB devices are
powered off when the ignition is turned off.
Very compact design (.86" x 1.5", 22cm x 39cm)
The P5V is a small (.86" x 1.5", 22cm x 39cm) board that can be mounted inside the P1900 or P2140
to take advantage of the heat dissipation capabilities of the chassis and fan. In non-P1900/P2140
applications, the P5V can either be mounted on an existing metal chassis (ie your CarPC or car
chassi), or you can add a small, inexpensive heatsink (see below) to use the P5V in an un-mounted
application.
-3-
CarNetix CNX-P5V V1.2 Installation Manual
The P5V runs quiet and cool while easily providing
over 3 amps of current: plenty for both a powered
USB hub and its USB devices AND a USB
soundcard. The P5V contains a thermal shutdown
feature which automatically activates if you
attempt to draw too much current.
The P5V installs easily into the P1900 or P2140
using only a Phillips screwdriver. The output wires
may be attached to your existing hub power cable
by simply connecting two wires.
The P5V can also be used as a stand-alone Point Of
Load (POL) regulator for +5V devices. For
applications that require more than about 1 amp, a
small heatsink will be required (16 degC/Watt).
Below is an example of an Aavid/Thermalloy (HS230) available from DigiKey for about $.50.
Alternatively, the P5V could be attached to an
existing metal chassis (the P5V mounting tab is at
ground potential) instead of using a dedicated
heatsink.
Here is an example of wiring two USB devices
(powered USB hub and Audigy 2NX USB sound
card) using modular Radio Shack cabling and barrel
connectors. The Radio Shack DC power cable has
been soldered directly to the P5V in this example.
-4-
CarNetix CNX-P5V V1.2 Installation Manual
1.3 Before You Begin
Before you begin the installation, make sure you take the time to read through these instructions. The
CNX-P5V is a simple switching regulator, but proper installation is required to prevent damage to
your system and to achieve optimum performance.
-5-
CarNetix CNX-P5V V1.2 Installation Manual
2.0 Installing Your CNX-P5V
2.1 Installing the CNX-P5V in a CNX-P1900
The P5V can easily be installed inside the CNX-P1900 using only a Phillips screw driver.
Step 1 – Remove the P1900 Lid
Remove the lid of the P1900 by removing the 4 lid mounting screws. Now would be a good time to
make any P1900 jumper settings since the jumpers will be somewhat hard to adjust after the P5V is
mounted.
Step 2 – Bolt the P5V to the P1900 Chassis
Bolt the mounting tab of the regulator IC to the INSIDE of the P1900 chassis at the LOWEST point
in the FIRST slot of the chassis nearest J1 (6-pin power input connector on the P1900) using the
supplied #4-40 screw, lock washer, and nut. Make sure the P5V is as far down in the slot as possible
so that it does not interfere with the chassis lid and fan. Tighten the nut so that the mounting tab of
the regulator IC is firmly pressing against the wall of the P1900 chassis. The regulator IC DOES
NOT need to be insulated since the tab is at GROUND voltage potential.
-6-
CarNetix CNX-P5V V1.2 Installation Manual
The P5V PCB should be mounted
with the TOP of the regulator IC
pointing DOWN as shown below.
The white lettering of the P5V
PCB will be facing UP as shown
here.
Now, thread the P5V output wires
(RED & BLACK) out of the side
of the chassis so that they are
accessible when you replace the
lid.
-7-
CarNetix CNX-P5V V1.2 Installation Manual
Step 3 – Attach the +12V RED input power cable
In order to use the P5V with the P1900 you will need to set the Secondary Output of the P1900 to
+12V operation. To do this you must move BOTH of the JP5 jumpers of the P1900 (Secondary
Power Input Select jumpers…IMPORTANT!) to the +12V setting position (see the P1900
Installation Manual for details). This will leave 2 jumper pins open. Connect RED +12V input
jumpers of the P5V to Pins 1&2 of JP5 on the P1900.
-8-
CarNetix CNX-P5V V1.2 Installation Manual
Step 4 – Attach the DLYON jumper cable
In order to use the P5V with the P1900 you will need to set the Secondary Output Control of the
P1900 to DLYON position (JP4 Pins 2&3). However, instead of using the jumper supplied with the
P1900 you will use the GRN/BLK cable of the P5V (these GRN & BLK wires are connected
together and act as a jumper). Connect the GRN/BLK cable of the P5V to JP4 Pins 2&3 on the
P1900 as shown in the picture below.
-9-
CarNetix CNX-P5V V1.2 Installation Manual
Step 5 – Attach the Ground wire
Attach the BLACK ground wire of the P5V to the P1900 PCB mounting screw as shown below.
Bend the metal connector upward slightly.
- 10 -
CarNetix CNX-P5V V1.2 Installation Manual
Step 6 – Attach the +5V output wires
Now you can attach your +5V devices
to the RED/BLACK output wires of
the P5V.
USB hubs and devices come
with various sized power
connectors. Radio Shack has a
particularly good selection of
plugs and adapters that will fit
most USB devices. Shown
here is an example of the
Radio Shack adapters
connecting an Audigy 2NX
sound device plus a Belkin
USB hub. In this example the
RED/BLK output wires from
the P5V have been replaced by
the Radio Shack Adaptaplug
Socket (273-1743) to allow
easy removal of the P1900.
Step 7 – Replace the Lid
Route the P5V wires so that they do not touch the fan or become pinched in the lid. Replace the lid
and 4 mounting screws. Double check your wiring to make sure it is not touching the fan blades.
This completes the installation of the P5V in the P1900.
- 11 -
CarNetix CNX-P5V V1.2 Installation Manual
2.2 Installing the P5V in a CNX-P2140
The P5V can easily be installed inside the CNX-P2140 using only a Phillips screw driver.
Step 1 – Remove the P2140 Lid
Remove the lid of the P2140 by removing the four lid mounting screws. Now would be a good time
to make any P2140 jumper settings since the jumpers will be somewhat hard to adjust after the P5V
is mounted.
Step 2 – Bolt the P5V to the P2140 Chassis
Bolt the mounting tab of the regulator IC to the INSIDE of the P2140 chassis at the LOWEST point
in the FIRST slot of the chassis nearest J1 (6-pin power input connector on the P2140) using the
supplied #4-40 screw, lock washer, and nut. Make sure the P5V is as far down in the slot as possible
so that it does not interfere with the chassis lid and fan. Tighten the nut so that the mounting tab of
the regulator IC is firmly pressing against the wall of the P2140 chassis. The regulator IC DOES
NOT need to be insulated since the tab is at GROUND voltage potential.
- 12 -
CarNetix CNX-P5V V1.2 Installation Manual
The P5V PCB should be
mounted with the TOP of
the regulator IC pointing
DOWN as shown below.
The white lettering of the
P5V PCB will be facing UP
as shown here.
Now, thread the P5V output
wires (RED & BLACK) out
of the side of the chassis so
that they are accessible when
you replace the lid.
- 13 -
CarNetix CNX-P5V V1.2 Installation Manual
Step 3 – Attach the +12V RED input power cable
In order to use the P5V with the P2140 you will need to set the Secondary Output of the P2140 to
the “Config 2” settings (see the P2140 Installation Manual Page 11 Figure 2 for details). To do this
you must move BOTH of the JP4 jumpers of the P2140 (Secondary Power Input Select
jumpers…IMPORTANT!) to the “Config 2” setting position. This will leave the two jumper pins
closest to the heat sink of the Secondary Output regulator open. Connect RED +12V input jumpers
of the P5V to the open pins (closest to the heat sink) of JP2 on the P2140.
Connect jumper to the two open
pins closest to the heat sink
Make sure BOTH JP4 jumpers
are in the “Config 2” position
- 14 -
CarNetix CNX-P5V V1.2 Installation Manual
Step 4 – Attach the DLYON jumper cable
Connect the GRN/BLK cable of the P5V to JP3 Pins 9&10 on the P2140 as shown in the picture
below. The orientation of the GRN/BLK plug does not matter (ie no poloarity). It can be plugged in
either way.
Connect Green/Black wire to
JP3 pins 9&10
(leftmost pins in this photo).
Polarity does not matter.
- 15 -
CarNetix CNX-P5V V1.2 Installation Manual
Step 5 – Attach the Ground wire
Attach the BLACK ground wire of the P5V to the mounting screw for the Secondary Output
regulator heatsink as shown below. Be careful to keep the wire close to the PC board to prevent it
from interfering with the fan.
Attach the Black ground wire to
the screw on the Secondary
Output regulator heatsink
- 16 -
CarNetix CNX-P5V V1.2 Installation Manual
Step 6 – Attach the +5V output wires
Now you can attach your +5V devices to
the RED/BLACK output wires of the P5V.
USB hubs and devices come with
various sized power connectors.
Radio Shack has a particularly
good selection of plugs and
adapters that will fit most USB
devices. Shown here is an
example of the Radio Shack
adapters connecting an Audigy
2NX sound device plus a Belkin
USB hub. In this example the
RED/BLK output wires from the
P5V have been replaced by the
Radio Shack Adaptaplug Socket
(273-1743) to allow easy
removal of the P2140.
- 17 -
CarNetix CNX-P5V V1.2 Installation Manual
Step 7 – Replace the Lid
Route the P5V wires so that they do not touch the fan or become pinched in the lid. Replace the lid
and 4 mounting screws. Double check your wiring to make sure it is not touching the fan blades.
This completes the installation of the P5V in the P2140.
Alternate Mounting Locations
In order to make it easier to get access to the JP3 for changing jumpers or upgrading firmware, the
P5V may be mounted in alternative locations on the P2140 chassis. Below is an example of
mounting the P5V on the lid of the chassis. Several other locations are possible as long as the tab of
the P5V regulator is firmly attached to the metal chassis of the P2140 and its wires do not interfere
with the operation of the fan. It is highly recommended that the Black ground wire be attached to
some point on the main chassis (not the lid) so that the P5V will operate properly with the lid
removed.
- 18 -
CarNetix CNX-P5V V1.2 Installation Manual
2.3 Installing the P5V in a Stand-Alone POL Application
2.3.1 Heat Dissipation of the Regulator IC
The P5V can be used as a stand-alone (not installed inside a P1900/P2140) Point of Load (POL)
regulator for powering +5V devices. When using the P5V as a stand-alone POL you will need to
make sure there is adequate heat dissipation for the
regulator IC. If your connected +5V devices consume
less than 1 amp the P5V can operate without a heat sink.
However, if your +5V devices consume greater than 1
amp you will need to attach a heat sink to the mounting
tab of the regulator IC. You can either use a small,
finned heatsink such as the Aavid/Thermalloy
530613b00000 shown here. This type of heatsink is
available from companies such as Radio Shack (2761363) and DigiKey (HS320-ND).
Other heatsinks can be used as long as they are rated for
Figure 1 Aavid/Thermalloy
16degC/W or better (lower). This heatsink will allow the
530613b00000
P5V to operate at maximum power (3 amps) at an
ambient temperature of 60degC. The heatsink will become very hot to the touch at maximum load.
Please be careful not to touch it or let it come in contact with plastic or flammable materials.
A preferred method of heatsinking the P5V would be to mount the regulator mounting tab to an
existing metal chassis, such as an existing PSU, CarPC, or car chassis. This technique offers the best
thermal dissipation and would simplify mounting and wiring. The regulator mounting tab DOES
NOT need to be insulated since it operates at GROUND voltage potential.
- 19 -
CarNetix CNX-P5V V1.2 Installation Manual
2.3.2 Wiring the P5V as a Stand-Alone POL Regulator
The figure below shows the inputs and outputs of the P5V. When connecting to the P5V in a standalone POL configuration you will need to remove the two black connectors on the RED/RED and
the GRN/BLK wires to make your connections.
The wire functions are as follows:
1) The RED/BLK is the +5V output and should be connected to your +5V devices.
2) The GRN/BLK is the ON/OFF control of the P5V. Even though there are two wires of
different colors, these wires are connected to each other and represent ONE wire/function.
When connecting to this wire you only need to connect to ONE of the wires. It does not
matter which wire you use. To turn the P5V ON you need to apply a positive voltage
between +5V and +12V to this wire. To turn the P5V OFF you need to apply 0V to this wire.
If you want the P5V to come ON when you power your CarPC system, simply run a small
wire to the +5V or +12V output of your PSU. If you want to control the P5V manually, you
can run a small wire to a toggle switch that is connected to your car battery. If you want the
P5V to be ALWAYS ON, you can connect this wire to the RED/RED battery input wire. Use
caution if doing this so that you don’t drain your battery!
3) The RED/RED wire is the +12V battery input to the P5V. Make sure that there is a fuse (510A) in this line somewhere near your battery, or tap off of an already-fused line feeding
- 20 -
CarNetix CNX-P5V V1.2 Installation Manual
other devices. This wire should be sized to carry 3+ amps under full load (~18GA if runs are
less than 12 feet. Use 14GA if longer than 12 feet).
4) The BLK wire is the battery GROUND wire for the P5V and should be connected to your
CAR CHASSIS as the return path for the +12V battery input.
- 21 -
CarNetix CNX-P5V V1.2 Installation Manual
2.4 Installing the P5V in a CarNetix P1280 or P1290
The P5V can be installed in the P1280 or P1290 in a similar fashion as described in Section 2.1
(“Installing the CNX-P5V in a CNX-P1900”).
Step 1 – Remove the Lid
Same as P1900.
Step 2 – Bolt the P5V to the Chassis
Same as P1900.
Step 3 – Attach the +12V RED input jumper cable
Cut off the black jumper connector on the end of the two RED input wires and solder them to the
+12V input pin (Pin 4) of the J1 power input connector on the P1280/90 as shown below. It may be
easier to solder these wires with the fuse removed.
- 22 -
CarNetix CNX-P5V V1.2 Installation Manual
Step 4 – Attach the DLYON jumper cable
Same as P1900, however the jumper header J4 is oriented slightly differently than the P1900. Here is
a picture. The P5V shown is an early prototype with wires exiting the top of the PCB instead of the
bottom (as in the production units). We have also shown a Radio Shack modular power cable
attached to the P5V output instead of production RED/BLACK +5V output wires.
Step 5 – Attach the Ground wire
Same as P1900.
Step 6 – Attach the +5V output wires
Same as P1900.
Step 7 – Replace the Lid
Same as P1900.
- 23 -