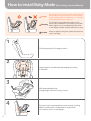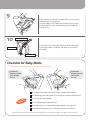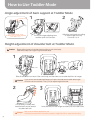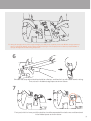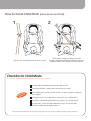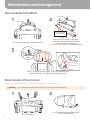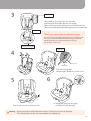
1
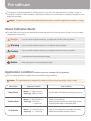
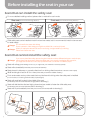
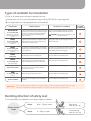
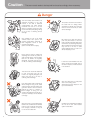
First 7
Car-seat Manual
First 7
Car-seat Manual
Table of contents
For safe use
1
About Indicative Marks
Conditions of children, who can use this product
1
1
Before installing safety seat in your car
Seats that can install the safety seat
Seats that cannot install the safety seat
Types of seatbelts for installation
Deciding direction of safety seat
Notes
Name of each part
Adjustment method
How to adjust angle
How to adjust shoulder belt
How to use buckle
How to use locking lever
How to adjust height of headrest
How to Use Baby Mode
Age, weight and height of baby for Baby Mode
Angle adjustment of back support at Baby Mode
Height adjustment of shoulder belt at Baby Mode
Height adjustment of headrest at Baby Mode
Back support cushion and inner seat at Baby Mode
How to install Baby Mode (Forward facing / front installment)
Checklist for Baby Mode
How to Use Toddler Mode
Age, weight and height of baby for Toddler Mode
Angle adjustment of back support at Toddler Mode
Height adjustment of shoulder belt at Toddler Mode
How to use shoulder pad at Toddler Mode
Height adjustment of headrest at Toddler Mode
Back support cushion and inner seat at Toddler Mode
How to install Toddler Mode (Rear facing / rear installment)
Checklist for Toddler Mode
How to Use Child Mode
Age, weight and height of baby for Child Mode
Separation and storage for Child Mode
How to install Child Mode (How to use seat belt)
Checklist for Child Mode
Maintenance and management
How to detach headrest
How to take off seat cover
2~5
2
2
3
3
4~5
6~7
8 ~ 12
8
9
10
11
12
13 ~ 18
13
14
14
15
15
16 ~ 18
18
19 ~ 26
19
20
20
21 ~ 22
23
23
24 ~ 26
26
27 ~ 31
27
28 ~ 30
31
31
32 ~ 35
32
32 ~ 33
* Warning : Warning label (yellow label) stuck in the front of sewing work cannot be detached.
This company does not take any responsibilities for its detachment.
For safe use
This product is safety equipment for children used in cars, which will reduce shocks to children in case of
accidents. However, it cannot perfectly (100%) save children from some cases, so please drive safely to not to
cause any accident.
Caution To install it correctly and use it effectively, please read this manual thoroughly before installation or usage.
About Indicative Marks
To use it safely, this manual has specified important indications to follow with marks. Since it is for your safety,
please follow instructions;
Danger
If you do not follow given instructions, you might lose your life or seriously injured.
Warning
If you do not follow given instructions, you might be seriously injured.
Caution
If you do not follow given instructions, you might be insured or cause an accident.
tion
ple d
Comhecke
C
Advice
A checklist that must be checked for safety.
Basic instructions for safe and pleasant usage.
Application condition (children who are suitable for this product)
Do not use this product for children who cannot fulfill following conditions.
Caution This safety equipment is designed for children from birth to those with weight of 25kg or under.
Classification
Application condition
Other conditions
Baby Mode
Weight : 0~13kg (Group 0)
Target age : Newborn infant
Protect head of the baby by installing rear facing.
Toddler Mode
Weight : 9~18 kg (Group 1)
Target age : 12 months
~ 5 years old
Use for forward facing.
Baby’s head should not go out the back of seat
when the baby seats on the safety seat.
Child Mode
Weight : 15~25 kg (Group 2)
Target age : 4 ~ 7 years old
Take off inner seat and 5-point belt of the child
safety seat and then use belt of the car.
1
Before installing the seat in your car
Seats that can install the safety seat
For more detailed installing method, please refer to method for each mode.
Rear seat (arrow shows the driving direction)
Rear facing
Forward facing
Front seat (arrow shows the driving direction)
Rear facing
Forward facing
Child safety seat can be installed in both front and rear seats, but it is recommend to install in the rear seat
for better safety.
Danger Do not install in the seats with airbag.
Due to operation of the airbag you might lose child’s life or seriously injured.
Danger When you equip the seat at front seat in rear facing, it might interfere your driving.
Please use it at the rear seat.
Seats that cannot install the safety seat
If you cannot install the safety seat as the given instruction due to different belt type or seat’s shape,
Danger please install it at other seats. When the safety seat is not properly installed as the instruction,
you might lose child’s life or seriously injured when the car crashes or suddenly stops.
Seats with airbag (when airbag comes out, you might lose your child’s life or seriously injured)
Seats without seatbelt (Child safety seat cannot be fastened)
Seats placed in sideways or opposite directions from driving directions (Difficult to absorb crash impact)
Width and length of seat is 45 cm or less (Child safety seat will be installed unstably)
Front center seats and any other seats that may interfere with driving when the safety seat is installed
(In some cases, it is hard to guarantee safety of passengers)
Seats with seat belt located in the middle of the seat
(Child safety seat cannot be fastened strongly) refer to drawing①
Seats with belt buckles that are highly placed and are unable to fasten the child safety seat
(Child safety seat cannot be fastened) refer to drawing②
Seats with 2-point seatbelt (Child safety seat cannot be fastened) refer to drawing③
①
2
②
③
Types of seatbelts for installation
☆ First of all, please check the type of seat belt in the car.
Please use it only for 3-point seat belt that is approved by ECE NO16 or same regulation.
This safety seat cannot be equipped with 2-point seat belt.
Classification
Special features
ELR.ALR
In general, ELR belt will fix the safety seat, but if
you take out the entire belt, ALR function will be
started, which will be automatically fastened.
Also, when all the belts are fastened, ELR
function will start.
Fasten the child safety seat firmly, and then
take out all the seatbelt to start ALR function.
In general, belt will fasten and unfasten freely,
but the belt will not move when it detects any
shock (such as sudden stop).
Child safety seat should be tightly fastened
with locking lever.
If you stop your hand while taking out the belt,
the belt will be automatically locked up and will
not be pulled out.
In order to fix child safety seat, take out the belt
as much as required at once. Then, secure
child safety seat with locking lever.
ELR safety belt without shoulder part.
Cannot install the child safety seat.
No fastening option, but instead, adjust the
length of belt after pulling out the whole belt.
Cannot install the child safety seat.
A system that will automatically fasten up the
belt when the door is closed and unfasten
when the door is open.
Cannot install the child safety seat.
2-point safety belt
( manual )
Safety belt without fastening function.
Cannot install the child safety seat.
All other seatbelt
All other types of seatbelt that are not stated in
this table.
Cannot install the child safety seat.
3-point safety belt
(
Precautions for installation
Belt fastening equipment
with safety seat installation
function
)
ELR
3-point safety belt
(
Automatic belt fastening
equipment
(
Automatic belt fastening
equipment
)
ALR
3-point safety belt
)
ELR
Safety belt
NLR
2-point safety belt
( Non-fastening belt )
Automatic seat belt
NR
Caution
Possibility
of installation
Before starting installation, read
manual of the car.
Danger For cars with airbags, children who weigh 13kg or under should be seated in the rear seat.
We recommend those children between 9 to 25kg to seat in the rear side as well.
Deciding direction of safety seat
☆ Choose direction of installation according to weights of children.
Weight
birth ~ 13kg or under
Rear facing
(refer to p.16~18)
Weight
9 ~ 25kg or under
Forward facing
(refer to p. 22~24)
Range of child’s
weight
3
Caution
The user manual needs to be kept well and read accordingly when necessary.
Danger
사용
서
설명
The infant safety seat needs to be
attached according to the user
manual. If the seat is attached
inappropriately, the infant maybe
loosened from the car or hit the
glass, for example, during the crash
or the ab the abrupt stopping, risking
his or her life, or suffering serious
damage.
Only suitable for use in the listed
vehicles fitted with 3-point with
retractor safety-belts, approved to
ECE Regulation No.16 or other
eauivalent standards.
(strike out what dies not apply)
Every time the infant is seated the
adjusting belt should be pulled to
seat the baby tightly. If the shoulder
belt can not function as originally
designed, the infant may risk his or
her life, or suffering critical damage.
당긴다
The product should not be used for
the seats with an airbag. When
activated, the airbag may cause the
infant to risk his or her life, or suffer
serious damage.
Be careful not to allow the infant to
push the press button of the front
pad. The fastening plate needs to be
checked for any loosening frequently.
When the plate is loosened, the infant
may risk his or her life, or suffer
critical damage when a crash or an
abrupt stopping occurs.
It shall be recommended that the
device should be changed when it
has been subject to violent stresses
in an accident.
The belt cover should be attached
for use. If the belt cover can not
function as originally designed, the
infant may risk his or her life, or
suffering critical damage.
If the infant safety seat is exposed to
direct sunlight for long hours, metal
and PVC parts may get heated. The
guardian needs to check it before
seating the infant. In summer or
when sunlight is strong, the car
needs to be parked in a shady lot, or
a towel, for example, can be used for
coverage.
When the chair is not provided with a
textile cover, it shall be recommended
that the chair should be kept away
from sunlight, otherwise it may be
too hot for the child’s skin.
4
Store the child seat in a safe place
when it is not being used.
Avoid placing heavy objects on the
top of the child seat.
It shall be recommended that children
are not left in their child restraint
system unattended.
Warning
When the infant safety seat is installed
on the passenger’s seat, it may cause
some interference, leading to inconve
nience in operating the transmission
gear or the side brake.
When such inconvenience arises,
you need to refrain from using the
product for the passenger’s seat, and
rather use it for the backseats.
When such inconvenience is caused,
it may interfere with operating the
transmission gear or the side brake,
leading to a highly risky situation.
When there is a passenger in the
back seat, the safety seat should not
be fastened to the passenger seat of
a 2-door or 3-door vehicle, or the
secondary seat near the access area
for ascending and descending in
case of the one box type vehicle or a
mini-van, in order to secure the
emergency exit.
When there is no infant in the vehicle,
the infant safety seat needs to be
stored, for example, in the trunk, or
fastened strongly within in a car.
When fastened insufficiently, the
safety seat may be shaking, causing
interference with driving.
While driving, you should not operate
the infant safety seat(Belt adjustment
/Angle adjustment, for example).
The car should be parked in a safe
place first before you operate the
safety seat. If you operate the safety
seat while driving, it is highly dangero
us, because your driving will be
interfered with, possibly leading to an
accident.
Never try to modify the children seat
without authorization by the manufac
turer or the approving authority.
When using the product for a new born baby (Younger than 1 month
after birth), a fellow passenger, not
just the driver, needs to get on the
vehicle to pay attention to the baby.
Avoid using the product for longer
than one hour consecutively, in case
of infants ranging from newborn
babies to ones younger than 6
months, considering the burden on
them.
Caution
When you need to ride together with
an infant, you should check the
attachment of the safety seat again
before driving the vehicle.
The safety seat needs to be checked
for any problems during or after the
driving (The vehicle should be parked
in a safe place first before the check
ing).
The safety seat should not be
installed or removed while the infant is
on it.
Be careful not to allow the infant to
play on the safety seat. You should
not allow the infant to use it as a play
apparatus.
It shall be recommended that any
luggage or other objects liable to
cause injuries in the event of a
collision shall be properly secured.
5
Name of each part
Front of safety seat
Shoulder belt holes
(4 levels)
Head seat
Shoulder pad
Fastening plate
buckle
Seat cover
Shoulder belt
Belt length
adjusting lever
Base
Angle adjusting lever
Rear facing lever
Accessories
☆ Design of the inner seat can be different according to types of models.
Manual
6
Head inner seat
Inner seat
Shoulder pad for toddler
Back of safety seat
Belt guide
(for rear facing only)
Belt cover
Sun visor ratch
frame
Belt locking lever
(For both directions)
When taking off the belt cover
Shoulder belt hanger
Belt path
Shoulder belt hanger is required
when the height of shoulder belt is
adjusted.
MEMO
7
Adjustment method
Warning
Please stop the car to adjust each function.
Adjusting the safety seat during driving will interrupt your driving and might cause accidents.
How to adjust angle
Forward facing
Rear
facing
You can adjust angles in 4 different levels. For forward facing,
use levels 1~3 and level 4 is only for facing to rear.
Levels 1~3 should be adjusted according to seat’s angle of the car.
Angle adjustment for rear facing
For child with weight of 13 kg or under
When you set your child safety seat to rear facing, please adjust the angle to level 4.
1
2
Pull out the angle adjusting lever
and then push it to the back.
Lay down the main body
of the seat to level 4 (lowest level).
(To check the right angle,
refer to the arrow on the side of the main body.)
Angle adjustment for forward facing
For child with weight from 9 to 25 kg
When you set your child safety seat in forward facing, adjust angles between level 1 and 3.
1
2
Pull out the angle adjusting lever
and then push it to the back.
8
Adjust the main body according to seat’s angle
of the car from level 1 to 3.
(To check the right angle,
refer to the arrow on the side of the main body.)
How to adjust shoulder belt
Warning
Please stop the car to adjust each function.
Adjusting the safety seat during driving will interrupt your driving and might cause accidents.
1
Shoulder belt
hanger
Belt cover
Take off the belt cover at the back of main body to pull out the shoulder belt from its hanger.
Caution
When you cannot see the shoulder belt hanger, pull out the front belt
so shoulder belt hanger at the back can come out to front to adjust height of belt.
2
Put baby in the seat and
then insert the belt to the nearest shoulder belt hole.
3
After inserting the belt into its hanger, put on the belt cover.
Danger
Belt cover should be attach ed for use.
If the belt cannot perform its function properly, it might risk a life or serious injury.
9
How to use buckle
Danger Using the safety seat without buckle is very dangerous, so do not use the seat after unfastening buckle.
Unfastening
1
Fastening plate
2
Buckle
Click
Fastening plate
Press button
Button cover
Press the press button inside buckle
of button cover to take off fastening plate.
Separate joined fastening plate into upper
and lower units.
Fastening
1
2
Fastening plate
Click
Buckle
Fastening plate
3
Click
Press button
Chec
k!
Button cover
Put two fastening plates together,
one in below other on top.
Insert the joined fastening plate
into the buckle until
you hear ‘click’ sound.
Make sure the fastening
plate is securely fastened.
How to use buckle fastening magnet
Side (Buckle fastening magnet)
Before putting your baby into the seat, unfasten buckle and put it on the armrest part
– it will be easier to let your baby to seat.
10
How to use locking lever
Locking lever is an equipment to securely install the child safety seat
into your car. Please use it.
You will find 2 locking levers, one on each side of the main body.
Please use it according to location of installment.
locking lever
Danger
Locking lever and belt guide are equipments for secure installment of child safety seat with car’s seat
belt. Please use it. If you do not use it, safety seat might be in danger, as it would not be tightened
up for shocks and abrupt stop.
Danger
Firstly, check if your car seat can install this child safety seat (refer to p.2 as some seats are not allowed
to install this product). If you cannot install safety seat as shown in this manual, do not force it to fasten up.
In this case, the safety seat might not work properly and cause unexpected accident.
Caution When you adjust locking lever, please be careful not to jam your finger.
1
Fastening
Push the locking lever to the side.
2
Pull shoulder part of car’s seat belt to make it tight
as much as possible and insert it into locking lever.
Then, pull the lever to opposite direction and push to lock.
Shoulder belt of car
3
Belt guide
For rear facing
As shown above, fix the belt with locking lever,
and then pull out the belt as much as possible
and hang it on belt guide
Unfastening
1
Unfasten buckle of car’s seat belt.
Locking lever
2
Push locking lever to the side
and then separate car’s belt.
11
How to adjust height of headrest
Using the safety seat without the buckle is very dangerous, so do not use the seat after unfastening
Danger the buckle.
1
Pull up adjusting lever in the middle of backside of headrest to adjust height (up and down).
Headrest can be adjusted in 7 different levels.
2
Lower part of headrest should be in the closest location from baby’s shoulder.
Please adjust location of headrest according to size of the baby.
Caution Otherwise, safety seat might not give the best result.
12
First 7
How to use
BABY MODE
Baby Mode is designed for children
aged 0 to 1 with maximum weight of 13kg.
How to Use Baby Mode
Angle adjustment of back support at Baby Mode
Forward facing
1
2
Rear
facing
Set the child safety seat to angle
of level 4,
which is for rear facing.
Pull out rear facing lever
(angle adjusting lever)
and then push it to the back.
Lay down the main body
of the seat to level 4 (lowest level).
To check the right angle,
refer to the arrow on the side
of the main body.
Tight attachment of shoulder belt at Baby Mode
Danger Whenever you seat the baby in the safety seat, pull out adjustment belt to tightly buckle up the baby.
If the belt cannot perform its function properly, it might risk a life or cause serious injury.
1
2
Unfasten buckle of front pad.
Pull out shoulder pad while pressing
adjustment button of the belt.
Seat the baby and then put on shoulder belt.
Remember to adjust height of shoulder belt
according to height of your baby’s shoulder.
(Refer to ‘How to use buckle’ on p.10)
(Refer to ‘Height adjustment of shoulder belt’ on p.9)
3
4
“Click”
to fasten
Fasten up front pad and buckle.
Pull
Pull out adjustment belt while pressing
adjustment button to securely
fasten up shoulder belt to the baby.
Caution Between the belt and the baby, make a gap that allows adult’s hand to move around
14
Height adjustment of headrest at Baby Mode
Headrest should have a room of 3 cm higher from top of the baby.
Caution
1
2
Pull up adjusting lever in the middle
of backside of headrest to adjust height
(up and down).
Lower part of headrest should be in the
closest location from baby’s shoulder.
3
Head inner seat
Please adjust location of headrest
Caution according to size of the baby.
Otherwise, safety seat might not give
the best result.
Use head inner seat of headrest together.
Back support cushion and inner seat at Baby Mode
1
Inner seat
2
Back support cushion
If your child weighs over 10kg and feels
uncomfortable with inner seat,
remove back support cushion inside inner seat.
At Baby Mode,
use both back support cushion
and inner seat as much as possible.
15
How to install Baby Mode (Rear facing/rear installment)
Danger
According to types of car’s seat belt, installment and
fixing methods vary. Please refer to check possible
and impossible seats for installment on p. 3 and then
install child safety seat in a right way.
For ELR/ALR 3-point safety belt, switch to ALR
Warning function after installment. Do not fasten up shoulder
belt too tightly. If you have tightened up like shown
on the diagram, please re-start installment from start.
Caution
When you adjust locking lever, please be careful not
to jam your finger.
1
Pull the seat back to full upright position.
2
Adjust height of shoulder belt and headrest according
to the baby.
3
With angle adjusting lever,
change angle of the main body to level 4.
4
16
Put main body in opposite direction (rear facing) of driving.
Make sure the bottom of safety seat to closely touch
car’s seat as shown on the diagram.
5
Shoulder belt of car
Belt path
Push the safety seat to contact the back of seat
and then pull out the car’s seat belt.
Then, let the pulled out belt and fastening plate of the
belt to pass through belt path in the backside of main body.
Caution Be careful not to twist the car’s seat belt.
Belt path
Belt path
6
Fasten the fastening plate into the buckle.
Fastening
plate of car
Caution Be careful not to twist the car’s seat belt.
Buckle of car
Car’s seat belt
7
7
Push the locking lever located on the opposite side of
fastening plate to open.
8
Pull shoulder part of car’s seat belt to make it tight as much as
possible and insert it into locking lever.
Then, pull the lever to opposite direction and push to lock.
8
(Make sure to put the belt inside the locking lever and then push the lever strongly,
so it can hold the belt tightly.)
Waist belt of car should be tightened up to the
Caution maximum for firm fixation, so it would not swing.
17
9
Firstly, make sure whether shoulder belt of car is properly
inserted into the locking lever.
Put your weight to the safety seat, and then strongly pull
the shoulder belt of car while pushing belt locking lever
on side to fix it.
10
Shoulder belt of car
For double fixation, hang the fixed belt inside belt guide.
You will get crease on the belt, but there is no problem
with safety.
Belt guide
Locking lever
Checklist for Baby Mode
☆ Please check the below list after completing the installation.
Installment
diagram viewed
from outside
the car
Installment
diagram viewed
from inside
the car
Base
Base
Are height of shoulder belt and headrest of safety seat suitable?
Are fastening plate and buckle of car’s seat belt securely fastened up?
tion
ple ed
Comheck
C
Is not car’s seat belt twisted?
Is car’s seat belt tightly fastened up?
Is shoulder belt of car fastened strongly inside the locking lever?
Does the main body swing more than 3cm when you shake it?
☆ Check the above list and if the main body swings more than 3cm, please re-install it according to above instruction.
18
First 7
How to use
TODDLER MODE
Toddler mode is designed for children
aged 1 to 4 with weight from 9 to 18kg.
How to Use Toddler Mode
Angle adjustment of back support at Toddler Mode
Forward facing
1
2
Rear
facing
For Toddler Mode, angle
of safety seat should be adjusted
from level 1 to 3.
Adjust the main body according
to seat’s angle of the car
from level 1 to 3.
Pull out the angle adjusting lever
and then push it to the back.
Height adjustment of shoulder belt at Toddler Mode
Please adjust location of shoulder belt according to size of the baby.
Otherwise, safety chair might not give the best result.
Caution
1
Shoulder belt
hanger
Belt cover
Take off belt cover from back of the main body, and then take out shoulder belt from its hanger.
If you cannot see shoulder belt hanger, pull out the front belt and shoulder belt hanger
Caution will come out from the back. Then, you can adjust height of the belt.
2
3
Put the baby in safety seat,
insert the belt into the nearest
shoulder belt hole.
Danger
20
Insert the belt into belt hanger and then put on the belt cover.
Belt cover should be attached for use.
If the belt cannot perform its function properly, it might risk a life or cause serious injury.
How to use shoulder pad at Toddler Mode
Shoulder pad for toddler should be used for the toddler mode only (For 9kg or above and forward facing)
Caution
1
Take off existing shoulder pad, put out shoulder belt from shoulder belt hanger of the backside.
From back of the safety seat, put shoulder pad for toddler into shoulder belt hole.
(Refer to height adjustment of shoulder belt at Toddler Mode on p. 20)
2
As shown in the diagram,
insert the shoulder belt at the same level
as baby’s shoulder or a little above.
Inner side
Outer side
As shown on the diagram,
if you insert shoulder pad with twisted side,
Stitched side
Advice it will get through smoothly.
At this stage, put shoulder pad for toddler into shoulder belt hole that is similar in height of your baby.
Stitched side should face ground. (Refer to above diagram)
Warning Rubber part should be closely attached to the baby.
Caution
Shoulder pad should be inserted into holes in the same height.
Front
Outer
side
Inner
side
Back
☆ Shoulder pad has inner and outer sides.
☆ Cotton part is front and rubber part is back for shoulder pad.
21
3
Shoulder belt will get through smoothly
Advice if you push it gently with your thumb.
Insert shoulder belt into shoulder pad for toddlers.
Shoulder belt with the shoulder pad should
be inserted into shoulder belt hole
at the back of safety seat.
Completed!
Inner side
Put shoulder belt into shoulder belt hanger.
Outer side
Caution
Shoulder belt should not be twisted and hanged on the shoulder belt hanger.
Seat the baby into safety seat, pull out lower adjustment belt to make baby
Warning to seat firmly (refer to Tight attachment of shoulder pad at Baby Mode on p.14).
If the belt cannot perform its function properly, it might risk a life or serious injury.
Warning Belt cover should be attached for use.
If the belt cannot perform its function properly, it might risk a life or serious injury.
22
Height adjustment of headrest at Toddler Mode
Caution Headrest should have a room of 3 cm higher from top of the baby.
1
2
Pull up adjusting lever in the middle
of backside of headrest to adjust height
(up and down).
Lower part of headrest should be
in the closest location from baby’s shoulder.
3
Caution
Please adjust location of headrest
according to size of the baby.
Otherwise, safety chair might not
give the best result.
Use head inner seat of headrest together.
Back support cushion and inner seat at Baby Mode
Inner seat
Back support cushion
If the safety seat is narrower compared to baby’s size at Toddler Mode,
take off back support cushion and inner seat.
23
How to install Toddler Mode (Forward facing /front installment)
☆ With 3-point car’s seat belt, install the baby seat forward facing.
Danger
Do not install in the seats with airbag.
Due to operation of the airbag you might lose your child’s life or seriously injured.
When the baby seat is installed on side seat of driver, it might be difficult to change gears or side
Warning break. In this case, do not install it on side seat of driver, and install it at the back seat. It will be very
dangerous if you continue to drive with these difficulties of gear change or side break.
When the baby seat is installed in front, it might cover side mirror on the right door, which will block
Warning out driver’s sight. In this case, install the baby seat in other seats.
When it is installed at the back seat, make sure not to install at side seat of 2 & 3-door vehicles and
Warning 1 box car and folding seats of mini van, since it will block out exit for the case of emergency.
1
Pull the seat back to full upright position.
2
For easier installation, push the front seat to the front.
3
Adjust height of shoulder belt and headrest according
to the baby.
24
4
Put the main body in same direction (forward facing) as driving.
5
Belt Path
Pull out car’s seat belt and then let it go through the belt path,
which is located in the backside of the main body.
Caution Be careful not to twist the car’s seat belt.
Belt Path
Belt Path
6
Fasten the fastening plate into the buckle.
Fastening
plate of car
Caution Be careful not to twist the car’s seat belt.
Car’s seat belt
Buckle of car
25
7
7
Push the locking lever located on the opposite side of
fastening plate to open.
8
Pull shoulder part of car’s seat belt to make it tight as much as
possible and insert it into locking lever.
Then, pull the lever to opposite direction and push to lock.
(Make sure to put the belt inside the locking lever and then push the lever strongly,
so it can hold the belt tightly.)
8
Waist belt of car should be fastened up to the
Caution maximum for firm fixation, so it would not swing.
9
Firstly, make sure shoulder belt of car is properly inserted
into the locking lever. Put your weight to the safety seat,
and then strongly pull the shoulder belt of car while pushing
belt locking lever on side to fix it.
Checklist for Toddler Mode
☆ Please check the below list after completing the installation.
Installment
diagram viewed
from outside
the car
Installment
diagram viewed
from inside
the car
Base
Base
Are height of shoulder belt and headrest of safety seat suitable?
Are fastening plate and buckle of car’s seat belt securely fastened up?
tion
ple ed
Comheck
C
Is not car’s seat belt twisted?
Is car’s seat belt tightly fastened up?
Is shoulder belt of car strongly fixed inside the locking lever?
Does the main body swing more than 3cm when you shake it?
☆ Check the above list and if the main body swings more than 3cm, please re-install it according to above instruction.
26
First 7
How to use
CHILD MODE
Child mode is designed for children
aged 3 to 7 with weight from 15 to 25kg.
How to Use Child Mode
Separation and storage for Child Mode
☆ To easily use child mode, First Seven will let you to safely store unused belt,
buckle and pad inside the safety seat.
1
2
Pull up the back lever of headrest
to the maximum height.
By using the lever at the back,
take off headrest.
Separate the belt strap from shoulder hanger
of the backside of the safety seat.
(For detailed detachment method, refer to p.32)
3
Unfasten all buckles of sabelt, and then take out buckle from the belt strap.
4
Remove inner seat and back support cushion.
Then, take cover off from bottom.
28
5
By using rubber band or string,
tight up fastening plate of buckle
and then store it in the hidden space
just as shown in the diagram.
6
7
5
9
☆ Taking off sponge (memory foam) might damage your safety seat, so please just look at different storage spaces as
shown in the above diagram and put things under the sponge. This company does not take any responsibilities of
sponge damage that is made during this process.
6
Shoulder belt strap without buckle should be rolled up, and then tie it up with rubber band or string.
Then, store it in hidden storage space as shown above.
7
Front pad, which is lower part of the buckle, should be separated from belt cover and then stored
in the hidden space as shown above.
29
8
Back part
of safety seat
Front part
of safety seat
Shoulder belt hanger should be fixed at the entry of shoulder belt at backside
of the safety seat as shown above.
Then, push belt adjustment belt in the front to pull it completely.
9
Store belt strap in the location shown above.
MEMO
30
10
Button cover and shoulder pad should be stored
inside hole above the back support part.
How to install Child Mode (How to use seat belt)
1
2
Pull out car’s seat belt loosely as shown above.
Pull the belt in diagonal direction to pass
through underneath headrest and below armrest,
and then fasten it with buckle as shown above.
Checklist for Child Mode
☆ Please check the below list after completing the installation.
Is safety belt of the safety seat removed before use?
Does the backside of safety seat contact the car’s seat?
tion
ple ed
Comheck
C
Does safety belt is crosses child’s center of chest and rests on the tops
of the thighs?
Isn’t upper part of car’s seat belt too close from your child’s neck?
Is position of headrest appropriate according to your child’s head?
Is upper part of car’s seat belt inserted in home of car’s seat belt,
which is located above head protector?
☆ Check the above list and if the main body swings more than 3cm, please re-install it according to above instruction.
31
Maintenance and management
How to detach headrest
1
2
Side levers located
inside the seat
Pull out the headrest to the highest position.
As you pull out the lever of headrest,
push right and left side levers located
on the backside of safety seat
at the same time in order to separate headrest.
3
Pull!
When you attach headrest again, as you pull headrest lever,
set each side rail in the right position and then push it.
How to take off seat cover
☆ When you put the seat cover on, follow below instruction in opposite order.
Warning
Do not detach front pad and the main body. This might cause breakdowns.
1
2
Side levers located
inside the seat
Take off headrest.
32
From the backside of headrest to side,
take off the seat cover.
3
Belt cover
Take off belt cover at the back of main body,
and then take off shoulder belt from its hanger.
Taken off belt should be pulled out from shoulder belt hole.
Take out shoulder pad and fastening plate from shoulder belt.
Shoulder belt
☆[Note] If you cannot see shoulder belt hanger
You cannot see shoulder belt hanger because it is pushed inside.
In this case, extend shoulder belt while pressing shoulder belt
adjusting lever and you will see the hanger coming up
from the back. (refer to p.9)
Shoulder belt hanger
Seat clip
4
Seat cover
Main body
Take out shoulder belt,
and then take off seat clip of seat cover.
5
6
Take off seat cover from bottom to top.
For belt guide, open the sit to right
and left as it is still attached.
Warning Warning label (yellow label) attached in the front of sewing work cannot be detached.
This company does not take any responsibilities for its detachment.
33
MEMO
34