1
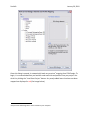
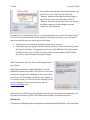
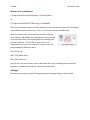
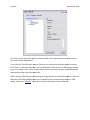
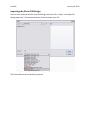
Revit To FEM-Design
Using Revit To FEM-Design 1.2
Joakim Lindberg
11/06/2010
Getting started using the Revit To FEM-Design connection.
StruSoft
January 29, 2010
Contents
Installation ....................................................................................................................................... 3
The Commands................................................................................................................................ 3
Export To File ............................................................................................................................... 3
Export To FEM-Design 8.0 ........................................................................................................... 4
Export To FEM-Design 9.0 ........................................................................................................... 4
Mapping ....................................................................................................................................... 4
Settings ........................................................................................................................................ 9
About ......................................................................................................................................... 10
User Manual .............................................................................................................................. 10
Export and Import: Step-by-Step .................................................................................................. 11
Before exporting ........................................................................................................................ 11
Exporting the file from Revit Structure ..................................................................................... 11
Importing the file in FEM-Design............................................................................................... 14
Which elements are exported? ..................................................................................................... 15
Advanced Mapping ....................................................................................................................... 16
Saving to File .............................................................................................................................. 16
Loading from File ....................................................................................................................... 16
Empty Section ............................................................................................................................ 16
Transferring Mapping Files between computers .......................................................................... 17
Revit To FEM-Design commands are missing after installation.................................................... 17
StruSoft
January 29, 2010
Installation
When installing the Add-In on Windows Vista or Windows 7, to be sure that it installs correctly,
run the installation as Administrator and have the UAC (User Account Control) set to the lowest
settings. If you change the UAC setting, you should restart the computer before running the
installer. The Add-In might install correctly even if you don’t install it as Administrator, but it’s
not recommended.
The Commands
In Revit Structure 2009 the commands can be found in the “StruSoft” menu then “FEM-Design,
as shown below.
In Revit Structure 2010, the commands can be found in the Add-Ins tab under “StruSoft FEMDesign”, as shown below. In Revit Structure 2011 they can be found under the “Analyze” tab.
Export To File
Upon running the command, you will be asked to name you
export file, enter a name and click “Save”. This will create an export file (*r2f) that can be
imported in to FEM-Design 8.0 or 9.0. If any elements are selected in the documents before
running the command only those elements will be exported. If no elements are selected, all
elements in the document will be exported. Exactly which elements that will be exported
depend on your export settings. See “Settings” command for more information on which
elements that will be exported.
StruSoft
January 29, 2010
Export To FEM-Design 8.0
Note that this command will only be available if you have FEM-Design 8.0 installed on your
system. The user will not be able to choose a file to export to, instead the Export Result Dialog
will show and upon clicking “Done” FEM-Design 8.0 will be launched and the Revit document
will be automatically be imported.
Export To FEM-Design 9.0
Note that this command will only be available if you have FEMDesign 9.0 installed on your system. The user will not be able to
choose a file to export to, instead the Export Result Dialog will show
and upon clicking “Done” FEM-Design 9.0 will be launched and the
Revit document will be automatically be imported.
Mapping
Before starting FEM-Design you must first map the materials and sections in Revit to those in
FEM-Design. You do this by running the “Mapping” command.
If both FEM-Design 8.0 and 9.0 is detected on the system, you will be asked for which version
you wish to do the mapping.
After you have made your choice, the mapping dialog will appear. See next page.
StruSoft
January 29, 2010
Once this dialog is opened, it automatically loads any previous1 mapping from FEM-Design. To
begin, it is recommended that you load the used materials and profiles from you project. You
do this by clicking the “Load from Project” button. Any newly added items that have not been
mapped are displayed in red (See image below).
1
Requires that FEM-Design 8.0 or 9.0 is installed on your computer.
StruSoft
January 29, 2010
To begin mapping, select a material. Type the code for the corresponding material in FEMDesign. Note that you can have multiple FEM-Design materials mapped to the same Revit
material; just separate them by a new line.
StruSoft
January 29, 2010
Once the material has been mapped, the text will turn black instead of red. Make sure you map
all the materials used in your project, otherwise it might not be correctly imported into FEMDesign.
To map a Profile, select it from the list and type in the corresponding FEM-Design Type and Size.
StruSoft
January 29, 2010
You can also manually add and remove materials and
profiles. To do this, either use the “Add” and
“Remove” buttons at the lower left of the dialog, or
right click in the tree view and choose “Add” or
“Remove” from the context menu. Note that you will
be adding a new item to the category you have
selected or right clicked on.
Although you can manually add items, it is recommended that you use the “Load from Project”
button to ensure that the name of Revit materials and profiles are correct. If you still wish to
add items manually there are two things to think about:
•
•
Case sensitivity; all material and profile names are case sensitive.
Profile Naming; when typing in the Revit profile, the name consists of the Family Name +
the Type of that family. For example, say we have an IPE 300 beam. The Family name is
IPE-Beam and the Type is IPE300. The name would then be IPE-Beam IPE300. Notice
that there is a space between the name and type.
When finished, first click the “Save to FEM-Design” button,
then “Done”.
Note that the save button might be disabled. It can be
disabled because of two reasons. The first one is that there
has been no change to the mapping and the second is that
you do not have FEM-Design installed on your computer. If
it is the later reason, you can still save the mapping to a file
on your computer. To learn how to do this, see the
advanced mapping topic.
When you save to FEM-Design, the application actually saves the information to two files, one
for materials and one for profile. These files can be located in three different places:
Windows XP:
C:\Documents and Settings\All Users\Application Data\StruSoft\FEM-Design X.X\Formats\Revit
StruSoft
January 29, 2010
Windows Vista and Windows 7
C:\ProgramData\Strusoft\ FEM-Design X.X\Formats\Revit
Or
C:\Program Files\STRUSOFT\FEM-Design X.X\FORMATS
The two first locations is where the files should be placed, and the second one is for backwards
compatibility with previous versions. The X.X is the version number of FEM-Design.
When the import is run, it will use these two files to lookup
what materials and profiles that should be used to correspond
to the ones from Revit. The mapping files have nothing to do
with your exported *.r2f file. That is to say that it’s not
connected in any way to your export file, so you can use the
same mapping for different exports.
The two files are:
Revit_FEM_Material.cnv
Revit_FEM_Profile.cnv
But as a user, you do not have to worry about these files, but it could be good to know that
they exist. It is not recommended to manually edit these files.
Settings
Running the settings command will bring up the Export Settings dialog, as shown below.
StruSoft
January 29, 2010
The elements shows in the dialog above are the supported elements.
•
•
•
“Export”
If checked, all elements of this type will be exported.
“Don’t export if material is missing”
The elements of this type will not be exported if they do not have a valid material.
“Warn if material is missing”
If checked, a warning will be displayed in the Export Result dialog, iff the element was
missing a valid material . If unchecked, no warning will be displayed.
Clicking “OK” will save your settings. Clicking “Cancel” will not save you settings.
About
Will display a dialog with information about the “Revit To FEM-Design” Add-In.
User Manual
Will open this manual (Using Revit to FEM
FEM-Design 1.2.pdf).
StruSoft
January 29, 2010
Export and Import: Step-by-Step
Before exporting
This is probably the most important step in exporting you file. Before you export, you must
make sure that you have a consistent analytical model in Revit. If there is anything wrong with
it, this too will be exported over to FEM-Design, possibly making it difficult to run an analysis.
So always make sure you have a correct analytical model before exporting. Also before doing an
export, make sure your export settings are correct, so the desired elements get exported. See
“Settings” command for more details.
Exporting the file from Revit Structure
2009
If you are using the 2009 version, you can find the export command either under the “StruSoft”
menu -> FEM-Design -> Export To File or in the toolbar as the “Export to File”.
2010
If you are using the 2010 version, you locate the command under Add-Ins, then the “StruSoft
FEM-Design” Ribbon -> Export-> Export To File.
2011
If you are using the 2011 version, you locate the command under Analyze, then the “StruSoft
FEM-Design” Ribbon -> Export-> Export To File.
Should the menu/ribbon not be available after installation, please read the section “Revit To
FEM-Design commands are missing after installation”.
If you have any elements selected while running the export command, only those supported
elements will be exported. If none are selected all supported elements in the document will be
exported. Run the “Export To File” command. You will be asked to name the export file and
where it should be saved. After the export has been completed the “Export Result” dialog will
be shown.
StruSoft
January 29, 2010
As we can see above, 624 out of 714 elements were exported. This does not mean that 110
elements
lements failed. It means that there were 714 elements in the document, but only 624 of them
belonged to the supported category. See ““Settings” command and “Which
Which elements are
exported?”, for more information.
However we can see that there was also an error. Expand the error tree by clicking the plus (+)
sign.
You can now select elements in the tree to get more information on what caused the error.
StruSoft
January 29, 2010
As we can see the reason for why this element failed to be exported was that it did not have
any valid material assigned to it.
If you click the “Show Element”” button
button, Revit will try to bring the selected element into view.
Click “Done” to proceed. Note that if we had selected to Export direct
directly to FEM--Design instead
of via file, clicking on the “Done” button would launch the selected version of FEM
FEM-Design and
automatically import the Revit document.
Before opening FEM-Design
Design and importing our exported file, we should first make sure that the
Materials
aterials and Profiles (Beam/Column) are mapped to their corresponding versions in FEM
FEMDesign. Please see “Mapping”” command for more information on how to do this.
StruSoft
January 29, 2010
Importing the file in FEM-Design
Once we have exported out file, start FEM-Design and chose File -> Open. In the Open file
dialog choose the *r2f extension and then locate and open your file.
The file should now be successfully imported.
StruSoft
January 29, 2010
Which elements are exported?
We currently export the following elements:
Walls
Floors
Structural Columns
Structural Framing i.e. Beams*
Truss*
Brace*
Beam Systems*
Boundary Conditions: Point, Line and Area (In FEM-Design they are called Supports)
Materials
* Eccentricity for beams is currently not exported from Revit to FEM-Design. The reason for this
is that Revit does not calculate the eccentricity from the center of gravity of the beam. This
might be resolved in a later version.
StruSoft
January 29, 2010
Advanced Mapping
For more advanced mapping, there are six commands available in the “File” menu.
Saving to File
You can save your mapping to file. This can be useful if you don’t have FEM-Design installed on
the computer you’re exporting from, or if you want to make a backup of the mapping file or
send it to a different computer. There are two commands for saving to file, one for materials
and one for profiles. The files will be saved as a *.cnv files.
Loading from File
You can load a previously saved *.cnv file. When you load a file, you’ll merge it with the already
existing information in the mapping dialog. This can be used to combine different files into one.
Empty Section
This will empty the whole tree for which the command has been run. Example: running “Empty
Materials Section” will completely remove all materials from the material tree.
StruSoft
January 29, 2010
Transferring Mapping Files between computers
If you want to transfer a mapping file from one computer to another, use the save command to
save the file and then the load command to load it on the other computer, and then click “Save
to FEM-Design”. In case you do not have Revit on the other computer, hence you do not have
access to the Mapping dialog; you can manually replace the Mapping files in the FEM-Design
directory with your own. To do this, go to the FEM-Design install directory and look in the
“FORMATS” folder.
Example: C:\Program Files\STRUSOFT\FEM-Design 8.0\FORMATS\
There should be two files there that you should replace:
Revit_FEM_Material.cnv
Revit_FEM_Profile.cnv
Rename your saved material file to Revit_FEM_Material.cnv and place it in the FORMATS
folder. The same way, name your profile file to Revit_FEM_Profile.cnv and put it in the same
folder. Do not edit these files manually, since there a big risk that you’ll change the format of
the files, which will render them unreadable for FEM-Design. It is very important that the
material and profile files have these names; otherwise FEM-Design will not be able to locate
them.
In FEM-Design 9.0, the correct place to put the mapping files is in:
C:\Documents and Settings\All Users\Application Data\StruSoft\FEM-Design 9.0\Formats\Revit
If the “Revit” catalog does not exist in the formats directory, you should create it, then just copy
the mapping files into this folder and make sure they are named correctly.
Revit To FEM-Design commands are missing after installation
If the menu/ribbon is not available in Revit after installation, then the installer was unable to
locate Revit on your computer, and you have to add a little text snippet manually to the
Revit.ini file, located in the Revit install directory under the “Program” folder. Example:
C:\Program Files\Autodesk Revit Structure 2010\Program\Revit.ini
For 2009, do the following under the [ExternalApplications] section in the Revit.ini file.
Increment the EACount, example: EACount=1 becomes EACount=2
StruSoft
January 29, 2010
Add the following two lines:
EAClassName1=StruSoft.R2F.C09.Command.FDMenu
EAAssembly1=Install Directory\StruSoft.R2F.C09.dll
The number highlighted red should correspond to the EACount number. Also “Install Directory”
should be the path to where you installed the Add-In.
The green text is for which version you are using, for 2009 it should be “C09” and 2010 “C10”.
For Revit Structure 2011 this operation should never fail, since it uses a dll supplied by
Autodesk to find the installation of Revit.