1
M Display User's Manual
Serial High-Color Display
M Display
User's Manual
2015-11-09
“Everything for Embedded Control”
Comfile Technology Inc.
www.cubloc.com
Copyright 2013 Comfile Technology
Comfile Technology
M Display User's Manual
1 of 93
M Display User's Manual
Table of Contents
Features...................................................................................................................................................4
Specifications............................................................................................................................................4
Stand............................................................................................................................................................5
Physical Connections.......................................................................................................................................6
Initialization...................................................................................................................................................8
Serial ......................................................................................................................................................8
Protocol ...................................................................................................................................................8
EnableChecksum........................................................................................................................................8
Orientation................................................................................................................................................9
BootImage................................................................................................................................................9
EnableTrace..............................................................................................................................................9
Communication Protocol................................................................................................................................10
UTF-8 Protocol.........................................................................................................................................11
Binary Protocol........................................................................................................................................14
Coordinate System........................................................................................................................................16
Graphics......................................................................................................................................................19
Vector Graphics.......................................................................................................................................19
Raster Graphics.......................................................................................................................................20
Fonts and Text..............................................................................................................................................21
Internationalization and Multilingual Support...............................................................................................22
Layers.........................................................................................................................................................23
Using Layers to Update Text .....................................................................................................................24
Layers and Memory..................................................................................................................................25
Command Reference.....................................................................................................................................26
ArcTo (Hexadecimal 00)............................................................................................................................26
Backlight (Hexadecimal 01).......................................................................................................................28
BevelButton (Hexadecimal 02)...................................................................................................................29
Button (Hexadecimal 03)..........................................................................................................................31
Clear (Hexadecimal 04).............................................................................................................................32
ClearPath (Hexadecimal 05)......................................................................................................................33
ClosePath (Hexadecimal 32)......................................................................................................................34
Color (Hexadecimal 07)............................................................................................................................35
CreateLayer (Hexadecimal 08)...................................................................................................................38
CurveTo (Hexadecimal 09)........................................................................................................................39
Delay (Hexadecimal 0A)............................................................................................................................40
DestroyLayer (Hexadecimal 0B).................................................................................................................41
DisableFlush (Hexadecimal 0C)..................................................................................................................42
DisableLayer (Hexadecimal 34)..................................................................................................................43
DrawArc (Hexadecimal 0D)........................................................................................................................44
DrawCircle (Hexadecimal 0E).....................................................................................................................46
DrawCurve (Hexadecimal 0F).....................................................................................................................47
DrawEllipse (Hexadecimal 10)....................................................................................................................49
DrawLine (Hexadecimal 11).......................................................................................................................50
DrawPath (Hexadecimal 12)......................................................................................................................51
DrawRectangle (Hexadecimal 13)...............................................................................................................52
DrawText (Hexadecimal 14).....................................................................................................................54
DrawTextCenter (Hexadecimal 37).............................................................................................................56
DrawTextRight (Hexadecimal 36)..............................................................................................................57
EnableFlush (Hexadecimal 33)...................................................................................................................58
EnableLayer (Hexadecimal 35)...................................................................................................................59
FillCircle (Hexadecimal 16)........................................................................................................................60
FillEllipse (Hexadecimal 17).......................................................................................................................61
FillPath (Hexadecimal 18)..........................................................................................................................62
FillRectangle (Hexadecimal 19)..................................................................................................................63
FillText (Hexadecimal 1A)..........................................................................................................................66
FillTextCenter (Hexadecimal 39).................................................................................................................68
FillTextRight (Hexadecimal 38)...................................................................................................................69
FontSize (Hexadecimal 1B)........................................................................................................................70
GlossyButton (Hexadecimal 1C).................................................................................................................71
Image (Hexadecimal 1D)..........................................................................................................................73
Layer (Hexadecimal 1E)............................................................................................................................74
LineCap (Hexadecimal 1F).........................................................................................................................75
LineJoin (Hexadecimal 20).........................................................................................................................76
LineTo (Hexadecimal 21)...........................................................................................................................78
LineWidth (Hexadecimal 22)......................................................................................................................79
LinearGradient (Hexadecimal 23)...............................................................................................................80
Comfile Technology
M Display User's Manual
2 of 93
M Display User's Manual
LoadFont (Hexadecimal 24).......................................................................................................................81
MoveLayer (Hexadecimal 25).....................................................................................................................82
MoveTo (Hexadecimal 26).........................................................................................................................85
Ping (Hexadecimal 27)..............................................................................................................................86
RadialGradient (Hexadecimal 28)...............................................................................................................87
RunScript (Hexadecimal 29)......................................................................................................................88
Reset (Hexadecimal 2A)............................................................................................................................90
SetPixel (Hexadecimal 2C)........................................................................................................................91
UnloadFont (Hexadecimal 2D)....................................................................................................................92
Dimensions..................................................................................................................................................93
Attribution...................................................................................................................................................97
Comfile Technology
M Display User's Manual
3 of 93
M Display User's Manual
The M Display is a High-Color display that can render multi-layer vector graphics (lines, curves, etc…), raster graphics
(PNG images), and TrueType fonts from any RS-232 capable device, by sending it UTF-8 or binary encoded
commands.
The M Display is an excellent accessory for adding colorful, graphical output to the Moacon. A library is available for
download from the M Display's support website.
Features
➢
➢
➢
➢
➢
➢
➢
➢
➢
High-Color TFT display
User-configurable screen orientation
RS-232 interface
Vector graphics (lines, rectangles, circles, curves, text, images, and many other drawing primitives)
Solid colors and linear/radial gradients
Alpha blending (transparency and partial transparency)
TrueType font and Unicode Support
PNG image file support
Micro SD Card support (FAT32 File System) for storing user generated content (images, fonts, and scripts). 2GB
SD Card included.
➢ Field upgradable firmware
Specifications
➢ 16-bit color, 800×480 (or 480 x 800: see Orientation), 7” TFT LCD
4.3" (480x272), 5.6" (640x480), and 10.2" (800x480) displays are also available
➢
➢
➢
➢
➢
4MB RAM
168MHz ARM MCU
1 RS-232 Serial Port (PC-Level)
1 MicroSD Card slot
1 USB Console/Firmware Update Port
Comfile Technology
M Display User's Manual
4 of 93
M Display User's Manual
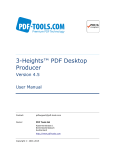
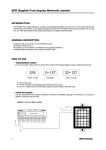
Stand
The M Display comes with an attractive and flexible stand that can be used to make desktop development more
convenient and desktop display more appealing.
The legs can be removed and reversed to change the angle at which the display faces: Steep angle as shown above or
a shallow angle as shown below.
Comfile Technology
M Display User's Manual
5 of 93
M Display User's Manual
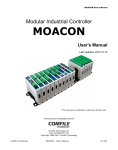
Physical Connections
Mode Dipswitch
➢
Dipswitch 1 – Switches between Demo Mode (On) and Serial Mode(Off)
◦
◦
➢
Demo Mode (On) – The M Display will display a simple demonstration on its screen.
Command Mode (Off ) – The M Display will only display the result of serial commands received on its RS232 port. Changes to serial and protocol settings will be persisted between power cycles.
Dipswitch 2 - Switches between Firmware Update Mode (On) and Execution Mode (Off).
◦
◦
Firmware Update Mode - This mode is used to update the M Display's firmware. The M Display will not
respond to any serial commands while in this mode. In this mode, the USB port functions as a USB
Device Firmware Upgrade (DFU) device and requires a DFU driver for PC connectivity. Please see the M
Display support website to download the DFU driver and firmware updates.
Execution Mode - The M Display will respond to serial commands received on its RS-232 port. In this
mode, the USB port functions as a virtual serial port and requires a virtual serial port driver for PC
connectivity. The virtual serial port driver can be downloaded from the M Display support website. This
USB virtual serial port is intended to be used as a console port for monitoring the status of the M Display.
When powered on, the firmware version and serial and protocol settings will be output to this port. Any
errors encountered while processing commands will also be output to this port.
Set both dipswitches to the off position to run the M Display in its default mode, as a serial display.
Power & RS-232
Contains pins for power, reset, and RS-232 communication. Pins are numbered from left to right.
➢
➢
➢
➢
Pin 1 – RS-232 TX (PC Level)
Pin 2 – RS-232 RX (PC Level)
Pin 3 – Power (+5V)
Pin 4 – Ground
Comfile Technology
M Display User's Manual
6 of 93
M Display User's Manual
Micro-SD Card Slot
Accepts a FAT32 formatted Micro-SD Card for storing user content such as PNG images, fonts, and scripts. Long file
names are not supported, so please limit file names to 8.3 format (8 character file name, 3 character file extension).
Console / Firmware Update USB Port
This USB port functions as either a console port, or a firmware update port depending on the state of the Mode
Dipswitch. See the Mode Dispswitch explanation for details.
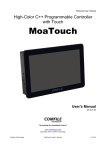
Power Adapter
The M Display comes with a power adapter. It accepts a 9 ~24VDC input and will supply the M Display and potentially
other devices through its 5V output. It also exposes the M Display's RS-232 TX/RX pins (PC Level) to a screw terminal
and a DB9 connector.
Screw terminal with 5V power
output. Exposes the M
Display's TX/RX pins (PC Level)
Molex connector to supply
5V power to the M Display
and expose the M Display's
TX/RX pins (PC-Level) to the
screw terminal and DB9
connector
DB9 Connector exposing the
M Display's TX/RX pins (PCLevel)
9~24VDC power input
There is no RS-232 level converter in this power adapter; the TX and RX pins are all the same node.
Comfile Technology
M Display User's Manual
7 of 93
M Display User's Manual
Initialization
When the M Display is powered on, it will default to the following settings:
Serial: 115200bps, No Parity, 1 Stop Bit
Protocol: UTF-8
Checksum: Disabled
Orientation: 0 degrees (e.g. 800x480 landscape for 7" & 10.2" model)
Boot Image: None
To change these settings, insert an SD card, and add a file named “init.txt” to the root of the SD card. In that text
file, you can add the following commands to change the settings above.
Serial
Syntax
Serial baudRate parity stopBits
Description
Sets the serial communication settings.
Arguments
Argument
Type
Description
baudRate
UInt32
The baud rate in bits per second
parity
Text
“odd” “even”, or “none”
stopBits
Real Number 0.5, 1.0, 1.5, or 2.0
Protocol
Syntax
Protocol protocol
Description
Sets the serial communication protocol.
Arguments
Argument
protocol
Type
Text
Description
“UTF-8” or “Binary”
EnableChecksum
Syntax
EnableChecksum
Description
Enables checksum verification for the serial communication protocol.
Comfile Technology
M Display User's Manual
8 of 93
M Display User's Manual
Orientation
Syntax
Orientation orientation
Description
Changes the display orientation effectively rotating the screen by orientation degrees.
Arguments
Argument
protocol
Type
UInt16
Description
0, 90, 180, or 270
BootImage
Syntax
BootImage filePath
Description
Displays an image when the M Display powers on.
Arguments
Argument
filePath
Type
Text
Description
Path to the image file to display when the M display is powered on.
EnableTrace
Syntax
EnableTrace
Description
Each command and response will be echoed on the M Display's USB console port. See the M Display Console manual
on the M Display's support website for more information.
Comfile Technology
M Display User's Manual
9 of 93
M Display User's Manual
Communication Protocol
Communication is based on a command/response protocol – the host issues a command, and the M Display responds
with a response.
Responses will contain one of the following status codes indicating the success or failure of a command.
Status Code
(Hexadecimal)
Description
0000
Success
0001
Unknown command
0002
Wrong number of command arguments
0003
Invalid command argument
0004
Error reading from a file
0005
Memory allocation error
0006
Serial communication error
0007
Checksum error
FFFF
Unspecified error
The M Display can communicate using a either a UTF-8 protocol or a binary protocol further defined in the sections to
follow. The protocol to use is configured in the initialization sequence. See Initialization.
Comfile Technology
M Display User's Manual
10 of 93
M Display User's Manual
UTF-8 Protocol
The UTF-8 protocol is an ASCII compatible, text based protocol that transmits all information as a series of UTF-8 code
points. Each command and its arguments (i.e. the payload) is encapsulated in a frame starting with a Newline
character (\n – Hexadecimal 0A) and ending with a Carriage Return character (\r – Hexadecimal 0D).
<\n><payload (n-bytes)><\r>
Command
The payload consists of a one-word command name followed by zero or more arguments, each separated by a space.
Example
\nDrawLine 0 0 100 100\r
Arguments may be any one of the following types.
Argument Type
Format/Notation
Description
Real Number
Decimal Fraction (3.4E +/- 38 )
Base 10, 32-bit floating point number
UInt8
Decimal (0 ~ 255)
Base 10, 8-bit unsigned integer
Int16
Decimal (-32,768 ~ 32,767)
Base 10, 16-bit singed integer
UInt16
Decimal (0 ~ 65,535)
Base 10, 16-bit unsigned integer
UInt32
Decimal (0 ~ 4,294,967,295)
Base 10, 32-bit unsigned integer
Color*
Hexadecimal (AARRGGBB). Example:
Opaque Fuschia = 00FF00FF
Base 16, 32-bit unsigned integer used to represent a
color with Alpha(AA, 00 = opaque, FF =
transparent), Red(RR), Green(GG), and Blue(BB)
components.
Text
UTF-8 See (Textual Command Arguments)
A string of characters in UTF-8 format
See the Command Reference to find the specification of each command and its arguments.
* Note that although the notation for color arguments allows users to specify a 24-bit RGB component, the LCD is only
capable of displaying 16-bit (565) RGB colors.
Response
Responses consist of a one-word response (“Ack” or “Nak”) followed by a 4-digit hexadecimal status code, separated
by a space.
Example
Positive Response
\nAck 0000\r
Negative Response (Unknown command)
\nNak 0001\r
Comfile Technology
M Display User's Manual
11 of 93
M Display User's Manual
Textual Command Arguments
Arguments are separated by spaces, so to send a command with a textual argument that must contain a space (e.g. a
text message containing a space) the argument must be enclosed in double quotes (Decimal 34, Hexadecimal 22).
The following command will only display the word 'Hello' because it recognizes the argument World as an additional
argument, and additional arguments are ignored.
FillText 100 100 Hello World
Hello
The following command will display 'Hello World' as the entire phrase is enclosed within double quotes.
Fillext 100 100 "Hello World"
Hello World
To display a double quote character ('”', Decimal 34, Hexadecimal 22), it must be escaped with backslash character
(Decimal 92, Hexadecimal 5C). The following command will display 'Double quotes (”) must be escaped'.
FillText 100 100 "Double Quotes (\") must be escaped"
Double Quotes (“) must be escaped
To display a backslash character, it too must be escaped with a preceding backslash character. The following command
will display 'Backslashes (\) must also be escaped'.
FillText 100 100 "Backslashes (\\) must also be escaped"
Backslashes (\) must also be escaped
Optional Checksum
If the checksum feature is enabled via the EnableChecksum command, a 4-byte hexadecimal number is appended to
the end of the payload for both commands and responses. The checksum is simply a sum of all bytes in the payload,
Comfile Technology
M Display User's Manual
12 of 93
M Display User's Manual
including spaces.
Example – Command
All bytes in the payload are added together (D + r + a + w+ L + I + n + e + space + 0 + space + 0 + space + 1 + 0
+ 0 + space + 1 + 0 + 0 + space = Hexadecimal 0538) and appended to the end of the payload.
DrawLine 0 0 100 100 0538
Example – Positive Response
All bytes in the payload are added together (A + c + k + space + 0 + 0 + 0 + 0 + space = Hexadecimal 020F) and
appended to the end of the payload.
Ack 0000 020F
Comfile Technology
M Display User's Manual
13 of 93
M Display User's Manual
Binary Protocol
The binary protocol sends commands and responses as pure binary data. Multi-byte values are transmitted least
significant byte first (i.e. Little Endian).
Each command and its arguments (i.e. the payload) is encapsulated in a frame starting with a 2-byte start sequence,
<DLE><STX> (Hexadecimal 1002) and ending with a 2-byte end sequence, <DLE><ETX> (Hexadecimal 1003)
<DLE><STX><payload (n bytes)><DLE><ETX>
If the payload contains a <DLE> byte (Hexadecimal 10), the byte must be escaped by prepending a <DLE> just
before it.
Command
The payload consists of a 1-byte command code followed by zero or more arguments.
Arguments may be any one of the following types.
Argument Type
Description
Real Number*
Real number multiplied by 10 to form a 16-bit integer. Example: 123.4 = 1234.
UInt8
8-bit unsigned integer
Int16
16-bit signed integer
UInt16
16-bit unsigned integer
UInt32
32-bit unsigned integer
Color**
32-bit unsigned integer used to represent a color with Alpha(AA, 00 = opaque, FF =
transparent), Red(RR), Green(GG), and Blue(BB) components.
Text
Null-terminated UTF-8 encoded character string
See the Command Reference to find the specification of each command and its arguments.
* For the binary protocol, Real Number arguments are multiplied by 10 so fractions can be used without requiring
floating point formats. This can be conveniently implemented on the host by treating the LCD as having a resolution
of 8000x4800 rather than 800x480. However, be careful to distinguish vector graphics coordinate arguments (Real
Numbers) from as raster graphics coordinate arguments (Int16/UInt16). Raster graphics coordinate arguments are
not real numbers as they must specify whole pixels, so should not be multiplied by 10.
** Note that although the notation for color arguments allows users to specify a 24-bit RGB component, the LCD is
only capable of displaying 16-bit (565) RGB colors.
Example 1
In this example, we'll look at constructing the binary equivalent of the the UTF-8 command DrawLine 0 0 100 100.
The DrawLine command has the following specification:
•
•
•
•
•
DrawLine command code – Hexadecimal 11
x1 – 16-bit Real Number
y1 – 16-bit Real Number
x2 – 16-bit Real Number
y2 – 16-bit Real Number
So, the command would be transmitted as follows.
Field
Bytes (Hex)
DLE STX DrawLine
10
02
11
0
0
1000*
1000*
DLE
ETX
00-00
00-00
E8-03
E8-03
10
03
*Note that real number arguments are multiplied by 10 so that they can be transmitted as 16- bit integers.
Example 2
Consider the command DrawLine 0 0 104 104. Multiplying by 10 for real number arguments 104 becomes 1040.
The binary representation for the number 1040 is 10-04 (Little Endian). Notice that the 1 st byte is equivalent to the
DLE character (Hexadecimal 10). Therefore it must be escaped by prepending a DLE byte as shown below.
Comfile Technology
M Display User's Manual
14 of 93
M Display User's Manual
Field
DLE STX DrawLine
Bytes (Hex)
10
02
11
0
0
1040*
1040*
DLE
ETX
00-00
00-00
10-10-04
10-10-04
10
03
*Note that real number arguments are multiplied by 10 so that they can be transmitted as 16- bit integers.
Example 3
Text arguments must be null-terminating. Consider the command DrawText 100 100 Hello. The string “Hello” is
encoded in UTF-8 as 48-65-6C-6C-6F, but to know where the string ends, a null character (Hexadecimal 00) is
appended to the string.
Field
DLE STX DrawText
Bytes (Hex)
10
02
14
1000*
1000*
Hello
E8-03
E8-03 48-65-6C-6C-6F-00
DLE
ETX
10
03
*Note that real number arguments are multiplied by 10 so that they can be transmitted as 16- bit integers.
Response
Responses consist of a 1-byte response code, <ACK> (Hexadecimal 06) or <NAK> (Hexadecimal 15), followed by 16bit status code
Example
Positive Response
Field
Bytes (Hex)
DLE STX ACK
10
02
06
Success
DLE
ETX
00-00
10
03
Negative Response (Unknown command)
Field
Bytes (Hex)
DLE STX NAK
10
02
Unknown Command
DLE
ETX
01-00
10
03
15
Optional Checksum
If the checksum feature is enabled via the EnableChecksum command, a 16-bit integer checksum is appended to the
end of the payload for both commands and responses. The checksum is simply a sum of all bytes in the payload.
Example – Command
Consider the command DrawLine 0 0 100 100. All bytes in the payload are added together (Hexadecimal: 11 + 00
+ 00 + 00 + 00 + E8 + 03 + E8 + 03 = 01E7) and appended to the end of the payload.
Field
DLE
STX
DrawLine
0
0
1000*
1000*
Checksum
DLE
ETX
Bytes (Hex)
10
02
11
00-00
00-00
E8-03
E8-03
E7-01
10
03
*Note that real number arguments are multiplied by 10 so that they can be transmitted as 16- bit integers.
Example – Positive Response
All bytes in the payload are added together (Hexadecimal: 06 + 00 + 00 + 00 + 00 = 0006) and appended to the end
of the payload.
Field
Bytes (Hex)
DLE STX
10
Comfile Technology
02
ACK
Success
Checksum
DLE
ETX
06
00-00-00-00
06-00
10
03
M Display User's Manual
15 of 93
M Display User's Manual
Coordinate System
For the 7" and 10.2" models, the M Display features an 800 x 480 (or 480 x 800: see Orientation) pixel display. The
X-axis increases from left to right while the Y-axis increases from top to bottom. The origin (0, 0) is the top-left corner
of the display.
Coordinates are in units of pixels and are always relative to the active layer's origin. So the command…
DrawLine 0.0 0.0 800.0 480.0
…will draw a diagonal line from the top-left corner of the screen to the bottom-right corner of the screen. However,
notice that commands for drawing vector graphics can accept real number arguments. This means it's possible to
specify coordinates of sub-pixels (e.g. half of a pixel). So, that might beg the question “How does half of a pixel
appear?”.
To answer that question, consider the commands…
Color FFFFFF
LineEnd Butt
LineWidth 1.0
DrawLine 2.0 2.0 12.0 2.0
One might expect this to draw a bright white horizontal line, 10.0-pixels long, and exactly 1.0-pixel thick. However the
line actually appears blurred. Zoomed in, one can see the line is actually 2.0-pixels thick and light-gray in color as
shown below.
Comfile Technology
M Display User's Manual
16 of 93
M Display User's Manual
To understand why this is, one must understand that pixels are not dimensionless; rather they have a width and
height. The most common displays have a pixel array of 72 DPI (dots per inch) meaning each pixel is approximately
0.013 inches square (pixels aren't actually square, but, it helps this explanation to think of them as square).
To draw a 1.0-pixel thick horizontal line from (2.0, 2.0) to (12.0, 2.0), that really means drawing a 10.0-pixel wide,
1.0-pixel tall rectangle centered on the line between (2.0, 2.0) and (12.0, 2.0). Therefore, the rectangle's top-left
corner is (2.0, 1.5) and bottom-right corner is (12.0, 2.5). This is illustrated on the graph below. The outline of the
actual line is shows in red. (NOTE: Observe that the ends of the line are clipped exactly at the x-coordinates due to the
“Butt” line ending)
One can see that the line partially covers the pixels in rows 2 and 3. That is why the line appears to be two-pixels
wide. The pixels in row 2 and 3 are each only half-covered (i.e. the pixel coverage is 50%). Since a single pixel is the
smallest individual unit of color, the graphics engine approximates the 50% pixel coverage by making the pixel half as
bright (i.e. 50% transparent). That is why, on a black background, the line appears gray instead of white.
In summary, sub-pixels are approximated by varying the pixel's brightness according to the percentage of pixel's area
covered by the shape.
All this is necessary in order to support anti-aliasing, and ensure the visuals appear smooth and professional.
Comfile Technology
M Display User's Manual
17 of 93
M Display User's Manual
If an application requires a horizontal line that is exactly 1.0-pixel thick and not approximated on the pixel grid, simply
shift the line as necessary to achieve 100% pixel coverage.
In the following example, the horizontal line in the previous illustrations is shifted up by 0.5 pixels to get 100% pixel
coverage on row 2.
Color FFFFFF
LineEnd Butt
LineWidth 1.0
DrawLine 2.0 1.5 12.0 1.5
Now, because the pixel coverage is 100%, the pixels will be lit at 100% brightness (i.e. 100% opaque), resulting in a
bright white horizontal line with a thickness of exactly 1.0 pixel.
Comfile Technology
M Display User's Manual
18 of 93
M Display User's Manual
Graphics
The M Display can display 3 types of graphics: Vector Graphics, Raster Graphics, and Fonts for text.
Vector Graphics
The majority of the M Display's command repertoire is used to draw vector graphics. Vector graphics consist of
geographical primitives (lines, curves, rectangles, circles, etc…) that can be used in isolation or in combination with
other visuals to create buttons, graphs, charts, panels, or just about any other visual that can be imagined.
Vector graphics commands can be broken down into 2 categories: stroked visuals and filled visuals. Stroked visuals
draw an outline around the shape, and filled visuals have their interior filled with a specific color or pattern.
The following draws two rectangles: one stroked, and one filled. Commands that draw stroked shapes begin with
“Draw” and commands that draw filled shapes begin with “Fill”. There are also path drawing commands ArcTo,
ClearPath, ClosePath, CurveTo, LineTo, MoveTo that can be used to create arbitrary shapes.
The following example shows two different rectangles: one stroked and one filled.
# Clear the active layer
Clear
# Draw a stroked rectangle
LineWidth 2
Color 00FF00
DrawRectangle 50 50 100 100
# Draw a filled rectangle
Color FF00FF
FillRectangle 200 50 100 100
➢
The color of the stroke or the fill can be specified with the Color, LinearGradient, or RadialGradient
commands.
➢
The characteristics of the stroke can be specified with the LineWidth, LineEnd, and LineJoin commands.
Vector graphics can be mathematically transformed (rotated, scaled, translated, etc…) without loosing any definition.
This makes them particularly useful for rendering dynamic content such as gauge needles and graphs.
Comfile Technology
M Display User's Manual
19 of 93
M Display User's Manual
Raster Graphics
Raster graphics are simply arrays of plotted pixels. They are mostly used for displaying photographs and other filebased images. The M Display supports two commands for drawing raster graphics: Image and SetPixel. Image can be
used to read a PNG file from the SD Card and plot it to the screen at a given location. SetPixel is used to plot one or
more pixels at a specified location and can be used to plot images on the screen without needing to read from the SD
Card.
The following example shows an image of a gauge being displayed from a PNG file on the SD Card.
# Clear the active layer
Clear
# Display the image
Image 229 115 "/gauge.png"
Comfile Technology
M Display User's Manual
20 of 93
M Display User's Manual
Fonts and Text
The M Display supports the TrueType font format. TrueType fonts are actually a specialized class of vector graphics,
and can, therefore, be scaled, stroked, and filled just like vector graphics.
The shape of the characters (a.k.a. glyphs) are stored in a TrueType font file. The M Display can read these glyphs
from a TrueType font file, and draw the characters at a specified location on the screen.
By default the M Display has a Sans-Serif font file loaded in its internal memory. This font contains glyphs for ASCII
and Extended ASCII characters. Additional fonts can be loaded from the SD Card at runtime with the LoadFont
command.
Text is positioned relative to its baseline origin as illustrated below.
This example shows how to stroke and fill text.
# Clear the active layer
Clear
# Draw yellow text in the default font
Color FFFF00
DrawText 100 100 "\"Hello\" in Korean is..."
# Load font with Korean glyphs
LoadFont "/gulim.ttf"
# Draw green text in the gulim font
Color 00FF00
FontSize 48
FillText 100 200 "안녕하세요"
Comfile Technology
M Display User's Manual
21 of 93
M Display User's Manual
➢
The color of the stroke or the fill can be specified with the Color, LinearGradient, or RadialGradient
commands.
➢
➢
The characteristics of the stroke can be specified with the LineWidth, LineJoin, and LineCap commands.
The size of the font is specified with the FontSize command.
When loading a font from the SD Card, every time text is displayed, the glyphs have to be read from the file. This may
be fine for infrequent text updates, but for highly dynamic text, it may be too slow. Therefore, the LoadFont command
has an additional parameter that can be used to cache the font in memory if enough memory is available. This can
greatly improve performance for applications that require frequent text updates.
To ensure fonts fit in memory, however, the size of the font file must be reduced to an absolute minimum. To help
users reduce the size of font files, Comfile Technology has created a SubsetFont Utility that can be used to remove
unneeded glyphs from font files so they can be used more efficiently with the M Display. Please see the M Display's
support site to obtain this utility.
Internationalization and Multilingual Support
Unicode is supported as long as all text is encoded in UTF-8. Therefore, it is possible to render just about any written
language as long as the active font contains the glyphs. The M Display does not have a text layout engine, however,
so combining marks, right-to-left text, and other advanced layout features are not supported. The M display will
simply render glyphs in sequential order from left to right.
The example below shows how to load a font for English, Korean, Japanese, and Chinese, and display text in each of
those languages.
# English text using default font
FontSize 48
FillText 100 200 "Hello"
# Load font with Korean glyphs
LoadFont "/korean.ttf"
FillText 100 200 "안녕하세요"
# Load font with Japanese glyphs
LoadFont "/japan.ttf"
FillText 100 200 "おはよう"
# Load font with Chinese glyphs
LoadFont "/china.ttf"
FillText 100 200 "你好"
Comfile Technology
M Display User's Manual
22 of 93
M Display User's Manual
Layers
Layers are independent visuals superimposed on one another to create a composite visual. They are useful for
separating a visual into logical parts that can be updated independently without impacting other visuals that they may
overlap.
At power on, the M Display creates a background layer as the default drawing surface. Additional foreground layers
can be created with the CreateLayer command.
The user can draw, independently, to the background layer or any foreground layer. Using the painter's algorithm
(background layer rendered first, foreground layer-1 rendered second…foreground layer-n rendered last) the layers
are combined into a single frame buffer, the composite buffer. Then on every vertical refresh of the LCD, any changes
to the composite buffer are flushed to the screen.
The flushing of the composite buffer to the LCD can be controlled with the DisableFlush and EnableFlush commands.
This can be useful to prevent the M Display from displaying part of a composite visual until the entire visual has been
completely drawn. It can also improve performance when drawing many visuals, as the M Display doesn't have to
waste resources updating the LCD multiple times.
Comfile Technology
M Display User's Manual
23 of 93
M Display User's Manual
Using Layers to Update Text
Using layers is particularly useful when updating text. Consider the desire to update text on green background.
Attempt 1
If one issues a FillText command and attempts to update the text with a second FillText command, the the second text
will be superimposed on the first text as shown below.
# Green Rectangle
Color 000800
FillRectangle 0 0 200 75
# White Text
Color FFFFFF
FillText 50 50 "123"
FillText 50 50 "456"
Attempt 2
If a Clear command is used in between the two FillText commands, the background will be erased and a black box will
appear, which is also not desirable.
# Green Rectangle
Color 000800
FillRectangle 0 0 200 75
# White Text
Color FFFFFF
# Display "123"
FillText 50 50 "123"
# Clear the box containing the text (black on background layer)
Clear 40 20 70 40
# Display "456"
FillText 50 50 "456"
Attempt 3
However, by separating the green background and the text onto different layers, clearing the foreground layer will
erase the text without impacting the green background layer.
# Green Rectangle
Color 000800
FillRectangle 0 0 800 480
# New 70x40 layer, positioned at 40,20 to contain text
Comfile Technology
M Display User's Manual
24 of 93
M Display User's Manual
CreateLayer 40 20 70 40 1
Layer 1
# White text
Color FFFFFF
# Display "123"
# Coordinates are relative to new layer's top-left corner (i.e. 40,20)
FillText 0 40 "123"
# Erase "123" (Transparent for foreground layer)
Clear
# Display "456"
FillText 0 40 "456"
That's better! One could have simply displayed a new green-filled rectangle to clear the text in this example, but that
method falls short for backgrounds that may be images. Images are stored on the SD card and reading from the SD
card is orders of magnitude slower than drawing with the CPU. Re-displaying the background image from the SD card
for each and every text update, especially if the image were full-screen, would be much too slow to be practical, and
this is why the layering feature was created.
Layers and Memory
Creating layers requires memory to hold the state of its pixels. The M Display has 4MB of memory that is shared by all
layers, cached fonts, and any other loadable content. When the M Display is first powered on, it creates an
800x480x16-bits = 768KB background layer and an 800x480x16-bits = 768KB composition layer. These layers only
need 16-bits per pixel because they are opaque layers. That leaves approximately 2~2.5MB of memory for any
foreground layers, cached fonts, and other loadable content.
Foreground layers will reside “on top” of the background layer, and will therefore need an additional byte for the alpha
(transparency) component. This byte, in addition to the 16 bits required for the RGB components, results in for a total
of 24 bits per pixel. So, as an example, an 800×480 foreground layer will need 800x480x24-bits = 1,152KB of
memory.
As can be seen, layers can potentially consume a lot of memory. So, be sure to create layers sparingly, and keep them
to as small an area as possible to avoid running out of memory.
Comfile Technology
M Display User's Manual
25 of 93
M Display User's Manual
Command Reference
ArcTo (Hexadecimal 00)
Syntax
ArcTo x y horizontalRadius [verticalRadius [rotationAngle [largeArc [sweep]]]]
Description
Draws an elliptical or circular arc on the active layer from the current point (see MoveTo) to x,y.
➢
➢
➢
➢
The color of the stroke can be specified with the Color, LinearGradient, or RadialGradient commands.
The width of the stroke is specified with the LineWidth command.
The stroke's end cap is specified with the LineCap command.
The appearance of the joint with preceding and subsequent strokes is specified with the LineJoin command.
Arguments
Argument
Type
Description
x
Real Number
The X-Coordinate of the point to draw the arc to
y
Real Number
The Y-Coordinate of the point to draw the arc to
horizontalRadius
Real Number
The horizontal radius of the ellipse that forms the arc
verticalRadius
Real Number
(Optional) The vertical radius of the ellipse that forms the arg. If
omitted, the this value will be equal to the horizontal radius forming a
circular arc.
rotationAngle
Real Number
(Optional) The angle in degrees to rotate the ellipse that forms the
arc. Default is 0 degrees.
largeArc
UInt8
(Optional) 0 - Draw the smaller arc, non-zero - draw the larger arc.
Default is non-zero.
sweep
UInt8
(Optional) 0 - Draws arc starting at the current point in a counterclockwise direction, non-zero - Draws the arc starting at the current
point in a clockwise direction. Default is non-zero.
Understanding the largeArc and sweep Arguments
The following illustrates the affect of the largeArc and sweep arguments.
Example
This example demonstrates how to use ArcTo to draw a fraction of a pie chart.
Comfile Technology
M Display User's Manual
26 of 93
M Display User's Manual
# Clear the active layer
Clear
# Create a fraction of a pie
MoveTo 200 200
LineTo 270.7 129.29
ArcTo 270.7 270.7 100 100 0 0 1
ClosePath
# Fill the pie with partially transparent red
Color AAFF0000
FillPath
# Draw a border around the pie in bright red
LineWidth 1
Color FF0000
DrawPath
Comfile Technology
M Display User's Manual
27 of 93
M Display User's Manual
Backlight (Hexadecimal 01)
Syntax
Backlight brightness
Description
Sets the brightness of the LCD backlight. The default brightness is 255.
Arguments
Argument
brightness
Type
UInt8
Comfile Technology
Description
The brightness of the backlight ranging from 0-off to 255-brightest.
M Display User's Manual
28 of 93
M Display User's Manual
BevelButton (Hexadecimal 02)
Syntax
BevelButton topLeftX topLeftY width height buttonColor topLeftColor bottomRightColor [text]
Description
Draws a rectangular button with a beveled border to the active layer.
Arguments
Argument
Type
Description
topLeftX
Real Number
The X-Coordinate of the top-left corner of the button.
topLeftY
Real Number
The Y-Coordinate of the top-left corner of the button.
width
Real Number
The width of the button.
height
Real Number
The height of the button.
buttonColor
Color
The color of the body of the button.
topLeftColor
Color
The color of the top and left bevel border.
bottomRightColor
Color
The color of the bottom and right bevel border.
text
Text
(Optional) The text label to display in the center of the button. If omitted, no
text will be displayed
➢
➢
➢
The color of the text is specified with the Color, LinearGradient, or RadialGradient commands.
The width of the border is specified with the LineWidth command.
The size of the font for the text label is specified with the FontSize command.
Example
This example displays a gray beveled button with black text.
# Clear the active layer
Clear
# Black Text
Color 0
# Border width of 10 pixels
LineWidth 10
# Gray beveled button
BevelButton 100 100 250 100 AAAAAA C5C5C5 555555 "Text"
Comfile Technology
M Display User's Manual
29 of 93
M Display User's Manual
Comfile Technology
M Display User's Manual
30 of 93
M Display User's Manual
Button (Hexadecimal 03)
Syntax
Button topLeftX topLeftY width height cornerRadius buttonColor borderColor [text]
Description
Draws a rectangular or rounded-rectangular button to the active layer.
Arguments
Argument
Type
Description
topLeftX
Real Number
The X-Coordinate of the top-left corner of the button.
topLeftY
Real Number
The Y-Coordinate of the top-left corner of the button.
width
Real Number
The width of the button.
height
Real Number
The height of the button.
cornerRadius
Real Number
The radius of curvature for the corners of the button.
buttonColor
Color
The color of the body of the button.
borderColor
Color
The color of the button's border.
text
Text
(Optional) The text label to display in the center of the button. If omitted, no
text will be displayed
➢
➢
➢
The color of the text is specified with the Color, LinearGradient, or RadialGradient commands.
The width of the border is specified with the LineWidth command.
The size of the font for the text label is specified with the FontSize command.
Example
This example draws a blue rounded-rectangular button with white text.
# Clear the active layer
Clear
# white text
Color FFFFFF
# Border width of 1 pixel
LineWidth 3
# Blue button with 20 pixel radius rounded corners
Button 100 100 250 100 20 0000AA 0000FF "Text"
Comfile Technology
M Display User's Manual
31 of 93
M Display User's Manual
Clear (Hexadecimal 04)
Syntax
Clear [x y width height]
Description
Clears the active layer. If x, y, width, and height are omitted the entire layer will be cleared. Otherwise, just the
rectangle bound by x,y width,height will be cleared.
Foreground layers are transparent when cleared in order to reveal pixels in the layers beneath them. The background
layer is black when cleared as there are no layers beneath it.
Arguments
Argument
Type
Description
x
Int16
The X-Coordinate of the top-left corner of the area to be cleared
y
Int16
The Y-Coordinate of the top-left corner of the area to be cleared
width
UInt16
The width of the area to be cleared
height
UInt16
The height of the area to be cleared
Comfile Technology
M Display User's Manual
32 of 93
M Display User's Manual
ClearPath (Hexadecimal 05)
Syntax
ClearPath
Description
Clears the current path drawn with any of the path drawing commands (e.g. ArcTo, ClearPath, ClosePath, CurveTo,
LineTo, MoveTo).
Comfile Technology
M Display User's Manual
33 of 93
M Display User's Manual
ClosePath (Hexadecimal 32)
Syntax
ClosePath
Description
Draws a line from the current point on the path to the path's origin creating an enclosed polygon.
➢
➢
➢
➢
The color of the stroke can be specified with the Color, LinearGradient, or RadialGradient commands.
The width of the stroke is specified with the LineWidth command.
The stroke's end cap is specified with the LineCap command.
The appearance of the joint with preceding and subsequent strokes is specified with the LineJoin command.
Example
This example demonstrates use ClosePath to enclose a section of a pie.
# Clear the active layer
Clear
# Create a fraction of a pie
MoveTo 200 200
LineTo 270.7 129.29
ArcTo 270.7 270.7 100 100 0 0 1
# Enclose the pie by drawing a line back to the center
ClosePath
# Fill the pie with partially transparent red
Color AAFF0000
FillPath
# Draw a border around the pie in bright red
LineWidth 1
Color FF0000
DrawPath
Comfile Technology
M Display User's Manual
34 of 93
M Display User's Manual
Color (Hexadecimal 07)
Syntax
Color color
Description
Specifies the solid color to use in subsequent drawing and filling commands. The color is global and applies to all
layers.
Arguments
Argument
color
Type
Color
Comfile Technology
Description
The solid color to use for all subsequent commands.
M Display User's Manual
35 of 93
M Display User's Manual
Example 1
This example will display a black, blue, green, and red rectangle on a gray background.
# Clear the active layer
Clear
# Opaque gray background
Color CCCCCC
FillRectangle 0 0 800 480
# Opaque black rectangle
Color 0
FillRectangle 50 50 100 100
# Opaque blue rectangle
Color FF
FillRectangle 100 100 100 100
# Opaque green rectangle
Color FF00
FillRectangle 150 150 100 100
# Opaque red rectangle
Color FF0000
FillRectangle 200 200 100 100
Comfile Technology
M Display User's Manual
36 of 93
M Display User's Manual
Example 2
This example will display a partially transparent fuchsia filled rectangle on a partially transparent green filled rectangle.
# Clear the active layer
Clear
# Partially transparent green rectangle
Color A900FF00
FillRectangle 50 50 100 100
# Partially transparent fuchsia rectangle
Color A9FF00FF
FillRectangle 100 100 100 100
Comfile Technology
M Display User's Manual
37 of 93
M Display User's Manual
CreateLayer (Hexadecimal 08)
Syntax
CreateLayer x y width height layerID
Description
Creates a new layer on top of all existing layers. This command dynamically allocates memory to hold the layer's
frame buffer, so be aware that creating too may layers or too large of a layer can result in memory errors.
Arguments
Argument
Type
Description
x
Int16
The X-Coordinate of the top-left corner of the layer to be created
y
Int16
The Y-Coordinate of the top-left corner of the layer to be created
width
UInt16
The width of the layer to be created
height
UInt16
The height of the layer to be created
layerID
UInt8
The ID to give the layer. This is a text value that must be unique. ID “0” is
already assigned to the background layer so it cannot be used.
Coordinates are relative to the the screen's origin (0, 0).
Comfile Technology
M Display User's Manual
38 of 93
M Display User's Manual
CurveTo (Hexadecimal 09)
Syntax
CurveTo x y control0X control0Y [control1X control1Y]
Description
Draws a quadratic or cubic bezier curve from the current point (see MoveTo) to x,y.
➢
➢
➢
➢
The color of the stroke can be specified with the Color, LinearGradient, or RadialGradient commands.
The width of the stroke is specified with the LineWidth command.
The stroke's end cap is specified with the LineCap command.
The appearance of the joint with preceding and subsequent strokes is specified with the LineJoin command.
Arguments
Argument
Type
Description
x
Real Number
The X-Coordinate of the point to draw the curve to
y
Real Number
The Y-Coordinate of the point to draw the curve to
control0X
Real Number
The X-Coordinate of the first control point
control0Y
Real Number
The Y-Coordinate of the first control point
control1X
Real Number
(Optional) The X-Coordinate of the second control point. If this
argument is specified, the curve will be drawn as a cubic bezier. If
omitted, the curve will be drawn as a quadratic bezier.
control1Y
Real Number
(Optional) The Y-Coordinate of the second control point. If this
argument is specified, the curve will be drawn as a cubic bezier. If
omitted, the curve will be drawn as a quadratic bezier.
Example
This example draws a cyan curve from (200, 200) to (400, 200).
# Clear the active layer
Clear
# Create the vertices for the path
MoveTo 200 200
CurveTo 400 200 300 300 300 200
# Draw the path in a cyan, with a line width of 5 pixels
LineWidth 5
Color 00FFFF
DrawPath
Comfile Technology
M Display User's Manual
39 of 93
M Display User's Manual
Delay (Hexadecimal 0A)
Syntax
Delay milliseconds
Description
Pauses execution for the specified number of milliseconds. This is particularly useful for use with the RunScript
command so one can control the rate at which visuals are displayed.
Arguments
Argument
milliseconds
Type
UInt32
Comfile Technology
Description
The number of milliseconds to pause for.
M Display User's Manual
40 of 93
M Display User's Manual
DestroyLayer (Hexadecimal 0B)
Syntax
DestroyLayer layerID
Description
Destroys the layer specified by layerID and releases any memory held by its frame buffer.
Arguments
Argument
layerID
Type
UInt8
Comfile Technology
Description
The ID of the layer to be destroyed
M Display User's Manual
41 of 93
M Display User's Manual
DisableFlush (Hexadecimal 0C)
Syntax
DisableFlush
Description
Disables flushing all layers' frame buffers to the screen.
If you have many items to draw, use this to prevent displaying each item on the screen until all items have been
drawn. Using this command in combination with EnableFlush can improve performance and prevent display anomalies
while drawing.
Comfile Technology
M Display User's Manual
42 of 93
M Display User's Manual
DisableLayer (Hexadecimal 34)
Syntax
DisableLayer layerId
Description
Disables a layer so it is no longer displayed, effectively hiding the layer. The layer still exists and the contents of the
memory are not cleared. Use EnableLayer to undo this command and show the layer on the screen.
Arguments
Argument
layerID
Type
Description
UInt8
The ID of the layer to be disabled
Comfile Technology
M Display User's Manual
43 of 93
M Display User's Manual
DrawArc (Hexadecimal 0D)
Syntax
DrawArc centerX centerY horizontalRadius [verticalRadius] startAngle sweep
Description
Draws a circular or elliptical arc to the active layer.
➢
➢
➢
The color of the stroke can be specified with the Color, LinearGradient, or RadialGradient commands.
The width of the stroke is specified with the LineWidth command.
The stroke's end cap is specified with the LineCap command.
Arguments
Argument
Type
Description
centerX
Real Number
The X-Coordinate of the center of the ellipse that forms the arc.
centerY
Real Number
The Y-Coordinate of the center of the ellipse that forms the arc.
horizontalRadius
Real Number
The horizontal radius of the ellipse that forms the arc.
verticalRadius
Real Number
(Optional) The vertical radius of the ellipse that forms the arc. If omitted it will
be equal to horizontal radius producing a circular arc.
startAngle
Real Number
The angle (in degrees) at which to start drawing
sweep
Real Number
The number of degrees to sweep the arc. Positive numbers sweep in the
clockwise direction. Negative numbers sweep in the counter-clockwise direction.
Comfile Technology
M Display User's Manual
44 of 93
M Display User's Manual
Example
This example draws a green circular arc with a stroke width of 1.0, and fuchsia elliptical arc with a stroke width of 3.0.
# Clear the active layer
Clear
# Draw green circular arc with a stroke width of 1.0
LineWidth 1.0
Color 00FF00
# Width omitted for circular arc
DrawArc 100 100 50 45.0 235.0
# Draw fuchsia elliptical arc with a stroke width of 3.0
LineWidth 3.0
Color FF00FF
DrawArc 300 100 100 50 110 270
Comfile Technology
M Display User's Manual
45 of 93
M Display User's Manual
DrawCircle (Hexadecimal 0E)
Syntax
DrawCircle centerX cenerY radius
Description
Draws a square-bound circle to the active layer.
➢
➢
The color of the stroke can be specified with the Color, LinearGradient, or RadialGradient commands.
The width of the stroke is specified with the LineWidth command.
Arguments
Argument
Type
Description
centerX
Real Number
The X-Coordinate of the circle's center
centerY
Real Number
The Y-Coordinate of the circle's center
radius
Real Number
The radius of the circle
Example
This example draws circle with a radius of 100 centered at (200, 200).
# Clear the active layer
Clear
# Set line width
LineWidth 1.0
# Draw a green circle
Color 00FF00
DrawCircle 200 200 100
Comfile Technology
M Display User's Manual
46 of 93
M Display User's Manual
DrawCurve (Hexadecimal 0F)
Syntax
DrawCurve fromX fromY control0X control0Y [control1X control1Y] toX toY
Description
Draws a quadratic or cubic bezier curve from the point (fromX, fromY) to point (toX, toY) on the active layer.
➢
➢
➢
The color of the stroke can be specified with the Color, LinearGradient, or RadialGradient commands.
The width of the stroke is specified with the LineWidth command.
The stroke's end cap is specified with the LineCap command.
Arguments
Argument
Type
Description
fromX
Real Number
The X-Coordinate of the point to start drawing from
fromY
Real Number
The Y-Coordinate of the point to start drawing from
control0X
Real Number
The X-Coordinate of the first control point
control0Y
Real Number
The Y-Coordinate of the first control point
control1X
Real Number
(Optional) The X-Coordinate of the second control point. If this argument is
specified, the curve will be drawn as a cubic bezier. If omitted, the curve will be
drawn as a quadratic bezier.
control1Y
Real Number
(Optional) The Y-Coordinate of the second control point. If this argument is
specified, the curve will be drawn as a cubic bezier. If omitted, the curve will be
drawn as a quadratic bezier.
toX
Real Number
The X-Coordinate of the point to draw the curve to
toY
Real Number
The Y-Coordinate of the point to draw the curve to
Example 1
This example draws a green parabola between the two top corners of the screen
# Clear the active layer
Clear
# Draw X and Y axes
Color FFFFFF
DrawLine 0 240 799 240
DrawLine 400 0 400 479
# Draw quadratic bezier curve (parabola)
Color 00FF00
DrawCurve 0 0 400 800 799 0
Comfile Technology
M Display User's Manual
47 of 93
M Display User's Manual
Example 2
This example draws a green cubic bezier curve between the two top corners of the screen.
# Clear the active layer
Clear
# Draw X and Y axes
Color FFFFFF
DrawLine 0 240 799 240
DrawLine 400 0 400 479
# Draw cubic bezier curve
Color 00FF00
DrawCurve 0 0 700 400 100 400 799 0
Comfile Technology
M Display User's Manual
48 of 93
M Display User's Manual
DrawEllipse (Hexadecimal 10)
Syntax
DrawEllipse centerX centerY horizontalRadius verticalRadius
Description
Draws a rectangle-bound ellipse to the active layer.
➢
➢
The color of the stroke can be specified with the Color, LinearGradient, or RadialGradient commands.
The width of the stroke is specified with the LineWidth command.
Arguments
Argument
Type
Description
centerX
Real Number
The X-Coordinate of the ellipse's center
centerY
Real Number
The Y-Coordinate of the ellipse's center
horizontalRadius
Real Number
The radius of the ellipse in the direction of the x-axis
verticalRadius
Real Number
The radius of the ellipse in the direct of the y-axis
Example
This example draws an ellipse with a horizontal radius of 100, vertical radius of 75, centered at 200,200.
# Clear the active layer
Clear
# Set line width
LineWidth 1.0
# Draw a green circle
Color 00FF00
DrawEllipse 200 200 100 75
Comfile Technology
M Display User's Manual
49 of 93
M Display User's Manual
DrawLine (Hexadecimal 11)
Syntax
DrawLine x1 y1 x2 y2
Description
Draws a line on the active layer from point (x1, y1) to line (x2, y2) including both points.
➢
➢
➢
The color of the stroke can be specified with the Color, LinearGradient, or RadialGradient commands.
The width of the stroke is specified with the LineWidth command.
The stroke's end cap is specified with the LineCap command.
Arguments
Argument
Type
Description
x1
Real Number
The X-Coordinate of the point from which to begin drawing
y1
Real Number
The Y-Coordinate of the point from which to begin drawing
x2
Real Number
The X-Coordinate of the point at which to end drawing
y2
Real Number
The Y-Coordinate of the point at which to end drawing
Example
This example draws a fuchsia line from point 0,0 to point 799,479
# Clear the active layer
Clear
# Set the line width
LineWidth 1.0
# Set the color of the line
Color FF00FF
# Draw the line
DrawLine 0 0 799 479
Comfile Technology
M Display User's Manual
50 of 93
M Display User's Manual
DrawPath (Hexadecimal 12)
Syntax
DrawPath
Description
Displays the outline of the path drawn with the path drawing commands (e.g. ArcTo, ClearPath, ClosePath, CurveTo,
LineTo, MoveTo) on the active layer.
➢
➢
➢
The color of the stroke can be specified with the Color, LinearGradient, or RadialGradient commands.
The width of the stroke is specified with the LineWidth command.
The stroke's end cap is specified with the LineCap command.
Example
This example draws a cyan curve from (200, 200) to (400, 200).
# Clear the active layer
Clear
# Create the vertices for the path
MoveTo 200 200
CurveTo 400 200 300 300 300 200
# Draw the path in a cyan, with a line width of 5 pixels
LineWidth 5
Color 00FFFF
DrawPath
Comfile Technology
M Display User's Manual
51 of 93
M Display User's Manual
DrawRectangle (Hexadecimal 13)
Syntax
DrawRectangle x y width height [topLeftCornerRadius [topRightCornerRadius
bottomLeftCornerRadius bottomRightCornerRadius]]
Aliases
DrawRect
Description
Draws a rectangle or rounded-rectangle on the active layer.
➢
➢
The color of the stroke can be specified with the Color, LinearGradient, or RadialGradient commands.
The width of the stroke is specified with the LineWidth command.
Arguments
Argument
Type
Description
x
Real Number
The X-Coordinate of the point to be the rectangle's top-left corner
y
Real Number
The Y-Coordinate of the point to be the rectangle's top-left corner
width
Real Number
The width of the rectangle.
height
Real Number
The height of the rectangle.
topLeftCornerRadius
Real Number
(Optional) The radius of the quarter circle that forms the top-left corner.
If omitted, a value with sharp (90 degree) corners will be drawn. If
topRightCornerRadius , bottomLeftCornerRadius , and
bottomRightCornerRadius are omitted, this value will be used for all
corner radii.
topRightCornerRadius
Real Number
(Optional) (Optional) The radius of the quarter circle that forms the topright corner
bottomLeftCornerRadius
Real Number
(Optional) The radius of the quarter circle that forms the bottom-left
corner
bottomRightCornerRadius Real Number
(Optional) The radius of the quarter circle that forms the bottom-right
corner
Example
This example will draw a cyan rectangular perimeter 150 pixels wide, 200 pixels tall, positioned so it's top left corner is
at 50,100.
#Clear the current layer
Clear
# Draw a cyan rectangular perimeter
Color 00FFFF
DrawRectangle 50 100 150 200
Comfile Technology
M Display User's Manual
52 of 93
M Display User's Manual
Example
This example will draws an opaque rounded rectangle 150 pixels wide, 200 pixels tall, with a corner radius of 20 pixels
positioned so it's top left corner is at 50,100.
#Clear the current layer
Clear
# Set Line Width
LineWidth 1.0
# Draw a cyan rounded rectangular perimeter
Color FFFF
DrawRectangle 50 100 150 200 20
Comfile Technology
M Display User's Manual
53 of 93
M Display User's Manual
DrawText (Hexadecimal 14)
Syntax
DrawText baselineX baselineY text [angle]
Description
Draws outlined text on the active layer.
➢
➢
➢
➢
The font size is specified with the FontSize command.
The color of the stroke can be specified with the Color, LinearGradient, or RadialGradient commands.
The width of the stroke is specified with the LineWidth command.
The stroke's end cap is specified with the LineCap command.
Unicode characters are supported, but the font rendering engine does not contain a text layout features, so combining
marks, bi-directional text, and other such layout features are not supported.
Arguments
Argument
Type
Description
baselineX
Real Number
The X-Coordinate of the text's baseline
baselineY
Real Number
The Y-Coordinate of the text's baseline
text
Text
The text to display.
angle
Real Number
(Optional) Angle, in degrees, to rotate the text
Comfile Technology
M Display User's Manual
54 of 93
M Display User's Manual
Example
This example draws ”“Hello” in Korean is…” in yellow with a size of 32 pixels and “안녕하세요” in green with a size of 48
pixels.
# Clear the active layer
Clear
# Draw yellow text in the default font
Color FFFF00
DrawText 100 100 "\"Hello\" in Korean is..."
# Load font with Korean glyphs
LoadFont "/gulim.ttf"
# Draw green text in the gulim font
Color 00FF00
FontSize 48
DrawText 100 200 "안녕하세요"
Comfile Technology
M Display User's Manual
55 of 93
M Display User's Manual
DrawTextCenter (Hexadecimal 37)
Syntax
DrawTextCenter baselineX baselineY text [angle]
Description
Draws outlined text on the active layer, center-aligned to baselineX, baselineY.
➢
➢
➢
➢
The font size is specified with the FontSize command.
The color of the stroke can be specified with the Color, LinearGradient, or RadialGradient commands.
The width of the stroke is specified with the LineWidth command.
The stroke's end cap is specified with the LineCap command.
Unicode characters are supported, but the font rendering engine does not contain a text layout features, so combining
marks, bi-directional text, and other such layout features are not supported.
Arguments
Argument
Type
Description
baselineX
Real Number
The X-Coordinate of the text's baseline
baselineY
Real Number
The Y-Coordinate of the text's baseline
text
Text
The text to display.
angle
Real Number
(Optional) Angle, in degrees, to rotate the text
Comfile Technology
M Display User's Manual
56 of 93
M Display User's Manual
DrawTextRight (Hexadecimal 36)
Syntax
DrawTextRight baselineX baselineY text [angle]
Description
Draws outlined text on the active layer, right-aligned to baselineX, baselineY.
➢
➢
➢
➢
The font size is specified with the FontSize command.
The color of the stroke can be specified with the Color, LinearGradient, or RadialGradient commands.
The width of the stroke is specified with the LineWidth command.
The stroke's end cap is specified with the LineCap command.
Unicode characters are supported, but the font rendering engine does not contain a text layout features, so combining
marks, bi-directional text, and other such layout features are not supported.
Arguments
Argument
Type
Description
baselineX
Real Number
The X-Coordinate of the text's baseline
baselineY
Real Number
The Y-Coordinate of the text's baseline
text
Text
The text to display.
angle
Real Number
(Optional) Angle, in degrees, to rotate the text
Comfile Technology
M Display User's Manual
57 of 93
M Display User's Manual
EnableFlush (Hexadecimal 33)
Syntax
EnableFlush
Description
Enables flushing all layers' frame buffers to the screen.
If you have many items to draw, use DisableFlush to prevent displaying each item on the screen until all items have
been drawn. Once all items have been drawn use this command to make them appear on the screen. Using this
command in combination with DisableFlush can improve performance and prevent display anomalies while drawing.
Comfile Technology
M Display User's Manual
58 of 93
M Display User's Manual
EnableLayer (Hexadecimal 35)
Syntax
EnableLayer layerId
Description
Enables a layer effectively showing it on the screen. This command will undo a previous DisableLayer command.
Arguments
Argument
layerID
Type
Description
UInt8
The ID of the layer to be enabled
Comfile Technology
M Display User's Manual
59 of 93
M Display User's Manual
FillCircle (Hexadecimal 16)
Syntax
FillCircle centerX centerY radius
Description
Draws a filled circle to the active layer.
The fill color is specified with the Color, LinearGradient, or RadialGradient command.
Arguments
Argument
Type
Description
centerX
Real Number
The X-Coordinate of the circle's center.
centerY
Real Number
The Y-Coordinate of the circle's center.
radius
Real Number
The radius of the circle.
Example
This example displays green-filled circle of radius 50, centered at (100, 100).
# Clear the active layer
Clear
# Draw a green circle
Color 00FF00
FillCircle 100 100 50
Comfile Technology
M Display User's Manual
60 of 93
M Display User's Manual
FillEllipse (Hexadecimal 17)
Syntax
FillEllipse centerX centerY horizontalRadius verticalRadius
Description
Draws a filled ellipse on the active layer.
The fill color is specified with the Color, LinearGradient, or RadialGradient command.
Arguments
Argument
Type
Description
centerX
Real Number
The X-Coordinate of the bounding-rectangle's top-left corner
centerY
Real Number
The Y-Coordinate of the bounding-rectangle's top-left corner
horizontalRadius
Real Number
The radius of the ellipse in the X-axis direction
verticalRadius
Real Number
The radius of the ellipse in the Y-axis direction
Example
This example draws a green-filled ellipse at 100,100 with a horizontal radius of 50 pixels and vertical radius of 75
pixels.
# Clear the active layer
Clear
# Draw a green oval
Color 00FF00
FillEllipse 100 100 50 75
Comfile Technology
M Display User's Manual
61 of 93
M Display User's Manual
FillPath (Hexadecimal 18)
Syntax
FillPath
Description
Fills the path drawn with the path drawing commands (e.g. ArcTo, ClearPath, ClosePath, CurveTo, LineTo, MoveTo) on
the active layer.
The fill color can be specified with the Color, LinearGradient, or RadialGradient commands.
Example
This example demonstrates using the FillPath command to display a fraction of a pie chart.
# Clear the active layer
Clear
# Create a fraction of a pie
MoveTo 200 200
LineTo 270.7 129.29
ArcTo 270.7 270.7 100 100 0 0 1
ClosePath
# Fill the pie with partially transparent red
Color AAFF0000
FillPath
# Draw a border around the pie in bright red
LineWidth 1
Color FF0000
DrawPath
Comfile Technology
M Display User's Manual
62 of 93
M Display User's Manual
FillRectangle (Hexadecimal 19)
Syntax
FillRectangle topLeftX topLeftY width height [topLeftCornerRadius [topRightCornerRadius
bottomLeftCornerRadius bottomRightCornerRadius]]
Aliases
FillRect
Description
Draws a filled rectangle or filled rounded-rectangle on the active layer.
The fill color is specified with the Color, LinearGradient, or RadialGradient command.
Arguments
Argument
Type
Description
topLeftX
Real Number
The X-Coordinate of the rectangle's top-left corner.
topLeftY
Real Number
The Y-Coordinate of the rectangle's top-left corner.
width
Real Number
The width of the rectangle.
height
Real Number
The height of the rectangle.
topLeftCornerRadius
Real Number
(Optional) The radius of the quarter circle that forms the top-left
corner. If omitted, a value with sharp (90 degree) corners will be
drawn. If topRightCornerRadius , bottomLeftCornerRadius , and
bottomRightCornerRadius are omitted, this value will be used for all
corner radii.
topRightCornerRadius
Real Number
(Optional) The radius of the quarter circle that forms the top-right
corner
bottomLeftCornerRadius
Real Number
(Optional) The radius of the quarter circle that forms the bottom-left
corner
bottomRightCornerRadius
Real Number
(Optional) The radius of the quarter circle that forms the bottom-right
corner
Comfile Technology
M Display User's Manual
63 of 93
M Display User's Manual
Example 1
This example will display a partially transparent fuchsia filled rectangle on a partially transparent green filled rectangle.
# Clear the active layer
Clear
# Partially transparent green rectangle
Color A900FF00
FillRectangle 50 50 100 100
# Partially transparent fuchsia rectangle
Color A9FF00FF
FillRectangle 100 100 100 100
Comfile Technology
M Display User's Manual
64 of 93
M Display User's Manual
Example 2
This example will display a partially transparent fuchsia-filled rounded rectangle with a corner radius of 10 pixels on a
partially transparent green-filled rounded rectangle with a corner radius of 20 pixels.
# Clear the active layer
Clear
# Partially transparent green rounded rectangle
Color A900FF00
FillRectangle 50 50 100 100 20
# Partially transparent fuchsia rounded rectangle
Color A9FF00FF
FillRectangle 100 100 100 100 10
Comfile Technology
M Display User's Manual
65 of 93
M Display User's Manual
FillText (Hexadecimal 1A)
Syntax
FillText baselineX baselineY text [angle]
Description
Draws filled text on the active layer.
➢
➢
➢
➢
➢
The font size is specified with the FontSize command.
The color of the stroke can be specified with the Color, LinearGradient, or RadialGradient commands.
The width of the stroke is specified with the LineWidth command.
The stroke's end cap is specified with the LineCap command.
The appearance of the joint with preceding and subsequent strokes is specified with the LineJoin command.
Unicode characters are supported, but the font rendering engine does not contain a text layout features, so combining
marks, bi-directional text, and other such layout features are not supported.
Arguments
Argument
Type
Description
baselineX
Real Number
The X-Coordinate of the text's baseline
baselineY
Real Number
The Y-Coordinate of the text's baseline
text
Text
The text to display.
angle
Real Number
(Optional) Angle, in degrees, to rotate the text
Comfile Technology
M Display User's Manual
66 of 93
M Display User's Manual
Example
This example draws ”“Hello” in Korean is…” in yellow with a size of 32 pixels and “안녕하세요” in green with a size of 48
pixels.
# Clear the active layer
Clear
# Draw yellow text in the default font
Color FFFF00
FillText 100 100 "\"Hello\" in Korean is..."
# Load font with Korean glyphs
LoadFont "/gulim.ttf"
# Draw green text in the gulim font
Color 00FF00
FontSize 48
FillText 100 200 "안녕하세요"
Comfile Technology
M Display User's Manual
67 of 93
M Display User's Manual
FillTextCenter (Hexadecimal 39)
Syntax
FillTextCenter baselineX baselineY text [angle]
Description
Draws filled text on the active layer, center-aligned to baselineX, baselineY.
➢
➢
➢
➢
➢
The font size is specified with the FontSize command.
The color of the stroke can be specified with the Color, LinearGradient, or RadialGradient commands.
The width of the stroke is specified with the LineWidth command.
The stroke's end cap is specified with the LineCap command.
The appearance of the joint with preceding and subsequent strokes is specified with the LineJoin command.
Unicode characters are supported, but the font rendering engine does not contain a text layout features, so combining
marks, bi-directional text, and other such layout features are not supported.
Arguments
Argument
Type
Description
baselineX
Real Number
The X-Coordinate of the text's baseline
baselineY
Real Number
The Y-Coordinate of the text's baseline
text
Text
The text to display.
angle
Real Number
(Optional) Angle, in degrees, to rotate the text
Comfile Technology
M Display User's Manual
68 of 93
M Display User's Manual
FillTextRight (Hexadecimal 38)
Syntax
FillTextRight baselineX baselineY text [angle]
Description
Draws filled text on the active layer, right-aligned to baselineX, baselineY.
➢
➢
➢
➢
➢
The font size is specified with the FontSize command.
The color of the stroke can be specified with the Color, LinearGradient, or RadialGradient commands.
The width of the stroke is specified with the LineWidth command.
The stroke's end cap is specified with the LineCap command.
The appearance of the joint with preceding and subsequent strokes is specified with the LineJoin command.
Unicode characters are supported, but the font rendering engine does not contain a text layout features, so combining
marks, bi-directional text, and other such layout features are not supported.
Arguments
Argument
Type
Description
baselineX
Real Number
The X-Coordinate of the text's baseline
baselineY
Real Number
The Y-Coordinate of the text's baseline
text
Text
The text to display.
angle
Real Number
(Optional) Angle, in degrees, to rotate the text
Comfile Technology
M Display User's Manual
69 of 93
M Display User's Manual
FontSize (Hexadecimal 1B)
Syntax
FontSize size
Description
Selects the size to display with the DrawText and FillText commands. The default size at power on is 32 pixels.
Arguments
Argument
size
Type
Real Number
Description
The size of the text in pixels
Example
This example draws “Default Font Size” in yellow with the default font size and “Font Size 48” in green with a size of
48 pixels.
# Clear the active layer
Clear
# Yellow text at default font size
Color FFFF00
DrawText 100 100 "Default Font Size"
# Green text at font size of 48
Color 00FF00
FontSize 48
DrawText 100 200 "Font Size 48"
Comfile Technology
M Display User's Manual
70 of 93
M Display User's Manual
GlossyButton (Hexadecimal 1C)
Syntax
GlossyButton topLeftX topLeftY width height cornerRadius buttonColor borderColor [text]
Description
Draws a button with a glossy appearance on the active layer.
➢
➢
➢
➢
Coordinates are relative to the active's origin.
The color of the text is specified with the Color, LinearGradient, or RadialGradient commands.
The width of the border is specified with the LineWidth command.
The size of the font for the text label is specified with the FontSize command.
Arguments
Argument
Type
Description
topLeftX
Real Number
The X-Coordinate of the top-left corner of the button.
topLeftY
Real Number
The Y-Coordinate of the top-left corner of the button.
width
Real Number
The width of the button.
height
Real Number
The height of the button.
cornerRadius
Real Number
The radius of curvature for the corners of the button.
buttonColor
Color
The primary shade of color to use for the body of the button.
borderColor
Color
The color of the button's border.
text
Text
(Optional) The text label to display in the center of the button. If omitted, no text
will be displayed
Comfile Technology
M Display User's Manual
71 of 93
M Display User's Manual
Example
This example draws a blue glossy button.
# Clear the active layer
Clear
# White text
Color FFFFFF
# Border width of 2
LineWidth 2
# Draw a blue glossy button
GlossyButton 100 100 200 50 10 336699 336699 "Text"
Comfile Technology
M Display User's Manual
72 of 93
M Display User's Manual
Image (Hexadecimal 1D)
Syntax
Image x y filePath
Description
Reads a PNG file from the SD Card and displays it on the active layer.
Arguments
Argument
Type
Description
x
Int16
X-Coordinate of the point to be the image's top-left corner
y
Int16
Y-Coordinate of the point to be the image's top-left corner
filePath
Text
Path to image file on SD card
Example
This example draws reads the file “gauge.png” located at root of the SD card's file system and positions it so it's topleft corner is at 229,115.
# Clear the active layer
Clear
# Draw the image
Image 229 115 "/gauge.png"
Comfile Technology
M Display User's Manual
73 of 93
M Display User's Manual
Layer (Hexadecimal 1E)
Syntax
Layer layerID
Description
Sets the active layer.
Arguments
Argument
layerID
Type
UInt8
Comfile Technology
Description
The ID of the layer to become the active layer. The background layer's ID is 0.
M Display User's Manual
74 of 93
M Display User's Manual
LineCap (Hexadecimal 1F)
Syntax
LineCap cap
Description
Sets the type of end cap for all subsequent strokes
Arguments
Argument
cap
Type
Text (UTF-8 protocol)
UInt8 (binary protocol)
Description
The type of end cap to use. UTF-8 protocol valid values are “Butt”,
“Round”, and “Square” . Binary protocol valid values are 0, 1, and 2 for
Butt, Round, and Square respectively.
Example
This example shows the appearance of each kind of end cap.
# Clear the active layer
Clear
# Draw white lines with a thickness of 10
Color FFFFFF
LineWidth 10
# Draw three lines, each with a different end cap
LineCap Butt
DrawLine 100 100 200 100
LineCap Round
DrawLine 100 150 200 150
LineCap Square
DrawLine 100 200 200 200
# Draw red lines to illustrate the endpoints
LineCap Butt
LineWidth 1
Color FF0000
DrawLine 100 90 100 210
DrawLine 200 90 200 210
Comfile Technology
M Display User's Manual
75 of 93
M Display User's Manual
LineJoin (Hexadecimal 20)
Syntax
LineJoin join
Description
Sets the type join to use for interconnected strokes.
Arguments
Argument
join
Type
Text(UTF-8 protocol)
UInt8 (Binary protocol)
Comfile Technology
Description
The type of join to use. UTF-8 protocol valid values are “Miter”, “Round”,
and “Bevel” . Binary valid values are 0, 1, and 2 for Miter, Round and
Bevel respectively.
M Display User's Manual
76 of 93
M Display User's Manual
Example
This example shows the appearance of each kind of line join.
# Clear the active layer
Clear
# Set the line width
LineWidth 10.0
# Draw polyline with round join
ClearPath
MoveTo 100 100
LineTo 150 50
LineTo 200 100
LineJoin Round
DrawPath
# Draw polyline with miter join
ClearPath
MoveTo 250 100
LineTo 300 50
LineTo 350 100
LineJoin Miter
DrawPath
# Draw polyline with round join
ClearPath
MoveTo 400 100
LineTo 450 50
LineTo 500 100
LineJoin Bevel
DrawPath
Comfile Technology
M Display User's Manual
77 of 93
M Display User's Manual
LineTo (Hexadecimal 21)
Syntax
LineTo x y
Description
Adds a line to the current path from the current point (See MoveTo) to x,y.
➢
➢
➢
➢
The color of the stroke can be specified with the Color, LinearGradient, or RadialGradient commands.
The width of the stroke is specified with the LineWidth command.
The stroke's end cap is specified with the LineCap command.
The appearance of the joint with preceding and subsequent strokes is specified with the LineJoin command.
Arguments
Argument
Type
Description
x
Real Number
The X-Coordinate of the point to draw the line to
y
Real Number
The Y-Coordinate of the point to draw the line to
Example
This example uses the LineTo command to draw the edges of a fraction of a pie chart.
# Clear the active layer
Clear
# Create a fraction of a pie
MoveTo 200 200
LineTo 270.7 129.29
ArcTo 270.7 270.7 100 100 0 0 1
ClosePath
# Fill the pie with partially transparent red
Color AAFF0000
FillPath
# Draw a border around the pie in bright red
LineWidth 1
Color FF0000
DrawPath
Comfile Technology
M Display User's Manual
78 of 93
M Display User's Manual
LineWidth (Hexadecimal 22)
Syntax
LineWidth width
Description
Sets the width of the line (i.e. stroke) when drawing outlined and stroked shapes.
Arguments
Argument
width
Type
Real Number
Description
The width of the line in pixels
Example
This example draws a green circular arc with a stroke width of 1.0, and fuchsia elliptical arc with a stroke width of 3.0.
# Clear the active layer
Clear
# Draw green circular arc with a stroke width of 1.0
LineWidth 1.0
Color 00FF00
# Width omitted for circular arc
DrawArc 100 100 50 45.0 235.0
# Draw fuchsia elliptical arc with a stroke width of 3.0
LineWidth 3.0
Color FF00FF
DrawArc 300 100 100 50 110 270
Comfile Technology
M Display User's Manual
79 of 93
M Display User's Manual
LinearGradient (Hexadecimal 23)
Syntax
LinearGradient startX startY startColor endX endY endColor
Description
Sets the color pattern used to draw and fill shapes in subsequent commands. startColor blends with endColor starting
at startX,startY and finishing at endX,endY.
Arguments
Argument
Type
Description
startX
Real Number
The X-Coordinate of the point at which to start the gradient.
startY
Real Number
The Y-Coordinate of the point at which to start the gradient.
startColor
Color
The color to use at the start of the gradient
endX
Real Number
The X-Coordinate of the point at which to end the gradient.
endY
Real Number
The Y-Coordinate of the point at which to end the gradient.
endColor
Color
The color to use at the end of the gradient
Example
This example draws a rounded rectangle with a linear gradient fill starting with light-gray to navy blue.
# Clear the active layer
Clear
# Draw a rounded rectangle with a linear gradient fill
LinearGradient 400 200 C0C0C0 400 280 336699
FillRoundedRectangle 300 200 200 80 20
Comfile Technology
M Display User's Manual
80 of 93
M Display User's Manual
LoadFont (Hexadecimal 24)
Syntax
LoadFont filePath [cacheInMemory]
Description
Selects the active font to be used by all subsequent DrawText and FillText commands from a TrueType font file on the
SD card. The cacheInMemory argument can be used to optionally load the font into memory so every time text is
displayed it does not need to read the font data from disk. Caching the font in memory will improve performance when
displaying text, but could consume too much memory, causing memory errors, if the font is too large.
To revert back to the default font use the UnloadFont command.
Arguments
Argument
Type
Description
filePath
Text
Path to the TrueType font file on the SD Card
cacheInMemory
UInt8
0 - (default) Font will be streamed from disk. Non-zero - Font will be loaded into
memory.
Example
This example draws “This is text” at 100 100 in a normal typeface (font.ttf) and “This is Italic text” in an italic typeface
(fonti.ttf).
# Clear the active layer
Clear
# Display font in white
Color FFFFFF
#Load Font (stream from disk)
LoadFont "/font.ttf"
FillText 100 100 "This is text"
#Load Font (cache in memory)
LoadFont "/fonti.ttf" 1
Fillext 100 200 "This is Italic text"
Comfile Technology
M Display User's Manual
81 of 93
M Display User's Manual
MoveLayer (Hexadecimal 25)
Syntax
MoveLayer topLeftX topLeftY
Description
Repositions the active layer. The background layer cannot be repositioned, and will return an Invalid Argument status
code if this command is executed while the active layer is the background layer.
Arguments
Argument
Type
Description
topLeftX
Int16
The X-coordinate of the active layer's new top left corner.
topLeftY
Int16
The Y-coordinate of the active layer's new top left corner.
Example
This example moves layer 1 from (100, 100) to (150, 150).
# Clear the active layer
Clear
# Create layer 1 at (100, 100)
CreateLayer 100 100 200 200 1
# Change the active layer to layer 1
Layer 1
# Fill a rectangle that covers the entire layer
FillRectangle 0 0 200 200
# Move the entire layer to (300, 150)
MoveLayer 300 150
After the FillRectangle command:
After the MoveLayer command:
Comfile Technology
M Display User's Manual
82 of 93
M Display User's Manual
MoveTo (Hexadecimal 26)
Syntax
MoveTo x y
Description
When drawing a path, moves the current point to x,y to begin drawing.
Arguments
Argument
Type
Description
x
Real Number
The X-Coordinate of the point to move to
y
Real Number
The Y-Coordinate of the point to move to
Example
This example demonstrates using to MoveTo draw a fraction of a pie chart centered at (200, 200).
# Clear the active layer
Clear
# Create a fraction of a pie
MoveTo 200 200
LineTo 270.7 129.29
ArcTo 270.7 270.7 100 100 0 0 1
ClosePath
# Fill the pie with partially transparent red
Color AAFF0000
FillPath
# Draw a border around the pie in bright red
LineWidth 1
Color FF0000
DrawPath
Comfile Technology
M Display User's Manual
83 of 93
M Display User's Manual
Ping (Hexadecimal 27)
Syntax
Ping
Description
Responds with an acknowledgment. Use this command for testing communication.
Comfile Technology
M Display User's Manual
84 of 93
M Display User's Manual
RadialGradient (Hexadecimal 28)
Syntax
RadialGradient startX startY startColor radius endColor
Description
Sets the color pattern used to draw and fill shapes in subsequent commands to a radial gradient. startColor blends
with endColor outward radially starting at startX,startY for a distance of radius.
Arguments
Argument
Type
Description
startX
Real Number
The X-Coordinate of the point at which to start the gradient.
startY
Real Number
The Y-Coordinate of the point at which to start the gradient.
startColor
Color
The color to use at the start of the gradient
radius
Real Number
The radius of the gradient from startX,startY
endColor
Color
The color to use at the end of the gradient
Example
This example draws a rounded rectangle with a radial gradient fill starting with light-gray to navy blue.
# Clear the active layer
Clear
# Draw a rounded rectangle with a radial gradient fill
RadialGradient 300 140 C0C0C0 280 336699
FillRoundedRectangle 300 140 200 20 20
Comfile Technology
M Display User's Manual
85 of 93
M Display User's Manual
RunScript (Hexadecimal 29)
Syntax
RunScript filePath
Description
Reads a script file from the SD card and executes each command, in order, line-by-line. Using RunScript within a script
file is not supported.
➢
➢
➢
Lines preceded by a '#' character are ignored and can be used to add comments to a script file.
The script file should be encoded as UTF-8.
This command is acknowledged only after all commands have executed.
Arguments
Argument
filePath
Type
Text
Description
Path to the script file on the SD Card
Example
Assuming the following script is stored as “Grid.txt” in a folder called “Scripts” (e.g. ”/Scripts/Grid.txt”) …
# Clear the active layer
Clear
# Don't draw anything until all commands have executed
DisableFlush
# Set line width
LineWidth 2.0
# White lines
Color FFFFFF
# Vertical lines
DrawLine 10 10 10 470
DrawLine 30 10 30 470
DrawLine 50 10 50 470
DrawLine 70 10 70 470
DrawLine 90 10 90 470
DrawLine 110 10 110 470
DrawLine 130 10 130 470
DrawLine 150 10 150 470
DrawLine 170 10 170 470
DrawLine 190 10 190 470
DrawLine 210 10 210 470
DrawLine 230 10 230 470
DrawLine 250 10 250 470
DrawLine 270 10 270 470
DrawLine 290 10 290 470
DrawLine 310 10 310 470
DrawLine 330 10 330 470
DrawLine 350 10 350 470
DrawLine 370 10 370 470
DrawLine 390 10 390 470
DrawLine 410 10 410 470
DrawLine 430 10 430 470
DrawLine 450 10 450 470
DrawLine 470 10 470 470
DrawLine 490 10 490 470
DrawLine 510 10 510 470
DrawLine 530 10 530 470
DrawLine 550 10 550 470
DrawLine 570 10 570 470
Comfile Technology
M Display User's Manual
86 of 93
M Display User's Manual
DrawLine
DrawLine
DrawLine
DrawLine
DrawLine
DrawLine
DrawLine
DrawLine
DrawLine
DrawLine
DrawLine
590
610
630
650
670
690
710
730
750
770
790
10
10
10
10
10
10
10
10
10
10
10
590
610
630
650
670
690
710
730
750
770
790
470
470
470
470
470
470
470
470
470
470
470
# Horizontal lines
DrawLine 10 10 790 10
DrawLine 10 30 790 30
DrawLine 10 50 790 50
DrawLine 10 70 790 70
DrawLine 10 90 790 90
DrawLine 10 110 790 110
DrawLine 10 130 790 130
DrawLine 10 150 790 150
DrawLine 10 170 790 170
DrawLine 10 190 790 190
DrawLine 10 210 790 210
DrawLine 10 230 790 230
DrawLine 10 250 790 250
DrawLine 10 270 790 270
DrawLine 10 290 790 290
DrawLine 10 310 790 310
DrawLine 10 330 790 330
DrawLine 10 350 790 350
DrawLine 10 370 790 370
DrawLine 10 390 790 390
DrawLine 10 410 790 410
DrawLine 10 430 790 430
DrawLine 10 450 790 450
DrawLine 10 470 790 470
# Display the result
EnableFlush
… then the following command will execute that script and draw the grid as shown below.
RunScript "/Scripts/Grid.txt"
Comfile Technology
M Display User's Manual
87 of 93
M Display User's Manual
Reset (Hexadecimal 2A)
Syntax
Reset
Description
Initiates a software reset, causing the M Display to restart.
Comfile Technology
M Display User's Manual
88 of 93
M Display User's Manual
SetPixel (Hexadecimal 2C)
Syntax
SetPixel x y color0 [color1 ... colorn]
Description
Plots pixels to the active layer in contiguous horizontal line starting at (x, y). By sending a sequence of SetPixel
commands images and other graphics can be plotted pixel-by-pixel.
Arguments
Argument
Type
Description
x
Int16
X-Coordinate of the starting point
y
Int16
Y-Coordinate of the starting point
color0 …colorn
Color
A list of colors to be displayed in horizontal succession (color0 at x,y to colorn at x+n,y).
Example
This example draws a small checkerboard pattern in the upper left quadrant of the screen.
# Clear the active layer
Clear
# First row. Even pixels red.
SetPixel 100 100 FF0000 000000 FF0000 000000 FF0000 000000 FF0000
# Second row. Odd pixels red.
SetPixel 101 100 FF0000 000000 FF0000 000000 FF0000
# Third row. Even pixels red.
SetPixel 100 100 FF0000 000000 FF0000 000000 FF0000 000000 FF0000
# Fourth row. Odd pixels red.
SetPixel 101 100 FF0000 000000 FF0000 000000 FF0000
# Fifth row. Even pixels red.
SetPixel 100 100 FF0000 000000 FF0000 000000 FF0000 000000 FF0000
Zoomed in 1200%:
Comfile Technology
M Display User's Manual
89 of 93
M Display User's Manual
UnloadFont (Hexadecimal 2D)
Syntax
UnloadFont
Description
Unloads the active font, reverting to the default font.
Comfile Technology
M Display User's Manual
90 of 93
M Display User's Manual
Dimensions
Comfile Technology
M Display User's Manual
91 of 93
M Display User's Manual
Comfile Technology
M Display User's Manual
92 of 93
M Display User's Manual
Attribution
➢
Portions of the software make use of Anti-Grain Geometry - Version 2.4 Copyright (C) 2002-2004 Maxim
Shemanarev (McSeem) http://www.antigrain.com/license/index.html
➢
➢
➢
➢
Portions of this software are copyright © 2012 The FreeType Project (www.freetype.org). All rights reserved.
Portions of this software make use of libpng 1.2.50 http://www.libpng.org/pub/png/src/libpng-LICENSE.txt
Portions of this software make use of zlib 1.2.7 http://zlib.net/zlib_license.html
Portions of the software are copyright © 2003 Bitstream, Inc. Bitstream Vera is a trademark of Bitstream,
Inc. http://dejavu-fonts.org/wiki/License
Comfile Technology
M Display User's Manual
93 of 93