1
HRUI User Manual
HRUI User Manual
Daniel Peiró Moreno
2015
Contents
1
Installation
1.1 Quick Linux Installation Instructions . . . . . . . . . . . . . . . . . . . . . . .
1.2 Detailed Linux Installation Instructions . . . . . . . . . . . . . . . . . . . . .
1.3 Windows Installation Instructions . . . . . . . . . . . . . . . . . . . . . . . .
2
2
2
3
2
How to implement a robot controller
6
3
User Interface
3.1 Input Modules . . . . . . . .
3.1.1 Joystick . . . . . . .
3.1.2 Gamepad . . . . . .
3.1.3 Device Orientation .
3.1.4 Voice Commands . .
3.1.5 Custom Input . . . .
3.2 Output Modules . . . . . . .
3.2.1 Data Monitor . . . .
3.2.2 Live Video . . . . .
3.2.3 Live Audio . . . . .
3.2.4 Geolocation . . . . .
3.2.5 Custom Data . . . .
3.3 Utility Modules . . . . . . .
3.3.1 Script Execution . .
3.3.2 Profile Management
.
.
.
.
.
.
.
.
.
.
.
.
.
.
.
.
.
.
.
.
.
.
.
.
.
.
.
.
.
.
.
.
.
.
.
.
.
.
.
.
.
.
.
.
.
.
.
.
.
.
.
.
.
.
.
.
.
.
.
.
.
.
.
.
.
.
.
.
.
.
.
.
.
.
.
.
.
.
.
.
.
.
.
.
.
.
.
.
.
.
.
.
.
.
.
.
.
.
.
.
.
.
.
.
.
.
.
.
.
.
.
.
.
.
.
.
.
.
.
.
.
.
.
.
.
.
.
.
.
.
.
.
.
.
.
.
.
.
.
.
.
.
.
.
.
.
.
.
.
.
.
.
.
.
.
.
.
.
.
.
.
.
.
.
.
.
.
.
.
.
.
.
.
.
.
.
.
.
.
.
.
.
.
.
.
.
.
.
.
.
.
.
.
.
.
.
.
.
.
.
.
.
.
.
.
.
.
.
.
.
.
.
.
.
.
.
.
.
.
.
.
.
.
.
.
.
.
.
.
.
.
.
.
.
.
.
.
.
.
.
.
.
.
.
.
.
.
.
.
.
.
.
.
.
.
.
.
.
.
.
.
.
.
.
.
.
.
.
.
.
.
.
.
.
.
.
.
.
.
.
.
.
.
.
.
.
.
.
.
.
.
.
.
.
.
.
.
.
.
.
.
.
.
.
.
.
.
.
.
.
.
.
.
.
.
.
.
.
.
.
.
.
.
.
.
.
.
.
.
.
.
.
.
.
.
.
.
.
.
.
.
.
.
.
.
.
.
.
.
.
.
.
.
.
.
.
.
.
.
.
.
.
.
.
.
.
.
.
.
.
.
.
.
.
.
.
.
.
.
.
.
.
.
.
.
.
.
.
.
.
.
.
.
.
.
.
.
.
.
.
.
.
.
.
.
8
9
9
10
11
11
12
13
13
15
15
16
16
17
17
18
4
Setting Parameters
5
TCP/IP Port 80 Notes
21
5.1 How to use Port 80 . . . . . . . . . . . . . . . . . . . . . . . . . . . . . . . . 21
6
Item Reference
Daniel Peiró Moreno
19
22
1
1
Installation
1
Installation
1.1
Quick Linux Installation Instructions
Instructions for users familiar with software package installation on Linux using the distributions package manager.
1. Install nodejs, npm and python2 packages.
2. Install avconv (libav-tools) or FFmpeg (ffmpeg) (both optional, required for media streaming only).
3. Install MongoDB and start service.
4. Open terminal in HTML5RUI dir and enter:
mongo utils/hruiconfig.js
npm install
npm start
1.2
Detailed Linux Installation Instructions
Instructions are presented using the APT package manager, used in Debian, Ubuntu and Linux
Mint, among others. See your distributions package manager’s documentation for the correct
equivalent commands, which should be similar.
1. Install nodejs, npm, python2:
sudo apt-get install nodejs npm python2
On some systems (i.e. 32-Bit, Debian), nodejs-legacy package may also be required.
2. Install avconv/ffmpeg (Optional, required for media streaming):
sudo apt-get install libav-tools
or
sudo apt-get install ffmpeg
If you wish to use ffmpeg instead of avconv, change parameter AVCONV in config.json
to ’ffmpeg’ so the app calls ffmpeg instead of avconv. See section 4 for more on setting
custom parameters.
3. Install MongoDB. Essentially, you need to add the MongoDB repository to your package sources, update source list and install the mongodb-org package. Instructions are
given for MongoDB 3.0 for Ubuntu 14.04 Trusty Tahr. To change the ubuntu version,
change the “trusty” in the second command to whatever version codename is required.
See MongoDB documentation for different versions, but the installation process should
remain similar.
(a) Get software source (use method of your choice):
2
Escuela Técnica Superior de Ingenieros Industriales (UPM)
HRUI User Manual
sudo apt-key adv --keyserver hkp://keyserver.ubuntu.com:80 --recv
,→
7F0CEB10
echo "deb http://repo.mongodb.org/apt/ubuntu trusty/mongodb-org/3.0
,→
multiverse" | sudo tee
,→
/etc/apt/sources.list.d/mongodb-org-3.0.list
(b) Update package list:
sudo apt-get update
(c) Install mongodb and start service:
sudo apt-get install -y mongodb-org
sudo service mongod start
To check if mongodb was installed correctly, run mongo shell:
mongo
If no errors are presented and a command prompt is, mongoDB is running correctly.
4. Download HRUI from GitHub: Go to https://github.com/xpeiro/HTML5RUI and
click on Download ZIP or clone using git:
git clone https://github.com/xpeiro/HTML5RUI.git
or install with npm (will be installed in node_modules directory, can be moved if required):
npm install hrui
5. Open terminal in HRUI directory.
6. Configure HRUI MongoDB Database:
mongo utils/hruiconfig.js
Alternatively, backup/restore a working HRUI db with mongorestore.
7. Install and run app:
npm install
npm start
Optional: Use PM2 to monitor/manage server (Recommended) (see PM2 documentation).
npm install pm2 -g
pm2 start bin/start
pm2 logs
1.3
Windows Installation Instructions
Note: The server is designed to be deployed on Linux.
It can be installed on Windows or OS X, given that node.js and mongoDB are multi platform, but it’s not recommended, especially on Windows as installation is cumbersome (not of
the app itself, but of its dependencies) and some features aren’t available (namely: Live Media
Streaming).
Daniel Peiró Moreno
3
1
Installation
If installation on Windows is required, it’s strongly recommended to use the Chocolatey
Windows package manager, which streamlines much of the installation of the dependencies.
To install using chocolatey:
1. Install chocolatey. See https://chocolatey.org/ for precise instructions but running
this command in a cmd.exe window (with administrator privileges, use right-click run as
administrator on cmd.exe) should be enough:
@powershell -NoProfile -ExecutionPolicy Bypass -Command "iex ((new-object
,→
net.webclient).DownloadString('https://chocolatey.org/install.ps1'))" &&
,→
SET PATH=%PATH%;%ALLUSERSPROFILE%\chocolatey\bin
2. Install node.js, mongodb and python2. From a PowerShell command line:
choco install nodejs.install -y
choco install mongodb -y
choco install python2 -y
3. Close and re-open the command line windows that might be open to reload the PATH
Env. variables.
To install without chocolatey:
1. Install NodeJS from http://nodejs.org/ . Make sure NPM package manager is installed (it
is by default).
2. Install Python2 https://www.python.org/downloads/.
3. Install MongoDB from http://www.mongodb.org/downloads
Possible issues with Windows manual installation:
• npm error when trying to install (missing folder npm): Create folder manually (normally
in AppData/Roaming/npm).
• MongoDB error (missing data/db/): Create folder manually where the database will be
stored (use of MongoDB installation folder recommended).
• npm, node, mongod and mongo should be in your PATH if you don’t want to specify it
each time you use them.
Once the dependencies are installed, install the app:
1. Download HRUI from GitHub: Go to https://github.com/xpeiro/HTML5RUI and
click on Download ZIP or clone using git:
git clone https://github.com/xpeiro/HTML5RUI.git
or install with npm (will be installed in node_modules directory, can be moved if required):
npm install hrui
2. Open cmd in HRUI directory.
3. Configure HRUI MongoDB Database (cd to utils/ directory):
4
Escuela Técnica Superior de Ingenieros Industriales (UPM)
HRUI User Manual
mongo hruiconfig.js
Alternatively, backup/restore a working HRUI db with mongorestore.
4. Install and run app:
npm install
npm start
Optional: Install app as windows service (daemonize and keep running) using the provided
winsvc.js utility.
1. Install node-windows (globally):
npm install -g node-windows
2. Open cmd in HTML5RUI/utils.
3. Install service (where "name" is the name the service will have):
node winsvc install name
4. Other Actions :
node winsvc uninstall name
node winsvc start name
node winsvc stop name
Optional: use PM2 for Windows instead of the previous option.
Daniel Peiró Moreno
5
2
2
How to implement a robot controller
How to implement a robot controller
The inputs and outputs to and from the user interface are done directly through the mongoDB
HRUI database. APIs for mongoDB (called "drivers") are available for most modern general
purpose programming languages. The full list can be found in the MongoDB Drivers Documentation. The examples used in this section will use Python as a base language, given that
the mongoDB driver for this language is extremely simple, and the goal of this section is to
document the interaction with HRUI, not the driver API. See the previous link to the driver
documentations for extensive examples on how to access each driver for each language. In any
case, a Python script as the one presented here can be used to push and pull data to the database,
while communicating these inputs and outputs to other processes, written in other languages,
using IPC (inter-process communication) methods (Sockets, files, pipes, message-based middleware etc.).
Note: This section assumes installation was successfully completed, specifically running
mongo utils/hruiconfig.js, and having the mongod daemon running (check with mongo shell).
The HRUI database holds one collection, called "data". All of the inputs and outputs for the
user interface are included in this collection. The developer may use other collections freely,
for whatever purpose, but only items in this collection can be accessed by the application (this
is important for custom input/output, which is assumed to be in this collection).
Each item has two properties, for identification purposes:
• “_id”: An integer value used to identify the item, unequivocally. 0-9 are reserved for the
default items.
• “item”: A string that indicates the item’s contents.
The inputs and outputs that are present on a new installation (or re-run of hruiconfig) are:
• joystick: holds the state of the primary joystick.
• robotData: holds the location, speed, orientation and angular speed of the robot.
• robotGeolocation: holds the robots latitude and longitude, and the accuracy in meters.
• customDataTest: holds dummy data to test custom data module.
• profiles: holds the saved profiles for the profile management module.
• mapData: holds a 300x300 binary matrix (0 equals blank, 1 equals obstacle) as a model
of the map shown in the data monitor module.
• deviceData: holds the orientation and motion data of the client device.
• joystick2: holds the state of the secondary joystick.
• voiceCommand: holds the last command registered in the voice command module.
• gamepad: holds the state of the gamepad, as registered by the gamepad module.
6
Escuela Técnica Superior de Ingenieros Industriales (UPM)
HRUI User Manual
See section 6 for reference on the content of each item.
The usable code for the following controller example can be downloaded from:
http://xpeiro.github.io/hrui/code/controllerexample.py
The general process to design a robot controller using HRUI is divided into the following
steps:
1. Install the mongoDB driver for your chosen language. In this case, the Python mongoDB driver is pymongo. For more information on how to install modules in Python, see
Installing Python Modules from the Python documentation, but in short:
sudo pip install pymongo
2. Configure a connection to the HRUI database:
# import pymongo mongodb driver
import pymongo
from pymongo import MongoClient
#MongoDB setup (local)
mongoclient = MongoClient("127.0.0.1")
db = mongoclient.hrui
data = db.data
#end MongoDB setup
Note that this assumes that the controller is running on the same machine as the mongoDB database. To access through a network, simply change the IP address in the call
to MongoClient to the IP address of the machine running the HRUI mongoDB database,
and configure mongoDB to accept network connections.
3. Read and write inputs and outputs to the database.
# read joystick item from database
joystick = data.find_one({"item": "joystick"})
#use joystick items
x = float(joystick['x'])
y = float(joystick['y'])
print("X: " + str(x))
print("Y: " + str(y))
# write robotData item
data.update({"item": "robotData"}, {"set":{"position": {"x": x, "y": y}}})
And that’s it. The application takes care of updating the inputs and outputs automatically,
no need to do anything to schedule updates or polls, just r/w at whatever time and speed is
required by the controller. To generate items that are not already a part of the collection, set the
upsert option to true when updating the database. This will create the item if it does not exist,
and will only update it if it does exist:
# create new item (or update it if it exists)
data.update({"item": "newItem"}, {"set":{"x": x, "y": y}}, upsert=True)
Note that it’s not necessary to specify the “_id” property, as it will be generated automatically,
although it’s certainly possible to specify it, if preferred. These custom items can be retrieved
in the user interface, using the custom data module, simply by specifying the item name.
Daniel Peiró Moreno
7
3
3
User Interface
User Interface
The user interface can be accessed using any modern web browser by inputting the IP address
of the computer that is running the application into the address bar of the browser. If the application is run on a port other than 80 (see section 5), the port will have to be specified after the
URL with a colon separator (e.g. http://localhost:8080 for the local machine and port 8080).
The user interface can be accessed on a local network or through the Internet. The latter will
likely entail forwarding the port on which the application is run from your router to the machine, and inputting the public IP of your connection given to you by your ISP (Internet Service
Provider) into the browser address bar.
The User interface is modular, meaning that each of the options presented in the menu (look
for the three line icon at the top left of the screen) can be run individually, or in any permutation.
The following sections will briefly describe the functions of the modules, as most of them are
self explanatory.
• Input Modules: Used to give commands or more generally provide data to the application, and subsequently to the robot.
– Joystick Module
– Gamepad Module
– Device Orientation Module
– Voice Commands Module
– Custom Input Module
• Output Modules: Used to present data from the application model, typically from the
robot.
– Data Monitor Module
– Live Video Module
– Live Audio Module
– Geolocation Module
– Custom Data Module
• Utility Modules: Available for user convenience.
– Script Execution Module
– Profile Management Module
8
Escuela Técnica Superior de Ingenieros Industriales (UPM)
HRUI User Manual
3.1
3.1.1
Input Modules
Joystick
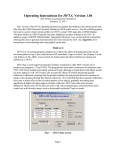
Figure 1: HRUI Joystick Input Module
The joystick module presents a virtual 2 dimensional joystick input that the user can manipulate
either with the cursor or with touch, if the device is so enabled. It has four modes, that can be
changed by the user at any given time, and provide bounds to the coordinates of the joystick,
which may be appropriate for different applications:
• Full Analog: the joystick can move freely inside its range.
• 8-Way: the joystick can only move on the Cartesian axes and on lines Y=X and Y=-X.
• 4-Way (Default): the joystick can only move on the Cartesian axes.
• 2-Way: The joystick can only move on line X=0.
Below the joystick itself is a visual representation of the vector created by the joystick, which
can be toggled on (default) or off, as well as a dynamic print out of the current coordinates.
The joystick can be toggled to stay in place or to return to the Cartesian origin (default) when
released by the cursor or touch event.
The joystick values are updated as soon as the click or touch event is produced. The joystick
is rendered at 60 FPS.
Daniel Peiró Moreno
9
3
User Interface
3.1.2
Gamepad
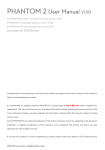
Figure 2: HRUI Gamepad Input Module
This module takes the inputs from any generic gamepad controller that is connected to the
client-host and detected by the browser and sends them to the back-end for use. This is still an
experimental feature, as many browsers haven’t implemented it yet, and those that have, have
done it in slightly different configurations.
Once activated, connect the gamepad if not already connected and press any button on it.
The module will notify that the gamepad has been detected. Use the dbtest.js utility in utils/
to test the inputs of the gamepad, and figure out how the browser interprets the layout of the
gamepad before designing a controller, or handle different layouts in the robot controller code.
The module has been tested by the developer in the following configurations successfully
(note: this is not an all-inclusive list, other configurations probably work as well):
• Wired Xbox 360 Controller (USB):
– Wired to a laptop computer, using Google Chrome, Mozilla Firefox (Linux and
Windows) and Microsoft Edge (Windows 10).
– Wired through a USB OTG (on-the-go) adapter to an android smartphone (Sony
Xperia Z3, Android 5.1) running Google Chrome (presented mapping issues with
right analog stick), Mozilla Firefox and Opera Mobile.
• Wireless PS4 Dualshock 4 Controller (Bluetooth):
– Paired through bluetooth to a laptop computer , using Google Chrome, Mozilla
Firefox (Linux and Windows).
– Paired through bluetooth to an android smartphone (Sony Xperia Z3, Android 5.1)
running Google Chrome (presented mapping issues with right analog stick), Mozilla
Firefox and Opera Mobile.
10
Escuela Técnica Superior de Ingenieros Industriales (UPM)
HRUI User Manual
3.1.3
Device Orientation
Figure 3: HRUI Device Orientation Input Module
Captures the client-host device orientation and motion data if available. If any, the captured
values are sent to the back-end and can be used as inputs. The values are updated at 60 FPS
(roughly every 16ms), but the presented values are updated every 240ms, for efficiency. The
module allows “spoofing” certain values, by disabling further updates of selected angles or
rotation rates, simply using a check-box. This enables the user, for example, to make the controller believe the device is totally horizontal by laying the device on a flat surface, unchecking
the beta angle check-box, and then moving the device for easier use.
3.1.4
Voice Commands
Figure 4: HRUI Voice Commands Input Module
Used to input voice commands from the client device. The steps involved in this process are as
follows:
1. On module activation, requests access to the client device microphone if available. The
user must grant access manually each time the module is activated or the input language
is modified. This is a limitation of the HTTP protocol, for security reasons.
Daniel Peiró Moreno
11
3
User Interface
2. Once access to the microphone has been granted, captures speech input continuously. If
sound level is too low, the capture will stop and access to microphone will have to be
granted again.
3. Compares the result of speech recognition it to the set of commands inputted by the user.
4. If the command matches the result of speech recognition, signals the matched command
to the user, sends the command and it’s assigned value to the back-end.
This feature is still very much experimental, given that the HTML5 Speech API is relatively
new to the standard (proposed in 2012), and as of the writing of this manual has only been implemented by Chromium browsers. However, it works perfectly if used with the latest Google
Chrome, both on mobile (tested on Android 5.1 and 4.4.4) and desktop versions. Recognition
speed is still lacking, as it’s done remotely, so recognition is delayed by a second or so. This is
not a fault of the application, it’s just simply the state of the art of web speech recognition.
If the browser doesn’t support the HTML5 Speech API, the module offers an alternative:
recording 5 seconds of audio that is sent to the back-end as a .wav file, for external processing.
This alternative is experimental and does not work on all browsers.
The module supports the following languages:
English, Spanish, Italian, French, German, Mandarin, Japanese, Arabic and Hindi;
3.1.5
Custom Input
Figure 5: HRUI Custom Input Module
This module allows the user to create any input that may not be covered with other modules,
simply by inputing the item name, the number of inputs and the type of each input. The input
can then be recovered in the back-end as simply as any other input module, by retrieving the
item name from the database and using the data accordingly. The process of generating the
inputs is as follows (see the image at the start of this section from left to right for reference):
12
Escuela Técnica Superior de Ingenieros Industriales (UPM)
HRUI User Manual
1. On module activation, the module requests the custom input item name, and the number
of inputs it holds.
2. Once the input item and number of inputs is given, the module presents a form with an
input name and type for each of the requested inputs. The types offered are:
• Text: A string of characters.
• Number: A number, with dot formatting for decimals. A minimum and maximum
value can be provided (both independently optional).
• Slider: A numeric value that can be controlled using a virtual sliding control. A
minimum and maximum value must be provided.
• Check-box: two-state control. Can be checked or unchecked.
3. Once the previous form is submitted, the controls are presented to the user in a table.
The user can then manipulate the inputs, sending them manually to the back-end using
a button, or allowing automatic updates to occur when values are changed (default). In
the back-end, the programmer can simply pull the item from the database and get all the
inputs organized by the name given by the user.
3.2
3.2.1
Output Modules
Data Monitor
Figure 6: HRUI Data Monitor Output Module
Daniel Peiró Moreno
13
3
User Interface
This module provides the basic data outputs received from the robot, as well as a multi-mode
map. The data is presented in a table format and includes:
• Position: X,Y, Z coordinates.
• Orientation: Euler Angles α, β , γ.
• Speed: Vx , Vy , Vz .
• Angular Speed: α̇, β̇ , γ̇
No units are provided for the data.
The map is a square, 300x300px blank surface, initially representing the robot on a 2d plane
as a blue dot, with a vector to show it’s orientation. The scale of the map can be set by the user
dynamically, and is to be coherent with the unit for the data provided, given that the blue dot
representing the robot will move dynamically inside and outside the bounds of the map when
the position and orientation values received are updated. This can be deactivated in Server
mode, making the blue dot stay in the center facing up, to support the map feed being relative
to the position of the robot. The map can function in three distinct modes:
• Server Mode: The map is pulled from the server approx. every 200ms. The map is held
in the model of the application as a 300x300 binary matrix, composed only of ones and
zeros, with one representing an obstacle, and zero representing free space. This matrix
can be manipulated by a controller freely, and the result will be displayed in the front-end
with white representing free space (zero) and black representing obstacles (one).
• Upload Mode: The user uploads to the server, through a file selection menu, a JPEG or
PNG image that is set as the map.
• Draw Mode: The user can draw obstacles on the map directly by using the cursor or
touch, if the client-host is so enabled. This black and white canvas is then stored in the
model in real-time in the same place and manner as the binary matrix explained in Server
Mode. The approximate coordinates (in data units) of the cursor are presented to the user
for convenience.
See hruiconfig.js for an example on how to fill in the 300x300 matrix in the back-end.
14
Escuela Técnica Superior de Ingenieros Industriales (UPM)
HRUI User Manual
3.2.2
Live Video
Figure 7: HRUI Live Video Output Module
Outputs a live video feed captured in the back-end. Playback is fully compatible with any
HTML5 compliant browser, given that the video is decoded natively using JavaScript, instead
of relying on any external software that would rely on the browser supporting that particular
format.
Live streaming is only available if the application is deployed on a Linux platform. This is
because external software is required for stream acquisition and because of the way this stream
acquisition is handled at the Operating System level.
If more than one video device is present, the user can change from one to the other dynamically using the input box in the module. This can be useful if, for example, the robot has a
front-facing and rear-facing camera.
3.2.3
Live Audio
Figure 8: HRUI Live Audio Output Module
Outputs a live audio feed captured in the back-end. This module is experimental and does not
work on some devices, particularly iOS based devices. This is not because it uses any external software that isn’t native, and the reasons unfortunately haven’t been documented in the
project, although effort was put in to find the issue. The stream has significant lag, that hovers
around 2 seconds. It doesn’t work consistently across audio capturing devices, depending on
the number of channels provided by the hardware. This can be tweaked in the back-end (see
section 4).
Daniel Peiró Moreno
15
3
User Interface
3.2.4
Geolocation
Figure 9: HRUI Geolocation Output Module
Presents a map that tracks the latitude and longitude of the robot. Once the module is active, the
latitude and longitude of the robot is retrieved periodically from the model in the back-end as
well as the accuracy in meters of the measurement. This is sent to the front-end where a map is
shown around a blue dot that represents the robot, and a translucent blue circle that represents
the accuracy of the location, and has the diameter of the accuracy provided.
The user can change the zoom, map type and visual angle, as well as momentarily pan away
from the robot, though on each update, the map is re-centered on the robot.
3.2.5
Custom Data
Figure 10: HRUI Custom Data Output Module
This module allows the user to poll any item from the application model, at a specified interval.
The process is as simple as inputting the desired item and the desired update interval. The
module generates a table with the data organized recursively. This means that not only the
top level keys in the item are represented. If the key is an object itself, the child properties
of the object are presented as well, differentiated by using HTML header table elements, that
emphasize each object name visually.
16
Escuela Técnica Superior de Ingenieros Industriales (UPM)
HRUI User Manual
3.3
Utility Modules
3.3.1
Script Execution
Figure 11: HRUI Script Execution Utility Module
This utility module is made available for the convenience of users who are also server administrators, robot programmers or researchers. It allows the user to execute and kill any Python or
Node.js script that is made available in the server in the folder “userscripts”. It also redirects the
standard output and standard error channels to the user (can be toggled on or off individually),
as well as showing the current state of the script with a color code:
• Grey: The script has not been executed. Note this only includes executions from this
instance of the client. If the script is run locally on the server or other clients run the
script, this will not change the state of the indicator.
• Green: The script is currently in execution after being run from this instance of the client.
• Red: The script is currently not running after being run from this instance of the client.
This can be because the script has finished, exited because of an error, or because the
user killed it using the kill button provided.
Note that it’s not obligatory to use this module to run the controllers, as the application works
independently from the actual robot controllers, nor are the scripts that are in the userscripts
folder necessarily robot controllers. This is a utility module and is therefore to be used as a tool
for any purpose necessary.
Daniel Peiró Moreno
17
3
User Interface
3.3.2
Profile Management
Figure 12: HRUI Profile Management Utility Module
This module is used to save the current state of the front-end to be retrieved later, at the convenience of the user. This is particularly useful when using the custom input module (see section
3.1.5) with a large amount of inputs, given that every input has to be named and it’s type selected manually by the user. This also allows the user to setup particular module combinations
for each of the robots that have been integrated with the application, given that every robot will
have a different set of features, not all modules will be necessary or compatible with all robots.
Another application is for the programmer to set up a particular set of custom inputs, and the
modules that the designed robot controller uses, so the user doesn’t have to setup the interface,
if the user doesn’t happen to know anything about the controller. There are many possibilities,
as the profiles are very easy to save and retrieve.
The module registers all of the active modules, and all of the settings inside of each of them,
and stores these values in the application model, in the item named “profiles”. The user can
give each profile saved a name, for easy reference when loading the module subsequently.
18
Escuela Técnica Superior de Ingenieros Industriales (UPM)
HRUI User Manual
4
Setting Parameters
Application Parameters can be set by modifying the config.json file in the root of the HRUI
directory. This file does not have to include all of the parameters, so the user can remove any
and all parameters that are to remain their default value, if the user requires. The structure must
adhere strictly to the JSON format, or the custom parameters will be altogether ignored (the
application will output that there has been an error parsing config.json, on startup). The default
file is as follows:
{
"PORT": 80,
"NODE": "node",
"PYTHON": "python",
"AVCONV": "avconv",
"DEV": "/dev/",
"VIDEOPORT": 8000,
"VIDEOWSPORT": 3000,
"VIDEOWIDTH": 640,
"VIDEOHEIGHT": 480,
"VIDEODEVICE": "video0",
"AUDIOPORT": 1234,
"AUDIOWSPORT": 4000,
"AUDIODEVICE": "hw:0,0",
"AUDIOCHANNELS": 2,
"_DESCRIPTION": "HRUI Server parameter config file.",
"_DESCRIPTION": "See app.js/manual for parameter reference and advanced
,→
parameters",
"_DESCRIPTION": "Not necessary to include all params, will use defaults.",
"_DESCRIPTION": "All properties starting with underscore will be disregarded."
}
Each parameter is defined as:
• PORT: The TCP/IP port where the application will listen for clients. See section 5 for
more.
• NODE: The name of the server’s node binary. This is required for node script execution.
If your binary is not in the system PATH, include the path to the binary in this parameter.
• PYTHON: The name of the server’s python binary. This is required for python script
execution. If your binary is not in the system PATH, include the path to the binary in this
parameter.
• AVCONV: The name of the server’s avconv binary. This is required for live media
streaming (audio and video). If your binary is not in the system PATH, include the
path to the binary in this parameter. If you wish to use FFmpeg instead of avconv, simply change this parameter to the path to your ffmpeg binary (if it’s in the system PATH,
simply “ffmpeg”).
• DEV: The location of the /dev folder. This should not be changed under normal circumstances, but could be useful for emulated video devices.
• VIDEOPORT: The port on which the video is streamed from avconv/ffmpeg to the application. This should not be changed, but can be if the default port is currently in use.
Daniel Peiró Moreno
19
4
Setting Parameters
• VIDEOWSPORT: The port on which the video is streamed from the application to the
clients. This should not be changed, but can be if the default port is currently in use.
• VIDEOWIDTH: The capture resolution width. Must be a multiple of 2. A higher value
will allow higher resolution at the cost of performance.
• VIDEOHEIGHT: The capture resolution height. Should be 0.75*VIDEOWIDTH. A
higher value will allow higher resolution at the cost of performance.
• VIDEODEVICE: The initial video device. Change if the device is recognized by the
system with a different name or index number.
• AUDIOPORT: The port on which the audio is streamed from avconv/ffmpeg to the application. This should not be changed, but can be if the default port is currently in use.
• AUDIOWSPORT: The port on which the audio is streamed from the application to the
clients. This should not be changed, but can be if the default port is currently in use.
• AUDIODEVICE: The audio device. Change if the device is recognized by the system
with a different index number.
• AUDIOCHANNELS: The number of channels of the audio device. Change if audio pitch
incorrect.
The default values of the application can be changed directly in app.js. This is not recommended, as it is no different to changing the values of config.json and changing things haphazardly in app.js can lead to application malfunction. If this occurs, just re-download HRUI and
re-install with npm. Nevertheless, modifying app.js is an option for advanced users, that want
to change the arguments for avconv/ffmpeg manually, to achieve a different media acquisition
source, for example.
20
Escuela Técnica Superior de Ingenieros Industriales (UPM)
HRUI User Manual
5
TCP/IP Port 80 Notes
The app is setup to use port 80 by default (makes for a ’prettier’ URL). Using standard HTTP
Port 80 (or any other port < 1024) requires root privileges. If user is not root, an EACCES error
will be thrown on app start (using sudo will work, but is a security risk, as it grants full rights
and capabilities to node). To use a different port (greater than 1024), Open config.json and
modify the PORT Parameter (should not be the same as other XXXPORT Parameters), save
changes and restart app if necessary. See section 4 for more on setting custom parameters.
The server can then be reached at:
http://localhost:XXXX/
where XXXX is the chosen PORT. (i.e. for PORT=8080; http://localhost:8080)
5.1
How to use Port 80
For Windows: the firewall should ask for permission to use port 80 on the first app run. If
granted, no further configuration is necessary. The following instructions are for Linux only.
One method to allow use of port 80 uses "setcap" to grant node.js the capability to bind to
ports under 1024:
sudo apt-get install libcap2-bin
sudo setcap cap\_net\_bind\_service=+ep /usr/local/bin/node
To revert, simply:
sudo setcap cap\_net\_bind\_service=-ep /usr/local/bin/node
Note that the location of the node binary may vary in your setup. Modify the path in the previous commands accordingly if necessary.
This only gives node the ability to bind to ports < 1024, keeping all other restrictions intact.
There are several other ways to use or redirect Port 80 without root privileges.
Daniel Peiró Moreno
21
6
6
Item Reference
Item Reference
This section presents the internal structure of all of the standard inputs and outputs of the user
interface, as registered on a new installation (using hruiconfig.js) for reference. Most item
properties are self-explanatory, but some are commented to further explain their purpose. More
detailed comments can be found in the source code of utils/hruiconfig.js.
{
}
{
}
{
}
{
}
{
}
22
"_id": 0,
"item": "joystick",
"x": "0.00",
"y": "0.00",
"mode": "lock4ways"
"_id": 1,
"item": "robotData",
"position": {
"x": 0.00,
"y": 0.00,
"z": 0.00
},
"orientation": {
"alpha": 0.00,
"beta": 0.00,
"gamma": 0.00
},
"speed": {
"vx": 0.00,
"vy": 0.00,
"vz": 0.00
},
"angularSpeed": {
"dGamma": 0.00,
"dAlpha": 0.00,
"dBeta": 0.00
}
"_id": 2,
"item": "robotGeolocation",
"latitude": 40.496534,
"longitude": -3.877457,
"accuracyRadiusInMeters": "5"
"_id": 3,
"item": "customDataTest",
"if": "you see this,",
"customData": "is",
"working": ":)"
"_id": 4,
"item": "profiles",
//saved profiles will appear here, with their name as key.
Escuela Técnica Superior de Ingenieros Industriales (UPM)
HRUI User Manual
/* mapData. used to generate a map from a 300x300 binary matrix, where 0 is white
(clear) and any other value is black (obstacle). This map is dumped in a PNG
,→
image, loaded by the front-end when data monitor map is on and in 'server' mode.
,→
If removed or if size not 300x300, 'server' map mode will not work, and may make
,→
map module unstable if selected (unlikely, but possible).
,→
*/
{
"_id": 5,
"item": "mapData",
"map": //300x300 binary matrix
}
{
"_id": 6,
"item": "deviceData",
"devMotion": {
"rotationRate": {
"alpha": 0,
"beta": 0,
"gamma": 0,
},
"acceleration": {
"x": 0,
"y": 0,
"z": 0,
}
},
"devOrientation": {
"absolute": null,
"alpha": 0,
"beta": 0,
"gamma": 0,
}
}
{
"_id": 7,
"item": "joystick2",
"x": "0.00",
"y": "0.00",
"mode": "lock4ways"
}
{
"_id": 8,
"item": "voiceCommand",
"command": "",
"value": "",
}
{
"_id": 9,
"item": "gamepad",
"axes": "",
"buttons": "",
}
Daniel Peiró Moreno
23