1
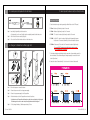
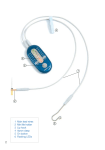
1 . D-Lux Introduction ENGLISH D-Lux is a new advanced cordless LED curing light. Made from the highest quality aluminum, D-Lux dissipates heat quickly to prevent overheating problem so that it can produce the maximum light intensity safely and consistently. With its lightweight and ergonomic design, D-Lux is easy to use and highly portable. Table of Contents 1. D-Lux Introduction ...................... 4 2. Parts & Components ....................... 5 .................... 5 3. Product Overview 4. Precautions ............................. 6 Its battery pack can easily be replaced. Without taking out the battery from the hand-piece completely, the power can be shut off by using the Power switch. With advanced built-in protection circuit modules (to protect over-charging and over- discharging), D-Lux is reliable and safe to use. OLED display panel conveniently indicates battery life and a countdown timer for the next needed charge. 5. Hand-piece Components Installation ..... 7 With D-Lux's fast charging system, the battery can be fully charged in 90 minutes. 6. Charger Installation & Charging Unit ..... 7 soft start mode and pulse mode. Soft-start mode and pulse mode can reduce the rapid 7. Hand-piece Features & Set up 8. Charger Features 11. Warranty contraction when the composite resin material is being cured by the curing light. ........... 8 ....................... 10 9. Hand-piece Maintenance 10. Trouble Shooting D-Lux also has 5 versatile curing modes for every indication, such as turbo mode, ................ 11 ........................ 12 ................................ 12 12. Specifications and Technical Details ..... 13 D-Lux - ENGLISH│4 2. Parts & Components 4. Precautions Before removing the device from the box, check the contents against the item list below to make sure you have everything. If any item is missing or damaged, contact your sales representative. Please keep in mind the following precautions before use CAUTION A. Cautions ① Only experienced dentists or endodontists should use this LED curing light. ② Doctors should be fully aware of product operating techniques before using it on the patient. ③ If the light guide has a crack or is broken, stop using the device immediately. The light guide is made from glass - broken fragments might fall into patient's mouth. ④ Do not use the device anywhere near inflammable or explosive material. ⑤ To reduce the risk of electric shock, do not disassemble or repair the hand-piece, battery pack, and/or charger. 1 x Hand Piece 1 x Charger 1 x Power Adapter & Cord 1 x User Manual ⑥ Avoid strong impact or vibration to the hand-piece. Check if the light guide is tightly and completely inserted into the hand-piece. (If the light guide is loose and not inserted properly, light intensity output would be reduced and affected.) 3. Product Overview ⑦ Do not immerse the hand-piece, battery pack, or charger in any liquid. Moisture should be avoided. ⑧ Charger and power supply adapter should only be connected to the electrical outlet specified by the manufacturer (100 ‾ 240V A C/50 ‾ 60 Hz). Light Guide B. Device Storage Plastic Protector ⓛ Store the device in a technically sound condition. - Dry place where there is no moisture. - Avoid leaving the device in a place with direct sunlight, or air with dust, salt, or sulfur. - Atmospheric Pressure 70 ‾ 106kPa / Temperature -10 ‾ 40° C / Humidity 30 ‾ 85% Operation Button OLED Panel Mode Button ② The device should be cleaned after each use. ③ Should there be any defects or malfunctions, stop using the device immediately and call the customer service team. ④ Please turn the device off when it is not in use. ΠΨΖΣ͑Switch WARNING · This device is not waterproof. Therefore, do not immerse the device in any liquid. Do not wipe Charger with wet towel either. · Keep and store the device at a clean, dry and well-ventilated place · Avoid dropping the hand-piece and/or the light guide · Avoid strong impact or vibration 5│D-Lux - ENGLISH D-Lux - ENGLISH│6 7 . Hand-piece Features & (Function) Setup 5. Hand-piece Components Installation ON OFF Hand-piece Features 1. Select the desired curing mode by pressing the Mode Button on the OLED panel. 2. 5 Max : Maximum light intensity output for 5 seconds 3. 10 Max : Maximum light intensity output for 10 seconds Step 1. Insert the light guide fully into the hand-piece. * For best result, check to see if the light guide is completely inserted into the hand-piece. Step 2. Put the Plastic Protector onto the light guide 5. 20 Soft : An initial 10% output of maximum light intensity that gradually increases to full power in 10 seconds, followed by 10 seconds output at full power. Step 3. Turn on the Power Switch button at bottom of the hand-piece. 6. 20 Pulse : Pulses every 0.15 seconds for 20 seconds at maximum light intensity. 6. Charger Installation & Charging Unit B2 Step 1. Step 4. 4. 20 Mid : 70% output of maximum light intensity output for 20 seconds Step 5. Step 2. * If you push ON/OFF button during the light intensity output procedure, it will immediately stop the procedure. 7. If the battery display lamp is blinking during the procedure, it means battery capacity is almost exhausted. It should be recharged or changed promptly in order for the device to be fully functional. 8. Hand-piece turns off automatically if it is not in use for 4 minutes. (sleep mode) Step 3. Step 1. Place the charger on a secure flat surface Step 2. Connect the power cord to the charger power supply Step 3. Connect charger power supply to the Charger Base Step 4. Seat the hand-piece into the Charger Base as shown in the picture. * Light indicator on the Charger Base will change from red to blue once the battery is fully charged. If the battery pack is broken or needs to be replaced, light indicator will be blinking red. Step 5. To fully charge the battery, it will take approximately 1.5 hour 7│D-Lux - ENGLISH D-Lux - ENGLISH│8 8 . Charger Features 7. Hand-piece Features & (Function) Setup 1. Charger has one display light indicator and the light indicator is not on unless the Function Setup hand-piece is seated and connected into the Charger Base. 2. When the hand-piece is seated into the Charger Base, the light indicator will turn red. Light indicator will turn blue once the battery is fully charged. If the battery is not fully 1. When the light is off on OLED panel, turn on the Power Switch button at the bottom of charged, light indicator will turn red and charging will begin. the hand-piece or press the MODE button to turn on the OLED panel. 3. When the hand-piece is seated into the Charger Base, light indicator can turn either red or 2. When MODE button is pressed, OLED Panel will display: 5 Max, 10 Max, 20 Mid, 20 Soft, and 20 Pulse. (See Hand-piece Features for Mode Functions.) blue. If the light indicator is not turned on, it means the hand-piece is not properly connected to the Charger Base. In this case, the hand-piece should be repositioned and reseated into the Charger Base. 3. When you press the Operation button on the OLED Panel, it will initiate the selected curing mode. When you press the button during operation, the program will stop. The light intensity output time is displayed on the OLED panel in numbers. 4. If the light indicator is blue, the battery is fully charged. (If the light indicator is blue, it is recommended for users to continue charging the device for about 10 - 20 minutes in order for the device to reach its full capacity.) 5. When the light indicator is blinking red, the hand-piece should be repositioned and reseated into the Charger Base. (If the light indicator continues to blink red after the procedure, the battery may be defective. Do not use this battery again.) 6. If the light indicator does not turn on even when the hand-piece is properly connected and seated, the battery may be defective. The battery should be replaced. * Due to D-Lux's fast charging system, it is normal for a little heat to be generated during the charging procedure. 9│D-Lux - ENGLISH D-Lux - ENGLISH│10 9. Hand-piece Maintenance Users should regularly inspect the device to prolong the life of the curing light unit and to ensure smooth daily operation. Test and Handling 1 0 . Trouble Shooting Please try the following procedures to rectify the common problems listed below. Other problems that are not found here should be directed to DiaDent's customer service department. 1. Before Use If OLED display panel on the hand-piece cannot be turned on: - Inspect any damages on hand-piece or parts - Turn on the Power Switch button at the bottom of the hand-piece. - Check if the light guide is broken or contaminated. If the light output part is contaminated, clean it thoroughly. (Contamination is the reason for power loss) - Push the mode button on the OLED panel. 2. Monthly Inspection - Change the battery pack. - Charge the hand-piece. - Check and tighten all the loose connection components. - Separate light guide from hand-piece and gently clean the inside of the light source and plastic protector with dry cotton swap. Caution: Don't apply any excessive force to the light source. OLED display panel is turned on, but the button doesn't work: - Turn off the Power Switch, and turn it back on. 3. Yearly Inspection - Extensive checkup should be done on a yearly basis. Inspect all the connection components on the hand-piece as well as the cables and power cords. 11. Warranty Cleaning - The device should be cleaned with dry soft wipes. - DO NOT use abrasive material such as scouring powder, organic solvents, or solvent-based cleaning fluids. In case of severe contamination, gently clean the device by using diluted alcohol - DO NOT use pure alcohol-based solutions - Turn off the Power Switch at the bottom of the hand-piece and store the device in the box if it is not to be used for an extended period of time. - DO NOT autoclave the hand-piece. - DO NOT autoclave the light guide. - Light emitted by LED can be harmful and should never be directed towards the eyes. Direct exposure to the light may damage the eyesight. 1. D-Lux is warranted by DiaDent for 1 year from the date of purchase against manufacturing defects. (However, expendables such as light guide, plastic protector, and battery are not covered) 2. DiaDent cannot accept any liability or provide any repair service for D-Lux Curing Light in case of: - Non-compliance with this operations manual - Operation and handling without care - Damages caused by natural disasters - Damages as a result of not using proper source of electricity WARNING Electromagnetic waves and radiation or other medical devices in the clinic may cause device to malfunction. 11│D-Lux - ENGLISH D-Lux - ENGLISH│12