1
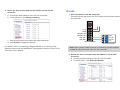
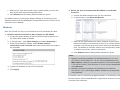
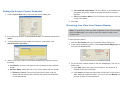
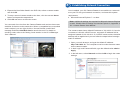
c. Select an ID, type the barcode of the camera reader, and use the
drop-down list to select the associated door.
d. Click Submit and the Setting Status should turn green.
For details, refer to Connecting a Wigand Reader or Connecting Card
Readers section and the Web-Based Configurations section in the GV-AS
Controller User’s Manual.
2. Define the door associated with GV-CR420 on the GV-AS
Controller
a. Access the Web interface of the GV-AS Controller.
b. In the left menu, click Extended Reader.
Network
Each GV-CR420 can only be connected to one AS Controller at a time.
1. Enable network connection to AS Controller on GV-CR420
a. Access the Web interface of the GV-CR420. Refer to section 6 in
the Quick Start Guide for details.
b. In the left menu, click Video Settings and select Streaming 1.
c. Under Face Detection Setting, select Enable network
connection to AS Controller and use the drop-down list to select
the controller.
c. Select an ID, type the barcode / MAC Address of the camera
reader according to the firmware version of GV-CR420 and the
controller, and use the drop-down list to select the associated
door. For details on firmware version and corresponding methods
of network connection, see the note below.
d. Click Submit and the Setting Status should turn green.
Note:
d. Type the IP address of the GV-AS Controller.
e. Click Apply.
1. Network connection between GV-CR420 firmware V1.0.1 and
GV-AS210 / 810 firmware V1.1.0 can only be established using
MAC address. Network connection between GV-CR420 firmware
V1.0 and GV-AS210 / 810 firmware V1.0 can only be established
using barcode.
2. Network connection between GV-CR420 and GV-AS400 or
GV-AS100 / 110 / 120 through ASBox / ASNet is only supported
using barcode.
For details, refer to Connecting a Wigand Reader or Connecting Card
Readers section and the Web-Based Configurations section in the GV-AS
Controller User’s Manual.