1
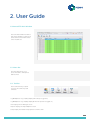
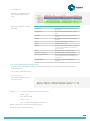
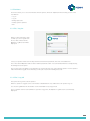
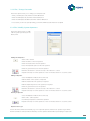
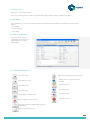
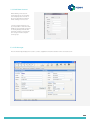
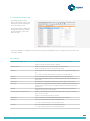
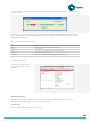
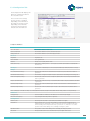
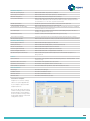
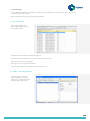
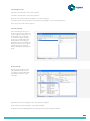
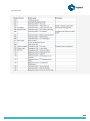
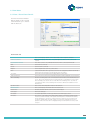
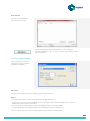
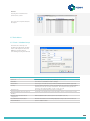
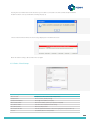
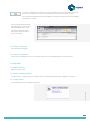
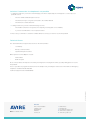
Memco Emergency
Telephone Receiver (ETR)
Software
User manual
Ref no. 450 852(GB) Version 2
Document No.: 450-852 ETR User Manual | Revision 1.1
Table of content
1 Introduction3
2 User Guide4
2.1 Memco ETR Main Window 4
2.1.1 Menu Bar 4
2.1.2 Tool Bar 4
2.1.3 Event List5
2.1.4 Event Information and Processing 5
2.1.5 Status Bar5
2.2 File Menu6
2.2.1 File / Log On6
2.2.2 File / Log Off 6
2.2.3 File / Change Passcode 7
2.2.4 File / Modify System Operators 7
2.2.5 File / Exit8
2.3 Edit Menu 8
2.3.1 Edit / Lift Manager
8
2.3.2 Lift Manager Tool Bar
8
2.3.3 Add New Account 9
2.3.4 Lift Manager 9
2.3.5 Site Details Tab10
2.3.6 Notes Tab10
2.3.7 Background Tests Tab10
2.3.8 Email Alerts Tab 12
2.3.9 Configuration Tab 13
2.3.10 Call Log Tab 15
2.3.11 Edit / Service Engineers
15
2.4 View Menu 18
2.4.1 View / Alarm Event Details
18
2.4.2 View / Report Options 19
2.5 Tools Menu 20
2.5.1 Tools / Modem Setup
20
2.5.2 Tools / Email Setup 21
2.5.3 Tools / Language22
2.5.4 Tools / Diagnostics22
2.6 Help Menu22
2.6.1 Help / Manual22
2.6.2 Help / Send Bug Report 22
2.6.3 Help / About 22
2
1.0Introduction
Using Memcom ETR software, users can set up and
maintain their own database of lift emergency telephones.
The software can be used to receive emergency calls,
to test calls and to monitor equipment for over 5,600
lifts per system. Additionally, the software can be used
remotely to program the telephone units reducing
the need for site visits which ultimately saves time
and cost. The following pages include a User Manual,
which explains the functions available through Memco
Emergency Telephone Receiver (ETR) Software.
3
2. User Guide
2.1 Memco ETR Main Window
This is the main window of Memco
ETR. In this window you will see all
active alarm events and the status
of the modems etc.
2.1.1 Menu Bar
The menu bar allows you to
access the Memco ETR options
and functions:
2.1.2 Tool Bar
The Tool Bar allows you quick
access to the commonly used
functions.
Log On: Operator Log on (Only displayed if nobody is logged on)
Log Off: Operator Log off (Only displayed when an operator is logged on)
Lifts: Displays the Lift Manager screen
Reports: Displays the Report Options screen
Setup: Display the Modem Setup options for Memco ETR
4
2.1.3 Event List
The Event List displays the alarm
events that still require further
action.
Each event includes the following
information:
Description
Date & Time
The date and time the event was received by
Memco ETR
Equipment ID
The unique identification number of the lift
alarm
Site Name
The name of the site where the lift alarm is
installed
Address
The address of the site where the lift alarm is
installed
Code
The event code number (see XXX)
Event
Description of the event
Operator
The name of the operator that processed the
event. This maybe blank if the event has not
been processed
Status
The current status of the alarm event
Awaiting Action (RED)
The event requires action by the operator
Acknowledged (YELLOW)
The event has been acknowledged by the
operator, but may have some pending actions
to carried out
Clear (GREEN)
The event has been cleared by the
operator
2.1.4 Event Information and Processing
The events on the main window can be processed by double clicking on the event and then the Event Information
window will pop up.
See 2.4.1 View / Alarm Event Details
2.1.5 Status Bar
The Status Bar displays the status
of the Memco ETR.
Modem 1 – 4: The status of Modems connected to Memco ETR
Green – ready
Red – disconnected
Yellow – in use
Grey – Modem either disabled or not present
Operator: The name of the operator currently logged on
Date & Time: The current Date and Time
5
2.2 File Menu
This menu allows you to select from the below menu options, which are explained in the following section of this
User Manual
++ Log on
++ Log off
++ Change passcode
++ Modify System operators
++ Exit
2.2.1 File / Log On
When you first start Memco ETR
or when you select Log On from
the Tool Bar or Menu Bar the
Operator Log On screen will be
displayed.
Select your operator name from the drop down list and enter the password, then click on the OK button.
Note 1: The default Operator Name is Master and the password is 1234. It is recommended that this is changed using
the Change Passcode option.
Note 2: There is also the ability to automatically log on with a specific user, using a default operator. For the operator
name which will be logged on automatically, set the option as shown in Change Passcode
2.2.2 File / Log Off
This option will log off the current operator.
When no operator is logged on, the user interface is disabled and is only enabled once an operator logs on.
You should Log Off when the workstation is left unattended for any long periods.
Note: If an alarm event is received whilst no operator is logged on, the Operator Log On screen is automatically
displayed.
6
2.2.3 File / Change Passcode
This menu option allows you to change your own passcode:
1. Enter your OLD passcode, and then click the OK button
2.Enter the NEW passcode, and then click the OK button
3.Enter the NEW passcode AGAIN, and then click the OK button
4.If successful you will see a prompt telling you that the NEW Passcode has been accepted
2.2.4 File / Modify System Operators
This menu option allows you add/
edit the system operator(s) for the
Memco ETR.
Adding a New Operator
1. Click on the + button
2.Enter the Name of the new operator
3.Enter the Password for the new operator
4.Select the required options for the new operator
5.Enter any optional notes for the new operator
6.Click the save button to save the record, or the x button to cancel
7.Repeat from step 1 for other operators or click on the Close button to close this screen
Editing an Operator
1. Select the Operator Name from list at the top
2.Edit the Name of the operator, if required
3.Edit the Password for the operator, if required
4.Edit the required options for the operator, if required
5.Enter any optional notes for the operator
6.Click the save button to save the record, or the x button to cancel
7.Repeat from step 1 for other operators or click on the Close button to close this screen
Deleting an Operator
1. Select the Operator Name from list at the top
2.Click on the - (minus) button
3.You will be prompted to confirm this operation
4.Repeat from step 1 for other operators or click on the Close button to close this screen
Operator Auto logon
To have the ETR software automatically log on for a specific operator, tick the Auto operator logon. When
the ETR software is started, it will automatically use this operators details without prompting for a passcode.
7
2.2.5 File / Exit
This option closes the Memco ETR.
Note: You must be logged on in order to select this option and you will be asked to confirm this operation.
2.3 Edit Menu
This menu allows you to select from the below menu options, which are explained in the following section of this User
Manual
++ Lift Manager...
++ Service Engineers...
++ Event Types…
2.3.1 Edit / Lift Manager
This menu option opens the
Lift Manager screen allows you
manage all aspects of each
monitored site.
2.3.2 Lift Manager Tool Bar
Select first record
Select previous record
Select next record
Select last record
Save changes to current record
Open account Print Report options screen
Call the lift via one of the connected
Modems
Select last record
Select last record
Select last record
Select last record
Cancel changes to current record
Duplicates current record and settings (a new ID
is requested)
Open account search screen
8
2.3.3 Add New Account
When adding a new account
(using the button), the following
form is displayed to enter all of
the most important information
when creating a new account
If service groups have been setup, it is possible to have the email
addresses automatically assigned
to missing background call and
technical events by selecting the
auto-assign, and choosing the
service group.
2.3.4 Lift Manager
The Site Details Page displays the location, contact, equipment and service details for the selected account.
9
2.3.5 Site Details Tab
Lift Location Details
Account No:
An automatically generated reference number
Lift Reference:
Free format lift reference
Site Name:
The name of the site where the Memcom is installed
Address, City, County, Postcode and Country:
The address where the Memcom is installed
Show Map...:
Displays the map using “Google Maps” (Postcode required)
Directions:
Free format text of how to find the site
Contact Details
Name:
The name of the contact
Tel No:
The contact telephone number
Fax No:
The contact fax number
Email:
The contact email address. Send an email by using the
button
Equipment Details
ID Number:
The unique lift ID number (maximum 9 digits)
Network ID:
This should be set to 0 if only one lift alarm is connected to the telephone line. If
multiple Memcoms (maximum of 8) are connected to the same telephone line each
unit should be given a unique Network ID, e.g. Memcom 1 = 1, Memcom 2 = 2 etc
Tel No:
The telephone number of the Memcom
Model:
The lift alarm model type
Password:
The password used to access the Memcom (maximum 8 digits)
Service Details
Serviced By:
The Service Group responsible for the maintenance of the lift
2.3.6 Notes Tab
The Notes tab displays the notes
for the selected account and
shows the date the account was
created.
10
2.3.7 Background Tests Tab
The Background Tests Page
displays the background test call
history and test call configuration
for the selected account.
The left hand section displays the
background call history, showing
the date and time, report code
and event type.
The events that have an equipment fault listed can be double clicked and the status of the Memcom at the time of the
call can be recalled.
Test Options
Enable Background Test Calls:
Enabled - Background call monitoring is enabled for the selected account
Disabled - Background call monitoring is disabled
Enable Caller ID:
Enabled - Background calls from the lift alarm are Caller ID based
Disabled - Background calls from the lift alarm are normal.
Initiated:
By Lift Telephone - The Memcom will dial the Memco ETR and perform a background
call
By PC - Memco ETR will dial the Memcom and perform a background call
Between:
Sets the start and end time in which a background call should be generated
Test Time:
The actual time the background call is carried out (the time stored in the lift alarm is
always GMT)
Test Interval:
The frequency of the background call (Every Day, Every 2 Days or Every 3 Days)
Time Sync:
This option is only enabled when “Enable Caller ID” is enabled. It sets the frequency in
which the Memco ETR will answer the background call and synchronise the clock on
the Memcom
Modem:
The enabled modem that will receive or perform the background call. The phone
number is shown next to modem number
Generate alarm for missing test calls:
Enabled - Missed background calls will cause Memco ETR to generate a “Technical
Alarm - Test Call overdue”
Disabled - Missed background calls are ignored
Alarm Delay:
The time after which a missed background call will generate an alarm
Last Test:
GMT - The GMT date and time of the last background call
LOC - The local date and time of the last background call
Next Test:
GMT - The GMT date and time of the next background call
LOC - The local date and time of the next background call
11
The events that have an equipment fault listed can be double clicked and the status of the Memcom at the time of the
call can be recalled.
An example is shown above where the Memcom called in with an equipment fault and highlighted in red is the Battery
which means that at the time of the call the battery charge is low. If this is repeated on the next call then the battery
will probably need replacing.
Other equipment faults in red will be shown.
Mains
either AC or DC power not active
Battery
the battery may need replacing or still charging
GSM Low
GSM signal low
Spk/Mic
the speaker or microphone are faulty and need attention
Change Bat
the battery requires replacing
Service Req
the Service Counter has activated and the lift requires servicing
2.3.8 Email Alerts Tab
The Email Alerts tab sets up the
frequency, type and who receives
the emails.
Missed Background calls
Generate Email: This sets the frequency (up to 5 missed calls) of the emails and also disables the email alerts
Email Recipients: Multiple valid email addresses can be entered here
Technical Calls
The type of technical alarm email can be selected here.
12
2.3.9 Configuration Tab
The Configuration tab displays the
Memcom configuration data for
the selected account.
Note: Several of the settings
are only shown, or enabled
depending on the firmware of
the Memcom for that account,
depending on the firmware
version that the feature was
introduced to the Memcom.
Telephone Numbers
Phone Number
1st to 4th Alarm:
The number dialled for Alarm calls
Service/Technical:
The number dialled for Service and Technical calls
Background call:
The number dialled for Caller ID background calls
Protocol
Unguided
Unguided calls
Voice Guided
Voice guided calls
Memtel
The protocol used by Memco ETR
SMS (GSM Only)
SMS (Text) to mobile phones – can only be used if the GSM Module is installed with
the Memcom
Attempts:
The number of dial attempts to the selected number (Any number between 0 and 9)
Delays
In Car Alarm Button Delay:
The amount of time the in car alarm button needs to be pressed before an alarm is
generated
Autodialler Answer Delay:
The number of rings the lift alarm needs to detect before answering the incoming call
Remote Telephones Delay:
The amount of time the remote telephone alarm button needs to be pressed before an
alarm is generated
Top of Car Alarm Delay:
The amount of time the in top of car alarm button needs to be pressed before an alarm
is generated
Technical Input 1 Delay:
The amount of time Technical Input 1 needs to be active before a Technical alarm is
generated
Technical Input 2 Delay:
The amount of time Technical Input 2 needs to be active before a Technical alarm is
generated
Note: setting any of the above delays to 0 will disable that feature (except for Autodialler Answer Delay where 0 is not permitted).
Advanced
Hangup Delay:
Sets the number of minutes for the Memcom to automatically hangup
Disconnect Frequency:
Only change if advised by Memco engineers
Configuration
Unit ID Code:
The unique ID allocated to each Memcom (maximum of 9 digits)
Network ID:
This should be set to 0 if only one lift alarm is connected to the telephone line. If
multiple Memcoms (maximum of 8) are connected to the same telephone line each
unit should be given a unique Network ID, e.g. Memcom 1 = 1, Memcom 2 = 2 etc The
speaker volume when talking to the car during an emergency alarm
Speaker Volume:
The speaker volume when talking to the car during an emergency alarm
Password:
The password used to access the Memcom. Up to 8 digits can be used
13
Hardware Options:
EN81-28 Operating Mode
When enabled EN81-28 operation is enabled
Service Input = Technical 2
When enabled the Service Input operates as Technical Input 2
External Microphone
When enabled the external microphone is activated
Consecutive Dial Mode
When enabled the unit will dial the first alarm number then move to the next alarm
number. When disabled the unit will dial each number(s) until all attempts have been
used and then move to the next sequential alarm number
Enable GSM Module
Enable this option if the GSM Module is connected to the lift alarm unit
Caller ID Background Calls
When enabled background calls are Caller ID based
Use External Mic. For Recording
When enabled the external microphone is used for recording the messages or disabled
the internal Memcom mic will be used
N/C Alarm Input
Changes the type of alarm button that can be used. Enabling this option will allow a
normally closed button to be used
Alternative Dial Tones
Used for countries with a interrupted dial tone (eg Greece, Italy)
Service Input = Ext Alarm
Used as an alternative method of activating the alarm, where the input is a voltage
Int Mic and Ext Speaker
When enabled the internal mic will be used with external speaker (sets volume to max)
Hardware Monitoring:
Power Supply Monitored
When enabled the input supply is monitored
Battery Monitored
When enabled the standby battery is monitored and tested
Phone Line Monitored
When enabled the telephone line is monitored
GSM No Signal Monitored
When enabled the GSM No Signal fault is monitored
GSM Low Signal Monitored
When enabled the GSM Low Signal fault is monitored
Speaker/Microphone Monitored
When enabled the speaker and microphone are monitored and tested prior to a
background call
Service
Service Interval:
The number of lift operations before the lift alarm generates a “Technical Alarm - Lift in
service too long”
Operations Since Last Service:
The number of lift operations since last service
Operations to Next Service:
The number of lift operations before a service is due
Total Number of Operations:
The total number of lift operations since the lift has been in service
Unit Information
Model Type:
The Memcom model type
Hardware Version:
The Memcom hardware version
Firmware Version:
The Memcom firmware version
Firmware Date:
The Memcom firmware release date
Set Common Template
Templates for common settings
can be set up and applied here.
To set templates press the Edit
Templates button.
The screen above will open and
common settings can be entered
and saved. Once saved and this
screen closed the settings can be
recalled and applied on the main
configuration screen.
14
Location Messages
For the appropriate firmware, if a headset is connected to the modem the location messages can be listened to or
recorded from the ETR software.
After recording, the message is automatically played back.
2.3.10 Call Log Tab
Call Log Page displays the
acknowledged alarm events for
the selected account.
Each alarm event includes the following information:
Date & Time: The date and time the event was received by Memco ETR
Report Code: The event code number
Event Type: The event type and description
Actioned By: The name of the operator that actioned the event
2.3.11 Edit / Service Engineers
This menu option opens the
Service Engineers screen and
allows you to manage the service
engineers and service groups.
15
Service Engineers Tab
First Name: The first name of the service engineer
Last Name: The last name of the service engineer
Phone No: The contact telephone number for the service engineer
Service Group: The service group the service engineer is assigned to, see Service Groups below
Notes: The notes for the service engineer
Service Groups Tab
The Service Groups allow you to
create a logical group to which the
service engineer is assigned to, e.g.
the group by area “South West”
or “North East”. When creating a
lift account in Lift Managers Site
Details Tab the service group is
assigned to the account. When the
Event Information screen is open
it will list the service engineers
that are available for the assigned
group.
Event Types Tab
This tab opens the Event Types
editor window and allows you
to manage the event labels and
operator procedures for each
event type.
Report Code: The event reporting code - this cannot be changed
Event Label: The event description - this may be changed
Procedure: The procedure displayed to the operator in the Event Information window
16
Event Type Table
17
2.4 View Menu
2.4.1 View / Alarm Event Details
The Event Information window
displays details for the selected
event and allows you to interact
with the Memcom.
Event Details Tab
Lift Location
This section displays details of site location and contact telephone numbers.
Service Contacts
This section displays the Service Group and Engineers details for the selected site
location.
Conversation Control
Note: This section is only enabled when Memco ETR is connected with the lift.
Talk:
Selects talk to car mode
Listen:
Selects listen to car mode
Duplex:
Selects duplex mode (two way conversation)
Test:
Causes the lift alarm unit to generate a tone from its loudspeaker, which in turn will be
picked up by the microphone and heard through your headset.
In car unit:
Selects the in car microphone and loudspeaker for conversation
Remote intercom:
Selects the remote intercom (if installed) microphone and loudspeaker for conversation
Time Remaining:
The time remaining before the connection between the Memco ETR and the Memcom
closes. This counts down from 180 Seconds. Each time a control button is pressed the
time remaining resets back to 180 seconds. When the remaining time is less than 30
seconds there will be a visual warning from the Memco ETR and an audible one from
the Memcom
Speaker Volume:
This controls the loudspeaker volume of the Memcom
Event Details
This section displays information about the alarm event:
Date & Time:
The date and time that the event was first acknowledged
Code/Type:
Event code and type
Procedure:
Procedure dependent on event type which is set in Event Types screen
Lift Status:
The statuses of the main power supply (Mains), Battery, GSM signal strength (if GSM
module used and activated), main speaker and microphone and whether the battery
needs replacing (a 3 year timer is activated once the Memcom is first powered on in
our factory and will notify the ETR software once timer has expired). If there are no
problems with each status then it is highlighted in green and red if there are any faults
to report
18
Event Audit Tab
Here the user can add actions,
clear and close the events.
Pressing the ‘Add Action’ button will enable the user to include any
comment regarding the event. To clear or close the events simply press the
respective buttons.
2.4.2 View / Report Options
This allows the user to export
event reports in various formats,
including Excel and pdf.
Report Type
The type of event reports can be selected here using the drop down menu.
Options
++ The start and end dates of events are selected using the drop down menus.
++ All accounts can be selected or by individual account. Pressing the ‘Search’ button will enable you to select an
individual account on which to run a report
++ Any user actions associated with the event can be added by ticking “Include Event Audit”
++ The generated report can be either previewed or emailed by pressing the relevant buttons
Note: For a report email to be sent the email program must be running in the background.
19
Preview
Pressing the ‘Preview’ button
activates this screen:
The user can now print and save
the report.
2.5 Tools Menu
2.5.1 Tools / Modem Setup
The ETR can control up to 4
modems provided each modem
has its own telephone line and
COM port. Each modem is
selected by pressing relevant tab.
Modem Settings
Com Port:
Selects COM port for modem (only available ports are listed)
Baud Rate:
Set to 9600 as a default (no need to change)
Model name:
Selects type of modem used (only Multitech MT5656 ZXDV and ZDXE supported)
Country:
Several countries telephone systems are supported. First select the country required
and then press the ‘Set Country Code’ button. This will automatically update the
modem to the required settibngs for the country selected
Modem Tel No:
The telephone number that the modem is attached to
Modem Telephone Line has Caller ID
Enabled
Check with your telephone line/system provider if Caller ID is activated on your line
Modem can be used for remote
configuration
When disabled modem can be used for test and alarm calls only
Use with External mic/headset
External mic/headset is for answering trapped passenger calls from the Memcom
Modem Enabled
Select to enable modem
20
Pressing the ‘Test Modem’ button will check that your modem is connected to the ETR software and provided the
modem has been correctly installed the following will pop up.
If the test fails then there will be an error message displayed on the ETR main screen.
Check all modem settings, cables and run the test again.
2.5.2 Tools / Email Setup
Email Settings
Email Provider:
Templates for some common web email providers
Senders Name
The users name („friendly name‟)
Senders Email Address:
The user‟s email address (for replies)
Email Server (SMTP):
Email server address (contact your IT person if required)
Account User Name:
User name that is required for email settings
Account Password:
Email account password
Show Password Chars
Allow the password characters to be seen as typing (removes password if set)
Use SSL
Set authentication for some providers.
21
To verify the settings press the button. Now enter the address for the test email to be sent to and
press ok. If the settings are correct then an email similar to the one below will be received.
The Test send messages will give progress indications, and any messages from the server regarding
authorization or security.
If the messages indicate problems
with authorization, check the user
name and password are correct.
If messages indicate problems
with security, check the state of
the Use SSL setting.
2.5.3 Tools / Language
Select desired user language.
2.5.4 Tools / Diagnostics
This contains several diagnostic tools for the ETR software. Use only if advised by Memco service personnel.
2.6 Help Menu
2.6.1 Help / Manual...
Opens to this document
2.6.2 Help / Send Bug Report
Provides feature to send any issues to the support team, automatically attaching internal logging files for analysis
2.6.3 Help / About
ETR UM V01 (GB)
Screen showing ETR version and date information.
22
ETR Troubleshooting Guide
Memcom Technical Alarms
There are two categories that require intervention:
1. Missing Background Calls (EN81-28)
2.Technical Alarms
Missing Background Calls (EN81-28)
There are several reasons for the Memcom not to call in at its assigned time…
1. The Memcom is defective…
2.The Line the Memcom is connected to is possibly faulty or has been disconnected by the Customer or Line Provider.
The customer may have used the line for another purpose…E.g. Fax Machine or used the Extension Number for Internal
Purposes…
3.The Telephone Line the Memcom is connected to is unable to place Out Going Calls…
4.The Memcom has not yet been programmed or programmed correctly with the Background Telephone Number or ID
Number. The Correct Settings are:
++ *16 12345678910**1 – Your ETR Software Modem Telephone Line Number, if on an Internal Telephone Line then a 9
maybe required for an Outside Line, hence *16 912345678910**1
++ ID Number *21 (Refer to the Memcom Installation Guide); this is the Memcom 6-Digit Serial Number, this number has to
match the Account/Record raised.
++ If more than one unit is connected to Line/GSM then Network ID *28 needs to be set correctly (Refer to the Memcom
Emergency Telephone Installation Guide 450 900]
++ E.g. Duplex Lift [Left Hand *21 123456 *28 1 & Right Hand *21 987654 *28 2]
5.
Solutions if connection via telephone is possible
1. Once you have connected to a Memcom, using the number on the Lift Manager Account/Record this proves the line is
okay, it will answer with several Beeps & possibly a Recorded Message…
2.To enter programming Mode, press * then the password (Default = 1234) followed by the # key. You should then hear 3
Beeps then silence…
3.To confirm the Background Number has been programmed Press *16#. The number will read back to you if any has
been programmed E.g. 12345678910**1 Your ETR Software Modem Number…
4.To confirm that the correct ID Number has been programmed Press *21#. The number will read back to you if it has
been programmed E.g. 123456. This is the Memcom Serial Number…
5.If 3 & 4 are correct to your records on the ETR Software, you can now force a Background Call by pressing *03#, you
will hear the line hang up, within 30 seconds the unit will check in, if you are looking at the modem you will see RD &
TD LED’s flash, if you are looking at the ETR Software you will see the Modem Indication [Bottom Left Hand Corner]
change from Green to Amber indicating Modem in use…
6.Once RD & TD on the Modem stop flashing or when the Modem Indication on the Software changes back to Green,
you can access the account via Lift Manager & then access the Background Tab to confirm that unit checked in…
23
Solutions if connection via telephone is not possible
1. If calling the Memcom your hear a constant ringing a Site Visit is required by the Lift Engineer to correct any local
problem such as:
•
The Line Number dialled may be incorrect
•
The Memcom may no longer be connected to the number dialled
•
The Memcom could be defective
2.If calling a Memcom you hear a Network Message such as:
•
The Number called is not recognised, not excepting Incoming Calls or not available;
•
If you hear a Fax Machine or even a person answer
In these cases you will have to check the number dialled or contact your client to resolve the problem
Technical Alarms
The Technical Alarms are reported as follows on the ETR Software:•
Low Battery
•
Battery Load Test Failure
•
Speaker/Microphone Failure
Other options & Service Options if used:•
Mains Failure
•
GSM No Signal
Most of these failures will require a Site Visit by the Engineer to investigate the failure, possibly taking spares to resolve
the problem…
Note: It is possible to program the Memcom via the Telephone by following the instructions in the Memcom Emergency
Telephone Installation Guide 450 900
ETR UM V01 (GB)
Technical Support Contact 01628540160
Avire Ltd
Memco is a brand of Avire
Unit 1, The Switchback
Gardner Road
Maidenhead
Berkshire
SL6 7RJ, UK
T: 01628 540100
F: 01628 621 947
E: [email protected]
W: www.memco-global.com
W: www.avire-global.com