1
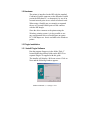
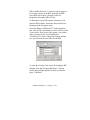
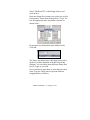
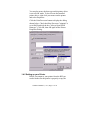
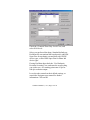
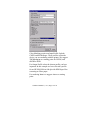
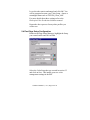
GI rtlProof Plugin
for Windows NT
Preliminary Manual
for HP 5000, Encad, Mutoh and other rtl plotters
Driver Version 3.10
RIP Version 5.2 or later
Document Version 0.10
p/n: 101-0011-002
GIrtlProof Manual (v. 0.1) Page 1 of 21
GI rtlProof Plugin
for Windows NT
Contents:
Chapter 1 – Installation
4
Chapter 2 – Configuration and Setup
13
Chapter 3 -
GIrtlProof Manual (v. 0.1) Page 2 of 21
GIrtlProof Manual (v. 0.1) Page 3 of 21
Chapter 1 - Installation
1.1 Introduction
The rtlProof plugin was developed by Graphics
Integration to provide a low cost RIP suitable for the
support of a wide range of ink jet and laser based
printing devices. With the acquisition of Graphics
Integration by Xitron in December 2000 the product is
now the property of Xitron.
This manual covers the installation and use of the GI
rtlProof plugin for driving ink jet plotters using the
“rtl” language. The plugin requires an existing Xitron
Navigator or Navigator XPR RIP, which should be
installed and functioning correctly before installing
the plugin. The plugin requires an Intel based PC
running Windows NT 4.0 or Windows 2000.
The rtlProof plugin is configured for, and supports,
the following printer types:
Encad Novajet 500, 630, 700, 850, Pro-36, Pro-42e,
Pro-50, Pro 60e
HP 5000
Mutoh PJ-1304NX, RJ-4000, RJ-4100, RJ-6100
OmegaJet 52 and 62
Ricoh 4910, 6910
It is also capable of driving other RTL devices using a
Generic rtl device type.
GIrtlProof Manual (v. 0.1) Page 4 of 21
1.2 Hardware
The printer is interfaced to the RIP with the standard
Centronics Parallel connector on the HP and a Parallel
port in the RIPs host PC, or alternatively by use of an
external network print server or built in network card.
When using a Parallel port we strongly recommend
the use of a second Parallel port to avoid conflicts
with the RIP dongle.
Since the driver connects to the printer using the
Windows printing system, it is also possible to use
any configuration such as a Parallel port on remote
PC, USB adapter etc. that is available to the Windows
printer.
1.3 Plugin Installation
1.3.1 Install Plugin Software
Run the program Setup.exe in the folder “Disk 1”
located within the rtlProof folder on the RIP CD or
separate Plugin CD supplied with this guide.
The installer will display a Welcome screen. Click on
Next and the following window appears:
GIrtlProof Manual (v. 0.1) Page 5 of 21
Click the Browse button and locate the folder in
which your RIP is installed. When the folder is
correctly located click on Next.
The Plugin is installed, with a progress dialogue
similar to this:
After the Plugin files are installed a Password
dialogue box is displayed:
If you have a Xitron password copy it carefully into
the dialogue box, check the number, and then click on
Next to complete the installation. If you do not have
the password to hand it can be added later. The Plugin
will still operate without a password, but it will
watermark the output.
1.4.2 Entering the Security Code
In addition to the Password mentioned above you may
also need to enter a Security Code in the Navigator
GIrtlProof Manual (v. 0.1) Page 6 of 21
RIP to enable the driver. A security code is required
for certain versions of the RIP, generally all XPR
series RIPs will require a Security Code, but
Imagesetter Navigator RIPs will not.
To determine if your RIP requires a Security Code
Start the RIP software. Select the menu item Device
Manager on the Navigator menu.
Select the Plugin “GIrtlProof.i32” in the plugin list
box, click on New and attempt to select a device in the
Type list box. If no device types appear, you need to
enter a Security Code. If you cannot find
“GirtlProof.i32” at all, re-install the Plugin, making
sure you select the correct folder for the RIP.
To enter the Security Code select the Configure RIP
dialogue from the Navigator RIP menu. Click on
Extras and scroll through the list until you find the
entry “GIrtlProof”
GIrtlProof Manual (v. 0.1) Page 7 of 21
Click on the “Extras” button and scroll down the list
until you see the entry “GIrtlPROOF, RTL”.
Highlight this name in the list and click on "ADD".
Enter the Security Code from the list supplied with
your Plugin exactly as shown on the sheet.
Note: This step is not required if you are installing the
driver on a Navigator high resolution imagesetter RIP.
In this case you will not see this entry in Configure
RIP Extras, and you can skip it.
Similarly enter Security Codes from the codes list for
any other options you have purchased such as "HDS
Low Resolution" and "HIPP" in this dialog box. (If
you do not have an HDS Code you will not be able to
use Stochastic screening with this driver, but you can
still output using conventional dot screening. If you
do not have an HIPP Code you will not be able to use
ICC based color management in the RIP.)
1.4.3 Install Device Types
If it’s not already running, start the RIP and access the
Device Manager from the Graphics-Pro menu.
GIrtlProof Manual (v. 0.1) Page 8 of 21
Select "GIrtlProof.i32" in the Plugin list box, and
click on New.
Enter the Output Device name you wish to use to refer
to this printer. Select from the drop down "'Type" list
box the appropriate make and model of printer, as
shown below:
Do not enter any information in the Address field.
Click OK.
The Name you choose here is the name under which
the device will be identified in the RIP Page Setup
dialogue. You can add as many different Names and
Device Types as you wish.
For several device types there is more than one entry
in the Type list. These entries represent different
imaging modes, as follows:
GIrtlProof Manual (v. 0.1) Page 9 of 21
Photo – uses a PhotoInk color space, and typically 6
inks, CMYK, Light Cyan and Light Magenta. Will
give the best results where available.
CMYK – uses a conventional CMYK color space and
4 inks. Best choice if Photo is not available.
Mono Halftone – uses black ink only with in-RIP
screening. Usual choice for monochrome output
plotter
Mono Contone – uses black ink only, RIP generates
continuous tone data, usually processed through a
Windows printer driver which applies screening.
RGB – generates a full color continuous tone RGB
image format, usually processed through a Windows
printer driver which applies separation and screening.
Mono Contone and RGB may give improved image
quality for some plotters where special screening
algorithms are employed in the Windows drivers.
1.4.4 Install Windows Printer Driver
You must select a method of output for the driver. The
Plugin prints via the Windows Spooling system. This
option has many benefits, the Windows Print system
will handle the printer for the RIP and deal with any
errors, reporting them to the user without disrupting
the RIP.
To print via the spooling system you must install the
appropriate Windows printer driver that is supplied
with your printer. In the following example the HP
2500CP driver is shown.
GIrtlProof Manual (v. 0.1) Page 10 of 21
You need to ensure the data type on this printer driver
is set to RAW mode. To do so locate the installed
printer driver, right click your mouse on the printer
and select Properties.
Click the Print Processor button to display the dialog
shown below. Check that Print Processor "winprint" is
set to RAW and tick the box "Always Spool RAW
Datatype". Click OK, then OK again on the Printer
Properties Dialog.
1.4.5 Setting up your Printer
Before you output to your printer from the RIP you
need to make sure the printer is properly set up, the
GIrtlProof Manual (v. 0.1) Page 11 of 21
ink system loaded and any tests or adjustments
recommended by the manufacturer have been carried
out. Banding and patterning artifacts that are often
blamed on the RIP are in fact usually due to the
printer’s having a blocked nozzle or mis-aligned print
head.
GIrtlProof Manual (v. 0.1) Page 12 of 21
Chapter 2 – Configuration
and Setup
2.1 Page Setup Configuration
2.1.1 Create Screening Style
Select the menu item Color > Separations Manager.
Select the device you created earlier (in Device
Manager)
Highlight the style CMYK Composite and click on
Edit:
GIrtlProof Manual (v. 0.1) Page 13 of 21
Check the “Generate Extra Gray Levels” box, and
select 2048 levels.
Select your preferred dot shape. Standard defaults are
Euclidean for conventional dot based proofs, and HDS
Super Fine for stochastic screened dots with CMYK
device types, or Hex HDS Super Fine for Photo Ink
device types.
If using Euclidean dots check the “Use Harlequin
Precision Screening” box, and enter the screen ruling
you wish to use. As a starting point enter 85 lpi for
600 dpi resolution output.
Leave the other controls at their default settings, or
consult the Navigator user manual for further
information. Click on OK.
GIrtlProof Manual (v. 0.1) Page 14 of 21
2.2 Initial Page Setup Configuration
2.2.1 Create Page Setup
Go to the Page Setup Manager and click New. The
following window appears:
GIrtlProof Manual (v. 0.1) Page 15 of 21
2.2.2 Select Device
Choose the correct output device (that you created
earlier in the Device Manager), and click on the
Configure Device button. A new dialogue box
appears:
Under Print To.. select the installed Windows driver
for your printer.
Make selections of the other controls as you require to
optimize performance and quality for your
application.
Close the Configure dialog.
2.2.3 Set Screening Style
Select Pooto Ink Composite or CMYK Composite as
the Screening Style, depending on the device type.
GIrtlProof Manual (v. 0.1) Page 16 of 21
2.2.4 Set Resolution
Set the output resolution. For high speed proofs use
300 by 300 dpi, for best quality use 600 by 600 dpi.
Some printer types offer more resolution options than
others, so check the list box to review the options. In
general lower resolutions will give faster results and
reduced quality.
Click on Save As.. and save the Page Setup with a
suitable name.
2.3 Configure Color Management
– (Optional)
2.3.1 Introduction
The ProofRIP provides the option of color
management by the use of ICC profiles. While not
essential to create colored prints, the use of color
management is necessary to create proofs with
accurate color.
The color profiles supplied with the ProofRIP include
linearization correction for their target printers.
Additional adjustment can be made by use of the Tone
Curves option, documented in the Navigator user
manual.
2.3.2 Installing ICC Profiles
Setting up Color Management requires the installation
and configuration of the ICC profiles.
GIrtlProof Manual (v. 0.1) Page 17 of 21
To install a profile Select the RIP Menu “Color” >
“Install ICC Profiles”.
Locate the profiles from the Plugin or RIP CD
"Profiles" directory for your printer, media and
screening. Note that each profile is only accurate for
one combination of printer family, ink set, media type,
resolution and screening style.
Read any notes that are with the profiles on the CD
and note the combinations of screening and media
(paper) that each is designed for.
When importing a CMYK profile check the "Device
Profile" box, select the output device you created
earlier from the Device Manager from the CMYK
Device drop down list, do not check the “Re-sample
on install” tick box.
After installing the profiles you need to configure at
least one Color Setup using one of the profiles.
2.3.3 Creating a Color Setup
From the Color menu select Color Setup Manager.
From the Manager select the correct output device
from the list, and then click on New.
Edit the entries as in this example:-
GIrtlProof Manual (v. 0.1) Page 18 of 21
Color Matching requires an Input Profile for both
CMYK and RGB images. These profiles reflect the
device you are emulating with the printer. We suggest
3M Matchprint as a starting point for CMYK, and
sRGB for RGB.
For Output Profile select the chosen profile you have
imported. In this example we have selected a profile
for an HP 2000/3000 at 600 dpi with HDS Super Fine
screening on Gloss paper.
For rendering Intent we suggest Auto as a starting
point
GIrtlProof Manual (v. 0.1) Page 19 of 21
Leave the other entries unchanged and click OK. You
will be prompted to name your Color Setup - choose a
meaningful name such as "HP2500_Gloss_600".
For more details about these settings refer to the
Harlequin Color Production Solutions manual.
Repeat the above process for any other profiles you
wish to use.
2.4 Final Page Setup Configuration
Return to the Page Setup Manager, highlight the Setup
you created earlier and click on Edit.
Select the Color Setup that you created in section 2.3
and click on Save. This installs your new color
management settings in the RIP.
GIrtlProof Manual (v. 0.1) Page 20 of 21
These settings will be utilized by the RIP when any
job is processed using the Page Setup you have
defined.
Create additional Page Setups and Color Setups for all
combinations of device, screening, media and
resolution that you wish to use.
Once you have made your Page Setups and associated
them with the correct Calibration and Color setups
you are ready to output either using the Print File
option, or by associating your Page Setup with an
Input in the Input Manager.
For more details about the Page Setup and Input
Manager options see the Navigator User Manual.
GIrtlProof Manual (v. 0.1) Page 21 of 21