1
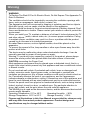
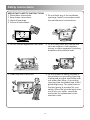
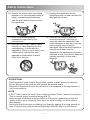
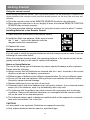
Warning CAUTION RISK OF ELECTRIC SHOCK DO NOT OPEN WARNING: TO REDUCE THE RISK OF ELECTRIC SHOCK DO NOT REMOVE COVER (OR BACK). NO USER SERVICEABLE PARTS INSIDE. REFER TO QUALIFIED SERVICE PERSONNEL. The lightning flash with arrowhead symbol, within an equilateral triangle, is intended to alert the user to the presence of uninsulated "dangerous voltage" within the products enclosure that may be of sufficient magnitude to constitute a risk of electric shock to persons. The exclamation point within an equilateral triangle is intended to alert the user to the presence of important operating and maintenance (servicing) instructions in the literature accompanying the appliance. REGULATORY INFORMATION This equipment generates uses and can radiate radio frequency energy and, if not installed and used in accordance with the instructions, may cause harmful interference to radio communication. However, there is no guarantee that interference will not occur in a particular installation. If this equipment does cause harmful interference to radio or television reception, which can be determined by turning the equipment off and on, the user is encouraged to try to correct the interference by one or more of the following measures: -Relocate the receiving antenna. -Increase the separation between the equipment and receiver. -Connect the equipment into an outlet on a circuit different from that to which the receiver is connected. -Consult the dealer or experienced radio/TV technician for help. Any changes or modifications not expressly approved by the party responsible for compliance could void the user's authority to operate the equipment. CAUTION DO not attempt to modify this product in any way without written authorization from supplier. Unauthorized modification could void the user's authority to operate this product. It is not recommended to keep a certain still image displayed on the screen for a long time as well as displaying extremely bright images on screen. 1 Warning WARNING To Reduce The Risk Of Fire Or Electric Shock, Do Not Expose This Apparatus To Rain Or Moisture. The ventilation should not be impeded by covering the ventilation openings with items, such as newspapers, table-cloths, curtains, etc. The Apparatus shall not be exposed to dripping or splashing and that no objects filled with liquids, such as vases, shall be placed on the apparatus. Attention should be drawn to the environmental aspects of battery disposal. Don’t throw used batteries in dustbin. Please contact your retailer in order to protect the environment. When you install your TV, maintain a distance of at least 4 inches between the TV and other objects (walls, cabinet sides, etc.) to ensure proper ventilation. Failing to maintain proper ventilation may result in a fire or a problem with the product caused by an increase in its internal temperature. No naked flame sources, such as lighted candles, should be placed on the apparatus. To prevent the spread of fire, keep candles or other open flames away from this product at all times. The device may be malfunction when under electrostatic discharge. It can be manually resumed by power off and power on again. Warning: To avoid any injury caused by overturn of the product, please always ensure the whole product was placed within the table surface in horizontal. CAUTION connecting the Power Cord Most appliances recommend they be placed upon a dedicated circuit; that is, a single outlet circuit which powers only that appliance and has no additional outlets or branch circuits. Do not overload wall outlets. Overloaded wall outlets, loose or damaged wall outlets, extension cords, frayed power cords, or damaged or cracked wire insulation are dangerous. Any of these conditions could result in electric shock or fire. Periodically examine the cord of your appliance, and its if appearance indicates damage or deterioration, unplug it, discontinue use of the appliance, and have the cord replaced with an exact replacement part by an authorized servicer. Protect the power cord from physical or mechanical abuse, such as being twisted, kinked, pinched, closed in a door, or walked upon. Pay particular attention to plugs, wall outlets, and the point where the cord exits the appliance. The MAINS plug is used as the disconnect device, and the disconnect device shall remain readily operable. Operating Temperature: 0°C to 40°C Operating Humidity: ≤80% Storage Temperature: -20°C to 60°C Storage Humidity: ≤90% Figures and illustrations in this User Manual are provided for reference only and may differ from actual product appearance. Product design and specifications may be changed without notice. 2 Warning IMPORTANT INFORMATION a. Using cabinets or stands recommended by the manufacturer of the television. b. Only using furniture that can safely support the television. c. Ensuring the television is not overhanging the edge of the supporting furniture. d. Not placing the television on tall furniture (for example, cupboards or bookcases) without anchoring both the furniture and the television to a suitable support. e. Not standing the televisions on cloth or other materials placed between the television and supporting furniture. f. Educating children about the dangers of climbing on furniture to reach the television or its controls. g. The television must to be positioned in a horizontal, stable, un-slippery plane to avoid sliding. 3 Safety instructions IMPORTANT SAFETY INSTRUCTIONS 7. Do not block any of the ventilation 1. Read these instructions. 2. Keep these instructions. openings. Install in accordance with the manufacturer's instructions. 3. Heed all warnings. 4. Follow all instructions. 5. Do not use this apparatus near water. 8. Do not install near any heat source such as radiators, heat registers, stoves, or other apparatus (including amplifiers) that produce heat. 6. Clean only with a dry cloth. 9. Do not defeat the safety purpose of the polarized or grounding type plug. A polarized plug has two blades with one wider than other. A grounding type plug has two blades and a third grounding prong. The wide blade or the third prong is provided for your safety. When the provided plug does not fit into your outlet, consult an electrician for replacement of the obsolete outlet. 4 Safety instructions 10. Protect the power cord from being walked on or pinched particularly at plugs, convenience receptacles, and the point where they exit from the apparatus. 13. Unplug this apparatus during lightning storms or when unused for long periods of time. 11. Only use the attachments/ accessories specified by the manufacturer. 14. Refer all servicing to qualified service personnel. Servicing is required when the apparatus has been damaged in any way, such as power supply cord or plug is damaged, liquid has been spilled or objects have fallen into the apparatus, the apparatus has been exposed to rain or moisture, does not operate normally, or has been dropped. 12. Use only with a cart, stand, tripod, bracket, or table specified by the manufacturer, or sold with the apparatus. When a cart is used, use caution when moving the cart/ apparatus combination to avoid injury from tip-over. ON DISPOSAL -The fluorescent lamp used in this product contain a small amount of mercury. -Do not dispose of this product with general household waste. -Disposal of this product must be carried out in accordance to the regulations of your local authority. NOTE -If the TV feel cold to the touch, there may be a small "flicker" when it is turned on. This is normal, there is nothing wrong with TV. -Some minute dot defects may be visible on the screen, appearing as tiny red, green, or blue spots. However there have no adverse effect on the monitor's performance. -Avoid touching the screen or holding your finger(s) against it for long periods of time. Doing so may produce some temporary distortion effect on the screen. 5 Getting Started Using the remote control When using the remote control, aim it at remote sensor on the television. If there is an object between the remote control and the remote sensor on the unit, the unit may not operate. Point the remote control at the REMOTE SENSOR located on the television. When using this television in a very brightly lit area, the infrared REMOTE CONTROL SENSOR may not work properly. The recommended effective distance for using the remote control is about 7 metres. Installing Batteries in the Remote Control 1. Open the cover at the back of the remote control. 2. Install two AAA size batteries. Make sure to match the “+” and “-” ends of the batteries with the diagram inside the compartment. 3. Replace the cover. Battery replacement You will need to install the supplied batteries into the remote control to make it operate following the instruction below. When the batteries become weak, the operating distance of the remote control will be greatly reduced and you will need to replace the batteries. Notes on Using Batteries: The use of the wrong type of batteries may cause chemical leakage and/or explosion. Please note the following: Always ensure that the batteries are inserted with the + and - terminals in the correct direction as shown in the battery compartment. Different types of batteries have different characteristics. Do not mix different types. Do not mix old and new batteries. Mixing old and new batteries will shorten battery life and/or cause chemical leakage. Replace batteries as soon as they do not work. Chemicals which leak from batteries may cause skin irritation. If any chemical matter seeps out of the batteries, wipe it up immediately with a dry cloth. The batteries with the product may have a shorter life expectancy due to storage conditions. Remove the batteries whenever you anticipate that the remote control will not be used for an extended period. The batteries (battery pack or batteries installed) shall not be exposed to excessive heat such as sunshine, fire or the like. CAUTION: It may result in an explosion if batteries are replaced incorrectly. Only replace batteries with the same or equivalent type. 6 Connection and setup Cable Installation Before the installation and use, please read carefully the relevant content in “Warning and Safety instructions”. 1. Take out the TV from the wrapping package and put it in a drafty and flat place. NOTE: ¾ When you plug or unplug the TV, computer or other equipments, you must make sure that the AC power has been already shut down; ¾ When unplugging the power cable or signal cable, please hold the plug (the insulated part), do not draw the body of the cable. 2. The RF output terminal can be connected with the RF input port of the TV. 3. The output AV terminal of DVD can be connected with the AV input port of the TV through AV cable. NOTE: ¾ COMPONENT and AV can not be used at same time for they share of one audio channel. 4. The output COMPONENT(YPbPr) terminal of DVD can be connected with the COMPONENT(YPbPr) input port of the TV through AV cable. 5. Connect one end of the VGA cable with the VGA port on computer, connect the other end of the VGA cable with the VGA port on the TV, and tighten the bolts clockwise on the each end of VGA cable. NOTE: ¾ While connecting the 15-pin VGA, please do not insert the plug overexertedly, for fear the pin might be broken. 6. Connect one end of the HDMI cable with HDMI output port, connect the other end of the HDMI cable with the HDMI port on the TV. NOTE: ¾ While connecting the HDMI, please aim at carefully, do not insert overexertedly, for fear the pin might be broken. 7. Check and make sure that all AV cables are connected with the corresponding ports correctly. 8. Connect the AC power cable with 240V AC power supply. NOTE: ¾ The range of power input for the TV is 240V~ 50/60Hz, do not connect the TV power input port with the AC power out of the above range. ¾ Please hold the insulated part of the plug when you are unplugging the power cable, do not touch directly the metallic part of the cable. 7 Remote Control The buttons of the original remote control are as following: : Power, switch on or off TV set. 1. 2. INFO: Press to display the current program information on the screen. i : Go to the index page. 3. : Press to mute or restore sound. 4. NUMBER BUTTONS: Choose channels or password importation. 5. SOURCE: Press to select signal source. ? : Reveal the hidden information of some teletext pages. 6. AUDIO (∞I/II): The button can be used 0 to switch between NICAM DUALⅠ/ NICAM DUALⅡ/ NICAM DUALⅠ+Ⅱ /MONO and switch Audio language in DTV mode. 7. MENU: Press to enter the menu screen for various optional adjustable settings. 8. EXIT: Exit OSD Menu . 9. ▲/▼/◄/►: To select the direction. 25 26 27 10. ENTER: Press to execute the selected item in the menu screen or enter the desired value in any input mode. 11. INDEX: Press to enter the Recorded list. (In DTV mode) 12. LIST: Press to call up the channel list. Press again to exit it. 13. CH+/CH-: Press to select channels in ascending or descending order. 14. VOL+/VOL-: Press to adjust the volume level up or down. 15. SLEEP: Press to set the sleep timer. When the preset length of time has passed, the TV set enters standby mode. 16. : Switch on/off the favorite programs list. 17. EPG: Electronic Program Guide, use in the DTV mode. 18. : Return to last viewed program. 8 Remote Control 19. COLOR BUTTONS: Red/ green/ yellow/ blue key navigation link. : Fast reverse (in USB mode). : Fast forward (in USB mode). : Previous (in USB mode). : Next (in USB mode). 20. STILL: Press to hold the picture. : Hold the teletext page on display, press again to release. : Stop (in USB mode). 0 21. : Enter the Teletext, press again for MIX mode, press this button again to exit. : Play / Pause (in USB mode). 22. RADIO: Press to interchange Radio and DTV programs when there is Radio program (In DTV mode). 23. : Press to select different images sizes. : Change size of teletext screen in display mode. 24. 25. 25 26 27 : Enter subtitle mode or subpage. : Cancel the teletext but not to exit teletext, press again to exit. 26. DMP: Press to switch to the USB source. 27. : Press button to start recording. (In PVR mode). NOTE: All pictures in this manual are examples, only for reference, actual product may differ from the pictures. The buttons not mentioned here are not used. 9 Basic Operation QUICK START GUIDE • Connection 1. Connecting the mains and antenna. 2. Press Power button on the remote to turn on the TV. • First Time Setup When the TV is initially powered on, a sequence of on-screen prompts will assist in configuring basic settings. OSD Language Press the◄/►button to select the desired OSD (On Screen Display) language. Mode Setting Press the◄/►button to select Home Mode or Store Mode. Country Press the◄/►button to select the country you want to. Auto Scan Press the◄/►button to select mode: DTV+ATV, DTV, ATV. Turning on and off the TV • Turn on the TV Connect the AC input cable. If TV has a power switch, turn it on firstly. Press the button on remote control can turn on TV from standby mode. • Turn off the TV Press the button on the remote control to enter standby mode. Do not leave your set in standby mode for long periods of time. It is best to unplug the set from the mains and aerial. • No signal There is No Signal menu on screen when there is no input signal. In ATV/DTV mode, if there is no signal in 15 minutes, the TV will turn off automatically. In PC mode, the TV set will automatically turn off in 5 minutes if no input signal. When VGA cable is connected, the TV turns on automatically. Programme Selection • Using the CH+/CH- on the panel of TV or on the remote control. Press CH+ to increase channel number. Press CH - to decrease channel number. • Using 0- 9 digital buttons. You can select the channel number by pressing 0 to 9. (In ATV, DTV mode) • Example To select - channel (e.g. Channel 5): Press 5. To select -- channel (e.g. Channel 20): Press 2 and 0 in a short time. 10 Basic Operation Volume adjustment • Press the VOL+/- button to adjust the volume. • If you want to switch the sound OFF, press the . • You can release mute by pressing the or increase the volume. Changing the Input Source You can select the input source by pressing the SOURCE button on the remote control. Press the▲/▼button to cycle through the input source, and press the ENTER button to confirm your choice. How to Navigate Menus Before using the TV follow the steps below to learn how to navigate the menu in order to select and adjust different functions. The access step may differ depending on the selected menu. 1. Press the MENU button to display the main menu. 2. Press the◄/►button to cycle through the main menu. 3. Press the▲/▼button to select the desired sub item. 4. Press the ENTER button to access the submenu. 5. Press the ▲/▼/◄/► button to select the desired value. The adjustment in the OSD may differ depending on the selected menu. 6. Press the MENU button to return to the previous menu. 7. Press the EXIT button exit from the menu. NOTE: When an item in MENU is displayed gray, it means that the item is not available or cannot be adjusted. Buttons on the TV have the same function as corresponding buttons on the remote control. If your remote control is lost or couldn’t work, you may use the buttons on the TV to select menus. This manual focuses on operation of the remote control. Some items in the menus may be hidden depending on modes or signal sources used. 11 Menu Operation Configuring the Picture Menu • Picture Mode You can select the type of picture which best corresponds to your viewing requirements. • Brightness Adjusts the base level of the signal in the picture. • Contrast Adjusts the signal level between black and white in the picture. • Sharpness Adjusts the level of crispness in the edges between the light and dark areas of the picture. • Saturation Adjusts intensity of all colours. • Hue (Only in the NTSC mode) Adjusts the balance between red and green levels. • Color Temp Select the color temperature of the picture. • Aspect Ratio You can select the picture size which best corresponds to your viewing requirements. • PC Setting (In PC mode) Auto Adjust: Adjust the image automatically. H Position: Centre the image by moving it left or right. V Position: Centre the image by moving it up or down. Phase: Minimize horizontal distortion. Clock: Minimize vertical stripes in the screen image. • Screen Mode (In HDMI mode) Press the▲/▼button to select Screen Mode, then press the◄/►button to select Auto, Video or PC. • Advanced Settings NR: Set options to reduce video noise. MPEG NR: Set options to reduce MPEG noise. Dynamic Contrast: Automatically adjust picture detail and brightness. 12 Menu Operation Configuring the Sound Menu • Sound Mode You can select a sound mode to suit your personal preferences. • Treble Adjust the treble effect. Increases or devreases high-pitched sounds. • Bass Adjust the bass effect. Increases or decreases lower-pitched sounds. • Balance You can adjust the sound balance of the speakers to preferred levels. • Surround Sound You can select a desired Surround Sound mode. • EQ Setting Adjust the curve of 7 bands equalizer. EQ Mode: Only in User mode, the following can be manually adjusted. 120Hz/300Hz/500Hz/1.2KHz/3.0KHz/7.5KHz/10KHz: Adjusts the level of specific bandwidth frequencies. Based on your favorites about which frequency band need to be adjusted, make small adjustment with certain frequency band at a time. Suggest NOT making too large changes. • AVL AVL automatically remains on the same level of volume if you change programmes. Because each broadcasting station has its own signal conditions, volume adjustment may be needed every time when the channel is changed. This feature allows users to enjoy stable volume levels by making automatic adjustments for each program. • SPDIF You can select a desired SPDIF Output mode. • Audio Description (In DTV mode) Press the▲/▼button to select Audio Description, then press the►button to enter sub-menu. Press the▲/▼button to select Mode, then press the◄/►button to select On, Off. When the mode is On, Volume can be adjusted by users. • Sound Type (In DTV mode) Press the▲/▼button to select Sound Type, then press the◄/►button to select. 13 Menu Operation Configuring the Channel Menu • Auto Scan Press the ENTER button to enter sub-menu. Country: Press the◄/►button to select country. Mode: Press the◄/►button to select Mode: DTV+ATV, DTV, ATV. Start: Press the ENTER button to start the auto searching. • Manual Scan Press the ENTER button to enter sub-menu. - Digital Manual Scan: Press the▲/▼button to select the Digital Manual Scan, then press the ENTER button to enter sub-menu. Digital Scan: Press the◄/►button to select the channel number. Start: Press the ENTER button to start the channel searching. Frequency: Display the frequency of current TV signal. Strength: Display the quality of current TV signal. - Analog Manual Scan: Press the▲/▼button to select the Analog Manual Scan, then press the ENTER button to enter sub-menu. Analog Scan: Press the◄/►button to select Analog Scan. Channel to Save: Press the◄/►button to select channel. Color System: Press the◄/►button to select Color System. Sound System: Press the◄/►button to select Sound System. AFC: Press the◄/►button to select On or Off. Start: Press the ENTER button to start the channel searching. • Channel Edit First press the▲/▼button to highlight the channel you want to delete or skip or swap, then: Press the red button to delete the channel. Press the green button to skip the select channel. (Your TV set will skip the channel automatically when using CH+/- to view the channels.) Press the yellow button to rename the channel. (In ATV mode) Press the blue button to set the channel to moving state, then press the▲/▼button to move it to the positon you want to put. • Signal Information (In DTV mode) Display the current Signal Information. 14 Menu Operation Configuring the Lock System Menu • Enter Password The following items are only available if the password input is correct. Default password is 0000, and if forget what you set, please call the service center. • Enable Channel Locks, Parental Rating and Lock Keypad are available when Enable is On. • Channel Locks Press▲/▼to select the channel you want to lock, then press ENTER to set it to lock. • Parental Rating (In DTV mode) Press the▲/▼button to select Parental Rating, then press◄/►button to select. • Lock Keypad Set to prevent it from being used by young children, or other unexpected usage. • New Password Press the▲/▼button to select New Password, then enter a 4-digital number you want to set twice. • Clear Lock Restore the Lock System settings to the factory default. 15 Menu Operation Configuring the Setup Menu • OSD Language Select your preferred On Screen Display language. • Audio Languages (In DTV mode) Select your preferred audio language. (Available for digital channels if multiple audio languages are broadcasted.) Press the▲/▼button to select Audio Languages, then press ENTER button to enter sub-menu. Press the arrow button to select the Audio Primary Language and Audio Secondary Language. • Subtitle (In DTV mode) Press the▲/▼button to select Subtitle, then press ENTER button to enter sub-menu. Press the▲/▼button to select Mode, then press◄/►button to select On or Off. Press the arrow button to select the Subtitle Primary Language and Subtitle Secondary Language. Press the▲/▼button to select Hearing Impaired, then press◄/►button to select On or Off. • Teletext Adjust Teletext settings. Only available under DTV and ATV source. Press the▲/▼button to select Teletext, then press ENTER button to enter sub-menu. Under DTV source, press◄/►button to select Digital Teletext Language. Under ATV source, press◄/►button to select Decoding Page Language. • Mode Setting Press◄/►button to select Store mode or Home Mode. • Time Settings Press the▲/▼button to select Time Settings, then press ENTER button to enter sub-menu. OSD Time: Select On-Screen Menu displaying time. Sleep Timer: Select the time to turn the TV to standby mode automatically. Auto Sleep: Select the Auto Sleep time you want. Time Zone: Select your time zone. Time: Press the▲/▼button to select Time, then press ENTER button to enter sub-menu. Set Auto Sync to Off, then you can set the time manually. Note: In the case of loss of power, the clock setting will be lost. 16 Menu Operation • PVR Settings (In DTV mode) Press the▲/▼button to select PVR Settings, then press ENTER button to enter sub-menu. It will check the USB. File Manager: To display the Recorded list. Replay: Press the red button to replay video. Delete One: Press the green button to delete a video. Delete All: Press the yellow button to delete all video. Zoom In: Press the blue button to zoom in the video. Device List: When multiple recording devieds are connected, the recording devices are listed. Select one recording device in the Device List. Format: Press the red button to format USB disk. Scheduled Record: To set the parameters for scheduled recording. Press the ENTER button to set the parameters for recording. Delete One: Press the green button to delete a video. Delete All: Press the yellow button to delete all video. Digital program recording 1. Insert an U disk, Press button to record the current program. During the recording, press button to zoom in/out the record menu. 2. Press button to stop recording, it will return to normal broadcast television. NOTE: USB disk at least the capacity with 512MB. Please format the inserted USB disk when it could not be recorded to. During the Device formatting, do not disconnect the device while formatting is in progress. If you format the device, all files will be deleted. Before formatting your device to the TV, please back up your files to prevent them from damage or loss of data. If USB disk in some virus meeting formats turn failure. When an USB device has several partitions,the PVR system can help to choose anyone of that to perform recording. If PVR recording system is used all the time, it will exit PVR system automatically. USB memory must support USB2.0 high-speed specification. Some of nonstandard USB device may not be supported. • First Time Setup This is a guide to help you to setup the TV. • Reset Restore the system settings to the factory default. 17 Menu Operation Using USB mode • To Access/Quit USB mode 1. Connect an USB device. 2. Press SOURCE button to display the main menu. Use the ▲/▼ to highlight USB, and the ENTER button to access the USB mode. 3. You may also use the signal source selection menu to exit from the USB mode. NOTE: Special USB device may be not or well supported. USB max. Load: DC5V 500mA • The formats supported Multimedia Categories File Extension *.avi MPEG(*.mpeg, *.mpg, *.dat, *vob) MPEG-4(*.mp4) Movie TS(*.ts, *.trp, *tp) MKV(*.mkv) *.flv Decoder Audio Decode Video Decode MPEG-1 MPEG-2 MP MPEG-4 SP MPEG-4 ASP MPEG-4 XVID DivX H.264(AVC) MPEG-1 Layer 2 MP@Level 4 MPEG-1 Layer 3 MPEG-2 Layer 3 H.264(AVC) HP@Level 4 AC3 AAC-LC MPEG-1 MP HE-AAC V1 MPEG-2 MP HE-AAC V2 MPEG-4 SP MPEG-4 ASP MPEG.-4 XVID H.264(AVC) MP@Level 4 H.264(AVC) HP@Level 4 MPEG-1 MPEG-2 MP H.264(AVC) MP@Level 4 H.264(AVC) HP@Level 4 MPEG-1 MPEG-2 MP MPEG-4 SP MPEG-4 ASP MPEG-4 XVID H.264(AVC) MP @ Level 4 H.264(AVC) HP @ Level 4 H.264(AVC) MP @ Level 4 H.264(AVC) HP @ Level 4 18 Notes MPGE1/MPEG2/M PEG4: Up to 1080p @ 30F H.264: Up to 1080p @ 25F AAC: AAC-LC(type 2), HE-AAC v1(type 5,SBR), HE-AAC v2(type 29,SBR+PS) Menu Operation MPEG-1 Layer 3 *.mp3 MPEG-2 Layer 3 Music AAC HE-AAC V1 HE-AAC V2 LPCM ADPCM AAC(*.aac,*m4a) *.wav 72x72 < Baseline resolution < 7680x4320 Baseline Mode Photo *.jpg *.jpeg Progressive Mode Size <=1280x1024 File Size <=10MB Progressive Mode Text Bit Rate: up to 320Kbps Sample Rate: 32KHz, 44.1KHz, 48KHz UTF-8 UNICODE ASCII *.txt File Size <=1MB Note: Max 500 files supported each folder. NOTE: Special algorithm documents may not be or well be supported by the USB. The USB supports the format mentioned above, if the file format is not supported, change it to the given format. • Main Operating Interface Use the ◄/► button to select Photo, Music, Movie or Text. Press ENTER button enter into sub-menu. 19 Menu Operation Photo Press the ◄/► button to select Photo in the main menu, then press ENTER button to enter. Press the ◄/► button to select disk you want to watch, then press ENTER button to enter. Press the CH+/- button to change page. Press the INDEX button to access to the quick menu. Use the arrow buttons to highlight the folder, and then press the ENTER button. Use the arrow buttons to highlight a file, and then press the button to play. Press the to stop the playing files. Press the EXIT button to back to the previous menu. Music Press the ◄/► button to select Music in the main menu, then press ENTER button to enter. Press the ▲/▼ button to select disk you want to watch, then press ENTER button to enter. Press the ◄/► button to change page. Press the INDEX button to access to the quick menu. Use the ▲/▼ button to highlight the folder, and then press the ENTER button. Use the ▲/▼ button to highlight a file, and then press the button to play. Press the to stop the playing files. Press the EXIT button to back to the previous menu. Movie Press the ◄/► button to select Movie in the main menu, then press ENTER button to enter. Press the ▲/▼ button to select disk you want to watch, then press ENTER button to enter. Press the ◄/► button to change page. Press the INDEX button to access to the quick menu. Use the ▲/▼ button to highlight the folder, and then press the ENTER button. Use the ▲/▼ button to highlight a file, and then press the button to play. Press the to stop the playing files. Press the EXIT button to back to the previous menu. Text Press the ◄/► button to select Text in the main menu, then press ENTER button to enter. Press the ▲/▼ button to select disk you want to watch, then press ENTER button to enter. Press the ◄/► button to change page. Press the INDEX button to access to the quick menu. Use the ▲/▼ button to highlight the folder, and then press the ENTER button. Use the ▲/▼ button to highlight a file, and then press the button to play. Press the EXIT button to back to the previous menu. 20 Important Unique Buttons PROGRAM GUIDE (In DTV mode) Press the EPG button to enter PROGRAM GUIDE menu. Press the button to set the parameters for recording. You can choose the time of the appointment to record you want. The unit is able to do schedule recording when TV is turning on or in standby mode. When recording starts in standby mode, there will be no picture or sound from the unit. Press the red button to view the previous date’s guide. Press the green button to view the next date’s guide. Press the yellow button to display the EPG Schedule List. Press the blue button to book program. Press the EXIT button to exit. Channel List Press LIST button to display the Channel List. Press ▲/▼ to select the items. Press ENTER button to enter the channel. Press ◄ / ► button to page up or down the Channel list. Press EXIT button to exit. Favorite List Press button to display the favorite list. Press the red button to delete the selected favorite program. Press the green button to add the current program to the favorite list. Press ▲/▼ to select the items. Press ◄ / ► button to page up or down the Favorite list. Press ENTER button to enter the channel. Press EXIT button to exit. 21 Teletext Using the teletext feature • Display teletext 1. Select a TV station with a teletext signal. 2. Press the button to enter teletext mode. button 2nd to enter Mix mode, this function enables you to 3. Press the superimpose the teletext page over the TV program. button 3rd return or exit to the normal ATV/DTV mode. 4. Press the • Page selection 1. Enter the page number (three digits) using the number buttons. If you press a wrong number during input, you must complete the three digit number and then reenter the correct page number. 2. The CH-/CH+ button can be used to select the preceding or following page. • Hold You can press the • Index Press the i button to hold a page, and press it again to release the page. button to enter the main index page directly. • Enlarging Text When a page is displayed, you can double the size of the text to make it easier to read. button to enlarge the top half of the page. 1. Press the button again to enlarge the bottom half of the page. 2. Press the 3. Press the button once more to return to the normal display. • Reveal mode You can display concealed teletext information (e.g. Answer to puzzles or riddles etc.) by pressing ? button. Press ? button again to remove the information from the display. • Subpage Some teletext may contain several sub-pages which are automatically paged in a certain cycle by the TV station. 1. Yon can enter into a certain sub page by pressing the button directly and select the page number with number buttons. Enter the sub page number (e.g. 0003) for the third sub page. 2. Press the button again to exit the sub page mode. • Color buttons (Red, Green, Yellow and blue) Press these buttons to access directly to the corresponding color pages displayed at the lower part of the teletext screen. 22 Troubleshooting Guide Troubleshooting Before contact the service technician, perform the following simple checks. If any program still persists, unplug the TV and calling for serving. PROBLEM POSSIBLE SOLUTION - Check whether the main plug has been connected to a wall let. No sound and picture - Check whether you have pressed the POWER button on the front of TV set. - Check the picture contrast and brightness settings. - Check the volume. - Sound muted? Press the MUTE button. Normal picture but no - Try another channel, the problem may be with the sound broadcast. - Are the audio cables installed properly? - Check to see if there any object between the product and remote control Causing obstruction. The remote control does - Are batteries installed with correct polarity (+ to +, not work - to -)? - Correct remote operating mode set: TV, VCR etc.? - Install new batteries - Is the sleep timer set? Power is suddenly turned - Check the power control settings. Power interrupted. off - No broadcast on station tuned with auto activated. - This is normal, the image is muted during the Picture appears slowly product startup process. Please contact your service after switching on center, if the picture has not appeared after five minutes. - Adjust the color in menu option. - Keep a sufficient distance between the product and the VCR. No or poor color or poor - Try another channel, the problem may be with the picture broadcast. - Are the VIDEO cables installed properly? - Activate the any function to restore the brightness of the picture. Horizontal/vertical bars or - Check for local interference such as an electrical picture shaking appliance or power tool. - Station or cable product experiencing problems. Tune to another station. Poor reception on some - Station signal is weak, reorient antenna to receive channels weaker station. - Check for sources of possible interference. Lines or streaks in - Check the antenna (Change the direction of the pictures antenna). No output from one of the - Adjust balance in menu option. speakers 23 Troubleshooting Guide NOTE: There is a problem in VGA mode (Only VGA mode applied). PROBLEM The signal is out of range. Vertical bar or stripe on back ground & Horizontal Noise & Incorrect position. Screen color is unstable or single color. POSSIBLE SOLUTION - Adjust resolution, horizontal frequency, or vertical frequency. - Check it whether the signal cable is connected or loose. - Check the input source. - Work the auto configure or adjust clock, phase, or H/V position. - Check the signal cable. - Reinstall the PC video card. Maintenance Early malfunctions can be prevented. Careful and regular cleaning can extend the amount of time you will have your new TV. Be sure to turn the power off and unplug the power cord before you begin any cleaning. Cleaning the screen 1. Here’s a great way to keep the dust off your screen for a while. Wet a soft cloth in a mixture of lukewarm water and a little fabric softener or dish washing detergent. Wring the cloth until it’s almost dry, and then used it to wipe the screen. 2. Make sure the excess water is off the screen, and then let it air-dry before you turn on your TV. Cleaning the cabinet To remove dirt or dust, wipe the cabinet with a soft, dry, lint-free cloth. Please be sure not to use a wet cloth. Extended Absence If you expect to leave your TV dormant for a long time (such as a vacation), it’s a good idea to unplug the power cord to protect against possible damage from lightning or power surges. Disposal of old electrical appliances The European directive 2012/19/EU on Waste Electrical and Electronic Equipment (WEEE), requires that old household electrical appliances must not be disposed of in the normal unsorted municipal waste stream. Old appliances must be collected separately in order to optimize the recovery and recycling of the materials they contain, and reduce the impact on human health and the environment. The crossed out “wheeled bin” symbol on the product reminds you of your obligation, that when you dispose of the appliance, it must be separately collected. Consumers should contact their local authority or retailer for information concerning the correct disposal of their old appliance. This equipment is a Class Ⅱ or double insulated electrical appliance. It has been designed in such a way th at it does not require a safety connection to electrical earth. 24 Installation Instructions for the Flat Panel Support Bracket: Caution: Pulling, pushing, or climbing on the TV may cause the TV to fall. In particular, ensure your children do not hang over or destabilize the TV; doing so may cause the TV to tip over, causing serious injuries or death. Follow all safety precautions provided on the included Safety Flyer. For added stability, install the anti-fall device for safety purposes, as follows. 1. The flat panel can easily topple over due to external force, as shown in the following figure, which should be prevented. 2. Two brackets on the rear cover of the flat panel are required to be installed. Refer to the diagram shown below for installation location. Bracket×2 Screws ×2 3. Finally, the flat panel is assembled as shown in the following figure to prevent from toppling over due to any external force. 25 Remarks: 1. The flat panel can only be placed on a flat surface object with a surface area larger than that of the flat panel. Both supporting brackets on either side must rest on the flat surface and the two brackets must be fastened with screws to the left and right corners of the flat panel’s rear cover respectively. 2. The above figures are for reference only, and the physical flat panel shall govern. 3. Any issue related to usage safety shall be the liability of the user in the event that the product is not set up properly according to requirements described in the instruction manual.