1
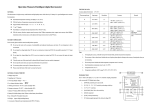
Thermocouple type R Input range Resolution Accuracy -40~1760℃ 1℃ S -20~1760℃ 1℃ -40~500℃: ±(0.5%+2℃) 500℃~1760℃: ±(0.4%+2℃) B 400~1800℃ 1℃ E -200~1000℃ 0.1℃ K -200~1370℃ 0.1℃ 1.5 Memory function: manually record 2500pcs temperature points, and automatically record 6000pcs temperature points. Recording interval can be adjusted. The longest recording time is about 99 hours. J -200~1200℃ 0.1℃ 2. SAFETY REGULATION FOR OPERATION T -200~400℃ 0.1℃ N -200~1300℃ 0.1℃ INTELLIGENT DIGITAL THERMOMETER INSTRUCTION MANUAL 1. GENERAL DESCRIPTION This multifunctional 4 ½ digital thermometer with highly stable performance and high accuracy is driven by 9V battery. With following features, it’s an ideal intelligent tool for temperature measurement: 1.1 Support K, E, J, T, N, B, R, S thermocouples; 1.2 ℃ and ℉ display, data hold; 1.3 Dual display: display the Max/ Min and relative mV value of input temperature; 1.4 Dual channel: measure the T1, T2 and T1-T2 value.. This instruction manual covers information on operation and safety. For safety and better use, please read the relevant information carefully before your operation! 2.1 Do not operate this instrument in occasions with stem or inflammable and explosive gas. It’s very dangerous. Note: 2.2 Do not input voltage higher than 30V for both terminals. Do not connect T1 and T2 in parallel. 1. 2. 2.3 Wipe the case with a damp cloth and detergent. Do not use abrasives and alcohol to clean the meter. 2.4 Do not disassemble the meter without professional direction. 2.5 For accuracy, please wait 5 minutes to warm up the meter after power on 2.6 Please contact the factory if the meter’s accuracy has big error. 3. GENERAL SPECIFICATIONS 3.1 Display: 4 ½ digit large LCD, Max display 19999. 3.2 Sampling rate: 2.5 times/sec. 3.3 Over range display: “-OL-”. 3.4 Low battery indication: LCD displays “ ”. 3.5 Working conditions: -10~50℃, relative humidity<80%. 3.6 Storage conditions: -20~60℃, relative humidity<80%. 3.7 Battery: 9V battery, 006P or IEC6F22 or NEDA1604. 3.8 Battery life: 150 hours for alkaline battery, and 80 hours for carbon battery. 3.9 Dimension: 130mm (L) × 95mm (W) × 28mm (H). 3.10 Weight: approx.240g (including battery). 3.11 Accessories: manual, two pieces K-type TP01 thermocouple, 9V battery. 3. 4. Remark 400℃~800℃: ±(0.5%+2℃) 800℃~1000℃: ±(0.4%+2℃) 1000℃~1800℃: ±(0.3%+2℃) -200℃~0℃: ±(0.3%+1℃) 0℃~500℃: ±(0.3%+2℃) -200~0℃: ±(0.3%+2℃) 0℃~800℃: ±(0.3%+1℃) 800℃~1370℃: ±(0.5%+2℃) -200~0℃: ±(0.3%+1℃) 0℃~1200℃: ±(0.3%+2℃) -200~0℃: ±(0.3%+1℃) 0℃~400℃: ±(0.3%+2℃) -200~0℃: ±(0.5%+2℃) 0℃~1300℃: ±(0.3%+2℃) T1-T2 accurate: ±[0.3% (T1-T2)+ 2] Input impedance: 1GΩ. Adopts ITS-90 thermometr ic scale For obtaining an accurate measurement result, please warm up for 5minuetes before taking measurements. The accuracy of above sheet doesn’t include the error of probe; please amend the accuracy according to the error of used probe. The accuracy doesn’t include the inside temperature compensate sensor’s accuracy. Environmental temperature compensate range: -10~50°C, compensate value ≤ 0. 5℃. Temperature coefficient: ±0.01%×range / °C (0°C~18°C, 28°C~50°C). 5. PANEL DESCRIPTION ① LCD: main display shows temperature of T1, T2 and T1-T2. Auxiliary display shows the relative input voltage. ② [POWER]: turn ON/OFF the thermometer. 8 9 ③ [T1-T2]: choose temperature of T1, T2 or T1-T2. ④ [℃/℉]: choose ℃ or ℉ temperature mode ⑤ [MAX/MIN]: show the maximum and minimum temperature value. 1 ⑥ [HOLD]: press [HOLD] button to hold the current measurement value on the LCD. ⑦ [LOG]: Memory function key ⑧ T1: temperature input terminal, max input voltage 30V. 4. TECHNICAL DATA ⑨ T2: temperature input terminal, max input voltage 30V. Accuracy adjustment environment: 23℃±5℃. ⑩ OUTPUT: alarm signal output terminal. ⑪ Symbol explanation 4 2 C/ F 6 3 MAX MIN 7 5 THERMOMETER TYPE-K/E/J/T/B/N/R/S Display symbol Explanation Channel switch Data hold Calibration mode 8. Do not input voltages at temperature range. 7. USER DEFINED OPERATION MODE 7.1 Turn on the meter and press [HOLD] key at the same time, it will enter the user-defined mode, it displays as below: Cold-junction compensation Main display Temperature unit Thermocouple type Max/min temperature value Memory scan mode Alarm mode Alarm setting, manually data record Auxiliary display Press [HOLD] / [LOG] key to add/ reduce the time of auto power-off. Press one time for 5 minutes. Default auto power off is 10 minutes. 7.2 Press [T1-T2] key to enter RJ-ON setting mode, it displays as below: Hour/minute/second Relative input mV Low battery indication 6. OPERATION INSTRUCTION Press [HOLD]/ [LOG] key to turn RJ-ON mode off.. The default state is on. 6.1 For obtaining an accurate measurement result, after turning on the meter, warm up for 5minuetes before 7.3 Press [T1-T2] key to enter thermocouple type choosing mode, it displays as below: taking measurements. 6.2 Factory defaults: 10 minutes auto power off, RJ-ON (cold-junction compensation) mode, K-type thermocouple mode, high limit alarm with 1 ℃ hysteresis. The alarm will be triggered and sound, meanwhile it will output control signal when the temperature is higher than the alarm point. For changing the factory defaults please refer to the user defined operation mode. 6.3 Insert the cold end (free end) of the thermocouple into the T1 terminal. The working end of thermocouple will be connected to the point under test, and LCD will display the ℃ of this point. 6.4 Press [℃/℉] can choose ℉ unit. Press [HOLD]/ [LOG] key to change the type, the sequence is K→E→J→T→B→N→R→S; 7.4 Press [T1-T2] key to enter recording rate setting mode, it displays as below: 6.5 Press [MAX/MIN] can shift between the maximum value, minimal value and current value. 6.6 Press [HOLD] can keep the current value. 6.7 Press [LOG] key to enter the memory mode: measurementÆauto recordÆmanually record Note: 5. Please pay attention to the polarity. If insert the thermocouple contrarily, the meter will display error value, and when the temperature is raising the display value is dropping. 6. When the input end is open circuit or the temperature is higher than the limited value, it will display “OL”. 7. Do not change the temperature sensor randomly, it will affect the accuracy. Press [HOLD]/ [LOG] key to change the recording interval time, every time add/decrease 1 minute. Default interval time is 10 minutes. 7.5 Press [T1-T2] key to enter factory defaults choosing mode, it displays as below: the temperature value, auxiliary displaying area shows the sampling time; if there isn’t any value auto recorded, all figures will be zero. Press [HOLD]/ [LOG] key to check the last/ next record; Press [T1-T2] key to check manually memory zone. It displays as below: Press [HOLD]/ [LOG] key to choose factory defaults, yes means all setting will be factory defaults, no means it will be user-defined setting; 7.6 Press [T1-T2] key to enter save menu, it displays as below: LCD displays the first manually record value, main displaying area shows the temperature value, auxiliary displaying area shows the numerical order of the record; if there isn’t any value manually recorded, and all figures will be zero. Press [HOLD]/ [LOG] key to check the last/ next record; Press [LOG] key to save above settings. If choose factory defaults, all the settings ahead are not valid. Factory defaults are: 10 minutes auto power-off, RJ-ON, K type thermocouple. Press [T1-T2] key again, it will return to the time setting of auto power-off. 7.7 To exit the user-defined mode, turn off the meter. 8. MEMORY AND MEMORY SCAN MODE Manually record 2500pcs temperature, automatically record 6000pcs temperature, the longest recording time is 99 hours. 8.1 Memory mode: Press [LOG] key to enter the auto memory mode and press [℃ / ℉] key to start it, the system will record the sampling value timely according to the recording interval time, press [℃/ ℉] key again to stop and save records. Press [LOG] key to enter manually memory mode, sampling data can be manually saved by pressing [℃/ ℉] . If LCD displays “FULL”, it means there is no space for new data; you should delete the old records. 8.2 Memory scan mode: Turn on the meter and press [LOG] key at the same time; it will enter memory scan mode and displays as below: User can set recording interval time, please refer to the “USER DEFINED OPERATION MODE”. Turn off the power to exit memory scan mode state. 8.3 Clear memory: After entering the memory scan mode, press [℃/℉] key can delete all the data in auto memory zone or manually memory zone. 9. MAINTENANCE 9.1 Do not expose the meter to the rapidly changed environment or environment with high temperature, high humidity and high vibration 9.2 Remove the battery, if the thermometer will not be used for a long time. 9.3 Do not use this meter for voltage and current measurement. To avoid damage, do not input voltage higher than 30V. 9.4 The probe of thermocouple might be oxidized corroded or polluted, which will cause the aging of the probe and affect the accuracy of measurement. So clean the probe frequently and change it if it is corroded. 9.5 During measurement, do not expose the thermometer to the heat source directly. Make sure the environment temperature for the thermometer isn’t beyond its working temperature. 9.6 The meter is a precise instrument. Random changes to the circuit are not allowed. The auto memory zone will be shown first. LCD displays the first auto record value, main displaying area shows The specifications are subject to changes without prior notice. The content of this manual is regarded as correct. If users find out any mistakes or omissions, please kindly contact the manufacturer. The manufacturer will not be responsible for accidents and damage caused by improper operations. The functions described in this User Manual shall not be considered as the reason for any special usages.