1
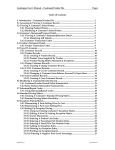
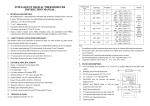
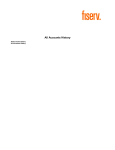
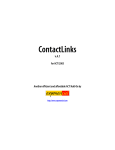
th
10835 N. 25 Ave, Suite 350, Phoenix, AZ 85029
www.usadsi.com
Phone: (602) 866-8199
Table of Contents
Table of Contents ...................................................................................................................... i
Introduction .............................................................................................................................. 1
General Options........................................................................................................................ 3
Enable Order Entry................................................................................................................ 3
Enable Documents ................................................................................................................ 3
Enable File Tracking.............................................................................................................. 4
Enable Detailed Search ......................................................................................................... 4
Enable Account Request ....................................................................................................... 4
Use External Document Provider........................................................................................... 4
Site Theme............................................................................................................................ 4
Email Options ........................................................................................................................... 5
Navigation Options................................................................................................................... 6
Save Configuration................................................................................................................... 6
User Administration ................................................................................................................. 7
Activating Users .................................................................................................................... 8
Add/Edit User ........................................................................................................................ 9
Required Fields .................................................................................................................9
User Permissions ..............................................................................................................9
Default Drop Down Boxes................................................................................................10
Apply Button....................................................................................................................10
Delete User ..........................................................................................................................10
Other Documentation ..............................................................................................................10
Support ....................................................................................................................................11
Impact Online v3.00 Site and User Administration
Page i
7/24/2008
Introduction
Introduction
Impact Online v3.0 is the latest release for use with the Impact/SQL Title and Escrow software suite.
Impact Online is a web-based application that allows clients to open orders and to view critical escrow file
information, including documents and escrow status, from anywhere, through the convenience of a web
browser. Additionally, Impact Online allows external clients to enter new orders via the web. The
application is directly integrated with the Impact/SQL Title and Escrow software suite, so all information
shown is up-to-date. Impact Online v3.0 requires the Impact/SQL database to be on version 7.0 or
higher. Impact Online is compatible with Internet Explorer 6.0.
This manual, Impact Online – Site and User Administration, provides the hosting company’s
administrative staff with the information needed to manage their Impact Online site, and administer user
accounts. Site Administration will be discussed first, and then User Administration will be explained.
The URL for the web site will be established by the Company. The Site Administrator will login into the
web site, via the Login Screen, with the Administrator account. The Impact Online Login Screen is
presented here:
Enter the Administrator Username and Password, then click on the Login button.
Upon login, assuming the user has full administrative permissions, the user will see five tabs across the
top of the web page: My Home, Order Entry, My Account, User Administration and Site
Administration. Click on the Site Administration page to select it. The selected tab’s label will be
highlighted. Site administration is done through the Site Administration page of the Impact Online web
site. It is used to configure system-wide options which, in some cases, may override user level
permissions. Access to the Site Administration page is controlled by user permissions. When USA
Impact Online v3.00 Site and User Administration
Page 1
7/24/2008
Introduction
Digital Solutions, Inc. initially sets up the Impact Online web site, they will configure an Administrator
account, with rights to Site Administration, and provide the login and password information to the
appropriate personnel.
The screen shot below presents the Site Administration page. There are three primary areas of
administrative control: General Options, Email Options and Navigation Options. General Options
address the functions that will be enabled. Email Options are used to configure how Impact Online will
email notifications. Navigation Options deal with other page configuration settings. Each option will be
discussed in detail on the following pages. The functionality of each option will not be explained in detail,
in most instances. The functionality will be explained in detail in the appropriate user documentation
(outside or inside users).
Impact Online v3.00 Site and User Administration
Page 2
7/24/2008
Site Administration – General Options
General Options
The General Options section has check boxes which are used to enable or disable the Order Entry,
Document Management, File Tracking, Detailed Search, Account Request and External Document
Provider functions. It also manages the Site Theme. Simply clicking on the check box in front of the
option enables (checked) or disables (unchecked) the option.
Enable Order Entry
Turning on this option will allow users to enter data, and edit data, on orders they wish to place with the
Company. This is a primary function of Impact Online, so will most often be enabled. There are three
sub-options under Enable Order Entry. The sub-options are:
•
Auto Approve Orders – when this option is turned on, orders entered by users will automatically
be accepted and a file number will be granted to them. When the option is turned on, on the Site
Administration screen, the Administrator will be warned that all currently pending orders will be
approved, if the change to the option setting is saved.
•
Limit Approval to Branch – when this option is turned on, the internal users will be limited to
approving orders in their assigned branch only. Users with 099 Title or 999 Accounting Branch
rights will not be restricted by this option.
•
Email Marketing Rep Upon Order Acceptance – turning this option on will result in email
notifications going to the Marketing Representative linked to an order, when the order is accepted
either automatically or manually.
•
Email Escrow Officer Upon Order Acceptance – turning this option on will result in email
notifications going to the Escrow Officer linked to an order, when the order is accepted either
automatically or manually.
Note: if Enable Order Entry is not already enabled, and any of the sub-options is enabled, Enable Order
Entry will be enabled; contrarily, if Enable Order Entry is unchecked (switching from enabled to disabled),
any sub-options previously selected will be disabled.
Enable Documents
Turning on this option will turn on the document management function of Impact Online – permitting
documents to be uploaded from Impact to Impact Online, and then for them to be viewed by Impact
Online users. This is also a primary function of Impact Online, so will most often be enabled. There are
three sub-options under Enable Documents. The sub-options are:
•
Enable Uploading Documents – turning on this option will permit non-Impact (outside) users to
upload documents to Impact Online (this is distinct from the uploading of docs from Impact).
•
Auto Approve Document Upload – when this option is turned on, documents that are uploaded
by outside users will automatically be accepted and will be viewable via Impact Online. When the
option is turn on, on the Site Administration screen, the Administrator will be warned that all
currently pending documents (awaiting approval) will be approved, if the change to the option
setting is saved.
•
Limit Approval to Branch – when this option is turned on, the internal users will be limited to
approving documents in their assigned branch only. Users with 099 Title or 999 Accounting
Branch rights will not be restricted by this option.
Impact Online v3.00 Site and User Administration
Page 3
7/24/2008
Site Administration - General Options
•
Email User Upon Document Approval – turning this option on will result in email notifications
going to the person who posted the document, when the document is approved for viewing on
Impact Online.
Note: if Enable Documents is not already enabled, and any of the sub-options is enabled, Enable
Documents will be enabled; contrarily, if Enable Documents is unchecked (switching from enabled to
disabled), any sub-options previously selected will be disabled.
Enable File Tracking
The Enable File Tracking option will permit outside users to see the File Tracking information recorded
in Impact/SQL, for the files on their Watch List. There are no sub-options for this setting, it is simply on or
off.
Enable Detailed Search
The Enable Detailed Search option will turn on a more robust search function, along the style of a
“Google” search, rather than the basic search by File Number. This will enable an outside user to locate
a file by entering a name of a party to a file, or an address, for example, if they don’t know the file
number. An outside user will only see search results of files to which they are a party. There are no suboptions for this setting, it is simply on or off.
Enable Account Request
The Enable Account Request option will permit outside users to request the establishment of an Impact
Online account, on their own, from the Impact Online Login screen. Note the Need An Account? link, on
the login screen shot shown earlier…that is an indication this option is turned on. When this option is
turned on, and a user selects the link, they are presented with a screen that collects information from the
potential user and sends it to Impact Online Administrators, who will confirm or deny the request.
Use External Document Provider
This option will replace the traditional Impact Online document management functionality with that of an
external document management system (currently ePaperless File is accommodated), still within the
Impact Online framework. An ePaperless File customer can select this option to combine the functionality
of ePaperless File with that of Impact Online, to provide for a single client interface – rather than the client
being forced to use Impact Online to open orders and then, separately, go to an ePaperless File web site
to view documents.
Site Theme
There are currently three generic Site Themes, or color schemes: Blue, Gray and Green. If the client
wishes for another theme to be created, to more closely match their corporate color scheme, USA DSI will
do so, for a fee.
The logo on the top left of the screen is managed by placement of a logo file into the appropriate location
for the web site files. USA DSI will take care of that at configuration.
Impact Online v3.00 Site and User Administration
Page 4
7/24/2008
Site Administration – Email Options
Email Options
The Email Options section of the Site Administration page contains fields into which information is
entered to manage email communications from Impact Online to users. There are four fields in the
section:
•
Mail From Address – this is the address shown as the sender for email communications from
Impact Online to users. For example, if a password is forgotten and a temporary one is
requested, this will be the “From” address the user sees when they get the email with their new
password.
•
SMTP Server – the name of the SMTP server to be utilized by Impact Online, for sending email is
entered in this field. No slashes are required, just the server name.
•
SMTP UserName – enter the username Impact Online’s email routine should use to connect to
the SMTP server, if required.
•
SMTP Password – enter the password Impact Online’s email routine should use in conjunction
with the SMTP UserName, if required. The account should be set to not have expiring
passwords, or constant maintenance of this field will be required.
Once the fields are complete, clicking on the Test Email Settings button will trigger the sending of an
email to the user that clicked on the button. If the test is successful, the user will get a popup altering
him/her that the test succeeded. If the settings are not successful, the user will get an error message and
a descriptive explanation as to why the test failed.
Impact Online v3.00 Site and User Administration
Page 5
7/24/2008
Site Administration - Navigation Options
Navigation Options
The Navigation Options section of the Site Administration page contains fields used to manage the users’
experience on the Impact Online site. There are three fields in the section:
•
Home Page Url – enter the Company’s web site’s home page URL into this field. Currently, this
information is not utilized by Impact Online.
•
Site Header – enter the text (normally the Company’s name) into this field. It will appear at the
top of each main page on the Impact Online site.
•
Purge Interval – this is a numeric only field that describes the number of days that a file will
remain on a user’s Watch List from the date the file was closed.
Save Configuration
Clicking on the Save Configuration button will save all of the configuration options to the database. If
the Auto Approve Document Upload option was selected, all pending documents will be approved. If
the Auto Approve Orders option was selected, all pending orders will be approved.
Exiting the screen, without clicking on the Save Configuration button will abandon all unsaved changes.
You will not be warned that changes have not been saved.
Impact Online v3.00 Site and User Administration
Page 6
7/24/2008
User Administration
User Administration
The User Administration page, selected by clicking on the tab labeled User Administration (visible only if
the logged in user has Add New Users rights), is used for User Administration. Once selected, the page
presented is laid out with two sections: Users and User Details. In the User Details section, a message
will be presented indicating that no user has been selected. The screen looks like the one presented
below. If one or more accounts have been requested by outside users (and have not been set up) a
message box will be displayed stating how many users are pending activation, and asking if you would
like to activate them now. Such activation will be discussed later in this documentation.
On the Users section banner, there are three icons that are used to Add New User
Delete User . The use of these will be discussed below.
, Edit User
or
Below the section banner is a drop-down box that is used to change the list of users displayed, and the
count (in the parentheses) of each user category is shown, when the drop-down list is presented by
clicking on the arrow on the right side of the field. The categories of users are Active Users, Inactive
Users, Active & Inactive Users and Pending User Requests. Active Users is the default view.
Selecting a category from the drop-down list will change the listing of users presented below the
Username label. The listing presented can be further limited with the filter field, which has the options of
No Filter, Contains and Starts With. The filter is managed with the icon.
When a username is clicked on, on the left side of the screen (under the Users label), details of the
user’s current configuration will appear on the right side of the screen (under the User Details label), in a
read-only state.
Impact Online v3.00 Site and User Administration
Page 7
7/24/2008
User Administration - Activating Users
Activating Users
If the system is configured to allow people to request an account, and people have used the Need an
Account? function, to request an Impact Online login, when a person with User Administration rights
clicks on the User Administration tab, they will get a popup message identifying how many people have
requested accounts, and asking if you would like to view them now.
Clicking on Yes, will make Pending User Requests the
presented category of users and will list the user(s) on the
left panel. Selecting No will keep the default view of Active
Users.
Assuming Yes was the response, you would then click on the
username to be Activated, and their details would be
presented on the right side of the screen. If the details do
not need editing (unlikely as no rights will have been set), the
(found just to the right of the candidate’s
activate icon
name on the username list) can be clicked on, and the user will become an active user. If the user does
need editing, the name, in the listing, can be double-clicked on, or the edit icon
in the Users section
heading can be selected. This will present the Editing User screen, as shown below. To disallow the
activation of a user, you can select the
icon to the right of the user’s name. This will remove the user
from the Pending User Requests listing, and an email will be sent to the user stating that their request
was denied.
Once the user’s settings have been properly set (detailed discussion of these below), click on the
Approve User button to activate the user and save their settings. A random password will be generated
for the user and an email notification will be sent to the new user containing all the information they will
need to get started with Impact Online.
Impact Online v3.00 Site and User Administration
Page 8
7/24/2008
User Administration – Add/Edit Users
Add/Edit User
The Add User and Edit User screens are essentially the same screens. They have different screen
labels, and the Edit version of the screen presents a Reset Password link (or a Change Password link,
if the user being edited is the user logged in).
The Reset Password link will email a randomly generated password to the edited user, with instructions
to the user to login with the temporary password and change the password to one of their choosing. The
email address used will be that in the Email Address field on the Edit User screen. The Change
Password link will cause a popup to be displayed with three required fields: Current Password, New
Password and Re Enter New Password. If the Current Password entered by the user does not match
their existing password, a message will be displayed stating that fact. If the New Password does not
match the Re Enter New Password entry, a message will be displayed stating that fact. If the validations
pass, the new password will be saved and will be ready for immediate use.
Required Fields
The Username is a required field, and must be unique to the database. Normally, this will be an email
address. The First Name and Last Name fields are required. The Email field is required, and must be
unique to the database. The Email field is validated to confirm it contains an “@” sign and a “.” (period).
The Address 1, City, State and Zip Code fields are also required.
User Permissions
•
Company Access – this denotes that the user is able to see all files that have parties to them
that share the same Company Name.
•
Order Entry – this permits the user to enter orders via Impact Online.
•
Order Approval – the user can approve orders entered into Impact. This permission would be
granted to internal, Company users.
•
Adding New Users – this permission will let the user add, edit and delete users.
•
Uploading Documents – the user is permitted to upload documents to Impact Online.
•
Approve Documents – the user can approved documents that have been uploaded. This would
normally be granted to internal, Company users.
•
System Configuration – the user can access, and utilize, the User Administration and Site
Administration pages. A very limited number of users should have this permission.
Impact Online v3.00 Site and User Administration
Page 9
7/24/2008
User Administration – Add/Edit User
Default Drop Down Boxes
The selections made in these boxes will be used during the order entry process, to set default values for
the user’s order. They can be changed at the time of order entry.
The Default Branch that should be assigned to the user (if an external user, the branch they are used to
working with would be selected; if an internal user, the branch they work out of would be selected).
The Default Branch drives both the Default Escrow Officer and Link Impact User textboxes. Those
two drop down boxes will only show EO’s and Impact Users for the specified default branch, respectively.
An Impact Online user account can be linked to an Impact/SQL user account by selecting the ellipses (…)
button to the right of the Link Impact User textbox. A screen will be displayed, when the ellipses icon is
selected, with a check box at the top of it, with which to indicate the user is an External User, as well as a
grid of Impact users for the selected Default Branch. If the check box is deselected when the screen is
presented, then re-selected, the screen will close and the Linked Impact User textbox will reflect
“-External Users-“. If the checkbox is selected when the screen is shown, the user grid will be disabled.
To select an Impact user, deselect the checkbox and click on the icon in front of the user name to be
selected. There are Name and Initials filters to speed the search for the appropriate user, and page links
at the bottom of the screen. Once a user is selected, the screen will close and the user’s full name will
show in the Link Impact User textbox.
Apply Button
When on the Add User screen, the Apply button will cause the user to be added to Impact Online if all
required fields have been completed. A random password will be generated for the user and an email
notification will be sent to the new user containing all the information they will need to get started with
Impact Online.
When on the Edit User screen, the Apply button will cause the changes made to be saved to the Impact
Online system. If not all required fields are complete, an error message will be displayed stating that fact.
Delete User
Clicking on the
Delete User icon, after selecting a username, will result in a prompt asking you to
confirm you wish to permanently remove the highlighted user from the Impact Online system. Clicking on
Yes, will remove the user.
Other Documentation
Detailed instructions for Impact Online external users is provided in the Impact Online Version 3.00
External User’s Manual and additional features for Internal users are discussed in the Impact Online
Version 3.00 – User Manual Addendum for Internal Users.
Impact Online v3.00 Site and User Administration
Page 10
7/24/2008
Support
Support
Please contact USA Digital Solutions, Inc. at (602) 866-8199 x 2 or by email at [email protected]
for support issues.
Impact Online v3.00 Site and User Administration
Page 11
7/24/2008