1
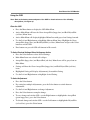
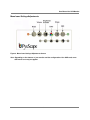
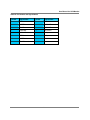
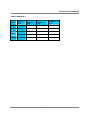
User Manual for LCD Monitor
User Manual
For
LCD Monitor
March 10, 2004
User Manual for LCD Monitor
CONTENTS
GENERAL SAFETY PRECAUTIONS .....................................................................................................................1
UNPACKING YOUR MONITOR..............................................................................................................................4
VIEWING ANGLE......................................................................................................................................................5
CONNECTING YOUR MONITOR ..........................................................................................................................6
REMOVING THE REAR COVER............................................................................................................................7
QUICK START FOR MONITOR ADJUSTMENT..................................................................................................8
USING THE FRONT PANEL CONTROL BUTTONS............................................................................................8
OSD FUNCTIONS ....................................................................................................................................................10
ON SCREEN DISPLAY (OSD).....................................................................................................................................10
MAIN MENU .............................................................................................................................................................10
SETTINGS..................................................................................................................................................................10
ADJUSTMENTS ..........................................................................................................................................................10
ACCEPT/REJECT .......................................................................................................................................................10
USING THE OSD ......................................................................................................................................................12
ENTER THE OSD.......................................................................................................................................................12
TO SELECT DESIRED SETTINGS WHEN SETTINGS ARE ACTIVE .................................................................................12
TO SELECT ADJUSTMENT..........................................................................................................................................12
MENU ICONS/SETTINGS/ADJUSTMENTS........................................................................................................13
RESET .......................................................................................................................................................................14
VOLUME ...................................................................................................................................................................15
BRIGHTNESS/CONTRAST ..........................................................................................................................................16
COLOR ......................................................................................................................................................................17
IMAGE SHAPE ...........................................................................................................................................................18
OSD .........................................................................................................................................................................20
WARNINGS ...............................................................................................................................................................21
CHANGE COMPUTER HZ ...........................................................................................................................................21
CABLE NOT CONNECTED ..........................................................................................................................................21
MODE ERROR ...........................................................................................................................................................22
APPENDIX ................................................................................................................................................................23
POWER MANAGEMENT FUNCTION ............................................................................................................................23
VIDEO INPUT TERMINAL...........................................................................................................................................23
DISPLAY MODES .......................................................................................................................................................25
i
User Manual for LCD Monitor
LIST OF FIGURES
Figure 1. Monitor and Accompanying Items .................................................................................................................4
Figure 2. Viewing Angle................................................................................................................................................5
Figure 3. Connecting the Monitor .................................................................................................................................6
Figure 4. Rear Cover .....................................................................................................................................................7
Figure 5. Front Panel Control Buttons...........................................................................................................................8
Figure 6. Main Menu Active........................................................................................................................................11
Figure 7. Settings Active .............................................................................................................................................11
Figure 8. Menu Icons/Settings/Adjustments Screen ....................................................................................................13
Figure 9. 15Pin D-Sub Connector ...............................................................................................................................23
LIST OF TABLES
Table I. Front Panel Control Buttons Description..........................................................................................................9
Table II. Reset Settings ................................................................................................................................................14
Table III. Volume Settings ...........................................................................................................................................15
Table IV. Brightness/Contrast Settings ........................................................................................................................16
Table V. Color Settings ................................................................................................................................................17
Table VI. Image Shape Settings...................................................................................................................................19
Table VII. OSD Settings ..............................................................................................................................................20
Table VIII. Power Mode Descriptions .........................................................................................................................23
Table IX. Pin Number and Signal Names....................................................................................................................24
Table X. Preset Timing Modes ....................................................................................................................................25
Table XI. MAC Modes ................................................................................................................................................26
Table XII. Specifications for 15-Inch Monitor SV 2150/SV 3150 .............................. Error! Bookmark not defined.
Table XIII. Specifications for 17-Inch Monitor SV 2170/SV 3170 .............................................................................27
ii
User Manual for LCD Monitor
General Safety Precautions
This monitor has been engineered and manufactured to assure your safety. Please read this
manual carefully and comply with the warnings and the procedures to avoid serious electrical
shock or other serious damage.
1.
2.
Do not place anything heavy, wet or
magnetic on the monitor or power cord.
Do not cover the ventilation openings nor
touch them with metallic or flammable
material.
High temperature can cause damage.
Avoid operating the monitor in extreme
heat, humidity or dust areas. Extreme
temperature may cause discoloration or
damage.
Ambient Temperature: 0°C – 40°C
3.
4.
To prevent damaging the LCD surface, do
not use solvents such as benzene to clean
the monitor.
To prevent scratching the LCD surface, do
not use tools with a fine tip, such as a pin
or pencil near the monitor.
1
User Manual for LCD Monitor
5.
6.
7.
8.
Place the monitor on a flat surface to
prevent it from falling.
Do not apply any mechanical shocks to
the machine.
Install it in a well-ventilated area or
secure enough space for ventilation.
Make sure the power cord and any other
cords are properly connected to a
grounded outlet.
2
User Manual for LCD Monitor
9.
10.
11.
Turn the monitor off before connecting it
to the power outlet.
Overloaded AC outlets and extension
cords are dangerous. Also, frayed power
cords and broken plugs can cause electric
shock or fire.
CAUTION: RISK OF ELECTRIC
SHOCK, DO NOT OPEN.
Do not open the monitor. There are no
user-serviceable components inside. There
is risk of exposure to high-voltage
electricity inside, even when power is
turned off.
If the display monitor does not operate
properly, unplug the power cord and
contact your dealer. Handling the
electrical equipment carelessly will cause
serious electrical shock and other hazards.
3
User Manual for LCD Monitor
Unpacking Your Monitor
Always make sure the following items are included with your monitor. If you find that any of
these items are missing or appear damaged, contact your dealer immediately.
Figure 1. Monitor and Accompanying Items
Note: The power cord can be different depending upon different voltage areas.
4
User Manual for LCD Monitor
Viewing Angle
Your monitor is designed to allow you to adjust it to a comfortable viewing angle. The viewing
angle can be adjusted 3° to 45° forward and backward respectively as indicated by the arrow
marks in the following illustration.
Figure 2. Viewing Angles
CAUTION: When the monitor is in use, always make sure that it is at a safe angle less
than 45 degrees.
5
User Manual for LCD Monitor
Connecting Your Monitor
Note: Always turn the computer off before connecting the monitor.
The AC adapter may be optional and any ITE or Direct Plug-in Power Supply with
maximum output ratings of 12VDC and 40 Watts may be used with the monitor.
Figure 3. Connecting the Monitor
Connect the power adaptor cord to the monitor and then to the power supply.
After powering on the computer, adjust the display using the various controls provided.
For further information on the installation procedure, refer to the operating guide of the
computer being used.
6
User Manual for LCD Monitor
Removing the Rear Cover
Always replace the rear cover of the monitor after accessing the input/out connectors.
Note: When returning the rear cover to the back of the monitor, be sure to hook the bottom of the
cover first and then snap the top into place.
Figure 4. Rear Cover
7
User Manual for LCD Monitor
Quick Start for Monitor Adjustment
To obtain the best viewing on your monitor, press and hold Auto Adjust button for four seconds.
Your monitor will self-adjust to your computer. After it self-adjust you press the select button
when the Green Smiley face is displayed, this saves the auto-adjusted values.
Using the Front Panel Control Buttons
See Figure 5 for control button identification and Table I for control button descriptions.
Use the buttons on the face of the monitor to access and navigate through the On Screen Display
(OSD).
Figure 5. Front Panel Control Buttons
8
User Manual for LCD Monitor
Table I. Front Panel Control Buttons Description
Name
Description
Activates the auto adjustment function.
AUTO
To activate Auto Adjust, press and hold button for
more than three seconds.
Opens the OSD (On Screen Display) menu.
MENU
Press and simply release the button-do not hold
button down.
SELECT
Selects the main menu items and sub-menu
items.
EXIT
Exits the ODS menu.
LEFT
RIGHT
Moves to the left of the menu item.
Increases the value of the parameter.
Moves to the right of the item.
Decreases the value of the parameter.
Indicates the status of the monitor:
LED
• Green: Normal operation
• Amber: Non–operational
• Red: No signal and/or power saving mode.
ON/OFF
Turns On/Off the monitor.
Notice: When power cord is plugged in the monitor, the LED is always on. The LED will display three
different colors, each will indicate the status of the monitor as below:
Green:
Normal operation.
Amber:
The ON/OFF switch has been selected in the OFF position. The monitor is nonoperational and in power saving mode.
Red:
NO input signal is detected. The monitor will automatically enter the power saving mode.
9
User Manual for LCD Monitor
OSD Functions
On Screen Display (OSD)
The OSD Menu provides access to controls that allow you to fine tune your monitor. The menu
includes the following:
Reset
Audio (optional based upon the model of the monitor)
Brightness/Contrast
Color
Image Shape
On Screen Display
The OSD contains four major components (see Figure 6 and Figure 7):
Main Menu
The Main Menu is the top level of the OSD. Each menu icon contains a series of settings used to
adjust your display.
Settings
Settings for each Main Menu icon appear as a sub-menu beneath the icon when it is highlighted.
Adjustments
Adjustments for each Setting appear when Setting is highlighted. Most settings use a slider
adjustment or a green dot to indicate active setting.
Accept/Reject
Selecting the Accept (green HAPPY face) icon saves setting changes and exits the OSD.
Selecting the Reject (red SAD face) icon disregards the setting change (returns previous setting)
and exits the OSD.
10
User Manual for LCD Monitor
Figure 6. Main Menu Active
Figure 7. Settings Active
11
User Manual for LCD Monitor
Using the OSD
Note: Refer to the button names and parts of the OSD for visual reference of the following
descriptions (see Figure 8).
Enter the OSD
Press the Menu button to display the OSD Main Menu.
Active Main Menu will have the Green Accept/Exit (happy face) and Red Reject/Exit
(sad face) Menu Icons.
Active Main Menu will display highlighted Menu Icon with grayed out Settings beneath.
Use the Left and Right buttons to highlight different Menu Icons. Highlight the Green
Accept/Exit (happy face) and Red Reject/Exit (sad face) Menu Icons and press the Select
button to exit the OSD.
If no buttons are pressed OSD will timeout in 20 seconds.
To Select Desired Settings When Settings are Active
Press the Select button to select desired Settings.
Main Menu Icons not selected will collapse.
Accept/Exit (happy face) and Reject/Exit (sad face) Menu Icons will be grayed out on
Main Menu.
Settings will have the Green Accept/Exit (happy face) and Red Reject/Exit (sad face)
icons.
Highlighted Setting will display Adjustment(s) beneath the Setting.
Use the Left and Right buttons to highlight desired Setting.
To Select Adjustment
Press the Select button.
If a setting has multiple Adjustments, press the Select button to switch between
adjustments.
Use the Left and Right buttons to change Adjustment.
Press the Select button to complete change.
To save change and exit the OSD - use the Right buttons to highlight the Accept/Exit
(green happy face), press the Select button.
To discard change and exit the OSD - use the Left buttons to highlight the Reject/Exit
(red sad face), press the Select button
12
User Manual for LCD Monitor
Menu Icons/Settings/Adjustments
Figure 8. Menu Icons/Settings/Adjustments Screen
Note: Depending on the features of your monitor and the configuration of the OSD used, some
OSD menu icons may not appear.
13
User Manual for LCD Monitor
Reset
Reset settings (see
Table II) are used to return one or all of the monitor adjustments to the manufacturers original
default settings.
These settings have no adjustments. Use the Left or Right buttons to highlight the desired setting,
and then press the Select button. After selecting a reset setting, you are given the opportunity to
preview the change before you Accept or Reject the change.
Table II. Reset Settings
Auto Adjust Resets ALL user-defined settings: Source, Audio, Bright/Contrast, Color, Shape, and
OSD.
Shape Reset Resets the Phase, Clock, Horizontal Position, and Vertical Position settings.
Color Reset Resets the RGB Adjust, Color Temperature, and Natural Color settings.
OSD Reset Resets the Timeout, Lock, and OSD Position settings.
14
User Manual for LCD Monitor
Volume
Note: This option is dependent upon the model of the monitor.
The Audio settings (see Table III) are used to control the speakers contained in your monitor.
Table III. Volume Settings
VolumeAdjusts the volume of the speakers in your monitor.
Balance Switches between the left and right speakers in your monitor.
Mute A toggle switch that enables or disables the speakers in your monitor.
15
User Manual for LCD Monitor
Brightness/Contrast
Brightness and Contrast settings (see Table IV) determine how much detail you will see in the
shadow and highlight areas. To maximize the visible detail in the images, adjust the brightness
and contrast controls on your monitor so that all objects on the screen are clearly visible.
Table IV. Brightness/Contrast Settings
Brightness Controls the brightness of the entire screen. Adjusts the brightness of the backlight.
Contrast Controls the brightness for each color at the same time.
Note: Contrast applies a scale factor to the red, green, and blue signals. It affects the luminance
that is reproduced for a full white input signal.
Adjust the Contrast so you can see each step separately.
Pay more attention to the black steps here. The darkest step should be as dark as you can make it
while still being able to distinguish it from the next lighter step.
16
User Manual for LCD Monitor
Color
Color settings (see Table V) are used to modify the color characteristics on the screen.
Table V. Color Settings
RGB Adjust Adjusts each color parameter for red, green, and blue.
Natural Color Allow you to fine tune color. Adjusts the purity of the color’s hue, moving from gray to
the pure color.
Color Temperature Temperature describes how warm (red) or cool (blue) the picture display looks. Lower
numbers indicate a warmer color temperature.
Reset Color Resets the RGB Adjust, Color Temperature, and Natural Color settings to factory
defaults.
17
User Manual for LCD Monitor
Image Shape
Image Shape settings (see Table VI) are used to adjust the position and clarity of the display.
While your monitor should come optimized from the factory, it may be necessary to manually
adjust the display image on your monitor.
Adjusting the display image is a progressive process. It may not be necessary to complete all
steps to achieve an optimized display. Work your way through the following steps or select the
steps that address your problem until you achieve an image that meets your needs.
1. Shape Reset
If the image on your monitor is distorted or not centered, first try the reset option.
2. Adjust the Image Position
If the image on your monitor is not centered, use the Horizontal and Vertical position adjustments
to position the display image so that there is a uniform 1/8-inch border between the outer frame of
the display image and the monitor bezel.
3. Removing Image Noise (Analog Input)
If the image on your monitor appears to have intermittent horizontal or vertical lines
running through it or if the image appears to flicker, use the Course Adjust and Fine
Adjust Settings to remove the noise.
18
User Manual for LCD Monitor
Table VI. Image Shape Settings
Shape Reset Resets the Shape settings to factory defaults: Course Adjust, Fine Adjust, Horizontal
Position, and Vertical Position.
Horizontal Position Adjusts the horizontal position of the screen image.
Vertical Position Adjusts the vertical position of the screen image.
Course Adjust Removes vertical lines (noise) that may appear on the screen.
Fine Adjust Removes horizontal noise (flicker). Adjust after making Course adjustments.
19
User Manual for LCD Monitor
OSD
On Screen Display settings (see Table VII) let you customize where and how long the OSD is
displayed on your screen, and allow you to block access to the OSD preventing accidental
changes to the display.
Table VII. OSD Settings
OSD Lock The Lock is used to prevent accidental changes to the OSD. When you try and access the
OSD with the lock is enabled a locked and unlocked icon appears in place of the OSD.
To unlock the OSD, highlight and select unlock to enable access.
OSD Timeout Sets the timeout period for the OSD (the length of time the OSD is displayed with no
user input).
OSD Position Change the display position of the OSD.
OSD Reset Returns OSD settings (i.e., Lock, Timeout, Position) to the factory defaults.
20
User Manual for LCD Monitor
Warnings
Change Computer Hz
The refresh frequency describes how often the video screen is retraced in order to prevent the
image from flickering. The entire image area of most monitors is refreshed approximately
60 times per second. A higher refresh frequency reduces any flicker on your screen, but choosing
a setting that is too high for your monitor can make your display unusable and may cause
damage to your hardware.
IMPORTANT:
If you see this warning, change the refresh rate in your monitor settings
on the PC to 60Hz.
Cable Not Connected
Powering on the monitor without connecting it to a PC will display this warning.
IMPORTANT:
If you see this warning, turn off the monitor and check the connection to
the PC.
21
User Manual for LCD Monitor
Mode Error
This warning indicates that the monitor does not recognize the signal it is receiving.
IMPORTANT:
If you see this warning, contact the monitor manufacturer.
22
User Manual for LCD Monitor
APPENDIX
Power Management Function
This monitor is equipped with a DPMS (Display Power Management Signaling) function that
automatically cuts power usage to less than 5W when the computer is left unattended.
Although the monitor can remain in power-saving mode for longer periods, we recommend that
you turn it off after your daily work.
Table VIII. Power Mode Descriptions
Status
Description
Green
Power on
Amber
Non-operating /abnormal operating
Red
Power saving
Video Input Terminal
A 15Pin D-Sub connector is used as the input signal connector as in Figure 9. Each pin and
assignment is shown in Table IX.
Figure 9. 15Pin D-Sub Connector
23
User Manual for LCD Monitor
Table IX. Pin Number and Signal Names
Pin No.
Signal Name
Pin No.
Signal Name
1
RED
9
N.C.
2
GREEN
10
GROUND
3
BLUE
11
GROUND
4
GROUND
12
DDC SDA
5
GROUND
13
H-Sync
6
RED Ground
14
V-Sync
7
GREEN Ground
15
DDC SCL
8
BLUE Ground
24
User Manual for LCD Monitor
Display Modes
Supported Display Modes
Table X. Preset Timing Modes
Mode
VGA
SVGA
XGA
SXGA
640 x 350
Horizontal
Frequency
(KHz)
31.5KHz
Vertical
Frequency
(Hz)
70Hz
IBM
720 x 400
31.5KHz
70Hz
IBM
640 x 480
31.5KHz
60Hz
Industry
Standard
640 x 480
37.9KHz
72Hz
VESA
Standard
640 x 480
37.5KHz
75Hz
VESA
Standard
640 x 480
43.3KHz
85Hz
VESA
Standard
800 x 600
35.2KHz
56Hz
VESA
Guidelines
800 x 600
37.9KHz
60Hz
VESA
Guidelines
800 x 600
48.1KHz
72Hz
VESA
Standard
800 x 600
46.9KHz
75Hz
VESA
Standard
800 x 600
53.7KHz
85Hz
VESA
Standard
1024 x
768
48.4KHz
60Hz
VESA
Guidelines
1024 x
768
56.5KHz
70Hz
VESA
Standard
1024 x
768
60.0KHz
75Hz
VESA
Standard
1280 x
1024
64.0KHz
60Hz
VESA
Standard
1280 x
1024
80.0KHz
75Hz
VESA
Standard
Display
Mode
25
Standard
Type
User Manual for LCD Monitor
Table XI. MAC Modes
640 x 480
Horizontal
Frequency
(KHz)
31.469KHz
Vertical
Frequency
(Hz)
59.940Hz
MAC
832 X 624
49.725KHz
74.551Hz
MAC
1024 x 768
48.780KHz
60.001Hz
MAC
1024 x 768
60.241KHz
74.927Hz
MAC
1152 x 870
68.681KHz
75.060Hz
MAC
Mode
Display
Mode
VGA
SVGA
XGA
SXGA
26
Standard
Type
User Manual for LCD Monitor
Specifications
Table XII. Specifications for 17-Inch Monitor SV 3170
LCD
INPUT
COMPATIBI-LITY
I/O CONNECTOR
Size
17.0” viewable
Resolution
SXGA 1280 x 1024
Brightness
250cd/m
Contrast
ratio
450:1 (Typical)
Viewing
angle
140 horizontal x 110 vertical
Surface
Anti-glare, H3 hard coating
Color
8 bit color depth: 16.2 millions colors
Video
Analog
PC
PC compatibles from VGA up to 1280 x 1024
non-interlaced.
Mac
MAC
Video
Analog: 15-pin mini d-sub
Power
DC In (external)
2
up to 1152 x 870
AUDIO (SV 3170s)
Two 1w speakers (2w max)
POWER
Consumption 35W (max)
USER
CONTROLS
Menu
Menu/Select/Exit/Right/Left/Power
Auto
Auto Adjust
DIMENSIONS
Physical
14” (W) x 15” (H) x 7” (D)
WEIGHT
4.2 kg (9.2 lbs)
OPTIONAL FEATURES
Optional VESA wall mount; bracket is optional.
AGENCY CERTIFICATIONS
CE, CB, UL1950, CSA C22.No.950, FCC-B,
EPA ENERGY STAR® PROGRAM
POWER MANAGEMENT
VESA DPMS
WARRANTY
12 months limited warranty
ACCESSORIES
User Manual/Warranty Registration card on CD
disk.
27